More cargo stowage Mod for 96-98 4runner
 04-19-2009, 10:06 PM
#1
More cargo stowage Mod for 96-98 4runner
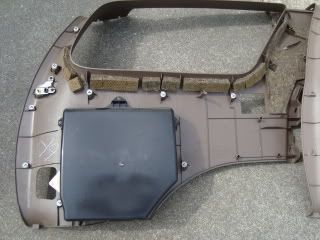
Here is my next in my latest mods to my 1998 4runner. Those of us who have the 1996-1998 4runners suffer from many deficits. One of which is the tiny cargo space in the rear right cargo panel. Well I took measure to eliminate that problem with my truck. This past weekend I made the trek to my favorite auto parts store and I located a 2000 4runner. It was a base model but the rear right cargo panel with cover was intact.
Besides removal of the old panel and installation of the new panel, I also decided to add another 12VDC outlet to the rear cargo area. The new outlet is located just above the existing one. More on that later.
If you are beginning from scratch, you will need to remove the following items:
Rear scuff plate
Right rear passenger scuff plate
Rear cargo light
Rear upper fascia trim panel ( the one the rear cargo light was in)
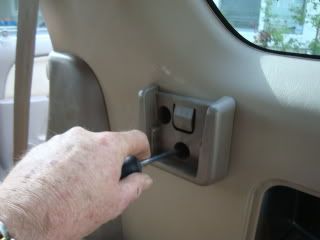
Right rear seat belt cover panel
Right rear seat belt anchor bolt
Right rear cargo panel.
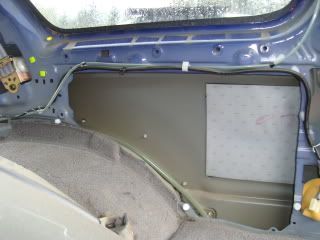
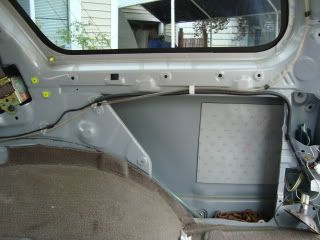
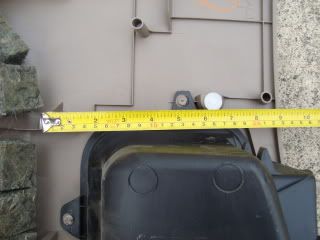
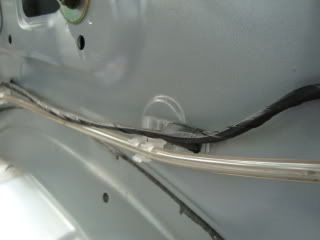
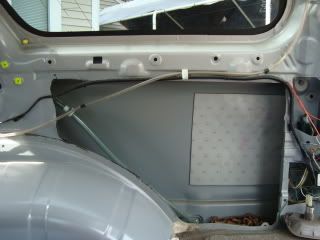
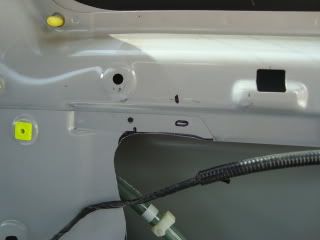
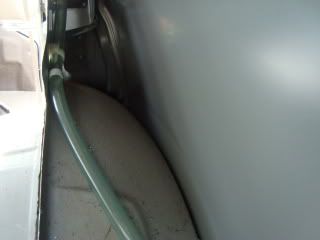
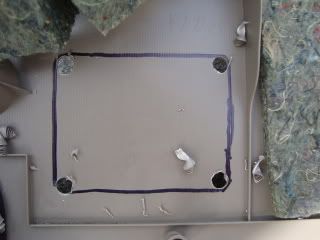
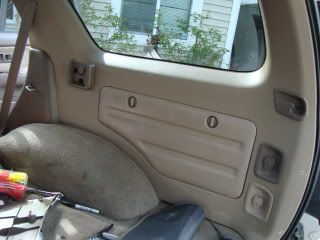
As you can see in these two photos, the physical area of the larger cargo panel makes this more then just a plug & play mod. You will need to cut out a portion of the interior fender to make room for the new cargo panel.

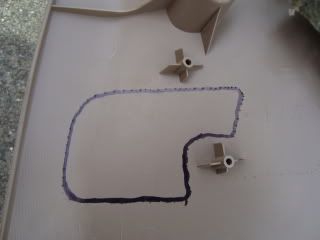
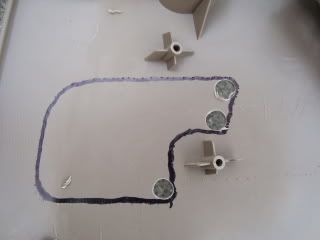
Begin by measuring the top length of the insert. You will find that if you start your measurement from the outer edge of the panel to the edge of the cargo insert the insert edge is approximately 30 inches.
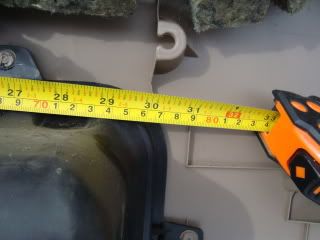
Now measure over from the rear edge of the cargo area near the rear door 30 inches and make a mark as shown.
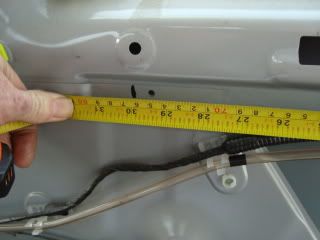
You will have a great point of reference in that one of the panel pin holes is almost directly above where the edge of the insert is located.
Using that panel pin as the reference, measure the insert to just past its furthest point. This will approximately 8 inches.
Next transfer your measurements to the interior metal panel in the cargo area
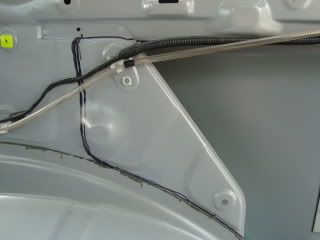
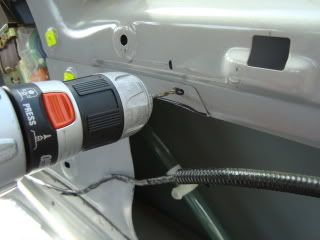
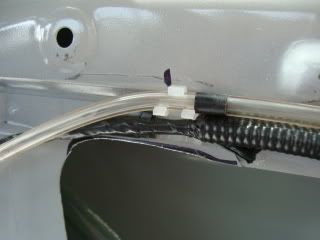
You will need to remove the cable and tubing from the inner fender area that will be removed. Carefully cut the tape holding the wires to the clip and remove the tubing
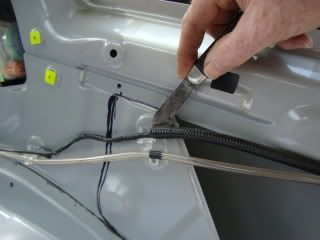
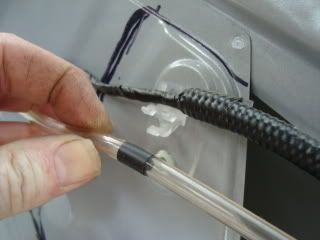
Remove the wires and tubing from the next clip just forward. This will be required in order to move the wires and tubing out of the way during cutting of the inner fender.
Remove the drain tubing from its mounting hole, this is a �” diameter tygon tube located inside the inner fender running to the rear corner This tubing is for the sun roof drain. You will need to pinch the base of the clip from hole. Press the small ears inward and push the clip through into the fender well. We will drill a new hole once the panel has been modified.
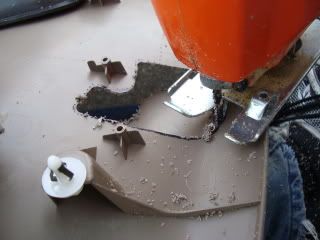
Using a jigsaw with a metal cutting blade, begin cutting out the inner portion of the fender well.
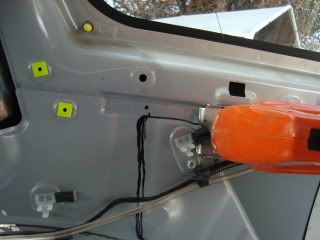
Begin cutting from the top. Follow the upper edge even with the rest of the opening and then begin your curved cut following the outline downward. You need to begin at the top and work your way forward then down. If you try to follow the lower edge contour you will run into difficulty when you try to make the upward cut. The fender well will be in your way of trying to make a clean smooth controlled cut. Continue cutting from the top down making the lower curved cut. Follow the raised edge of the lower fender well contour. Carefully follow the top edge of the inner fender well. You will note that this edge sticks up about 1” and is where the body sheet metal of the rear cargo area and inner fender well are joined. Be careful not to cut below this contour.
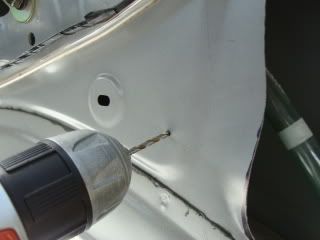
Next drill out the new clip location to secure the wires and tubing so as to keep them clear of the new insert. Near the forward edge make a mark using the removed piece of metal tracing, an outline of the oblong hole where the wire clip was removed from.
Select a drill bit that is the same diameter as the oblong hole in the removed piece of metal. Select a much smaller drill bit to drill the pilot holes.
Once the first pilot hole has been drilled, use the larger bit to enlarge the hole.

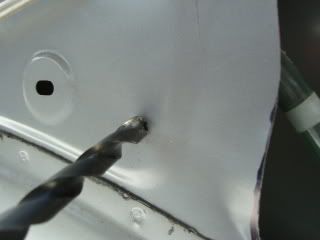
Carefully drill the second pilot hole so that when you drill the second hole the oblong hole will be the same size as the original hole.
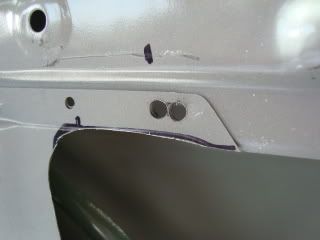
Use a small rat tail file, smooth out the opening so as to accept the wire and tube clip.
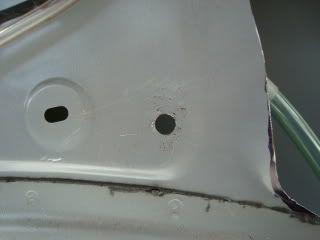
Test fit the clip to ensure the hole is the proper size to hold the clip properly.

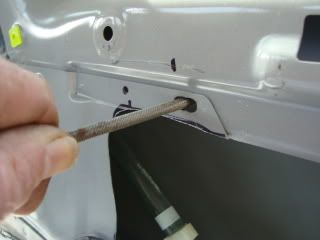
Use electrical tape attach the wires to the clip ensuring that the portion that holds the tubing is above the wires. Install the clip into our new location. Attach the tubing.
Select another drill bit that is the same diameter as the hole for the drain tubing clip. The new location for this hole will be near the lower front corner of our new opening. Drill a pilot hole and then the larger hole.
The metal is very thin so you will need to dress up the hole, remove the burrs and I even took two hammers placing one inside the fender well and then flattened out the hole to ensure it was flat and smooth.
Relocate the clip on the tubing so it will hold the tubing correctly in its new location.

Press the end of the clip into the new hole ensuring it is fully seated.
Check to ensure the tubing is not kinked.
While I added a second 12vdc outlet to the rear cargo area, for the expedience, I will make that a separate write up.
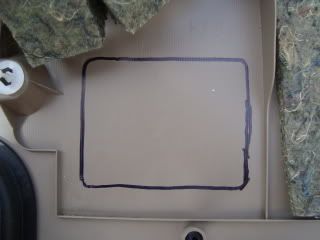
If you locate a cargo panel that did not have the pre-made cutouts for the cargo cover attachment points then you will have to do as I did, make them! This way you can install the cargo cover hold downs. This is not as difficult as it seems. Toyota actually made all the cargo panels the same. They just did not pre-cut all of them depending on what trim level they were going to be used in as was the case of the donor truck I located. At both locations on the inside of the right side uncut panels are raised dots showing the outline of the locations of both the cargo cover mounting and latching pieces. There are also raised arrows moulded into the plastic pointing out their locations. These appear to be hand cut at the factory as in the other panels you can see the smooth corners were drilled out and the edges were cut. Some are not totally straight! Also all the support pillars for securing the hold downs and latching pieces was also moulded into the inner sides of the panels. Once you cut out the panel holes, you can easily screw the inserts into their locations without further modification, just like they did at the factory.
I just took a sharpie and traced out the raised dots to give me an oultline of where I would need to cut.
Next select a large size drill bit big enough to allow the jigsaw blade to go through. Drill these holes in each corner that will require a curved cut. Most standard jigsaw blades will not be able to cut curved corners this sharp and smooth.
Carefully cut out the pieces and trim up any rough edges.
As I mentioned above, the latch already has the standoffs in their locations so simply remove your old insert and install it in the new location using the screws you removed. The cargo cover mount will be installed during panel installation.
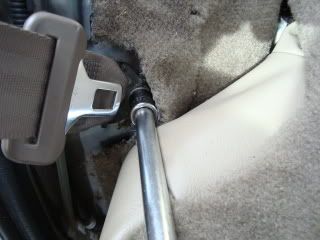
Install the panel into its new location. You will need to ensure that the front portion (smaller end) of the insert is in position first and then begin working the insert into its new location. You will need to thread the seat belt through the slot in the panel. Put the anchor plate through first then the seat belt tab. Pull out the slack.

Begin to press the panel into position. The panel pins should line up with their holes. Begin with slight tapping or even pushing the panel into position will secure it. Give it a firm fist stamp to ensure the pins are fully inserted int their holes.

You can also do as I did and use the heal of your hand just tapping the pins in fully to ensure they are seated.
Mount the seat belt anchor.
Install the rear seat anchor panel over the cargo panel and seat anchor. Tap into position ensuring it is seated
Install the cargo cover anchor mount with the two screws removed earlier.
Install the stowage cover.
Secure the rear upper corner of the cargo panel with the removed screw. Reinstall the upper fascia lining up the clips and tap into place. Install the rear cargo light by inserting the plug and using the 4 screws removed. Install the cargo area scuff plate. Install the rear passenger scuff plate. Fill up your new stowage space!
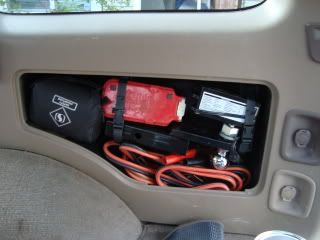
Besides removal of the old panel and installation of the new panel, I also decided to add another 12VDC outlet to the rear cargo area. The new outlet is located just above the existing one. More on that later.
If you are beginning from scratch, you will need to remove the following items:
Rear scuff plate
Right rear passenger scuff plate
Rear cargo light
Rear upper fascia trim panel ( the one the rear cargo light was in)
Right rear seat belt cover panel
Right rear seat belt anchor bolt
Right rear cargo panel.
As you can see in these two photos, the physical area of the larger cargo panel makes this more then just a plug & play mod. You will need to cut out a portion of the interior fender to make room for the new cargo panel.
Begin by measuring the top length of the insert. You will find that if you start your measurement from the outer edge of the panel to the edge of the cargo insert the insert edge is approximately 30 inches.
Now measure over from the rear edge of the cargo area near the rear door 30 inches and make a mark as shown.
You will have a great point of reference in that one of the panel pin holes is almost directly above where the edge of the insert is located.
Using that panel pin as the reference, measure the insert to just past its furthest point. This will approximately 8 inches.
Next transfer your measurements to the interior metal panel in the cargo area
You will need to remove the cable and tubing from the inner fender area that will be removed. Carefully cut the tape holding the wires to the clip and remove the tubing
Remove the wires and tubing from the next clip just forward. This will be required in order to move the wires and tubing out of the way during cutting of the inner fender.
Remove the drain tubing from its mounting hole, this is a �” diameter tygon tube located inside the inner fender running to the rear corner This tubing is for the sun roof drain. You will need to pinch the base of the clip from hole. Press the small ears inward and push the clip through into the fender well. We will drill a new hole once the panel has been modified.
Using a jigsaw with a metal cutting blade, begin cutting out the inner portion of the fender well.
Begin cutting from the top. Follow the upper edge even with the rest of the opening and then begin your curved cut following the outline downward. You need to begin at the top and work your way forward then down. If you try to follow the lower edge contour you will run into difficulty when you try to make the upward cut. The fender well will be in your way of trying to make a clean smooth controlled cut. Continue cutting from the top down making the lower curved cut. Follow the raised edge of the lower fender well contour. Carefully follow the top edge of the inner fender well. You will note that this edge sticks up about 1” and is where the body sheet metal of the rear cargo area and inner fender well are joined. Be careful not to cut below this contour.
Next drill out the new clip location to secure the wires and tubing so as to keep them clear of the new insert. Near the forward edge make a mark using the removed piece of metal tracing, an outline of the oblong hole where the wire clip was removed from.
Select a drill bit that is the same diameter as the oblong hole in the removed piece of metal. Select a much smaller drill bit to drill the pilot holes.
Once the first pilot hole has been drilled, use the larger bit to enlarge the hole.
Carefully drill the second pilot hole so that when you drill the second hole the oblong hole will be the same size as the original hole.
Use a small rat tail file, smooth out the opening so as to accept the wire and tube clip.
Test fit the clip to ensure the hole is the proper size to hold the clip properly.
Use electrical tape attach the wires to the clip ensuring that the portion that holds the tubing is above the wires. Install the clip into our new location. Attach the tubing.
Select another drill bit that is the same diameter as the hole for the drain tubing clip. The new location for this hole will be near the lower front corner of our new opening. Drill a pilot hole and then the larger hole.
The metal is very thin so you will need to dress up the hole, remove the burrs and I even took two hammers placing one inside the fender well and then flattened out the hole to ensure it was flat and smooth.
Relocate the clip on the tubing so it will hold the tubing correctly in its new location.
Press the end of the clip into the new hole ensuring it is fully seated.
Check to ensure the tubing is not kinked.
While I added a second 12vdc outlet to the rear cargo area, for the expedience, I will make that a separate write up.
If you locate a cargo panel that did not have the pre-made cutouts for the cargo cover attachment points then you will have to do as I did, make them! This way you can install the cargo cover hold downs. This is not as difficult as it seems. Toyota actually made all the cargo panels the same. They just did not pre-cut all of them depending on what trim level they were going to be used in as was the case of the donor truck I located. At both locations on the inside of the right side uncut panels are raised dots showing the outline of the locations of both the cargo cover mounting and latching pieces. There are also raised arrows moulded into the plastic pointing out their locations. These appear to be hand cut at the factory as in the other panels you can see the smooth corners were drilled out and the edges were cut. Some are not totally straight! Also all the support pillars for securing the hold downs and latching pieces was also moulded into the inner sides of the panels. Once you cut out the panel holes, you can easily screw the inserts into their locations without further modification, just like they did at the factory.
I just took a sharpie and traced out the raised dots to give me an oultline of where I would need to cut.
Next select a large size drill bit big enough to allow the jigsaw blade to go through. Drill these holes in each corner that will require a curved cut. Most standard jigsaw blades will not be able to cut curved corners this sharp and smooth.
Carefully cut out the pieces and trim up any rough edges.
As I mentioned above, the latch already has the standoffs in their locations so simply remove your old insert and install it in the new location using the screws you removed. The cargo cover mount will be installed during panel installation.
Install the panel into its new location. You will need to ensure that the front portion (smaller end) of the insert is in position first and then begin working the insert into its new location. You will need to thread the seat belt through the slot in the panel. Put the anchor plate through first then the seat belt tab. Pull out the slack.
Begin to press the panel into position. The panel pins should line up with their holes. Begin with slight tapping or even pushing the panel into position will secure it. Give it a firm fist stamp to ensure the pins are fully inserted int their holes.
You can also do as I did and use the heal of your hand just tapping the pins in fully to ensure they are seated.
Mount the seat belt anchor.
Install the rear seat anchor panel over the cargo panel and seat anchor. Tap into position ensuring it is seated
Install the cargo cover anchor mount with the two screws removed earlier.
Install the stowage cover.
Secure the rear upper corner of the cargo panel with the removed screw. Reinstall the upper fascia lining up the clips and tap into place. Install the rear cargo light by inserting the plug and using the 4 screws removed. Install the cargo area scuff plate. Install the rear passenger scuff plate. Fill up your new stowage space!
Last edited by Ritzy4Runner; 01-25-2010 at 05:53 AM. Reason: Updated and simplifed


 04-20-2009, 09:24 AM
#4

Yeah liked the idea of the 12vdc outlet and after checking for clearace noted that there was room for a second outlet. I then used a second OEM outlet with the connector, only thing I needed to do was make a template, cut it out and snap it in, wire up the outlet to the existing wiring, job done. I actually wanted to run a seperate wire but time limited me in what I could do. Didn't want to disassemble the interior again just run one wire to my aux fuse panel. The loads I will be using them for will not overload them. I'll be doing a write up on that as well, really simple.

Last edited by Ritzy4Runner; 04-22-2010 at 06:27 AM.
 04-20-2009, 01:57 PM
#6

Trending Topics
 04-20-2009, 08:18 PM
#9
Contributing Member
Join Date: Mar 2003
Location: COTKU,Ontario,Canada
Posts: 11,334
Likes: 0
Received 0 Likes
on
0 Posts
Another great mod Ritzy! well written and lots of pics too... I'm really going to have to get off my tush and post my truck mods lol... On the colour thing if it is a concern you can get a rattle can of Duplicolour Vinyl and plastic spray paint from Napa in a colour match for your interior just bring the colour code for your interior with you... they may have to order it in... around here they claim availability for most codes as 7-10 days.
01-13-2010, 05:47 PM
#10
Registered User
Join Date: Sep 2009
Location: Ridgefield, CT
Posts: 7
Likes: 0
Received 0 Likes
on
0 Posts
Nice, i gonna mod my current panel to work with the 99 cover/door, i know i lose the molded spot but i get a lot of space, i will base my work off this thread, i have to cut my panel which will be sketchy.
 01-24-2010, 06:43 PM
#13
 01-24-2010, 07:21 PM
#14
Contributing Member
Join Date: Mar 2003
Location: COTKU,Ontario,Canada
Posts: 11,334
Likes: 0
Received 0 Likes
on
0 Posts
I think he's referring to the flip up seat bottoms... the newer ones have a pair of receivers in the back edge to stow the headrests in when you flip the seat backs down. The HRs are standing up against the front seat backs that way instead of flying around loose or sitting in the dirt from the rear pax feet on the floor the way they have too now when you remove them to fold the seat down.
Last edited by aviator; 01-24-2010 at 07:24 PM.
01-25-2010, 05:58 AM
#16
I think he's referring to the flip up seat bottoms... the newer ones have a pair of receivers in the back edge to stow the headrests in when you flip the seat backs down. The HRs are standing up against the front seat backs that way instead of flying around loose or sitting in the dirt from the rear pax feet on the floor the way they have too now when you remove them to fold the seat down.

 03-10-2010, 10:13 PM
#18
Contributing Member
Join Date: Mar 2003
Location: COTKU,Ontario,Canada
Posts: 11,334
Likes: 0
Received 0 Likes
on
0 Posts
I will have to keep an eye out for them. As I have leather seats now, I doubt I will swap out another set of seats. Seems like they are similar to how I store my head rests right now when I flip down the seats, just slide the rods down between the seat backs and bottoms. My floor boards are pretty clean and I will sometimes lay the HR just under the rear edge of the front seats and flip the seat bottoms up into position holding them secure and out of the way.
03-17-2010, 09:40 PM
#20
Thanks again for your comps. I just recently was able to acquire a set of power leather seats and will be installing them so be watching for another installment of "Mods for Dummies"
 LOL!
LOL! I actually have the drivers seat installed and it was no simple task but it can be. Also picked up a limited bumper which has the Toyota factory/dealer installed Hella driving lights. Will also do one on that, well I hope to! Thanks again for your support.


