Hilux Surf Field Monitor installed in a 3rd Gen Write-Up *PICS*
 09-07-2006, 11:40 AM
#1
Hilux Surf Field Monitor installed in a 3rd Gen Write-Up *PICS*
I obtained a Field Monitor Overhead Console out of Hilux Surf some months back from a friend of mine who resides in New Zealand. He originally pulled this unit out of Surf while in a stay in Japan. This particular unit is designed to fit a Surf that came with a factory installed sunroof. Since the headliners are different on both sunroof and non-sunroof Surfs, Toyota also offered a field monitor (identical in function to mine below), that was designed to fit a non-sunroof Surf.
FYI, these Field Monitors were only available on Hilux Surfs. There were never an option for a 4Runner in the United States.
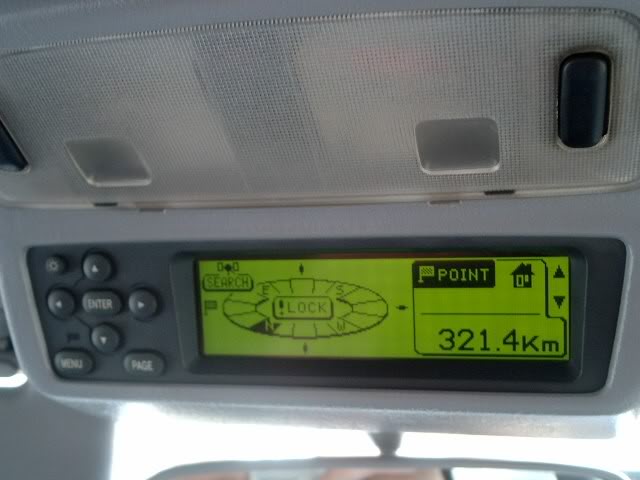
This Field Monitor is a temperature gauge, barometer, compass, altimeter and relative altimeter all in one. Of course the coolest thing is the scrolling green lights that start up once the vehicle starts moving!
I located a set of numbers stamped on it I believe to be the part number for this unit:
83290-35010
79127
Jeco Japan
>P.P.<
I'm fairly positive the first line of numbers is the part number, and the third line states where it was made. I'm not sure what the second line of numbers mean or what >P.P.< stands for.
Here are the wiring directions given to me by Soljah that I used to not only make the field monitor operate correctly, but also the sunroof and dome light switches as well:
The buddy of mine that I picked this FM up from, cut the wires about 10 inches from the White Plug (pictured above), so I would have a decent amount of wiring to work with. With that being said, below are the wiring directions These wires not only make the field monitor operate correctly, but to also make the sunroof and dome light switches work as well:
Now when I refer to certain wires as ?coming off the Blue Plug? as seen below, I am referring to the Blue Plug that connects to my Sunroof Switch Control Unit (that big white looking part) and to the map lights. I am not referring to the wires that go from the Blue Plug up and into the headliner.
Take each wire and connect it to its corresponding wire as so:
Field Monitor:
1. Blue/Yellow wire coming off the female end of the White Plug, taps into the Gray wire coming off the Blue Plug.
2. White/Black wire coming off the female end of the White Plug (this wire also could also be Gray), taps into the Black/Red wire coming off the Blue Plug.
3. White/Red wire coming off the female end of the White Plug, taps into the Red wire coming off the Blue Plug.
Clock:
4. Green wire coming off the female end of the White Plug, taps into the Green # 3 wire on the back of the clock in the dash.
Temp Sensor:
5. Blue wire coming off the female end of the White Plug, connects to your Air Temp Sensor. (This Sensor needs to be installed behind the front bumper. It contains 2 wires. See next step for second wire connection.)
6. Yellow/Black wire coming off the female end of the White Plug connects to your Air Temp Sensor.
Speed Sensor:
7. Green/Orange wire coming off the female end of the White Plug, taps into the Grey/Blue wire located at the ABS Unit. (It will be the Grey wire with a Blue stripe on it at the ABS unit. You could also say it is the Blue wire with a Grey stripe on it.)
Sunroof Controls:
9. Blk/Red wire coming off the Blue Plug, taps into the Grey ground wire at the Sunroof Light Switch on the Field Unit.
10. Gray wire coming off the Blue Plug, taps into the White/Black wire on the Sunroof Light Switch.
Just for future reference, listed below is the wiring diagram for a Toyota Hilux LN185 1996-2000 model also given to me by Soljah:
-Blue/Yel to constant 12 Volt
-Whi/Red to Switch 12v (ignition)
-Grn/Org to Speed sensor
-Blue to outside air temp sensor
-Yel/Blk to outside air temp sensor
-Whi/Blk to ground
-Green to dash clock (illumination)
-White to sunroof switch light dimmer
-Blu/White to sunroof switch light dimmer
The first part of the console install for the sunroof model involved swapping the sunroof controls from the original console into the new Field Monitor. Like Soljah?s 4Runner, my 4Runner too only had one button that controlled the tilt/slide of the sunroof. The field monitor came with two buttons. One that controls tilt and the other that controls slide. Since I was unsure how to convert a 2 button sunroof switch to a one button switch, Soljah suggested I swap out the sunroof control from my existing console and install it into the new field monitor. Not only did it fit perfectly, the wiring was very simple. I did not have to swap the dome lights and light switches themselves since they were identical on both units. The only difference is that the overhead factory console has one more screw hole inside itself for the sunroof control box compared to that of the field monitor.
Unlike Midiwall's 4Runner, the blue sunroof plug in my truck was completely different in size and pins compared to the new Field Monitor. I also did not have to swap my mirror out or cut my headliner to make the new field monitor fit properly. And just to point out, since I have a factory sunroof in my 4Runner, I did not need the metal bracket like the non-sunroof version requires.
Wiring involved splicing the newly swapped sunroof control to points on the field monitor, splicing wires on the White wire harness to wires that were already in place in my headliner and connecting the sensor and illumination wires. The new field monitor attaches in the same screw hole as the original console in the headliner and once installed, looks OEM.
I ran all 4 wires (2 temp sensor wires, illumination wire and speed sensor wire) across the headliner and down the driver's side A-pillar. The grab handles located on both A-pillars are a pain to remove, as I was only able to remove 1 of the 2 screws holding the grab handle to the A-pillar on the driver?s side. I was lucky enough just to move one end of the grab handle slightly out of the way enough to slide the wires down the A-pillar. I ran the 2 temp sensor wires through the firewall and into the engine compartment. Once there, I connected them to the temp sensor that was also sent to me. The illumination wire was run to the clock in the dash. The radio bezel was pulled to get to the clock of course. The speed sensor wire was run to the ABS unit. On my 2002 4Runner, the ABS Unit is located under the dash on the driver?s side. On other year 4Runners, it's located behind the kick panel on the passenger?s side.
The wiring was easy (with the directions of course), but both me and Soljah have not yet figured out what the two extra wires connect to that are on the White wire harness on the field monitor. (I know a guy who lives in East Sussex, England who's taking his field monitor apart as we speak to see if he can find where these 2 mystery wires attach. They are believed to attach to a sunroof light switch dimmer, but I?m unaware of such a device. If he finds out some new info, I'll post it.)
I was fortunate I did not have to paint mine like Midiwall & Soljah suggested, because mine already matched my gray interior.
-------------------------------------------------------------------------------------------
Here are the original links to threads started by both Midiwall & Soljah where they have both installed one of these field monitors in their own 4Runners.
Midiwall installed one in his '96 4Runner: https://www.yotatech.com/forums/f2/hilux-surf-overhead-console-installed-3rd-gen-83908/
Soljah installed one in his '99 4Runner: https://www.yotatech.com/forums/show...ghlight=soljah
**NEW MEMBERS ADDING FIELD MONITORS TO THEIR TOYOTAS AS OF 7/07/07**
As more and more Toyota owners are adding these FMs to their vehicles, I will post links to their write ups as well. I know of a couple guys working on getting their FMs to operate, so when they get a write up done, I'll add them to. So far:
Ritzy4Runner installed one in his '98 4Runner - https://www.yotatech.com/forums/f2/f...gen-3-a-120311. Additional info: https://www.yotatech.com/forums/f2/f...runner-118451/
Iceman601 installed one in his '97 4Runner - https://www.yotatech.com/forums/f2/a...or-mod-120208/
Blarchitect installed one in his '98 4Runner - https://www.yotatech.com/forums/f2/a.../#post50793243
Blcktpgsr installed one in his '97 4Runner - https://www.yotatech.com/forums/f2/f.../#post51309145
Keep them coming guys!
-------------------------------------------------------------------------------------------
And for another quick future reference, I thought I would restate what Midiwall has already stated in a previous thread:
A couple of points of interest for those looking to do this mod:
�The compass has fairly large steps of 22.5*, so you'll get 16 compass points.
�The compass _is_ magnetic, but it will only update when it detects the vehicle moving (fwd or rev) so you HAVE to hook up the speed sensor.
�The backlight on the display is sensitive to the headlights in a "weird" way (it's relative to ground, not hot). If you _don't_ hookup the headlight sensor, the backlight will be VERY dim.
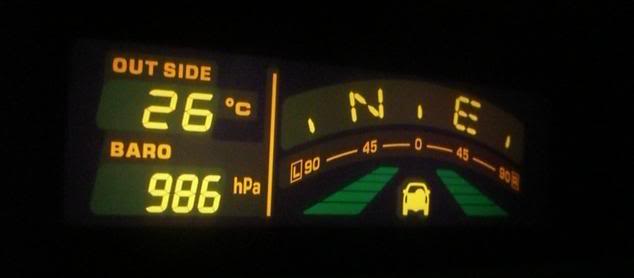
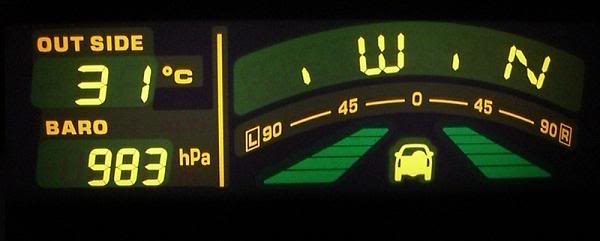
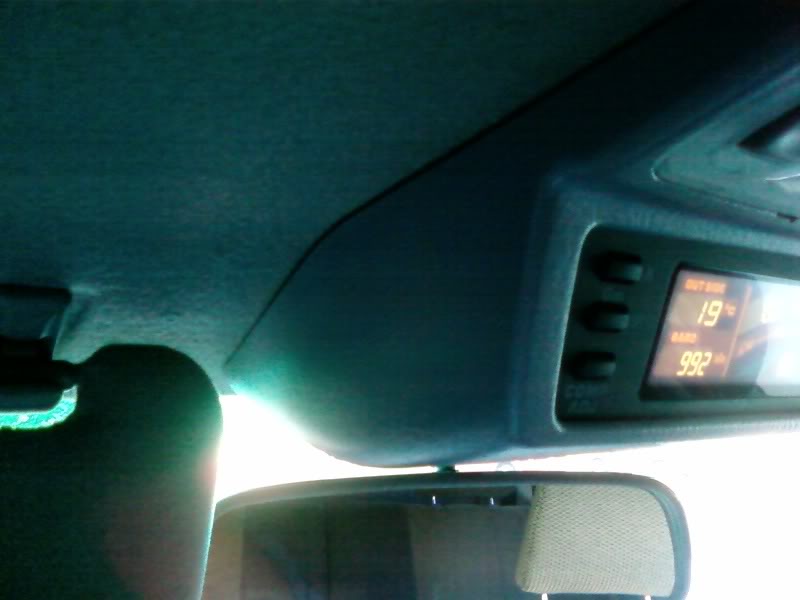
The first 2 pics below don't do the Field Monitor justice on how bright the display really is, b/c I was taking the pics at night and the flash on my camera was over powering the display on the Field Monitor:
Picture of the Barometer reading:
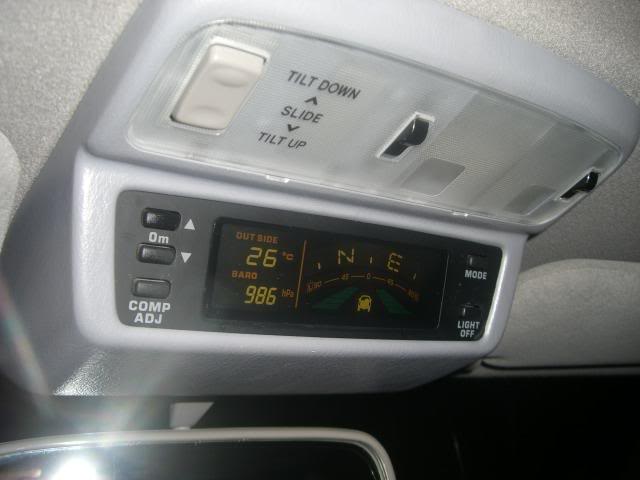
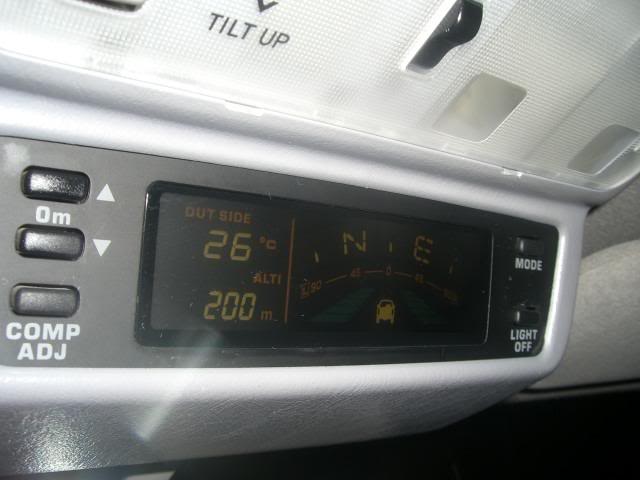
Picture of the Altimeter reading:
Night shot:
Another Night shot:
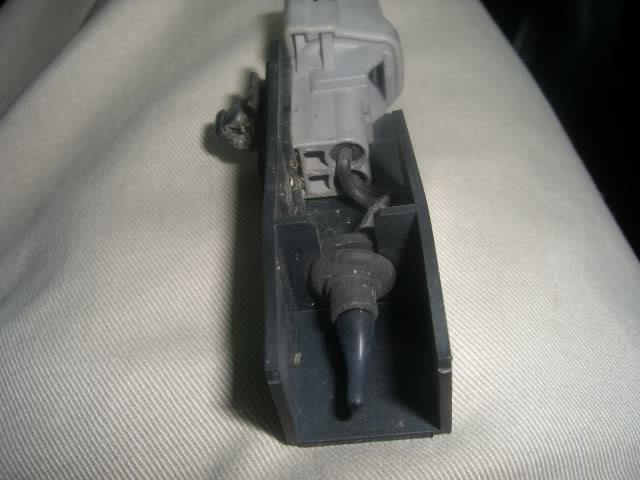
Shot of Temp Sensor before it was installed:
EDIT: My Temp Sensor is mounted behind my front bumper. I will add a picture of it mounted soon.
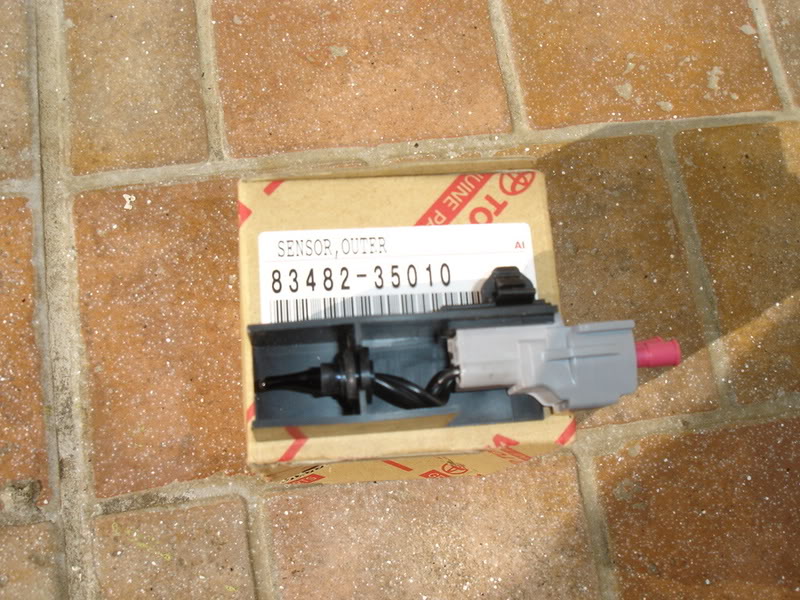
Courtesy of Blarchitect (Gordon) - Here's a picture of a brand new, oem temp sensor he was able to purchase for his install:
Shot of the 2 button sunroof controls that came stock on the Field Monitor w/ the lens cover removed. (I was doing a test fit here before I swapped in my 1 button sunroof control out of my factory console.)
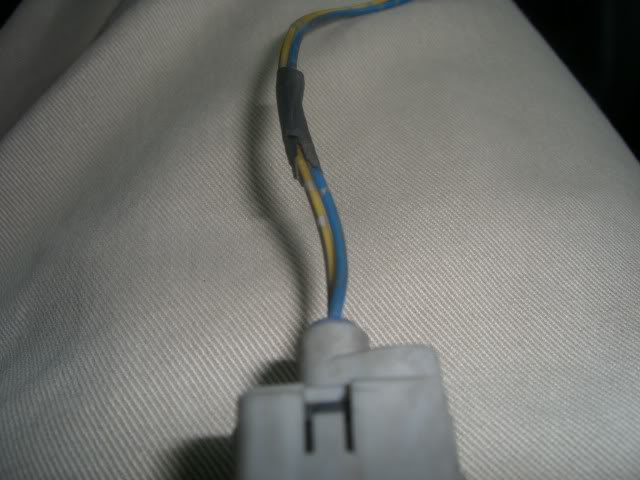
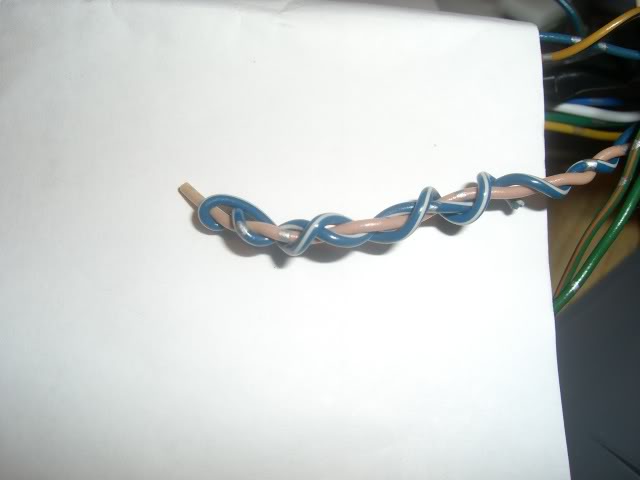
And a shot of those 2 mysterious wires that I?m unsure where they belong:
A few members have asked me recently how this model compares in shape to a nonsunroof model, thus a quick explanation:
Personally, I think if you are deciding between a field monitor that fits either a 4Runner with a sunroof or one without, I'd pick the model depending on whether or not my truck had a sunroof or not. Another words, I chose the sunroof field monitor because my 4Runner came with a sunroof from the factory.
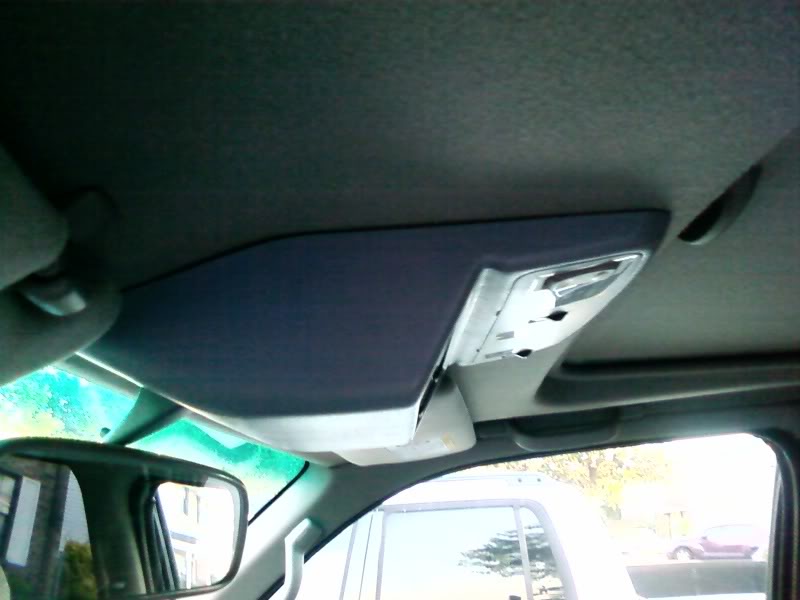
That being said, I took a few pics that should hopefully answer any questions. The roof area in front of the sunroof and between the windshield is flat from driverside door to passenger side door. The roof simply angles from the windshield back to the sunroof by about 15 degrees.
You'll notice my field monitor follows the contours of my roof line perfectly:
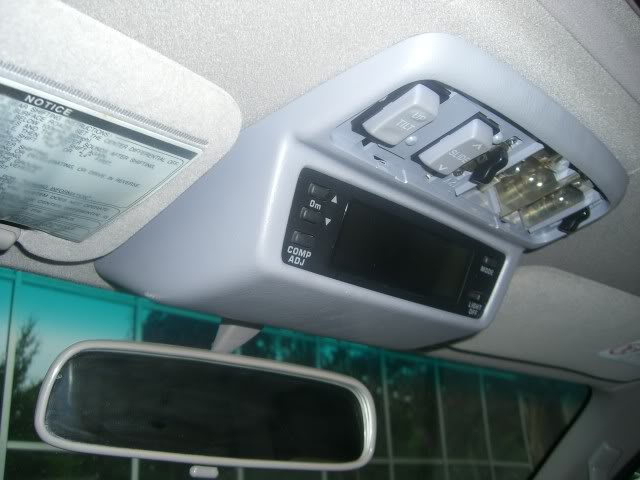
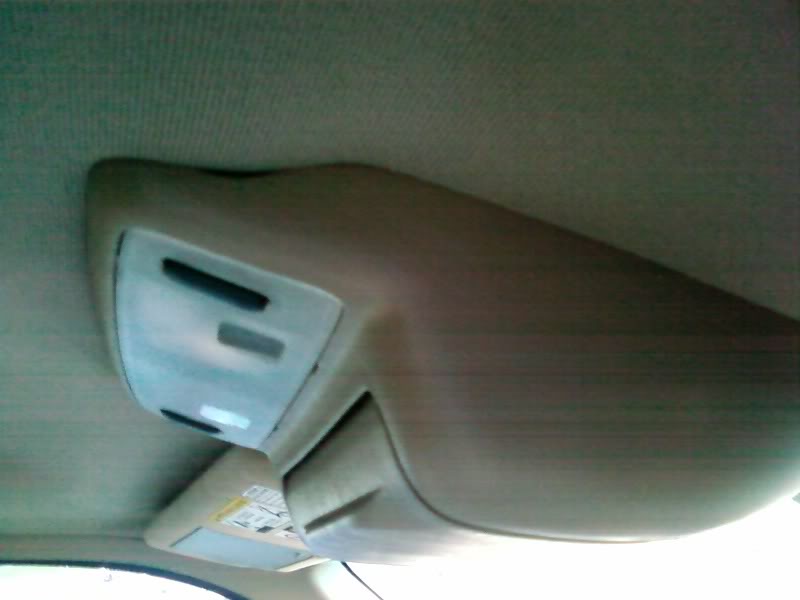
My wife's 2000 4Runner came from the factory without a sunroof. However, the previous owner had a sunroof installed, but never swapped out the oem overhead console for a sunroof version.
Granted she does not have a field monitor in her 4Runner, but as you can see in this picture, this is what her overhead console looks like. I've seen a nonsunroof field monitor before and they are shaped just like this.
Notice the funny lip at the end compared to mine:
**************************************************
**EDIT** 04/20/07
Here's a Step-by-Step Write-up I did for a fellow YT member recently. I feel like this write-up is important and it may help others install this Field Monitor with a little more ease. Good luck.
Okay here goes.
Here is a picture of the Field Monitor removed from the plastic trim:
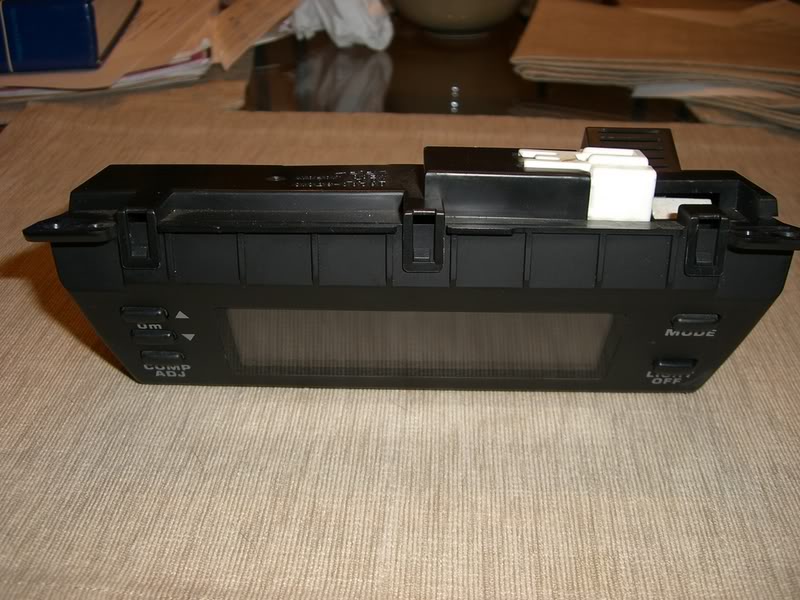
Notice the cover and female plug on it:
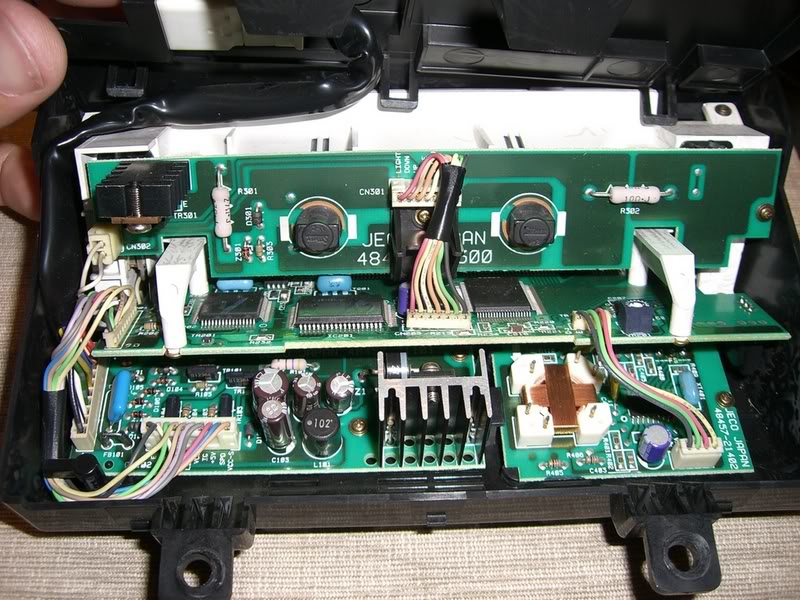
The cover removed:
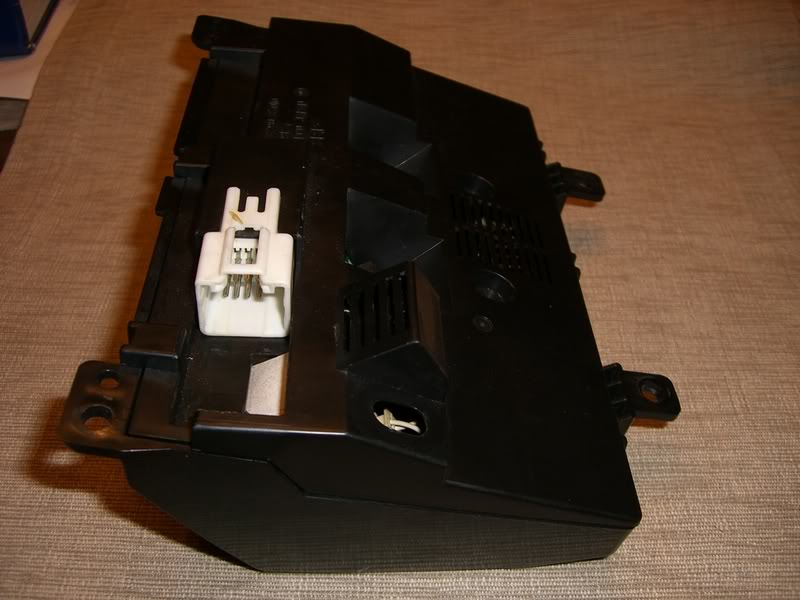
The wires from the circuit board attach to a female white plug that sits outside the black box cover:
Here's how mine come off the circuit board:
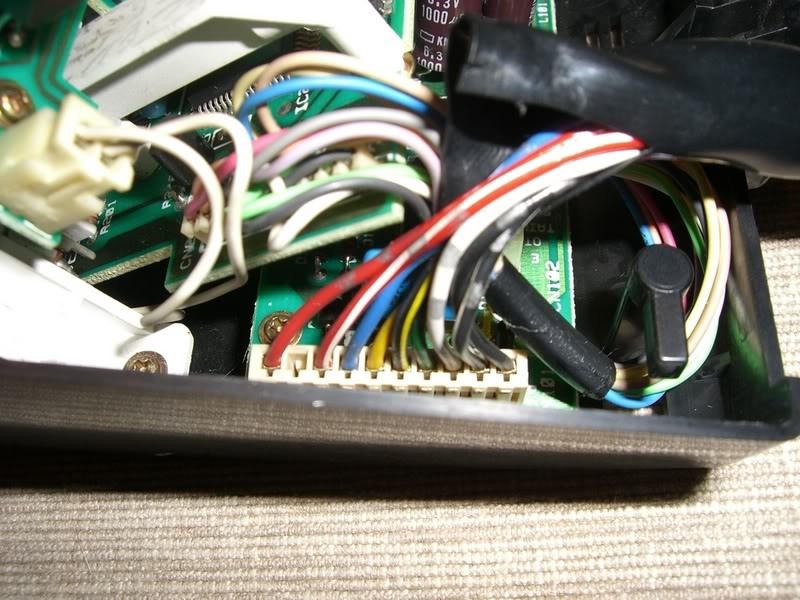
From there, they all connect to this female white plug that sits on the top of the black cover:
I peeled back the wire loom to see how the wires fed into the back of the female plug:
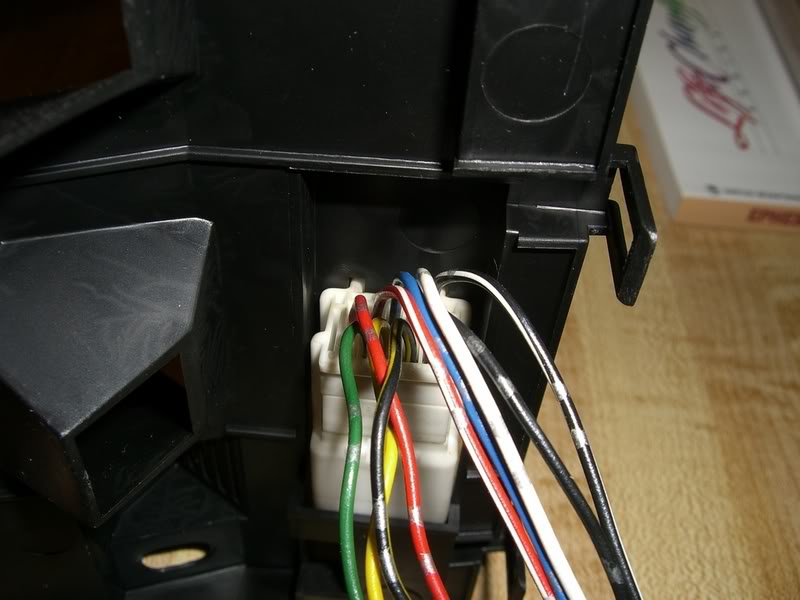
Here is a listing of each wire in order how they connect to the back of the FEMALE plug:
TOP ROW - from left to right:
Red wire
Red/White wire
Blue wire
White wire
Black/White wire
BOTTOM ROW - from left to right:
Slot one is empty
Green wire
Yellow wire
Black/Yellow wire
Black wire
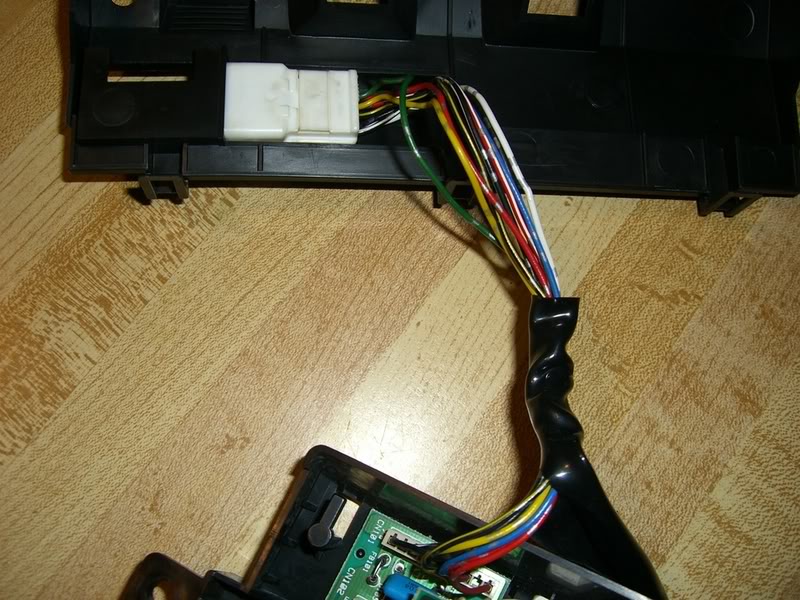
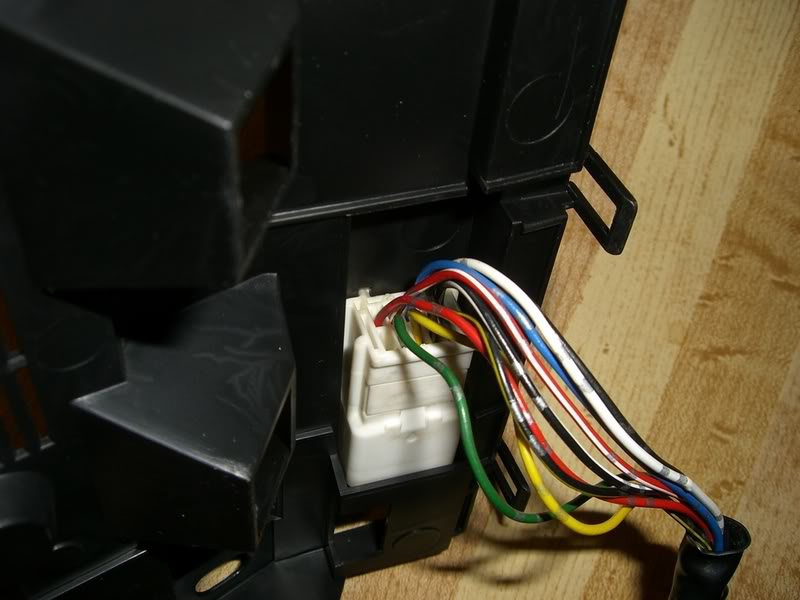
Now, from there, this female plug connects to this male white plug:

Both connected:
Here is the backside of the male connector:
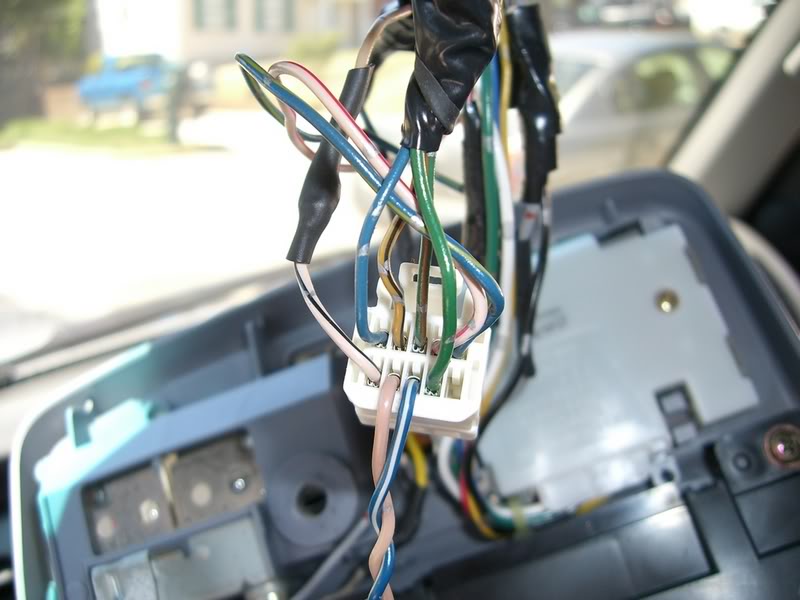
You see how the wires change color from when they enter the female plug and exit the male plug. Interesting huh?
Here is a listing of each wire in order how they connect to the back of the MALE plug:
TOP ROW - from left to right:
1. Blue wire
2. Yellow/Black wire
3. Green/Orange wire
4. White/Red wire
5. Blue/Yellow wire
BOTTOM ROW - from left to right:
1. White/Black wire
2. "Flesh" tone wire - *see below
3. Blue/White wire - *see below
4. Green wire
5. Empty
*Both the Blue/White wire and "Flesh" tone wire are not attached. I do not know where these 2 wires go.
You'll have to mirror my explanation of how the wires connect from the female plug to the male plug to get everything correctly wired.
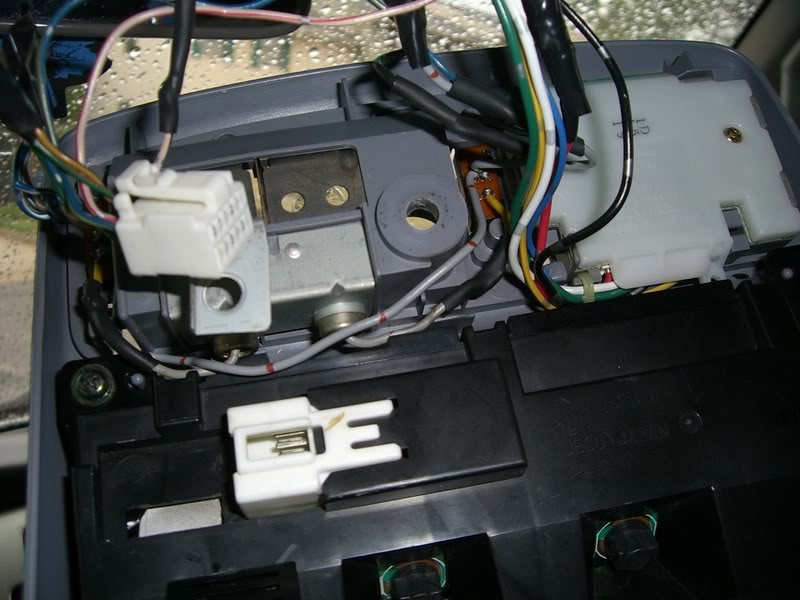
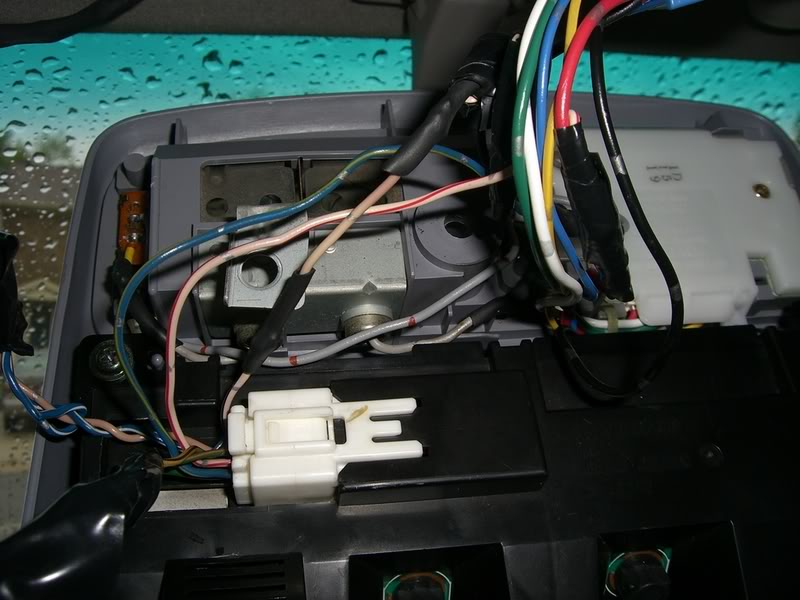
Here is the blue plug located in my Headliner. Also in the picture, notice the backside of my OEM sunroof control unit. (It's that white looking piece):

Again, I was not able to use the 2-button sunroof control feature that came with this Field monitor, b/c it did not match up correctly with my 4Runner. Therefore, I removed it from the Field Monitor and replaced it with my OEM 1-button sunroof control unit. Here is how the wires feed out of it. They connect to my Blue plug in the headliner:
The wires that come out of the male white plug connect in the following manner: (I took this info from my original thread here on YT):
Here are the wiring directions given to me by Soljah that I used to not only make the field monitor operate correctly, but also the sunroof and dome light switches as well:
The buddy of mine that I picked this FM up from, cut the wires about 10 inches from the White Plug (pictured above), so I would have a decent amount of wiring to work with. With that being said, below are the wiring directions These wires not only make the field monitor operate correctly, but to also make the sunroof and dome light switches work as well:
Now when I refer to certain wires as ?coming off the Blue Plug? as seen below, I am referring to the Blue Plug that connects to my Sunroof Switch Control Unit (that big white looking part) and to the map lights. I am not referring to the wires that go from the Blue Plug up and into the headliner.
Take each wire and connect it to its corresponding wire as so:
Field Monitor:
1. Blue/Yellow wire coming off the female end of the White Plug, taps into the Gray wire coming off the Blue Plug.
2. White/Black wire coming off the female end of the White Plug (this wire also could also be Gray), taps into the Black/Red wire coming off the Blue Plug.
3. White/Red wire coming off the female end of the White Plug, taps into the Red wire coming off the Blue Plug.
Clock:
4. Green wire coming off the female end of the White Plug, taps into the Green # 3 wire on the back of the clock in the dash.
Temp Sensor:
5. Blue wire coming off the female end of the White Plug, connects to your Air Temp Sensor. (This Sensor needs to be installed behind the front bumper. It contains 2 wires. See next step for second wire connection.)
6. Yellow/Black wire coming off the female end of the White Plug connects to your Air Temp Sensor.
Speed Sensor:
7. Green/Orange wire coming off the female end of the White Plug, taps into the Grey/Blue wire located at the ABS Unit. (It will be the Grey wire with a Blue stripe on it at the ABS unit. You could also say it is the Blue wire with a Grey stripe on it.)
Sunroof Controls:
9. Blk/Red wire coming off the Blue Plug, taps into the Grey ground wire at the Sunroof Light Switch on the Field Unit.
10. Gray wire coming off the Blue Plug, taps into the White/Black wire on the Sunroof Light Switch.
Just for future reference, listed below is the wiring diagram for a Toyota Hilux LN185 1996-2000 model also given to me by Soljah:
-Blue/Yel to constant 12 Volt
-Whi/Red to Switch 12v (ignition)
-Grn/Org to Speed sensor
-Blue to outside air temp sensor
-Yel/Blk to outside air temp sensor
-Whi/Blk to ground
-Green to dash clock (illumination)
-White to sunroof switch light dimmer
-Blu/White to sunroof switch light dimmer
Hope that helps you or at least better explains the inner workings of this unit.
**EDIT OVER**
************************************************** *
Here are some pics from a Surf manual showing how to operate the field monitor:
From what member RoySharif stated in a previous thread on this subject:
This one is the basic Field Monitor, which is an option on the N185 Hilux Surfs (3rd gens). Another option is the GPS Field Monitor. This one incorporates a small trip computer and is programmable. It can also be linked to a GPS device although individually, it has GPS capability for a limited number of functions.
Unfortunately, this model will not work properly in the United States because it?s made to work in only specific countries. At least this is what others who have these monitors have told me. Here are a few pictures of one of these GPS Field Monitors:
Anyway, just thought I?d post up what I?ve been playing around with for the past couple of weeks or so. A big thanks goes to Midiwall and Soljah for all the help and knowledge of electrical work they both provided! I know they were getting tired of my constant emails.
Thanks again guys!


**
FYI, these Field Monitors were only available on Hilux Surfs. There were never an option for a 4Runner in the United States.
This Field Monitor is a temperature gauge, barometer, compass, altimeter and relative altimeter all in one. Of course the coolest thing is the scrolling green lights that start up once the vehicle starts moving!
I located a set of numbers stamped on it I believe to be the part number for this unit:
83290-35010
79127
Jeco Japan
>P.P.<
I'm fairly positive the first line of numbers is the part number, and the third line states where it was made. I'm not sure what the second line of numbers mean or what >P.P.< stands for.
Here are the wiring directions given to me by Soljah that I used to not only make the field monitor operate correctly, but also the sunroof and dome light switches as well:
The buddy of mine that I picked this FM up from, cut the wires about 10 inches from the White Plug (pictured above), so I would have a decent amount of wiring to work with. With that being said, below are the wiring directions These wires not only make the field monitor operate correctly, but to also make the sunroof and dome light switches work as well:
Now when I refer to certain wires as ?coming off the Blue Plug? as seen below, I am referring to the Blue Plug that connects to my Sunroof Switch Control Unit (that big white looking part) and to the map lights. I am not referring to the wires that go from the Blue Plug up and into the headliner.
Take each wire and connect it to its corresponding wire as so:
Field Monitor:
1. Blue/Yellow wire coming off the female end of the White Plug, taps into the Gray wire coming off the Blue Plug.
2. White/Black wire coming off the female end of the White Plug (this wire also could also be Gray), taps into the Black/Red wire coming off the Blue Plug.
3. White/Red wire coming off the female end of the White Plug, taps into the Red wire coming off the Blue Plug.
Clock:
4. Green wire coming off the female end of the White Plug, taps into the Green # 3 wire on the back of the clock in the dash.
Temp Sensor:
5. Blue wire coming off the female end of the White Plug, connects to your Air Temp Sensor. (This Sensor needs to be installed behind the front bumper. It contains 2 wires. See next step for second wire connection.)
6. Yellow/Black wire coming off the female end of the White Plug connects to your Air Temp Sensor.
Speed Sensor:
7. Green/Orange wire coming off the female end of the White Plug, taps into the Grey/Blue wire located at the ABS Unit. (It will be the Grey wire with a Blue stripe on it at the ABS unit. You could also say it is the Blue wire with a Grey stripe on it.)
Sunroof Controls:
9. Blk/Red wire coming off the Blue Plug, taps into the Grey ground wire at the Sunroof Light Switch on the Field Unit.
10. Gray wire coming off the Blue Plug, taps into the White/Black wire on the Sunroof Light Switch.
Just for future reference, listed below is the wiring diagram for a Toyota Hilux LN185 1996-2000 model also given to me by Soljah:
-Blue/Yel to constant 12 Volt
-Whi/Red to Switch 12v (ignition)
-Grn/Org to Speed sensor
-Blue to outside air temp sensor
-Yel/Blk to outside air temp sensor
-Whi/Blk to ground
-Green to dash clock (illumination)
-White to sunroof switch light dimmer
-Blu/White to sunroof switch light dimmer
The first part of the console install for the sunroof model involved swapping the sunroof controls from the original console into the new Field Monitor. Like Soljah?s 4Runner, my 4Runner too only had one button that controlled the tilt/slide of the sunroof. The field monitor came with two buttons. One that controls tilt and the other that controls slide. Since I was unsure how to convert a 2 button sunroof switch to a one button switch, Soljah suggested I swap out the sunroof control from my existing console and install it into the new field monitor. Not only did it fit perfectly, the wiring was very simple. I did not have to swap the dome lights and light switches themselves since they were identical on both units. The only difference is that the overhead factory console has one more screw hole inside itself for the sunroof control box compared to that of the field monitor.
Unlike Midiwall's 4Runner, the blue sunroof plug in my truck was completely different in size and pins compared to the new Field Monitor. I also did not have to swap my mirror out or cut my headliner to make the new field monitor fit properly. And just to point out, since I have a factory sunroof in my 4Runner, I did not need the metal bracket like the non-sunroof version requires.
Wiring involved splicing the newly swapped sunroof control to points on the field monitor, splicing wires on the White wire harness to wires that were already in place in my headliner and connecting the sensor and illumination wires. The new field monitor attaches in the same screw hole as the original console in the headliner and once installed, looks OEM.
I ran all 4 wires (2 temp sensor wires, illumination wire and speed sensor wire) across the headliner and down the driver's side A-pillar. The grab handles located on both A-pillars are a pain to remove, as I was only able to remove 1 of the 2 screws holding the grab handle to the A-pillar on the driver?s side. I was lucky enough just to move one end of the grab handle slightly out of the way enough to slide the wires down the A-pillar. I ran the 2 temp sensor wires through the firewall and into the engine compartment. Once there, I connected them to the temp sensor that was also sent to me. The illumination wire was run to the clock in the dash. The radio bezel was pulled to get to the clock of course. The speed sensor wire was run to the ABS unit. On my 2002 4Runner, the ABS Unit is located under the dash on the driver?s side. On other year 4Runners, it's located behind the kick panel on the passenger?s side.
The wiring was easy (with the directions of course), but both me and Soljah have not yet figured out what the two extra wires connect to that are on the White wire harness on the field monitor. (I know a guy who lives in East Sussex, England who's taking his field monitor apart as we speak to see if he can find where these 2 mystery wires attach. They are believed to attach to a sunroof light switch dimmer, but I?m unaware of such a device. If he finds out some new info, I'll post it.)
I was fortunate I did not have to paint mine like Midiwall & Soljah suggested, because mine already matched my gray interior.
-------------------------------------------------------------------------------------------
Here are the original links to threads started by both Midiwall & Soljah where they have both installed one of these field monitors in their own 4Runners.
Midiwall installed one in his '96 4Runner: https://www.yotatech.com/forums/f2/hilux-surf-overhead-console-installed-3rd-gen-83908/
Soljah installed one in his '99 4Runner: https://www.yotatech.com/forums/show...ghlight=soljah
**NEW MEMBERS ADDING FIELD MONITORS TO THEIR TOYOTAS AS OF 7/07/07**
As more and more Toyota owners are adding these FMs to their vehicles, I will post links to their write ups as well. I know of a couple guys working on getting their FMs to operate, so when they get a write up done, I'll add them to. So far:
Ritzy4Runner installed one in his '98 4Runner - https://www.yotatech.com/forums/f2/f...gen-3-a-120311. Additional info: https://www.yotatech.com/forums/f2/f...runner-118451/
Iceman601 installed one in his '97 4Runner - https://www.yotatech.com/forums/f2/a...or-mod-120208/
Blarchitect installed one in his '98 4Runner - https://www.yotatech.com/forums/f2/a.../#post50793243
Blcktpgsr installed one in his '97 4Runner - https://www.yotatech.com/forums/f2/f.../#post51309145
Keep them coming guys!
-------------------------------------------------------------------------------------------
And for another quick future reference, I thought I would restate what Midiwall has already stated in a previous thread:
A couple of points of interest for those looking to do this mod:
�The compass has fairly large steps of 22.5*, so you'll get 16 compass points.
�The compass _is_ magnetic, but it will only update when it detects the vehicle moving (fwd or rev) so you HAVE to hook up the speed sensor.
�The backlight on the display is sensitive to the headlights in a "weird" way (it's relative to ground, not hot). If you _don't_ hookup the headlight sensor, the backlight will be VERY dim.
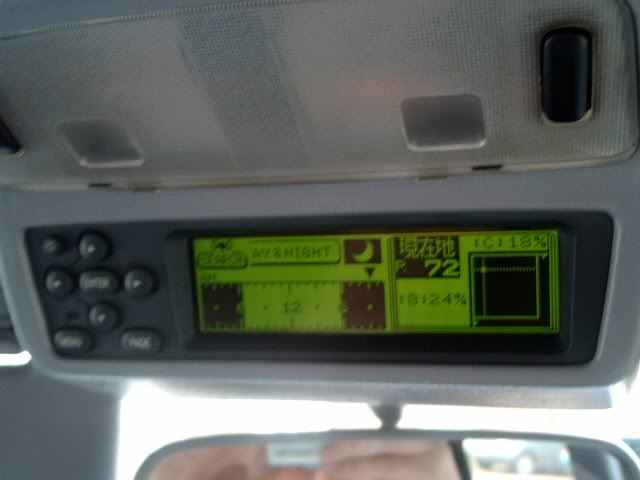
The first 2 pics below don't do the Field Monitor justice on how bright the display really is, b/c I was taking the pics at night and the flash on my camera was over powering the display on the Field Monitor:
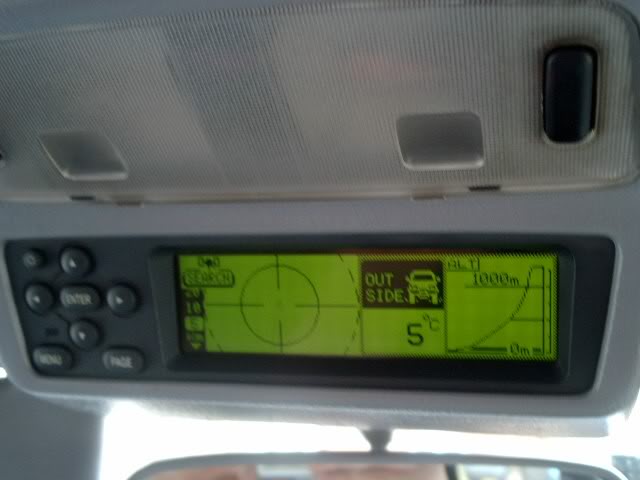
Picture of the Barometer reading:
Picture of the Altimeter reading:
Night shot:
Another Night shot:
Shot of Temp Sensor before it was installed:
EDIT: My Temp Sensor is mounted behind my front bumper. I will add a picture of it mounted soon.
Courtesy of Blarchitect (Gordon) - Here's a picture of a brand new, oem temp sensor he was able to purchase for his install:
Shot of the 2 button sunroof controls that came stock on the Field Monitor w/ the lens cover removed. (I was doing a test fit here before I swapped in my 1 button sunroof control out of my factory console.)
And a shot of those 2 mysterious wires that I?m unsure where they belong:
A few members have asked me recently how this model compares in shape to a nonsunroof model, thus a quick explanation:
Personally, I think if you are deciding between a field monitor that fits either a 4Runner with a sunroof or one without, I'd pick the model depending on whether or not my truck had a sunroof or not. Another words, I chose the sunroof field monitor because my 4Runner came with a sunroof from the factory.
That being said, I took a few pics that should hopefully answer any questions. The roof area in front of the sunroof and between the windshield is flat from driverside door to passenger side door. The roof simply angles from the windshield back to the sunroof by about 15 degrees.
You'll notice my field monitor follows the contours of my roof line perfectly:
My wife's 2000 4Runner came from the factory without a sunroof. However, the previous owner had a sunroof installed, but never swapped out the oem overhead console for a sunroof version.
Granted she does not have a field monitor in her 4Runner, but as you can see in this picture, this is what her overhead console looks like. I've seen a nonsunroof field monitor before and they are shaped just like this.
Notice the funny lip at the end compared to mine:
**************************************************
**EDIT** 04/20/07
Here's a Step-by-Step Write-up I did for a fellow YT member recently. I feel like this write-up is important and it may help others install this Field Monitor with a little more ease. Good luck.
Okay here goes.
Here is a picture of the Field Monitor removed from the plastic trim:
Notice the cover and female plug on it:
The cover removed:
The wires from the circuit board attach to a female white plug that sits outside the black box cover:
Here's how mine come off the circuit board:
From there, they all connect to this female white plug that sits on the top of the black cover:
I peeled back the wire loom to see how the wires fed into the back of the female plug:
Here is a listing of each wire in order how they connect to the back of the FEMALE plug:
TOP ROW - from left to right:
Red wire
Red/White wire
Blue wire
White wire
Black/White wire
BOTTOM ROW - from left to right:
Slot one is empty
Green wire
Yellow wire
Black/Yellow wire
Black wire
Now, from there, this female plug connects to this male white plug:
Both connected:
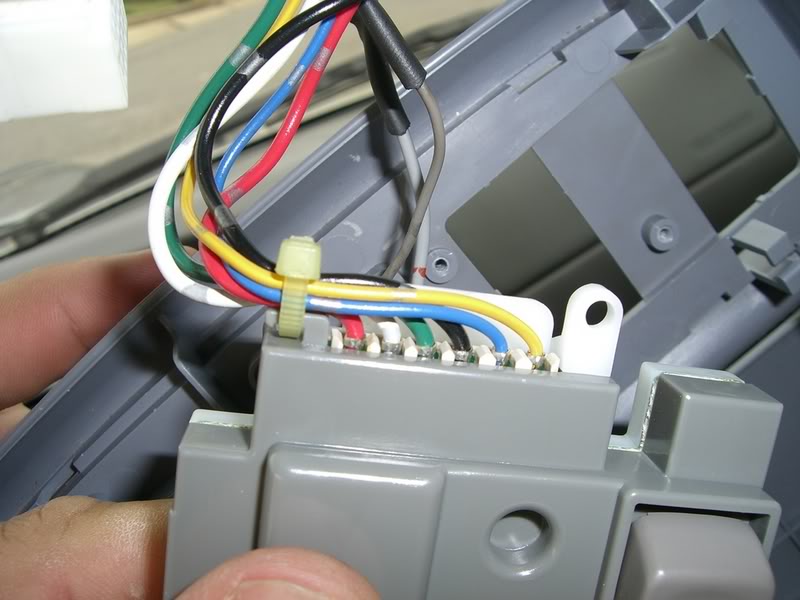
Here is the backside of the male connector:
You see how the wires change color from when they enter the female plug and exit the male plug. Interesting huh?
Here is a listing of each wire in order how they connect to the back of the MALE plug:
TOP ROW - from left to right:
1. Blue wire
2. Yellow/Black wire
3. Green/Orange wire
4. White/Red wire
5. Blue/Yellow wire
BOTTOM ROW - from left to right:
1. White/Black wire
2. "Flesh" tone wire - *see below
3. Blue/White wire - *see below
4. Green wire
5. Empty
*Both the Blue/White wire and "Flesh" tone wire are not attached. I do not know where these 2 wires go.
You'll have to mirror my explanation of how the wires connect from the female plug to the male plug to get everything correctly wired.
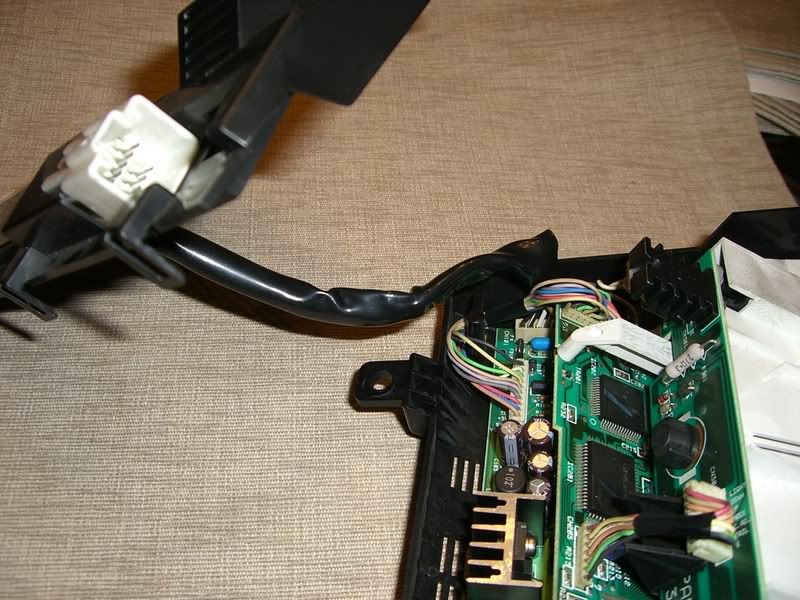
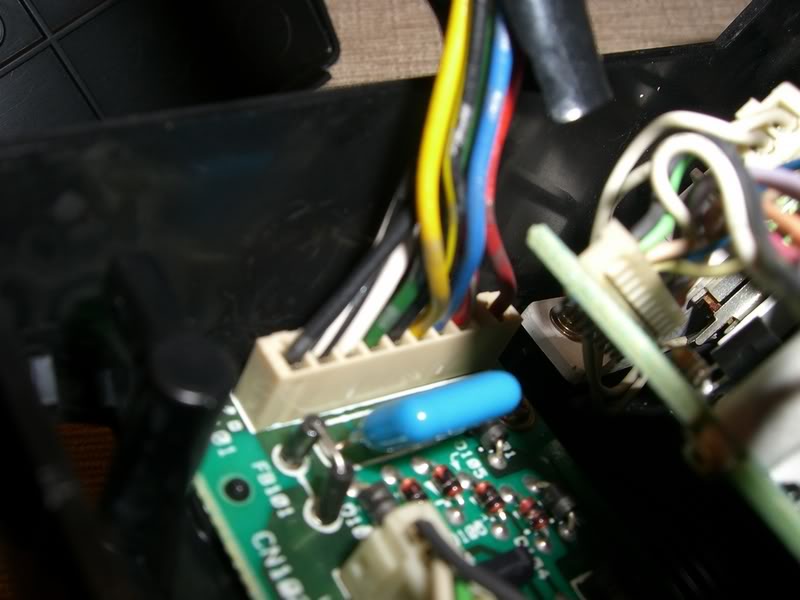
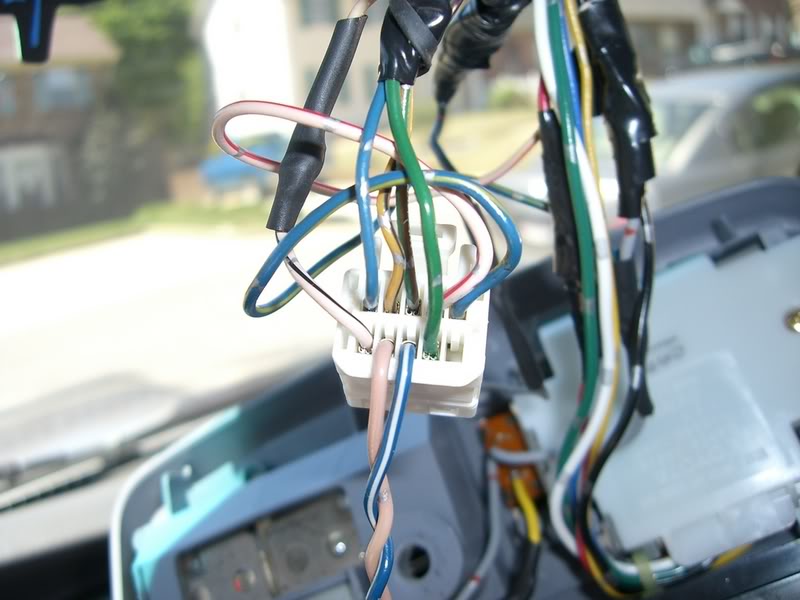
Here is the blue plug located in my Headliner. Also in the picture, notice the backside of my OEM sunroof control unit. (It's that white looking piece):
Again, I was not able to use the 2-button sunroof control feature that came with this Field monitor, b/c it did not match up correctly with my 4Runner. Therefore, I removed it from the Field Monitor and replaced it with my OEM 1-button sunroof control unit. Here is how the wires feed out of it. They connect to my Blue plug in the headliner:
The wires that come out of the male white plug connect in the following manner: (I took this info from my original thread here on YT):
Here are the wiring directions given to me by Soljah that I used to not only make the field monitor operate correctly, but also the sunroof and dome light switches as well:
The buddy of mine that I picked this FM up from, cut the wires about 10 inches from the White Plug (pictured above), so I would have a decent amount of wiring to work with. With that being said, below are the wiring directions These wires not only make the field monitor operate correctly, but to also make the sunroof and dome light switches work as well:
Now when I refer to certain wires as ?coming off the Blue Plug? as seen below, I am referring to the Blue Plug that connects to my Sunroof Switch Control Unit (that big white looking part) and to the map lights. I am not referring to the wires that go from the Blue Plug up and into the headliner.
Take each wire and connect it to its corresponding wire as so:
Field Monitor:
1. Blue/Yellow wire coming off the female end of the White Plug, taps into the Gray wire coming off the Blue Plug.
2. White/Black wire coming off the female end of the White Plug (this wire also could also be Gray), taps into the Black/Red wire coming off the Blue Plug.
3. White/Red wire coming off the female end of the White Plug, taps into the Red wire coming off the Blue Plug.
Clock:
4. Green wire coming off the female end of the White Plug, taps into the Green # 3 wire on the back of the clock in the dash.
Temp Sensor:
5. Blue wire coming off the female end of the White Plug, connects to your Air Temp Sensor. (This Sensor needs to be installed behind the front bumper. It contains 2 wires. See next step for second wire connection.)
6. Yellow/Black wire coming off the female end of the White Plug connects to your Air Temp Sensor.
Speed Sensor:
7. Green/Orange wire coming off the female end of the White Plug, taps into the Grey/Blue wire located at the ABS Unit. (It will be the Grey wire with a Blue stripe on it at the ABS unit. You could also say it is the Blue wire with a Grey stripe on it.)
Sunroof Controls:
9. Blk/Red wire coming off the Blue Plug, taps into the Grey ground wire at the Sunroof Light Switch on the Field Unit.
10. Gray wire coming off the Blue Plug, taps into the White/Black wire on the Sunroof Light Switch.
Just for future reference, listed below is the wiring diagram for a Toyota Hilux LN185 1996-2000 model also given to me by Soljah:
-Blue/Yel to constant 12 Volt
-Whi/Red to Switch 12v (ignition)
-Grn/Org to Speed sensor
-Blue to outside air temp sensor
-Yel/Blk to outside air temp sensor
-Whi/Blk to ground
-Green to dash clock (illumination)
-White to sunroof switch light dimmer
-Blu/White to sunroof switch light dimmer
Hope that helps you or at least better explains the inner workings of this unit.
**EDIT OVER**
************************************************** *
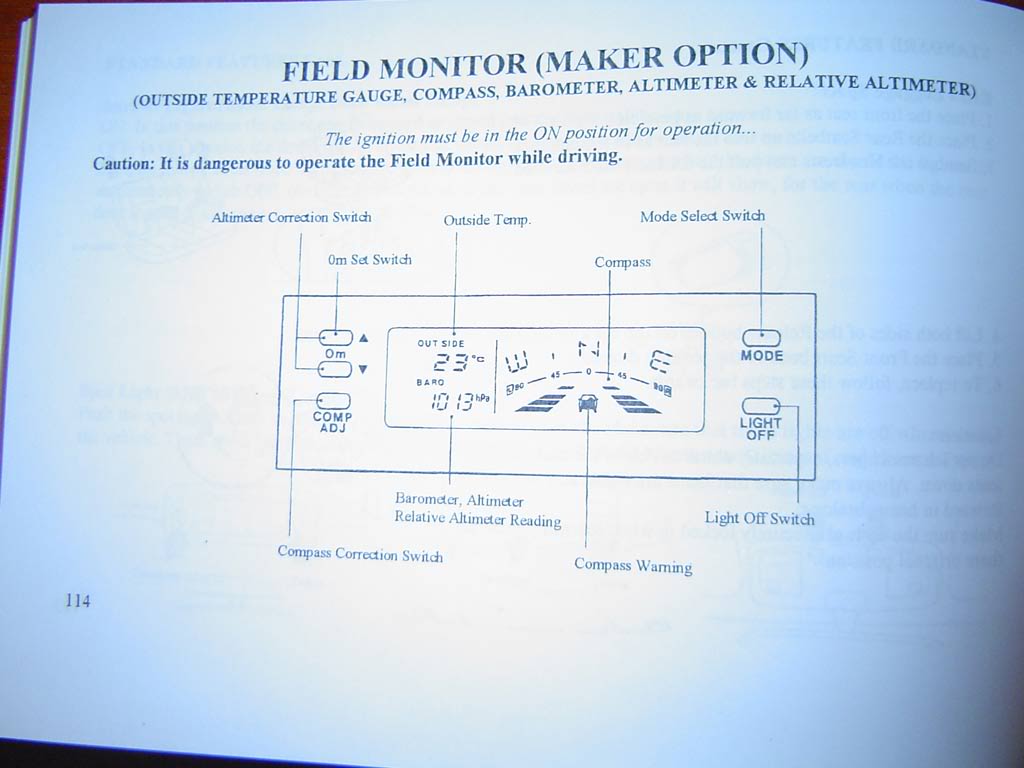
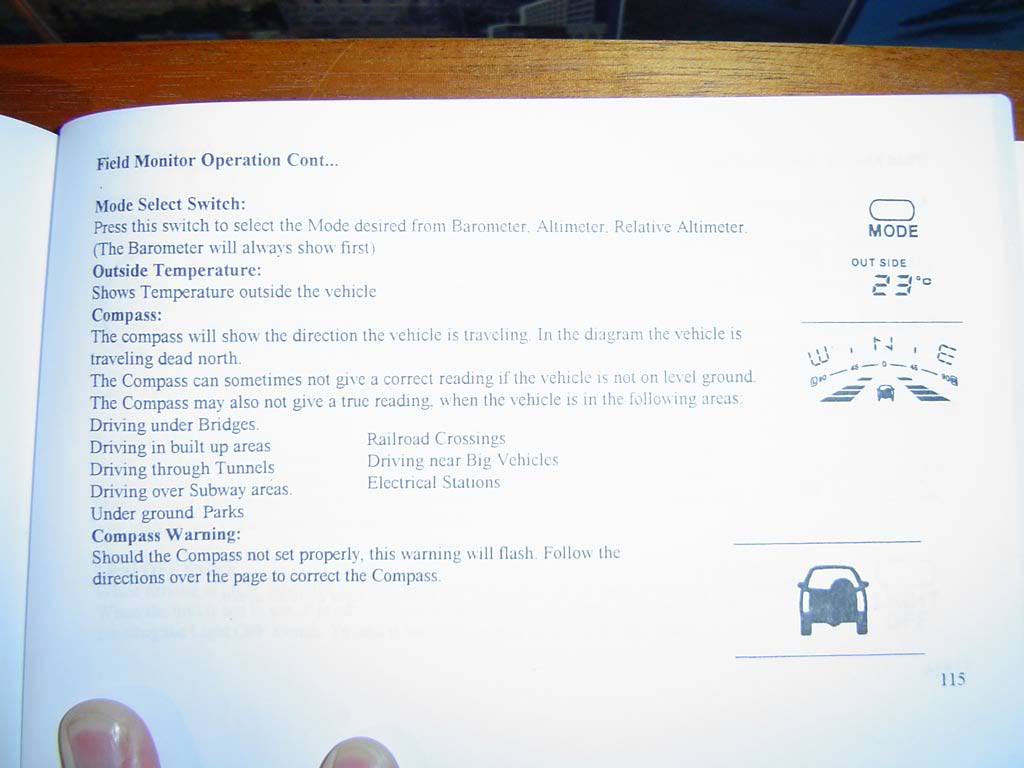
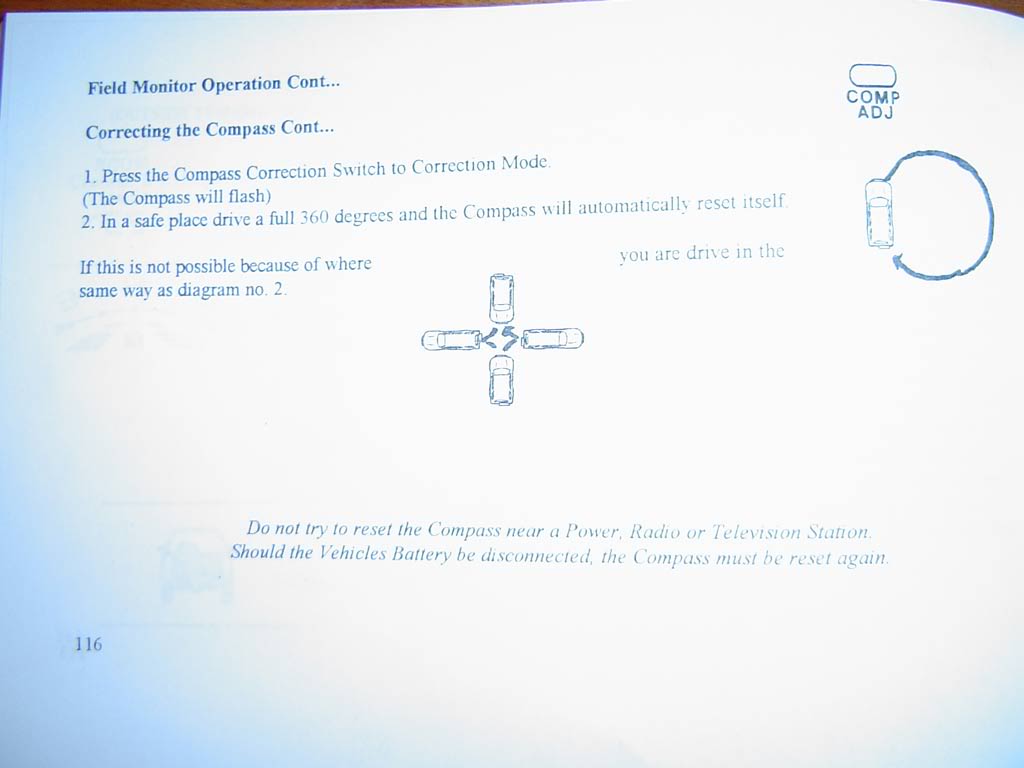
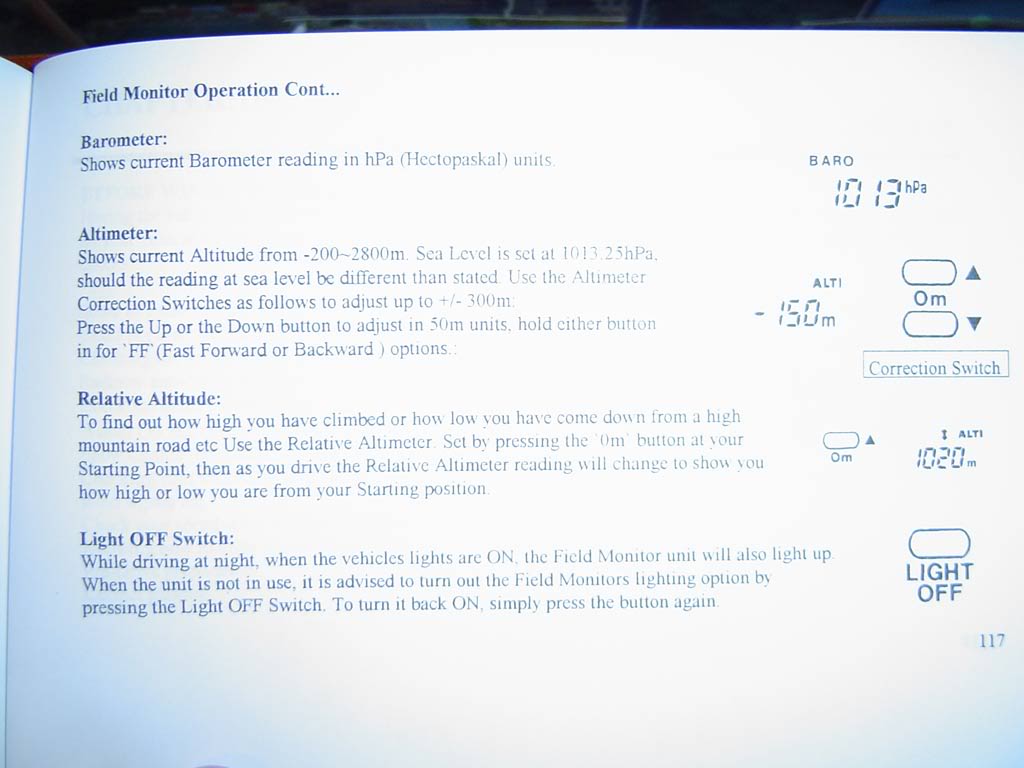
Here are some pics from a Surf manual showing how to operate the field monitor:
From what member RoySharif stated in a previous thread on this subject:
This one is the basic Field Monitor, which is an option on the N185 Hilux Surfs (3rd gens). Another option is the GPS Field Monitor. This one incorporates a small trip computer and is programmable. It can also be linked to a GPS device although individually, it has GPS capability for a limited number of functions.
Unfortunately, this model will not work properly in the United States because it?s made to work in only specific countries. At least this is what others who have these monitors have told me. Here are a few pictures of one of these GPS Field Monitors:
Anyway, just thought I?d post up what I?ve been playing around with for the past couple of weeks or so. A big thanks goes to Midiwall and Soljah for all the help and knowledge of electrical work they both provided! I know they were getting tired of my constant emails.
Thanks again guys!
**
Last edited by Rock Slide; 08-16-2017 at 05:49 PM. Reason: Had to add picture

The following users liked this post:
old87yota (09-03-2023)
09-07-2006, 01:55 PM
#2
Registered User
Join Date: Jun 2006
Location: Nevada
Posts: 77
Likes: 0
Received 0 Likes
on
0 Posts
That's very cool. So much better than the aftermarket temp gauges and compass units that can be added on. I'd be interested in finding one of these and putting it in based on the writeup  .
.
.

 09-08-2006, 05:37 AM
#7
Originally posted by Jason B
Looks great. Is there a way to get the outside temp to show in F?
Looks great. Is there a way to get the outside temp to show in F?
Since it was designed to read C, I don't how difficult, if at all, it would be to convert it to read F.
With that being said, I've been doing like others have and converting it in my head! (C x 2) + 30 = F.
Originally posted by uberhahn
There was a compass style on ebay some months ago...I think it went for over $600... cool, but not that cool. good you got from a friend. me likey. I'd love to get a GPS one
There was a compass style on ebay some months ago...I think it went for over $600... cool, but not that cool. good you got from a friend. me likey. I'd love to get a GPS one
Another guy I talked to said he and a buddy were able to get there hands on one of these GPS units, but when they tried to install it, it still didn't work in Britian. He said the units are not linked to road maps, but rather waypoints and therefore only work properly in the country they were designed to work in.
Originally posted by lee
nice that looks pretty cool
what was this originally available for / where?
nice that looks pretty cool
what was this originally available for / where?
This is where it gets tricky. To my understanding, they were only available on 3rd Gen Hilux Surfs as an option. Or if you got what's considered a limited Surf (not sure what they designate as a limited Surf), I believe they came standard. As far as the GPS units, not sure what Surfs got those.
I began to think only Surfs got these units, but a guy in London has a '96 4Runner and he said he�s got the same field monitor as I do in his 4Runner standard. Go figure? So it appears some 4Runners get them as an option as well.
Now as far as what country or area they were sold in Surfs/4Runners is just as tricky. I know for a fact U.S. 4Runners were never offered a field monitor as an option, nor can you just walk into any toyota dealer and ask for one. They'll look at you like you're speaking a foreign language. Most of the dealers I asked thought I was asking for some part in the engine??
Someone correct me if I'm wrong, but I don't believe Canadian Surfs/4Runners or South American Surfs/4Runners were given a field monitor as an option either.
I know Japanese and New Zealand Surfs either came w/ them standard or as an option. I've even heard a few Aussie Surfs have them standard as well. Either way, it seems they were only placed in Surfs/4Runners located in the Eastern Continents of the World. Who knows what Toyota's reasoning was behind this?
Trending Topics
09-08-2006, 07:20 AM
#8
Registered User

rock slide,
freakin' fantastic work!!! would you mind if i added this to the tech section? i will need to copy the images with your permission too.
thanks,
bob
freakin' fantastic work!!! would you mind if i added this to the tech section? i will need to copy the images with your permission too.
thanks,
bob
09-08-2006, 07:58 AM
#9
Originally posted by Bob_98SR5
rock slide,
freakin' fantastic work!!! would you mind if i added this to the tech section? i will need to copy the images with your permission too.
thanks,
bob
rock slide,
freakin' fantastic work!!! would you mind if i added this to the tech section? i will need to copy the images with your permission too.
thanks,
bob
By all means, put it in the tech section...and yes, you have my permission to copy the pics.
If possible, please add my responses to the 3 comments above as well b/c they were very good questions that I did not state in the initial write-up.
Thanks
 09-09-2006, 03:37 AM
#13
Registered User
Join Date: Oct 2004
Location: Montreal, QC, Canada
Posts: 49
Likes: 0
Received 0 Likes
on
0 Posts
I would love to get one as well, if someone gets a lead for a beige color one let me know, that would be so sweet.
Does someone have some part #'s, maybe get someone in japan to order a couple from a dealer? I may have a buddie posted there soon.
Does someone have some part #'s, maybe get someone in japan to order a couple from a dealer? I may have a buddie posted there soon.
09-09-2006, 11:10 AM
#14
Registered User
Hey Jason...
I pulled mine apart before the install and I had some ideas but never tried 'em out. There's nothing "stock" on the unit that would let you do it, either from the front panel or inside. But... There are two empty switch pads on the board that must be for some option, possibly a C/F switch. One of these days I just have to try it out.
My ultimate thought was to replace the chip with a over-the-counter part that will support C/F. That's not the easiest thing to do though in terms of driving the LCD display, and it would still leave you with metric pressure and altitude.
In the end... (C x 2) + 30 rulez.
09-09-2006, 02:08 PM
#16
Originally posted by fireteacher
i would deff be interested in a new one, i cant find one used and sure as "bleep" am not paying 600 for one!
i would deff be interested in a new one, i cant find one used and sure as "bleep" am not paying 600 for one!
I saw one on Ebay go for under $200 before...so you just have to be on the lookout for them.
Last edited by Rock Slide; 09-11-2006 at 05:00 AM.
09-09-2006, 03:42 PM
#18
Contributing Member
Join Date: Mar 2003
Location: COTKU,Ontario,Canada
Posts: 11,334
Likes: 0
Received 0 Likes
on
0 Posts
Very interesting... personally i'd like to change the altimeter to feet from meters and the barometer to inches of mercury from hectopascals... btu I can use my aviation computer if I have to... wonder if those unused switch pads would change it to imperial measurements from metric?
aviator
aviator


