Got a little more clearance, Clarence!
 03-19-2007, 12:41 PM
#1
Contributing Member
Thread Starter
Join Date: Dec 2003
Location: Between a rock and a hard place, AZ
Posts: 3,659
Likes: 0
Received 0 Likes
on
0 Posts
Got a little more clearance, Clarence!
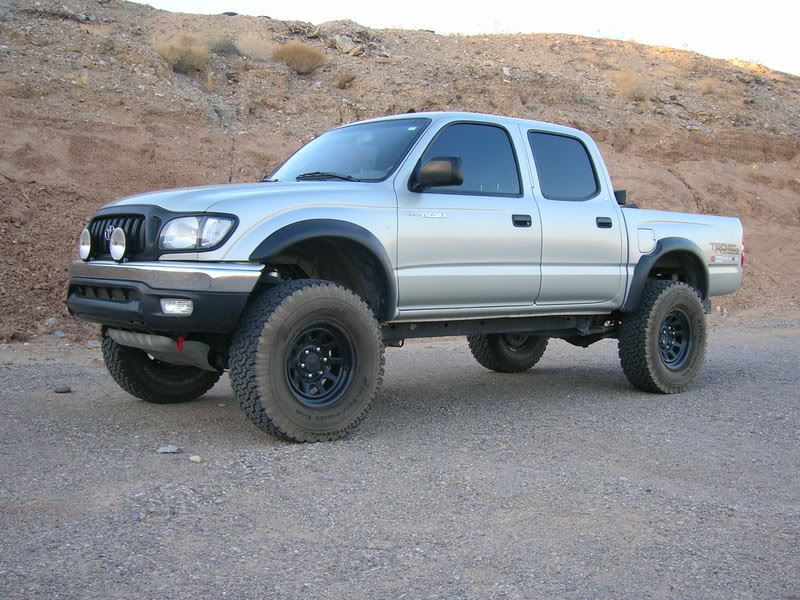
Well, I got my 2" 4Crawler BL installed last weekend. I did it by myself, wasn't TOO hard...  Had to make a few trips to Home Depot for some extra nuts and bolts, but all in all, it was very straightforward. Being that I did by myself, I didn't take pics of the install, but I just followed Roger's notes, anyway. I really like it, and other than a couple of minor adjustment issues left to resolve (AT linkage and gas lines), she's good. I'll be taking it out on the 31st for a real trail run, so we'll see how the extra clearance works out. I drove to Tuscon and back this week, and didn't notice any real change in handling even at highway speeds.
I wanna thank Ryan (Tanto) for blessing me with a sweet deal, and Roger for making a great product.
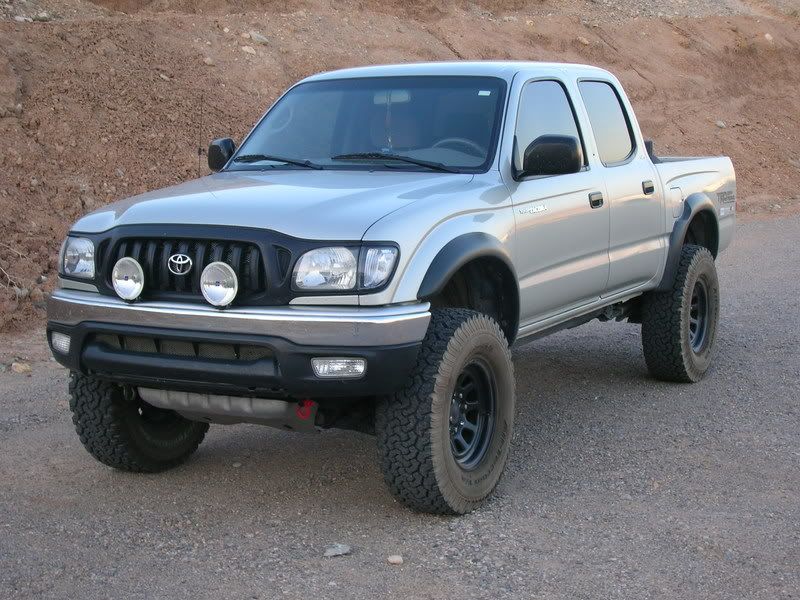
Here's some pics (I know, I know the trucks dirty, but it ain't no street queen, ok?)
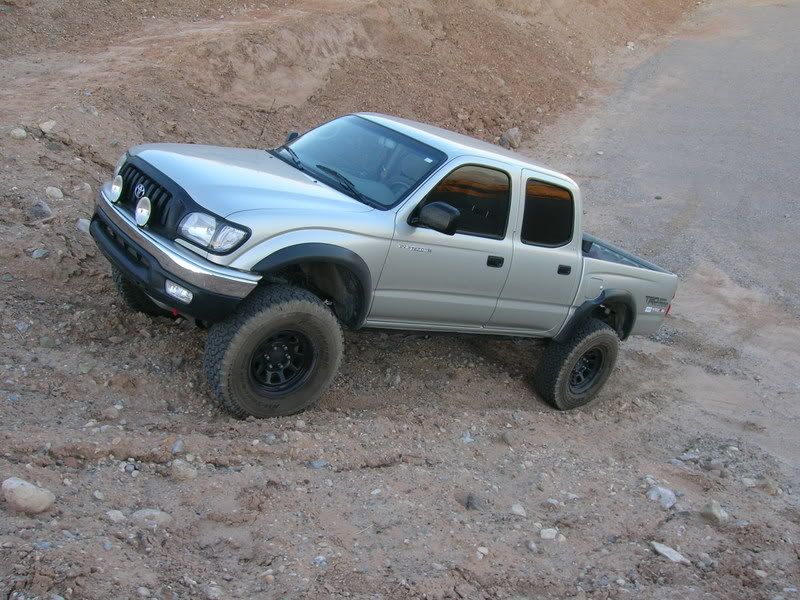
Screwing around on a hill near the church:


Oh yeah, and I got the go ahead from me wifey to get some sliders as soon as we get the tax return back... WOO HOO!!!
Had to make a few trips to Home Depot for some extra nuts and bolts, but all in all, it was very straightforward. Being that I did by myself, I didn't take pics of the install, but I just followed Roger's notes, anyway. I really like it, and other than a couple of minor adjustment issues left to resolve (AT linkage and gas lines), she's good. I'll be taking it out on the 31st for a real trail run, so we'll see how the extra clearance works out. I drove to Tuscon and back this week, and didn't notice any real change in handling even at highway speeds. I wanna thank Ryan (Tanto) for blessing me with a sweet deal, and Roger for making a great product.
Here's some pics (I know, I know the trucks dirty, but it ain't no street queen, ok?)
Screwing around on a hill near the church:
Oh yeah, and I got the go ahead from me wifey to get some sliders as soon as we get the tax return back... WOO HOO!!!
 03-19-2007, 12:48 PM
#2
Registered User
Join Date: Aug 2005
Location: Spencer, Iowa
Posts: 887
Likes: 0
Received 0 Likes
on
0 Posts
Looking good! Surprising how much lift 2" really is! So, let me get this straight: you're getting a tax refund AND the wifey will let you spend it on off road toys??? You are ONE LUCKY MAN!!! I ain't got either, LOL.
03-19-2007, 01:02 PM
#3
Registered User

Join Date: Oct 2006
Location: NorthWest NJ
Posts: 1,589
Likes: 0
Received 0 Likes
on
0 Posts
truck looks prime...and that body lift makes it that much better. good work....and what the hell are you talking about with dirty...mine is way dirtier then that all the time!
03-19-2007, 01:03 PM
#4
Registered User
Join Date: Mar 2006
Location: Lake Stevens, Washington
Posts: 586
Likes: 0
Received 0 Likes
on
0 Posts
WOW...your Taco looks SWEET! are the bumper's for your rig attached to the frame? I nothiced there wasn't any gap..the reason I ask is that I'm gonna do the same 4crawler bl lift later this month and on the 3rd gens it leaves a noticeable gap on the bumper and body. Did it mess with your center of gravity..you said it ran fine on the freeway? Thanks James
03-19-2007, 01:06 PM
#5
Contributing Member
Join Date: Jun 2006
Posts: 4,047
Likes: 0
Received 0 Likes
on
0 Posts
Looks great CJ!! Absolutely beautiful. What all do you have to extend/fab up when doing a BL as far as steering, and electrical wiring, and plumbing, things of that nature, I saw you mentioned the AT Linkage, what are you gonna do with that?

Trending Topics
03-19-2007, 04:23 PM
#8
Contributing Member
Thread Starter
Join Date: Dec 2003
Location: Between a rock and a hard place, AZ
Posts: 3,659
Likes: 0
Received 0 Likes
on
0 Posts
WOW...your Taco looks SWEET! are the bumper's for your rig attached to the frame? I nothiced there wasn't any gap..the reason I ask is that I'm gonna do the same 4crawler bl lift later this month and on the 3rd gens it leaves a noticeable gap on the bumper and body. Did it mess with your center of gravity..you said it ran fine on the freeway? Thanks James

As far as the bumper goes, Ryan didn't have the bumper brackets that you can get from Roger, but after looking at Roger's site, I just made some from some flat steel stock I had. I'll get some pics of what I did in the next few days...
If you get the bumper brackets from Roger, you'll be golden.
03-19-2007, 04:28 PM
#9
Contributing Member
Thread Starter
Join Date: Dec 2003
Location: Between a rock and a hard place, AZ
Posts: 3,659
Likes: 0
Received 0 Likes
on
0 Posts
03-19-2007, 04:29 PM
#10
Contributing Member
Thread Starter
Join Date: Dec 2003
Location: Between a rock and a hard place, AZ
Posts: 3,659
Likes: 0
Received 0 Likes
on
0 Posts
 03-19-2007, 09:02 PM
#13
Registered User
Join Date: Oct 2005
Location: Gilbert, AZ
Posts: 167
Likes: 0
Received 0 Likes
on
0 Posts
Truck looks great CJ! Very nice! 
BTW, did you strip the paint off of your factory skid plate? I've seen a few rigs on Yotatech with what appears to be a bare metal factory skid plate. I'm guessing this involves simply removing the factory black paint by brushing on paint stripper? Do tell, beacuse I like it.
BTW, did you strip the paint off of your factory skid plate? I've seen a few rigs on Yotatech with what appears to be a bare metal factory skid plate. I'm guessing this involves simply removing the factory black paint by brushing on paint stripper? Do tell, beacuse I like it.
Last edited by RR DIFF LOCK; 03-19-2007 at 09:04 PM.
03-20-2007, 06:29 PM
#14
Contributing Member
Thread Starter
Join Date: Dec 2003
Location: Between a rock and a hard place, AZ
Posts: 3,659
Likes: 0
Received 0 Likes
on
0 Posts
03-20-2007, 06:31 PM
#15
Contributing Member
Thread Starter
Join Date: Dec 2003
Location: Between a rock and a hard place, AZ
Posts: 3,659
Likes: 0
Received 0 Likes
on
0 Posts
Truck looks great CJ! Very nice!
BTW, did you strip the paint off of your factory skid plate? I've seen a few rigs on Yotatech with what appears to be a bare metal factory skid plate. I'm guessing this involves simply removing the factory black paint by brushing on paint stripper? Do tell, beacuse I like it.
BTW, did you strip the paint off of your factory skid plate? I've seen a few rigs on Yotatech with what appears to be a bare metal factory skid plate. I'm guessing this involves simply removing the factory black paint by brushing on paint stripper? Do tell, beacuse I like it.
For the skid, I just did a little sanding, priming, and used Krylon Aluminum colored paint. A few coats, and it was good. I just touch it up periodically...
03-21-2007, 11:07 AM
#18
Contributing Member
Join Date: Oct 2005
Location: Smoky San Diego
Posts: 2,346
Likes: 0
Received 0 Likes
on
0 Posts
CJ, all you have to do is put the tranny in park, remove the nut on the linkage and put the shifter into Park again, reattach the nut and linkage and that's it.
Yeah, I forgot to take the front bumper bracket off my bumper before I threw it out and I never raised my rear bumper....at the time I thought that a new rear bumper was going to be in my near future but that obviously never happened LOL
Yeah, I forgot to take the front bumper bracket off my bumper before I threw it out and I never raised my rear bumper....at the time I thought that a new rear bumper was going to be in my near future but that obviously never happened LOL
03-21-2007, 11:34 AM
#19
Registered User
Join Date: Jan 2005
Location: Vancouver, British Columbia
Posts: 575
Likes: 0
Received 0 Likes
on
0 Posts
Nice job on the install bro!! Looks good!!
I'll be doing a 1.5" BL on my Runner in the next couple months, Just saving up for the Poly replacement Body mount bushings (so I can do both at once)
I'll be doing a 1.5" BL on my Runner in the next couple months, Just saving up for the Poly replacement Body mount bushings (so I can do both at once)
03-21-2007, 11:44 AM
#20
Contributing Member
Thread Starter
Join Date: Dec 2003
Location: Between a rock and a hard place, AZ
Posts: 3,659
Likes: 0
Received 0 Likes
on
0 Posts
Thanks, man! That would be the best, doing both at the same time. It's not really hard, it's just time consuming loosening all the hardware and then getting it all dialed again. The hardest part was getting the old hardware off. Mine's only been on there for 4 years, and I live in the desert (very little moisture). Roger recommends soaking all the bolts with a lubricant for a few days prior to install. Lining up the bed and the cab was a little interesting, but again, not too huge of an issue. All in all, it want pretty well and straightforward. Making the bumper brackets took the most time out of everything.


