99 4runner Limited Aux Fuse Block install
 04-01-2013, 09:59 AM
#1
Registered User
Thread Starter

Join Date: Feb 2012
Location: Ellensburg, WA
Posts: 22
Likes: 0
Received 0 Likes
on
0 Posts
99 4runner Limited Aux Fuse Block install
Well thanks to the advice on yotatech, I was able to finish up my fuse block install. If you want to see my idiot questions, the initial query is located here:
https://www.yotatech.com/forums/f131...-block-264922/
If you end up with a 3rd Gen limited, there is very little working room under the hood, and I didn't want the block in the cab (longer power wires/heavier guage etc).
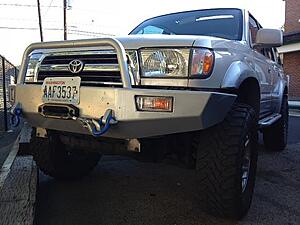
First of all, My rig:

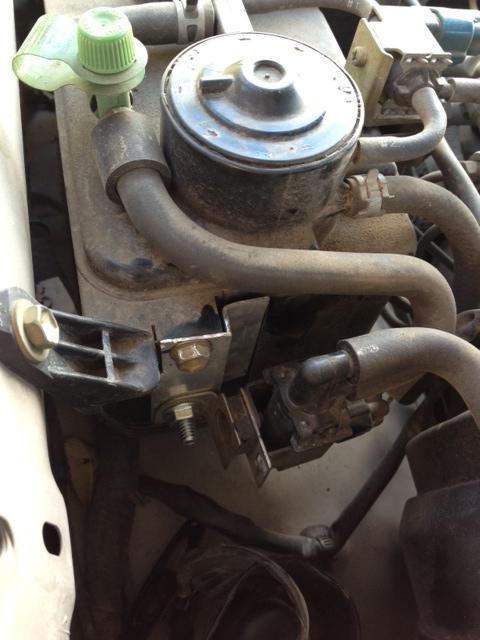
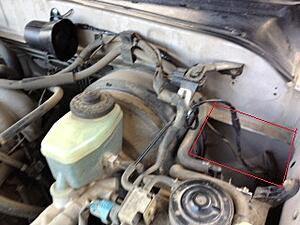
And the available space I have to fit in a fuse block, you can see I all ready relocated the alarm horn:

So, first things first, I need to modify a few minor things to free up some room. Fab up a quicky bracket to drop these lines a few inches. A Vice and a BFH made quick work of it.
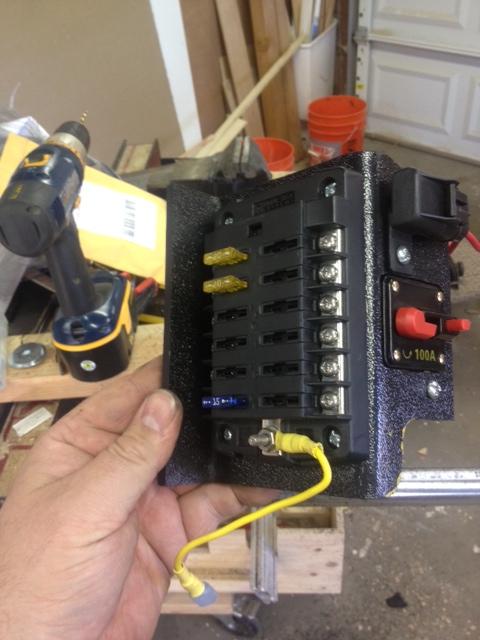
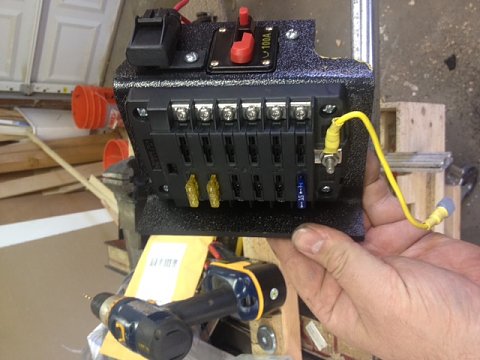
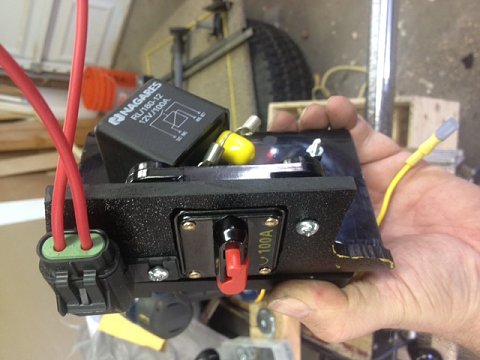
Next, I picked up some puckboard (thats High Density Polyethelyne sheeting to you Americans) and fabbed up a mount for the FuseBlock, Relay, fuse, and Circuit Breaker. For anyone who has not discovered the wonders of puckboard, it is pretty awesome. A heatgun and a dremel tool made short work of this. Incidently, the yellow wire is just left over from testing, All the power wires are 8 guage.
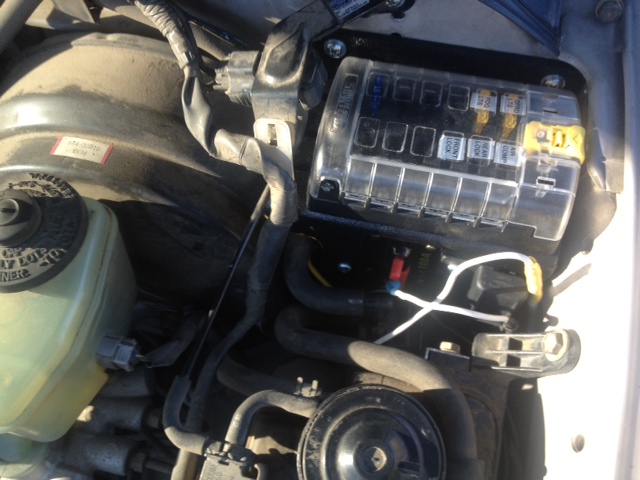
And Installed:
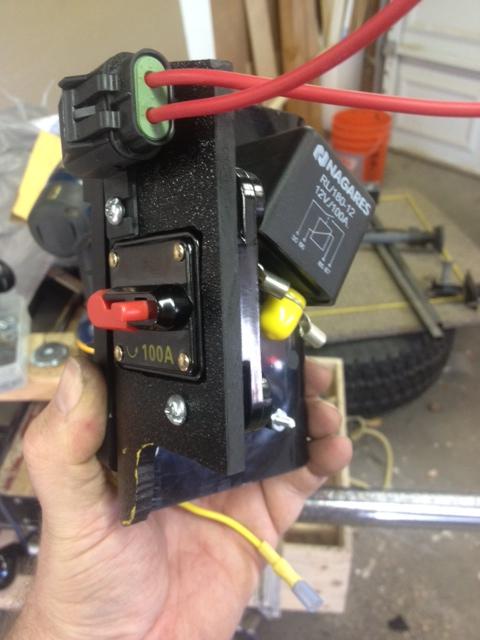
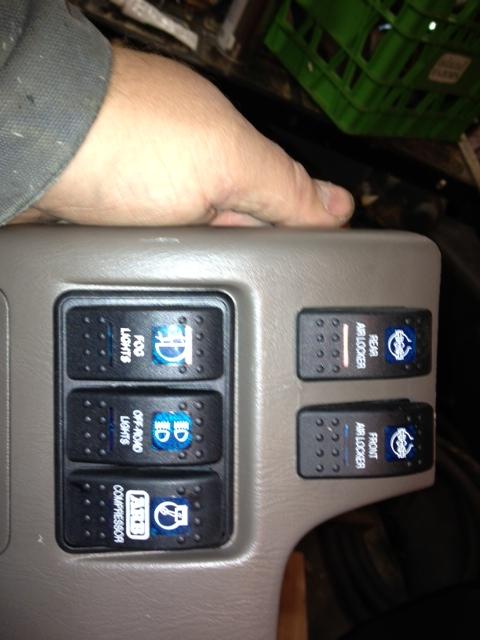
All so I could do this:
Just have to connect the few wires, and good to go.
https://www.yotatech.com/forums/f131...-block-264922/
If you end up with a 3rd Gen limited, there is very little working room under the hood, and I didn't want the block in the cab (longer power wires/heavier guage etc).
First of all, My rig:
And the available space I have to fit in a fuse block, you can see I all ready relocated the alarm horn:
So, first things first, I need to modify a few minor things to free up some room. Fab up a quicky bracket to drop these lines a few inches. A Vice and a BFH made quick work of it.
Next, I picked up some puckboard (thats High Density Polyethelyne sheeting to you Americans) and fabbed up a mount for the FuseBlock, Relay, fuse, and Circuit Breaker. For anyone who has not discovered the wonders of puckboard, it is pretty awesome. A heatgun and a dremel tool made short work of this. Incidently, the yellow wire is just left over from testing, All the power wires are 8 guage.
And Installed:
All so I could do this:
Just have to connect the few wires, and good to go.
Last edited by summerprophet; 04-05-2013 at 07:17 PM.
 04-03-2013, 04:28 PM
#5
The images aren't showing up.
I think they're being hosted by expeditionportal.com and because you have to login to see images hosted, they won't show up.
Upload them to imgur.com or imageshack.us or something similar and use the easy forum links to post images in the forum.
Edit: Here, I just took care of it. Here's the original post, duplicated, but with the pictures:
__________________________________________________ __________________________________________________ _____________________
Well thanks to the advice on yotatech, I was able to finish up my fuse block install. If you want to see my idiot questions, the initial query is located here:
https://www.yotatech.com/forums/f2/9...-block-264922/
If you end up with a 3rd Gen limited, there is very little working room under the hood, and I didn't want the block in the cab (longer power wires/heavier guage etc).
First of all, My rig:
And the available space I have to fit in a fuse block, you can see I all ready relocated the alarm horn:
So, first things first, I need to modify a few minor things to free up some room. Fab up a quicky bracket to drop these lines a few inches. A Vice and a BFH made quick work of it.

Next, I picked up some puckboard (thats High Density Polyethelyne sheeting to you Americans) and fabbed up a mount for the FuseBlock, Relay, fuse, and Circuit Breaker. For anyone who has not discovered the wonders of puckboard, it is pretty awesome. A heatgun and a dremel tool made short work of this. Incidently, the yellow wire is just left over from testing, All the power wires are 8 guage.


And Installed:

All so I could do this:

Just have to connect the few wires, and good to go.
I think they're being hosted by expeditionportal.com and because you have to login to see images hosted, they won't show up.
Upload them to imgur.com or imageshack.us or something similar and use the easy forum links to post images in the forum.
Edit: Here, I just took care of it. Here's the original post, duplicated, but with the pictures:
__________________________________________________ __________________________________________________ _____________________
Well thanks to the advice on yotatech, I was able to finish up my fuse block install. If you want to see my idiot questions, the initial query is located here:
https://www.yotatech.com/forums/f2/9...-block-264922/
If you end up with a 3rd Gen limited, there is very little working room under the hood, and I didn't want the block in the cab (longer power wires/heavier guage etc).
First of all, My rig:

And the available space I have to fit in a fuse block, you can see I all ready relocated the alarm horn:

So, first things first, I need to modify a few minor things to free up some room. Fab up a quicky bracket to drop these lines a few inches. A Vice and a BFH made quick work of it.

Next, I picked up some puckboard (thats High Density Polyethelyne sheeting to you Americans) and fabbed up a mount for the FuseBlock, Relay, fuse, and Circuit Breaker. For anyone who has not discovered the wonders of puckboard, it is pretty awesome. A heatgun and a dremel tool made short work of this. Incidently, the yellow wire is just left over from testing, All the power wires are 8 guage.
And Installed:

All so I could do this:

Just have to connect the few wires, and good to go.
Last edited by 98SR54RUNNER; 04-03-2013 at 04:35 PM.
04-03-2013, 05:01 PM
#7
I can tell you from running a amp wire through the grommet on the firewall under where you mounted your box that area on mine gets a lot of water when it rains. I didn't get the grommet sealed up good and water run into the floor. Of course if may just be bad seals on my cowl letting water into the engine compartment. Just a heads up incase.
Trending Topics
04-10-2013, 12:59 PM
#10
Registered User
Join Date: Feb 2013
Location: Portland OR
Posts: 48
Likes: 0
Received 0 Likes
on
0 Posts
Nice man, looks sharp. I plan on installing mine as soon as I get off my ass and wire my lights up. Side note, I'm looking to fab a bumper very similar to your front. I don't know if you already have a thread up but any info you can share would be GREATLY appreciated(dimensions, weight, metal thickness ect.)
04-10-2013, 01:09 PM
#11
Registered User
Thread Starter
Join Date: Feb 2012
Location: Ellensburg, WA
Posts: 22
Likes: 0
Received 0 Likes
on
0 Posts
Hey Farty,
I don't do fab work near this nice. The front bumper came with the rig (as did the rear, and the sides...) when I bought it.
The bumper was fabbed by Perkins Performance in Seattle, and they used to have a bunch of pics up, but looks like no more. It is all 3/16 steel.
Let me know what you need as far as pics or dimensions and I will see what I can do for you.
04-10-2013, 10:25 PM
#12
Registered User
Join Date: Feb 2013
Location: Portland OR
Posts: 48
Likes: 0
Received 0 Likes
on
0 Posts
Thanks for the reply first of all. In a perfect world id like the measurement of every individual piece of cut plate it was made from so I can make an exact replica, but that takes time and we are all busy people. If I could at least get a pic of your mount and perhaps a measurement of the pentagon on the sides and the stickout from your grill that would help. Looks tough as hell, what do you think it weighs? I don't want to toss on 75+ without a rear to balance it out. thanks again.
04-11-2013, 04:32 PM
#13
Registered User
Thread Starter
Join Date: Feb 2012
Location: Ellensburg, WA
Posts: 22
Likes: 0
Received 0 Likes
on
0 Posts
I will see about some pics and dimensions for you. I have a 1.5" body lift, so take that into consideration when it comes to the mounts.
J.
04-18-2013, 08:44 AM
#14
Registered User
Thread Starter
Join Date: Feb 2012
Location: Ellensburg, WA
Posts: 22
Likes: 0
Received 0 Likes
on
0 Posts
Farty,
Sorry to take so long getting back to ya.
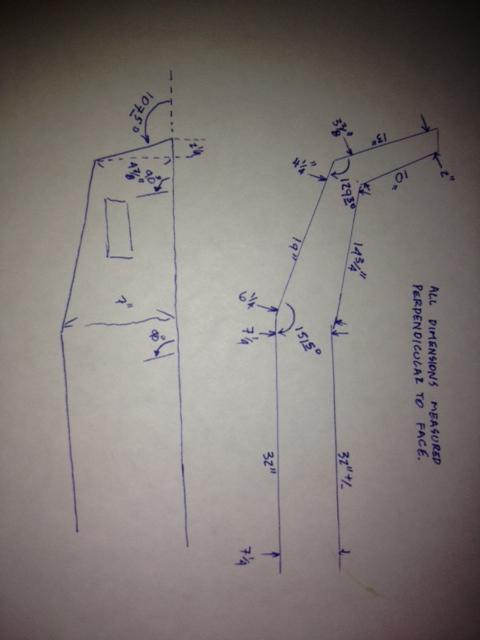
Here is a sketch of the top of the bumper.... should be a good starting point for the frameup.
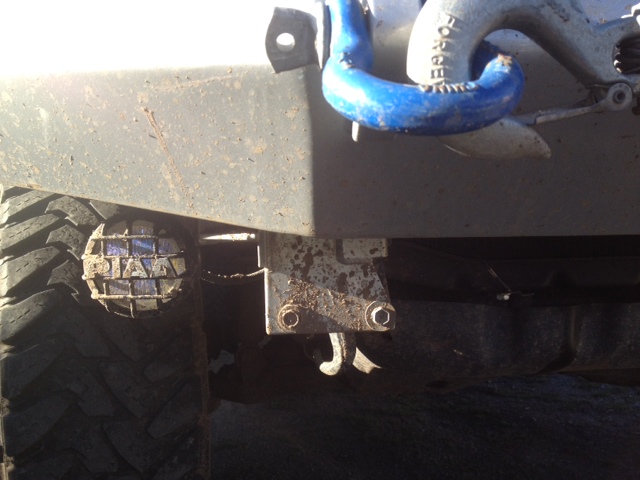
And starting from Passenger side rear:
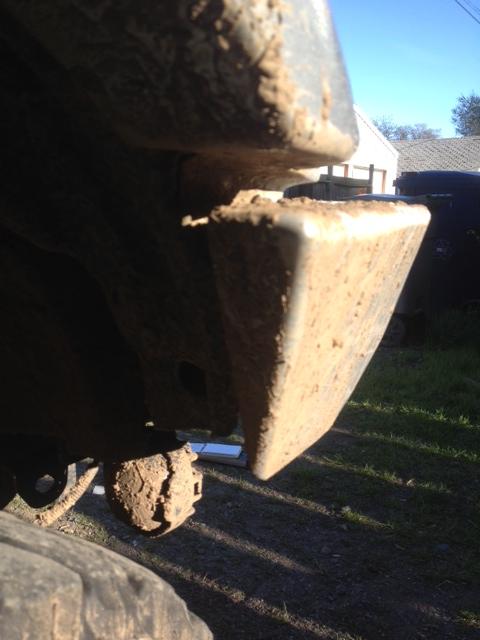

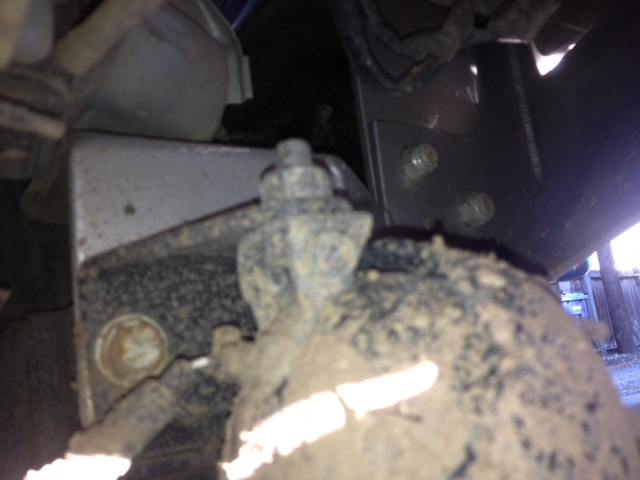
Mount from Pass side looking in. The Fog light mounts utilize the bumper mounts as well, so one of the 2 bolts is hidden by the light.
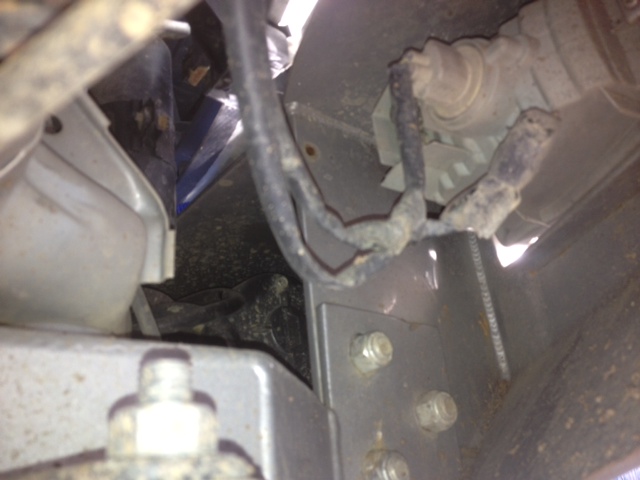
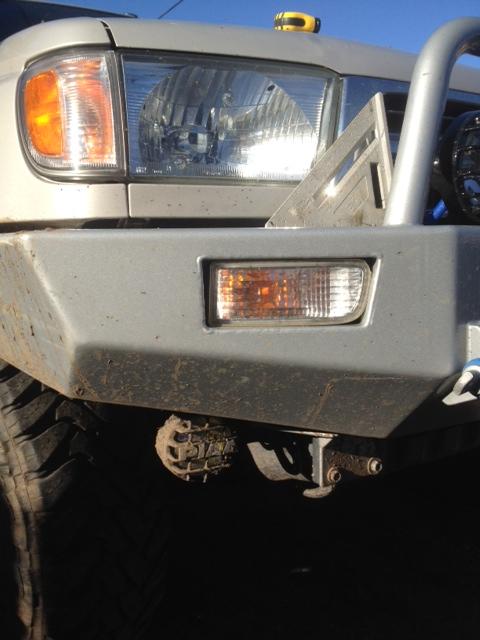
Front Shot of Mount
Inner shot of Pass Side Mount

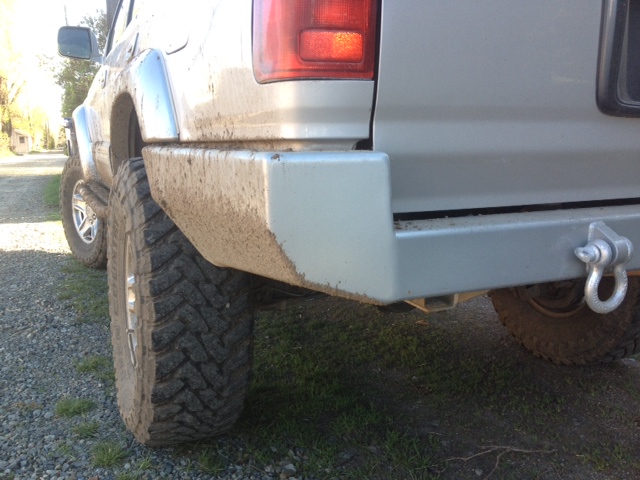
And just for Kicks... the rear
Sorry to take so long getting back to ya.
Here is a sketch of the top of the bumper.... should be a good starting point for the frameup.
And starting from Passenger side rear:
Mount from Pass side looking in. The Fog light mounts utilize the bumper mounts as well, so one of the 2 bolts is hidden by the light.
Front Shot of Mount
Inner shot of Pass Side Mount
And just for Kicks... the rear
Last edited by summerprophet; 04-18-2013 at 08:52 AM.
04-21-2013, 05:00 PM
#15
Registered User
Join Date: Feb 2013
Location: Portland OR
Posts: 48
Likes: 0
Received 0 Likes
on
0 Posts
your the ˟˟˟˟ man! that should do just fine. well done on the drawing btw, very clear and exactly what I was hoping for. thanks a million, I was afraid to be caught measuring some strangers rig in a parking lot and you just saved me that encounter.
 11-10-2013, 05:01 PM
#18
Registered User
Thread Starter
Join Date: Feb 2012
Location: Ellensburg, WA
Posts: 22
Likes: 0
Received 0 Likes
on
0 Posts

Thread
Thread Starter
Forum
Replies
Last Post
RedRunner_87
95.5-2004 Tacomas & 96-2002 4Runners (Build-Up Section)
84
06-01-2021 01:51 PM
Jnkml
95.5-2004 Tacomas & 96-2002 4Runners
3
07-06-2015 01:20 PM


