5vzfe leaky valve covers fixed (56k beware)
 07-16-2008, 09:00 AM
#1
Registered User
Thread Starter

Join Date: Jan 2004
Posts: 234
Likes: 0
Received 0 Likes
on
0 Posts
5vzfe leaky valve covers fixed (56k beware)
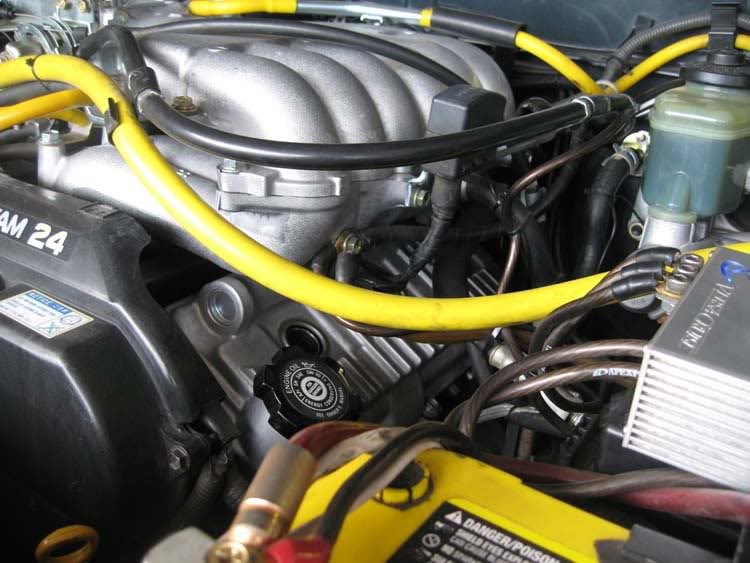
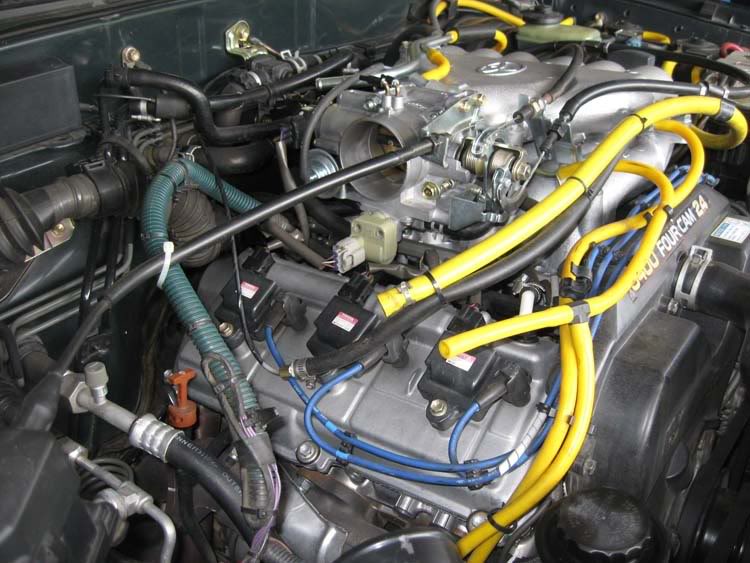
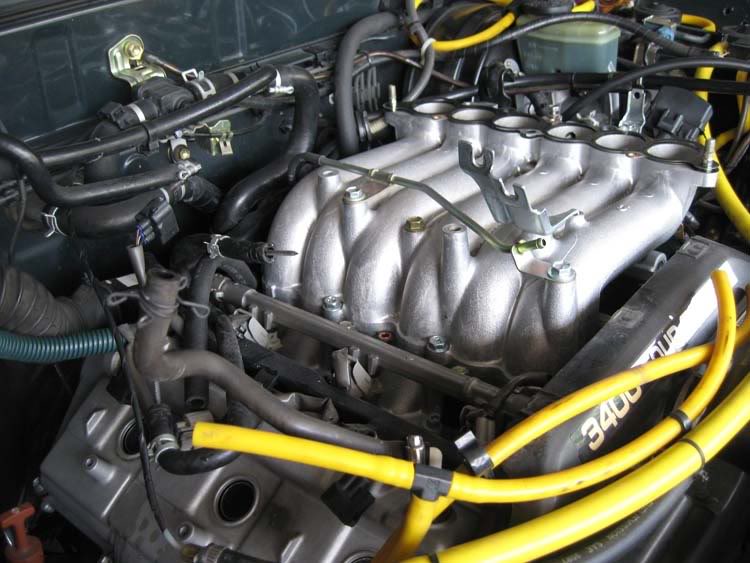
Finally got some time this past weekend to tackle this overdue project. Fixed the leaky valve covers and vacuum hoses with some additional touches thanks to callmej75.
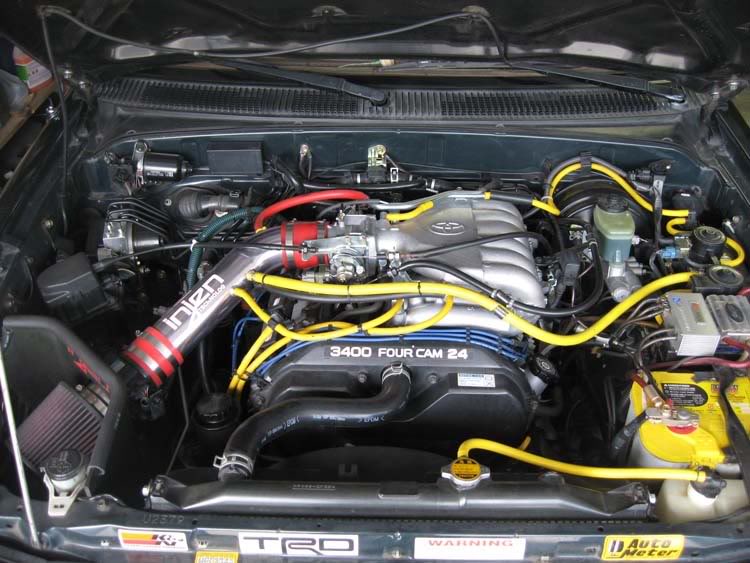
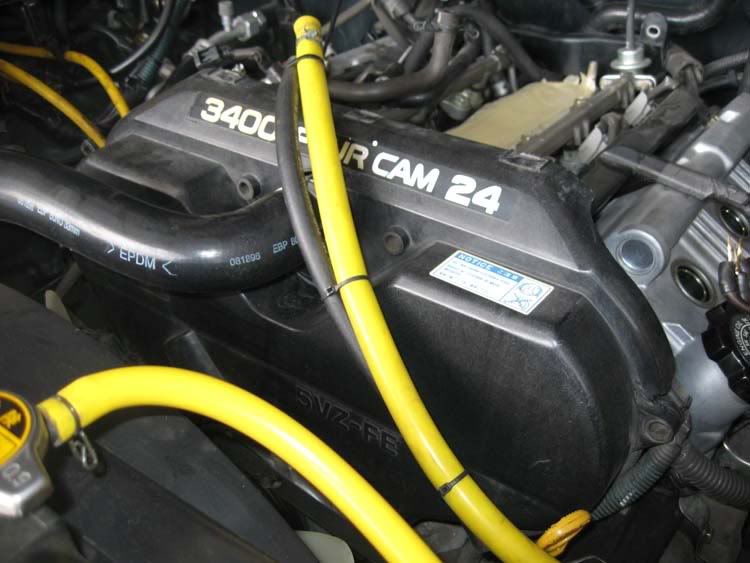
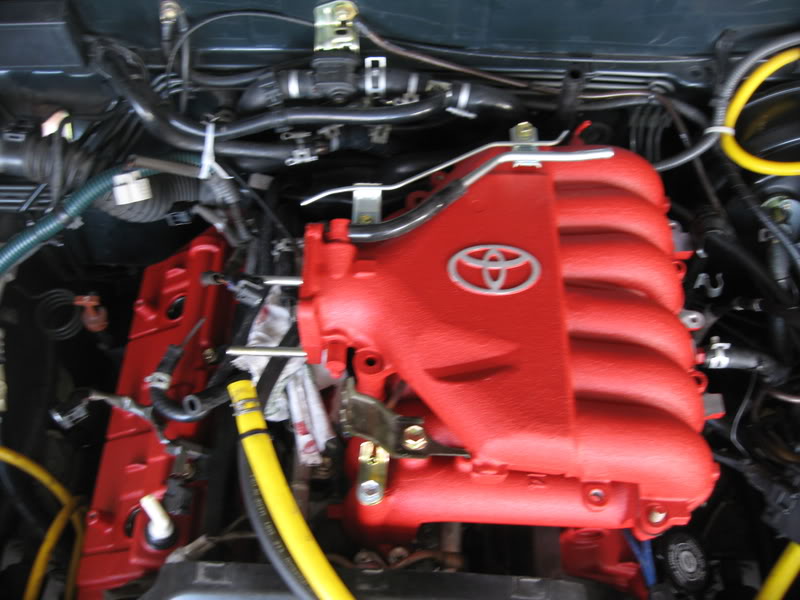
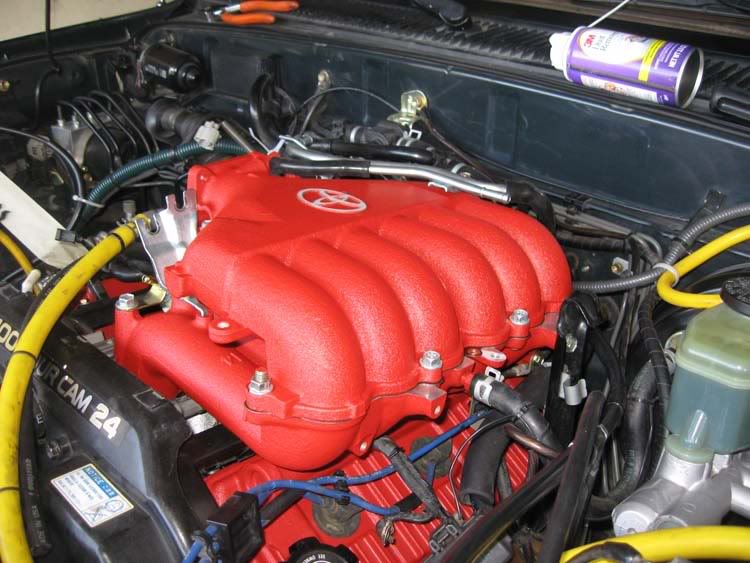
Before
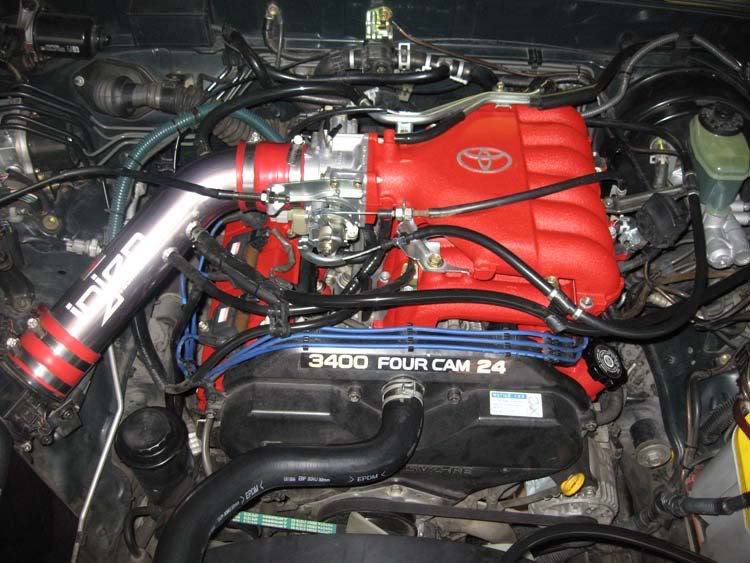
After
Brief step by step :
:
Remove the air intake
Unbolt the 3 10mm bolts holding the spark distributors and remove the spark plug wires
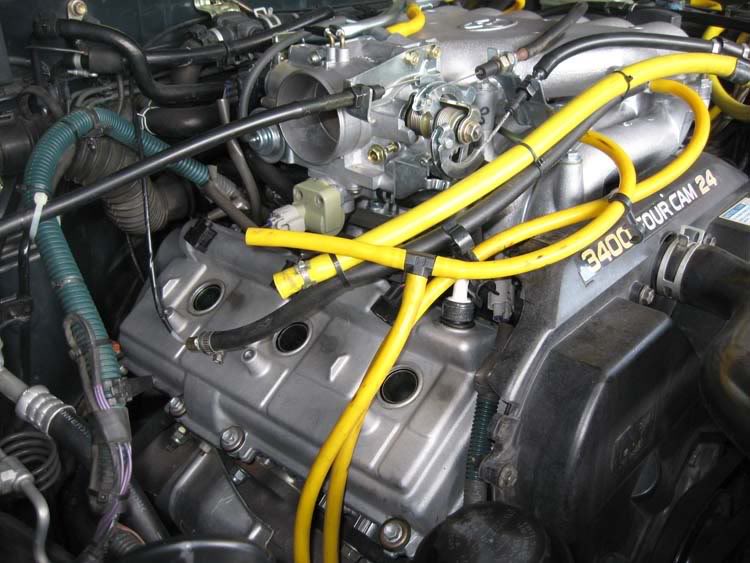
Remove the cruise control cable, throttle body cable, and the transmission kick-down cable
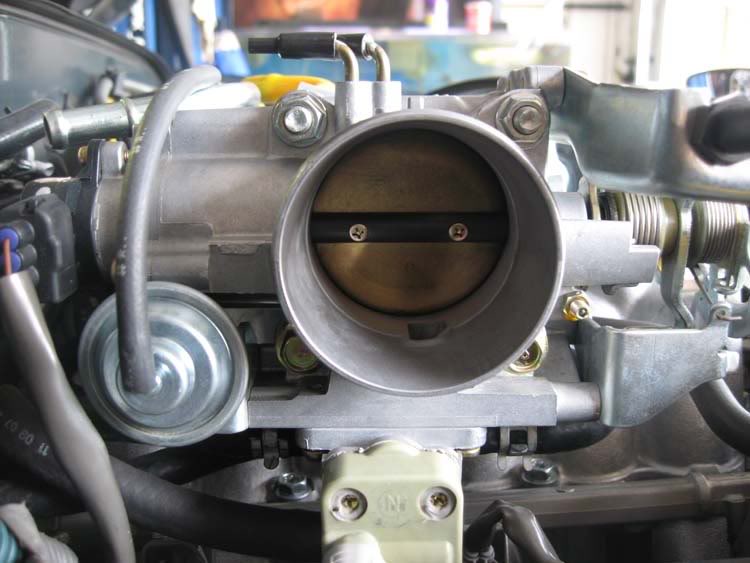
Unbolt the 2 12mm bolts and 2 12mm nuts holding the throttle body. You will also need to unplug 3 hoses that under the throttle body and plug two of them as they will star leaking coolant....I just used some standard drywall screws
Throttle body removed
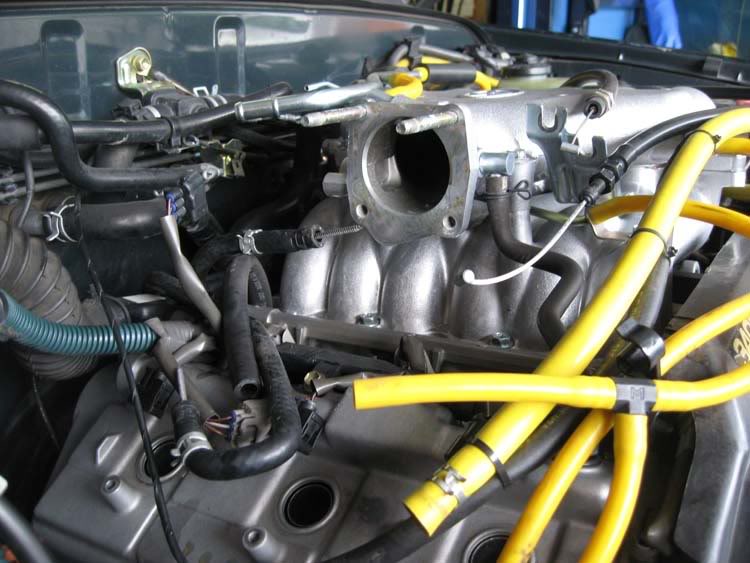
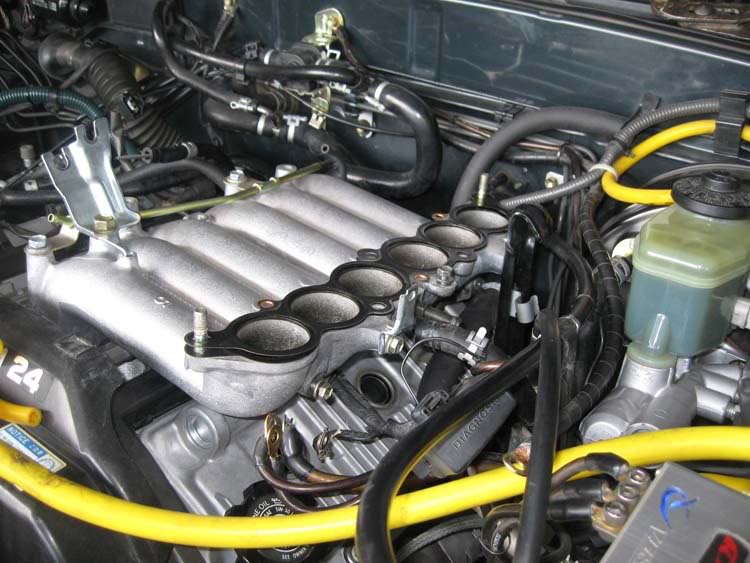
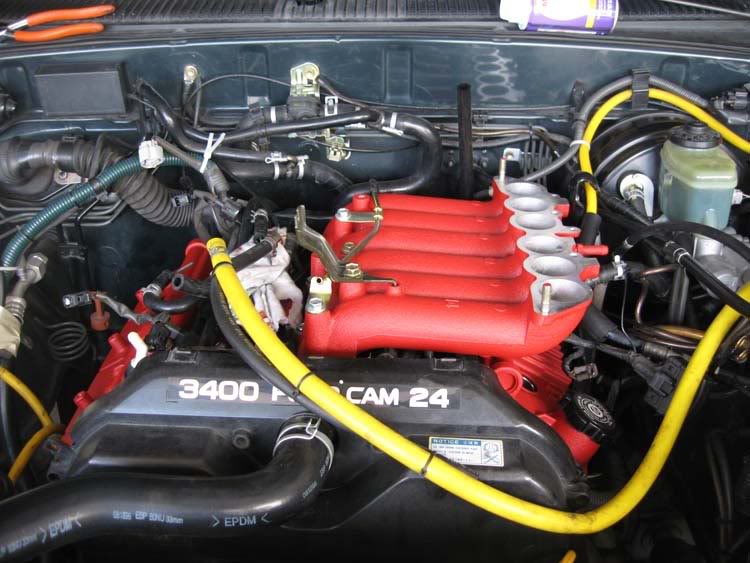
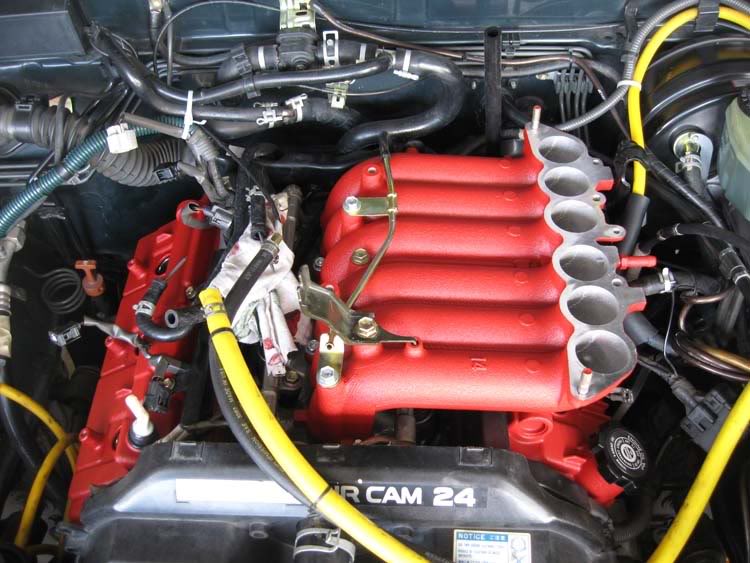
Remove the 12mm bolts and nuts to the upper intake plenum
More 12mm nuts and bolts on the lower plenum
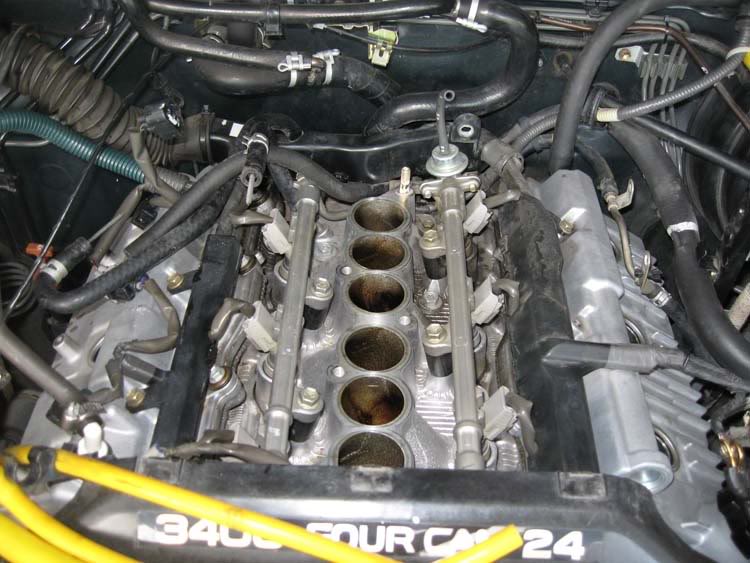
Once you have the lower plenum off, you will need to tape the manifold to prevent dirt and tools from falling in.
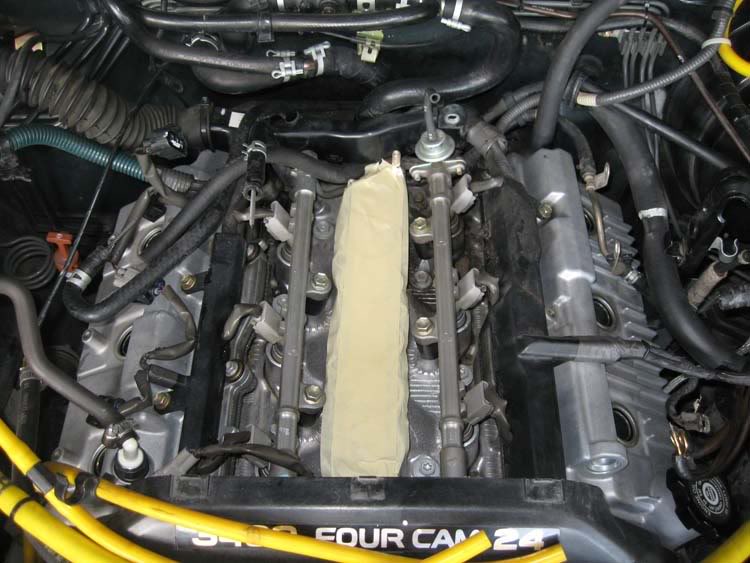
Nicely taped off.
Removed the bolts holding the cam cover for some additonal clearance for the valve covers.
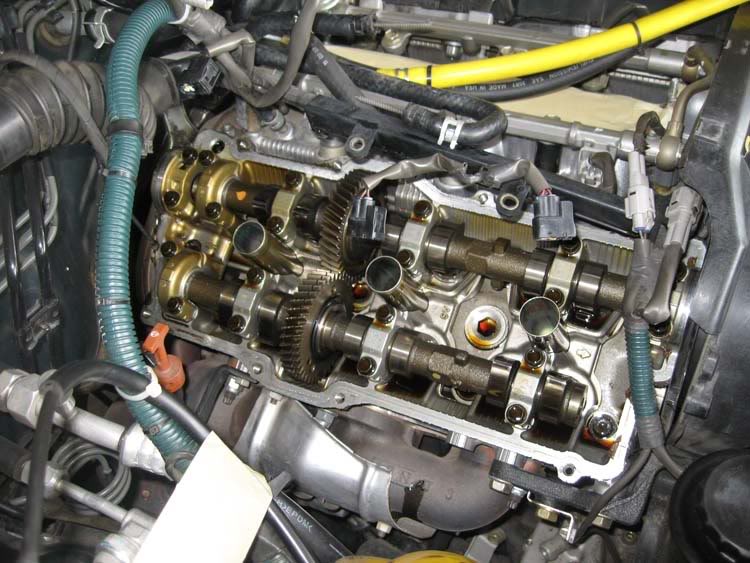
Unbolted the 8 10mm bolts and removed the passenger side valve covers....Pretty darn clean considering it as 135,000 miles on it
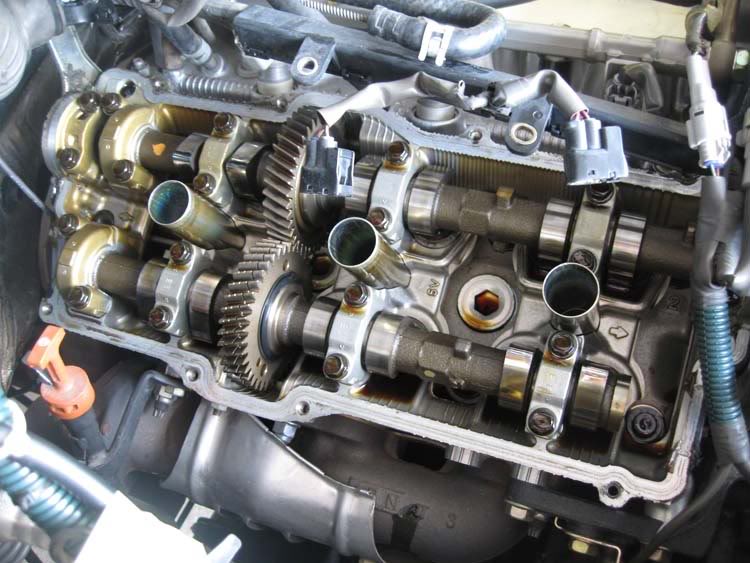
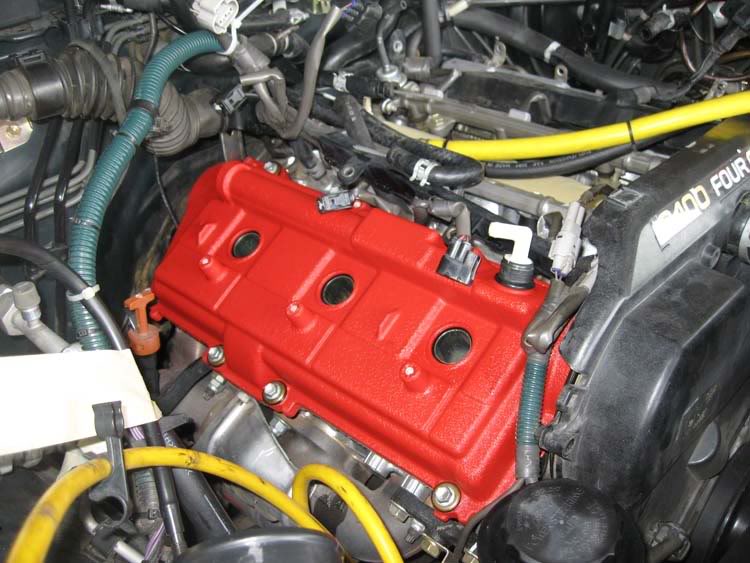
Replace the gaskets, apply some silicone on the halfmoons and bolt it back up
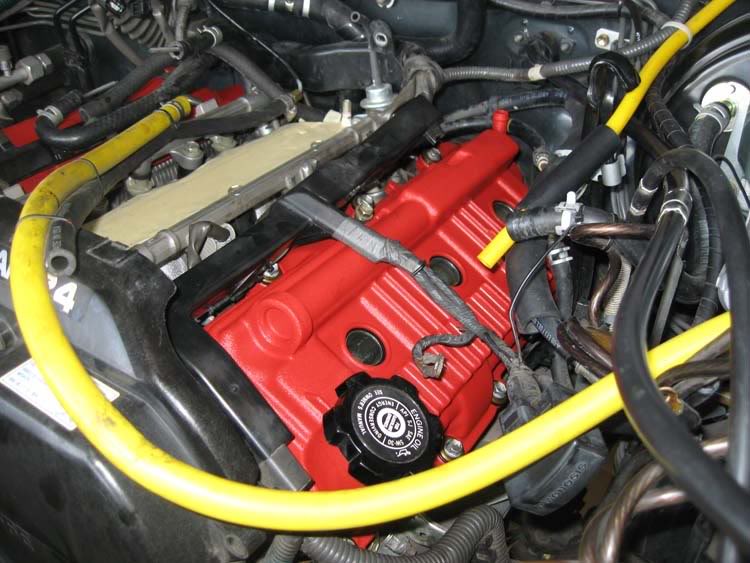
Repeat for the driver side
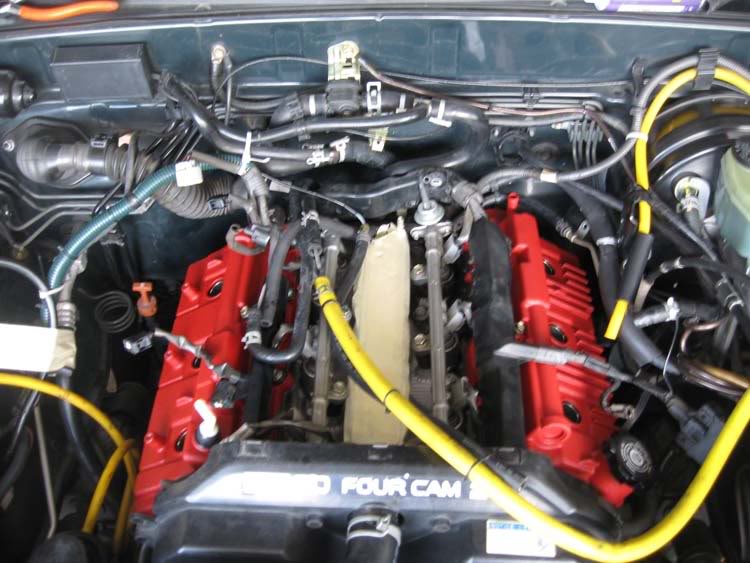
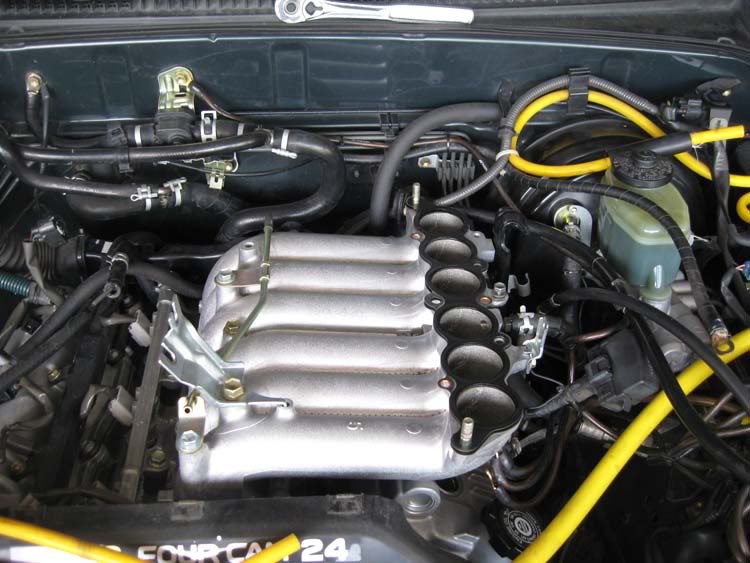
Both vavle covers done
Bolt back the lower intake plenum...don't forget to remove the tape.
Plug back some of the vacuum hoses and attachments
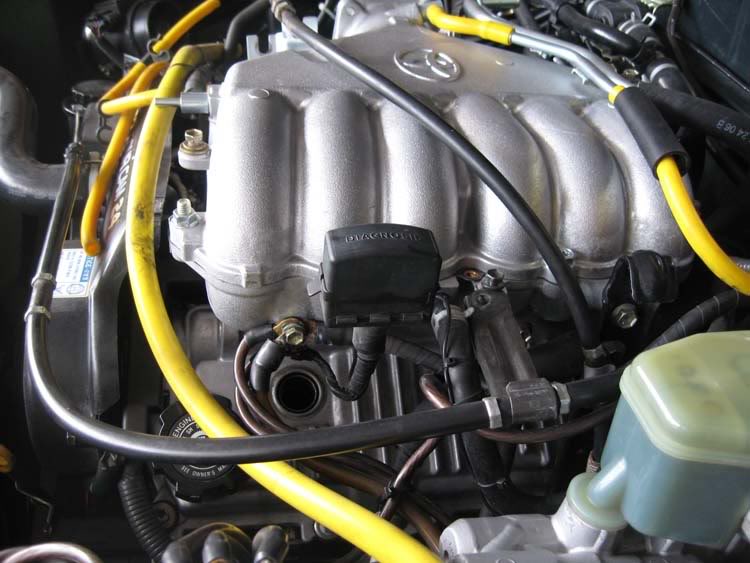
Bolt back the upper intake plenum
More vacuum hoses, diagnostic box, ground cables
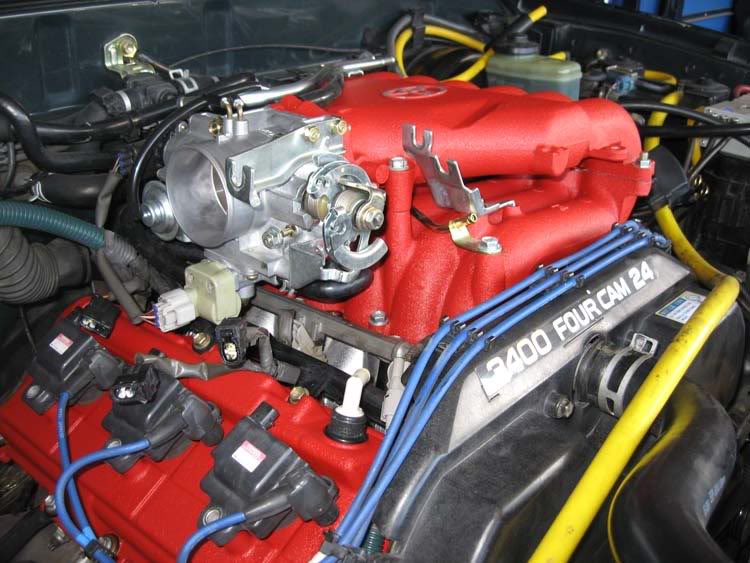
Spark plug wires and distributors plugged back in.
Before
After
Brief step by step
:Remove the air intake
Unbolt the 3 10mm bolts holding the spark distributors and remove the spark plug wires
Remove the cruise control cable, throttle body cable, and the transmission kick-down cable
Unbolt the 2 12mm bolts and 2 12mm nuts holding the throttle body. You will also need to unplug 3 hoses that under the throttle body and plug two of them as they will star leaking coolant....I just used some standard drywall screws
Throttle body removed
Remove the 12mm bolts and nuts to the upper intake plenum
More 12mm nuts and bolts on the lower plenum
Once you have the lower plenum off, you will need to tape the manifold to prevent dirt and tools from falling in.
Nicely taped off.
Removed the bolts holding the cam cover for some additonal clearance for the valve covers.
Unbolted the 8 10mm bolts and removed the passenger side valve covers....Pretty darn clean considering it as 135,000 miles on it
Replace the gaskets, apply some silicone on the halfmoons and bolt it back up
Repeat for the driver side
Both vavle covers done
Bolt back the lower intake plenum...don't forget to remove the tape.
Plug back some of the vacuum hoses and attachments
Bolt back the upper intake plenum
More vacuum hoses, diagnostic box, ground cables
Spark plug wires and distributors plugged back in.
 07-16-2008, 09:41 AM
#5
Registered User
Join Date: Feb 2008
Location: Spokane, WA
Posts: 190
Likes: 0
Received 0 Likes
on
0 Posts
ya what kind of paint?
and dang that looks good!
opps never mind......
Looks SWEET!!!!
and I like the black hoses better then those yellow ones, looks cleaner!
and dang that looks good!
opps never mind......
Looks SWEET!!!!
and I like the black hoses better then those yellow ones, looks cleaner!
Last edited by 4x4phil; 07-16-2008 at 09:42 AM.
01-18-2010, 05:44 AM
#7
Registered User

Join Date: Jan 2010
Posts: 10
Likes: 0
Received 0 Likes
on
0 Posts
Thank For This Thread
To iceman601 and related threads:
Doing this to a stock 96 4Runner (In Laws Vehicle) as of January of 2010.
Started when a Prompto garage noticed a severe leak by passenger side valve cover.
Thanks for taking the time to post this invaluable information, it certainly helped me get over the intimidation factor, and I had a Haynes manual as well.
But...There is nothing like a clear digital picture.
This job, while not impossible, is no picnic, especially with a dirty engine in a cramped, cold garage with a LED work light that keeps falling off the "magnetic" base.
As I write this, I am halfway through the rebuild of the upper assembly. (Valve covers on, new spark plug wires and plugs, plenum and wiring and hoses have to go on.)
Some thoughts:
1) Murphy's Law applies here, I have been set back from everything from the wrong gaskets/parts etc. to having spark plugs and valve cover bolts fall into dark and dirty crevices. If you can, check your parts prior to turning a wrench or ratchet.
2) Spark Plug tube seals cost me time, mostly due to ignorance on my part.
I was never able to get a clear picture of how they went in to the covers, because the old ones were so disintegrated.
I thought I needed gasket material remover, and didn't realize that the outer ring of the seals were NOT part of the valve cover, it is really hard to tell where the valve cover ends and the seal ring begins.
Got them out by using a tiny flat blade screwdriver and gently prying, they pop right out.
I ruined a set by installing the seals in backwards to the cover.
I figured out the correct orientation by slipping the seal down an exposed tube with the valve cover off, one way it glides, the other way it resists. This becomes clear when you test fit.
To put it another way, the convex raised edge of the seal faces you while the concave side faces the cover.
Once I got that figured out, I was still damaging the seals hammering in, even with the metal tab clear of the ring in the valve cover.
This was solved by using a 30MM socket to guide the seals in, this saved hours of time and helps the seal guide in.
Use a piece of wood to keep from damaging the socket and make precise taps, the seals will go in, but too much force and they will break from damage.
See here..
3) COUNT on the plastic electronic wire protectors by the manifold and fuel rail to break in to brittle shards.
If you can unplug the injector wires, great, I didn't want to risk breaking them as they are dry and brittle as well.
You will have to move these wries countless times to get the valve covers in and out.
Instead if re-taping this useless plastic, I simply bought new wire protectors (that flexible, circular stuff with ridges) and covered the wires.
Anyway, thanks again!
(Found out about that trick on another forum..)
Trending Topics
01-18-2010, 08:28 AM
#8
Registered User
Join Date: Aug 2005
Location: Spencer, Iowa
Posts: 887
Likes: 0
Received 0 Likes
on
0 Posts
Nice writeup and thanks for the detailed pics. Knock on wood: luckily, I haven't had problems with my valve covers. On a side note, the motor looks nice with the powder coating, but how do you manage to keep it that clean??
01-18-2010, 01:20 PM
#9
Registered User
Join Date: Jul 2006
Location: Lake Ontario
Posts: 371
Likes: 0
Received 0 Likes
on
0 Posts
The original posting is quite useful! Older , but great, especially seeing how one of my valve covers was rather oily this cold morning! Thanks iceman + samtheman for your feedback.
01-20-2010, 12:58 PM
#11
Registered User
Join Date: Jan 2010
Posts: 10
Likes: 0
Received 0 Likes
on
0 Posts
Update..
Hey Guys:
Speaking of the search function, most information on a Google search overwhelmingly points back to this forum, from there, It was easy to specify using the search function here.
I had the engine all together yesterday, started right up, no leaks.
This engine had no functional PCV valve, now it is pulling well.
Then I noticed that idle was excessively high even after warm up, the throttle body and cables were not sticking.
In Park it was at 2000 cold and 1500 hot, in gear about 1000.
Soon after Check Engine light, the code is for a bad Idle Air Control Valve/Sensor.
It had always idled way too high from a cold start, but this was really bad, roaring like a jet engine.
I took off the throttle body and checked the IAC (it is the original Toyota part, and had run about 210,000 miles) so rather than clean it, I am replacing.
Otherwise, except for the high idle/surging/it ran a LOT smoother, and most importantly, no oil leaks.
Oh, I forgot to mention from above, I used flourescenr green masking tape and sharpie to mark all hoses, (and some screw holes and bolt holes), this was critical in reassembly.
Take the time to mark what you have taken apart, you will not regret the extratime spent!
Also deep cleaned the butterfly and plate, throttle body was FILTHY.
Thanks to you guys again.
01-20-2010, 02:59 PM
#12
Registered User
Join Date: Sep 2009
Location: Sunny San Diego
Posts: 129
Likes: 0
Received 0 Likes
on
0 Posts
Oil Question
Just a quick question for iceman:
What type/brand of oil do you use and your oil change intervals? Your engine is pretty clean compared to my 110k.
If you put valve cover gaskets in the search toolbar, you'll see a picture of my engine.
What type/brand of oil do you use and your oil change intervals? Your engine is pretty clean compared to my 110k.
If you put valve cover gaskets in the search toolbar, you'll see a picture of my engine.
01-20-2010, 03:31 PM
#13
Registered User
Thread Starter
Join Date: Jan 2004
Posts: 234
Likes: 0
Received 0 Likes
on
0 Posts
Its good to know that it helped you guys out . As for the oil, all I use on all my cars is Mobil 1. Oil change intervals are roughly around 5k.
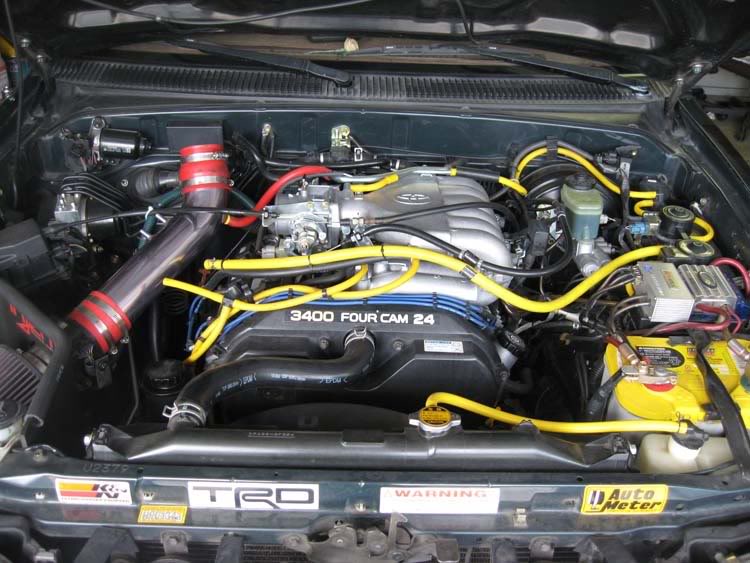
Heres where it sits now:
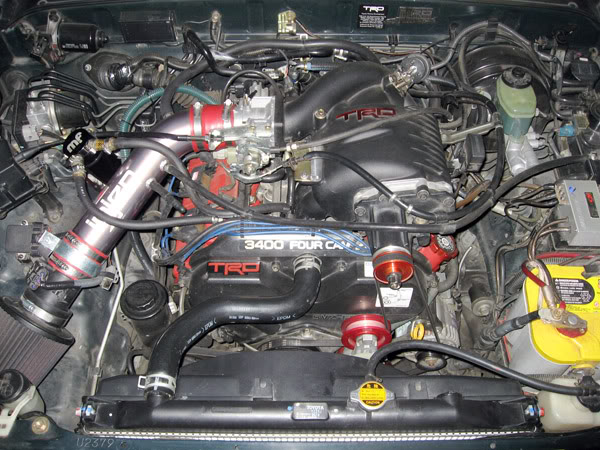
. As for the oil, all I use on all my cars is Mobil 1. Oil change intervals are roughly around 5k.Heres where it sits now:
Last edited by iceman601; 01-20-2010 at 03:55 PM.
01-20-2010, 08:03 PM
#15
Registered User
Join Date: Sep 2006
Location: Boston, MA area
Posts: 190
Likes: 0
Received 0 Likes
on
0 Posts
BTW, Iceman, have you tried to source some red spark plug wires? I know the NGKs are the way to go, but it would be nice to have some screamin red ones. Don't you think?
01-20-2010, 09:41 PM
#16
Registered User
Thread Starter
Join Date: Jan 2004
Posts: 234
Likes: 0
Received 0 Likes
on
0 Posts
You're telling me you will be willing to risk tearing apart a brand new supercharger to have it powdercoated  As for the sparkplug wires, you will be looking at around $200 for a custom set made in either black, yellow, blue, red, grey, or purple.
As for the sparkplug wires, you will be looking at around $200 for a custom set made in either black, yellow, blue, red, grey, or purple.
01-21-2010, 05:52 AM
#18
Registered User
Join Date: Jul 2008
Location: Chantilly, VA
Posts: 81
Likes: 0
Received 0 Likes
on
0 Posts
01-21-2010, 07:09 AM
#19
Registered User
Join Date: Jun 2009
Location: No cal but NORCAL
Posts: 292
Likes: 0
Received 0 Likes
on
0 Posts
06-02-2010, 08:33 AM
#20
Registered User

Join Date: Apr 2010
Posts: 5
Likes: 0
Received 0 Likes
on
0 Posts
Following this to change VC gaskets on 97 4runner sr5. The plastic covers that run along side each valve cover and protect the wiring harness broke into a million pieces. Dealer said i need to buy whole harness. Other suggestions? Heat resistant tape?


