Terrys87 88 4Runner Restoration/Build thread
 01-27-2011, 08:54 AM
#41
Super Moderator
Staff
Thread Starter
iTrader: (1)
Join Date: Aug 2008
Location: Anderson Missouri
Posts: 11,788
Likes: 0
Received 21 Likes
on
19 Posts
Jason, Rob, and flg8r22.. I hear you on time and money. If I only had a few hundred and a week off to do things. I know I will be waiting for machine work, so that will be a delay.
I am thinking this is going to turn into a full rebuild. I originally wanted to just get it running as I have another motor I was going to rebuild and was going to swap it in later. But since I am going to be this far into it, it will be coming out. I could use my dads shop and pull the motor but that would slow things down even more. Here I can just go side and work on it when I get the chance, even if just a few mintes a day.
I am thinking this is going to turn into a full rebuild. I originally wanted to just get it running as I have another motor I was going to rebuild and was going to swap it in later. But since I am going to be this far into it, it will be coming out. I could use my dads shop and pull the motor but that would slow things down even more. Here I can just go side and work on it when I get the chance, even if just a few mintes a day.
 01-29-2011, 04:23 AM
#42
Super Moderator
Staff
Thread Starter
iTrader: (1)
Join Date: Aug 2008
Location: Anderson Missouri
Posts: 11,788
Likes: 0
Received 21 Likes
on
19 Posts
I started tearing the motor down. Got the Plenum off and one of the metal lines was so plugged up, I had to take a drill bit by hand to get it clear. This is actually alot cleaner then some I have seen. I will make a block off plate to avoid this.

I got to the Intake side and the Allen Bolt stripped on me. This isnt the first time it has happened to me. I think I will try and find a regular bolt to put in. I am sure there is one out there.

I got the valve cover off and I think the timing chain has been replaced before. The Chain Guides looked new. The head itself looked really clean, with the exception of exhaust valves #3 and #4. It is probably one of the cleanest I have seen. I wondering if it was redone before the PO parked it. I couldnt see anything out of the ordinary with just the cover off.

I did loose a 12mm socket. I checked all of the usual hiding places such as the front axle, on top of the fuel filter, and on top of the starter. I looked for 15-20 minutes. I seen fall off on the Intake side and it didnt go all the way to the ground. I think chasing tools around is just part of being a mechanic. : )
I replaced my back gate. The window was out and someone had cut the wires to the motor. It was just easier to replace the whole thing. The gate worked on my parts truck but not on this one. I havent looked into it just yet. I hoping it might just be a fuse, but not sure I could be so lucky. I will start from the switch back. Electrical is not my strongest area. I know just enough to be dangerous.

Well I started cleaning some more parts I took off. It is a slow process.
I got to the Intake side and the Allen Bolt stripped on me. This isnt the first time it has happened to me. I think I will try and find a regular bolt to put in. I am sure there is one out there.
I got the valve cover off and I think the timing chain has been replaced before. The Chain Guides looked new. The head itself looked really clean, with the exception of exhaust valves #3 and #4. It is probably one of the cleanest I have seen. I wondering if it was redone before the PO parked it. I couldnt see anything out of the ordinary with just the cover off.
I did loose a 12mm socket. I checked all of the usual hiding places such as the front axle, on top of the fuel filter, and on top of the starter. I looked for 15-20 minutes. I seen fall off on the Intake side and it didnt go all the way to the ground. I think chasing tools around is just part of being a mechanic. : )
I replaced my back gate. The window was out and someone had cut the wires to the motor. It was just easier to replace the whole thing. The gate worked on my parts truck but not on this one. I havent looked into it just yet. I hoping it might just be a fuse, but not sure I could be so lucky. I will start from the switch back. Electrical is not my strongest area. I know just enough to be dangerous.
Well I started cleaning some more parts I took off. It is a slow process.
Last edited by Terrys87; 03-01-2016 at 02:05 AM.
01-29-2011, 06:47 AM
#43
Super Moderator
Staff
Thread Starter
iTrader: (1)
Join Date: Aug 2008
Location: Anderson Missouri
Posts: 11,788
Likes: 0
Received 21 Likes
on
19 Posts
Fix: How to clean an EGR and fix code 71 is below pictures.
More how to pics: https://www.yotatech.com/forums/f199...l#post52146627
Did get a few more parts cleaned and got the stripped Allen bolt out. So am making steady progress.

--------------------------------------------------------------------------------------------------
Fix for EGR/ Code 71
I got a couple of pictures out of order, but this should give you a good idea of what is needed to be done. You can leave the Plenum on the truck and clean the parts and hoses, I tried to explain both on and off the truck. Best is to take it off and pressure wash it.
I have ran into several EGR codes 71. I have been able to get them fixed without ever replacing one. There may come a time that I will have to replace one. To fix this problem, it will have a bunch of carbon, blocking flow of things. These EGRs usually cost $150 or more new.
2 bolts hold it to the back of the plenum and 3 to the head. Remove and clean out the little tube on the EGR for the vacuum hose and the pipes attached to the EGR. I will use a drill bit, cloth hanger and air hose. Probably could use brake cleaner or something.
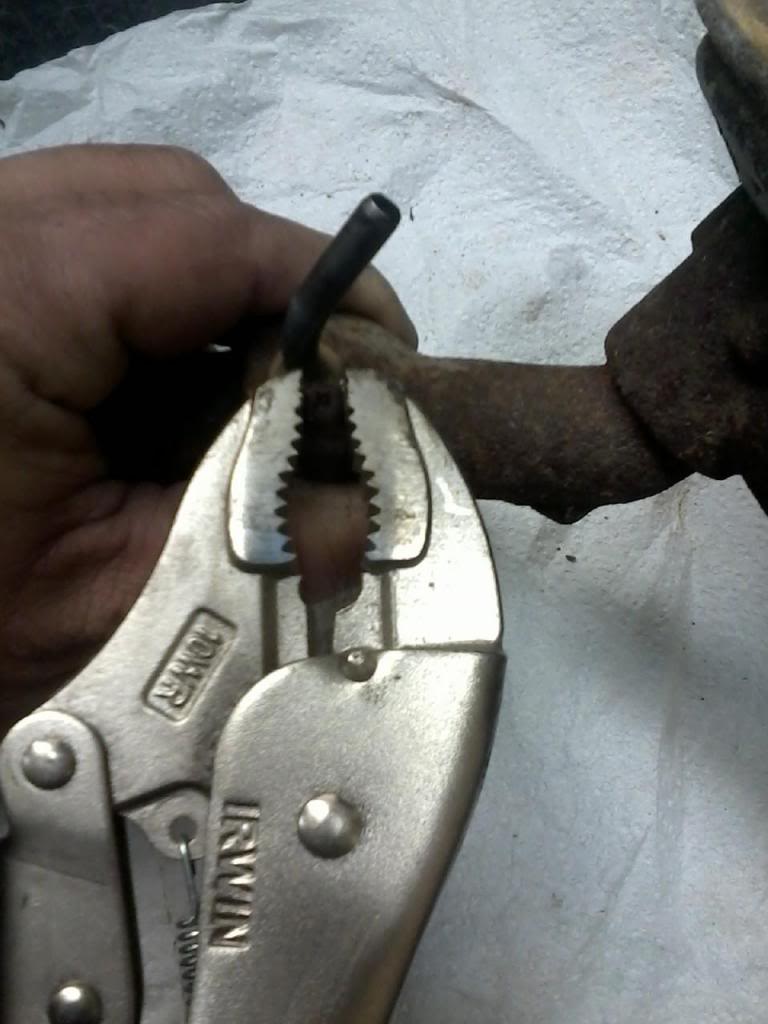
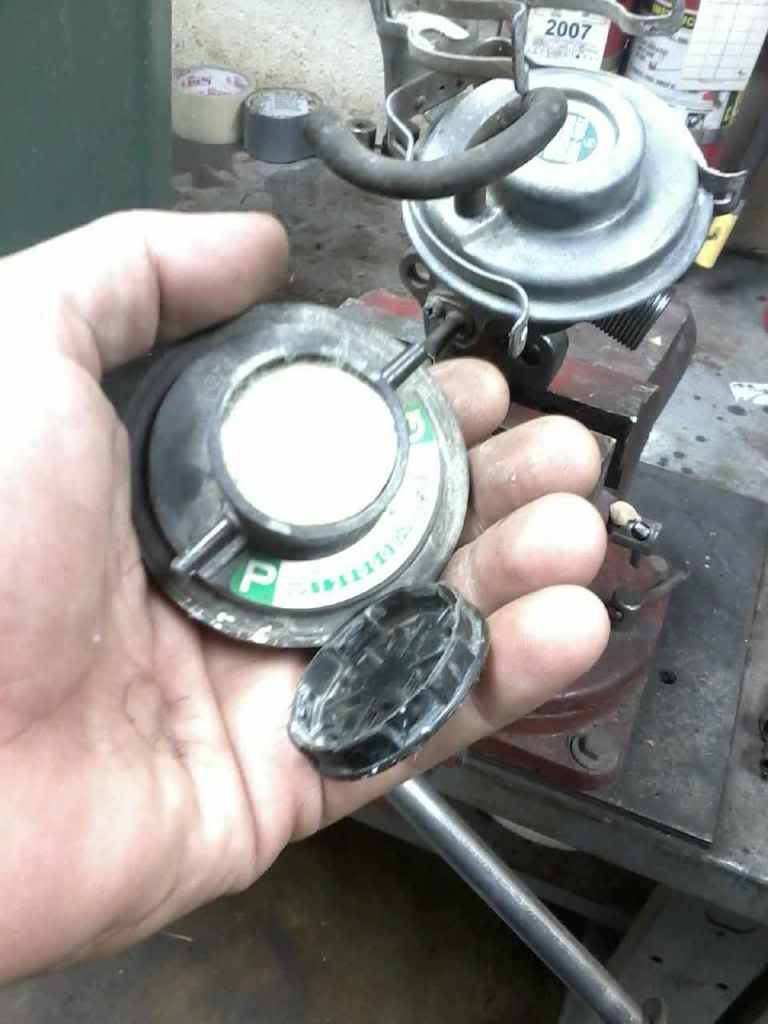
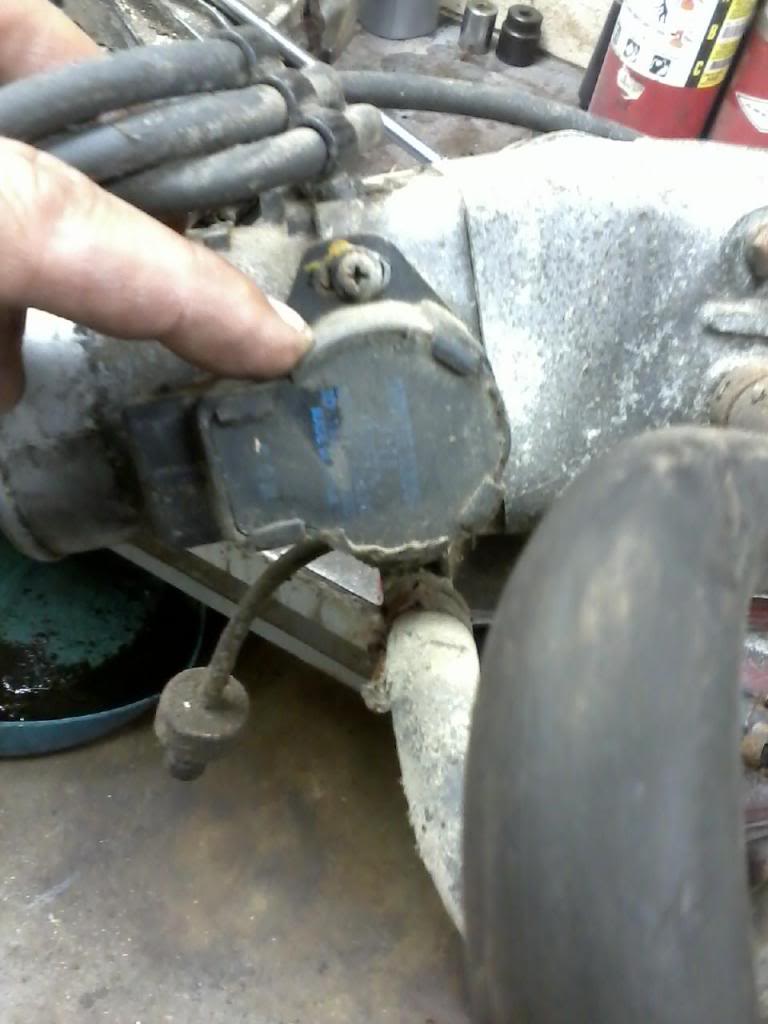
This EGR is set up a little different then most but the Valve and EGR are the same as yours. You should be able to a vacuum on the hose and a vacuum on the EGR and get air to flow through(where my thumb and pointer finger is). I have a drill bit in the small tube. I usually try to take the screw out and but this one doesnt want to come out and dont want to risk breaking. A small wire will get around the bend. Get all pipes clean.

If you leave the Plenum on the truck,take a cloth hanger/ wire and clean out the back of the Plenum where the 2 bolts connect. It will have a bunch of carbon there also. I just work it with wire and air hose til I get it the best that I can.
Here is how I clean the EGR. You will most likely need to pull the Plenum and clean all of the hoses and pipes as they will probably be plugged as well.
I worked on the EGR. Here is another picture that may look like the wrong way to do this, but the screw will strip if you use a screwdriver. Get a good firm grip, but not so hard to distort the screw.
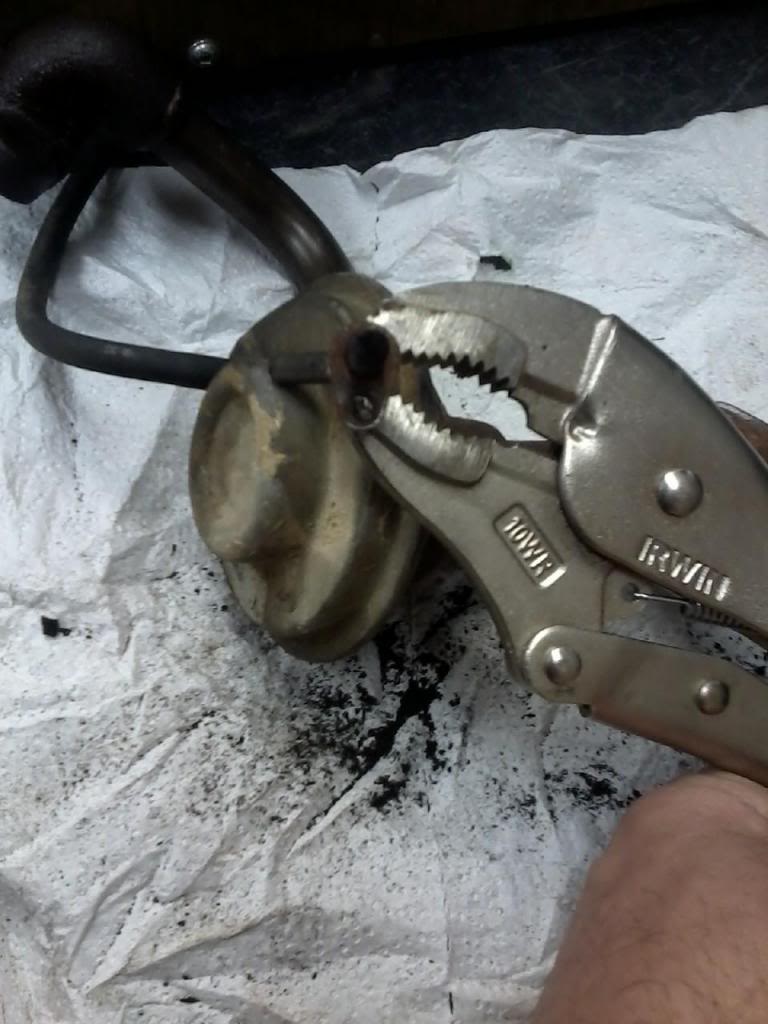
With the screw out, get another bite on the the pipe to get it out of the EGR. Leave the carbon in the pipe at this time as it will help keep the pipe round. The carbon is hard as concrete. Slowly work back and forth to get the pipe spinning inside the EGR tube and to start breaking it free. Could take up to 10 minutes but just be patient.
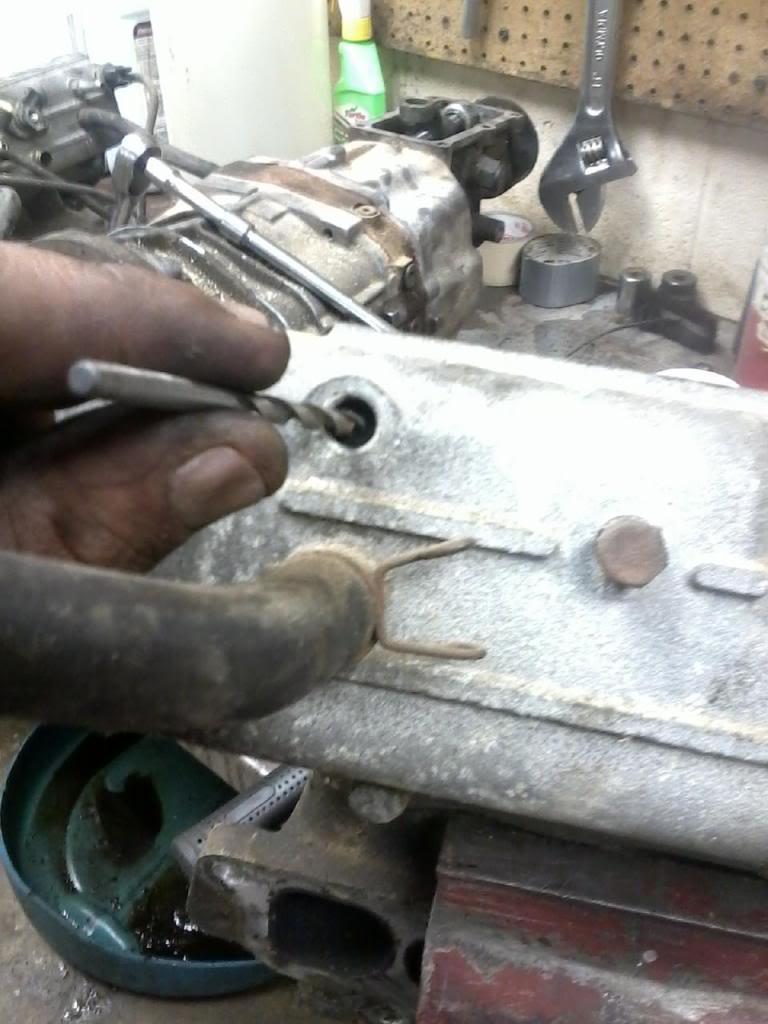
Here is me using a drill bit. I have never gotten as screw out with a Phillips screwdriver. Ususally rusted to bad. I use vise grips, then getting the pipe out is another job in itself. Take your time, you have to get this out to get all the carbon out.
After it is apart, I use a drill bit, screw driver, nail, clothes hanger to get all of the carbon out. It is rock solid in places. You can put vacuum on the hose and see and hear the plunger moving and operating inside the EGR, the goldish part.
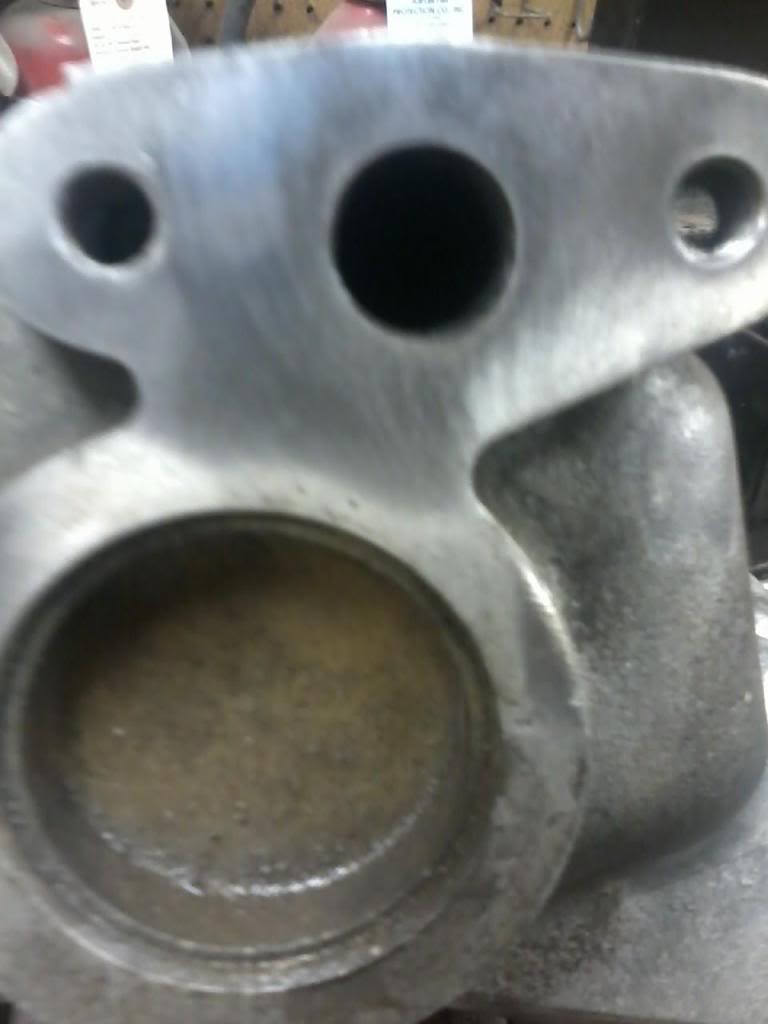
If you take the Plenum off, Pull the Throttle Body off and take the Plenum to the carwash. The Thottle Postion Sensor is on the Throttle Body. Dont get it wet with water or cleaner. I just leave it on. You dont want the TPS giving problems. Where the EGR connects on to the Plenum, it will be very dirty. It has tubes that go through the Plenum so you wont be able to see all the way through. I take some kind of cleaner and spray into it to break up the carbon.
On the Brown Valve, just pop the black cap off and take an air hose and blow the paper filter clean.
All of the hose connections on the Plenum will more than likely be plugged to. Here to I use a drill bit with my fingers and get it all cleared out. Check the hoses also and make sure there is no carbon blocking them.
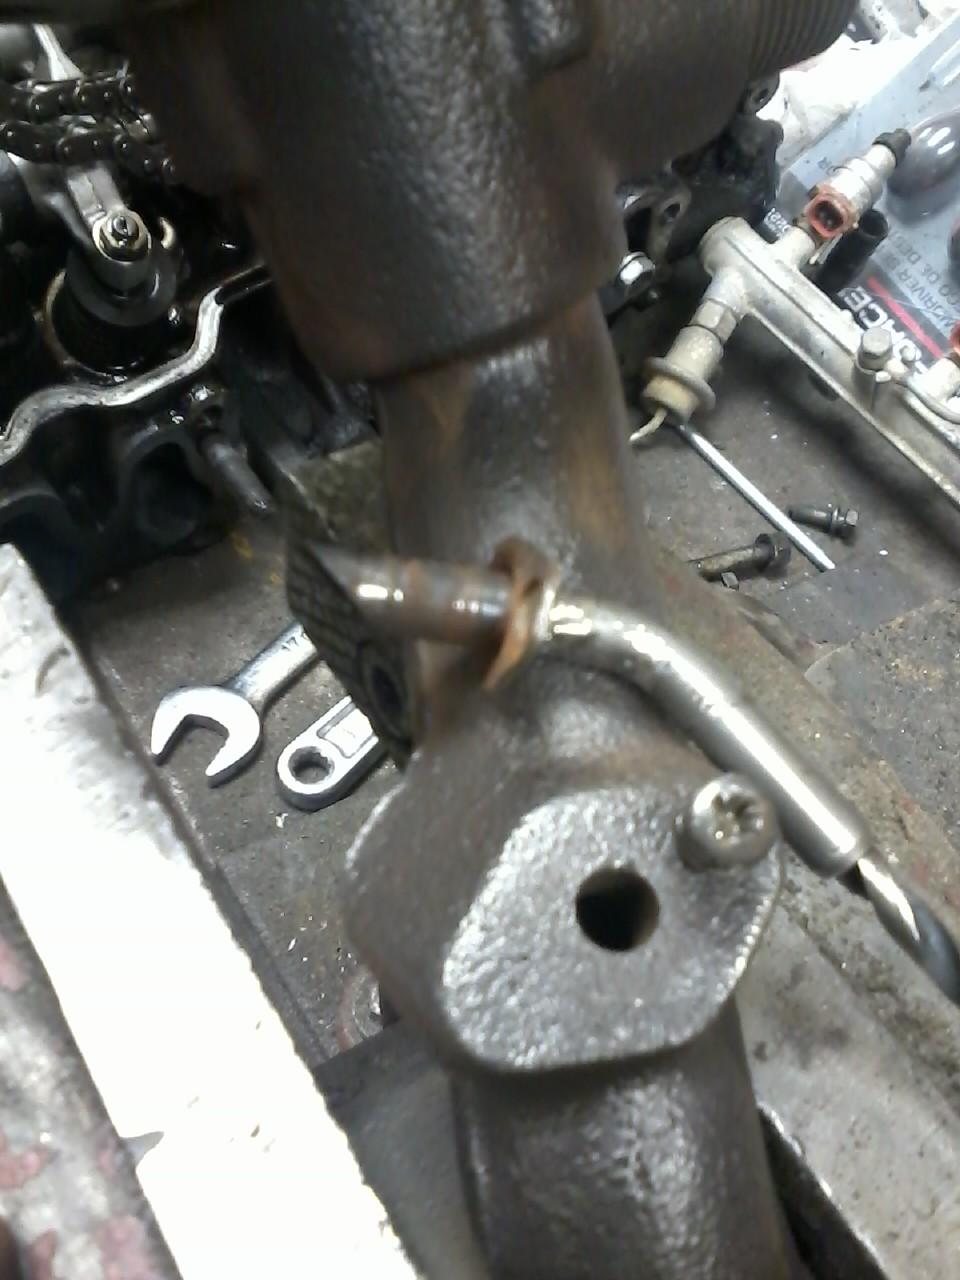
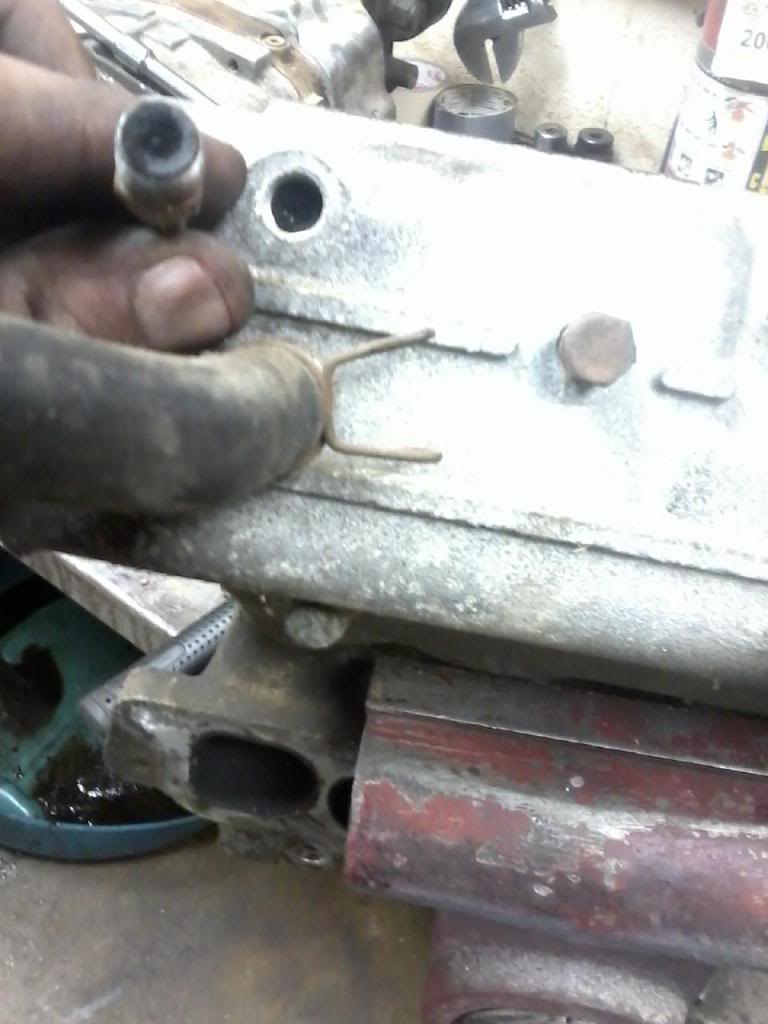
Here both the port and line is completely plugged with carbon. There were others plugged as well.
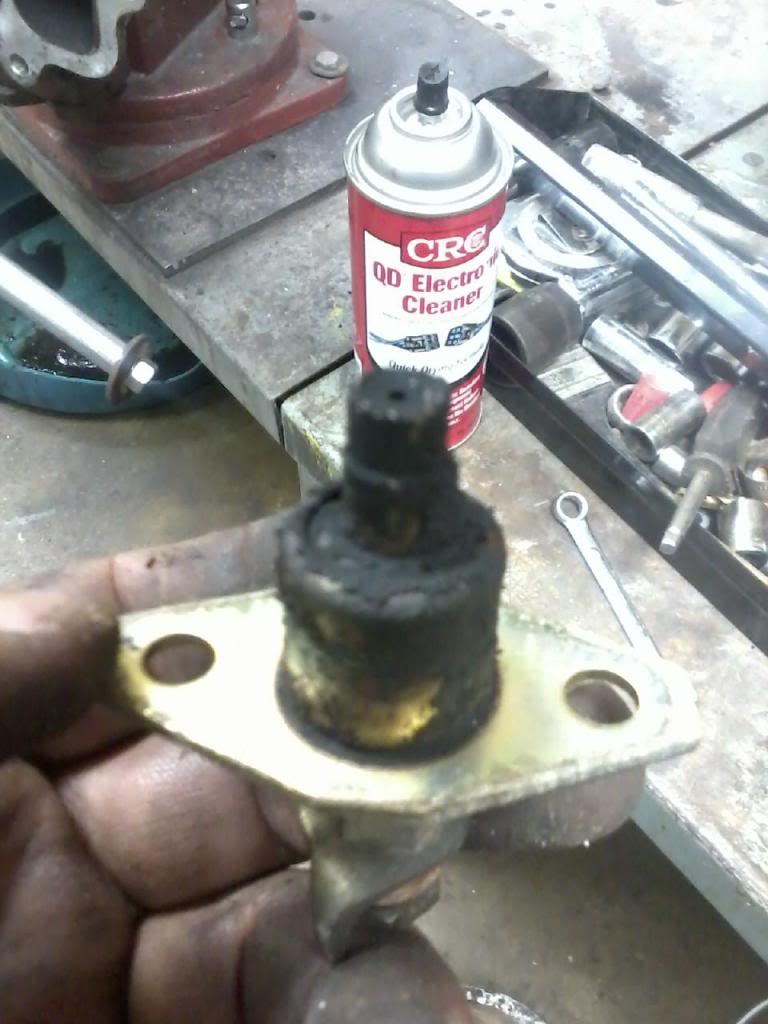
The Cold Start Injector is held on with two 10 mm bolts. The Throttle Body and Cold Start Injector gaskets usually stay on the Plenum and I just reuse the gaskets. Just be careful cleaning around them so as not to damage and you can reuse the gasket. Here is a picture of a dirty CSI. I just clean it up with a wire tooth brush. It will have a metal line connected to it. Double check when you start your truck up that it is not leaking. This is on place it will want to leak and is under a lot of pressure.
Here is a picture of the Throttle Position Sensor. You dont want to remove this from the Throttle Body or get it wet with water or chemical cleaners. Just clean around it.
The best way to get this is to remove the Throttle Body and take the Plenum to a carwash and really wash it out good. You will be surprised at the build up in it. I can usually have this done from start to finish in about an hour to an hour and half.
In Post #42 is a poor picture of some of the build up. The Modulator on the head cover may just need taken apart and cleaned with an air hose. The Haynes manual on page 6-38 says "California Model only" for a Code #71, this pretty much applies to all trucks.
More how to pics: https://www.yotatech.com/forums/f199...l#post52146627
Did get a few more parts cleaned and got the stripped Allen bolt out. So am making steady progress.
--------------------------------------------------------------------------------------------------
Fix for EGR/ Code 71
I got a couple of pictures out of order, but this should give you a good idea of what is needed to be done. You can leave the Plenum on the truck and clean the parts and hoses, I tried to explain both on and off the truck. Best is to take it off and pressure wash it.
I have ran into several EGR codes 71. I have been able to get them fixed without ever replacing one. There may come a time that I will have to replace one. To fix this problem, it will have a bunch of carbon, blocking flow of things. These EGRs usually cost $150 or more new.
2 bolts hold it to the back of the plenum and 3 to the head. Remove and clean out the little tube on the EGR for the vacuum hose and the pipes attached to the EGR. I will use a drill bit, cloth hanger and air hose. Probably could use brake cleaner or something.
This EGR is set up a little different then most but the Valve and EGR are the same as yours. You should be able to a vacuum on the hose and a vacuum on the EGR and get air to flow through(where my thumb and pointer finger is). I have a drill bit in the small tube. I usually try to take the screw out and but this one doesnt want to come out and dont want to risk breaking. A small wire will get around the bend. Get all pipes clean.
If you leave the Plenum on the truck,take a cloth hanger/ wire and clean out the back of the Plenum where the 2 bolts connect. It will have a bunch of carbon there also. I just work it with wire and air hose til I get it the best that I can.
Here is how I clean the EGR. You will most likely need to pull the Plenum and clean all of the hoses and pipes as they will probably be plugged as well.
I worked on the EGR. Here is another picture that may look like the wrong way to do this, but the screw will strip if you use a screwdriver. Get a good firm grip, but not so hard to distort the screw.

With the screw out, get another bite on the the pipe to get it out of the EGR. Leave the carbon in the pipe at this time as it will help keep the pipe round. The carbon is hard as concrete. Slowly work back and forth to get the pipe spinning inside the EGR tube and to start breaking it free. Could take up to 10 minutes but just be patient.

Here is me using a drill bit. I have never gotten as screw out with a Phillips screwdriver. Ususally rusted to bad. I use vise grips, then getting the pipe out is another job in itself. Take your time, you have to get this out to get all the carbon out.
After it is apart, I use a drill bit, screw driver, nail, clothes hanger to get all of the carbon out. It is rock solid in places. You can put vacuum on the hose and see and hear the plunger moving and operating inside the EGR, the goldish part.
If you take the Plenum off, Pull the Throttle Body off and take the Plenum to the carwash. The Thottle Postion Sensor is on the Throttle Body. Dont get it wet with water or cleaner. I just leave it on. You dont want the TPS giving problems. Where the EGR connects on to the Plenum, it will be very dirty. It has tubes that go through the Plenum so you wont be able to see all the way through. I take some kind of cleaner and spray into it to break up the carbon.
On the Brown Valve, just pop the black cap off and take an air hose and blow the paper filter clean.
All of the hose connections on the Plenum will more than likely be plugged to. Here to I use a drill bit with my fingers and get it all cleared out. Check the hoses also and make sure there is no carbon blocking them.
Here both the port and line is completely plugged with carbon. There were others plugged as well.
The Cold Start Injector is held on with two 10 mm bolts. The Throttle Body and Cold Start Injector gaskets usually stay on the Plenum and I just reuse the gaskets. Just be careful cleaning around them so as not to damage and you can reuse the gasket. Here is a picture of a dirty CSI. I just clean it up with a wire tooth brush. It will have a metal line connected to it. Double check when you start your truck up that it is not leaking. This is on place it will want to leak and is under a lot of pressure.
Here is a picture of the Throttle Position Sensor. You dont want to remove this from the Throttle Body or get it wet with water or chemical cleaners. Just clean around it.
The best way to get this is to remove the Throttle Body and take the Plenum to a carwash and really wash it out good. You will be surprised at the build up in it. I can usually have this done from start to finish in about an hour to an hour and half.
In Post #42 is a poor picture of some of the build up. The Modulator on the head cover may just need taken apart and cleaned with an air hose. The Haynes manual on page 6-38 says "California Model only" for a Code #71, this pretty much applies to all trucks.
Last edited by Terrys87; 10-07-2015 at 01:31 PM.
01-30-2011, 12:56 AM
#44
Super Moderator
Staff
Thread Starter
iTrader: (1)
Join Date: Aug 2008
Location: Anderson Missouri
Posts: 11,788
Likes: 0
Received 21 Likes
on
19 Posts
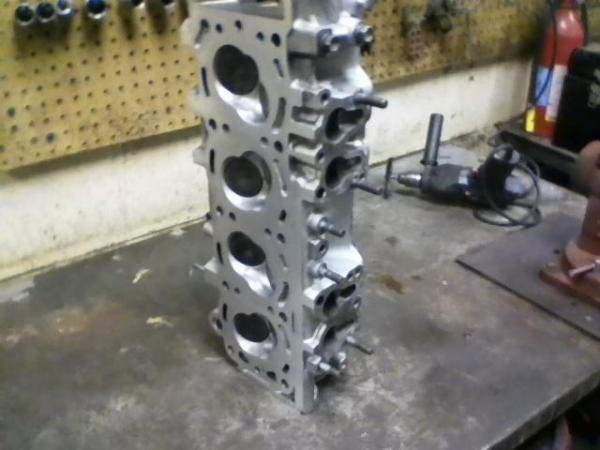
May not be the best picture, but it does show the overall condition of the head. The far rockers on
right have carbon/ sludge like build up. The rest of the head is really clean. I thinking the head gasket
was leaking between #3 and #4 cylinders. I am taking the head in to the machine shop to have it
checked out.
Any suggestions as what to look for as I am wondering if I have a crack in
the head that would cause this?? Also on the intake side of the head there
feels and looks like an oil leak that has like a rubbery feeling to it. It is not dry,
powdery,crusty build up like carbon would have. It is in all 4 of the intake runners.
I think once I hear the results of the head being checked will answer alot of my questions.
It will be around 4 or 5 days before I get a chance to have it checked. I will get some pictures of it up so show the runners on the intake.
Thanks for any suggestions.
01-30-2011, 02:10 AM
#45
Super Moderator
Staff
Thread Starter
iTrader: (1)
Join Date: Aug 2008
Location: Anderson Missouri
Posts: 11,788
Likes: 0
Received 21 Likes
on
19 Posts
Here is the Intake Runners that have build up in them. My guess it is oil, but I your ideas. I am not impressed
with whoever did the work on this previously. I have found some wrong bolts. I am starting to think it was poor workmanship.

I cleaned the head as best as I could and dont see any obvious cracks. I am letting it soak to help clean it
up a little better. But what I am seeing now. I am thinking someone didnt do a very good job on rebuilding
this. I am still sending it to the machine shop.

with whoever did the work on this previously. I have found some wrong bolts. I am starting to think it was poor workmanship.
I cleaned the head as best as I could and dont see any obvious cracks. I am letting it soak to help clean it
up a little better. But what I am seeing now. I am thinking someone didnt do a very good job on rebuilding
this. I am still sending it to the machine shop.
Last edited by Terrys87; 01-31-2011 at 12:47 AM.
01-31-2011, 12:42 AM
#46
Super Moderator
Staff
Thread Starter
iTrader: (1)
Join Date: Aug 2008
Location: Anderson Missouri
Posts: 11,788
Likes: 0
Received 21 Likes
on
19 Posts
Youtube video...
My Power Steering Pulley is a little noisey so thought I would show how to replace the bearing. I used PN# 204-FF.

Then I removed the nut and the pulley. On the backside there is a wire clip that holds the bearing to the pulley. Remove it,
then I used a 3/4 inch socket and drove it out over a vice.
I put a little oil in side the pulley and used the vice and slowly worked it back in most of the way. Once it is flush with
the pulley I used another socket to finish getting it all the way in so as the wire clip would seat.

Here it is all cleaned and painted. The bearing was $22. Toyota wants to sell the whole assembly. I was unable to
find just the pulley. Hope this helps someone.

My Power Steering Pulley is a little noisey so thought I would show how to replace the bearing. I used PN# 204-FF.
Then I removed the nut and the pulley. On the backside there is a wire clip that holds the bearing to the pulley. Remove it,
then I used a 3/4 inch socket and drove it out over a vice.
I put a little oil in side the pulley and used the vice and slowly worked it back in most of the way. Once it is flush with
the pulley I used another socket to finish getting it all the way in so as the wire clip would seat.
Here it is all cleaned and painted. The bearing was $22. Toyota wants to sell the whole assembly. I was unable to
find just the pulley. Hope this helps someone.
Last edited by Terrys87; 07-19-2015 at 07:08 AM.
02-01-2011, 02:52 AM
#47
Super Moderator
Staff
Thread Starter
iTrader: (1)
Join Date: Aug 2008
Location: Anderson Missouri
Posts: 11,788
Likes: 0
Received 21 Likes
on
19 Posts
I was wanting to take the head in and see if it has any problems, but we are getting a snow storm we havent had in awhile. I will try today and see if they will be open. I did work on my Plenum. It took quite awhile to get all of the carbon from inside. I did a lot of soaking, scrubbing and high pressure washing. One step closer.

02-01-2011, 05:35 AM
#48
Registered User
That intake plenum looks great Terry. If you are planning on detailing the whole motor like that then it is gonna be one sexy 22re. Surelly you have seen pics of Chefyota4x4's motor, it is one of my favorites.
02-04-2011, 07:45 AM
#49
Super Moderator
Staff
Thread Starter
iTrader: (1)
Join Date: Aug 2008
Location: Anderson Missouri
Posts: 11,788
Likes: 0
Received 21 Likes
on
19 Posts
Hello Rob.. I really like Chefs motor. I tried to get it to look that good, but he had is blasted. I had thought of painiting it to that color but wasnt sure how it would last. His does look sharp. Even his engine compartment.
I will be glad for this weather to clear out of here. I finally got my head to the shop, they were closed do to all of the snow. Said it might be done today but its looking like Monday before I can pick it up and dont know when I will get a chance to work on it.
Cool.. while I was typing this, the machine shop just called.. Going to get my head.
02-04-2011, 10:56 AM
#50
Super Moderator
Staff
Thread Starter
iTrader: (1)
Join Date: Aug 2008
Location: Anderson Missouri
Posts: 11,788
Likes: 0
Received 21 Likes
on
19 Posts
I just got my head picked up, now just got to check the rest of the motor out. Still need to put everyting back together and will do that tonite. I am going to make a page on here as to where or what Part number might be helpful for others. I will add to it as I find some other parts. If you know of any either pm me or list them here.
02-04-2011, 11:03 AM
#51
Super Moderator
Staff
Thread Starter
iTrader: (1)
Join Date: Aug 2008
Location: Anderson Missouri
Posts: 11,788
Likes: 0
Received 21 Likes
on
19 Posts
Great thread for parts OEM parts https://www.yotatech.com/forums/f123...-parts-258178/
130 amp alternator http://acealternators.com/
Aisin Part Lookup Tool. http://www.aisinaftermarket.com/English/Catalog.php
85-87 Injector connectors EV1 Style. http://api.viglink.com/api/click?for...3Bcc%3D1272136
More connectors for 88/89
www.bmotorsports.com
www.connectorsfast.com
www.repairconnector.com
A better injector seal kit.
http://www.ebay.com/itm/331112021116?_trksid=p2055119.m1438.l2649&ssPageName=STRK%3AMEBIDX%3AIT&rmvSB=true
Another injector seal kit>>> http://injector-rehab.com/shop/Toyota-4Runner-Kit.html
GM alternator wire plug http://alternatorparts.com/search?query=461804&search=1 PN# 461804
204- FF.. is a part number for the Power Steering Pulley. $22
www.sparkplugs.com (with a "s" on plugs) has been great for O2 sensors. I have a California Emissions truck and got 2 sensors for the price of one that I would of paid from a parts store. Price varies
On ebay "BackseatAuto" Part Number 76689 is good replacement latches for the sliding back glass on pickups. It is for the 1 1/2" wide latch. Around $6 and $3 shipping. My 2WD has the 3/4" wide latch and I havent had to replace it. There are 2 different sizes on these trucks.
Another site for the backglass latch http://www.dkhardware.com/product-29...ta-trucks.html
"carpartswholesale" ebay seller for fuel pumps. http://api.viglink.com/api/click?for...13464420007671
Part # 90916-03070 for Dual Stage Themostat. 4Runners with back heater can have this problem.
For your valves yes noisy is normal with the 22re...So usually what we all do is .007 and .011 COLD. Then they quite down but aren't too tight to cause issues. If you ask around most of the toyota gurus run 7-11 for valve clearance.
Hood Prop Stay Clip.... http://www.clipsandfasteners.com/Toy...s_p/a17611.htm
Hood Prop Stay Clip.... http://www.lowrangeoffroad.com/index...stay-clip.html
Hood Prop Stay Clip.. http://www.ebay.com/itm/Toyota-Pickup-Truck-Tacoma-4Runner-Etc-HOOD-PROP-ROD-HOLDER-CLIP-/160873043964?hash=item2574c7d7fc&item=160873043964&pt=Motors_Car_Truck_Parts_Accessories&vxp=mtr
Hood Grommet PN 53430B http://www.utoyot8.com/Picture.aspx?...ccode=&ppName=
Where to buy http://www.villagetoyotaparts.com/sh...ssembly=332649
http://www.ebay.com/itm/84-88-Toyota-4Runner-Truck-Door-Weatherstrip-Seal-New-/310400136509?pt=Motors_Car_Truck_Parts_Accessories&hash=item48454a353d&vxp=mtr
Front Bumper on Ebay ... http://www.ebay.com/itm/New-Bumper-Front-Center-Chrome-Truck-4-Runner-Toyota-Pickup-TO1002118-5211189146-/230805198080?pt=Motors_Car_Truck_Parts_Accessories&hash=item35bd0fd500&vxp=mtr
Denso Plug Wire PN# 671-4003.
Denso Plug Wires ... http://www.ebay.com/itm/250854901322...84.m1438.l2649
Front Valance .... http://www.ebay.com/itm/New-Valance-Front-Primered-Truck-4-Runner-Toyota-Pickup-TO1095163-5391189113-/230797981225?pt=Motors_Car_Truck_Parts_Accessories&hash=item35bca1b629&vxp=mtr
These are prices I have paid. If you know of a place that you are happy with and think would be a good deal or hard to find part let me know.
http://www.toyota-global.com/company.../kyohokai.html
Injector Seals and Screens http://www.ebay.com/itm/270921195123...S:3160&vxp=mtr
OEM OSK Timing Kit - $68 (Including Shipping) (TC Gaskets, Passenger/Driver Guide Rails, Tensioner, Chain, Top/Bottom Gears)
OEM Aisin Timing Cover - $173 Free Shipping
OEM Aisin Oil Pump w/gasket - $52 Free Shipping
OEM Aisin Water Pump w/gasket - $40 Free Shipping
Toyota Valve Cover Gasket - $13.50 Plus Shipping
http://www.toyotapartszone.com/Page_Product/PartDetail.aspx?model=TRUCK,PICKUP&year=1993&catal ogCode=671450&VAID=2019,2029&selectConditions=%281 0=USA;1=22RE;3=T1;5=MTM;7=RCB;8=W%29&subModel=JPP-4%20WHEEL%20DRIVE&originCountry=%2810=USA%29�ionID =&componentsID=11-04
Toyota Head Gasket - $35 Plus Shipping
http://www.toyotapartszone.com/Page_Product/PartDetail.aspx?model=TRUCK,PICKUP&year=1993&catal ogCode=671450&VAID=2019,2029&selectConditions=%281 0=USA;1=22RE;3=T1;5=MTM;7=RCB;8=W%29&subModel=JPP-4%20WHEEL%20DRIVE&originCountry=%2810=USA%29�ionID =&componentsID=11-04
Head Bolts (Qty. 10) - $60 Plus Shipping
vhttp://www.toyotapartszone.com/Page_Product/PartDetail.aspx?model=TRUCK,PICKUP&year=1993&catal ogCode=671450&VAID=2019,2029&selectConditions=%281 0=USA;1=22RE;3=T1;5=MTM;7=RCB;8=W%29&subModel=JPP-4%20WHEEL%20DRIVE&originCountry=%2810=USA%29�ionID =&componentsID=11-04
Subtotal Cost: $441.50
Plus Toyotapartszone Estimate Shipping: $20
If you have no Tax for Amazon or Toyotapartszone (Cali): $0
TOTAL Estimated Cost using OEM/Toyota Parts: $461.50. $1,020.50 less than your dealer provided estimate. (What I would have paid (but less $30 because I would have used Altrom head bolts) because I'm an OEM/Toyota parts whore )
)
http://www.ebay.com/itm/84-88-Toyota-4Runner-Pickup-Truck-Rubber-Door-Weatherstrip-Seals-Pair-Set-/130894580598?pt=Motors_Car_Truck_Parts_Accessories&fits=Year%3A1986%7CMake%3AToyota%7CModel%3A4Runner&hash=item1e79eccb76&vxp=mtr
Actually useful and I like better then the long plastic ones.
http://www.ebay.com/itm/Auto-Ventshade-Stainless-Steel-Window-Ventshades-12123-Toyota-Pickup-/390756077628?pt=Motors_Car_Truck_Parts_Accessories&fits=Year%3A1986%7CMake%3AToyota%7CModel%3A4Runner&hash=item5afae0903c&vxp=mtr
https://www.yotatech.com/forums/f116...engine-287779/
http://www.ebay.com/itm/Toyota-22R-or-22RE-ENGINE-1985-95-with-new-head-No-Core-Required-/111590036104?pt=Motors_Car_Truck_Parts_Accessories&hash=item19fb48d288&vxp=mtr&rmvSB=true
Gates part numbers
for 5/16 hoses
18222 - Throttle body to thermostat fitting
18223 - Throttle body to iacv
18021 - Iacv to bypass bolted to back of timing cover
1/2 hose
18400 - Timing cover to bottom of lower intake
130 amp alternator http://acealternators.com/
Aisin Part Lookup Tool. http://www.aisinaftermarket.com/English/Catalog.php
85-87 Injector connectors EV1 Style. http://api.viglink.com/api/click?for...3Bcc%3D1272136
More connectors for 88/89
www.bmotorsports.com
www.connectorsfast.com
www.repairconnector.com
A better injector seal kit.
http://www.ebay.com/itm/331112021116?_trksid=p2055119.m1438.l2649&ssPageName=STRK%3AMEBIDX%3AIT&rmvSB=true
Another injector seal kit>>> http://injector-rehab.com/shop/Toyota-4Runner-Kit.html
GM alternator wire plug http://alternatorparts.com/search?query=461804&search=1 PN# 461804
204- FF.. is a part number for the Power Steering Pulley. $22
www.sparkplugs.com (with a "s" on plugs) has been great for O2 sensors. I have a California Emissions truck and got 2 sensors for the price of one that I would of paid from a parts store. Price varies
On ebay "BackseatAuto" Part Number 76689 is good replacement latches for the sliding back glass on pickups. It is for the 1 1/2" wide latch. Around $6 and $3 shipping. My 2WD has the 3/4" wide latch and I havent had to replace it. There are 2 different sizes on these trucks.
Another site for the backglass latch http://www.dkhardware.com/product-29...ta-trucks.html
"carpartswholesale" ebay seller for fuel pumps. http://api.viglink.com/api/click?for...13464420007671
Part # 90916-03070 for Dual Stage Themostat. 4Runners with back heater can have this problem.
For your valves yes noisy is normal with the 22re...So usually what we all do is .007 and .011 COLD. Then they quite down but aren't too tight to cause issues. If you ask around most of the toyota gurus run 7-11 for valve clearance.
Hood Prop Stay Clip.... http://www.clipsandfasteners.com/Toy...s_p/a17611.htm
Hood Prop Stay Clip.... http://www.lowrangeoffroad.com/index...stay-clip.html
Hood Prop Stay Clip.. http://www.ebay.com/itm/Toyota-Pickup-Truck-Tacoma-4Runner-Etc-HOOD-PROP-ROD-HOLDER-CLIP-/160873043964?hash=item2574c7d7fc&item=160873043964&pt=Motors_Car_Truck_Parts_Accessories&vxp=mtr
Hood Grommet PN 53430B http://www.utoyot8.com/Picture.aspx?...ccode=&ppName=
Where to buy http://www.villagetoyotaparts.com/sh...ssembly=332649
http://www.ebay.com/itm/84-88-Toyota-4Runner-Truck-Door-Weatherstrip-Seal-New-/310400136509?pt=Motors_Car_Truck_Parts_Accessories&hash=item48454a353d&vxp=mtr
Front Bumper on Ebay ... http://www.ebay.com/itm/New-Bumper-Front-Center-Chrome-Truck-4-Runner-Toyota-Pickup-TO1002118-5211189146-/230805198080?pt=Motors_Car_Truck_Parts_Accessories&hash=item35bd0fd500&vxp=mtr
Denso Plug Wire PN# 671-4003.
Denso Plug Wires ... http://www.ebay.com/itm/250854901322...84.m1438.l2649
Front Valance .... http://www.ebay.com/itm/New-Valance-Front-Primered-Truck-4-Runner-Toyota-Pickup-TO1095163-5391189113-/230797981225?pt=Motors_Car_Truck_Parts_Accessories&hash=item35bca1b629&vxp=mtr
These are prices I have paid. If you know of a place that you are happy with and think would be a good deal or hard to find part let me know.
http://www.toyota-global.com/company.../kyohokai.html
Injector Seals and Screens http://www.ebay.com/itm/270921195123...S:3160&vxp=mtr
OEM OSK Timing Kit - $68 (Including Shipping) (TC Gaskets, Passenger/Driver Guide Rails, Tensioner, Chain, Top/Bottom Gears)
OEM Aisin Timing Cover - $173 Free Shipping
OEM Aisin Oil Pump w/gasket - $52 Free Shipping
OEM Aisin Water Pump w/gasket - $40 Free Shipping
Toyota Valve Cover Gasket - $13.50 Plus Shipping
http://www.toyotapartszone.com/Page_Product/PartDetail.aspx?model=TRUCK,PICKUP&year=1993&catal ogCode=671450&VAID=2019,2029&selectConditions=%281 0=USA;1=22RE;3=T1;5=MTM;7=RCB;8=W%29&subModel=JPP-4%20WHEEL%20DRIVE&originCountry=%2810=USA%29�ionID =&componentsID=11-04
Toyota Head Gasket - $35 Plus Shipping
http://www.toyotapartszone.com/Page_Product/PartDetail.aspx?model=TRUCK,PICKUP&year=1993&catal ogCode=671450&VAID=2019,2029&selectConditions=%281 0=USA;1=22RE;3=T1;5=MTM;7=RCB;8=W%29&subModel=JPP-4%20WHEEL%20DRIVE&originCountry=%2810=USA%29�ionID =&componentsID=11-04
Head Bolts (Qty. 10) - $60 Plus Shipping
vhttp://www.toyotapartszone.com/Page_Product/PartDetail.aspx?model=TRUCK,PICKUP&year=1993&catal ogCode=671450&VAID=2019,2029&selectConditions=%281 0=USA;1=22RE;3=T1;5=MTM;7=RCB;8=W%29&subModel=JPP-4%20WHEEL%20DRIVE&originCountry=%2810=USA%29�ionID =&componentsID=11-04
Subtotal Cost: $441.50
Plus Toyotapartszone Estimate Shipping: $20
If you have no Tax for Amazon or Toyotapartszone (Cali): $0
TOTAL Estimated Cost using OEM/Toyota Parts: $461.50. $1,020.50 less than your dealer provided estimate. (What I would have paid (but less $30 because I would have used Altrom head bolts) because I'm an OEM/Toyota parts whore
)http://www.ebay.com/itm/84-88-Toyota-4Runner-Pickup-Truck-Rubber-Door-Weatherstrip-Seals-Pair-Set-/130894580598?pt=Motors_Car_Truck_Parts_Accessories&fits=Year%3A1986%7CMake%3AToyota%7CModel%3A4Runner&hash=item1e79eccb76&vxp=mtr
Actually useful and I like better then the long plastic ones.
http://www.ebay.com/itm/Auto-Ventshade-Stainless-Steel-Window-Ventshades-12123-Toyota-Pickup-/390756077628?pt=Motors_Car_Truck_Parts_Accessories&fits=Year%3A1986%7CMake%3AToyota%7CModel%3A4Runner&hash=item5afae0903c&vxp=mtr
https://www.yotatech.com/forums/f116...engine-287779/
http://www.ebay.com/itm/Toyota-22R-or-22RE-ENGINE-1985-95-with-new-head-No-Core-Required-/111590036104?pt=Motors_Car_Truck_Parts_Accessories&hash=item19fb48d288&vxp=mtr&rmvSB=true
Gates part numbers
for 5/16 hoses
18222 - Throttle body to thermostat fitting
18223 - Throttle body to iacv
18021 - Iacv to bypass bolted to back of timing cover
1/2 hose
18400 - Timing cover to bottom of lower intake
Last edited by Terrys87; 10-08-2015 at 04:46 AM.
02-05-2011, 01:26 AM
#52
Super Moderator
Staff
Thread Starter
iTrader: (1)
Join Date: Aug 2008
Location: Anderson Missouri
Posts: 11,788
Likes: 0
Received 21 Likes
on
19 Posts
I got my head back today and it just needed to be shaved. After looking at the motor some more, I dont think I will rebuild it at this time. I do have 2 other motors and one I will rebuild for this truck just so as I know I have a really good motor in it.
The quicker I can get this on the road the sooner I can get the bodywork and other things done on it as I can take it to my dads shop and work on it. Right now having to work on it outside really slows things down. Besides Im sure the neighbors are thinking it is just a yard ornament at this time.[IMG]
The quicker I can get this on the road the sooner I can get the bodywork and other things done on it as I can take it to my dads shop and work on it. Right now having to work on it outside really slows things down. Besides Im sure the neighbors are thinking it is just a yard ornament at this time.[IMG]
02-08-2011, 09:30 PM
#53
Super Moderator
Staff
Thread Starter
iTrader: (1)
Join Date: Aug 2008
Location: Anderson Missouri
Posts: 11,788
Likes: 0
Received 21 Likes
on
19 Posts
With the cold and snow just havent been able to get a whole lot accomplished. Here is the head and cover ready to go back on. This weekend the weather is supposed to be a little nicer but will have to wait and see. If I can get this running, I would be able to get a lot more done with it.

02-19-2011, 03:35 AM
#54
Super Moderator
Staff
Thread Starter
iTrader: (1)
Join Date: Aug 2008
Location: Anderson Missouri
Posts: 11,788
Likes: 0
Received 21 Likes
on
19 Posts
Just wanted to do an update on my progress. I got the head and exhaust on. I am hoping to hear it run by Monday or Tuesday but have some other things coming up. I been checking several other threads I am subscribed to, and looks like now that the weather is clearing up everyone is getting started on their projects again which is always good news and motivation.
03-05-2011, 10:46 PM
#56
Super Moderator
Staff
Thread Starter
iTrader: (1)
Join Date: Aug 2008
Location: Anderson Missouri
Posts: 11,788
Likes: 0
Received 21 Likes
on
19 Posts
It been awhile between the weather and things to take care of at the house, that I have had a chance
to work on this. My neighbor got a warning to get a car that has been parked for a some time to do
something with it, so now I really need to get this running so I dont get a complaint for having a broken
down car. I have the Intake on, and am guessing I still have 3 or 4 hours to go before I get this running.
I did get some help on this. She is wanting this for herself and that should help get it completed a little
faster. I think once she gets to hear it run after working on it and having a part in it, that she might
get the bug to work on these projects.
03-05-2011, 11:05 PM
#57
Super Moderator
Staff
Thread Starter
iTrader: (1)
Join Date: Aug 2008
Location: Anderson Missouri
Posts: 11,788
Likes: 0
Received 21 Likes
on
19 Posts
I got it put back togther and running .. I still have some vacuum lines to get routed correctly as my diagram on the hood isnt very easy to read and some of the pictures I have taken dont show the connections to well. I have 2 small water connection lines I have to fix, but I was able to drive it for a 1/4 mile. Hopefully Monday I will have it legal to drive on the hiway and it first stop is for a bath.
I will get pictures later. I dropped my phone and it isnt working now. I have had this phone for 3 years now, but with the pictures and information I had stored in it, really would be useful at this time.
I had wanted this running alot sooner than today, but with the weather and things that keep coming up, it just kept got putting further back. Im really happy with the way it has been running and sounds. Hopefully I will be able to have more updates as weather clears and things settle down.
.. I still have some vacuum lines to get routed correctly as my diagram on the hood isnt very easy to read and some of the pictures I have taken dont show the connections to well. I have 2 small water connection lines I have to fix, but I was able to drive it for a 1/4 mile. Hopefully Monday I will have it legal to drive on the hiway and it first stop is for a bath.I will get pictures later. I dropped my phone and it isnt working now. I have had this phone for 3 years now, but with the pictures and information I had stored in it, really would be useful at this time.
I had wanted this running alot sooner than today, but with the weather and things that keep coming up, it just kept got putting further back. Im really happy with the way it has been running and sounds. Hopefully I will be able to have more updates as weather clears and things settle down.
03-06-2011, 02:35 AM
#58
YotaTech Milestone-Two Millionth Post
Terry,,,,EXCELLENT!!!
I have loads of pics on my "THREAD B" thread......and if you need any others for the vac-lines, let me know......PM me and I will post them up
I have loads of pics on my "THREAD B" thread......and if you need any others for the vac-lines, let me know......PM me and I will post them up
03-11-2011, 02:36 AM
#59
Super Moderator
Staff
Thread Starter
iTrader: (1)
Join Date: Aug 2008
Location: Anderson Missouri
Posts: 11,788
Likes: 0
Received 21 Likes
on
19 Posts
Hello Jerry...Thanks, I was able to use some of your orginal 22 rebuild and a few others and got them straightened out. My phone not working sure put a damper on that.
Other good news, Hoping Tuesday I will go and get it legal for the road. Fixed the headlight, exhaust leak, replaced alternator, I have a pin hole in the radiator that I will need to have fixed. I got the back glass working a little. Went half way and stopped. Think I will need to replace motor. Little by little it is getting there. Got to work all weekend and the weather is going to be nice so that is a downer. But next week is looking good.
Other good news, Hoping Tuesday I will go and get it legal for the road. Fixed the headlight, exhaust leak, replaced alternator, I have a pin hole in the radiator that I will need to have fixed. I got the back glass working a little. Went half way and stopped. Think I will need to replace motor. Little by little it is getting there. Got to work all weekend and the weather is going to be nice so that is a downer. But next week is looking good.
03-11-2011, 02:46 AM
#60
YotaTech Milestone-Two Millionth Post
good to hear. so it's running well?
back window on my son's 4runner, i replaced the motor with a used one.....not a terribly complicated job.......just be careful, almost lost a few fingers when i released the tension on the spring. i definitely couldn't be able to tell you how to do it, as i just kinda trudged on through it making sense of things as i went along. but it works.
back window on my son's 4runner, i replaced the motor with a used one.....not a terribly complicated job.......just be careful, almost lost a few fingers when i released the tension on the spring. i definitely couldn't be able to tell you how to do it, as i just kinda trudged on through it making sense of things as i went along. but it works.


