RBx 1988 4Runner Build-Up Thread
 12-23-2010, 06:32 AM
#81
Registered User
Thread Starter
Something else i just thought of,
my 3Weez-E doesn't have a dashpot, at least not that i could find. All the ones for my vintage seem to be in front of the throttle body below the TB spring/cable actuator attachment.
Would the absence of the dashpot cause my idle issue? I understand what the dashpot is for, and figure it will only affect throttle closing speed...am i wrong?
Thanks
 12-23-2010, 03:40 PM
#82
Registered User
Thread Starter
Update:
Had a few vacuum lines that weren't connected to the proper valves. So I made sure the vsv and egr as well as the ac valve were all connected correctly. Upon turning the key she springs to life then quickly goes into the low idle loping. Through codes 31 and 41 so I double checked vafm. Cleared the codes and tried again. Now I'm just getting a code 31 me thinks this is a loose wire....sux!!
I installed a fuel pressure gauge on the injector rail which is reading around 40 when jumping the pump, so that is good.
Now I have takes the TB off and cleaned that, what a carbony oily mess. I noticed that one of my small Vac lines on top of the TB was clogged so I cleared it with a wire then sprayed with throttle body cleaner.
I'm ready to pu the TB back on but I need to adjust the TPS since I removed it to clean. Upon bench testing the TPS before I put the whole thing back on the intake I can't seem to find 'infinite ' on the idl e2 test. This TPS is aftermarket and to my knowledge was working fine before once I adjusted it.
Since I have a known good oem TPS sitting on the other runner(22re) I think I may try to swap that. Anyone know if they are the same part, just different feeler gauge values?
Thx
12-23-2010, 11:12 PM
#83
Registered User
Join Date: Aug 2009
Location: Home is Mathis, Texas, for now
Posts: 87
Likes: 0
Received 1 Like
on
1 Post
I collected a few of the TPS sensors from junk yards back when I was trying to tune mine. I seem to remember the plug for the 88 3VZ was different from any other TPS that I pulled or won on Ebay. The settings are the same though. While you are messing with that, go to your local hardware store and pick up some allen head bolts to replace the screws taht originally came with it. It makes adjustment easier later on
12-24-2010, 02:53 AM
#84
Registered User
Thread Starter
Thanks 88, i actually have a buddy that owns a metric fastener shop down the street from me and he gave me some stainless allen head screws/bolts. The 3VZ-e tps is way easier to adjust(or remove for that matter) then the 22RE.
I did get the TPS adjusted. The reason it wasn't testing within spec is because i was using some small vacuum line over the contacts so i could test it and adjust with the other hand. Well this technique was pushing the contact enough to make contact with something else, i guess. Funny thing, i used the same vacuum line, instead of gator clips, when i adjusted it on the truck...go figure.
Just really frustrated with tracking down a possible wire issue now that i know the vafm tested fine.
12-24-2010, 04:07 AM
#85
Registered User
Join Date: Aug 2009
Location: Home is Mathis, Texas, for now
Posts: 87
Likes: 0
Received 1 Like
on
1 Post
One last thing I can think of. What kind of shape is the distributor in. If the drive rod bushings have slack, or if the dizzy internals have corrosion or moisture, or heck, even where the harness plugs into the dizzy has corrosion or a bad fitting could cause an erratic or bad idle. Question you may have answered before. What kind of plugs and wires are you running? OEM wires and NGK plugs seem to work the bests. I have read where Bosch plugs have been used with some very undesirable results, same with some HiPo wire sets. Back in '90, i tried a set of Bosch platinum+ plugs in a F250, I drove about 250 miles, and changed the plugs back to Motorcraft in a parking lot of a motel during a sleet storm. Thats how bad it was!
12-24-2010, 04:41 AM
#86
Registered User
Thread Starter
Plugs and wires are aftermarcket not sure what type. Just tried starting this morning and she revs up when the cold start injector kicks in then dies after a second or two. Cleared the codes only to get a code 11 now. I think she hates me, and here I thought I was showing her love....
12-24-2010, 04:58 AM
#87
Registered User
Join Date: Aug 2009
Location: Home is Mathis, Texas, for now
Posts: 87
Likes: 0
Received 1 Like
on
1 Post
It is the same with women and cars, they both will try your pateince to the end. My early bronco was the same way. Before I got married, I would spend 9 months wrenching on her to get her ready to go to Moab, or Colorado, only to have her sputter and die on the mountain every time. Twice I was offered 6000 and a ride back down the mountain for her. Several more times I entertained thoughts of rolling her off the side. In the end, all things were figured out, and worked out. Nothing a little time and a lot of money could not cure. I'm sure I will be going thru what you are experiencing when I get serious with my Toy.
Your issue is sounding more like a plugged fuel injector or two, or possibly a fuel pressure regulator staying open(reduced pressure). Is there a vacume line that goes to the fuel pressure regulator on these Toys?
Your issue is sounding more like a plugged fuel injector or two, or possibly a fuel pressure regulator staying open(reduced pressure). Is there a vacume line that goes to the fuel pressure regulator on these Toys?
12-24-2010, 05:37 AM
#88
Registered User
Thread Starter
I hope it's not an injector. And yes the regulator gets a Vac line, and is hooked up correctly.
I installed a fuel pressure gauge but it's on the engine, I'll have my son crank her while I watch since I can't do both. Jumping the fp- b+ gives me 45ish psi.
Thanks
I installed a fuel pressure gauge but it's on the engine, I'll have my son crank her while I watch since I can't do both. Jumping the fp- b+ gives me 45ish psi.
Thanks
12-24-2010, 06:55 PM
#89
Registered User
Thread Starter
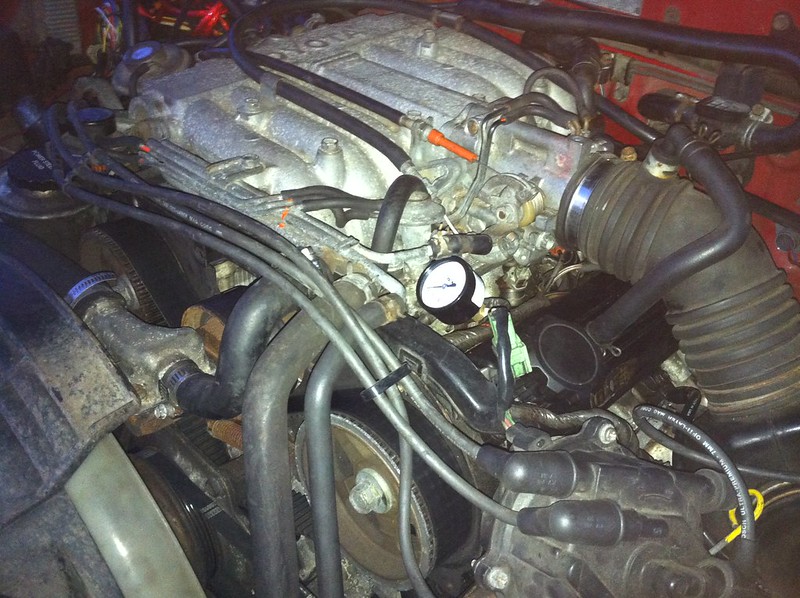
installed fuel pressure gauge:

interior
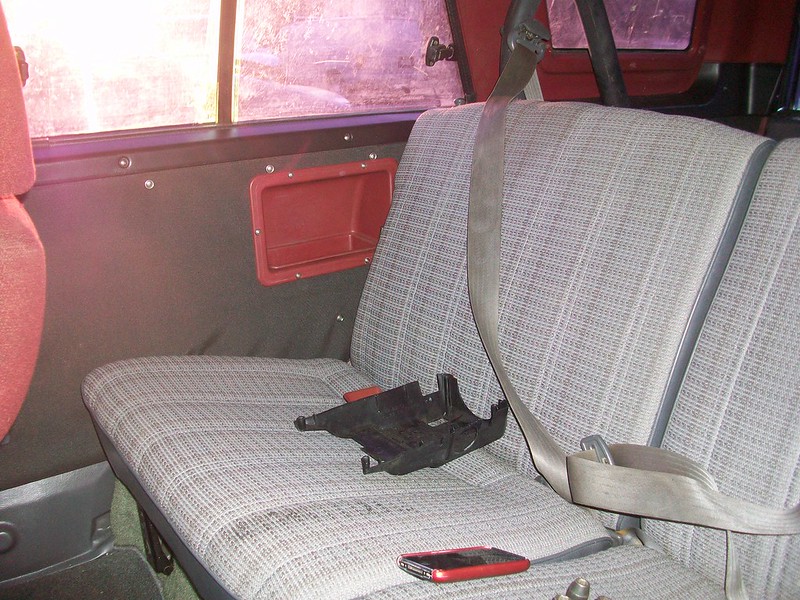
window switches, need to be seated still
however, she still won't idle!!
interior
window switches, need to be seated still
however, she still won't idle!!
Last edited by RBX; 12-30-2014 at 04:21 AM.
12-24-2010, 11:35 PM
#90
Registered User
Join Date: Aug 2009
Location: Home is Mathis, Texas, for now
Posts: 87
Likes: 0
Received 1 Like
on
1 Post
Pull the plugs, and see which ones look dry, or possibly fouled out. You have ruled out fuel pressure in the system, now see if its getting to the pistons. I still stand by the plug and wire issue. There are several posts here where members have had the same issues with aftermarket plugs and wires causing issues.
On the fuel injectors, they have rebuild kits that include orings, hats and screens. I bult a pigtail and switch and used a siphon tube on an air gun to pressure carb cleaner thru the injecter after soaking overnight. Cheap A$$ ed way to do it, but its worked for me on both sets of injectors I run in my Bronco, and I have cleaned, rebuilt and tested the ones that will go in the engine I plan on rebuilding in Feb
On the fuel injectors, they have rebuild kits that include orings, hats and screens. I bult a pigtail and switch and used a siphon tube on an air gun to pressure carb cleaner thru the injecter after soaking overnight. Cheap A$$ ed way to do it, but its worked for me on both sets of injectors I run in my Bronco, and I have cleaned, rebuilt and tested the ones that will go in the engine I plan on rebuilding in Feb
12-25-2010, 03:54 AM
#91
Registered User
Thread Starter
88 I think you may be on to something with the plugs and wires.
Yesterday, out of frustration I turned my attention to the exhaust. From the manifold to the tail pipe I counted four leaks, no problem I made a 2.25" exhaust on the 4Ruster. Break out the sawz-all. I was able to remove the entire exhaust and install in one piece!!!
Setup: 2.25" from manifold to tail. After the O2 I have a Cherry Bomb(glass pack) used as a resonator to a delta flow 40(I like this setup better on the 3vz the the 22re for sound).
So back to my running issue.
After installing the exhaust I needed to start it and here the new noise, of course. She won't idle but will fire, revs up to about 1500rpm as it should, then shudders and dies. I can feather the pedal and keep her running at about 2500rpm.
So does this sound more like plugs and wires? Since it's the holiday I can't go get another set to test.
Thanks for the help
01-04-2011, 09:41 AM
#92
Registered User
Thread Starter
Cap, Rotor, Plugs & wires -came in the mail yesterday. I only had a few minutes to pull the cap and rotor. They both definitely need replacing...and the cap had rust on the contact points...not good.
Also, my MR2 alternator is on the way, think ill fab there bracket up for that tonight, oh and i need to buy a larger fusible link...120a (90982-08254) i think...calling Denso now.
Also, my MR2 alternator is on the way, think ill fab there bracket up for that tonight, oh and i need to buy a larger fusible link...120a (90982-08254) i think...calling Denso now.
01-04-2011, 09:49 AM
#93
Registered User
Join Date: Jan 2009
Location: Moyock,NC
Posts: 477
Likes: 0
Received 0 Likes
on
0 Posts
I found the 120amp F-link at advance auto parts. If you want to go bigger than that, good luck. I forget the companies name but someone out there makes it.
Also what do you think about putting sound deadener on the rear interior panels? I want to make some aluminum panels like I did on the front and use the sound deadener stuff.
Also what do you think about putting sound deadener on the rear interior panels? I want to make some aluminum panels like I did on the front and use the sound deadener stuff.
01-04-2011, 10:52 AM
#94
Registered User
Thread Starter
Thanks Rich!
I put sound deadner behind every panel, still need to do the door panels though.
The only thing i would caution about with making your panels aluminum is they will bounce a lot of sound. It may not be as bad with the deadner behind it, and it may not be noticeable at all. If you have a plan to go with the panels like your doors, do it. Just figure you may need to cover a bit of the panel with some sort of fabric to make it a bit less reflective.
01-04-2011, 11:10 AM
#95
Registered User
Join Date: Jan 2009
Location: Moyock,NC
Posts: 477
Likes: 0
Received 0 Likes
on
0 Posts
Do you recommend a certain brand of the sound deadner? I saw some stuff online that was pretty cheap and then I saw some stuff that was crazy expensive. I plan to leave the panels bare on the outside. I'm only going to use the aluminum for the back half. The part by the back seats will be something different. Also you may have noticed I don't have carpet in my truck just bed liner so anything at this point will help I assume? I actually don't have any panels in the rear of the truck at all right now and it's loud.
01-04-2011, 12:31 PM
#96
Registered User
Thread Starter
I can't really recommend a type of deadner, check your local Auto-body supply distributor, most sell to the public, and see if they have any stock they are trying to get rid of. When i did auto-body we called the deadner 'q-pads'(quiet pads).
Since our trucks won't be luxury car quiet, especially with the top off i wouldn't buy the expensive deadner, and if you don't have carpet..... You could use Home Depot butyl tape inside the door and bed cavity, stuff is pretty cheap, and sticky. Don't worry about covering every square inch(try to get about 75% covered), the q-pad is there to stop the sheet metal from vibrating and amplifying the sound.
If you don't plan on putting carpet in think about undercoating the underside of your truck, that will help a good bit with corrosion as well. Make sure you buy the stuff that dries, or pay a shop that specializes in that stuff. They make an undercoating that is really good for sound absorption but it doesn't really cure, and working on your rig after that stuff has been applied is awful.
I removed my panels in the truck and put the 1/8" thick (15'x12" roll) foil backed foam on the back of all my interior panels, that should help you also.
Oh, almost forgot, if you put any deadner inside the door and bed cavity, you will need to remove the waxy paraffin sprayed in there from the factory(to keep moisture rolling down the sheet metal) or your q-pads/butyl won't stick. Once you deaden the area re-spray it with the paraffin wax (get it at the local AutoBody joint).
I've heard of guys using spray foam(Great Stuff brand) in areas to deaden the panels, but i would be concerned that it may trap moisture .
01-04-2011, 12:44 PM
#98
Registered User
Thread Starter
Thanks, i need to get some more pics up on here.
Lately i have been baffeled buy a ground issue with my tailgate coutesy light mod. Some how the courtesy light will not turn off now, and the grounding issue is somewhere in the tailgate, and i can't find it. For now i have it disconnected from the rear door lock detection switch. So all the lights still come on when you open the front doors, just not when you open the tailgate(which stinks because that was the main reason i did this mod).
Oh well, i've learned by now that i need to do things 4-5 times before i don't have to take it apart anymore...hahaha.
01-04-2011, 12:52 PM
#99
Registered User
^ you are doing better than me. I can't seem to get the rear window in my tail gate working at all. It hasn't worked since I've had the truck, I did find the original switch in a box of parts that came with the truck but can't seem to find the wiring it plugs into. I am thinking about how I could rewire the whole thing with out all of the saftey stuff.
01-05-2011, 07:04 AM
#100
Registered User
Thread Starter
Rob,
So are you saying you have no wiring running back to the window? The relay/control box should be on the lower b-pillar behind the driver. that main harness runs to your tail-lights, then down to a big plug.
I am pretty sure i have an extra window switch if you need it. The rear window switch is just a ground switch...uh...switch. It is unlike the front window switches in that the control box i mentioned determines the up down motion according to which ground is applied.
Defeating the safety stuff may be a little more involved. But one easy mod is to jumper the cab removal switch. The little box on the third(i think) bolt back on the drivers side rail. Then you have the door lock detection switch, and rear door open switch. Those two switches are completing grounds, so you would have to jumper some pins on the control box. 4Crawler has a section about the rear window, but I'm sure you know that.
I have a few other parts for the rear window mechanism, PM me if you need something.


