RAD4Runner's 1986 4Runner dlx Build-up
 10-26-2012, 04:03 PM
#81
Registered User
Thread Starter
LOL! Spaghetti soup... Schematic Cliff-Jumping... Only in Yotatech LOL!
 10-28-2012, 09:28 PM
#82
Registered User
Thread Starter
ZUKcessful Zuk Mod
Zuk Mod Using 12-INCH, 125-Pound/Inch Black Magic Springs
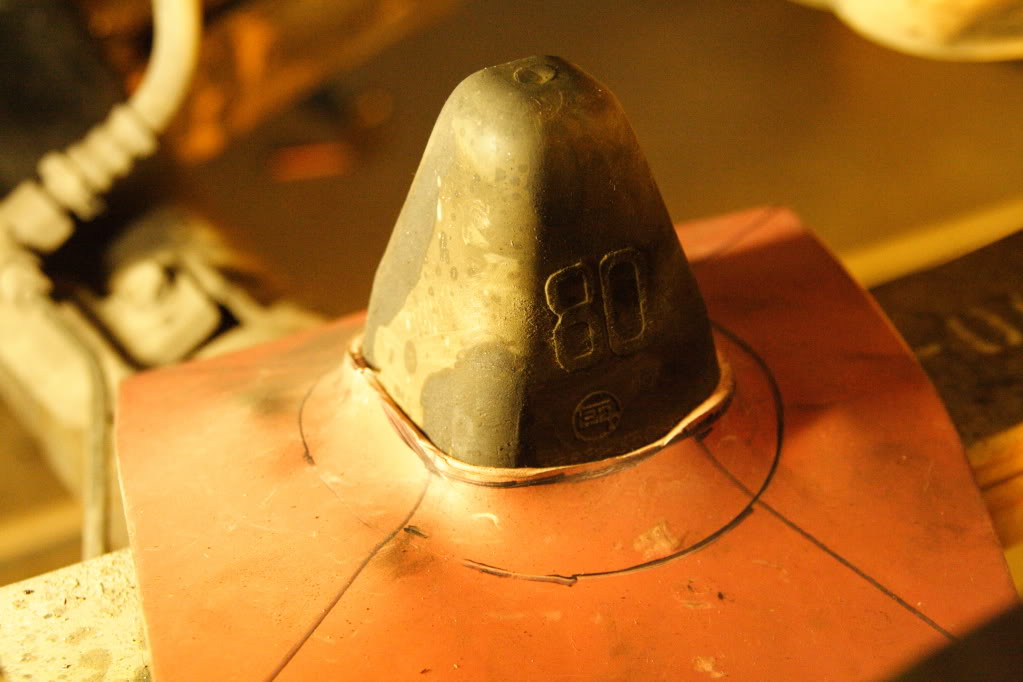
Bump Stops Cut to 0.75 inch from frame. This prevents the "plucking" action that others get.

Needed spring pads to eliminate any metal on metal (spring to frame, spring to lower bumpstop bracket). Originally wanted to use durometer 75A urethane (same material as suspension bushings & skateboard wheels), but too expensive. Ended up using rubber pads from Marshall Industrial Hardware. Pad is 1/8-inch thick.
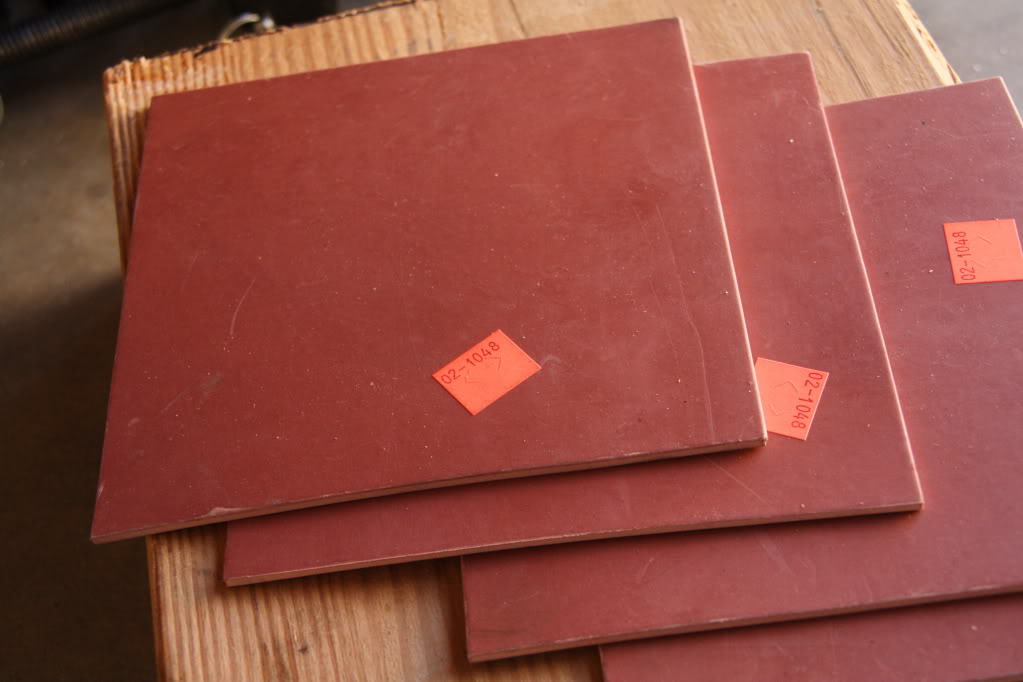
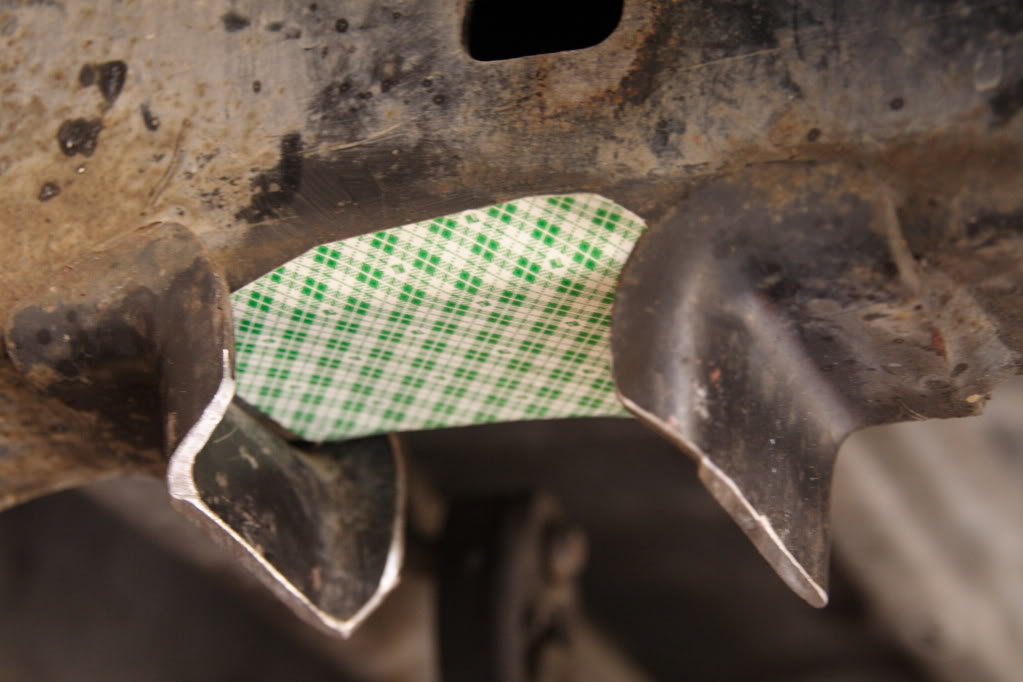
Use 3M double-sided adhesive tape stick to frame.
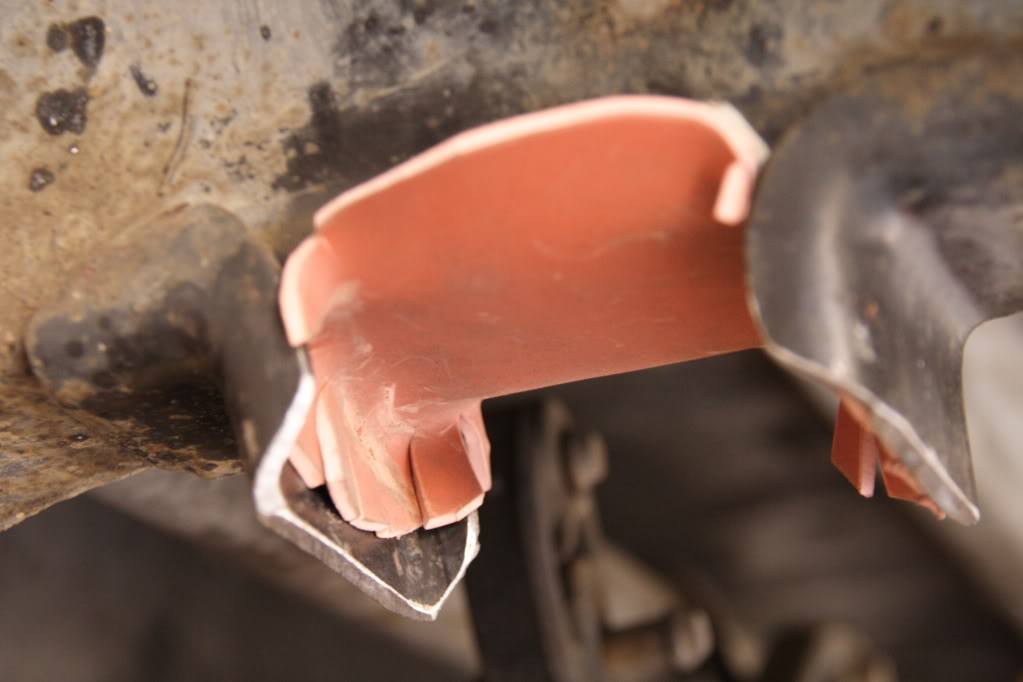
I put this pad on bottom bumpstop bracket but spring & bracket cut it. (A modified bottom perch that captures/cups the spring, if I could fab one, would be ideal.)
Capture Screws:
Drill and tapped for 1/4-20 screws (ideal would be 6-mm), 0.5 inch from frame @ 6 places per bumpstop for capture screws This is for more flexibility where to place capture screws where they would get the least stress.
Capture screw threads centered 1/2 inch from frame.
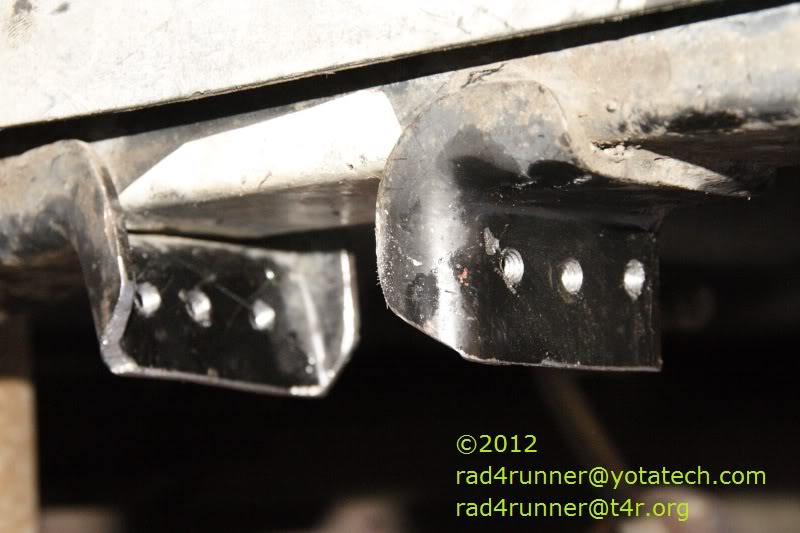
Just right for 1/8-inch thick rubber spring pad plus 3/8-inch dia spring material.
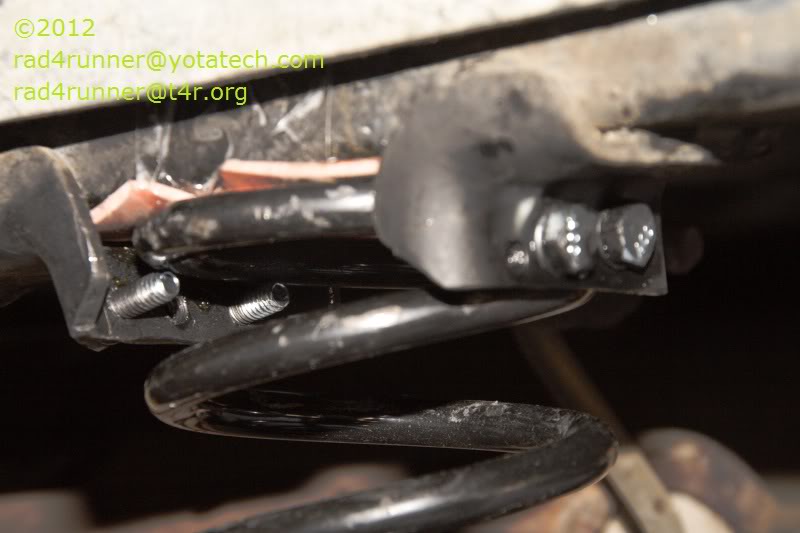
Using Black Magic springs rated 12-inch, 125 pounds/inch.
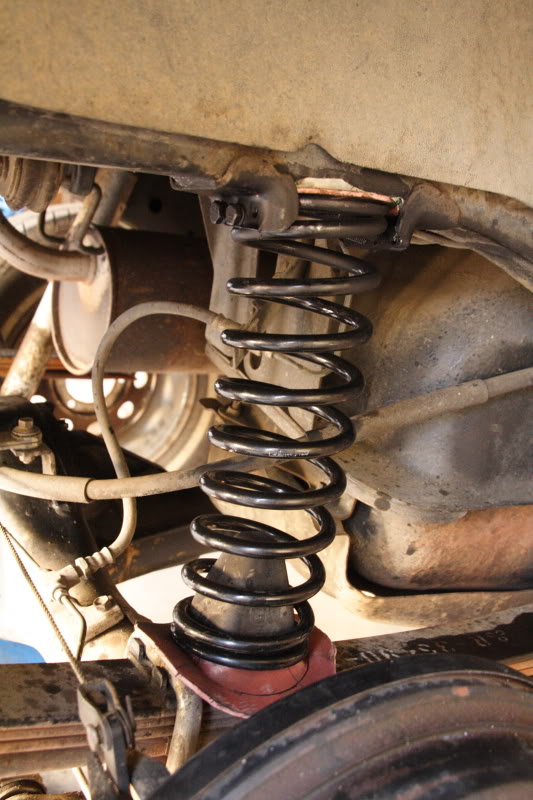
No Noticeable Rake!
Wheel rim to wheel well rim in front: 14"
Wheel rim to wheel well rim in rear: 12.5"
Frame to Leaf Pack:
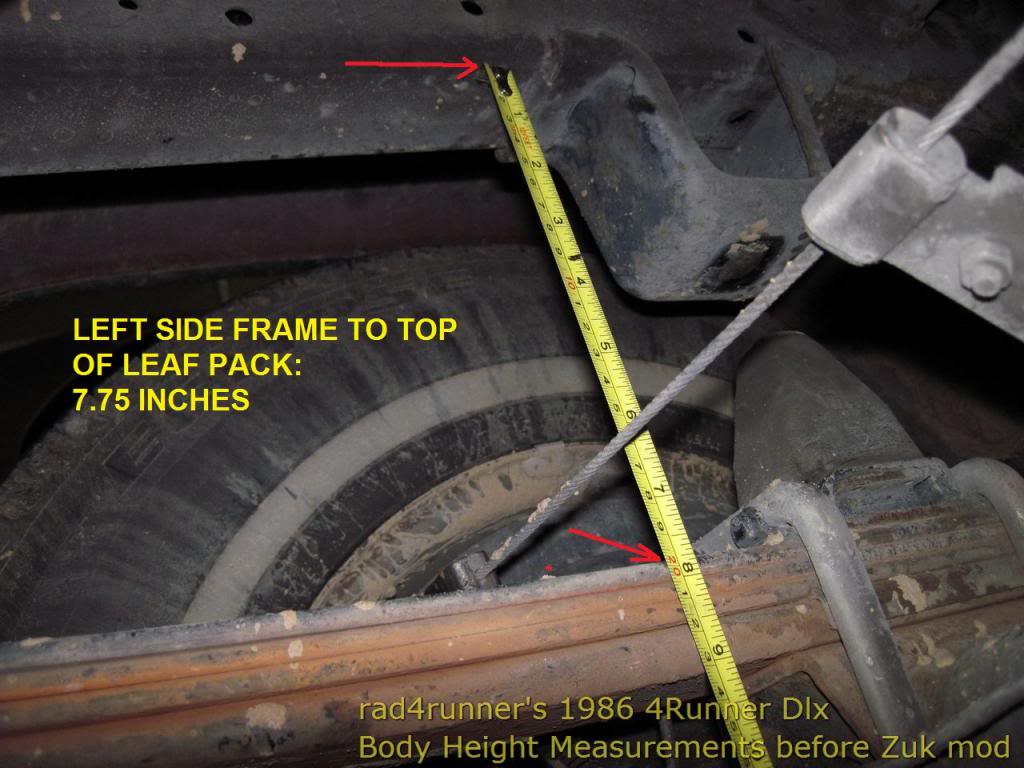
Before: 7.75 Inches [/color, on both sides):
After: 9.25 inches (As of 22Mar2013)
Thanks for all your earlier inputs, especially Chef's, regarding the 12-inchers.
Bump Stops Cut to 0.75 inch from frame. This prevents the "plucking" action that others get.
Needed spring pads to eliminate any metal on metal (spring to frame, spring to lower bumpstop bracket). Originally wanted to use durometer 75A urethane (same material as suspension bushings & skateboard wheels), but too expensive. Ended up using rubber pads from Marshall Industrial Hardware. Pad is 1/8-inch thick.
Use 3M double-sided adhesive tape stick to frame.
I put this pad on bottom bumpstop bracket but spring & bracket cut it. (A modified bottom perch that captures/cups the spring, if I could fab one, would be ideal.)
Capture Screws:
Drill and tapped for 1/4-20 screws (ideal would be 6-mm), 0.5 inch from frame @ 6 places per bumpstop for capture screws This is for more flexibility where to place capture screws where they would get the least stress.
Capture screw threads centered 1/2 inch from frame.
Just right for 1/8-inch thick rubber spring pad plus 3/8-inch dia spring material.
Using Black Magic springs rated 12-inch, 125 pounds/inch.
No Noticeable Rake!
Wheel rim to wheel well rim in front: 14"
Wheel rim to wheel well rim in rear: 12.5"
Frame to Leaf Pack:
Before: 7.75 Inches [/color, on both sides):
After: 9.25 inches (As of 22Mar2013)
Thanks for all your earlier inputs, especially Chef's, regarding the 12-inchers.
Last edited by RAD4Runner; 02-15-2019 at 03:43 PM. Reason: Updated Spring Compression after several months
10-28-2012, 09:42 PM
#83
Registered User
Thread Starter
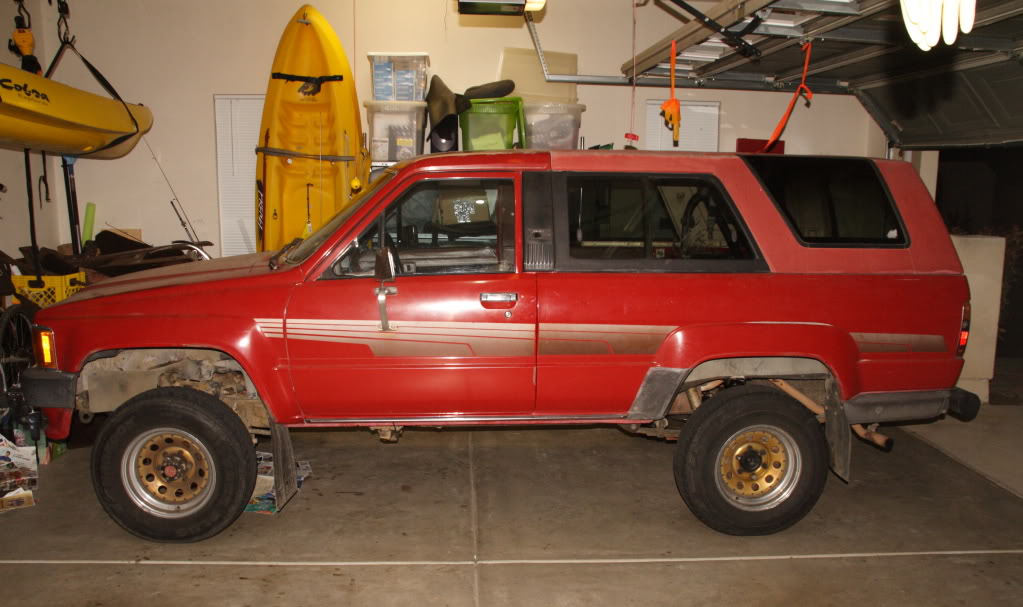
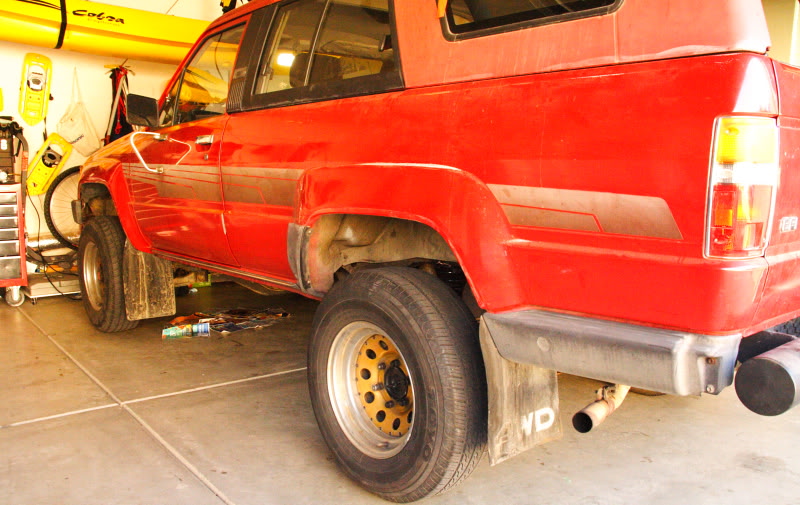
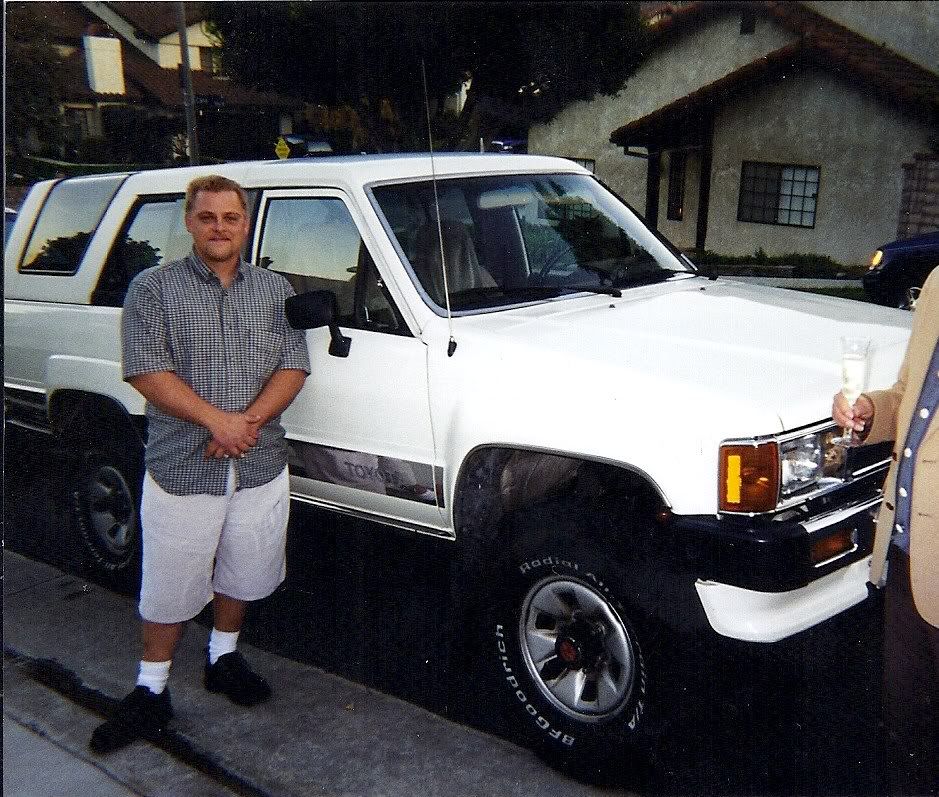
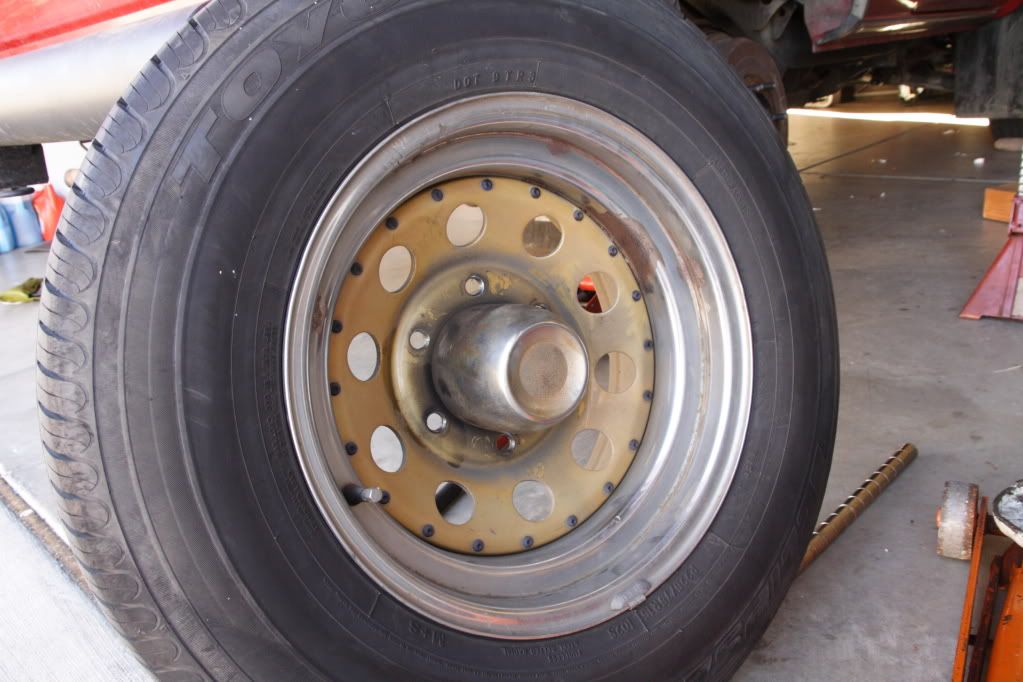
No Bling Nor Cheesy Accessories
I hate non-functional chrome (else I would have bought a Cadillac) so off came the wheel well trims, and the cheesy bullet.
Before:

After:
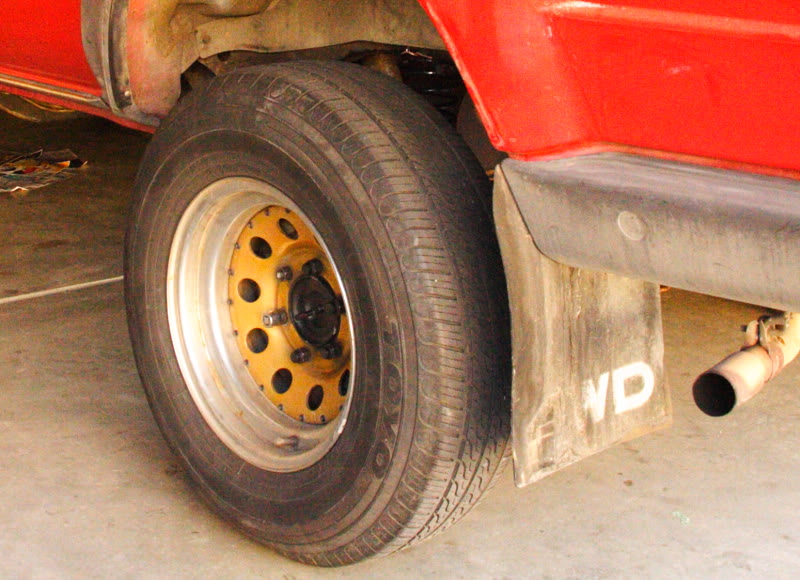
I'll paint the wheel in graphite someday when I'm done with more functional projects.
Before:
After:
I'll paint the wheel in graphite someday when I'm done with more functional projects.
Last edited by RAD4Runner; 12-18-2013 at 04:36 PM.
10-28-2012, 10:24 PM
#84
Hey Buddy, .... my pleasure on the Zuk e-pinions, lol. Wow, .... 12.5? Interesting. Mine is 13.25... You said you were completely resting on the bump stops/overload? That would maybe explain it... I still had an inch or 2 of space when just sitting still/no load.
Anyway, NICE JOB!
I would try to do what Grego did on the wheels.... It's just a simple Stainless Steel Color Paint... and I think it would REALLY match well with your decal colors Check out his thread and the wheels.. I think you'd agree. Then, you'd have NO ADDED BLING factor... in fact, it would reduce it from the Chrome Rings around the GOLD wheels.. Right?
You DO NOT need the wheel caps on. They're in no way critical... simply cosmetic. They can help or hurt... They can help if their HIGH quality and a nice seal... then less crap gets in there around the hubs OD where the wheel slides over. (Not sure if you've seen guys trying to pull off wheels with tractors? hahaha. Yeah, back east, they get TOTALLY rusted onto the hubs(steelies, anyhow )...
)...
Not sure on the Rocker panels... Are you talking about the Black Plastic rock guards in front of the rear wheel wells? I pulled those for Jason-in-TN off that blue one at the PYPart.... It was I managed to get one clip partially out and then it snapped off the back side of one... so I just compressed the other one with it pulled out a bit and it came out... Then turned and pulled out a lil bit again and did the other ones.
I'm afraid to look under mine! lol. I actually found mud splatter INSIDE my panels.... They have quite the lil gap there for air and water to get in and out.
I updated a lil bit on my build.... THANKS SO MUCH FOR THE FROST KING IDEA, MAN! That stuff is A GREAT application for this! Hot or cold... it's gonna stay put and seal off the P&S(which is already sealed off with Foil tape.)... it came out REALLY NICE, RAD, ...can't thank you enough for all your input!
Anyway, NICE JOB!
I would try to do what Grego did on the wheels.... It's just a simple Stainless Steel Color Paint... and I think it would REALLY match well with your decal colors
Check out his thread and the wheels.. I think you'd agree. Then, you'd have NO ADDED BLING factor... in fact, it would reduce it from the Chrome Rings around the GOLD wheels.. Right? You DO NOT need the wheel caps on. They're in no way critical... simply cosmetic. They can help or hurt... They can help if their HIGH quality and a nice seal... then less crap gets in there around the hubs OD where the wheel slides over. (Not sure if you've seen guys trying to pull off wheels with tractors? hahaha. Yeah, back east, they get TOTALLY rusted onto the hubs(steelies, anyhow
)... Not sure on the Rocker panels... Are you talking about the Black Plastic rock guards in front of the rear wheel wells? I pulled those for Jason-in-TN off that blue one at the PYPart.... It was I managed to get one clip partially out and then it snapped off the back side of one... so I just compressed the other one with it pulled out a bit and it came out... Then turned and pulled out a lil bit again and did the other ones.
I'm afraid to look under mine! lol. I actually found mud splatter INSIDE my panels.... They have quite the lil gap there for air and water to get in and out.
I updated a lil bit on my build.... THANKS SO MUCH FOR THE FROST KING IDEA, MAN! That stuff is A GREAT application for this! Hot or cold... it's gonna stay put and seal off the P&S(which is already sealed off with Foil tape.)... it came out REALLY NICE, RAD, ...can't thank you enough for all your input!
10-28-2012, 10:54 PM
#86
Registered User
Thread Starter
My concern is how to patch up the holes they'd leave. Maybe tiny (quarter-size) fiberglas patch, then epoxy and paint over. Doesn't need to be pretty, just seal water out. Maybe Terry and others with body work experience can comment?
10-28-2012, 11:27 PM
#87
Yeah, I hear ya... Well, the rocker panel patch and plastic rock guard patch has been done on here... just don't remember by whom. My tires stick out past the fender and those rock guards have been covered in mud...BUT, yes, they're also likely screwed up behind there due to debris. I like them... I think they add contrast on the sides of these... BUT, maybe there's a good way to seal them up?
The thread on saw on the plastic things the guy pulled the inner panel and laid steel with JB Kwik weld on the inside..... Then filled it on the outside with metal fill and sanded that down and painted the whole rig. Not sure what you'd do if you didn't plan to repaint... BUT, thinking about it... I think if you did a 'MOCK ROCK GUARD' with Bed Liner(in the spray can/all taped off with the same lines)... with all those holes filled in... that would work great! Just a thought. I might do that myself. I don't think my rig looks Cadillac-like with the SR5 Chrome Package... But that's just me I guess. I like it.. but many don't, I get that. I just see so many 'blacked out' rigs and I think the trim looks nice. Grego could have taken the easy 'blacked out' route all around, but he left that contrast in there, and I think it looks really nice I think that color would look great with your stripes, even though you're trying to keep it 'weathered' looking on the outside... I just gotta say though, RAD...... That is NOT EVEN going to stop thieves from nabbing it. People that steal these want EVERYTHING THEY CAN GET OFF IT IN UNDER AN HOUR... Pretty or not, they don't care. But I get not wanting to have THOUSANDS in Extras for them to get IF THEY DID take it, either. My CLEAN AND BA 89 Pick up 4x4 got dragged up onto a flatbed towtruck and taken to the near by angeles crest for stripping of quite a few things. I didn't wanna start over, and I'd REALLY wanted a 4Runner, even though my buddy kept talking me out of it... So I grabbed the white one. It was heavily loaded with armor and suspension and turbo trans and built motor... And it was very clean... but looked pretty stock>>>

The thread on saw on the plastic things the guy pulled the inner panel and laid steel with JB Kwik weld on the inside..... Then filled it on the outside with metal fill and sanded that down and painted the whole rig. Not sure what you'd do if you didn't plan to repaint... BUT, thinking about it... I think if you did a 'MOCK ROCK GUARD' with Bed Liner(in the spray can/all taped off with the same lines)... with all those holes filled in... that would work great! Just a thought. I might do that myself. I don't think my rig looks Cadillac-like with the SR5 Chrome Package... But that's just me I guess. I like it.. but many don't, I get that. I just see so many 'blacked out' rigs and I think the trim looks nice. Grego could have taken the easy 'blacked out' route all around, but he left that contrast in there, and I think it looks really nice
I think that color would look great with your stripes, even though you're trying to keep it 'weathered' looking on the outside... I just gotta say though, RAD...... That is NOT EVEN going to stop thieves from nabbing it. People that steal these want EVERYTHING THEY CAN GET OFF IT IN UNDER AN HOUR... Pretty or not, they don't care. But I get not wanting to have THOUSANDS in Extras for them to get IF THEY DID take it, either. My CLEAN AND BA 89 Pick up 4x4 got dragged up onto a flatbed towtruck and taken to the near by angeles crest for stripping of quite a few things. I didn't wanna start over, and I'd REALLY wanted a 4Runner, even though my buddy kept talking me out of it... So I grabbed the white one. It was heavily loaded with armor and suspension and turbo trans and built motor... And it was very clean... but looked pretty stock>>>
10-29-2012, 08:30 AM
#88
Registered User
Thread Starter
 10-29-2012, 09:53 AM
#89
Registered User
iTrader: (4)
Join Date: May 2010
Location: People's Republic of California
Posts: 720
Likes: 0
Received 15 Likes
on
12 Posts
 You had those bullet things like me! I hated mine also, so dorky looking. You're rig is gonna end up looking like Mark's rig pretty soon, all decked out and ready for show!
10-29-2012, 10:36 AM
You had those bullet things like me! I hated mine also, so dorky looking. You're rig is gonna end up looking like Mark's rig pretty soon, all decked out and ready for show!
10-29-2012, 10:36 AM
#90
Registered User
Thread Starter
What paint did you use on your wheels, btw? Non-gloss silver, right?
Now those bullets will be mixing bowls for whatever I need to work in the garage. Too big to be cup holders -
Regards,
RAD
Last edited by RAD4Runner; 10-29-2012 at 10:39 AM.
10-29-2012, 10:44 AM
#91
Registered User
iTrader: (4)
Join Date: May 2010
Location: People's Republic of California
Posts: 720
Likes: 0
Received 15 Likes
on
12 Posts
I used rustoleum products. Etching primer and then graphite colored wheel paint.
http://www.rustoleum.com/CBGProduct.asp?pid=375


http://www.rustoleum.com/CBGProduct.asp?pid=375
10-29-2012, 01:50 PM
#92
Registered User
Thread Starter
I used rustoleum products. Etching primer and then graphite colored wheel paint.
http://www.rustoleum.com/CBGProduct.asp?pid=375
http://www.rustoleum.com/CBGProduct.asp?pid=375
10-30-2012, 08:19 AM
#93
Registered User

Join Date: Oct 2012
Posts: 7
Likes: 0
Received 0 Likes
on
0 Posts
Update with picstures
To answer the questions, it runs and starts right up, most of the time, but when it doesnt I do get a click at the circuit open relay and on the starter solenoid but just like the descrption in rad4runner's wiring issue with these models, it does seem to be a voltage drop because the starter is new and tapping on the starter makes it go ahead and start up.
The VIN label in the drivers door jam says it was produced in November of 1985. I think it is possible that I am working on a truck that was manufactured without a starter relay.
So rad4runner, can I use a typical curcuit breaker, or does it have to be a kill switch like you mentioned? Am I thinking correctly when I say that a kill switch and a toggle switch are both about the same thing that must be manually operated? I would like to have something that is automatic if I can.
Again it is currently running fine, I just have to put the interior back in and hopefully fix this voltage drop.
Thanks, Guys! I love yotatech.

Just click on the pics to see larger images. Sorry Im not a photobucket fan lol


 10-30-2012, 10:02 AM
#94
Registered User
Thread Starter
Adding Starter Relay Does Not Change User-Interface
I do get a click at the circuit open relay and on the starter solenoid but just like the descrption in rad4runner's wiring issue with these models, it does seem to be a voltage drop because the starter is new and tapping on the starter makes it go ahead and start up. The VIN label in the drivers door jam says it was produced in November of 1985. I think it is possible that I am working on a truck that was manufactured without a starter relay.
. However, for 27 years 12-amps necessary to energize the solenoid has been passing through ST1 contacts of your ignition switch, causing arcing and pitting. Try taking resistance reading from battery terminal to this brown connector on the thinner wire that plugs into your starter solenoid here. I would not be surprised if you get some resistance (when there should be none- it's a straight wire plus a switch) or intermittent connectivity because contacts are pitted.
So rad4runner, can I use a typical circuit breaker, or does it have to be a kill switch like you mentioned? Am I thinking correctly when I say that a kill switch and a toggle switch are both about the same thing that must be manually operated? I would like to have something that is automatic if I can.
[IMG]
 [/IMG]
All will be automatic, nothing will change with user-interface. The kill switch is merely a suggestion. You can leave that on/closed at all times. Flick it OFF/open when you leave truck in a questionable area... Oh we trust that you'll never go to those places LOL!
Relay:
General-purpose Auto relay that would handle 12-Amps (pick one that would handle 30-40 Amps for safety margin, like .
Challenges:
- Need to know whether your truck has the clutch safety switch, and how clutch safety switch is wired because yours does not have a starter relay.
- Need to find which Fusible link (with terminal 3 in schematic) to connect load power to relay.
10-30-2012, 11:26 AM
#95
Registered User
Join Date: Oct 2012
Posts: 7
Likes: 0
Received 0 Likes
on
0 Posts
- Need to know whether your truck has the clutch safety switch, and how clutch safety switch is wired because yours does not have a starter relay.
- Need to find which Fusible link (with terminal 3 in schematic) to connect load power to relay.
Thanks, rad4runner. It is an automatic tranny. Would it matter so much since this is the case? Thanks so much, Bradley.
10-30-2012, 12:40 PM
#96
Registered User
Thread Starter
Mount starter relay where it would go on 1986 - 1988.
Find that wire with brown connector going to starter solenoid and trace it back. That wire will power the coil of starter relay. Negative side of starter relay will go directly to chassis ground, on fender near fuse box.
Power for load of relay (one side of contact) will be taken from Fusible link - side away from battery. Meaning find the terminal which when FL is removed has no voltage to it (term 3 on 1986-8 schematic).
Other side of relay contact will go to solenoid where brown connector came from.
Gotta have schematic to make it clearer.
10-30-2012, 01:06 PM
#97
Ok..... now, ..... I must flee, before I lose everything I have planned on my rig in the near/immediate future  hehehehe. HOLY WOWEEE, ... you ARE a Guru of sorts in this realm, RAD.... VERY good info! Now get up here and do it for me too! hehehe.
hehehehe. HOLY WOWEEE, ... you ARE a Guru of sorts in this realm, RAD.... VERY good info! Now get up here and do it for me too! hehehe.
10-30-2012, 01:46 PM
#98
Registered User
Join Date: Oct 2012
Posts: 7
Likes: 0
Received 0 Likes
on
0 Posts
So much simpler. Meaning no clutch safety.
Mount starter relay where it would go on 1986 - 1988.
Find that wire with brown connector going to starter solenoid and trace it back. That wire will power the coil of starter relay. Negative side of starter relay will go directly to chassis ground, on fender near fuse box.
Power for load of relay (one side of contact) will be taken from Fusible link - side away from battery. Meaning find the terminal which when FL is removed has no voltage to it (term 3 on 1986-8 schematic).
Other side of relay contact will go to solenoid where brown connector came from.
Gotta have schematic to make it clearer.
Thanks, Bradley.
10-30-2012, 07:34 PM
#99
Registered User
Thread Starter
Bradley, NP.
Can't leave out relay. Until you have a starter relay added, you'll keep on beating up your ignition switch with that 12-Amp current for solenoid, and you'll keep on having problems.
And why leave out the kill switch? You can get one for less than $10 and have one more theft deterrent.
OOOPS! Just reviewed the schematic. Since you have an auto tranny, even IF you had the 1986 it would not have the starter relay. Simplified scheamtic of 1986-1988 here:
So, IF and only IF your 85 shares same schematic, 12-Amps needed to run starter solenoid passes through both the ST1 contacts AND the neutral safety switch, meaning more chances to have pitted/corroded contacts from repeated starting. Note that now 12-Amp current for solenoid coil runs from battery on right -front corner of engine comp, to inside cabin, to left side of dash, to ignition switch, to transmission (neutral safety switch) back to engine compartment, to starter solenoid. That's a lot of resistance just from length of wire alone. Add to that tired ST1 and neutral safety contacts.
Modified circuit with added starter relay would look like this:
Now 12-Amp solenoid coil current only runs from battery, to right-hand fender, to solenoid. ALL ARE INSIDE ENGINE COMPARTMENT NEAR THE BATTERY AND STARTER = shorter wire run = less resistance = less voltage drop.
Also, only low current needed to energize starter solenoid runs through ST1 contacts and neutral safety switch, helping extend their lives (for another 27 years)
.If too complicated for you, I recommend using the Hot Shot (search on Yotatech). Same Concept.
Last edited by RAD4Runner; 10-31-2012 at 09:08 AM.
 .......... heard something go 'twoingggggggggoingoing-BADINK....... poooooooof' in my brain again.... THANKS, RAD!


