Ocell's 88 4Runner build thread
 12-06-2014, 03:21 PM
#741
You are getting crazier and crazier, aren't you? Thus the cage... Because 4.7 mean you want to get even crazier! Lol. Actually no, they just make a lot less difficult on your engine and you! And they take a lot of the flop factor away. Just remember, when you get down or you are in a sticky situation in about to flop over and you need to gas out, you better throw it back into 4 low single case! Lll... Flooring it at 10.5/1 gets you about, well, nowhere! Lol.
 12-06-2014, 08:22 PM
#742
Registered User
Thread Starter
I've had a few moments where I got VERY tippy at the top of a situation where, if I rolled, I wasn't going to stop rolling for a while. I think a cage should be my next move before I get serious about the solid front axle.
I like doing a lot of slow rocky creek bed type stuff, and I have to slip the clutch constantly with the stock t-case gearing to keep from slamming against everything. I really want the 4.7's so I can crawl properly. That's a good point about not being able to gas out. For now I'm planning to keep a single case, so I guess I'll have to hope I'm quick enough in the head to slam it into 5th gear if I need to gas out of anything.
I like doing a lot of slow rocky creek bed type stuff, and I have to slip the clutch constantly with the stock t-case gearing to keep from slamming against everything. I really want the 4.7's so I can crawl properly. That's a good point about not being able to gas out. For now I'm planning to keep a single case, so I guess I'll have to hope I'm quick enough in the head to slam it into 5th gear if I need to gas out of anything.
12-08-2014, 12:09 AM
#743
3rd should work brother. You'll get a feel for it and know exactly what to do. But that's the point, play around with it a lot in the safe or situation before you get in those sticky ones. The 3 - 4ft boulders we hump are pretty good its slowing down a roll, but I've seen some really bad ones even in those situations. I'm still trying to decide what would you do interior or exterior. Look forward to seeing whatever comes up next man! Now get on Instagram and update there! Lol.
12-09-2014, 09:18 PM
#745
Registered User
Thread Starter
Here are a few photos. A full album of photos from the trip is here: https://www.flickr.com/photos/ocell/...7649276397008/
My truck didn't get a ton of action on this trip. I mostly wanted to ride along in my buddy's Jimmy. He's been working on it for over a year, so I wanted to spend some time in it.
 2014-11-30 11.08.40-1 by Ocell, on Flickr
 2014-11-30 11.09.05-1 by Ocell, on Flickr
Michael in his beast of a Jeep found the right line and walked up this in the dark. The Jimmy basically jumped it using muscle (500hp). The 4Runner had a good run, but ended up laying down on its side before getting winched out.
 2014-11-29 20.20.54-1 by Ocell, on Flickr
 2014-11-29 20.51.39-1 by Ocell, on Flickr
 2014-11-29 20.51.53-1 by Ocell, on Flickr
 2014-11-29 20.52.08-1 by Ocell, on Flickr
 2014-11-29 20.53.39-1 by Ocell, on Flickr
Yeah, I know this isn't true flex because my back wheel is coming off the ground. I'm still pretty happy with it, though.
 2014-11-29 15.08.59-1 by Ocell, on Flickr
 2014-11-29 15.09.44 by Ocell, on Flickr
 2014-11-29 15.09.58 by Ocell, on Flickr
This doesn't look like much, but it's a pretty deep V-shaped trench that was easy to get wrong. As you can see in the next photo of the Samurai.
 2014-11-29 13.54.14-1 by Ocell, on Flickr
 2014-11-29 13.38.52-1 by Ocell, on Flickr
 2014-11-29 13.34.16-1 by Ocell, on Flickr
 2014-11-29 12.35.48-1 by Ocell, on Flickr
We had two Samurais on the trip, both with open differentials. This yellow one powered through some stuff I didn't think it had a chance with. Unfortunately it lost a driveshaft and steering shaft at the same time, so we spent a long time recovering it from the trail and towing it back to camp.
 2014-11-29 12.46.59-1 by Ocell, on Flickr
My truck didn't get a ton of action on this trip. I mostly wanted to ride along in my buddy's Jimmy. He's been working on it for over a year, so I wanted to spend some time in it.
2014-11-30 11.08.40-1 by Ocell, on Flickr2014-11-30 11.09.05-1 by Ocell, on FlickrMichael in his beast of a Jeep found the right line and walked up this in the dark. The Jimmy basically jumped it using muscle (500hp). The 4Runner had a good run, but ended up laying down on its side before getting winched out.
2014-11-29 20.20.54-1 by Ocell, on Flickr2014-11-29 20.51.39-1 by Ocell, on Flickr2014-11-29 20.51.53-1 by Ocell, on Flickr2014-11-29 20.52.08-1 by Ocell, on Flickr2014-11-29 20.53.39-1 by Ocell, on FlickrYeah, I know this isn't true flex because my back wheel is coming off the ground. I'm still pretty happy with it, though.
2014-11-29 15.08.59-1 by Ocell, on Flickr2014-11-29 15.09.44 by Ocell, on Flickr2014-11-29 15.09.58 by Ocell, on FlickrThis doesn't look like much, but it's a pretty deep V-shaped trench that was easy to get wrong. As you can see in the next photo of the Samurai.
2014-11-29 13.54.14-1 by Ocell, on Flickr2014-11-29 13.38.52-1 by Ocell, on Flickr2014-11-29 13.34.16-1 by Ocell, on Flickr2014-11-29 12.35.48-1 by Ocell, on FlickrWe had two Samurais on the trip, both with open differentials. This yellow one powered through some stuff I didn't think it had a chance with. Unfortunately it lost a driveshaft and steering shaft at the same time, so we spent a long time recovering it from the trail and towing it back to camp.
2014-11-29 12.46.59-1 by Ocell, on Flickr
Last edited by Ocell; 12-09-2014 at 09:21 PM.
01-23-2015, 02:22 PM
#746
Registered User
Thread Starter
I wonder if I need new control arm bushings......

I was hoping to limp on my shot bushings until I could do the SAS... but I'm not sure if that's a reasonable way to approach this anymore.
My camber bolts are completely frozen in the lower control arms so I'm going to have to cut them out. I've read that it's a major pain to do, so I was ignoring it. I didn't really want to spend so much time/effort/money on the IFS if I'm going to get rid of it in the next year or two. I'm not sure I can drive it long without any bushing at all, though.
01-27-2015, 03:08 PM
#748
Registered User
Thread Starter
I ordered some polyurethane bushings from Prothane. Hoping I can get them lubed up REAL good and keep them from squeaking.
I'm planing to reuse my control arms. From what I've read, you burn/clean out the old rubber bushings and leave the outer metal sleeves pressed in the control arms. Then you slide the poly bushings in.
Right now I'm working on making sure I order the correct camber bolt kits. Mine are frozen so I'm going to try cutting them from the side with a sawjaw or cutoff wheel, then clean out the bushings and use the new poly bushings and camber bolt kits.
I think this is the right bolt, but I'd like to find a kit with all the washers and nuts:
If all goes as planned I'll be able to actually align the truck!
03-22-2015, 01:31 PM
#749
Registered User
Thread Starter
It's depressing to see that my last post about my issues was nearly 2 months ago.
A while ago I went to try and at least replace the upper control arm bushings, leaving the lower bushings/cam-bolts alone, so I could keep driving the truck. I went to remove the torsion bar adjuster bolts so I could undo the top control arm and found out my adjuster bolts/nuts are completely frozen. I did some searching and it looks like my only real solution is to snap the bolts with a breaker bar and replace them.
Yesterday I finally had time to head to the dealership to order all the bolts I need, and they told me that the torsion bar adjuster bolts are discontinued. That's put a real road block in my plans, since I can't touch the top bushings until I can get the torsion bars loose in a way that lets me put it back together.
One reason I went to the dealership was for a sanity check on exactly which parts I needed. The searches I was doing were giving me multiple part numbers and had me confused. The dealer gave me a printout of the parts, so I plugged those in at villagetoyotaparts.com and ordered everything. ($100 cheaper than my local dealer, of course.)
I've got my fingers crossed that they won't e-mail me on Monday telling me that they don't have the adjuster bolt, either.
Last edited by Ocell; 03-22-2015 at 01:46 PM.
04-01-2015, 02:36 AM
#750
It's depressing to see that my last post about my issues was nearly 2 months ago.
A while ago I went to try and at least replace the upper control arm bushings, leaving the lower bushings/cam-bolts alone, so I could keep driving the truck. I went to remove the torsion bar adjuster bolts so I could undo the top control arm and found out my adjuster bolts/nuts are completely frozen. I did some searching and it looks like my only real solution is to snap the bolts with a breaker bar and replace them.
Yesterday I finally had time to head to the dealership to order all the bolts I need, and they told me that the torsion bar adjuster bolts are discontinued. That's put a real road block in my plans, since I can't touch the top bushings until I can get the torsion bars loose in a way that lets me put it back together.
One reason I went to the dealership was for a sanity check on exactly which parts I needed. The searches I was doing were giving me multiple part numbers and had me confused. The dealer gave me a printout of the parts, so I plugged those in at villagetoyotaparts.com and ordered everything. ($100 cheaper than my local dealer, of course.)
I've got my fingers crossed that they won't e-mail me on Monday telling me that they don't have the adjuster bolt, either.
A while ago I went to try and at least replace the upper control arm bushings, leaving the lower bushings/cam-bolts alone, so I could keep driving the truck. I went to remove the torsion bar adjuster bolts so I could undo the top control arm and found out my adjuster bolts/nuts are completely frozen. I did some searching and it looks like my only real solution is to snap the bolts with a breaker bar and replace them.
Yesterday I finally had time to head to the dealership to order all the bolts I need, and they told me that the torsion bar adjuster bolts are discontinued. That's put a real road block in my plans, since I can't touch the top bushings until I can get the torsion bars loose in a way that lets me put it back together.
One reason I went to the dealership was for a sanity check on exactly which parts I needed. The searches I was doing were giving me multiple part numbers and had me confused. The dealer gave me a printout of the parts, so I plugged those in at villagetoyotaparts.com and ordered everything. ($100 cheaper than my local dealer, of course.)
I've got my fingers crossed that they won't e-mail me on Monday telling me that they don't have the adjuster bolt, either.
04-01-2015, 08:54 PM
#751
Registered User
Thread Starter
Hey Mark! Thanks for reaching out. I did think of contacting you, but I figured all of your IFS stuff was long-gone by now.
I found the bolts at Yotamasters (https://www.yotamasters.com/shop/gen...justing-bolts/). This weekend I was able to snap the old bolt out of there and get the upper control arm out. Unfortunately I hadn't looked close enough to see that I needed to order two new nuts for the ends of the control arm. They're the nuts you steak into a slot on the axle they're going onto to lock them in place, so I'll have to destroy the existing ones to get them off.
I ordered those from villagetoyotaparts.com, so hopefully THEY aren't discontinued. If they are, I guess I'm giving up and buying pre-built upper control arms.
04-26-2015, 01:28 PM
#752
Registered User
Thread Starter
Another month of chipping away on this in between work and also hacking away on my BMW E30.
I made good progress on cleaning the old rubber bushings out of the control arm, leaving the pressed in metal sleeve for the poly bushings to use. Everything was going fine, but when I tried to bolt in the new bushings the nut cross-threaded, and it ruined the axle in the control arm.
I need to put the E30 on jack stands for some deep surgery before a track day May 16th, so I didn't have the luxury of time I'd need to hit the junk yard to get a replacement control arm. I went ahead and ordered Moog pre-built control arms. I was also worried about all the squeaking I hear about with poly bushings, so I am actually glad that I've ended up using rubber instead.
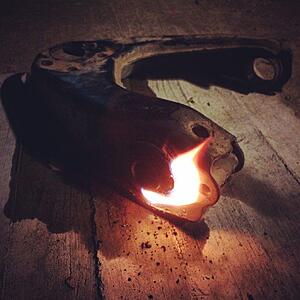
Burning the old bushings to weaken them.
I used a bottle jack to press out the old bushing.
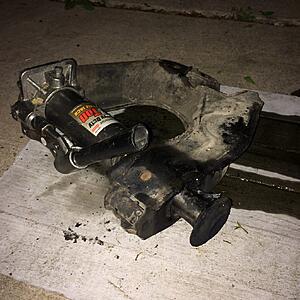
That nut on the right is what cross threaded. The shaft it threads onto is slotted so you can punch the flange of the nut to lock it. That slot, along with trying to press the new poly bushing in, made it hard for me to realize I was cross threading it. Not a cheap mistake.
Because of a shipping mixup it took a couple weeks to get the new control arms. Yesterday I finally had all the parts I needed to get to work.
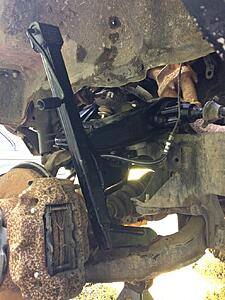
I decided to use the ball joints that were preinstalled in the new control arms. This means I'm not running ball-joint spacers anymore. It was faster to go this way since I'd need to grind some clearance into the new arms to fit the spacers. I also want to see how the geometry works out without the spacers... I may prefer to not have them. I can always put them back in if I decide I want them back. (So far, not having the spacers seems to have fixed my camber. I can't adjust the camber since my camber bolts are frozen. Replacing the camber bolts and bushings is next on my list.)
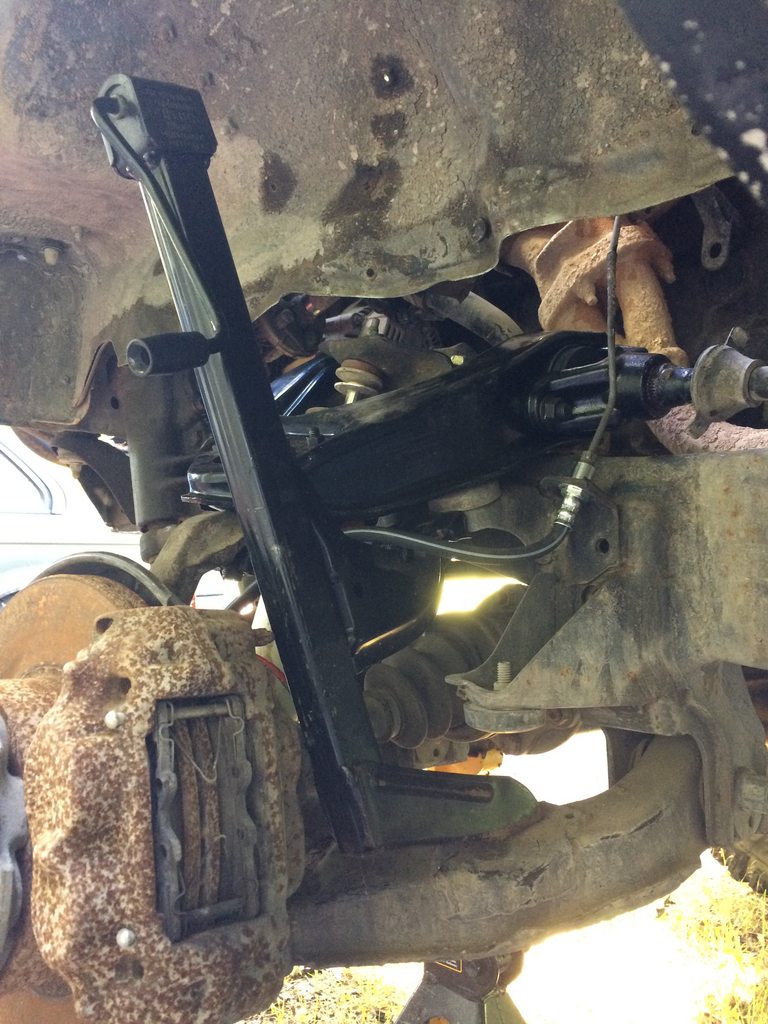
Once I got the new control arms on, I couldn't get them to fully droop so I could get the torsion bars on. I ended up using the factory jack from my E30 to pry the lower control arm open against one of the bump stop brackets. I made sure it was secure before wrapping my hands up in the torsion bar.
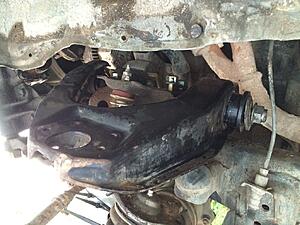
And finally, here's the new control arm in!
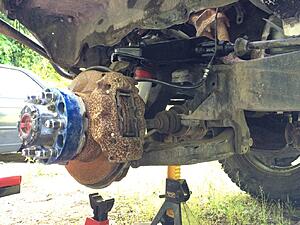
The driver's side took me, what, two months? I did the passenger side in a couple hours. The truck rides so much better (as is to be expected). I'm so happy to be driving it again.
I made good progress on cleaning the old rubber bushings out of the control arm, leaving the pressed in metal sleeve for the poly bushings to use. Everything was going fine, but when I tried to bolt in the new bushings the nut cross-threaded, and it ruined the axle in the control arm.
I need to put the E30 on jack stands for some deep surgery before a track day May 16th, so I didn't have the luxury of time I'd need to hit the junk yard to get a replacement control arm. I went ahead and ordered Moog pre-built control arms. I was also worried about all the squeaking I hear about with poly bushings, so I am actually glad that I've ended up using rubber instead.
Burning the old bushings to weaken them.

I used a bottle jack to press out the old bushing.

That nut on the right is what cross threaded. The shaft it threads onto is slotted so you can punch the flange of the nut to lock it. That slot, along with trying to press the new poly bushing in, made it hard for me to realize I was cross threading it. Not a cheap mistake.

Because of a shipping mixup it took a couple weeks to get the new control arms. Yesterday I finally had all the parts I needed to get to work.
I decided to use the ball joints that were preinstalled in the new control arms. This means I'm not running ball-joint spacers anymore. It was faster to go this way since I'd need to grind some clearance into the new arms to fit the spacers. I also want to see how the geometry works out without the spacers... I may prefer to not have them. I can always put them back in if I decide I want them back. (So far, not having the spacers seems to have fixed my camber. I can't adjust the camber since my camber bolts are frozen. Replacing the camber bolts and bushings is next on my list.)
Once I got the new control arms on, I couldn't get them to fully droop so I could get the torsion bars on. I ended up using the factory jack from my E30 to pry the lower control arm open against one of the bump stop brackets. I made sure it was secure before wrapping my hands up in the torsion bar.
And finally, here's the new control arm in!

The driver's side took me, what, two months? I did the passenger side in a couple hours. The truck rides so much better (as is to be expected). I'm so happy to be driving it again.
 08-29-2016, 01:44 PM
#755
Registered User
Thread Starter
I'm about to start focusing on the 4Runner again. The motor leaks everything, and plenty of it. So I just ordered a bunch of oil gaskets for the motor... valve cover, timing case, front and rear main seals, and coolant hoses. I also ordered a transmission rebuild kit with new bearings, syncros, and seals. I've got a buddy who's going to handle the rebuild for me. That's out of my league.
While the transmission's out I'm going to do a new clutch. Right now I'm leaning toward the 1,200lb unit from Marlin Crawler, still organic, not ceramic.
I'm a little nervous to drive into the motor. I haven't really touched it, so I'm crossing my fingers that everything will come apart easily and there won't be many surprises waiting for me under the layers of mud and oil. I've had an "ignorance is bliss" policy so far, but I think it's time to clean it up and get it sealed.
Last edited by Ocell; 08-29-2016 at 01:45 PM.
08-29-2016, 02:07 PM
#756
Registered User
Thread Starter
I've also had some fun tearing down the solid axle, trying to put together a game plan on how I want to build it. I'm probably not going to invest any money into it until I get the transmission/clutch/gaskets done though. Maintenance before upgrades.

Solid Axle Teardown by Chris Owens, on Flickr
Solid Axle Teardown by Chris Owens, on Flickr
 09-22-2016, 06:48 AM
#759
Registered User
Thread Starter
Thanks guys! The work is going well. I'll put together some posts with pictures as I get the photos organized.
Right now the transmission is being put back together. It had complete bearing failure on the last bearing on the output shaft, so I'm soooo glad I'm doing this now and didn't wait any longer.
I've got the crank pulley broke loose on the front of the truck but haven't taken the timing case apart yet. I got the oil pan off and found some plastic chunks, so I've ordered new timing chain guides and a new tensioner. I'm planning to do the rear main seal, oil pan, and get the new clutch set up before moving to the front of the motor.
All this work is SO much easier without the front differential in the way. And for that matter, without the transmission. If only I had a lift I would have been done 2 weeks ago.
I've pulled the trigger on some 4.70 transfer case gears from Trail Gear. I think it's going to be a while before I can make the SAS happen, so I figured the 4.7 gears would be a fun upgrade in the meantime. I'm hoping to have a wheeling trip in late October so I can see the results of all this work. I'M PUMPED!
12-05-2016, 03:53 PM
#760
Registered User
Thread Starter
I owe this thread a huge update... Hopefully I can find some time to sit down and put an album of photos together. In the meantime, if you want a sneak peak you can pick through my Instagram account to see a lot of the work I did on the motor and transfer case: https://www.instagram.com/ocell/
I got the motor back together, got the 4.70 Trail Gear t-case gears in, new clutch/flywheel, and got it all put back together! I did the transfer case myself. I learned a LOT while I did it, and I feel a lot more confident about tackling something like a transmission in the future. I just need a press and some bearing tools and I'd be set.
We took a trip out to Hidden Falls and the 4Runner was flawless. The only thing lacking was my driving skill and bravery. It had been a long time (maybe a couple years?) since I'd hit the trails hard, so it took me a while to warm up and get used to feeling the truck at different angles.
I didn't get a ton of video this time, but here are a couple.
First is my buddy Jason in his SASed 4Runner going up Loose Rock.
Then my buddy Michael in his V8 swapped CJ going up Loose Rock. He got VERY crooked, so we put a winch line on him for safety. He never put tension on it though, so he finished the climb without needing it. (Safety first, kids)
Finally, here's my 4Runner dropping in to, and climbing out of, a pretty significant mud bowl (video doesn't do it justice, blah blah blah). The 4.70 gears are incredible. The tires were working great even as the tread is getting worn. The 4Runner was surprising a lot of the people in our group who hadn't seen it before.


