When you click on links to various merchants on this site and make a purchase, this can result in this site earning a commission. Affiliate programs and affiliations include, but are not limited to, the eBay Partner Network.
So I'm averaging around 19+/- MPG right now with the 285/75R16s and the 2.5" high flow cat back exhaust. In the next few weeks I'll be doing a tune up, NGK plugs, wires, rotor, cap and getting into the SUPRA MAF mod.
Got the 4Crawler 1.5" BJ Spacers already... ordered up the NAPA upper and lower BJs.... $79 a BJ... I figured since I'm gonna wheel this hard and will eventually do the Blazeland LT kit... I might as well have some nice BJs.
Ha, your pretty close to me, My dad lives near Bel Air and Im in Shrewsbury PA. You can buy oem toyota ball joints for around 54$ per joint. I use toyomotorparts.com for all the oem parts I need. Takes about a week to get them but the prices are pretty good.
Are you still having the wobble issues? Rotors are usually guaranteed to be true, and a wobble under braking is worn steering components, which you have replaced.
Check the hub nuts for proper torque? An unbalance tire might exaggerate the feeling, but you would notice it at certain speeds, and not as slow as 25mph. A rotor could be warped, unlikely but not impossible. Are the calipers working correctly? Make sure they aren't dragging and heating the rotor.
that truck is super clean, keep it off our roads during salt season.
So the lower BJs are shot apparently. I have new BJs waiting to go on, but don't have the time to do them right now... nor the space/help because I'm also putting on a 1.5" BJ spacer so I can relax the T-Bars a bit. This is only temporary until I go to a larger T-Bar and the Blazeland LT kit. (I need someone around as a bit of a confidence booster since I'm so far away from my Dad and his expertise and garage).
The calipers are recently new.... (owner gave me the recent when he put them on less than a year ago)
Thompson toyota replaced the front bearings, rotors. So I'd assume they torqued the hub nuts correctly.
I did the inner and outer TREs, idler arm and didn't do the pitman arm which looks newer and was nice and stiff (no play).
The tires don't feel unbalanced at high speeds (no wobble at all unless only during braking. You know how sometimes you can feel an unbalanced tire around 55-70mph... not there.
The reason why I say i think its a warped rotor is because I can hear a scratch once a rotation at slow speeds... like the pads are hitting the rotor on one portion of the rotor. Now I'm freaking out! uhh!!!
Lastly... its my only vehicle. I am super nervous about how rusted out peoples whips are around here.
I'm wondering if my rubber brake lines need replacing to ensure a free flow of fluid to/from the caliper...I wonder if they are dragging a little bit. I wouldn't mind upgrading to the V6 calipers at this point too. Thoughts?
Rubber brake lines swell under pressure when they are old, they don't collapse.
Keep the truck clean from road salt in the winter buy washing the underside well at a self serve car wash.
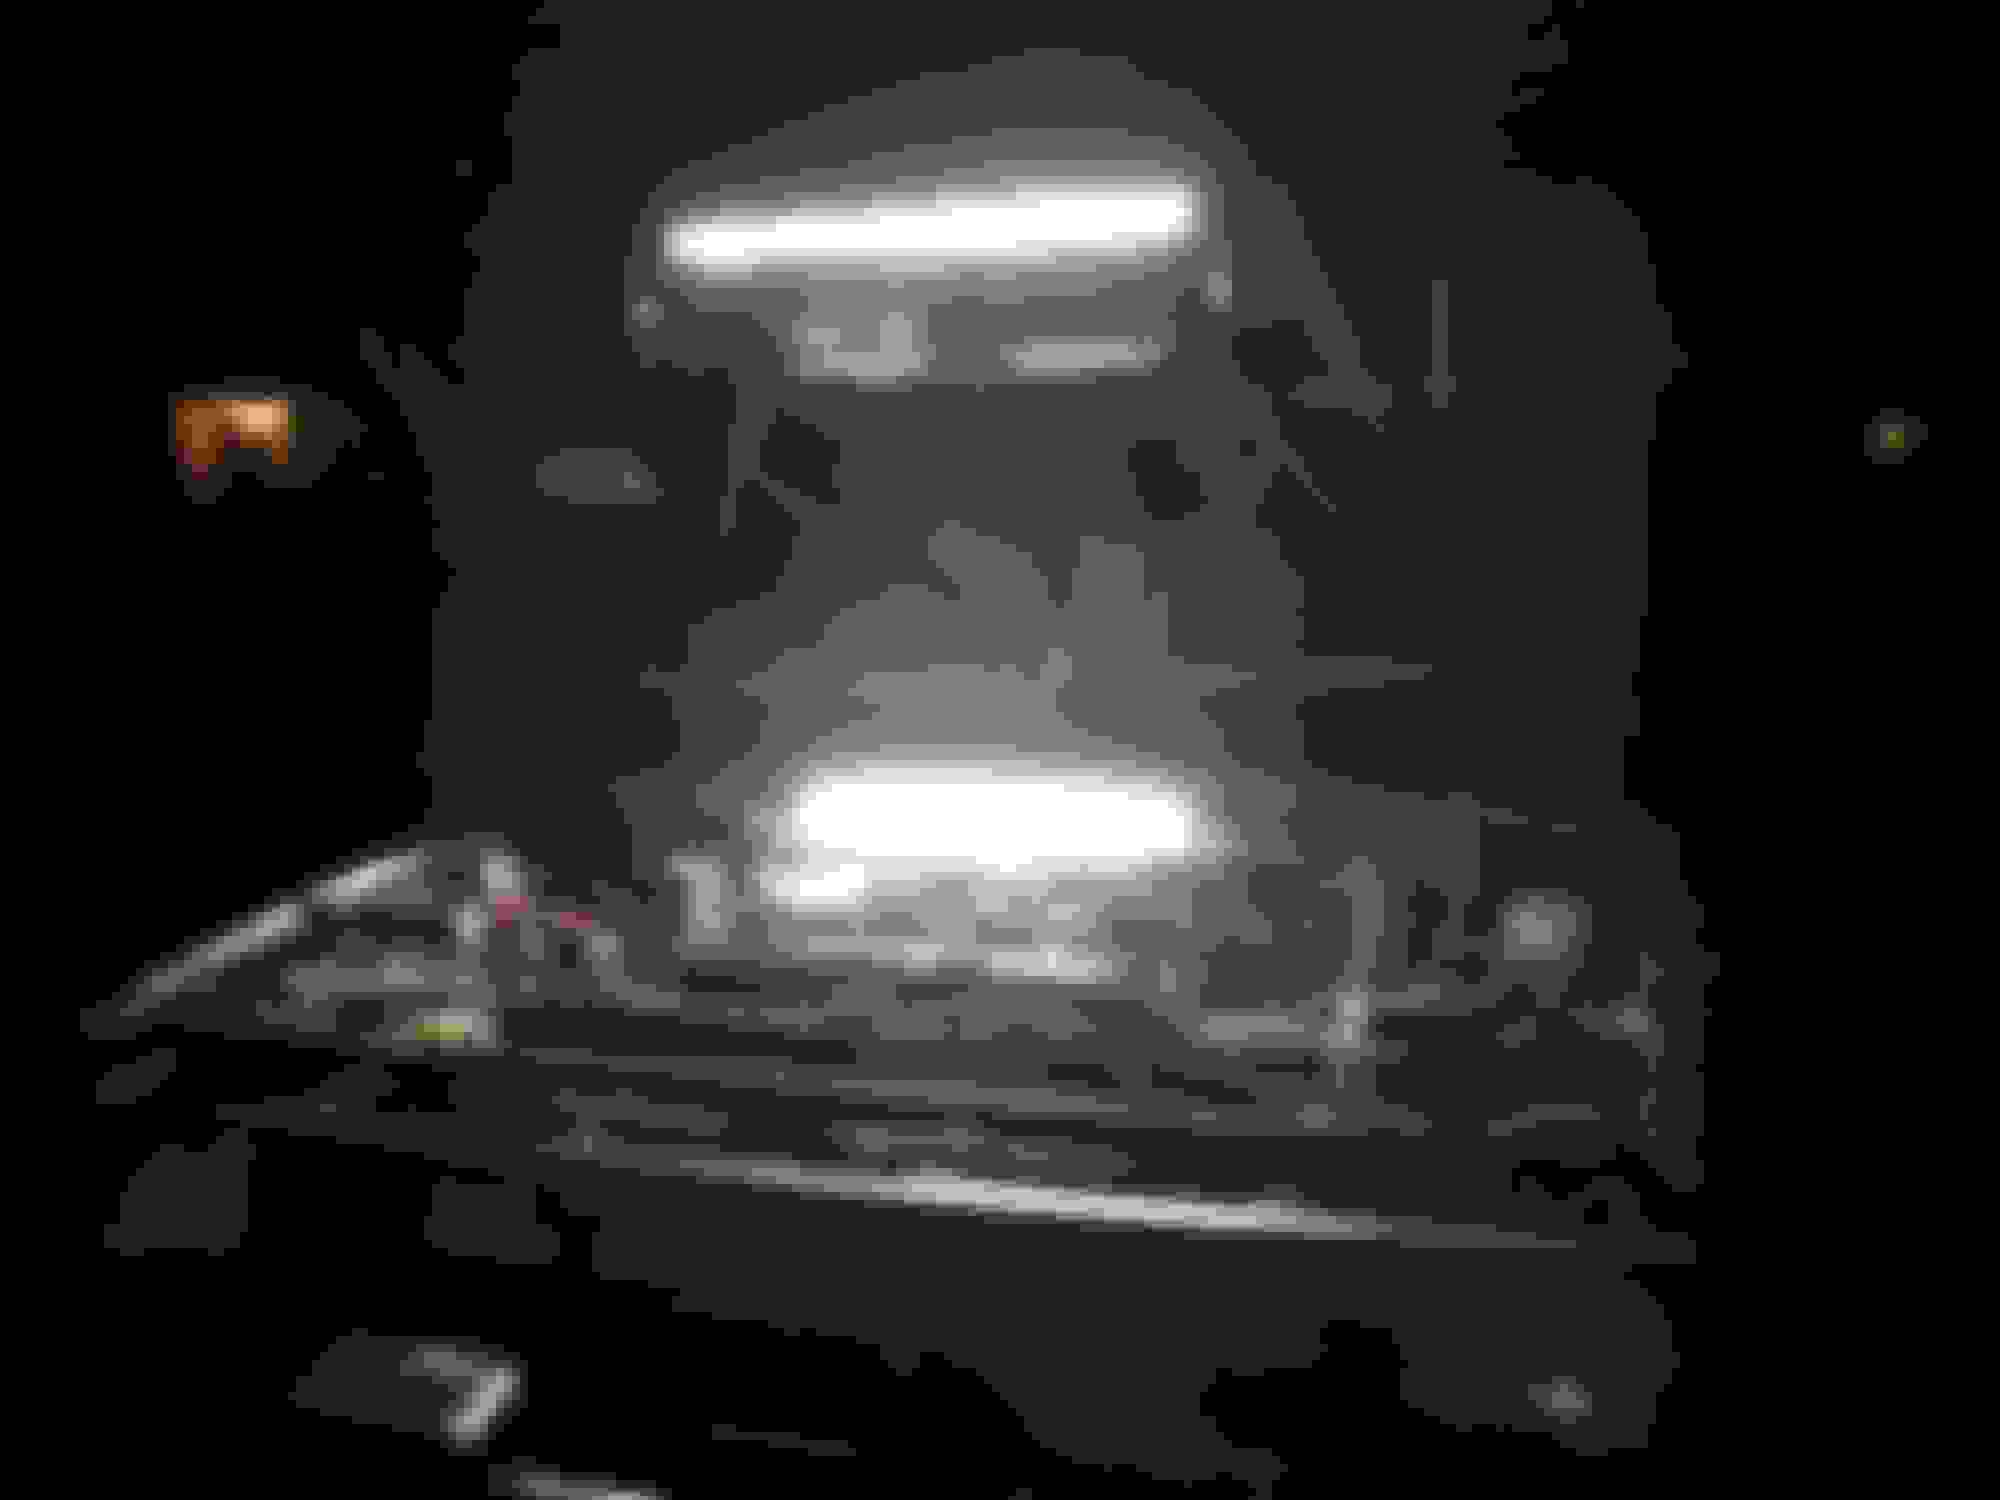
Had an hour of free time so I fixed up the rear storage area with new LED lights. I put my 2nd 12" LED waterproof strip on the roll bar so I can retain that light even with the hard top removed.
you can also see the LED light bar's light under the tailgate. can't wait to re-wire the entire switch so I don't need my running lights on for the storage area lights.
So I had time to bring the truck to Firestone; had all four tires re-balanced. One was out of whack. Now the braking is a little smoother, but the issue is still there. I'm hoping to have the BJs done within the month (time constraints).
I put in a new rotor and distributor cap, new NGK plugs and wires all from NAPA. OEM spark plug wires from Toyota are $86!!!! Insane!
As I read through yotatech, pirate4x4 and other toyota centric forums, I get rather upset that I got rid of so many of my extra parts from my 3rd gen and my 87' pickup 2WD. I did a rather high quality 120 ampere jag alternator upgrade on my 87 and even kept the old alt. Looking back on that, I wish I kept all of those parts. Anyways, I've recently noticed I'm getting too much draw on the alt and I'll be throwing the winch back on because the addicted offroad bumpers showed up, so I'll be doing the mod. Here is a good write up on what to get and how to do it. Rather easy. https://www.yotatech.com/forums/f116...ow-too-253689/
I've also been collecting the parts to do a clean Cressida AFM swap/Battery swap. I have the cressida AFM, need to do the guts swap (even picked up a nice older soldering iron). I've test fitted it on the air box if I want to go that route, or I can use one of those aluminum thingys
and an airaid 3" 90 degree bend intake tube.
Pretty stoked about all of these mods but as always, sorta nervous considering its my daily too.
I got a letter in the mail today from Maryland Motor Vehicle Administration specifying that I need to get my tailpipe sniffed. I'm a bit nervous as I've never had this done. The engine received a rebuild (probably has around 80K on it) and it runs well at idle (around 850 rpm) and I can chug along on the highway at 75mph (guestimated due to 33"s) at 3000 rpm and I get about 19+/- MPG. All in all I'd say I'm doing pretty good, but I do want to replace the O2 with a new OEM Denso O2 after I do a good intake cleaning and soak the EGR valve assembly. I've already done new spark plugs, wires, cap/rotor and have a clean air filter. Also have new CAT back exhaust. The CAT is a "MagnaFlow Universal Catalytic Converter 51206" found on Summit Racing. Any other tricks I need to know about? I have not completed the SUPRA AFM swap yet and don't plan on doing that until after I complete the emissions test to give me plenty of time to sort out any bugs I'll have if any after that mod.
I'd just register it historic and never worry again. If you do test, run it around with some 104+ octane boost in the tank about 20min. before you go. Other then that you could just go in with a bunch of holes in your exhaust after the catalytic and it will probably pass because the meter just measures pollutant density.
I'd just register it historic and never worry again. If you do test, run it around with some 104+ octane boost in the tank about 20min. before you go. Other then that you could just go in with a bunch of holes in your exhaust after the catalytic and it will probably pass because the meter just measures pollutant density.
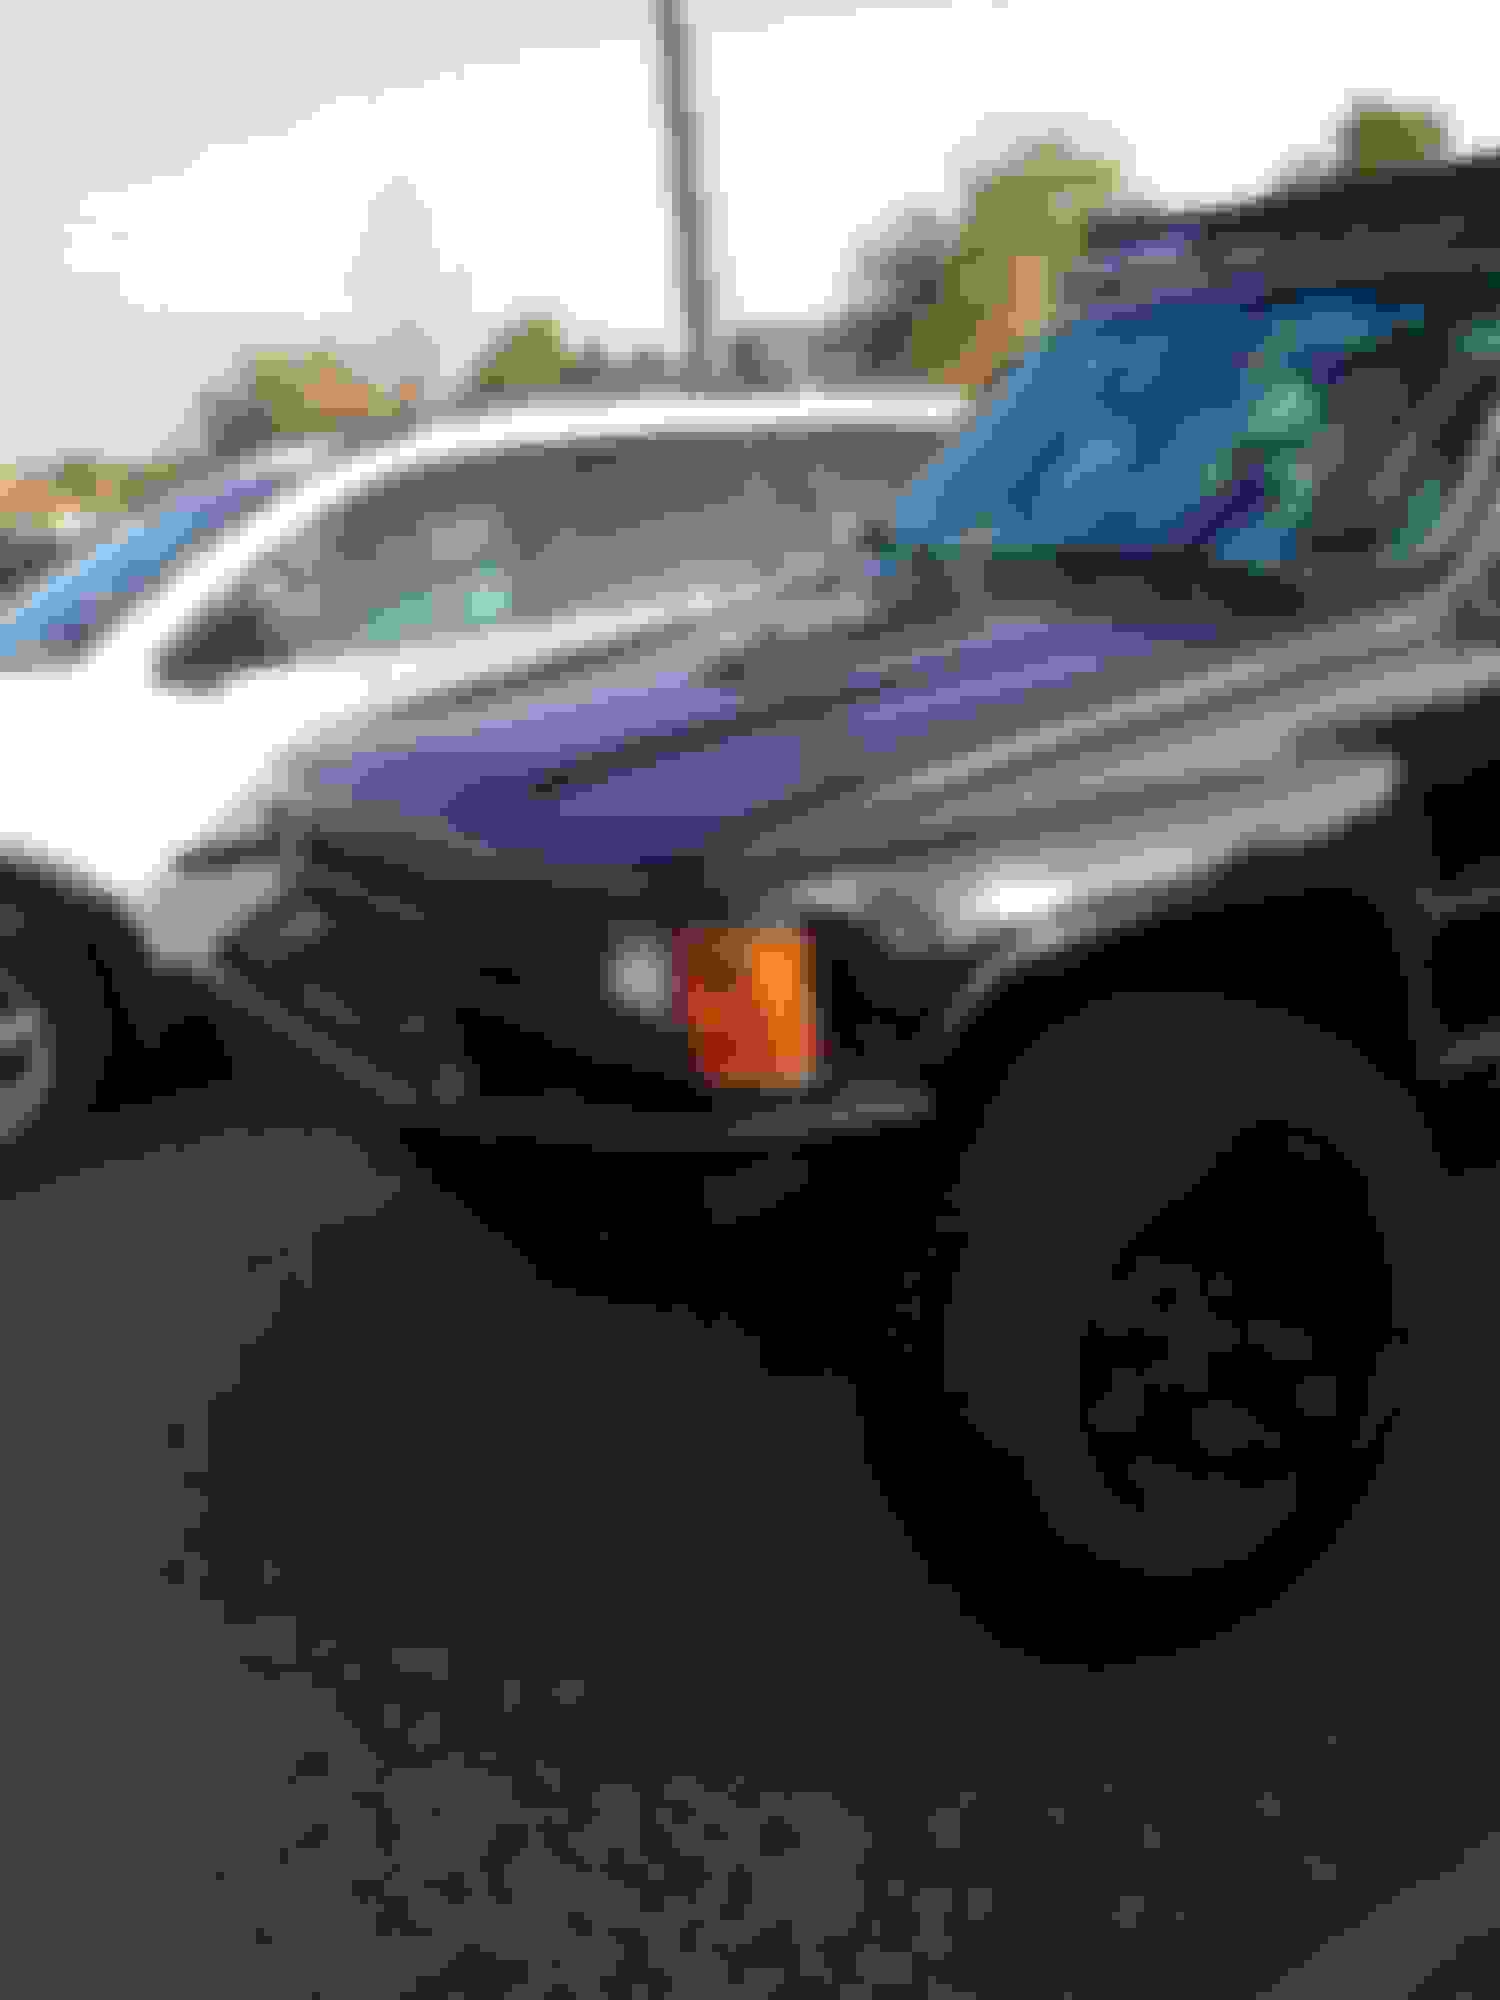
Good weekend working on the T4R. Got some small stuff done, but still essential. This picture is of the previous weekends work. Addicted Offroad's front bumper temporarily installed. XRC-8 Comp partially installed - still need to put on the synthetic line & do a final wire up. Also, you can see the louvre I put on - lets all that heat exit. I put it right over the exhaust manifold.
I removed the EGR Valve, cleaned and soaked it in TB cleaner for a couple of hours. I do need to replace the lower gasket as the old one fell apart. Otherwise, that's all clean and back on the truck.
I pulled the O2 sensor and it looks like its been on there for about 80k unfortunately I didn't purchase the right sized O2 sensor. I went to NAPA, provided the credentials on the truck and purchased the Denso OE Manufacturer O2 (Part # DEN 2341056) however, the sensor portion was too big to fit into the exhaust manifold port (stock manifold). So I'm not sure if I have a 1986 22RE manifold or not, however, the sensor on the denso O2 was too large in diameter and too long.
The O2 I have didn't have any brand identifications, so I took it up to Napa and we identified the Bosch O2 (Part # BSH 12031) as having the same design as the O2 I have on the truck. Ordered that and should be in on Tuesday.
I'm hoping that all of my cleaning & tune up work coupled with a new O2 will lend to a passed emissions test. RBX, I also grabbed some 104+ to add.
Next up were my lights. I really wanted to have lights under the hood for working in the dark without having to always string a light from the house to the truck. I ordered some 1/2 meter 30-LED Light Tube with 3-Chip LEDs - Cool White (Part # LT-CW30X3SMD) from superbrightleds.com and a mini toggle switch. The cool thing is the light tubes are wired to be daisy chained together and are easily removable from the mounting surface. So I wired up the switch on the back side of the fuse box on the left, put a lgith tube on the top of the firewall, then wired one up on the hood very close to the where the hood sits near the radiator. I drove the truck for 40 minutes with the tube right near the radiator and there's no heat transfer issues at this time. HOWEVER, I can always remove the tube in less than a minute for safe storage inside the truck when I'm not using it. The tubes come wired with waterproof quick disconnects. Don't worry, that picture is just the mock up. I cleaned up the wires. I'll be doing a bit more of heat protection to ensure I don't get any melted wires. As you can see I cut a nice hole in the hood and put a louver I picked up from eBay.
Next up, I tackled the corner marker/turn signal mod. I followed dsal 86yota's lead and used some pre-wired enclosed LEDs inside of the current housings.
Just like dsal did, I flipped the grommet upside down. Notice though, that there's a lip on the fixture portion. I should have trimmed that edge away in order to allow the hole to be smaller. I was too quick in my mod and didn't trim that edge off, making the hole on the housing too large. When I pushed the grommet down, it grabbed the housing, but not as tightly as I'd like. So, if you do this, be sure to trim that, make the hole smaller, so you don't have to use gasket sealer. I ended up putting gasket sealer inside of those little boxed cut outs on the grommet to create a water resistant seal into the housing.
I also replaced those little running light light bulbs with LEDs. Unfortunately all I had on me was red, so I'll be ordering up some cool whites to replace them.
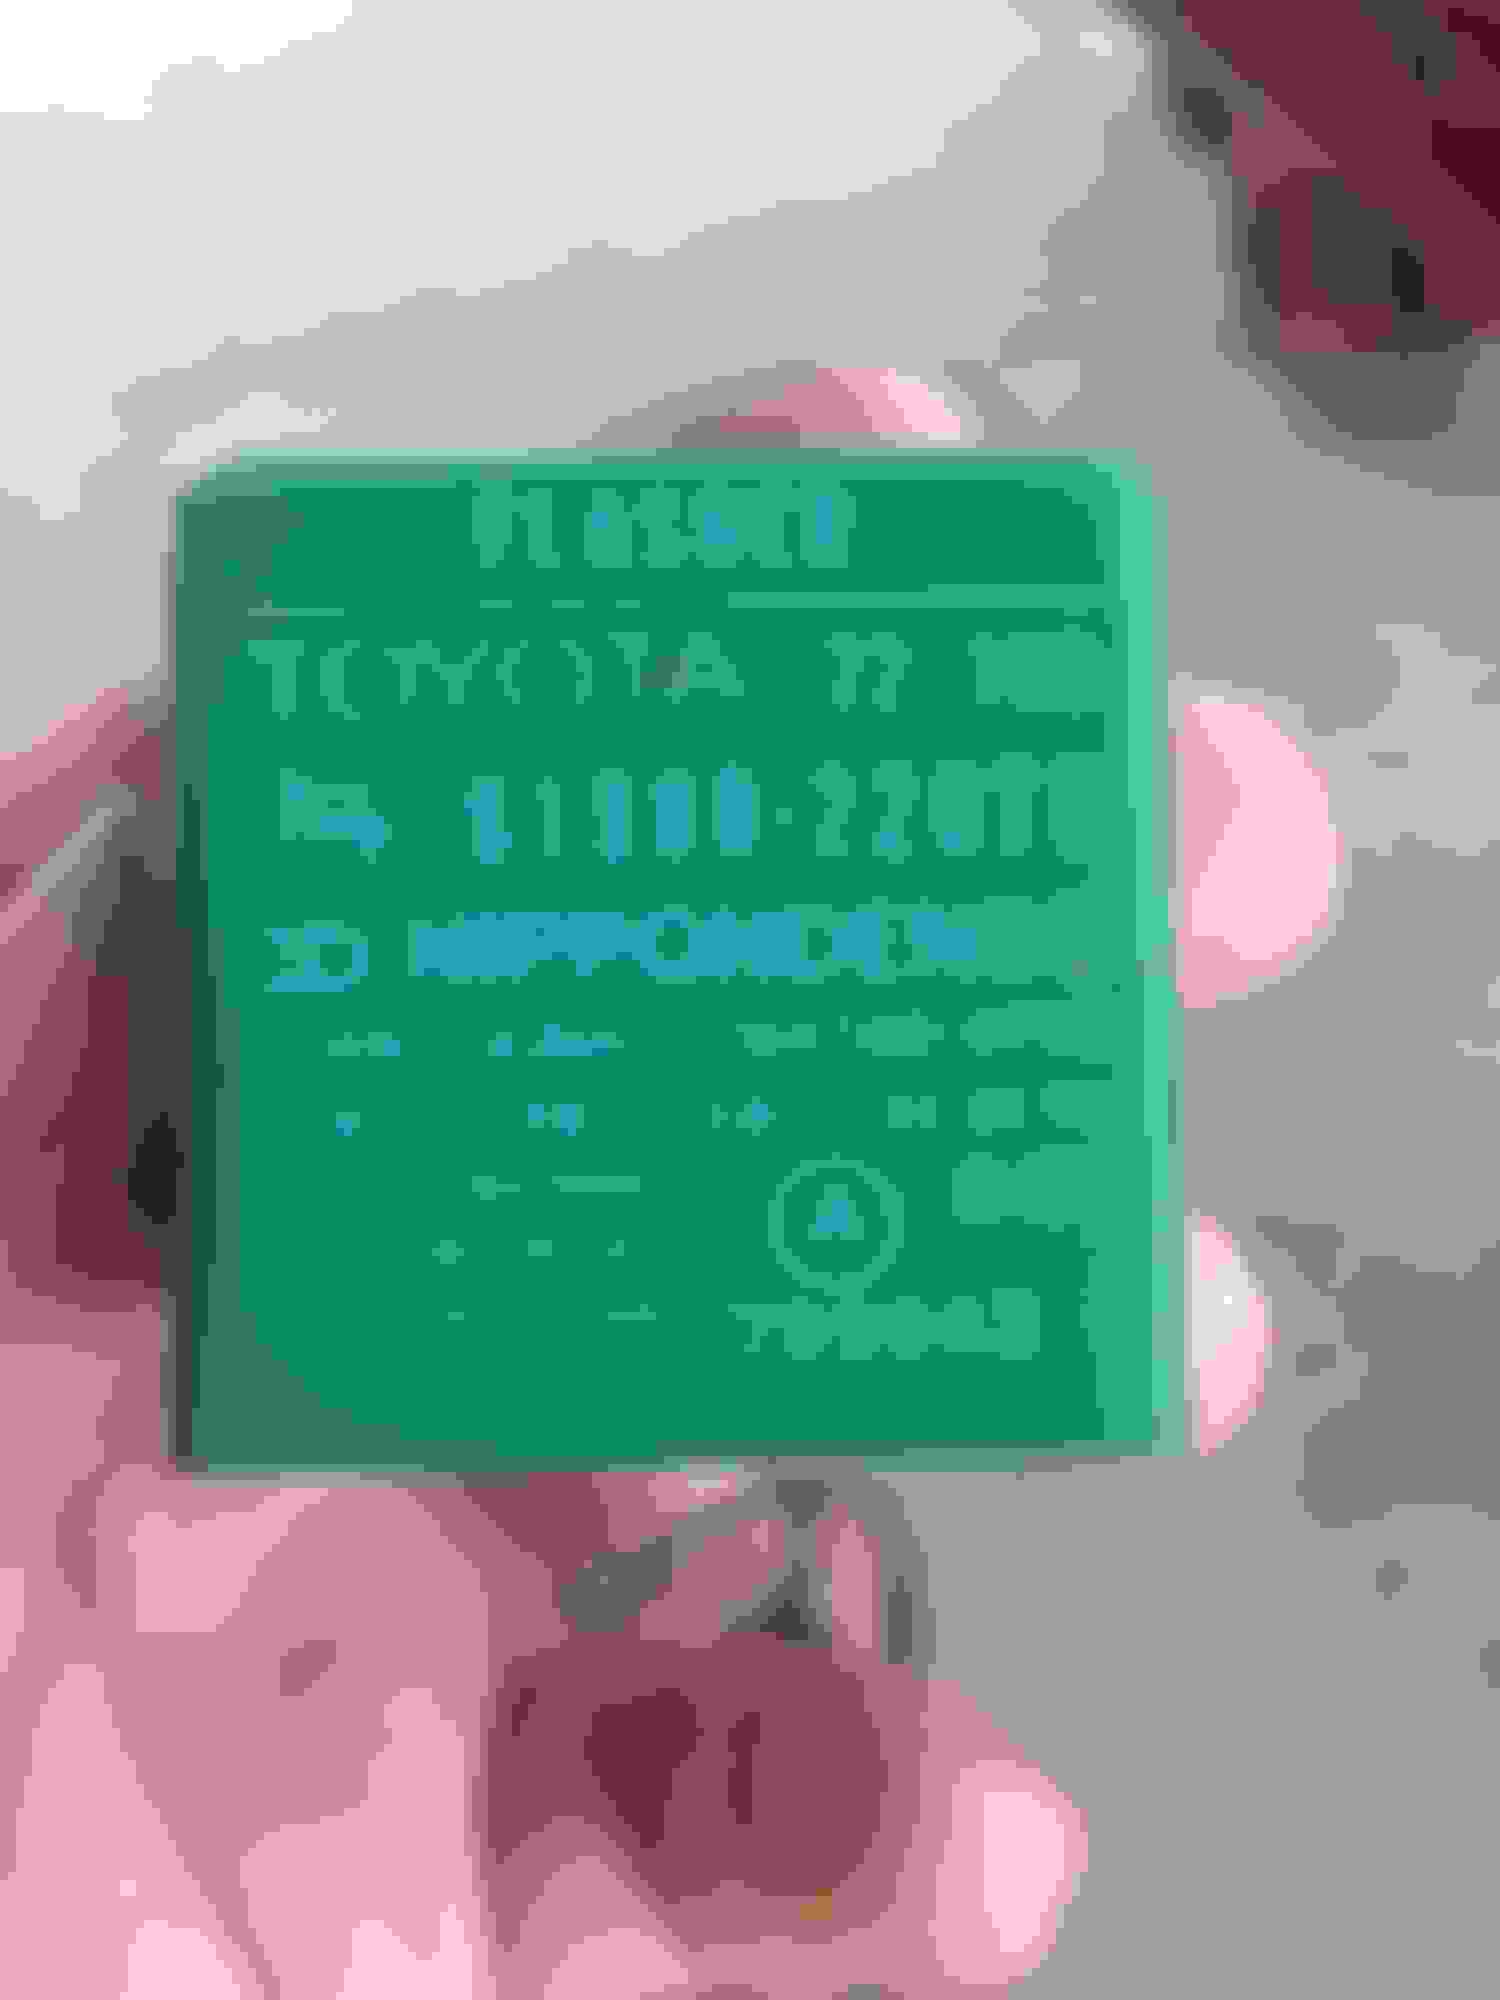
Now your thinking about low resistance and the flasher relay... well on dsal's write up, some dude was kind enough to take pictures of the 4WD Toyota Owner magazine article that describes how to mod the stock Toyota Flasher Relay to allow for use of LEDs in the turn signal department. Below are nice clear pictures for your viewing pleasure.
This flasher Relay is located behind the kick panel on the driver side.
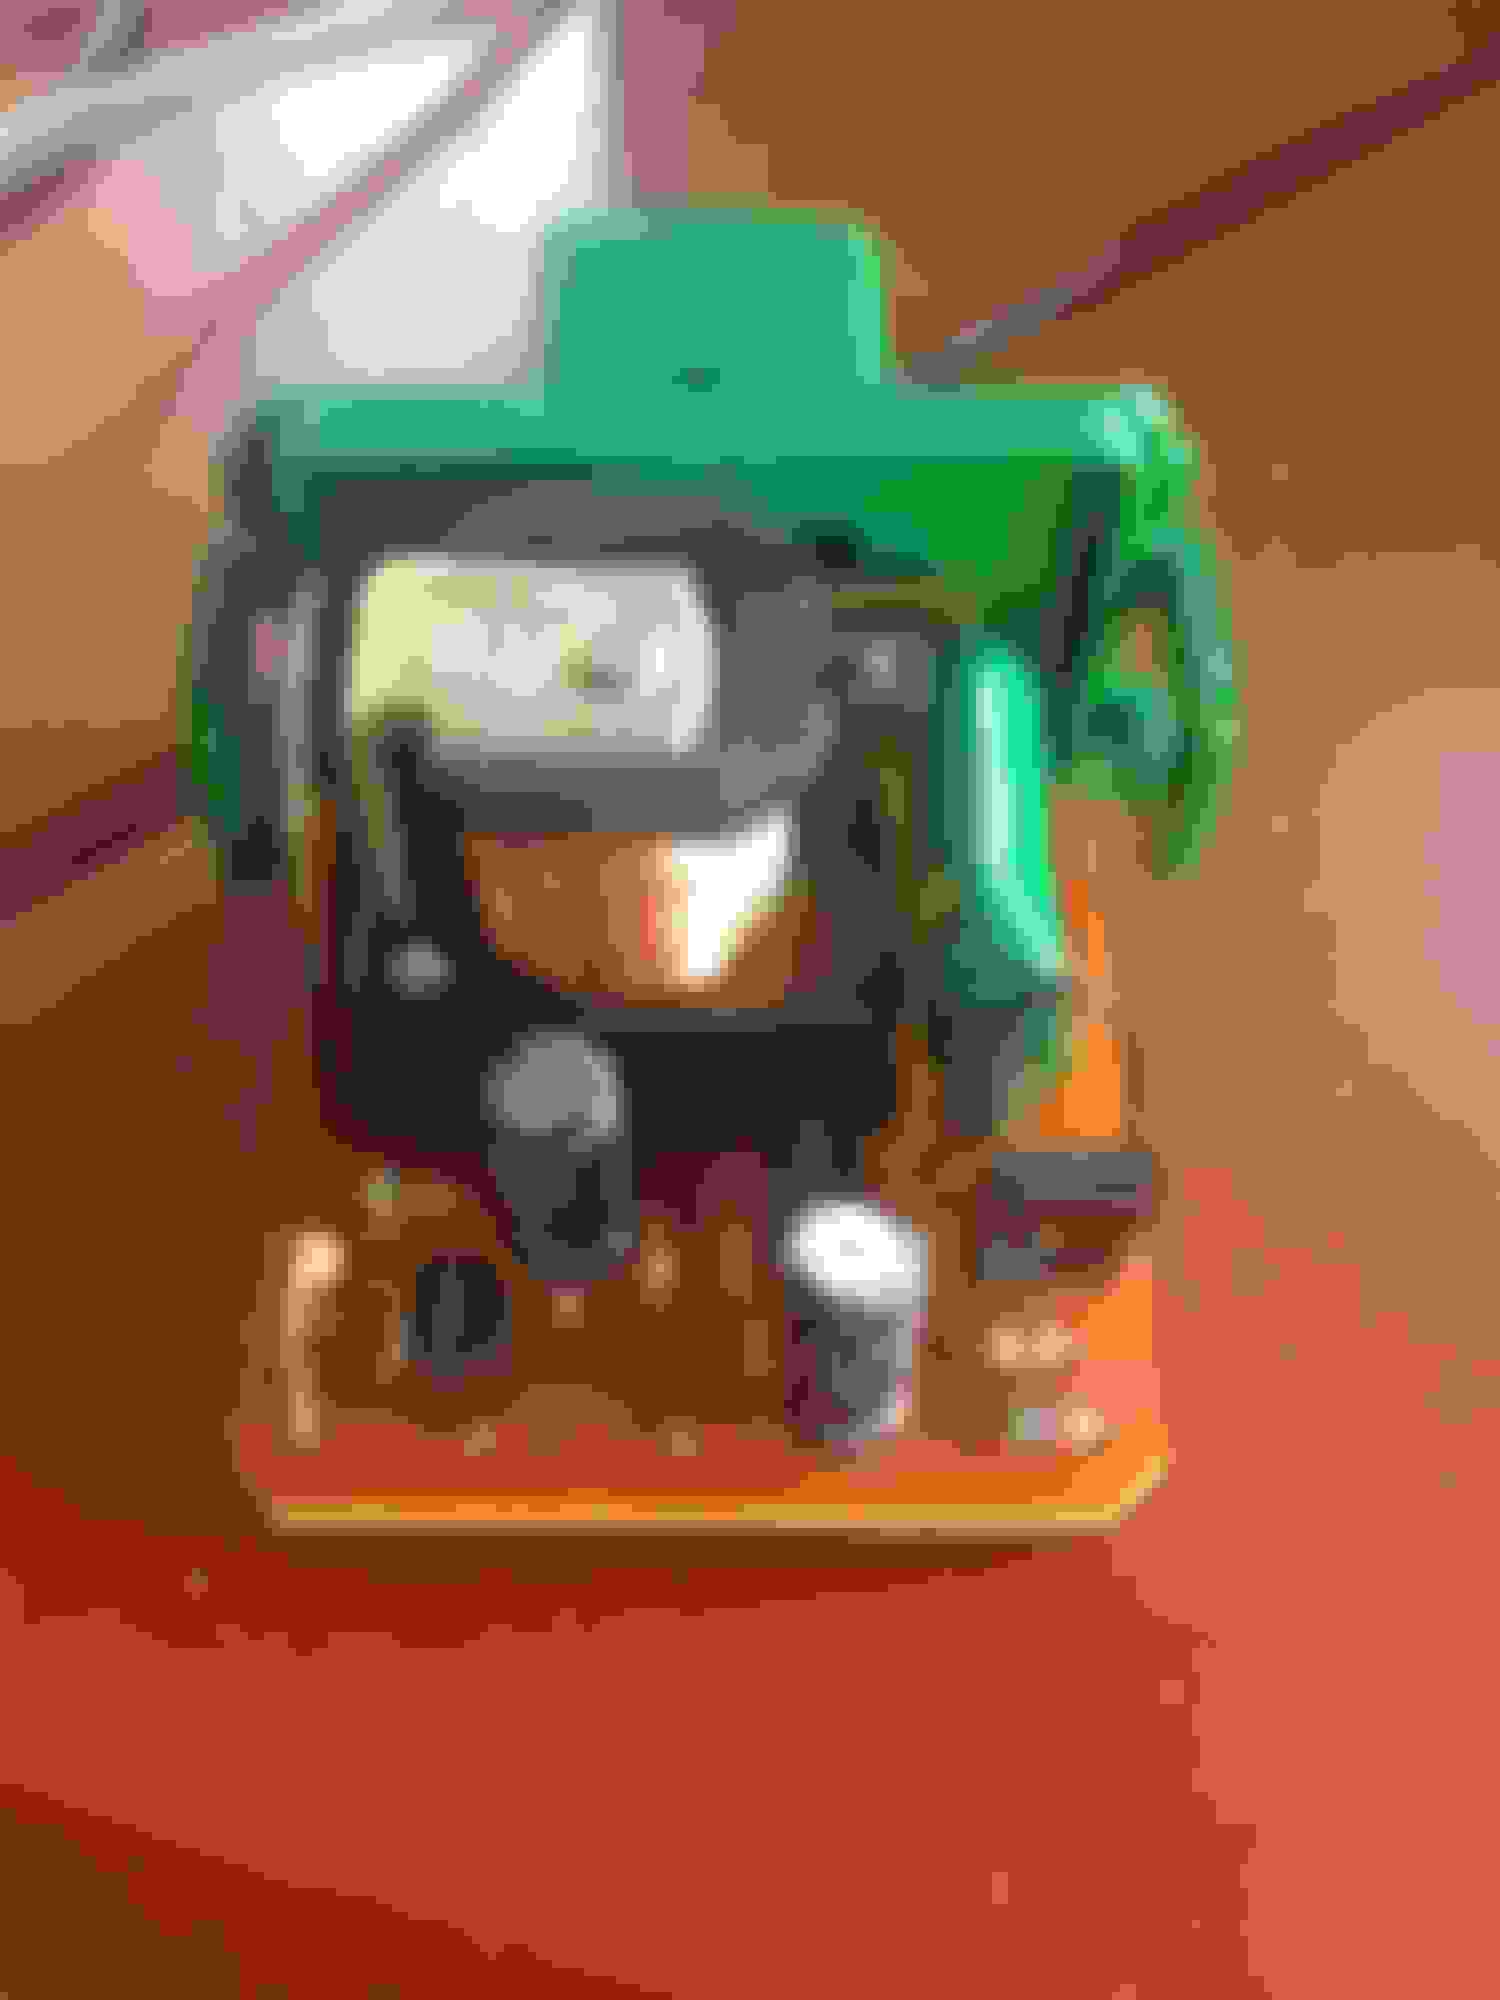
When you go to take the flasher apart, be careful and gentle. There are two clips on the flasher, however, the board slides into the housing, so you need to pull the top off level. Below is what you see when the cover has been removed from the flasher. Look for the small diode in the center bottom with a blue and brown stripe on the right side. That is the diode to remove. Before.
After. Plugged the flasher relay in, perfect, no issues, everything worked like it was stock.
I also replaced every bulb in the tail light housing with LEDs. So everything sans my headlights and the map lights are LED now. I did notice that the housing for my driver side courtesy light (in the door) is broken so I'll be looking for a new housing. But, everything went well.
 07-17-2015, 06:02 AM