Grego92's Retroactive and Current Build Up

 09-09-2012, 01:10 PM
#82
What a shock...... VELLIOS STRIKES AGAIN! lol.... Yep, they're who TOTALLY screwed up my first build on the red motor. They did the bore poorly, didn't match the rings properly and then they NEVER seated, even after 5K miles... 2. They used WAY too much sealant on the timing cover.... LEAKED BADLY, ended up having to replace it. 3. I obviously kept the alternator bracket that provides space between that bolt and the timing cover(shortening the length of the amount of thread that enters the block into that lil bead in the block cast)..... He inserted the ACTUAL SIZE BOLT into that, without the bracket, bottomed it out and cracked my block(Pics on my build).... 4. Did a TERRIBLE grind on my CAM, DESTROYED, had to replace it, which I did w/out pulling the head. 5. Never replaced the guides or ANY valves.... Did a grind, didn't even replace the exhaust valves. 6. Must not have lubed the front main seal.... It leaked within a short time. 7. STOLE OR LOST my LCE steel guide timing kit, and installed, instead, whatever came with the 'rock' kit, plastic guides and all. Then when I called, he said, "Hey, are you sure you gave me that?".... WTH? "YES", I said, then got a, "Well, lemme look around here.... " AS IF THAT'S ACCEPTABLE? I mean, we're talking NOW I had to pull the timing cover cuz of his screw ups(was also leaking at the AC brace mounting/timing cover holes, through the oil pump galleys and right out the side)... He looked around and said, "Nope, i don't see it here..... I can get you one if you want... 89$"...... THAT WAS THE LAST STRAW! Only reason I didn't sue? Well, obvious.... NOT WORTH MY PAIN AND TIME AND EFFORT!
There were more things they messed up.... But the fact that the play in the guides and valves was around 10thousandths too much.... etc., etc. ,etc., ...... It NEVER would have ran right... And sure enough, most ALL of my gremlins I chased for months ended up being mechanical/his DOING! Swapping in a new CAM helped... But the damage was done and the holes were so glazed by then due to never having seated... it was hopeless. 1499$ DOWN THE TOILET!
I warn everyone! And remember, Grego, what I told you? Guess who DCH Toyota is now using for much of their machine work? YEP, VELLIOS!
Not sure what happened, cuz Harry used to be one of the most respected guys in the biz..... But EVERYONE I went to thereafter with my problems, asked, "Who did the motor?".... I responded, "Vellios".... They ALL, 10 OF THEM, 'SIGHED' and said, "Ohhhhhhhhhhh, yeah, that explains a lot!" .... VERY much wish I'd known that BEFORE they were recommended to me, ya know?
Did this one myself, with LOTS of help and guidance from my new Machinist at Japanese Auto Center, Torrance, CA(I think I turned you on to him, right?.... PHIL IS AN ANIMAL! lol.... Filthy mouth, crazy looking shop and all.. I WOULD NEVER take something to vellios again even if Phil had ONE ARM AND A EYE MISSING! FAR superior work! )... And after doing this one with his help... MY FIRST FULL Rebuild, including much of the machining..... Well, you've seen/heard it... I am NOT bragging...HARDLY... .My point is, HOW SAD IS THAT? I've done NONE, and I did a better job at machining on my first try, with help, than a shop that's been around 40 years did????????? VERY SAD!
There were more things they messed up.... But the fact that the play in the guides and valves was around 10thousandths too much.... etc., etc. ,etc., ...... It NEVER would have ran right... And sure enough, most ALL of my gremlins I chased for months ended up being mechanical/his DOING! Swapping in a new CAM helped... But the damage was done and the holes were so glazed by then due to never having seated... it was hopeless. 1499$ DOWN THE TOILET!
I warn everyone! And remember, Grego, what I told you? Guess who DCH Toyota is now using for much of their machine work? YEP, VELLIOS!
Not sure what happened, cuz Harry used to be one of the most respected guys in the biz..... But EVERYONE I went to thereafter with my problems, asked, "Who did the motor?".... I responded, "Vellios".... They ALL, 10 OF THEM, 'SIGHED' and said, "Ohhhhhhhhhhh, yeah, that explains a lot!" .... VERY much wish I'd known that BEFORE they were recommended to me, ya know?
Did this one myself, with LOTS of help and guidance from my new Machinist at Japanese Auto Center, Torrance, CA(I think I turned you on to him, right?.... PHIL IS AN ANIMAL! lol.... Filthy mouth, crazy looking shop and all.. I WOULD NEVER take something to vellios again even if Phil had ONE ARM AND A EYE MISSING! FAR superior work!
)... And after doing this one with his help... MY FIRST FULL Rebuild, including much of the machining..... Well, you've seen/heard it... I am NOT bragging...HARDLY... .My point is, HOW SAD IS THAT? I've done NONE, and I did a better job at machining on my first try, with help, than a shop that's been around 40 years did????????? VERY SAD!
Last edited by ChefYota4x4; 09-09-2012 at 01:14 PM.
09-09-2012, 07:28 PM
#83
Registered User
Thread Starter
iTrader: (4)
Join Date: May 2010
Location: People's Republic of California
Posts: 720
Likes: 0
Received 15 Likes
on
12 Posts
I'm taking a breather from addressing this issue right now. Having fun working on the rear spoiler and electric seat for the camry  THEN I'll get back to this issue!
THEN I'll get back to this issue!
 09-16-2012, 04:26 PM
#85
Registered User
Thread Starter
iTrader: (4)
Join Date: May 2010
Location: People's Republic of California
Posts: 720
Likes: 0
Received 15 Likes
on
12 Posts
In an attempt to avoid addressing the exhaust stud, decided to do some little stuff while I wait for my camry spoiler to get back from the paint shop. 
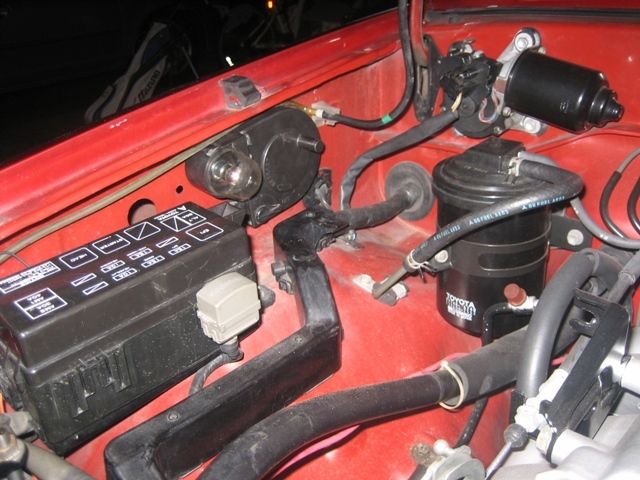
Mark reminded me of my chevy chord light I had gotten from the yard. Was going to stick it in the bed, but after seeing Mark's and how long the chord goes, decided to mount it in the engine bay. Just a couple of screws and moving my windshield wiper fluid hose up and out of the way. Ordered an LED bulb off ebay from Hong Kong...probably get here in a few weeks.

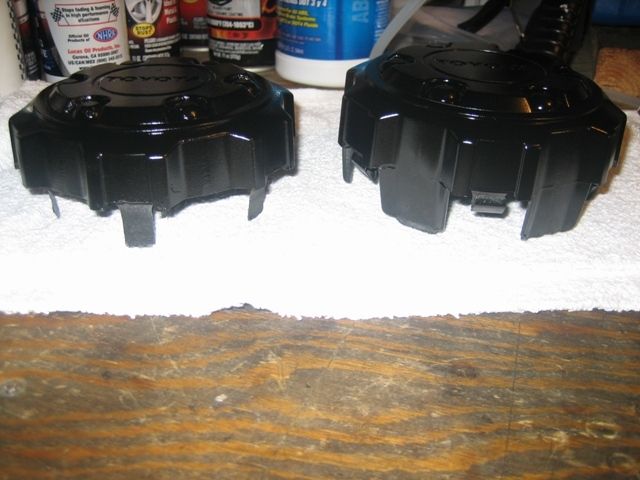
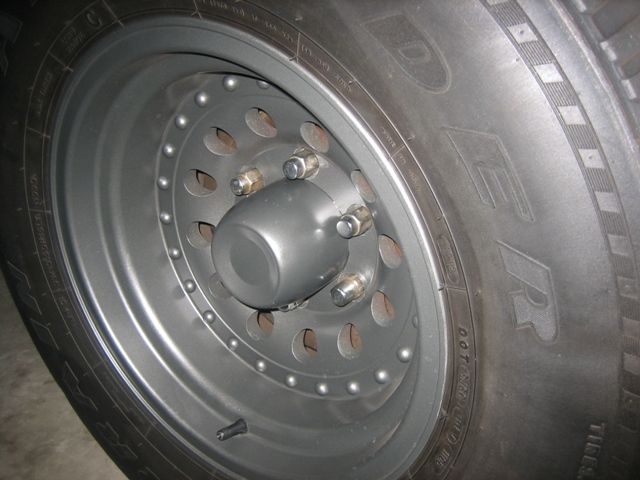
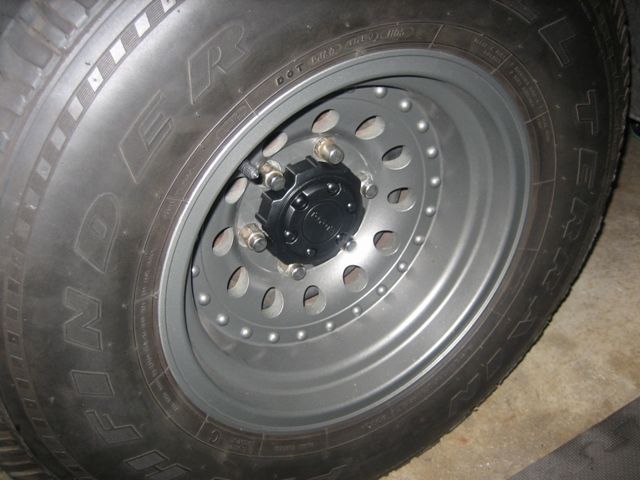
Didn't like my center caps on the rear wheels. Had these "Bullet" looking things that I hated. Took some OEM hubs from the yard and modified them a bit. Broke off the plastic tabs and straightened out the metal clips. Just enough length to bend them over the lip of the wheel so they don't come off.
Before I painted them flat trim black....glossy was too much "bling". The modified one is on the left.
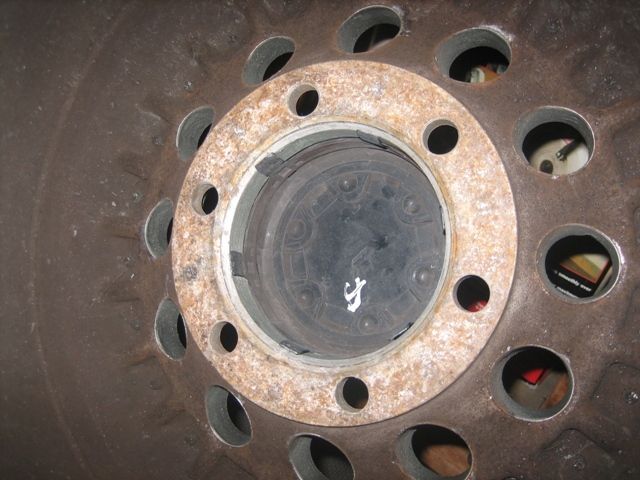
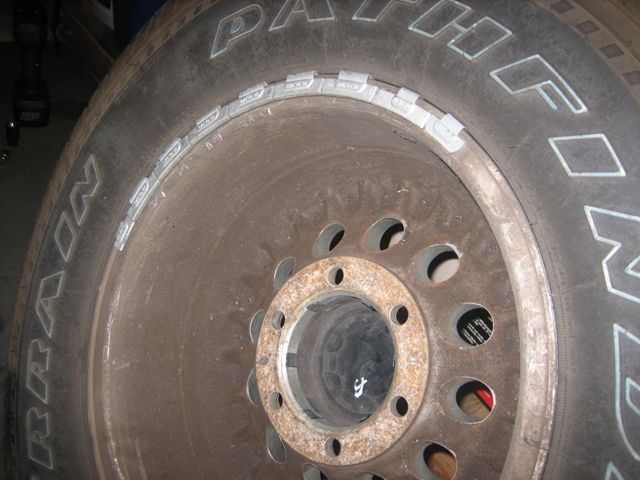
Check out how lopsided my tires are! 7 year old tires but lots of tread because I hardly drive it. I need new tires....ALL 4 of them are like that and cracking, drove the guys crazy at America's Tire Co. trying to balance them. I still vibrate all over the place over 50mph.....

BEFORE and AFTER: Hated those bullet look'n hubs!
And my Camry spoiler..bondo done and primered....it's at the paint shop now.
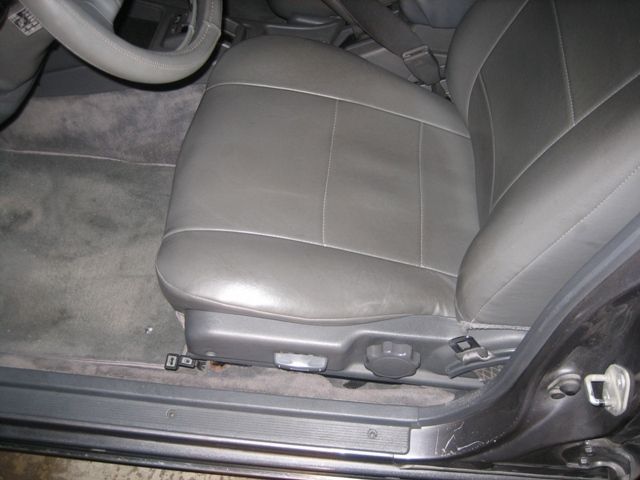
Electric seat installed also.
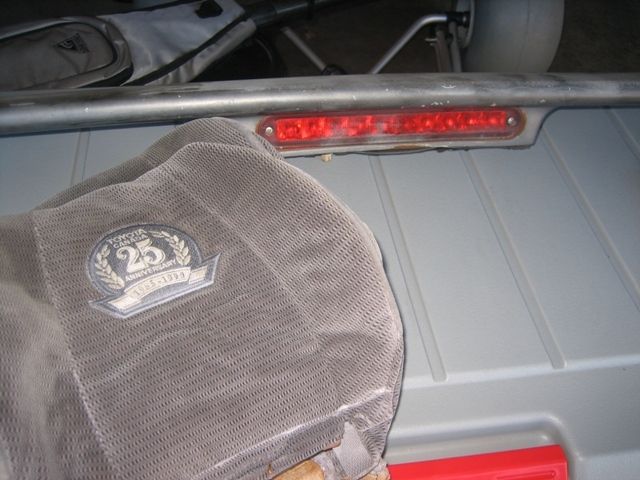
Pic of the Canadian 25th Anniversary head rests...they're installed now but my covers cover them up! oh wells, at least I know I have them.
Mark reminded me of my chevy chord light I had gotten from the yard. Was going to stick it in the bed, but after seeing Mark's and how long the chord goes, decided to mount it in the engine bay. Just a couple of screws and moving my windshield wiper fluid hose up and out of the way. Ordered an LED bulb off ebay from Hong Kong...probably get here in a few weeks.
Didn't like my center caps on the rear wheels. Had these "Bullet" looking things that I hated. Took some OEM hubs from the yard and modified them a bit. Broke off the plastic tabs and straightened out the metal clips. Just enough length to bend them over the lip of the wheel so they don't come off.
Before I painted them flat trim black....glossy was too much "bling". The modified one is on the left.
Check out how lopsided my tires are! 7 year old tires but lots of tread because I hardly drive it. I need new tires....ALL 4 of them are like that and cracking, drove the guys crazy at America's Tire Co. trying to balance them. I still vibrate all over the place over 50mph.....
BEFORE and AFTER: Hated those bullet look'n hubs!
And my Camry spoiler..bondo done and primered....it's at the paint shop now.
Electric seat installed also.
Pic of the Canadian 25th Anniversary head rests...they're installed now but my covers cover them up! oh wells, at least I know I have them.
Last edited by Grego92; 09-16-2012 at 04:28 PM.
09-16-2012, 06:00 PM
#86
Dude, that seat looks SO NICE! Great find! Love the headrests.... Great on the engine light... My relay is there for the off road lights... gonna have to move it, cuz that is GREAT location! BUT, I also have to really take a look...cuz you're 92..... different engine bay.. plus, no starter relay on yours, right? No injector resistor either... Oy, ..maybe wont work,  lol.
lol.
lol.
09-16-2012, 07:56 PM
#87
Registered User
Wow I can't believe I'm just now seeing this build thread. Grego, we pretty much have the same model truck. lol
Of course yours is far more attractive than mine. lol I love the interior setup with the console and buckeet seats.
Perfect fishing/hunting truck, your truck is exactly what I want mine to look/ be like.
Of course yours is far more attractive than mine. lol I love the interior setup with the console and buckeet seats.
Perfect fishing/hunting truck, your truck is exactly what I want mine to look/ be like.
09-16-2012, 10:10 PM
#88
Hey Grego,
Not sure where to mount mine just yet... butttttttt, ... I found a nice fridge magnet(the thicker ones that are not rubber style work best).. to fasten to the light portion.... JB Kwik Weld and it's SOLID! LOVE having a magnet on it, obvious why... but REALLY helpful for hands free work/slap it on the hood underside, etc. Just thought I'd pass that along. Just make sure it is away from center, slightly, dead straight line diameter from the peg that secures it in the body. You'll see what I mean if you do what I did... I'll get pics... LOVE it even more now! ahahaha.
Not sure where to mount mine just yet... butttttttt, ... I found a nice fridge magnet(the thicker ones that are not rubber style work best).. to fasten to the light portion.... JB Kwik Weld and it's SOLID! LOVE having a magnet on it, obvious why... but REALLY helpful for hands free work/slap it on the hood underside, etc.
Just thought I'd pass that along. Just make sure it is away from center, slightly, dead straight line diameter from the peg that secures it in the body. You'll see what I mean if you do what I did... I'll get pics... LOVE it even more now! ahahaha.
09-17-2012, 09:46 AM
#89
Registered User
Thread Starter
iTrader: (4)
Join Date: May 2010
Location: People's Republic of California
Posts: 720
Likes: 0
Received 15 Likes
on
12 Posts
Jaino, looked at your thread and even our wheels are painted the same I like your oem style better though. I'll subscribe to yours so I can watch your build and maybe get some tips.
Mark, thanks for the magnet tip. I used magnetic tape, but it's not very strong. It works and keeps it to the hood but I'll look for a better magnet off my fridge! I know exactly what you mean by it needing to be a little off center so it will go back in the stow away position.
I like your oem style better though. I'll subscribe to yours so I can watch your build and maybe get some tips.Mark, thanks for the magnet tip. I used magnetic tape, but it's not very strong. It works and keeps it to the hood but I'll look for a better magnet off my fridge!
I know exactly what you mean by it needing to be a little off center so it will go back in the stow away position.
09-26-2012, 10:24 PM
#90
Registered User
Thread Starter
iTrader: (4)
Join Date: May 2010
Location: People's Republic of California
Posts: 720
Likes: 0
Received 15 Likes
on
12 Posts
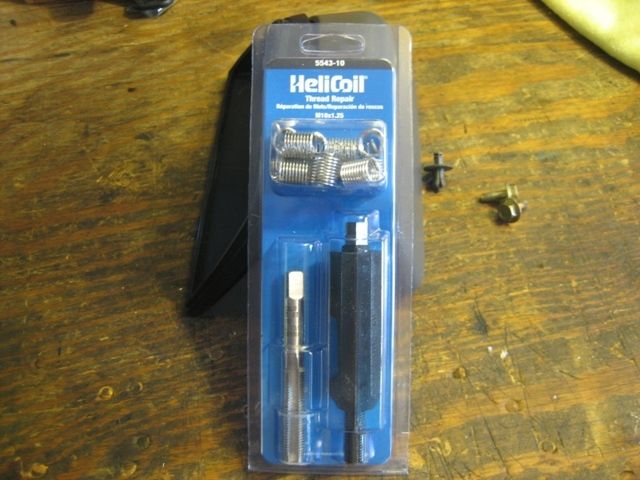
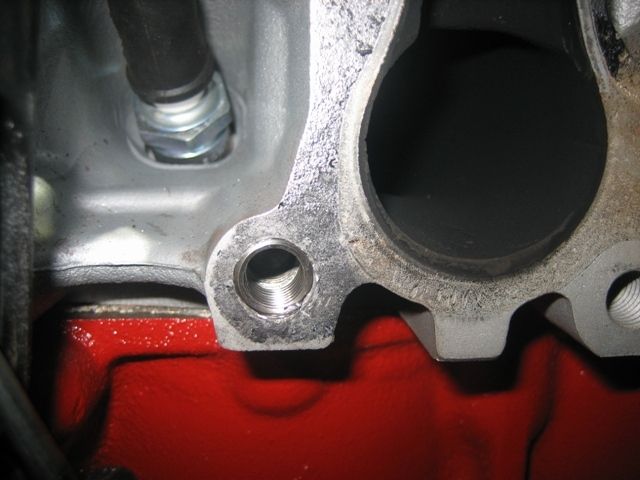
Well, finally fixed the stud for the exhaust header. It was actually pretty easy! Now I am truly convinced that Vellios machine shop is a bunch of morons, now that I've personally done a helicoil. I can't see how he could not have seen what he was doing was damaging....he literally had to say "f@#k it, let him deal with it" to let that type of crappy work out of the shop. 
Anyhow, I didn't even need to drill it out since all the threads were taken out already! Just tapped it and used the tool to put the helicoil in. I didn't tap deep enough for the whole helicoil so I just snipped off the remaining couple of threads..no biggie - plenty of threads and was easily able to torque.
10 x 1.25 Helicoil
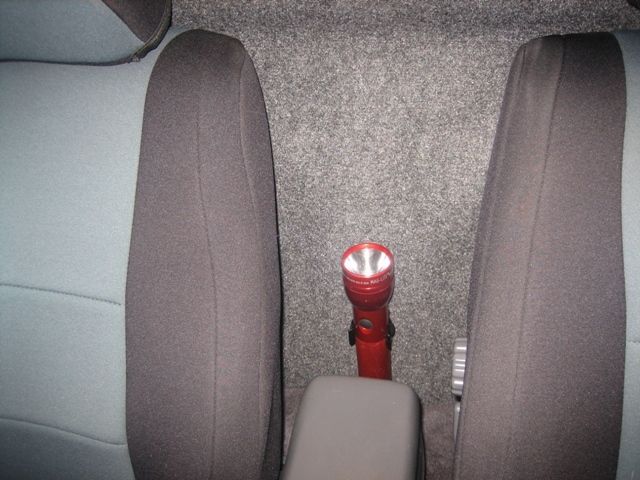
I got done so quickly that I had time to spray glue some charcoal grey speaker carpet over the rear cab wall piece I got off a 2nd Gen pickup. There were a couple of square cut outs in it for that years' model, so wanted to cover those up and get the carpeting color closer to my interior color. Also mounted my mag-lite to it, much rather drill holes into that cab piece rather than the actual rear wall.

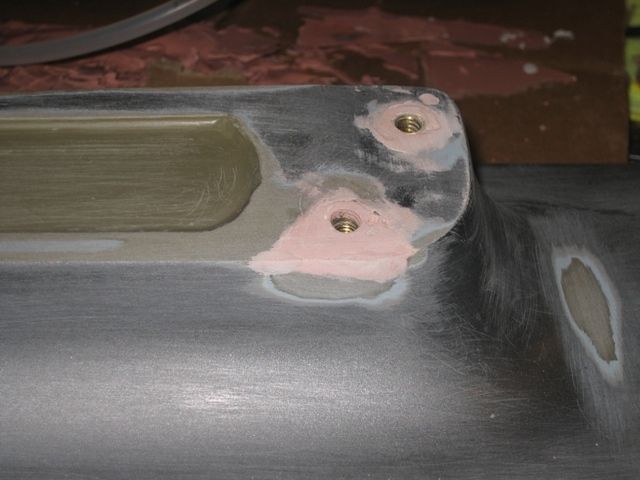
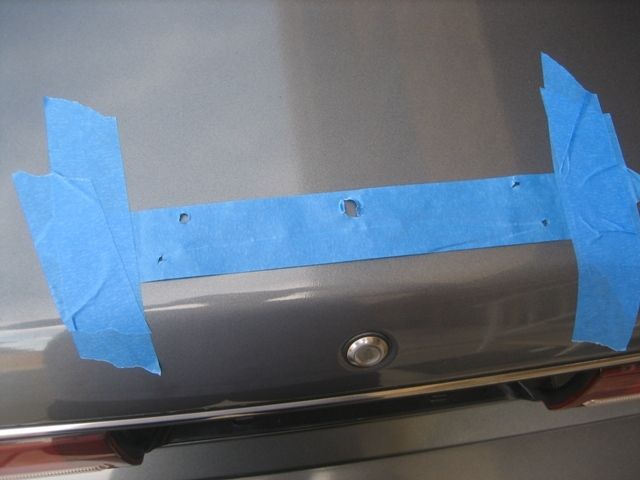
Oh, and just as a future idea to keep in the back of anyone's head. If you ever need to mount something, I came up with this idea that worked perfectly. I was needing to mount a rear spoiler on my camry and wanted to get the holes as perfect as possible. I put a piece of masking tape over the area with holes and then cut them out from the tape. I was then able to position and measure the spoiler perfectly where it needed to be. I then folded down the ends of the tape and taped them down to the trunk. Slowly and carefully removing the spoiler but leaving the tape with the holes right where I needed it.

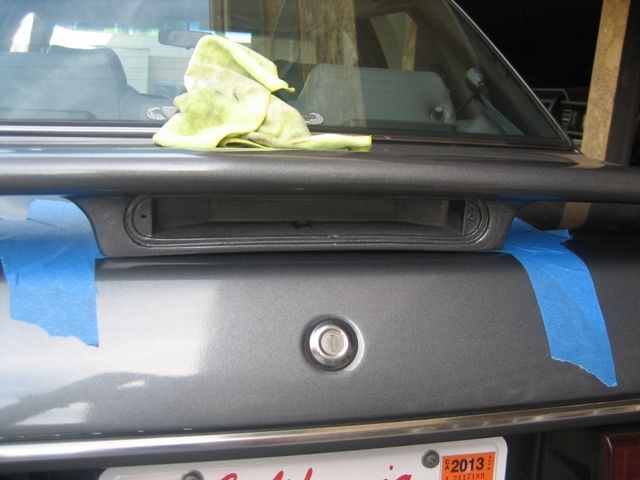
It doesn't look like it in the photo, because some of the tape wasn't fully cut out, but it worked perfectly enough (outline of the hole could still be seen on the tape) for me to know where to center my drill holes.
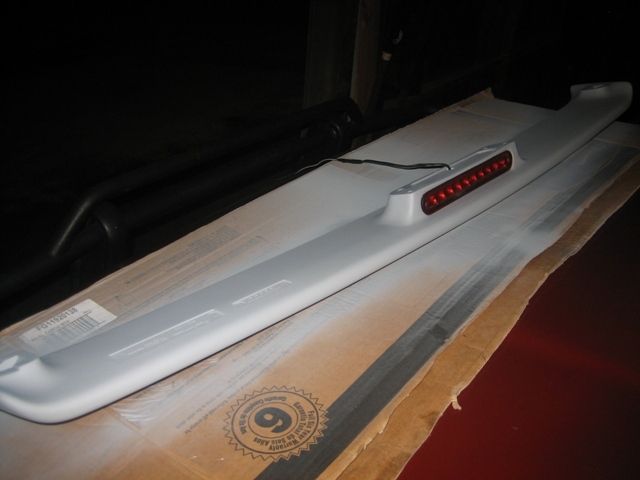
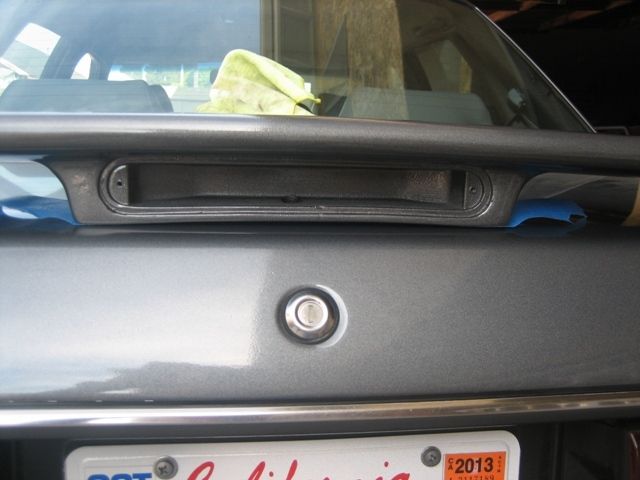
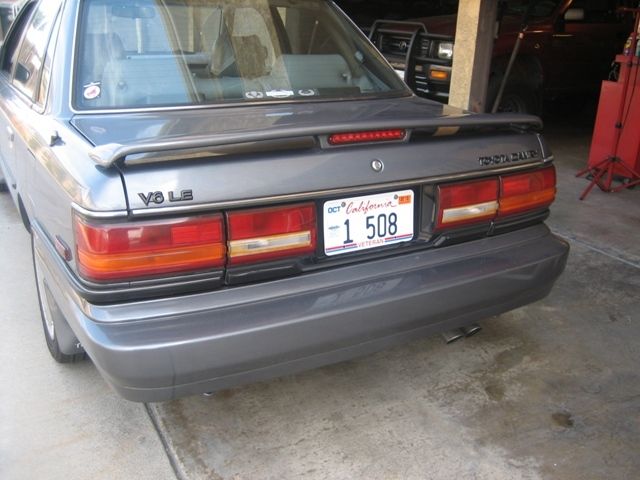
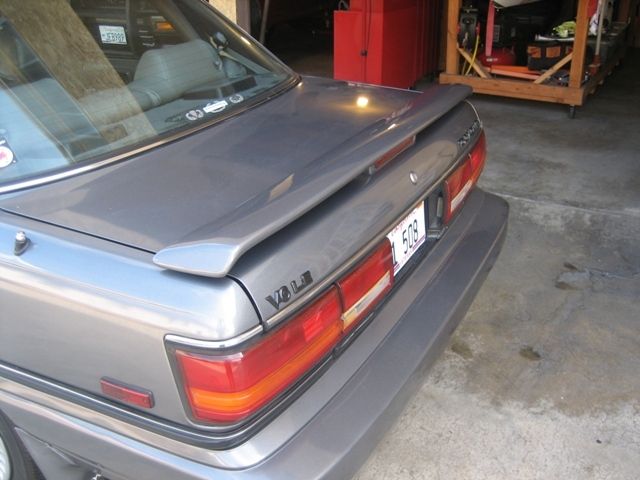
My very rare Toyota Canada 25th Anniversary spoiler. It was only available on the 25th Anniversary Edition Camry which was only for the 1990 model year (the year of my Camry) and it was only sold in Canada. You also had to not only purchase the 25th Anniversary Edition Camry, but you had to order the top of the line of that special edition in order to get the spoiler option. I was very fortunate to have found it in a junkyard in the U.S., I never expected to be able to have this on my 1990 camry! but here it is!
Anyhow, I didn't even need to drill it out since all the threads were taken out already!
Just tapped it and used the tool to put the helicoil in. I didn't tap deep enough for the whole helicoil so I just snipped off the remaining couple of threads..no biggie - plenty of threads and was easily able to torque.10 x 1.25 Helicoil
I got done so quickly that I had time to spray glue some charcoal grey speaker carpet over the rear cab wall piece I got off a 2nd Gen pickup. There were a couple of square cut outs in it for that years' model, so wanted to cover those up and get the carpeting color closer to my interior color. Also mounted my mag-lite to it, much rather drill holes into that cab piece rather than the actual rear wall.
Oh, and just as a future idea to keep in the back of anyone's head. If you ever need to mount something, I came up with this idea that worked perfectly. I was needing to mount a rear spoiler on my camry and wanted to get the holes as perfect as possible. I put a piece of masking tape over the area with holes and then cut them out from the tape. I was then able to position and measure the spoiler perfectly where it needed to be. I then folded down the ends of the tape and taped them down to the trunk. Slowly and carefully removing the spoiler but leaving the tape with the holes right where I needed it.
It doesn't look like it in the photo, because some of the tape wasn't fully cut out, but it worked perfectly enough (outline of the hole could still be seen on the tape) for me to know where to center my drill holes.
My very rare Toyota Canada 25th Anniversary spoiler. It was only available on the 25th Anniversary Edition Camry which was only for the 1990 model year (the year of my Camry) and it was only sold in Canada. You also had to not only purchase the 25th Anniversary Edition Camry, but you had to order the top of the line of that special edition in order to get the spoiler option. I was very fortunate to have found it in a junkyard in the U.S., I never expected to be able to have this on my 1990 camry! but here it is!
Last edited by Grego92; 09-26-2012 at 10:25 PM.
09-27-2012, 12:41 PM
#92
Registered User
Thread Starter
iTrader: (4)
Join Date: May 2010
Location: People's Republic of California
Posts: 720
Likes: 0
Received 15 Likes
on
12 Posts
Yeah, it's quieter...I can tell. Hitting a couple of yards tomorrow out in the Ontario/Riverside area in the morning (opposite traffic) to see what's out there....I'll give you a call if I run into a 1st Gen 4runner...so keep the phone close. My Fronty hasn't seen the road since I came back from mammoth/sierras so I want to take it for a good drive and burn some of that gas that's been sitting in there!
Last edited by Grego92; 09-27-2012 at 12:42 PM.
09-27-2012, 12:49 PM
#93
BTW, ..... I hit every Camry I could find at the small Wilmington yard on Blinn Ave... No digital dashes. NO electrical seats, either(driver side only, I remembered
 )
) If you find any 31 BFG AT's in good shape...Lemme know. I wanna mount one instead of the Lemans... Keeping the lemans for a backup, ya know? Just had so much trouble finding A SINGLE BFG31AT that someone would part with.... that wasn't dryrotting to death! haha.
Couple other things I'll think of as well. I might be doing a leaf pack swap sooner than I'd planned... Been talking with a few guys on it... and I might have found a solution. (PU's like yours don't have that problem like the 4Runners do, ya know?)...... Early Dakota PU's have a leaf pack that's rated 2K# higher than OUR STOCK 4RUNNER ONES? WTH? hahaha.... And they're only 2" or so longer... So moving a shackle forward that much, adding longer shackles and calling it susie might be my plan. Around 50$ or so at the Yards for leaf packs...
.... But still better than anything i've found on CL, etc. Bit of work for me to get em out... BUT, I think would be worth it in the end and give me WAY better flex. Plus, at 2K# rating higher, when I camp, I don't have to worry about my 500# of gear putting stress on the Zuks and the lil bit of Axle Wrap I get from the Zuk's as well(NOTHING to be concerned about... I LOVE what they've done for me so far... But 'Intended' and 'Practical' and 'Recommended' upgrades or stock are just better for the rig and the flex/ride in general, ya know? BBL8r!
09-27-2012, 03:27 PM
#94
Registered User
Thread Starter
iTrader: (4)
Join Date: May 2010
Location: People's Republic of California
Posts: 720
Likes: 0
Received 15 Likes
on
12 Posts
Ok, will do. OH, and the ticking in my engine, I forgot about this, but I'm sure this is certainly a contributor of it. The rockers not hitting perfectly...never got a reply on it.
https://www.yotatech.com/forums/f116...gnment-201856/
I'll peek inside sometime soon to adjust the valves again and see if there is anything wrong. The past two times I've checked nothing going on damage wise. If everything is still good, then maybe next year (4,000 miles or so) I'll ratchet down the head and put a whole new rocker in there and see if that quiets things down.
09-27-2012, 08:43 PM
#95
I looked at that thread.. figured I'd just post here. It seems permanently dead, lol...WOW, ..... Grego, talk about a LONG pause, right? hahahaha...
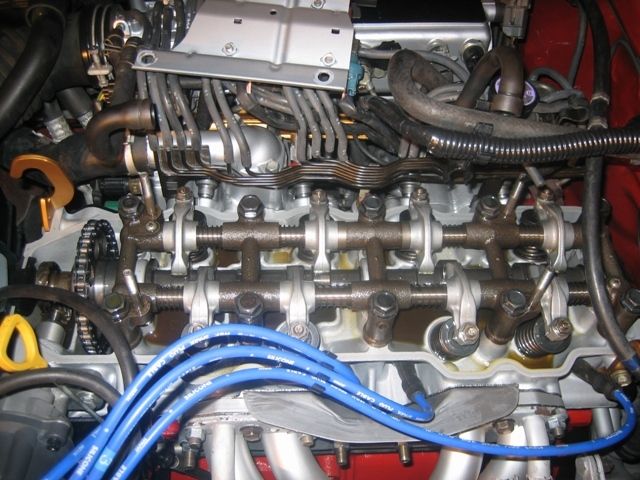
I can't speak for Rust Bucket... but I MIGHT be the guy he's speaking of when referring to the "Some guy strapped the head down and pulled the head bolts to change out a cam after 10K and was fine thereafter"..... that's EXACTLY what I did. Now.... keep in mind.... engnbldr do their CAM's TO SPECS, I would bet to the thousandth! YET, ..... it seemed interesting that I ran that new CAM and the rocker pads are wearing DIRECTLY center on the Engnbldr cam.... Yet were NOTTTT on the OEM one that VELLIOS TOTALLY JACKED UP(he tried to give me an 'RV Grind', he said... even wrote "RV" on it, lol... PERSONALLY, I think the Driver, Carlos, took a box of sandpaper and started rolling it over and over in his hand until Harry said, "HEY, get over here.... YEP, that looks good... slap "RV" on it and call it Susie!".......) ......... And NO, unlike most of my posts, whether upset or not... While I usually laugh..... I'M NOT LAUGHING at this one. It cost me 100'S of hours with this, the timing cover, cracking my block at the top right timing cover bolt......... AND PLENTY more, including a TERRIBLE bore! 5K and my bearings already looked a bit crappy! And, he's ground it to 20/30, my orig. Crank... SO, I had to start over with another short block.
'YOU KNOW ALL THAT', sorry! hahaha... My point is,.... When doing that, I ended up realizing that my adjuster screws seemed to 'stick'.... And to this day, I can't verify this... But it was almost as if they made a perfectly flat mating surface and 'CLICK', it was causing a clicking. So I ordered all new OEM adjusters and nuts from LCE.... not bad at all on price. .... During my SECOND rebuild in 5K miles..... I just felt MAYBE something was wrong with the rocker assembly, since I still had the same lil miss to some degree, which traveled over from my original motor to the full Vellios rebuild..... Best person to tell you whether there is or is not? PHIL! He took my rocker assembly in hand, to the bench,... then he messed with it a bit.... "NOTHING wrong with this".... He did measure a lil bit.. But he didn't see any dramatic wear and my rocker pads were fine/261-swapped in cam was wearing nicely... And my original spacers were all fine, etc.
Anyway, before the new Adjusters; I strapped the head down with HD ratchet straps, FIRMLY, front sides and back..... removed the head bolts.... pulled the rocker assembly, inspected it, slapped in the 261 CAM, ...and it INSTANTLY ran better once putting it back together... BUT, the damage from Vellios was done.
Do you have pics of your adjuster/valve stem misalignment? Is it very noticeable, like the pics above?
Another thing Phil found is, that Vellios hadn't replaced any of the valves OR guides. 254K miles and they were all original. He measured the play and it was beyond tolerable allowance..... Something like 16 Thousandths of play inside the guides.... Some of my adjusters were seemingly wearing off center as well... But after fully rebuilding the head and since I replaced the Valves with all new, new Manganese Bronze Guides, Dual Row Eski Springs at 78#, .... going over the head with a fine tooth comb and redoing the seats to fit the new engnbldr valves....... Well, you tell me, .... does it run smoothly?
I remember listening to your engine..... Lil 'ticky'.....but seemed to run smoothly. I've heard MUCH tickier, lol.... But I TOTALLY get it... it's bothersome, especially after all the work you've done/had done.... And you SEE, PHYSICALLY, something that has you questioning things. Have you taken pics of those misalignment's and given Phil a look see? That's what I would do.... Pick his brain, ya know?(if you have, sorry... I didn't see that).
09-29-2012, 12:42 PM
#96
Registered User
Thread Starter
iTrader: (4)
Join Date: May 2010
Location: People's Republic of California
Posts: 720
Likes: 0
Received 15 Likes
on
12 Posts
Hey Mark,
These are the only photos I have, took them the last time I had the valve covers off to do some adjusting (about 3,000 miles after rebuild). They're almost as bad as the guy on that thread. I didn't have vellios do my whole head, that went to Perfect Engine in L.A. whom I trust (they did my camry heads also). But now that I know about Phil I will take my stuff to him from now on, since he's way closer and cooler. Phil only did my crank.

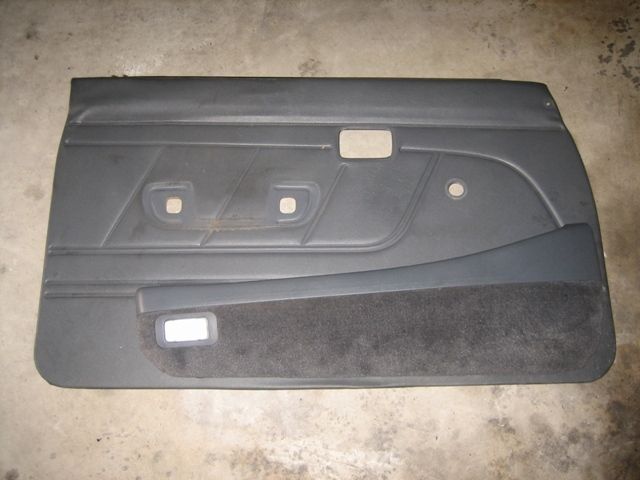
Was out in Pomona this morning and OF COURSE I had to stop at the junk yard out there on Mission Blvd. I had to grab these 3rd Gen P/U vinyl door cards. They were in too good of shape to just leave there! and they are already hard to come by to begin with, specially without speaker cut outs. One was already in the dirt, but lucky no tears. There was this 90' something Landcruiser there with these map pockets. I took them off and they were a near perfect match! I would totally have put these on my truck if I didn't already now have the SR5 cloth ones. I had to grab them! I'm going to keep them as spares, but if anyone is following this thread and needs some door cards post up. They cost me $20 each and the map pockets were $10 each. I'll sell them to you exactly what they cost me, but you have to pay shipping and you would have to wait until I found an appropriate box.
These are the only photos I have, took them the last time I had the valve covers off to do some adjusting (about 3,000 miles after rebuild). They're almost as bad as the guy on that thread. I didn't have vellios do my whole head, that went to Perfect Engine in L.A. whom I trust (they did my camry heads also). But now that I know about Phil I will take my stuff to him from now on, since he's way closer and cooler. Phil only did my crank.
Was out in Pomona this morning and OF COURSE I had to stop at the junk yard out there on Mission Blvd. I had to grab these 3rd Gen P/U vinyl door cards. They were in too good of shape to just leave there! and they are already hard to come by to begin with, specially without speaker cut outs. One was already in the dirt, but lucky no tears. There was this 90' something Landcruiser there with these map pockets. I took them off and they were a near perfect match! I would totally have put these on my truck if I didn't already now have the SR5 cloth ones. I had to grab them! I'm going to keep them as spares, but if anyone is following this thread and needs some door cards post up. They cost me $20 each and the map pockets were $10 each. I'll sell them to you exactly what they cost me, but you have to pay shipping and you would have to wait until I found an appropriate box.
10-09-2012, 06:54 PM
#97
Registered User
Thread Starter
iTrader: (4)
Join Date: May 2010
Location: People's Republic of California
Posts: 720
Likes: 0
Received 15 Likes
on
12 Posts
Pretty handy 22RE Timing Cover Bolt Chart to reference from LCE
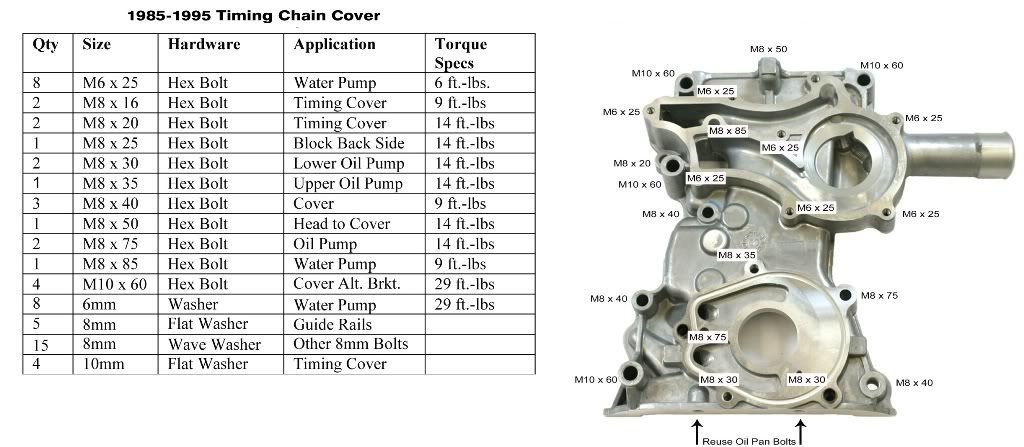
The link to the larger image is here http://www.lcengineering.com/LCNewsl...are-Kit_lg.jpg
The link to the larger image is here http://www.lcengineering.com/LCNewsl...are-Kit_lg.jpg
10-09-2012, 08:48 PM
#98
Wow, those are cool pockets with the light, Grego! And HECK YEAH, this stuff is harder and harder to come by, ya know? GRAB IT when you see it. I've learned what's not worth grabbing and what's a must! lol.... Thankfully, I REALLY have been blessed there over the last month or so.
Cool pic from LCE.... From their Tutorials/Write ups/Spec Sheets?
BTW, .... just wanted to mention... I think that the Rear View Dome Light is different in your year from mine.(I think you might have mentioned that.. I'd have to read back on my thread... and I'm too tired! hahaha)... But anyway, in case you haven't... The bolts are staggered, with 2 of the triangle on the right side in a line parallel with the truck front to back... and the bottom left one... well, on the left, hahaha. Mine is, well, as you saw in that pic. I remember you saying you saw one and it turned to dust? SAME HERE with this CHERRY Previa... I mean, this was the nicest one I've EVER seen in the yards... for the first gen ones.. And it was strange; I reached up to take the lens off and it just 'POOOOOF', like chalk! hahaha. Went to get the festoon out, ...."POOOF", the Festoon mounting pieces just snapped right out and more dust! haha. Then some, they're like brand new! WTH? It's almost like you can tell the ones who use a sun visor and those who don't, ya know?lol
Good to hear from ya, Grego... Hope you and your lady are doing well Take care, both of ya!
And HECK YEAH, this stuff is harder and harder to come by, ya know? GRAB IT when you see it. I've learned what's not worth grabbing and what's a must! lol.... Thankfully, I REALLY have been blessed there over the last month or so. Cool pic from LCE.... From their Tutorials/Write ups/Spec Sheets?
BTW, .... just wanted to mention... I think that the Rear View Dome Light is different in your year from mine.(I think you might have mentioned that.. I'd have to read back on my thread... and I'm too tired! hahaha)... But anyway, in case you haven't... The bolts are staggered, with 2 of the triangle on the right side in a line parallel with the truck front to back... and the bottom left one... well, on the left, hahaha. Mine is, well, as you saw in that pic. I remember you saying you saw one and it turned to dust? SAME HERE with this CHERRY Previa... I mean, this was the nicest one I've EVER seen in the yards... for the first gen ones.. And it was strange; I reached up to take the lens off and it just 'POOOOOF', like chalk! hahaha. Went to get the festoon out, ...."POOOF", the Festoon mounting pieces just snapped right out and more dust! haha. Then some, they're like brand new! WTH? It's almost like you can tell the ones who use a sun visor and those who don't, ya know?lol
Good to hear from ya, Grego... Hope you and your lady are doing well
Take care, both of ya!
10-11-2012, 11:43 PM
#99
Spring Mounts from Zuk
Hi Grego,
Thanks a lot for sharing your transfer case seal fix!. BTW, if you haven't found a fix for the off centered spring (Might shear off your lower bump stop), Did you see that Zuk makes the spring mounts? Featured here:
https://www.yotatech.com/forums/f116.../#post50948702
Regards,
RAD

Thanks a lot for sharing your transfer case seal fix!. BTW, if you haven't found a fix for the off centered spring (Might shear off your lower bump stop), Did you see that Zuk makes the spring mounts? Featured here:
https://www.yotatech.com/forums/f116.../#post50948702
Regards,
RAD
10-12-2012, 01:53 PM
#100
Registered User
Thread Starter
iTrader: (4)
Join Date: May 2010
Location: People's Republic of California
Posts: 720
Likes: 0
Received 15 Likes
on
12 Posts
No problem Rad! glad someone could use it as a reference. Thanks for that link, I'm gonna seriously think about that!
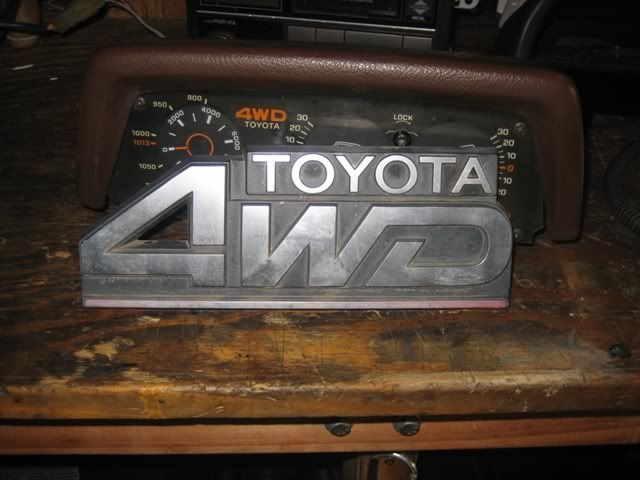
My score from the yard today! Finally an Altimeter!!! The guy only charged me $12.95...was expecting like $20. I have had an idea on mounting it in my truck, so one of these days I'm gonna work on that project. Also grabbed this cool looking badge off a 4WD Tercel....HAVE to stick it somewhere. Probably on the cab wall between the seats. Gotta polish it up and paint it first though....another project.
A comparison of the Montero accessory gauge. Gotta admit they have a cool electronic compass/thermometer (in/out), but the inclinometer is kinda ugly, and the altimeter is pretty much the same.


