CO_94_pu's 1994 truck Build-Up Thread
 02-05-2013, 10:57 PM
#21

After thought, forgotten fixes. Tighted the tailgate linkages and lubed all the moving bits, its all nice and smooth again, no more having to lift the handle to close the gate. Which of course was a PITA since I don't have a handle 
Thanks Chef!
Thanks Chef!
 02-06-2013, 03:43 AM
#23
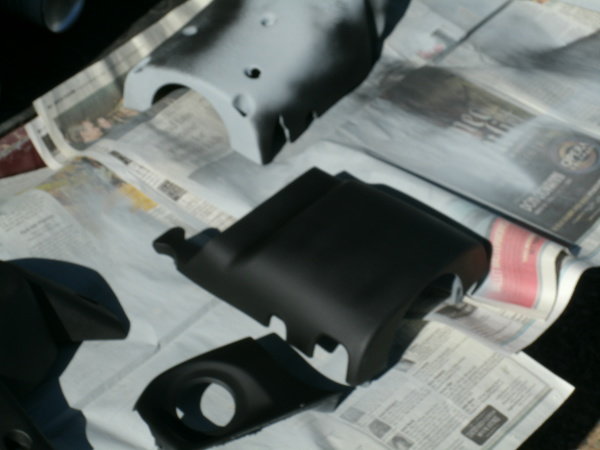
http://i44.photobucket.com/albums/f3...E/IMG_0197.jpg
Those ones should have some screws or other removable fasteners, where the arm rest pad disconnects from the plastic bit with the pocket. These are easy to recover, using the same methods he uses for the upper portion of the door panel. eg pop it off, lay it flat, trace it, cut it, then glue and stretch and glue some more.
Here are some tips for that type.
Start by gluing the pad to the material. Next you will start attaching to the base at the inner side(away from door), next the cut out for the door pull, the front and back ends, and finish with the front and rear facing bits of the door pull area.
You can as much padding as you'd like within reason, eg if you add too much it'll look sad/droopy when it starts to wear in(stretch).
Don't pull too tight or you get puckering. There is an example in my door panel album. I didn't check the face side before I glued it, but what do I care thats not my side bahahaha.
Greg has the full length arm rests I want, I'm not even sure if they fit my doors correctly but I want that pocket. Great place for the stereo remote, or smokes and lighter.
Now my little dinky ones are a whole different issue. These are constructed of molded/shaped foam and covered in a heavy molded rubber.
They will require multiple stitched compound curves. I can't see anyway around cutting them up to make templates(Notice my headliner is still in one piece so could be reinstalled if attached to the bracket). They need cut into atleast three pieces. One section each for the lower, the top and the pull cut out. Once you have a base pattern you need to add seam allowances about 1/2 inch all the way around, and attachment points for the door to handle junctions at least one inch.
The next issue is the molded foam, its likely to tear when you're removing the cover material. It will be difficult to impossible to get the proper foam asa hobbist. It is softer than say the spray foam they sell for insulation, but harder than the average upholstry/stuffing foams the craft store sells. It is also I think denser than either one. So probably a upholstry specific item.
Ok I'll admit it, I was a seamstress at one point. We did hotels, motels, and all of the denver areas big hospital's curtians. And as a kid my cousin had me helping heer make those puffy little photo albums so she could sell em at the craft fairs. So uh if you in a denver ER and spurting blood try not to aim for my drapes
I don't currently have a source/supply for the heavy duty auto vinyl. Nor a way to do the heat bonding, like the panel weld designs or headliner seams. And of course NO IDEA what to charge.
using upullandpay for cores/templates... Any of the other yards will be more.
Armrests 16-18$.
Door panels for templates are around 13$, 10-20 for mdf blanks, 5-10 for fabric/vinyl, 5-10 for padding.
Headliners, full headliner 20-22 (If i can even find them there), front bracket only 5-10, 5-10 fabric/vinyl
Add incidentals like thread and glue, a 60 mile trip, and labor to all of those. Not counting pattern development time, or material setup time. It gets kinda pricey even at minimum wage of 7.85. I can only hand stitch about 1/3rd of a meter in an hour and a half.
There is about 118$ invested in my headliner not counting materials, with just 15hrs of sewing. Of course that'd obviously not be as bad with a machine, but the curves are still pretty finicky.
I knocked out the door panels in one evening or about 4-6 hours is ~30-50$ labor, but that is reusing the panel blanks. So maybe 100-120 total for those.
The headliner took atleast as much time as the door panels just for planning, layout and pinning. No idea how long material prep took, that was mostly winding heavy guage thread, and some post pinning ironing.
And after rambling thru all that. Yes I am a firm believer in open source and business. Free speech is better than free beer. Give me the later and I'll excercise the former
 And maybe open gov, but I try not to think of those crazy SOB's.
So uhm where was I. Yeah I could maybe do a set of arm rests, first set of full length ones I find are going in my truck of course, but I wouldn't know what to charge. USPS flat rate boxes run about 6-17$, the longest box is only just over 13 inchs but only 3inch tall. Not sure the long arm rests fit in those but for reference on the shipping there ya go.
02-07-2013, 05:48 PM
#25
Woe is me! 
So I was on the phone with the old man last night and mistakenly told him "Oh yeah the toyotas doing great..", I said the magic phrase I guess it heard me.
As I was getting ready to leave the salvage yard today it started high-surging. So I go to pop the hood and the levers not working, "Oh thats just great, where is my screw driver.". Go up to the hood and the sleeve of the cable poped the end off and let it slip out of the holder. Could have been worse I guess and the cable could have been broken.
So as I'm standing there looking over the engine bay, there develops a puddle of coolant at my feet. Arg! shut it off before it gets to hot to open the radiator. Look around abit more and notice the drips are coming out the front seal.
About 4-500 miles ago I had a loose nut on the fan clutch assembly which started banging around like a little guy with a hammer. Turned out I only had two nuts and one was loose. Tightened it up and got two new nuts from the local salvage yard, no charge. Thank you sir!
On the way home it sounded like a gnome with a wrench, you know not as loud as the little man with a hammer. So i'll be needing to replace the water pump ASAP. Poor little guys probably original too. I feel so bad for spliting him up from his buddies.
And of course the salvage run wasn't as spectacular as I hoped. I found a grille, and thought oh great now I can't put it on cause the cables all fubar. The new 89 truck they got yesterday didn't have pretty much everything I'd wanted. Tailgate down handle gone. Front lamps missing, and on every car I passed I checked for bulbs either the whole assembly was gone or the lamp sockets were hanging there empty or obviously blown. The 89 had a full vinyl headliner that wrapped all the way down the A pillar and was tucked into the windshield, so no headliner brackets. I saw one good armrest but it was the only door panel in the 4runner, all the rest were yard rashed to bad for my taste. The forklift guy at the yard poped a hole in the door, trashed the bumper and some other bits of the front end. (Bumper was folded under the cab, was chrome no rust but mangled). The 89 was also sitting in what was apparently the wettist muddiest part of the yard and not set on the rims like normal, so no spare T-bar bolts for me I wussed out.
I managed to get my bumper hangers, the grill part of the header panel(They wanted 30 for it with the broken headlamp bits so I took em off and left em on the counter), a set of powered 4runner rear speakers, my headlight adjustment insert. A tilt column I couldn't pass up cause it had a good black leather wrap on it, but I snaped the 1/4 inch adapter on my socket set to get it. (Yeah should have brought the big boy tools, and would have went for em but the vultures were circling the truck whle I was in it).
I also scored me a new socket out of the 4runner, it was inside the rear panel where the window guy left it. They didn't remove the panel when they put the window in just glued it in instead of using the bolts, lazy..
Not too bad overall. I have a grill so come junebug season I wont cause any more/as much damage to my A/C condensor. And my bumper won't have the eternal frown anymore. Going to have to pull the whole bumper off to get the grill in however, and do it again when I find the right headlamp trim. And that water pump issue.
Of course there is also the damned HF tach I picked up, doesn't seem to like my plug wires, but I might of had it hooked up wrong (noticed the arrow when I was putting it away, Duh) I know I'm idling above 2-300. Which doesn't make me to optimistic for the timing lights clamp pickup too.
Obviously the 70$ toyota pump is the smart choice, but that 20 remanufactured one is pretty tempting. Need to get that handled tomarrow. I have a 120mile trip planed for saturday and don't wanna have to do it in the snow on the side of the road, in an area known for 60mph sustained winds. Yep bad idea..
So in conclusion, thanks for reading sorry about the whining
On with the build!
I saw a pair of custom interior door handles in Twistedyota's build thread. They are FED required safety equipment they should maybe be safety orange right? I tryed it out in a graphics program but I'm not sure I'm sold on the idea. Since I don't have a matching red paint currently, and it didn't look great in the paint program.
What I've decided is to add an led/lamp to them and paint the insides with a glow in the dark(Color undecided), and give them a clear coat of UV protection.. So when you have the lights on at night they charge up and you can find the door handles easily without groping around for them.
While I have the doors open and am adding custom wiring.. Would be a good time to add an led strip to the rear edge so people are less likely to pull your door off. Noticed some of them already have the "Hey my doors open don't fold it forwards please" lights. A nice dark stop sign red maybe, or and RGB strip but that'd require a controller too.
I'm also planing on doubling or tripple up on the festoon lamps in the overhead, in parallel config. For a brighter light. Maybe with a reflector, but they get pretty hot already and an aluminium one needs to be just right to not short out.
Need to test fit the 4runner speakers. They will either go under the seat or in a console/armrest box. My preference would be under the seats. I want a console/armrest that doubles as the third seat.
Didn't get a chance to grab stripper, sand paper, weather strip foam, or more fabric, so all those plans are still on hold.
02-08-2013, 04:11 PM
#26
Decided to just pickup the cheap water pump as an emergency bandaid, will carry it in the truck with some extra coolant and lots of water. And put it on if it starts leaking faster than I can fill the resi', or return it when a front end kit arrives.
And now back to the show!.
Got the tilt mounted up, and I want to pass on the key to a 20minute swap. Ready? Take the wobble/nuckle off the bottom of the donors steering wheel,and put it on the shaft bang done. Screwed around trying to wiggle the full assembly onto there for atleast 20 minutes, take it off try spreading it, lube it again and again... Silly me. Had it on in 60 seconds or so once I only had to hold one bit in alignment.
For those that haven't seen the swap it goes like this.
Drop the trim below the wheel, remove the clam shell, remove the metal bracket, remove the duct, unplug the harness (two on the wheel and the one ignition switch). Undo the severely oveer torqued bolt on the steering wobble at the firewall, remove the two foremost bolts(nearest fw), then break the two nuts loose at the dash. Climb into the seat and hold the steering wheel to the dash with your forearms while you take the nuts off. Lightly pull the steering column into your lap.
Pull the knuckle off the new one and slip it onto the shaft thru the firewall, lay the donor on the seat with proper alignment(eg straight), pull the knuckle back to the column, get into seat and lift column into place (make sure you hook the rear mount), hold it up and put atleast on nut on. Now put the bolts back in the knuckle, the fore-bracket, the back nuts. Plug it in replace duct and metal shield then clam shells.
You will want a breaker bar, even if you weight 400lbs. It's a knuckle saving device, thats stuffs kinda sharp and point up in there.
I had to drill the lock pin, did it in the drill press. No major problems, untill i was done and putting away my punch I used to knock in the little rim the drill bit left. I found the proper sized drill bit laying where it shouldn't have been. Figures
Oh I guess there is another tip. I couldn't get the steering lock to release and let me rotate the ignitions intermediate shaft(Bit between the tumbler and switch). Rotate it the wrong way untill it lines up to the new tumbler in. Turn the new tumbler to On and pull it back out, it should now rotate the full 360. Ok I'm not really sure what went on there to be honest but it went something like the above. I couldn't hit whatever the upper spear bit of the tumbler mates with, with a screw driver *shrug*
Last edited by Co_94_PU; 02-08-2013 at 04:18 PM.
02-08-2013, 04:27 PM
#27
When the weather permits I'll clean up the steering wheel and paint the clam shell and post up pictures. I'll need to hook up the light for the key at some point also. And probably replace the turn signal side of the combi' switchs it was abit damaged at the yard.
But I got tilt and intermitten wipers Yay! a rear wiper switch if I decide to mount one on the camper shell. And cruise control switches when I'm ready to tackle the addon.
It is tempting to do a custom cruise control system that maintains a throttle position not just a speed setting. That's mostly how I drive anyway on the highway, no sense burning more gas to get up the next hill.
02-11-2013, 01:45 AM
#28
Got some trim preped for paint today, doesn't look great for paint temp wise. under 50 till sunday.
Snapped off my turn signal switch doing a uturn after making a wrong highway exit saturday. Whoops! I knew it was broken and was going to need some work but not this soon, I only got about six "blinker ups" out of it.
Managed to pull the installed wheel off the column with a little bit of tugging. But the unmounted (base model) wheel didn't want to play nice. So I'll need to build , buy or borrow a wheel puller. Then I can disassemble and replace the shaft in the combi' switch on the tilt column.
And more not great news. My spiffy black leather wheel I couldn't resist. Yeah it ain't black just eewwww dirty standard blue, and not leather either it's vinyl. And in pretty bad shape after I got all the gunk off it, had to resort to tarlip hand cleaner 'cause the dishsoap and hot water wasn't cutting it.
It is intact enough to make a template out of so. I did a little bit of looking around on the tandy leather website, and couldn't believe they didn't have a steering wheel wrap kit. I'm not sure if leather has gotten outragiously expensive or I just didn't notice the prices before since it was free from my tooling teacher. You'd think we didn't eat a million cows a day in america or something.
Rabbit is cheap but perhaps a little cheesy.
Wool is the obvious choice if you want fur, but sure is pricey
White deer, is a great price for a full skin and multi textured, but white doesn't fit my color scheme. Can be dyed of course.
Suede comes in great pre-dyed vibrant colors
Remnent bags, are plenty cheap but might be difficult to get enough length for the top piece and width to cover the steering wheel arms.
And of course I spoted some bling in two sizes, I could probably get away with the colored leather, and my odd choice of door panels, but that'd put me over the top from restoration to "custom" interior for sure
Last edited by Co_94_PU; 02-11-2013 at 01:48 AM.
02-11-2013, 06:29 AM
#29
Registered User

Join Date: Jan 2013
Posts: 33
Likes: 0
Received 0 Likes
on
0 Posts
for the steering wheel puller wd 40 and a rubber mallet to the back side of the wheel in opposite corners. my day job is a mechanic by trade and i have a steeering wheel puller and never use it
02-11-2013, 02:38 PM
#30
Over night with the wd40, harder soled shoes, a tap on the back side with the old hammer and it poped right off with a little tuging.
24 screws and 6 plug pins later i had the arm and housings swaped. I didn't bother to remove the arm from the donor housing, well I did but I couldn't find my 7/16 starhead socket to press it out with so just stuck with the dirtier old one.
I had to spray that nasty ugly vinyl wheel with primer or I just couldn't stomach putting the ugly SOB back on. Hopefully it dries ok being only 30f outside it's quite abit below the recommended painting temps, but it came from room temp to get sprayed atleast.
Dropped my hammer(or something) on the old grey clam shell for the solid steering column, it shattered like glass. Didn't notice it untill i went to use if to hold some screws from wandering off. Working around the dash in the cold is such a bad idea.
Need to add some white enamel paint to my shopping lists to redo the letter/markings on various bits, CC buttons, shifter and climate controls.
Got a set of knobs for my window handles for free from the local yard, he doesn't bother to walk all the way to the office and write up a sales slip for stuff that fits in your hand pretty much. Thank you sir! Not sure they will take paint very well, they are a different plastic than the other (ABS) stuff. Much softer, and they were really grungy, so I might wind up having to buy aftermarket replacments.
The painted vinyl visors have cured nicely, not sticking to my documents or anything.
Really too cold and windy to bee out there so that'll wrap up todays update, unless I get really bored and find something I can fiddle with inside.
02-12-2013, 03:25 PM
#31
Sorry I don't recall what I said I was going to have pictures of but here are some progress pictures
Sad bumper makeing a frown.


No more frowning bumper!


Got the side bumper hangers installed. Spent most of the time straightening out that lower portion with a hammer & dolly. OMG I love that dolly, it is night and day having the proper tools. Got the top and bottom all straight and flat, knocked out a couple divits, and got the cope(cove?) drivers side pretty well back in shape to match the passengers.
Had to straighten/flatten out the top of the bumper it was interfering with the fit for the grill, bumper had a big bow upwards near the middle. The 95(?) 4runner grille has a minor issue with fitting, the lower center clip doesn't line up with the hood latch brace so it's free floating in the middle and might have a vibration noise from contacting the not perfectly flat bumper.
Horrible picture of the grille but there is the dent in the hood I need to work on still.

New to me 4runner grille

Got the window handle knobs painted, igniton key surround, forward face of the steering wheel trim, and upper half of the steering column clamshell. Then ran out of my flat black paint, while doing the lower clam shell.
Wheel cover

Upper column clam shell, and ignition key surround
Cruise control switch covers, and window handle knobs(shiney crescent shapes)

Here is the ratty old vinyl steering wheel in place in a "Just in case I need to go somewhere" mounting.

After running out of black I thought maybe the fire red I have laying around might be ok on the interior. So I test shot some on the front side of the steering wheel at the bottom where noone will notice. It was a pretty bad match even to a color blind male, so I wiped most of it off before it had a chance to dry. But I took pictures of it anyway..


This one looks pretty close in the picture, sure doesn't in person however.


Not really great pictures but that red is a really bad match in person.
Here is the shot of under my hood with the same paint on it.

Will need to pick up multiple cans of that 0.99$ flat black from the bigbox hardware guys. I'll need it to finish interior, column covers, seat trim, seat belt recepticles, and the other already black plastic bits of the dash. Aswell as maybe my body trim. And of course the reason I got it in the first place, the camper shell. I also use the flat black for sealing body work till I can get an overall paint job done.
Also some "Brushed Aluminium" for the front bumper and wheel rims. Unless I stumble upon a chrome front bumper to go with my rear.
Sad bumper makeing a frown.
No more frowning bumper!
Got the side bumper hangers installed. Spent most of the time straightening out that lower portion with a hammer & dolly. OMG I love that dolly, it is night and day having the proper tools. Got the top and bottom all straight and flat, knocked out a couple divits, and got the cope(cove?) drivers side pretty well back in shape to match the passengers.
Had to straighten/flatten out the top of the bumper it was interfering with the fit for the grill, bumper had a big bow upwards near the middle. The 95(?) 4runner grille has a minor issue with fitting, the lower center clip doesn't line up with the hood latch brace so it's free floating in the middle and might have a vibration noise from contacting the not perfectly flat bumper.
Horrible picture of the grille but there is the dent in the hood I need to work on still.
New to me 4runner grille
Got the window handle knobs painted, igniton key surround, forward face of the steering wheel trim, and upper half of the steering column clamshell. Then ran out of my flat black paint, while doing the lower clam shell.
Wheel cover
Upper column clam shell, and ignition key surround
Cruise control switch covers, and window handle knobs(shiney crescent shapes)
Here is the ratty old vinyl steering wheel in place in a "Just in case I need to go somewhere" mounting.
After running out of black I thought maybe the fire red I have laying around might be ok on the interior. So I test shot some on the front side of the steering wheel at the bottom where noone will notice. It was a pretty bad match even to a color blind male, so I wiped most of it off before it had a chance to dry. But I took pictures of it anyway..
This one looks pretty close in the picture, sure doesn't in person however.
Not really great pictures but that red is a really bad match in person.
Here is the shot of under my hood with the same paint on it.
Will need to pick up multiple cans of that 0.99$ flat black from the bigbox hardware guys. I'll need it to finish interior, column covers, seat trim, seat belt recepticles, and the other already black plastic bits of the dash. Aswell as maybe my body trim. And of course the reason I got it in the first place, the camper shell. I also use the flat black for sealing body work till I can get an overall paint job done.
Also some "Brushed Aluminium" for the front bumper and wheel rims. Unless I stumble upon a chrome front bumper to go with my rear.
02-13-2013, 07:11 PM
#32
So todays work consisted of a bit of hammering out my body some.
This dent in the cab

Is in side a double wall area and not easy to reach. There are a few approaches, Stud welder, slide hammer, or back side hammering which are pretty much your basic technics. Since I dont have a stud welder, and I'm trying not to have to poke any holes I'm left with just the backside hammering.
Now as I mentioned this area is double walled. There is one obvious approach angle, pull the bed and remove the vent located at the rear of the cab. This approach doesn't give alot of working room. My guru, hi pop!, said to just drill a hole thru the inside and attack it with the hydraulic jack. As I was inspecting the area I spoted the inside vent holes located behind the seatbelt motors. Ahah I can get a bar down that and not do any permenant alterations. Now I don't have a cold chisle set and my screw drivers we all too short but mounted right there in front of me was the toyota jack and handle, Yep handle extension to the rescue.
Spent maybe an hour attacking from the inside, and another hour from the outside hammering in the spots where it kinked(front side) and bowed(backside). It should be pretty close to shallow enough to put some body putty on now.
One good smack from the inside on the bed dent in the photo with a hand dolly, it's previously had lots of hammering, got it just about to a satisfactory spot. It's a really long shallow dent and the peaning hammer just wasn't doing it. There isn't alot of room in this area due to the bed cross bracing and frame mounts, so the anvil dolly is probably the best tool. I spend a little bit of time trying to work the crease out with the pick hammer, but It was ugly due to the sharpness of the pick and bad aim from not being able to see or manuver well. So I had to knock some of it back in. There is still the spot under the trim piece in the photo I'm not happy with. Will try jamming a 2x4 up between the inner and outer bed and see if it'll work it's self out. I don't want to have to putty that body line if I can avoid it.
spent another 10-20 minutes on the hood. The buckle crease I needed to resess abit more cause it was still a high spot. And I got the front lip nice and straight so it should match the passenger side. There is still the buckle and divit in the front left but no way to attack it without deskinning the hood. I will have to try a glue/stud meathod or just knock in the raised portion and fill the low with putty it is pretty shallow but I haven't measured it.
Took a couple swings at the front left fender raised area, and decided that was a bad idea todo with it still mounted. I don't want to buy a new headlight for a foolish choice.

So onto todays tip and lesson.
Always always sand before you hammer. Or you'll wind up with peaks and valleys that are no fun at all to try and sand. I might of spent more time sanding and picking out the paint from valleys than I did hammering today.
My other task for today was to clean up the 4runner self ampped/powered rear speaker boxes. Just a quick wipe down to remove the human debris from the front, and the road from the back side.
Next up was figuring out all the wiring.
Pin/function
1/Spk+
3/Spk-
2/Amp power, connects to B+/Dome fuse, radio pin 4
6/Amp gnd
5/Power ant, connects to radio pin 9
Then I spent way too long scouring the napa website to see what wire they had in stock, or if I should just get some from HF or the local hardware store.
The store was closed by the time I was close to ready to run down there, spent too much time looking for the generic scotchlok they had in stock. I know I know they suck but, I didn't really feel like dragin the extension cord out and having to wind it up again so I could solder in the cab.
So tomarrow I'll be assembling the rear speaker loom and laying it down the tranny hump well that's what it's called don't look at me like that, would you prefer "tranny bulge"?
part #'s,desc,price
NW 727615, Shrink tube, 1.49
NW 737299, Wiring loom wrap, 0.39/ft
BEL 785100, 20g Wire Black 50', 7.49
BEL 785102, 20g Wire Red 50', 7.49
length from radio to floor, around 2ft
firewall to rear of cab, around 4ft
left/right side of hump, 2ft
Total wires lengths.
4 each 8', 3 each 6', 3 each 4'.
Each speaker wire will be full runs, the three shared wires will run to the back then Y off to the left and right sides. The 20g wire is rated for around 10amps so, 5amps * 12v = 60w which is acceptable to me If I ever upgrade I'll just need to add a fuse and run new supply wires to the stereo area so I don't overload the dome fuse.
I pre labeled both speaker pigtails, and the pigtail for the rear speakers at the radio. Also made labels, 23 of them, for all junctions of the new wiring. So it's all measure, cut, tape, strip, twist, solder, and seal ready. hah first time you've seen a whole loom assembly in one sentence I bet.!
While I have the stereo out I need to remeber to check all the lamps in it and replace the burnt out ones. Hopefully that is all thats making it's lights not work and I can ditch the led flashlight clamped to my cup holder. Also to put the bulbs in my ashtray and lighter sockets.
I should probably do my other dash work while I'm in there but I don't think I'll feel up for pulling the whole thing apart to get to the air box to clean and reseal all the ducts. Also on that list is the tach calibration, key lamp wiring (int relay pin #4), and add my unbroken passenger vent. I don't have paint todo the dash painting and it is a two day job to prep and dry.
Regarding the key lamp. That does stay on some amount of time after the door is shut, eg I don't need to engineer up a capacitor, resistor and diode right?
*Updated* Corrected speaker wire length, should have been 8' was 10'
This dent in the cab
Is in side a double wall area and not easy to reach. There are a few approaches, Stud welder, slide hammer, or back side hammering which are pretty much your basic technics. Since I dont have a stud welder, and I'm trying not to have to poke any holes I'm left with just the backside hammering.
Now as I mentioned this area is double walled. There is one obvious approach angle, pull the bed and remove the vent located at the rear of the cab. This approach doesn't give alot of working room. My guru, hi pop!, said to just drill a hole thru the inside and attack it with the hydraulic jack. As I was inspecting the area I spoted the inside vent holes located behind the seatbelt motors. Ahah I can get a bar down that and not do any permenant alterations. Now I don't have a cold chisle set and my screw drivers we all too short but mounted right there in front of me was the toyota jack and handle, Yep handle extension to the rescue.
Spent maybe an hour attacking from the inside, and another hour from the outside hammering in the spots where it kinked(front side) and bowed(backside). It should be pretty close to shallow enough to put some body putty on now.
One good smack from the inside on the bed dent in the photo with a hand dolly, it's previously had lots of hammering, got it just about to a satisfactory spot. It's a really long shallow dent and the peaning hammer just wasn't doing it. There isn't alot of room in this area due to the bed cross bracing and frame mounts, so the anvil dolly is probably the best tool. I spend a little bit of time trying to work the crease out with the pick hammer, but It was ugly due to the sharpness of the pick and bad aim from not being able to see or manuver well. So I had to knock some of it back in. There is still the spot under the trim piece in the photo I'm not happy with. Will try jamming a 2x4 up between the inner and outer bed and see if it'll work it's self out. I don't want to have to putty that body line if I can avoid it.
spent another 10-20 minutes on the hood. The buckle crease I needed to resess abit more cause it was still a high spot. And I got the front lip nice and straight so it should match the passenger side. There is still the buckle and divit in the front left but no way to attack it without deskinning the hood. I will have to try a glue/stud meathod or just knock in the raised portion and fill the low with putty it is pretty shallow but I haven't measured it.
Took a couple swings at the front left fender raised area, and decided that was a bad idea todo with it still mounted. I don't want to buy a new headlight for a foolish choice.
So onto todays tip and lesson.
Always always sand before you hammer. Or you'll wind up with peaks and valleys that are no fun at all to try and sand. I might of spent more time sanding and picking out the paint from valleys than I did hammering today.
My other task for today was to clean up the 4runner self ampped/powered rear speaker boxes. Just a quick wipe down to remove the human debris from the front, and the road from the back side.
Next up was figuring out all the wiring.
Pin/function
1/Spk+
3/Spk-
2/Amp power, connects to B+/Dome fuse, radio pin 4
6/Amp gnd
5/Power ant, connects to radio pin 9
Then I spent way too long scouring the napa website to see what wire they had in stock, or if I should just get some from HF or the local hardware store.
The store was closed by the time I was close to ready to run down there, spent too much time looking for the generic scotchlok they had in stock. I know I know they suck but, I didn't really feel like dragin the extension cord out and having to wind it up again so I could solder in the cab.
So tomarrow I'll be assembling the rear speaker loom and laying it down the tranny hump
well that's what it's called don't look at me like that, would you prefer "tranny bulge"?part #'s,desc,price
NW 727615, Shrink tube, 1.49
NW 737299, Wiring loom wrap, 0.39/ft
BEL 785100, 20g Wire Black 50', 7.49
BEL 785102, 20g Wire Red 50', 7.49
length from radio to floor, around 2ft
firewall to rear of cab, around 4ft
left/right side of hump, 2ft
Total wires lengths.
4 each 8', 3 each 6', 3 each 4'.
Each speaker wire will be full runs, the three shared wires will run to the back then Y off to the left and right sides. The 20g wire is rated for around 10amps so, 5amps * 12v = 60w which is acceptable to me If I ever upgrade I'll just need to add a fuse and run new supply wires to the stereo area so I don't overload the dome fuse.
I pre labeled both speaker pigtails, and the pigtail for the rear speakers at the radio. Also made labels, 23 of them, for all junctions of the new wiring. So it's all measure, cut, tape, strip, twist, solder, and seal ready. hah first time you've seen a whole loom assembly in one sentence I bet.!
While I have the stereo out I need to remeber to check all the lamps in it and replace the burnt out ones. Hopefully that is all thats making it's lights not work and I can ditch the led flashlight clamped to my cup holder. Also to put the bulbs in my ashtray and lighter sockets.
I should probably do my other dash work while I'm in there but I don't think I'll feel up for pulling the whole thing apart to get to the air box to clean and reseal all the ducts. Also on that list is the tach calibration, key lamp wiring (int relay pin #4), and add my unbroken passenger vent. I don't have paint todo the dash painting and it is a two day job to prep and dry.
Regarding the key lamp. That does stay on some amount of time after the door is shut, eg I don't need to engineer up a capacitor, resistor and diode right?
*Updated* Corrected speaker wire length, should have been 8' was 10'
Last edited by Co_94_PU; 02-14-2013 at 06:40 PM.
02-14-2013, 02:15 AM
#33
Super Moderator
Staff
iTrader: (1)
Join Date: Aug 2008
Location: Anderson Missouri
Posts: 11,788
Likes: 0
Received 21 Likes
on
19 Posts
On the steering wheel, the parts store lets me use it in the parking lot and I just make sure the nut is on tight enough to not let the wheel back off of the shaft til I get home.
An old timer told me that if you can get a deflated football or basket ball behind some dents and then air it with a pump that can get alot of dents out as well.
I enjoy seeing bodywork. Like that over mechanicing and it makes a big difference when done. Wont even feel or look like the same truck when you are done.
Later on if you get to the duct work, I think you will be surprised at how dusty and dirty the are in there.
02-14-2013, 07:38 PM
#34
Rear speaker harness, 4runner powered rear speakers
Well it took alittle longer than I expected, but it's done and done pro'. Still having battery issues so I only got 'the money shot" for photos no progression ones, sorry..
Step one was running to the village and picking up materials, there was a minor issue with thier pricer gun settings but they fixed that right up at the counter.
Next up was measuring up wire and cutting.
Measured up the two full length runs for the speaker inputs using the "wrong" measurement of 10' it should have been 8' I figured this out later. Bound these four wires together every six inches to keep them tangle free.
Measured up the three wires at four foot, these run across the rear of the cab and provide the power, ground and power switch for the 4runner amps. Bound these up every six inches also, then folded it in half to mark the mid point where it Y's off for each side.
Measured up another three wires at six foot, for the run to the rear. Again power, ground and power switch, and bound them up like the others.
Then it was time to apply the labels. Since I only bought two colors of wire in fifty foot rolls, I needed to use the meter to apply these. I used the red wire for the amp power six foot section and each speakers positive wires, these were easy to find. Everything else was black and only a little bit tricky, no real problems just do one wire at a time and make sure not to drop it while grabing the label.
All labeled up and ready for stripping, twisting and soldering.
Strip one inch off each wire. Slide a one to one half inch piece of shrink wrap onto one side of the wire. Then form an X meeting the wires in the middle of the stripped area. Pinch in the middle and wrap the free end around the side that has insulation, repeat for the other side. This gives a firm mechanical bond, with the free end wrapped around the straight section of it's mate you shouldn't be able to pull these apart. Ideally you'll have four full turns on each side, this is some old mil/jdec/nasa spec or something. (Hi pop!, thanks!)
I forgot my shrink wrap atleast twice and had to cut out my solder joint, oops.
Now heat up the soldering iron and start perm' attaching. I used a bit of solder flux on each joint, applied before heating, and a little dab of solder applied to the iron before each wire. The little dab of solder helps the heat conduct into the wire, you know it's time to apply the solder wire when this little dap flows from the iron up the wires.
Then I locate the shrink wrap over the solder joint with about an eighth inch on each side. Apply heat to one side with the iron, I use the heating element securing screw not the iron tip so it doesn't get any plastic on it. Then the other side, and finally the middle area. Working from the sides first prevents the shrink wrap from shrinking away from the insulation, so I can use less eg 1/8th inch over the cut, normally you'd want to use atleast twice the length of the exposed area.
I droped a couple pieces of the shrink wrap I cut, and made a few of the first ones longer than needed. So by the time I was down to the last plug connections I had to run back in and grab some more. I was a bit "cooled off" and distracted afteer that and this is when I forgot to put them on before soldering.
Finally it was time to apply the loom shield. I just squeeked by with the quarter inch ID looming, in a few places I had used too much tape for the first bundling and it bulges a little in those placed. Then I spend 30-60 minutes applying the final wrap.
Total time was about 4 hours most of it in front of the tv which didn't speed things up. Materials and labor come up to about 60$, which is more than I spent on all 6 of my speakers and the toyota stereo.
It took another hour to get the dash apart in the cold/dark. Turns out I put both the screws in the glove box area and couldn't figure out why it didn't want to come loose. I also found I didn't have the wire for the power ant' signal that turns on the amps, so I had to run inside and grab the wire and pin from my extra pigtail from the donor.
The harness on the left is from the donor (celica or camry maybe), it had aftermarket speakers installed. I wish it would have had more of the shielding intact, I only got about ten inches of it. The three loose wires are the ones for the amp, I got lazy and just used taps to connect to the existing harness. In my defense it's cold and wet since it snowed today.

Overhead show of the harness and speakers.

I'm still considering enlarging the openings or trying to fit my slightly larger round set of speakers into these housings. I still don't have front boxes since my donor wasn't a truck/4runner. But these would fit under the dash much better if I had them.
It's cold and dark and it took me about an hour to get the dash loose and plug this stuff in. Thought I'd come post my results and warm up. Now to go bring the head-unit in and see if I can get the knobs I attached with lock-tite to come off. I need to check all the back lights. And clean up the contacts on the volume knob. I'm not positive my stereo harness has the illumination wiring, it should be on pin j or 10 depending which pin map you're using, which I have.
There is also an odd wire, red-blue maybe, that comes out of the harness in this area I have no idea what it's for currently. Also one in the rear speaker plug from my donor I don't know what it is for either.
Step one was running to the village and picking up materials, there was a minor issue with thier pricer gun settings but they fixed that right up at the counter.
Next up was measuring up wire and cutting.
Measured up the two full length runs for the speaker inputs using the "wrong" measurement of 10' it should have been 8' I figured this out later. Bound these four wires together every six inches to keep them tangle free.
Measured up the three wires at four foot, these run across the rear of the cab and provide the power, ground and power switch for the 4runner amps. Bound these up every six inches also, then folded it in half to mark the mid point where it Y's off for each side.
Measured up another three wires at six foot, for the run to the rear. Again power, ground and power switch, and bound them up like the others.
Then it was time to apply the labels. Since I only bought two colors of wire in fifty foot rolls, I needed to use the meter to apply these. I used the red wire for the amp power six foot section and each speakers positive wires, these were easy to find. Everything else was black and only a little bit tricky, no real problems just do one wire at a time and make sure not to drop it while grabing the label.
All labeled up and ready for stripping, twisting and soldering.
Strip one inch off each wire. Slide a one to one half inch piece of shrink wrap onto one side of the wire. Then form an X meeting the wires in the middle of the stripped area. Pinch in the middle and wrap the free end around the side that has insulation, repeat for the other side. This gives a firm mechanical bond, with the free end wrapped around the straight section of it's mate you shouldn't be able to pull these apart. Ideally you'll have four full turns on each side, this is some old mil/jdec/nasa spec or something. (Hi pop!, thanks!)
I forgot my shrink wrap atleast twice and had to cut out my solder joint, oops.
Now heat up the soldering iron and start perm' attaching. I used a bit of solder flux on each joint, applied before heating, and a little dab of solder applied to the iron before each wire. The little dab of solder helps the heat conduct into the wire, you know it's time to apply the solder wire when this little dap flows from the iron up the wires.
Then I locate the shrink wrap over the solder joint with about an eighth inch on each side. Apply heat to one side with the iron, I use the heating element securing screw not the iron tip so it doesn't get any plastic on it. Then the other side, and finally the middle area. Working from the sides first prevents the shrink wrap from shrinking away from the insulation, so I can use less eg 1/8th inch over the cut, normally you'd want to use atleast twice the length of the exposed area.
I droped a couple pieces of the shrink wrap I cut, and made a few of the first ones longer than needed. So by the time I was down to the last plug connections I had to run back in and grab some more. I was a bit "cooled off" and distracted afteer that and this is when I forgot to put them on before soldering.
Finally it was time to apply the loom shield. I just squeeked by with the quarter inch ID looming, in a few places I had used too much tape for the first bundling and it bulges a little in those placed. Then I spend 30-60 minutes applying the final wrap.
Total time was about 4 hours most of it in front of the tv which didn't speed things up. Materials and labor come up to about 60$, which is more than I spent on all 6 of my speakers and the toyota stereo.
It took another hour to get the dash apart in the cold/dark. Turns out I put both the screws in the glove box area and couldn't figure out why it didn't want to come loose. I also found I didn't have the wire for the power ant' signal that turns on the amps, so I had to run inside and grab the wire and pin from my extra pigtail from the donor.
The harness on the left is from the donor (celica or camry maybe), it had aftermarket speakers installed. I wish it would have had more of the shielding intact, I only got about ten inches of it. The three loose wires are the ones for the amp, I got lazy and just used taps to connect to the existing harness. In my defense it's cold and wet since it snowed today.
Overhead show of the harness and speakers.
I'm still considering enlarging the openings or trying to fit my slightly larger round set of speakers into these housings. I still don't have front boxes since my donor wasn't a truck/4runner. But these would fit under the dash much better if I had them.
It's cold and dark and it took me about an hour to get the dash loose and plug this stuff in. Thought I'd come post my results and warm up.
Now to go bring the head-unit in and see if I can get the knobs I attached with lock-tite to come off. I need to check all the back lights. And clean up the contacts on the volume knob. I'm not positive my stereo harness has the illumination wiring, it should be on pin j or 10 depending which pin map you're using, which I have.There is also an odd wire, red-blue maybe, that comes out of the harness in this area I have no idea what it's for currently. Also one in the rear speaker plug from my donor I don't know what it is for either.
02-15-2013, 12:06 AM
#35
Replaced three bulbs in the radio unit, still no lights 
Disassembled the volume control on/off switch, cleaned and rebent the wipers and cleaned the resistive print, no more gravely twitchy volume knob! It's nice and tight again the knob doesn't have play and the right side stays on at all levels again.
I also traced out that pin I was wondering about on the rear speaker plug. It's the isolated ground for the rear pre-amp.
That other questionable wire is a red-black I'll have to look it up but I don't expect to find it.
...
Found it, maybe. According to the 93 FSM audio section, it should be the rheostat connection, I'll have to probe it. For anyone following along at home, there is a typo in the first schematic. There is never a B-10 they really meant A-10 is the from tail fuse. Which left me with the issue of where to put it. I think my radio is a 2002-2004 model, based on the date code of the CD changer headunit's IC's. However the book indicates the wire I traced around the rear audio fets on the pcb is going to be the light ground. If i was right about the routing and function connecting this to ground is safe, if they are right my lights will come on. There is of course the chance we're both wrong and it'll let out the magic smoke and I'll be looking for a new radio unit.
...
Yep confirmed light ground is B-5. I'll need to pull the radio one more time to put a light/LED behind the LCD since it doesn't have one and the holes I cut for the light pipe isn't showing thru.
Oh I got pictures of the before and after cleaning of the 20kOhm pot, that is the volume knob, I'll post that up when the camera battery feels like playing nice. I was going to link the picture of the insides of the TPS since it is basicly the same three wiper type potentiometer, But I can't seem to find it just know it was semi recently posted. *shrug*
02-15-2013, 12:26 AM
#36
On the steering wheel, the parts store lets me use it in the parking lot and I just make sure the nut is on tight enough to not let the wheel back off of the shaft til I get home.
An old timer told me that if you can get a deflated football or basket ball behind some dents and then air it with a pump that can get alot of dents out as well.
I enjoy seeing bodywork. Like that over mechanicing and it makes a big difference when done. Wont even feel or look like the same truck when you are done.
Later on if you get to the duct work, I think you will be surprised at how dusty and dirty the are in there.
An old timer told me that if you can get a deflated football or basket ball behind some dents and then air it with a pump that can get alot of dents out as well.
I enjoy seeing bodywork. Like that over mechanicing and it makes a big difference when done. Wont even feel or look like the same truck when you are done.
Later on if you get to the duct work, I think you will be surprised at how dusty and dirty the are in there.
I'll try and get some filler done one of these days. I only have the fiberglass reinforced stuff currently, not sure I want to use it. And no finishing glaze still. I really like doing body work also, it's a nice zen state type proceedure, and you can actually wash off that grime much easier than grease. And your right it's something everyone gets to see, and even chicks "get it" not like chrome engine parts.
Thanks for that tip on the football. That sounds perfect for those corner dents in my bed, and the other one I don't have good access to. I'll be keeping the next one that comes over the fence for body work!
I was planning on asking the local mechanic in town to use his puller. He's a really nice guy and lets me have exhaust cut offs for my trike pedal housings. I just hate to bug him cause he's always busy with cars lined up and an overflowing parking lot. My local store is a napa doesn't have loaner tool program that I'm aware of. Not sure why they torque those so tight with those fanged lock washers, You'd have to be having a temper tantrum to pull one off in the first place.
Thanks for dropping by, for the tips also!
02-15-2013, 04:46 PM
#37
It's kinda of cold, really cold, moving my little plastic box socket set and it started to make funny noises and crack kind of cold. So I didn't do much today, got the dash buttoned back up and a couple bulbs thrown in. Decided one of my "new" speakers had maybe a loose wire so pulled it from the box and poked around at it, it has a bit of a loose connection bu flexing the braided cabe to the cone in the other direction, for the time being, solved it.
Got a better idea of the space under the bucket seats, the boxes will not fit even if I was to remove the seats and bolt them back down after the boxes were in place. Can either raise the seat back mounts or trim the boxes down but I just went with wedging them behind the seats for now.
Need to plug the front blinkers back in, I forgot to do so when I had the bumper off, they are rapid flashing and I thought i'd blown a bulb then I made a turn in the other direction and it dawned on me I never pluged them back in.
02-16-2013, 06:53 AM
#38
Super Moderator
Staff
iTrader: (1)
Join Date: Aug 2008
Location: Anderson Missouri
Posts: 11,788
Likes: 0
Received 21 Likes
on
19 Posts
I got a laugh when you forgot to put shrink wrap on. Done that myself and brought back memories. Really frustrating after you solder it.
These trucks really dont have much room for mounting speakers. I have seen more then one when they run sheet metal screws thru the back wall of the cab.
These trucks really dont have much room for mounting speakers. I have seen more then one when they run sheet metal screws thru the back wall of the cab.
02-16-2013, 04:31 PM
#39
Weather says two days of warm and sunshine! YAY!
Had to pull the shell off to move a monster TV this morning. So got some work done in the truck bed. Off with the top, out with the rubber mat and fluid stash, and let there be soap LOTS of soap.
I've been carrying around an oily nasty old counter balance shaft assembly off the grand-am in the bed pretty much since I got, and it's been seeping oil thru it's container for awhile. Pretty much ruined a brand new scrub brush getting this oil slick cleaned up.
Next up was the vinegar and water treatment. Applyed the first batch with the scrub brush and let it sit for a half hour. Then did two more buckets with scotch pads, one per side. The second side will maybe need abit more tomarrow, it started to get cold and dark and I was probably rushing too much. Just some minor touch ups on the rim and tailgate I'm guessing.
Found some pretty nasty pitting at the front passenger side, going to blame this on the iron scraps that shouldn't have been in there anyway but it might have been the lack of oil there or something else. I don't have a good wire wheel, or for that matter a drill that uses a cord. So this might get attacked with the sanding wheels on the old angle grinder. Not alot just enough to smooth it out some and so a scotch pad can get to the deeper spots.
It still needs, maybe a bit of sanding to smooth out any chipped paint areas, and a good wash and rinse and wipe down. I'm not sure I want to try and fix any of the dings inside the bed, there aren't many and nothing too big it'd be good practice but.. meh It has character. It's tempting to take it to the car wash for the power sprayer, but I don't want any wax seeping into my spray and screwing up the adhesion.
I did find one of those 4-6" kids basketballs in the bed, no idea where it came from, but it was rotten and in two pieces so no new body tool..
On with the show! Pictures..
This is the wiper bits of the volume knob assembly.
The gunky bits are the ring shapes, a little bit of cleaning to make it more obvious. I think I mentioned already I needed to respring the wipers abit. And got the shell very tight, they tend to spread abit due to the on/off function being a push the knob type.

And the fully cleaned side. Some minor scratchs but they won't effect anything, if it was bigger I would have used a scotchpad instead of the razor and exacto. The cotton swap wasn't really cutting it, and I was afraid I was going to snag the wipers.

Overview, All that dust and dirt in the puddles was embeded in the rust and crevises.

All these passenger side stiffening ribs are pitted here at the front.

Close up, pits full of yuck and who knows what. These tear up scotchpad really fast.
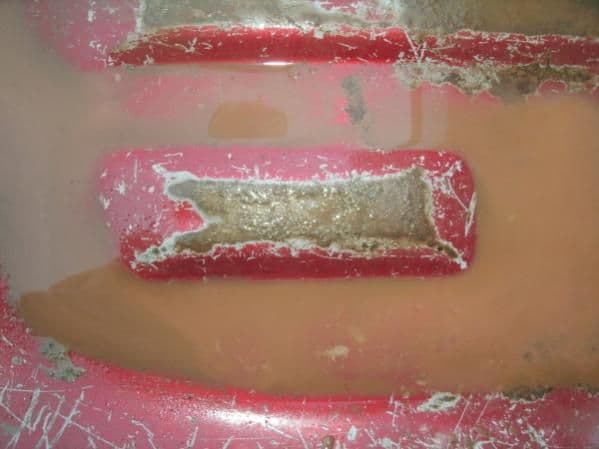
I commented on a another post about yellow rust, being spooky. I don't recall ever see it that color.

So apparently it's not just a Hawian bug, it's migrated to colorado too.
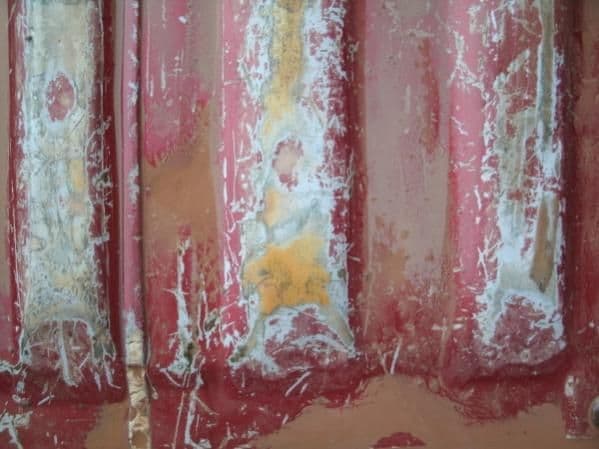
Rust begnign. or gone.

I've been carrying around an oily nasty old counter balance shaft assembly off the grand-am in the bed pretty much since I got, and it's been seeping oil thru it's container for awhile. Pretty much ruined a brand new scrub brush getting this oil slick cleaned up.
Next up was the vinegar and water treatment. Applyed the first batch with the scrub brush and let it sit for a half hour. Then did two more buckets with scotch pads, one per side. The second side will maybe need abit more tomarrow, it started to get cold and dark and I was probably rushing too much. Just some minor touch ups on the rim and tailgate I'm guessing.
Found some pretty nasty pitting at the front passenger side, going to blame this on the iron scraps that shouldn't have been in there anyway but it might have been the lack of oil there or something else. I don't have a good wire wheel, or for that matter a drill that uses a cord. So this might get attacked with the sanding wheels on the old angle grinder. Not alot just enough to smooth it out some and so a scotch pad can get to the deeper spots.
It still needs, maybe a bit of sanding to smooth out any chipped paint areas, and a good wash and rinse and wipe down. I'm not sure I want to try and fix any of the dings inside the bed, there aren't many and nothing too big it'd be good practice but.. meh It has character. It's tempting to take it to the car wash for the power sprayer, but I don't want any wax seeping into my spray and screwing up the adhesion.
I did find one of those 4-6" kids basketballs in the bed, no idea where it came from, but it was rotten and in two pieces so no new body tool..
On with the show! Pictures..
This is the wiper bits of the volume knob assembly.
The gunky bits are the ring shapes, a little bit of cleaning to make it more obvious. I think I mentioned already I needed to respring the wipers abit. And got the shell very tight, they tend to spread abit due to the on/off function being a push the knob type.
And the fully cleaned side. Some minor scratchs but they won't effect anything, if it was bigger I would have used a scotchpad instead of the razor and exacto. The cotton swap wasn't really cutting it, and I was afraid I was going to snag the wipers.
Overview, All that dust and dirt in the puddles was embeded in the rust and crevises.
All these passenger side stiffening ribs are pitted here at the front.
Close up, pits full of yuck and who knows what. These tear up scotchpad really fast.
I commented on a another post about yellow rust, being spooky. I don't recall ever see it that color.
So apparently it's not just a Hawian bug, it's migrated to colorado too.
Rust begnign. or gone.


