CO_94_pu's 1994 truck Build-Up Thread
 01-28-2013, 07:26 PM
#1

CO_94_pu's 1994 truck Build-Up Thread
I was intending to put up more pictures, but well it's snowing.
My truck is a one owner 1994 assembled at the end of 1993 in the USA(Fremont, CA).
22RE (With over 200k miles), 2wd
CTR 3k3/LA11, Garnet-pearl(Red-metallic), Base model with A/C
ATM Ao1A/W55, 7.5Inch Diff, 3.42 stock gearing
It started it's life as a paper delivery truck. It did so much stop and go with it's original owner, she wore a hole thru the carpet and pad and into the floor board.
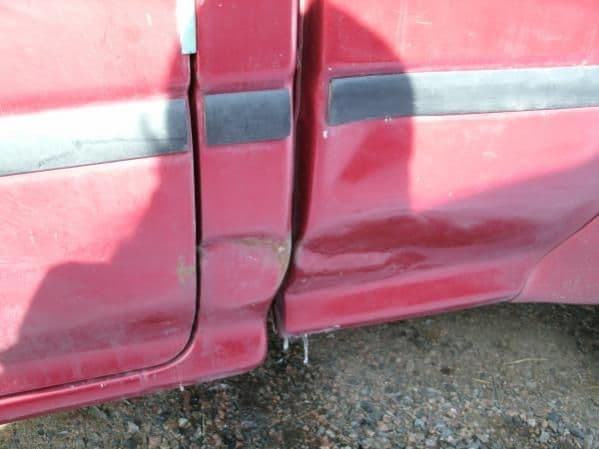
It was involved in a minor fender bender its first week off the lot. Which bend the drivers fender into the door, crumpled the hood at the mid point on the side reinforcement, buckled the inner apron above the wheel, and leaned the radiator support backwards.
It was a slow speed impact with a high bumper vehicle, so no frame damage. However the door ripped the fender over time, and the apron was cracked when the radiator support was force straightened.
The bed was abused with dirt, leaf, and other random debris. There is load shift damage that has bend the front of the bed. It has tractor dents on both rear corners, complete with "catapiller yellow" paint. Substancial dents at the rear of the cab on the drivers side and a matching one at the front of the bed. And another load shift dent at the top of the cab behind the driver.
-------------------------------------------------------
I have...
-------------------------------------------------------
Welded the fender, sanded off the surface rust, and primered over the bare sheet metal. ( Wrong primer needs re sanded and primed/sealed. )
Mostly straightened the hood buckle, welded the hood support frame which broke when I sat on it, primed and painted the weld with rattle can fire truck red.
Tightened the passenger side torsion bar to get rid of sag. (Needs another 2-4 turns still but I didn't want to press my luck with the bolts, or deal with the scarey floor jack with no pins again.) it still sits 1/8th to 1/16th low on that side.
Replaced the stock(?) shocks, so it's freeway safe again.
Partially raised,(I need a good fender hammer still), the drivers side dents on the front and rear of the bed.
Replaced the bench seat with 1995 4runner buckets.
Added a SR5 instrument cluster. (Still needs tach calibrated, but I just want it so I have a reference when in the city and can't hear the engine)
Installed a factory toyota radio from the salvage yard.
Added the upgraded lighter and ash tray that has lights.
Added the segmented/"map lights" and day/night rearview mirror.
Added a camper shell top to keep the bed out of the snow.
Recovered the door panels.
-------------------------------------------------------
Currently working on ...
-------------------------------------------------------
Replacing the headliner and various visual fixes.
My truck is a one owner 1994 assembled at the end of 1993 in the USA(Fremont, CA).
22RE (With over 200k miles), 2wd
CTR 3k3/LA11, Garnet-pearl(Red-metallic), Base model with A/C
ATM Ao1A/W55, 7.5Inch Diff, 3.42 stock gearing
It started it's life as a paper delivery truck. It did so much stop and go with it's original owner, she wore a hole thru the carpet and pad and into the floor board.
It was involved in a minor fender bender its first week off the lot. Which bend the drivers fender into the door, crumpled the hood at the mid point on the side reinforcement, buckled the inner apron above the wheel, and leaned the radiator support backwards.
It was a slow speed impact with a high bumper vehicle, so no frame damage. However the door ripped the fender over time, and the apron was cracked when the radiator support was force straightened.
The bed was abused with dirt, leaf, and other random debris. There is load shift damage that has bend the front of the bed. It has tractor dents on both rear corners, complete with "catapiller yellow" paint. Substancial dents at the rear of the cab on the drivers side and a matching one at the front of the bed. And another load shift dent at the top of the cab behind the driver.
-------------------------------------------------------
I have...
-------------------------------------------------------
Welded the fender, sanded off the surface rust, and primered over the bare sheet metal. ( Wrong primer needs re sanded and primed/sealed. )
Mostly straightened the hood buckle, welded the hood support frame which broke when I sat on it, primed and painted the weld with rattle can fire truck red.
Tightened the passenger side torsion bar to get rid of sag. (Needs another 2-4 turns still but I didn't want to press my luck with the bolts, or deal with the scarey floor jack with no pins again.) it still sits 1/8th to 1/16th low on that side.
Replaced the stock(?) shocks, so it's freeway safe again.
Partially raised,(I need a good fender hammer still), the drivers side dents on the front and rear of the bed.
Replaced the bench seat with 1995 4runner buckets.
Added a SR5 instrument cluster. (Still needs tach calibrated, but I just want it so I have a reference when in the city and can't hear the engine)
Installed a factory toyota radio from the salvage yard.
Added the upgraded lighter and ash tray that has lights.
Added the segmented/"map lights" and day/night rearview mirror.
Added a camper shell top to keep the bed out of the snow.
Recovered the door panels.
-------------------------------------------------------
Currently working on ...
-------------------------------------------------------
Replacing the headliner and various visual fixes.
Last edited by Co_94_PU; 02-11-2013 at 02:41 PM. Reason: updated "working on"
 01-28-2013, 07:27 PM
#2
Reserved, pictures/albums
-- Pre body work album link

-- New door panels album link

-- New headliner album link
-- Interior trim album link"

-- Bodywork Front clip album link
-- Bodywork Bed album link

-- New door panels album link
-- New headliner album link
-- Interior trim album link"
-- Bodywork Front clip album link
-- Bodywork Bed album link
Last edited by Co_94_PU; 02-27-2013 at 05:57 PM. Reason: Added album links. Bed&Front bodywork, Interior trim
01-28-2013, 07:43 PM
#3
Reserved: writeups/links
And somewhere to link write ups.
---------------------------------------
Door panel restoration link
My panels were heat damaged, shrunken, from living in the desert. My panels differ from Grego92's in basicly two ways. Mine were and are vinyl, and I used 1/2 inch poly-fill for pading. I did not need to replace the cores.
Link to finished door panel photo album
--
Last edited by Co_94_PU; 01-29-2013 at 03:19 PM. Reason: Adding link to photo album.
01-29-2013, 02:35 AM
#4
ATABOY Please
Ok someone wander by and give me an ataboy. Thats about 15hrs of hand sewn Lockstich in that headliner.
DIY headliner
-- Materials
1.5 yards fabric (I used black canvas/duckcloth)
Sewing pencil, chaulk
Flexible tape measure.
Drafting square, or yard/meter stick (I used a drafting square with the flex tape attached)
6 inch ruler (I used a transparent type)
Hot glue gun
Scissors (Sharp and tight for a cut clean cut)
Fresh/New razor blade.
2x Scrap cardboard, or other template material, 12x3 inches
-- Steps
1: Remove headliner.
Remove Sun visors and rear view mirror. Remove "A" piller trim with panel tool (flat head screw driver with tape to protect paint), by prying about 2 inchs down from the top and again at about two inchs above the top of the dash. Slide trim up and out to release lower tab. Pull down on door seal around top of door, to provide access to headliner. Peal vinyl down, it is attached with silicone sealant. Remove "B" pillar headliner attachments with panel tool, by prying at the button type panel attachments. Insert flat panel tool, screw driver or putty knife into rear window seal. Pull down on vinyl at edge gently to release from silicone. (I got lazy after the first 2-3 inchs one each side and cut the rest with a razor blade.) Release rear rod from the keeper located in the center of the roof, by pulling it towards the back of the cab. Unspring headliner rods, by inserting finger near door and sliding towards the middle of the cab while pulling downwards. Unseat rods from body holes, by carefully bending rods. Mark the holes with a marker or tape. Unscrew bracket at front of cab, 5-6 screws. (There maybe a plastic holder in one screw hole. I couldn't get this out with out it breaking. The other screws provide ample attachment). Remove the headliner rods from rod pockets, and label each for front middle and rear they are slightly different lengths. You can leave the heat shield(Fiber frax?) in place if it's in good condition, other wise remove it and store out of the way.
Clean off any silicone left on the headliner, and door jams. Replace the door jam seal, so it doesn't form stress memory. And reattach the visors and mirror. Clean the headliner on both sides, and bring it inside.
Pull the vinyl over the front of the forward metal anchor. You will see the vinyl is heat welded to the upper side of the metal anchor, the anchor has a plastic/vinyl coating on the upper side. Cut the headliner free, by tracing the weld points with your razor.
2: Layout new headliner.
Clean headliner on both sides with warm soapy water, and towel dry. (These things get amazingly dirty.) Yes clean it again! Steam/Iron any major wrinkles and tape any major rips in the old headliner. Take reference measurements of old headliner.
Rod pocket size at center: 1.5cm each side, 3cm total
Lengths:
Front center to ??: 13.5cm (don't recall if thats the visors or mirror)
Front center to first rod pocket: 26cm
Front center to middle pocket: 48cm
Front center to rear pocket: 70cm
Front center to center point at window: 82cm
Front center to "B" pillar: 85cm
Width:
Center to edge of pocket: 66.5cm
Center to start of curve: 33.5cm
Curve to top of pocket: 6cm (!!! This is not exact, should be shorter for atleast the middle pocket, but we can adjust them later. If you find the perfect length let me know and I'll add it.. )
*Updated curves* (Still to be verified/altered)
Front pocket: 3cm
Middle pocket: ~3cm
Rear pocket: 6.5cm (no adjustment needed)
**
Now lay down your new fabric with the "factory fold" closed. Press the fold down with your straight edge and mark it with the fabric marker to give a center line reference. (I did my layout with it folded, but you can open it if you have a large enough table, eg over 48inchs).
Mark the center line at the following locations:
Goof allowance: 1cm
Attachments: 14.5cm (I didn't wind up using this)
Start of first pocket:27cm
Center of first pocket: 28.5cm
Rear of first pocket: 30cm
Start of middle pocket: 52cm (+4 from the reference = 1goof, +3 pocket #1)
Middle of middle pocket: 53.5cm
Rear of middle pocket: 55cm
Start of rear pocket: 77cm (as above, +3cm for the middle pocket)
Middle of rear pocket: 78.5cm
End of rear pocket: 80cm
Window: 92cm
Rear: 95cm
Goof allowance: 96cm (Just in case!)
Extend these lines to the edge of the fabric, flip the fabric to the unmarked side and extend there also if your doing the layout folded. Make sure you are starting at the same end, you can roll the factory fold away from you some to get a starting mark. Check the measurements at the edges of the fabric to make sure they didn't wander, and are square. (Why I use a drafting instead of yard stick.)
Measure along the pocket center lines, and place reference marks at 33.5cm and 63cm. Using the marks at each rod pocket center line place a line across each rod pocket between the start and end marks at the 33.5cm point. Using the marks at 63cm, draw a line 6cm to each side of the pocket center line. These lines mark the start and end point of the curves.
Now prepare the template for the curve. Place marks down the short sides, at 1.5cm, and connect with your straight edge. Place another mark on the short side at curve bottom(refer to "Updated curves" above). Place a mark on the long side at 29.5 cm away from the curve bottom mark, and connect the line from the edge to the 1.5cm line. Using the headliner front metal bracket, the bracket not the rod, align the first hole where the vinyl was welded below the bottom of curve mark so the edge of the bracket touches the mark. Holding the bracket on the bottom of curve mark rotate it till it touches the intersection at the 1.5cm and 29.5cm lines. Now trace the curve onto the template, and make a cut slong the curved line. Repeat for each curve offset (3cm and 6cm)
Place the template on each pocket center line and line up the templates 29.5cm mark with the fabrics 33.5cm line. Trace the curve, then flip it over the pocket center line and repeat. Do this for all three rod pockets, on both sides of the fabric centerline.
Fold the fabric on each rod pocket center line. Place pins along the 1.5cm lines of each rod pocket(the start and end lines), and then along each curved section.
Gather the fabric by matching the center lines of fabric, so you have folds between each rod pocket. And carry it to your sewing location. (local seamstress, wife, sewing room, or couch..)
Now is where our paths diverge. I did my lockstitch by hand using medium/heavy guage thread. Most of you may have access to a machine but not one equiped for medium/heavy thread. For medium/heavy thread you can combine multiple strands or regular/light thread, or use embroidery thread. (I used multiple strands of light/regular combined "boy scout" style.)
You will need two pieces to create a lockstitch. Each about 7.5 feet long. (5 lengths of arms outstretched, find the mid point and fold, thread the fold thru the needle, and move to the center, you'll have four strands in the needle eye. Get yer boy scout on.. and assemble by the twist method)
Sew along each rod pocket. If you're using a machine and light thread place a second (and third?) row of reinforcing stitches directly behind the first stitchs, try not to get to much separation or you'll have difficulty inserting the rods.
Refold the fabric mating the rod pockets as before, and return to the work bench/cutting area.
Now we start to make cuts!
Slide the rod pockets away from each other, so your fabric lays flat on the work surface. (You see what I mean when you get to this point, it'll look like a pleate. You can't lay it flat because of the curved stitches..) You'll have the front section, fold, rod pocket, a few inches of the middle(flat) fabric, fold, another rod pocket, some more fabric, a fold, the last pocket and rest of the fabric.
Center the front bracket on the center line and square it up by measuring the ends. Holding the bracket firmly inplace you can cut with the razor blade along the curve, or trace and cut it with the scissors. (I just used the razor blade.)
Line up the rear pocket of the old headline (folded, as above, or similar), with the rear rod pocket of the new one. Trace the rear window curve, and the "B" pillar ears all the way up to the rear rod pocket.
Reverse the folds of each headliner, so you can work at the front.
Line up the old headliner on top of the front curve trace/cut. Trace the "ears" at the front, trace all the way to the first rod pocket.
With the straight edge connect the tracing at the front and rear rod pockets.
Now cut around the side and rear trace marks, 1/8th inch or so OUTSIDE of the trace marks. Better safe than sorry, you'll trim it up later.
Measure in 9cm from the end of each rod pocket and cut a 1/4 inch slit for the rod to escape. (Don't go to deep, just enough for the rod to come thru!)
Cut a roughly 1 inch wide 3/8th inch length in the center of the rearmost rod pocket.(For the rear rod attachment clip, see the old headliner if you forgot)
On to the Glueing! The forward edge needs to be cut exact to size for the next step.
Place the fabric with the rod pockets on the top and the good/shown side. Now place the front bracket centered under the front edge. The cut fabric will line up where the metal is folded over and the vinyl backing starts. (Test fit the old one in place if you forgot what it looks like, you will see what I mean.) Pull back the fabric in the center and place a dab of hot glue around the hole in the bracket, and press the fabric into it. Verify that it's centered and lined up at both ends, as you won't get another chance. Start attaching it along the whole length by placing hot glue where the vinyl welds were. Go slow (1-3inch sections), use ample (1/8th inch beads) glue, and take care not to stretch the fabric out of shape too much.
Now invert the fabric over the front of metal bracket, by pulling forward on the fabric and rotating the metal brace. Tidy up the fold in the fabric so the overlap is even all the way across the top of the bracket. Roll the fabric forward and inject hot glue and press it to hold it down.
To the test fit and adjustments and mounting!
THE END!
"But wait you didn't tell us how to mount it or make adjustments!!"
Nope sure didn't. It started to snow on me and I hate the cold! I forced mine into whatever holes were convenient. Strong armed the rear rod into the hook with a pair of pliers and folded the rear flap of fabric over the rear rod. In case I wind up needing to drive it.
Your test fit with the 6cm based curve will put the rear mounting holes inches forward of where they need to be. Measure this distance and split it for each rod pocket or take it out of the middle rod pocket depending on how far off the rear holes are.
I got cold and snowed on so... TO BE CONTINUED/EDITED
*updated the curves and template section..*
Still need to pull mine back out and see where I can stretch it since I fully cut the rod pockets over rod release area instead of using just slits there isn't enough material over the front and middle curves to re-sew.
Last edited by Co_94_PU; 01-29-2013 at 04:06 PM. Reason: *updated the curves and template section..*
01-29-2013, 02:23 PM
#6
DIY Headliner replacment, Reference pictures
Link to the Album
Remove the pillar trim..


Release the liner from the door.


Remove the panel clips.

Release the rear window liner pinch.

Release rear rod from retainer

Note the tension is too high it should sit flat.

Mark the rod slots on the cab body.


Headliner centerline marked by the factory.

Headliner front "ears"

Headliner rear "ears". shows reinforcment orientation, flat end to the rear.

Rear window pinch seal cut after several inches of tugging and a tear point.

Fan folded with the pockets offset, and the edges even.

Rear rod attachment to tension holder cutout.

Rear rod release cut at 13.5cm from the factory

Rough centerline.


Curve debug shots!
Front at 3cm

Middle at 3-4cm

Rear at 6.5cm
Front bracket details.
Pull this back and put the bracket next to the wood, NOT on the material. Top side of vinyl showing, note the textures. Smooth is the not seen side.

Bracket will wind up under this fold.

Panel bracket reinforements with location marks.

Curve templates

Curve start alignment marks

Remove the pillar trim..
Release the liner from the door.
Remove the panel clips.
Release the rear window liner pinch.
Release rear rod from retainer
Note the tension is too high it should sit flat.
Mark the rod slots on the cab body.
Headliner centerline marked by the factory.
Headliner front "ears"
Headliner rear "ears". shows reinforcment orientation, flat end to the rear.
Rear window pinch seal cut after several inches of tugging and a tear point.
Fan folded with the pockets offset, and the edges even.
Rear rod attachment to tension holder cutout.
Rear rod release cut at 13.5cm from the factory
Rough centerline.
Curve debug shots!
Front at 3cm
Middle at 3-4cm
Rear at 6.5cm
Front bracket details.
Pull this back and put the bracket next to the wood, NOT on the material. Top side of vinyl showing, note the textures. Smooth is the not seen side.
Bracket will wind up under this fold.
Panel bracket reinforements with location marks.
Curve templates
Curve start alignment marks
Last edited by Co_94_PU; 01-30-2013 at 05:22 PM. Reason: Adding curve template pictures
01-30-2013, 05:20 PM
#7
Pulled the headliner down to try and make some adjustments for fit.
Pulled about 1cm off the front overlap and put the iron to it to stretch it out some. If I'm still short I'll next try the wet shrink to fit jeans method.
..
And here is the photos of the most grievious error.
DO

DO NOT

I got distracted for what ever reason as I really wasn't intending to cut these off.. Since I knew I may want them.
Pulled about 1cm off the front overlap and put the iron to it to stretch it out some. If I'm still short I'll next try the wet shrink to fit jeans method.
..
And here is the photos of the most grievious error.
DO
DO NOT
I got distracted for what ever reason as I really wasn't intending to cut these off.. Since I knew I may want them.
Trending Topics
01-31-2013, 01:35 PM
#8
Headliner finished, for now.
So it warmed up enough I thought I could work with the rubber moldings without snapping anything. Got the sides pulled tight and tucked to the body. Got the rear tucked and secured in the window rubber also.
I'm quite happy with it, but will be redoing it with the shallower curves. Will need to pick up another cut of fabric next time I'm in the city.
Finished for now pictures!
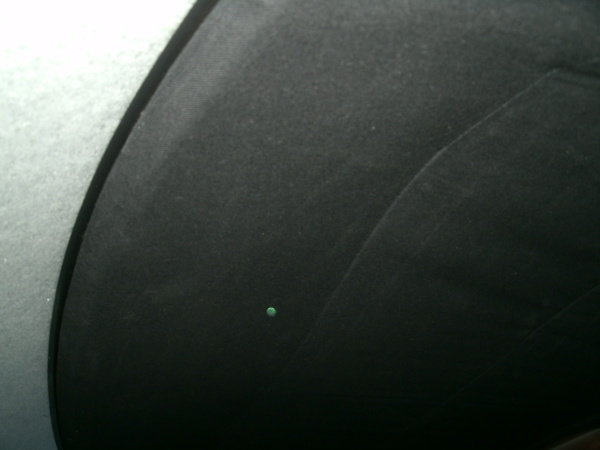
With the right angle and lighting it looks about perfect.

Just a bit of puckering at the rear where it's not fully installed around/under the window rubber. (The bit at the front is light rays hitting not wrinkles)

Another 1/2-1 inch of fabric or a lot of fidgeting would get these clips back in place.

I got the dome light cover painted to match, it was tan now it is black, but my camera batterys failed me and I couldn't get the picture. I'd originaly brought it inside to clean the clear light cover bits to get a little more light. Decided I would try the cheapy 1$ big box store black rattle can I have. Turned out pretty nice. Cleaned it with the scotch pad and soapy water, litely sanded it, scotch pad rinse and dry. Followed with a light coat of rustolem auto primer and then cheapy black.
Should have done the mirrors back and arm, but I don't have to look at it. Need to paint the visor mounts, and recover those visor flaps also. Will be picking up a sewing machine off CL before I tackle that or redo the liner, not really interested in hand sewing it again. Just gotta find one on the right side of town.
(The spooky eye ball polaroid came out of the dash of one of the parts 4runners at the yard, It was a little startling it was wedged up in the back upper bits no idea how it got there thought I'd keep it up there to pass on the spooking )
)
I'm quite happy with it, but will be redoing it with the shallower curves. Will need to pick up another cut of fabric next time I'm in the city.
Finished for now pictures!
With the right angle and lighting it looks about perfect.
Just a bit of puckering at the rear where it's not fully installed around/under the window rubber. (The bit at the front is light rays hitting not wrinkles)
Another 1/2-1 inch of fabric or a lot of fidgeting would get these clips back in place.
I got the dome light cover painted to match, it was tan now it is black, but my camera batterys failed me and I couldn't get the picture. I'd originaly brought it inside to clean the clear light cover bits to get a little more light. Decided I would try the cheapy 1$ big box store black rattle can I have. Turned out pretty nice. Cleaned it with the scotch pad and soapy water, litely sanded it, scotch pad rinse and dry. Followed with a light coat of rustolem auto primer and then cheapy black.
Should have done the mirrors back and arm, but I don't have to look at it. Need to paint the visor mounts, and recover those visor flaps also. Will be picking up a sewing machine off CL before I tackle that or redo the liner, not really interested in hand sewing it again. Just gotta find one on the right side of town.
(The spooky eye ball polaroid came out of the dash of one of the parts 4runners at the yard, It was a little startling it was wedged up in the back upper bits no idea how it got there thought I'd keep it up there to pass on the spooking
)
01-31-2013, 02:37 PM
#9
Registered User
Consider trying http://www.spraylock.com/6500productpage.html
Its a pressure sensitive adhesive. I use this for installing LVT (luxury vinyl tile) flooring. This stuff bonds like crazy good. Can be released with a heat gun. And last forever. Ideal for a headliner. I plan on doing the trekker back half with a commercial carpet padding and auto carpet.
Its a pressure sensitive adhesive. I use this for installing LVT (luxury vinyl tile) flooring. This stuff bonds like crazy good. Can be released with a heat gun. And last forever. Ideal for a headliner. I plan on doing the trekker back half with a commercial carpet padding and auto carpet.
01-31-2013, 03:46 PM
#10
Consider trying http://www.spraylock.com/6500productpage.html
Its a pressure sensitive adhesive. I use this for installing LVT (luxury vinyl tile) flooring. This stuff bonds like crazy good. Can be released with a heat gun. And last forever. Ideal for a headliner. I plan on doing the trekker back half with a commercial carpet padding and auto carpet.
Its a pressure sensitive adhesive. I use this for installing LVT (luxury vinyl tile) flooring. This stuff bonds like crazy good. Can be released with a heat gun. And last forever. Ideal for a headliner. I plan on doing the trekker back half with a commercial carpet padding and auto carpet.
It's not the foam and board type, its sprung rod suspended. The factory stuff is silicone caulk, stays soft and doesn't require alot of effort to clean up for R&R. Did you mean for the window seals, or the front bracket where I used hot glue?
I didn't actually glue it down to the door/body seams since it's not permanent. The door seam trim seems to provide ample tension.
The winkles are all in the last/rear section which is just folded under and tucked into the rear window seal. They would pull right out if it was fully tucked from the outside, or maybe even i'f I'd had a uniform fold(cursed seats in the way). That would require shifting the bed shell and pulling the rear window. Not really a big task, but I still need to source or fab better hold downs for the shell than C-clamps because of course thats not thier intended use and they take too long to remove.
I'm not sure there is enough fabric to attach the trim clips that go in the last picture. It'll need to sit and stretch a bit atleast. And I'm not perfectly happy with where the rear rod seam falls. I think it should be right above the rear door edge (Grey trim piece in the last picture), but it is just off the picture on the top of the curve. I wasn't expecting show car quality but I know I can do better.
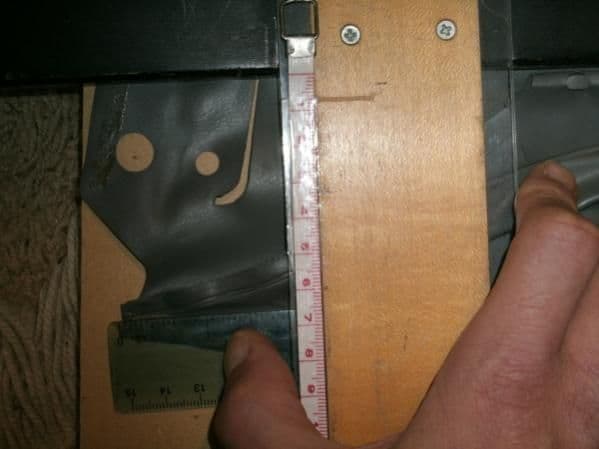
Attached is a picture of the bad seam location that I'm not happy with, short white line is where it ends, long white line is where it should be and the grey is the seam where it not parallel. Again all things considered not to shabby looking even with my error originally of duplicating the rear curve to the middle and front.
02-01-2013, 11:56 AM
#12
Letting the liner rest seems to have back fired on me, it's tighter today than yesterday (less wrinkles in that rear section). I also noticed there might be a bit of a centering issue, the passenger side body clip portion is lower than the drivers side but the center line looks ok.
Won't be getting much done today wind is steady at 32 mph with gusts to 40mph out here on the high plains. Can't work on raising any of the dents if I can't paint.
Need to pick up paint striper and steel wool for the bed next time I'm in the city also, or a ton of sand paper. I've got toyota fever I can't stay off CL, even though I know I can't afford another project, spoted two great projects and an assortment of tools I really want.
02-01-2013, 09:26 PM
#13
Well the wind dies down a bit right before the sun set. Only gusting to 30 steady at 25. So In an effort to atleast get something done I went and pulled the rearview mirror, sun visors, window handles, then preped them for paint. Will have the before and after pics tomarrow.
I'm going to spray the visor vinyl black and see what I think of it, I'm not sure there is enough left in my vinyl scraps from the door panels todo them with. The vinyl I used was a remnant cut should have got something I could readily get more of, but I couldn't resist the pattern.
Of course I need to pick a color scheme for the majority of the dash soon. Since I know once I get the visor mounts up the A pillar and door pinch trim are going to be the ones that stand out and bug me..
Open to suggestions something that goes with the door panels(Black and whatever that is Green maybe? Yes I'm kinda color blind I'm told..) and the metallic red.
I'm going to spray the visor vinyl black and see what I think of it, I'm not sure there is enough left in my vinyl scraps from the door panels todo them with. The vinyl I used was a remnant cut should have got something I could readily get more of, but I couldn't resist the pattern.
Of course I need to pick a color scheme for the majority of the dash soon. Since I know once I get the visor mounts up the A pillar and door pinch trim are going to be the ones that stand out and bug me..
Open to suggestions
something that goes with the door panels(Black and whatever that is Green maybe? Yes I'm kinda color blind I'm told..) and the metallic red.
02-02-2013, 05:05 AM
#14
Registered User
"I've got the fever!!! and the only cure is more......Toyota"..... lol sorry couldnt resist. Trust me I know how you feel cuz Ive got the fever too....
Question.. are you planning on painting the whole truck or just the interior?? If you are going to paint the exterior of the truck then that color choice would affect my interior color choice. good luck and keep up the great work
Question.. are you planning on painting the whole truck or just the interior?? If you are going to paint the exterior of the truck then that color choice would affect my interior color choice. good luck and keep up the great work
02-02-2013, 02:37 PM
#15
So I'd need more supplies and tools I don't have. Also to convince my brother to clean out his garage so I can paint in it, It's full of kids toys. It'll likely wind up at the local paint/body guy, unless I can find a good deal thru the old man or a deal on paint that makes the tool price not so hefty.So on with the SHOW!
Seperating the visor from the mounts. Loosen the screw and rotate the visor up into the mount and the little tab will slip past the clips inthe visor.

Before and after cleaning comparison. (Note: I ddn't scuff the vinyl with sand paper just the scotch pads)


All clean! The wore out tired looking one is the drivers side which of course sees the most use. You can see the drip of glue from where the PO tried to repair the ripped headliner, this never came off with the scotch pad.


Visor clips side by side, clean and dirty.


(Couldn't get proper lighting to show the scuffed vs unscuffed clean clips)
Visor mounts, clean and dirty.


Window cranks, clean vs dirty.


Scotch pad left, Sand scuff on the right.


Scuff vs original screws, only needed to scotch pad these. Do them last they will trash the pad pretty quick.

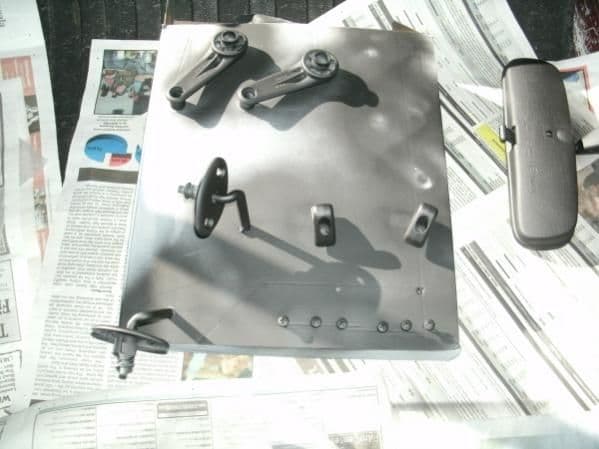
Ready for paint!

(Think thats actually an unscuffed one in the background the metal looks bad)

(Didn't get any pictures of just the primer coat)
Painted.
Still looks a little tired

No more tan. (For now, still have a tan donor passenger vent not installed)


Need a little touch up, couldn't hang em had to flip sides.

And a thumb print

Off to the hillbilly hot box!


As you can tell the uv exposure hasn't been kind to our 20+ year old clear coats. Thats an 92 grand am in the back ground and it's a sad clear coat too.
Very happy with the results overall.
Generic paint obviously isn't the best for vinyl. The vinyl wasn't fully cured. Got abit of tack on my hands while putting these back together and up. 2hrs and still abit tacky. We'll see if it ever fully cures, if not I'm planing to rubbing in anything thats not fully stuck to the primer(primer dried really well) before I recover them.

Sorry dirty windshield, didn't have any problems with the drying on the metal or plastics.

Also I checked out my vinyl scrap and I might be able to make it fit the visors. It's about a half inch to 1cm short on one end of the scrap but I think it'll stretch with some steam. Maybe a two tone, vinyl and canvas with a document pocket or something.
The grey pillar trim looks pretty good with the upper trim redone. It seems more of a charcoal grey than the faded grey now, and I didn't even do anything to it not even a wipe down.
There is still a big nasty wear mark on the passanger side dash from having newspapers rubbing it day in day out. So that will need something done about it eventually.I wonder if the cherry red 4runner panels fit in these, might look ok? I'm tring to avoid going all black for the dash as it'll just build up too much heat I think.
02-02-2013, 05:25 PM
#17
I swear it's flat black, same can I used on the rear corner of the bed.
https://www.yotatech.com/members/co_...-alt-angle.jpg
I just kinda suck at getting the perfect lighting, and my camera batterys keep dieing so I'm always abit rushed.
Went digging for more paint research. Even if it's way down the line still.
Turned up the PPG paint code for the 3k3 it's 4478, the sample sheet looks like a black on the computer. Same as the Garnet pearl sample the autoparts store has.
tcpglobal seems to have much better prices than that last place, and definitely a better selection. They have "Restoration shop" urethane base and clear coat kits for what seems a reasonable price. I don't see a perfect match yet for my color, but pretty sure they do blend onsite.
240$ For that seems a no brainer compared to 270 for just a premixed base coat. 270$ for the low-voc, cali stuff. or 270 for the "Premium" clear and color.
For single stage paints they have, in the same brand.
1 Gallon Acrylic Enamel 95$
1 Gallon Acrylic Lacquer 130$
1 Gallon Acrylic Urethane 120$
Link for the kit
Link for the brands landing page
And a couple color samples that are close.
http://images.tcpglobal.com/rsp/newbody/rsp2916gal.jpg
http://www.tcpglobal.com/restoration...es/rsp2701.jpg
http://images.tcpglobal.com/rsp/newbody/rsp2706gal.jpg
"Kustom shop" brand DTM (Direct to metal) Epoxy primer, 115$ 1.5gallon mix kit. Red color since I know thats whats under the factory paint. Of course I could be wrong and thats an under coat, but I know it's a different red than the top.
"Kustom shop" 2k primer 1-3/8gal 100$
"Kustom shop" lacquer primer 60$ Gallon, kit is 80$ includes 1gal thinner.
Anyways enough rambling and note making. Feel free to chime in with DIY do and don't's. Or "Stuff you outta know before you go to the paint shop".
*EDIT* Forgot to attach my color collage
https://www.yotatech.com/members/co_...-alt-angle.jpg
I just kinda suck at getting the perfect lighting, and my camera batterys keep dieing so I'm always abit rushed.
Went digging for more paint research. Even if it's way down the line still.
Turned up the PPG paint code for the 3k3 it's 4478, the sample sheet looks like a black on the computer. Same as the Garnet pearl sample the autoparts store has.
tcpglobal seems to have much better prices than that last place, and definitely a better selection. They have "Restoration shop" urethane base and clear coat kits for what seems a reasonable price. I don't see a perfect match yet for my color, but pretty sure they do blend onsite.
This Restoration Shop URETHANE BASECOAT with CLEARCOAT KIT Includes:
1 - Gallon of Restoration Shop PREMIUM URETHANE BASECOAT COLOR,
1 - Gallon of MEDIUM URETHANE REDUCER (RSP UR70-GL),
1 - Gallon of Kustom Shop PREMIUM URETHANE SPEED CLEAR (KC-210),
1 - Quart of OVER-ALL CLEARCOAT HARDENER (KC-212),
5 - EA Quality 190 Micron Nylon Automotive Strainers,
5 - EA Wood Paint Mixing Sticks.
For single stage paints they have, in the same brand.
1 Gallon Acrylic Enamel 95$
1 Gallon Acrylic Lacquer 130$
1 Gallon Acrylic Urethane 120$
Link for the kit
Link for the brands landing page
And a couple color samples that are close.
http://images.tcpglobal.com/rsp/newbody/rsp2916gal.jpg
http://www.tcpglobal.com/restoration...es/rsp2701.jpg
http://images.tcpglobal.com/rsp/newbody/rsp2706gal.jpg
"Kustom shop" brand DTM (Direct to metal) Epoxy primer, 115$ 1.5gallon mix kit. Red color since I know thats whats under the factory paint. Of course I could be wrong and thats an under coat, but I know it's a different red than the top.
"Kustom shop" 2k primer 1-3/8gal 100$
"Kustom shop" lacquer primer 60$ Gallon, kit is 80$ includes 1gal thinner.
Anyways enough rambling and note making. Feel free to chime in with DIY do and don't's. Or "Stuff you outta know before you go to the paint shop".
*EDIT* Forgot to attach my color collage
Last edited by Co_94_PU; 02-18-2013 at 08:44 PM. Reason: fixing some formatting
02-04-2013, 03:30 PM
#18
No pictures for the recent progress, sorry it's not really worty of pictures anyway.
Pulled the drivers side fender off and worked on the dent at the front, got it mostly raised but I'm at the limits of what I can do with my current tools ( Ball peen hammer can only do so much body work), it still needs the high spot crease knocked in. I'll need to pick up a proper dolly and chisel and pick hammers, hopefully before HF takes them off sale. HF doesn't carry the one I really need for the rear bed corners, it's a chisel head with a pretty severe bend, I call em gonzo hammers cause they look like his nose.
Straightened out / stood-up the front apron quite abit more, it's still probably an inch back or so at the front left corner. While I had the airbox and headlamp out I found out the fluid return line for my power steerng is leaking, it's a slow leak and it's pretty grungy down in that area must have been at it for a while.
Raised the front left side dent in the lower portion of the bed about as far as I dare for now. Will need the chisle hammer to get the crease out of the corner.
Found out there are missing parts for my front bumper, which explains why it looks a little sad and droopy at the ends. Parts diagram, Part #'s 90179-08093(Top nut) 52145-89102(Hangar bracket) 90540-08018(Bushing) 90179-08142(Bottom nut), 2 of each. I guess when the left side was damaged both were removed so it didn't look lopsided. ~26$ from the online parts shop so I'll add em to my yard to find list, along with a grill that fits.
Sanded, filed, and glassed the gaping crack in the front of my camper shell, ran out of "warm" and light before I could get the color sprayed. It's not pretty but it should be much closer to water tight now. Just one more crack and a bunch of crazing to take care of left. Also want to source or salvage a front window for it, I think it's a bit bigger than the toyota so that might be a minor issue, since I'm not a fan of the rubber gasket and don't have a rear slider in the truck. Then its out with leaking sliding side windows, a fresh coat of paint, and fresh window caulk.
The painted vinyl visors finally dryed to a satisfactory feel, yesterday I tacked them off with some blue paper towels to give them a helping hand.
Still not sure how I am going to deal with the big cab dent since it has creases on both sides and isn't accessible from the inside. It'll need the slide hammer or stud welder approach. HF has the studs for a few $ might try tacking some of those on with the wire welder, hill-billy style!
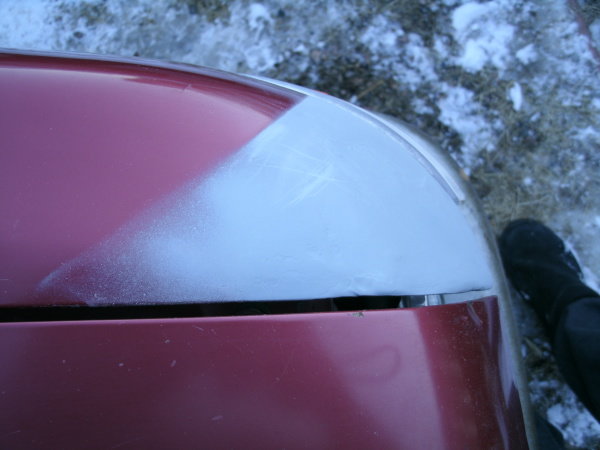
Here is the big split in the camper I repaired. It ran about 30 inches across and back to the crown. You can see the holes I drilled to secure it to a piece of AL-foil backed MDF to replicate a gelcoat finish. It's reinforced with a strip of fiberglass on the inside.

And here is where my clamping let loose because *shrug* it wasn't good enough. I didn't notice till it was too late to do anything about. This is the bit I finished today.

I sanded thru the gelcoat on the outside and put a strip of fibgerglass on each side and pinched the front to meet the rear piece for a glass-glass bond. Then clamped a bar across the back and painted in some more epoxy on the outside. I use aluminium foil and or wax paper for "peel-n-ply" and it works pretty good.
Pulled the drivers side fender off and worked on the dent at the front, got it mostly raised but I'm at the limits of what I can do with my current tools
( Ball peen hammer can only do so much body work), it still needs the high spot crease knocked in. I'll need to pick up a proper dolly and chisel and pick hammers, hopefully before HF takes them off sale. HF doesn't carry the one I really need for the rear bed corners, it's a chisel head with a pretty severe bend, I call em gonzo hammers cause they look like his nose. Straightened out / stood-up the front apron quite abit more, it's still probably an inch back or so at the front left corner. While I had the airbox and headlamp out I found out the fluid return line for my power steerng is leaking, it's a slow leak and it's pretty grungy down in that area must have been at it for a while.
Raised the front left side dent in the lower portion of the bed about as far as I dare for now. Will need the chisle hammer to get the crease out of the corner.
Found out there are missing parts for my front bumper, which explains why it looks a little sad and droopy at the ends. Parts diagram, Part #'s 90179-08093(Top nut) 52145-89102(Hangar bracket) 90540-08018(Bushing) 90179-08142(Bottom nut), 2 of each. I guess when the left side was damaged both were removed so it didn't look lopsided.
~26$ from the online parts shop so I'll add em to my yard to find list, along with a grill that fits.Sanded, filed, and glassed the gaping crack in the front of my camper shell, ran out of "warm" and light before I could get the color sprayed. It's not pretty but it should be much closer to water tight now. Just one more crack and a bunch of crazing to take care of left. Also want to source or salvage a front window for it, I think it's a bit bigger than the toyota so that might be a minor issue, since I'm not a fan of the rubber gasket and don't have a rear slider in the truck. Then its out with leaking sliding side windows, a fresh coat of paint, and fresh window caulk.
The painted vinyl visors finally dryed to a satisfactory feel, yesterday I tacked them off with some blue paper towels to give them a helping hand.
Still not sure how I am going to deal with the big cab dent since it has creases on both sides and isn't accessible from the inside. It'll need the slide hammer or stud welder approach. HF has the studs for a few $ might try tacking some of those on with the wire welder, hill-billy style!
Here is the big split in the camper I repaired. It ran about 30 inches across and back to the crown. You can see the holes I drilled to secure it to a piece of AL-foil backed MDF to replicate a gelcoat finish. It's reinforced with a strip of fiberglass on the inside.
And here is where my clamping let loose because *shrug* it wasn't good enough. I didn't notice till it was too late to do anything about. This is the bit I finished today.
I sanded thru the gelcoat on the outside and put a strip of fibgerglass on each side and pinched the front to meet the rear piece for a glass-glass bond. Then clamped a bar across the back and painted in some more epoxy on the outside. I use aluminium foil and or wax paper for "peel-n-ply" and it works pretty good.
02-05-2013, 12:33 AM
#19
Super Moderator
Staff
iTrader: (1)
Join Date: Aug 2008
Location: Anderson Missouri
Posts: 11,788
Likes: 0
Received 21 Likes
on
19 Posts
Like how well you are doing your write ups on how to do things. Great job and appreciate the effort you are putting into it to show how it is done. Having a nice looking interior adds to the pride and pleasure of the truck as well.
Paint can be expensive. I was shocked at the prices that it can vary. I do my own painting and usually $300 is what I expect to spend on a paint job. I use Nasson and get mine from Oriellys. There are other and better brands but so is the cost and I like my results with it. Also there are autobody supply stores that can get some paints at better prices, ask some of the body shops in town and they might point you do some good places as well.
As far as painting, I really dont have problems getting the paint to go as I would like it. I do have problems sometimes with the clear coat. But it can be wet sanded so it there are going to be problems at least it is on the surface. Another surprise that I got is wetsanding the clear with 2000 grit is really not a problem, just watch the edges, it is a buffer and polishing compounds that will get you into trouble.
Great build.
Last edited by Terrys87; 02-05-2013 at 12:34 AM.
02-05-2013, 10:22 PM
#20
No real big progress today.
Got the primer covered on the repaired fiberglass shell so it doesn't stick out and bother me.
Added some more wd40 to the front bumper bolts, it'll be coming off next week when the weather clears up and I have enough time to clean treat and paint it. It's the base model brushed aluminium painted one.
The lower cover will need some straightening also. Might hammer on that some tomarrow.
Located the rear speaker plug for my stereo in a place it shouldn't have been.
Thursday I have to go into the city so I'll be wandering the upullandpay. Which of course means I'll find a bunch of stuff I don't really need but want anyway and none of the stuff I need because I either can't find or forgot about 'em.
Side mirror(12-24), grille(6-12), bumper hangers(4), tailgate handle(5-10), handfull of plastic light mount clips(1), headlight aiming nut(1,Yeah no way I'm giving the parts store 5$ for THAT, insane price), factory dash speaker boxes(8), Light bulbs(5,Don't forget to take a test meter!), Headliner metal bits(5), muffler(9), tailpipe(5) glove box(10), mud flaps(12), 4runner rear powered speakers(10), torrsion bar bolt(2), L/R door weatherstripping(14), wiper arm nut-cover(1), marker lenses(4),all four corner light assemblies(28), tilt steering column(29), full length arm rests(16).
~200$, Yep way over budget good thing I only really need the bulbs, bumper hanger, headlight bit, extra headliner bracket and hangers, and a spare torsion bolt.
While I tend to fully support our small town businesses, the local parts guy wants a first born child for a lightbulb, he'll be selling me no more of those at 500% markup!
I'm thinking maybe I can sell cloth headliners to help fund my restoration. What do you guys think any interest? Seen a post indicating 200$ is the going shop price and 100$ is a deal. And thought I could that
Starting with regular cab in black canvas, blue canvas or denim, or white canvas dye your own. Shipping without the brackets would be reasonable with the flatrate boxes. I would have to look into shipping tubes to send them with brackets. With brackets I'd need some kind of a CORE system, they'll get hard to find really fast if there is any real interest.


