CBO's 87 4runner build


 12-10-2015, 05:39 AM
#85
Registered User
Thread Starter
Thanks to El Ni�o for keeping winter temperatures at bay. It's been hitting the mid 50's and allowing me to do some runner work.
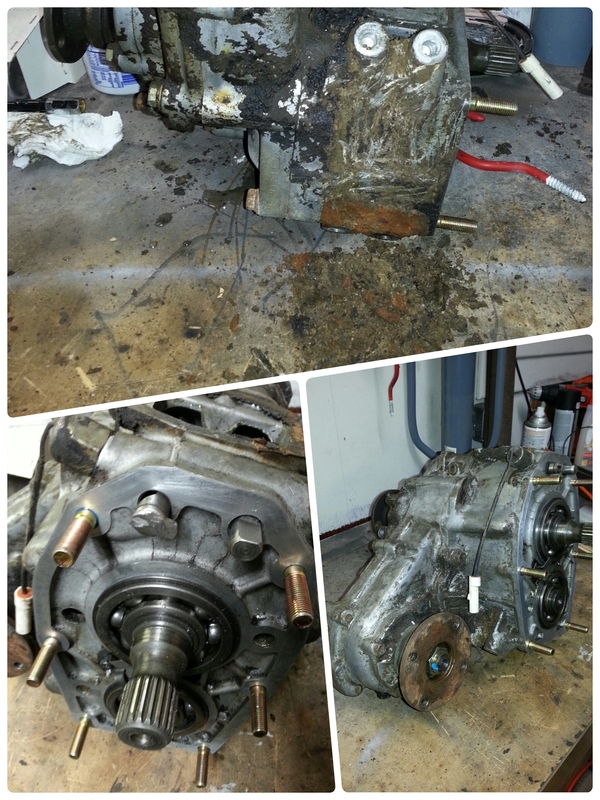
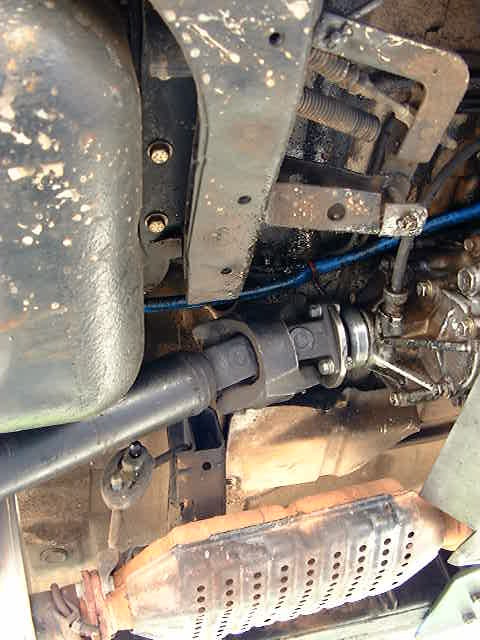
You can see the dirt and grime on this damn thing. Eventually I gave up on completely cleaning it and just bolted it on. The top drivers side studs on the adapter got in each others way. With one nut on the other wouldn't fit. Took one nut down about 1/3 and it snuck on. Might only be an issue for the 10* clocked adapter.
So its bolted up!
If I want a full flat belly it looks like I'll need to modify the tunnel a bit. Probably cutting the horse collar out completely and putting in 1 or 2 new frame braces. Still a ton of work to do!

You can see the dirt and grime on this damn thing. Eventually I gave up on completely cleaning it and just bolted it on. The top drivers side studs on the adapter got in each others way. With one nut on the other wouldn't fit. Took one nut down about 1/3 and it snuck on. Might only be an issue for the 10* clocked adapter.

So its bolted up!

If I want a full flat belly it looks like I'll need to modify the tunnel a bit. Probably cutting the horse collar out completely and putting in 1 or 2 new frame braces. Still a ton of work to do!
Last edited by crashburnoveride; 12-10-2015 at 03:55 PM.
12-10-2015, 03:58 PM
#87
Registered User
Thread Starter
It's the length of the reduction box and adapter put together. I believe 6 inches. I'll hafta triple check before I mod a shaft so I don't make any more mistakes! 😡😁
03-21-2016, 11:57 AM
#88
Registered User
Thread Starter
Ahhh... my first post of 2016. Almost 4 months in. Well, weather is warming up and I'm itching to drive the 4runner around so work needs to be done.
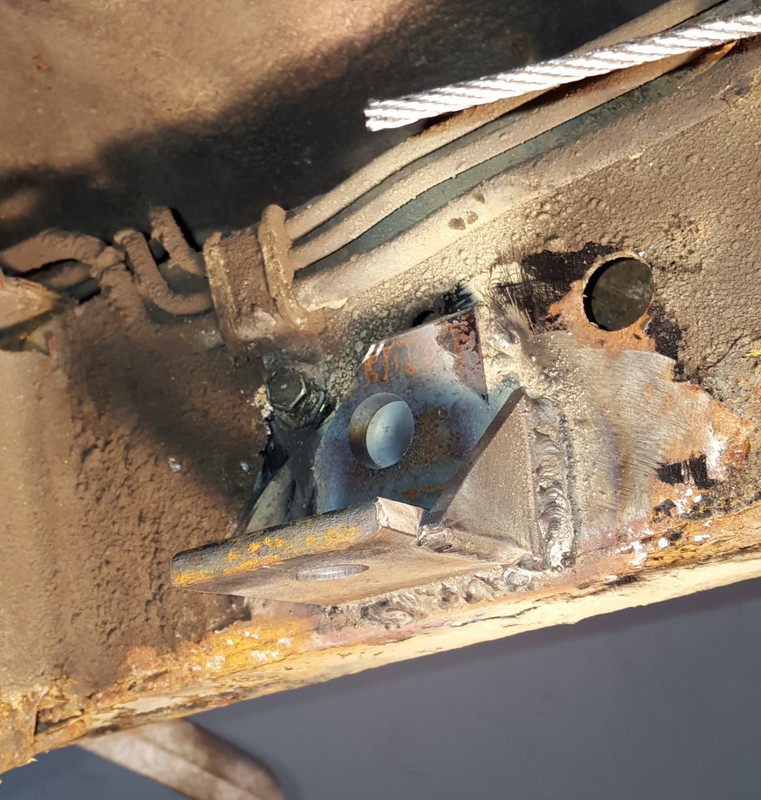
Been working on mounting the transfer case with the mounting plate i got from low range offroad. I ordered a 10 degree clocked mounting plate. I assumed thats what they sent. I was wrong. That has resulted in multiple attempts at getting this mount right. Alot of welding, cutting and re-welding has happened. And I call it the frankenmount.
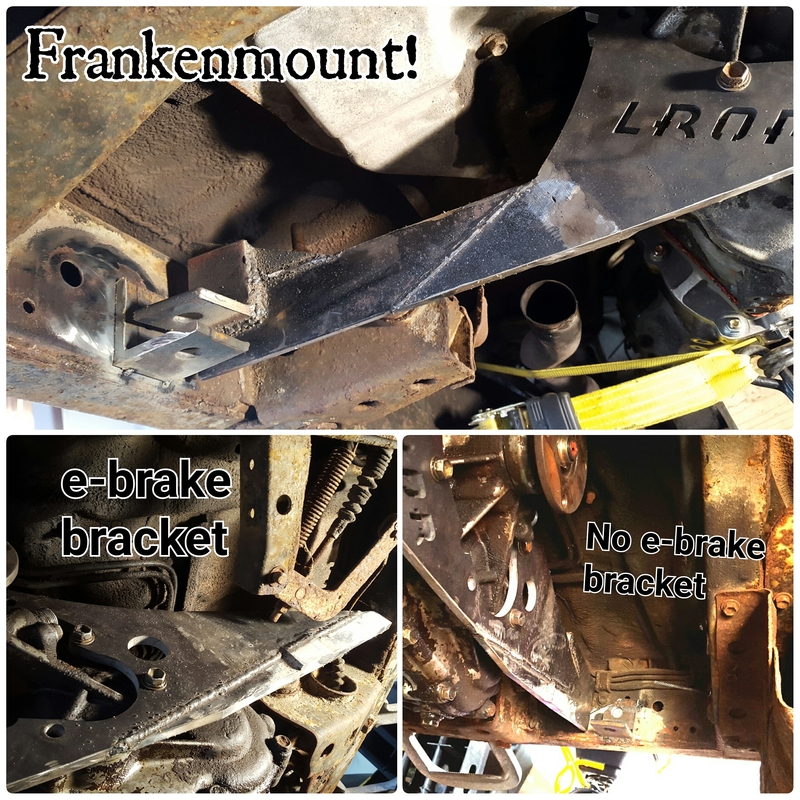
Yes its ugly. Will it break? We'll see in due time. Do I give AF at this point? Absolutely not. This style mount got in the way of my e-brake bracket. Since I'd already cut the cable at the rear axle I had no problems with cutting out the whole bracket.
Note: using this type of mount would not be easily done with just a single transfer case setup. The torsion bars would be in the way.
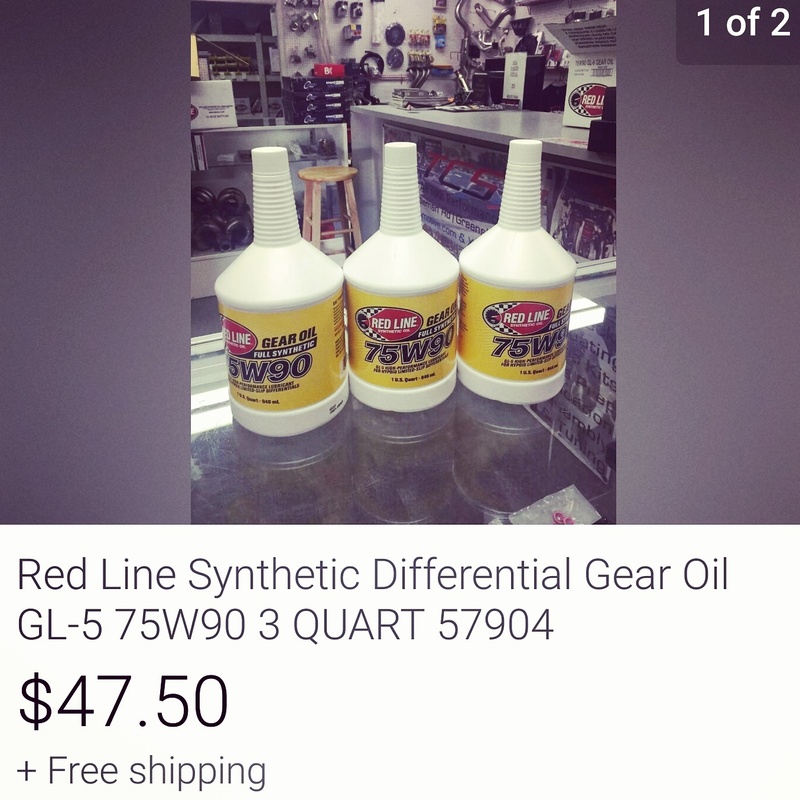
Since im cheap I didnt wanna pay $45 + shipping for the stupid bushings that low range offroad sells so i bought some from energy suspension for a ford (chevy? Dont remember) transfer case. Uses 5/8 bolts. Should work fine and cost $22.
The next issue after the mounts totally done (still needs braced) is the "horsecollar" being in the way of my driveshaft. This guy on pirate (boogerwelds) just cut his out in the middle.
Not sure if i should do that or just notch it. BW claims it hasn't had ill effects. Thoughts?
Been working on mounting the transfer case with the mounting plate i got from low range offroad. I ordered a 10 degree clocked mounting plate. I assumed thats what they sent. I was wrong. That has resulted in multiple attempts at getting this mount right. Alot of welding, cutting and re-welding has happened. And I call it the frankenmount.

Yes its ugly. Will it break? We'll see in due time. Do I give AF at this point? Absolutely not. This style mount got in the way of my e-brake bracket. Since I'd already cut the cable at the rear axle I had no problems with cutting out the whole bracket.
Note: using this type of mount would not be easily done with just a single transfer case setup. The torsion bars would be in the way.
Since im cheap I didnt wanna pay $45 + shipping for the stupid bushings that low range offroad sells so i bought some from energy suspension for a ford (chevy? Dont remember) transfer case. Uses 5/8 bolts. Should work fine and cost $22.
The next issue after the mounts totally done (still needs braced) is the "horsecollar" being in the way of my driveshaft. This guy on pirate (boogerwelds) just cut his out in the middle.

Not sure if i should do that or just notch it. BW claims it hasn't had ill effects. Thoughts?
Last edited by crashburnoveride; 03-21-2016 at 01:59 PM.
 03-21-2016, 03:41 PM
#90
Registered User

Join Date: Jul 2015
Posts: 9
Likes: 0
Received 0 Likes
on
0 Posts
Rig is looking great, a little late but congrats on the son, I'm sure he will love crawling all over the 4 runner as my girls do. Nice job on the rust repair, its coming along nicely. Doubler is a sweet needed addition
03-21-2016, 05:52 PM
#91
Registered User
Thread Starter
 03-23-2016, 04:59 PM
#92
Registered User
Thread Starter
T-case oil is on its way.
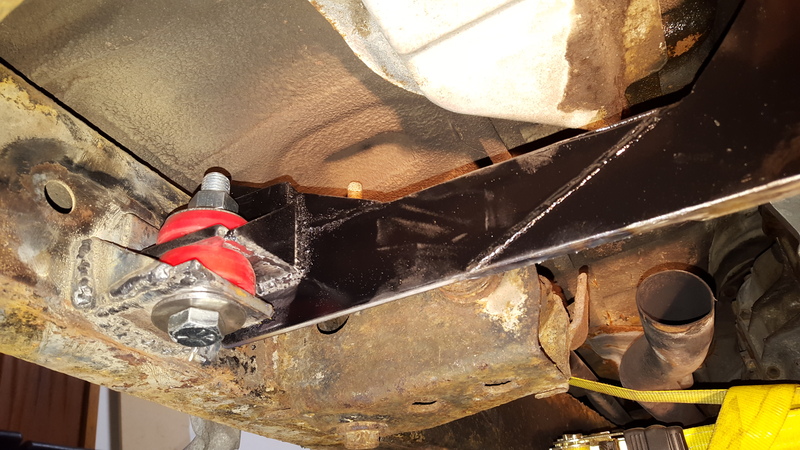
Passenger side frame mount.
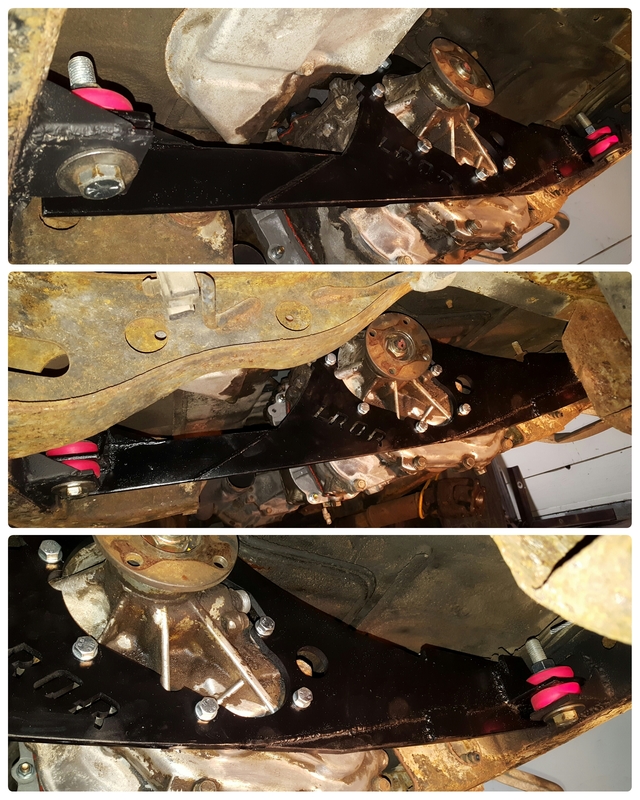
Frankenmount one coat of paint.
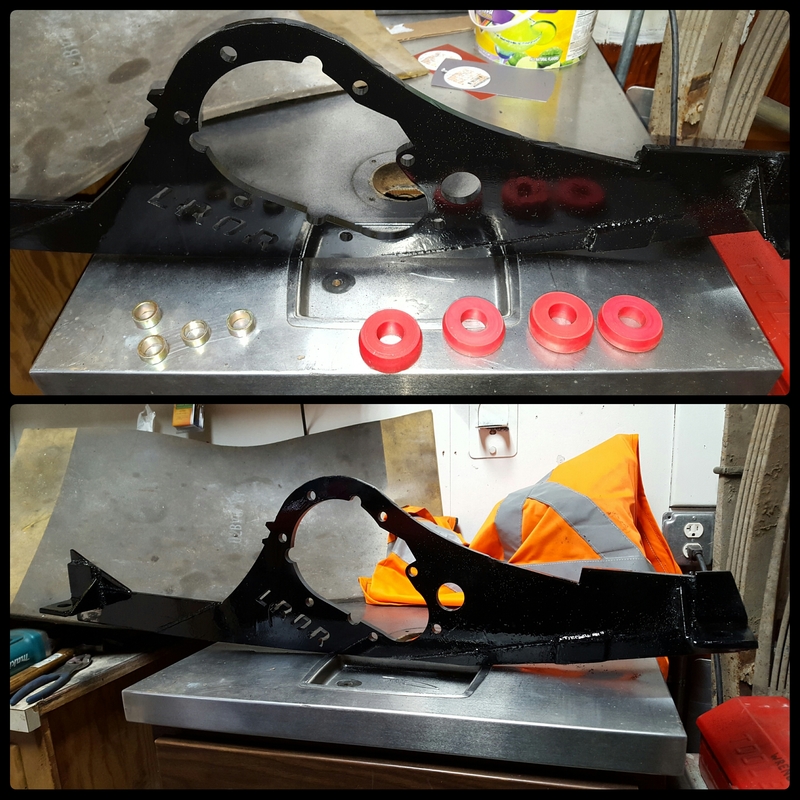
Test fit.

Need to paint everything and its on to shortening the rear DS. Making a front one. Etc etc...
Passenger side frame mount.
Frankenmount one coat of paint.
Test fit.
Need to paint everything and its on to shortening the rear DS. Making a front one. Etc etc...
Last edited by crashburnoveride; 03-24-2016 at 04:55 AM.
 03-25-2016, 05:16 AM
#94
Registered User
Thread Starter
03-27-2016, 08:52 AM
#95
Registered User
Thread Starter
Happy easter (jeep safari) y'all! I vow to make it to that some day. Definitely a dream trip. 
Made this for fun.

So I think I decided I'll cut the horsecollar crossmember in half so the driveshaft can clear. Then probably after a few wheeling trips I'll do a ford gas tank swap in the spare tire location. That will then allow me to put in a new crossmember back where the stock tank previously was. I'm buying an open 4.10 diff on monday for the future sas. Slowly collecting parts...
Made this for fun.
So I think I decided I'll cut the horsecollar crossmember in half so the driveshaft can clear. Then probably after a few wheeling trips I'll do a ford gas tank swap in the spare tire location. That will then allow me to put in a new crossmember back where the stock tank previously was. I'm buying an open 4.10 diff on monday for the future sas. Slowly collecting parts...
03-29-2016, 02:44 PM
#96
Registered User
Thread Starter
Put in the oil. Then I had to lower the drivetrain down so I could screw in the bolts for the rear shifter. Jacked it back up and installed the mount.
Yessss
Yessss
03-31-2016, 09:19 AM
#98
Registered User
Thread Starter
Thanks bud. Heard your new runner is getting seriously pimped out at mark's school. Gonna be awesome. 
So if im gonna cut the horsecollar crossmember in half to make room for the cv driveshaft I'm pretty sure a new brace is needed, but the gas tanks in the way. So that means relocating the stock tank, doing a ford tank swap, or using a fuel cell. I dont know a damn thing about fuel pumps or sender units because I've never fiddled with them. So lets break down the options here...
Stock relocation to spare tire area is the cheapest. But the tank is bulky and will stick below the frame rails. It may also be the easiest because extending the fuel lines and fabbing the mount is about the extent of the work. But then the low lying tank would probably need a skid of some kind.
Stock relocation, Cost: cheapest. Difficulty: easy to moderate.
Ford swap you find a used tank with the guts in it and either keep the ford parts and use a separate fuel gauge or swap toyota guts into it. The latter involves cutting, welding, leak testing, modifying the pump and sender, basically a nightmare. Upullit punctures all their gas tanks which sucks cuz thats an extra patch. Not sounding too appealing as I'm writing this. Needs custom mounts but maybe no skid plate. Great ground clearance. Used $20-$50, new $80-$100.
Ford swap, Cost: cheaper. Difficulty: High.
Fuel cell would look clean and be just as high and tight as a ford tank. $150- $250 ish price range. I can't find one with a sending unit in the same ohm range as our trucks. Maybe I could do an external inline fuel pump and just use an aftermarket fuel gauge...
Fuel cell, Cost: highest. Difficulty: moderate.
Looking at all that I think I'm first going to drop the stock tank and see how it looks and works in the back. Then make a decision from there. I've been searching google for good write ups on ford swaps and fuel cells but I'm just not finding what I'd hoped for. Everyone always says "just search theres a ton of threads about it" well bs, cuz all of them have missing photos or vague info. Maybe fuel tanks are super simple and I'll figure that out when I get my hands dirty. We'll see.
Last edited by crashburnoveride; 03-31-2016 at 09:21 AM.
03-31-2016, 11:51 AM
#100
Registered User
Thread Starter


