CBO's 87 4runner build
 01-01-2015, 04:01 PM
#1
Registered User
Thread Starter
CBO's 87 4runner build
I'm bored so I figured I'd start my new build thread. I just bought this on new years eve.
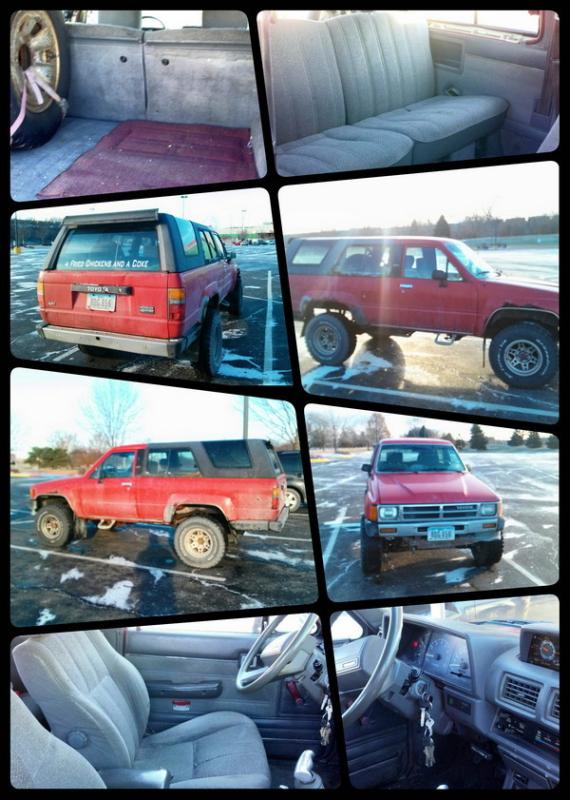
297k on the motor, some body rust, frame is typical midwest rust but not terrible. I bought this because in August 2015 I will be a first time dad, and 2 seats ain't gonna work much longer.
*update: The plan for this project has changed from using it as a DD/offroad rig to basically only a trailer'd rig that holds the whole family. It will still be street legal tho.
Heres what I want to do:
-Flat belly/drivetrain lift [✔]
-Dual transfer cases [✔]
-Get 35x12.5r15 tires [✔]
-Rear disc brake swap [✔]
-Chevy spring swap [✔]
-Custom front bumper [✔]
-Custom rear bumper [ ]
-SAS [✔]
-Fuel tank swap/relocation [ ]
-Interior cage [ ]
So I'm sure progress will be slow, but it should be a fun build! Looking forward to learning a lot and pickin y'alls brains. Happy new year!
Last edited by crashburnoveride; 04-15-2023 at 11:28 PM.
 01-01-2015, 04:47 PM
#3
Registered User
Thread Starter
01-01-2015, 04:58 PM
#4
Trade???...lol.
Hey is that a Hurst "T" handle shifter or a B&M? I had a Hurst on my 69' Firebird back in the day, I've thought about putting one on my 4runner, they make for a comfortable grip when shifting.
Hey is that a Hurst "T" handle shifter or a B&M? I had a Hurst on my 69' Firebird back in the day, I've thought about putting one on my 4runner, they make for a comfortable grip when shifting.
Last edited by rustED; 01-01-2015 at 05:03 PM.
01-02-2015, 05:20 AM
#5
Registered User

I have the same style of handle made by B&M. There wicked and I think I only paid 15-20 for it at O'rileys. I wanna flat belly my 4runner also! I'll have to follow your build and see how you do it
 01-06-2015, 12:01 PM
#7
Hey Pat!! Not sure how I missed this thread! I guess that's what I get for being off the forum for awhile.
Looks great and you made some good progress on the engine teardown. Its always a good idea to keep stuff organized like you have it there on the bench. Makes reassembly very easy.
I like your plans for the runner. I have some of the same ones for mine. 35's would be nice on that and still be a good DD.
I am also going to try my hand at the Dual case setup so I will make sure to share any and all info I gather along the way.
I know I have told you this already, but congrats on the baby.
Hows the wife coming along? I need to make a trip to Lincoln and hang out.
Trending Topics
01-06-2015, 12:14 PM
#8
Registered User
Thread Starter
 She's sick 24/7 right now.
  yessss. When u do, bring that gray trans shift nob if u still have it!
01-08-2015, 04:28 PM
yessss. When u do, bring that gray trans shift nob if u still have it!
01-08-2015, 04:28 PM
#9
Registered User
Thread Starter
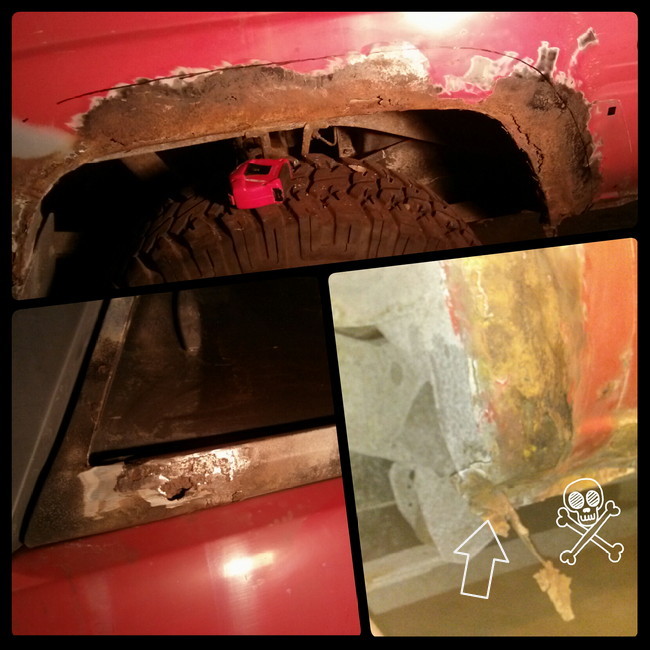
Decided to work on the rust a bit today. I don't know what to do about the "L" trim on the top. It is rusted clean through in spots, and already has bondo all up in it. On the passenger side rear wheelwell, behind the plastic piece, was a good hole with a bunch of fur and other crap in it that was most likely a dead mouse. So thats neat. I measured out a 3.5" cut line which clears most of the rust. That'll make room for the 35's.
Hopefully I'll cut tomorrow.

Hopefully I'll cut tomorrow.
01-08-2015, 05:36 PM
#10
Decided to work on the rust a bit today. I don't know what to do about the "L" trim on the top. It is rusted clean through in spots, and already has bondo all up in it. On the passenger side rear wheelwell, behind the plastic piece, was a good hole with a bunch of fur and other crap in it that was most likely a dead mouse. So thats neat. I measured out a 3.5" cut line which clears most of the rust. That'll make room for the 35's.

Hopefully I'll cut tomorrow.
Hopefully I'll cut tomorrow.
Sorry about the wife being sick. My wife was sick the entire time with our twins. Are you sure there's not two in there???!!!!!!!!!
01-10-2015, 08:38 AM
#13
Registered User
Thread Starter
I saw toyotafiberglass.com sells a set for $190 + shipping I assume. Replacing those is down the list after the body is done. I wanted to work on the runner today, but as soon as I go into my cold garage I lose motivation. Working on my bathroom reno instead.
01-13-2015, 05:24 PM
#14
Registered User
Thread Starter

1) Built a new shelf to get more crap out of the way in my small garage. Everything except the grey tote up there is spare yota parts I got with the 4runner. Also have 4 steel rims, found a cruise control cpu box, and other crap. Some I dont even know what it is.
2) Interior was swapped from fugly red to grey. Minus the roof liner. How hard is it to uninstall the liner without ruining it? Because I'd like to swap my grey one from the pickup in. Didnt see anything in fsm about it. Any help?
3) I threw this away days ago cuz at first glance I thought it was just a regular spare set, and I try to not be a hoarder because I lack the space.
5) Browsing the interwebs today I discovered the cruise control "buttons" were on the wiper controls. Today was also trash day. Uh oh. Luckily I didn't get around to putting out that specific can and dug it out. Like I suspected it actually was an sr5 control. Phew!
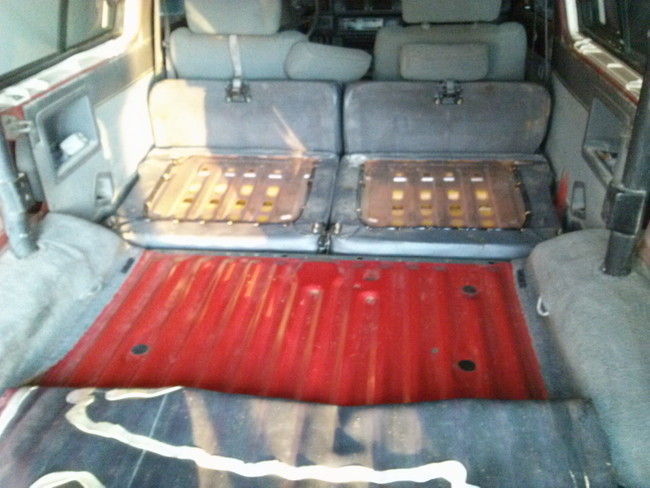
4) Vacuumed the cargo bay. Actually looks ok!
In other news I heard friday or Saturday may reach the 50's!? Haven't verified this claim, but if true... runner work shall be done!!
01-14-2015, 05:29 PM
#15
Registered User
Thread Starter
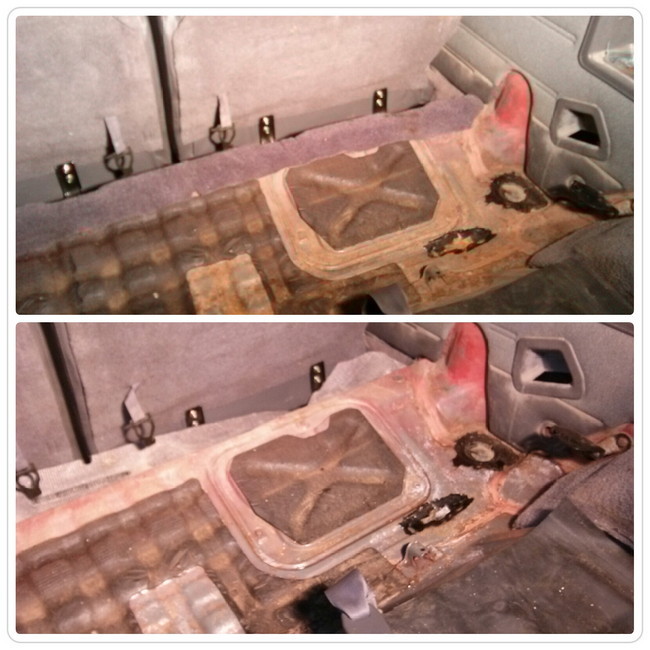
Pulled up the carpet. Thought it'd be rusty like under the rear seats, but thankfully I saw shiny red paint.
I picked up this stuff called naval jelly today. Supposed to kill rust. Had to give it a try. I wire wheeled what I could and slapped on the jelly.
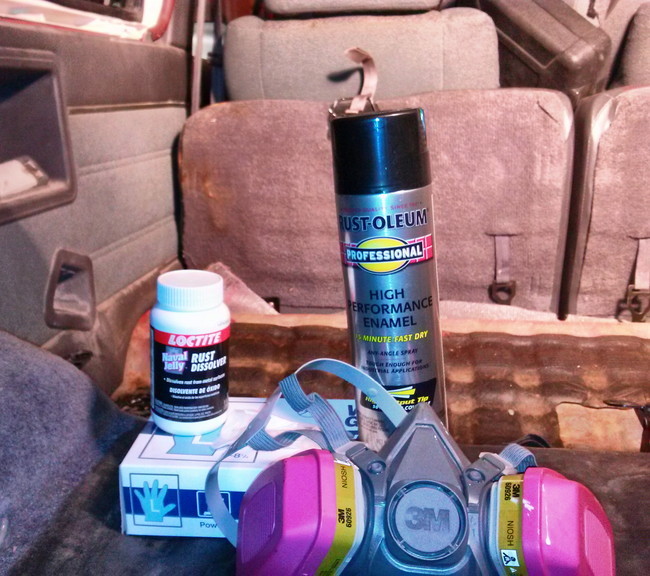
Here's a b4 and after. It actually did clean it up more than I expected. It's drying now.

I picked up this stuff called naval jelly today. Supposed to kill rust. Had to give it a try. I wire wheeled what I could and slapped on the jelly.

Here's a b4 and after. It actually did clean it up more than I expected. It's drying now.

Last edited by crashburnoveride; 01-15-2015 at 05:20 AM.
01-16-2015, 04:16 PM
#16
Registered User
Thread Starter
Lovin this weather. Spent about 2.5 hrs and got this far:
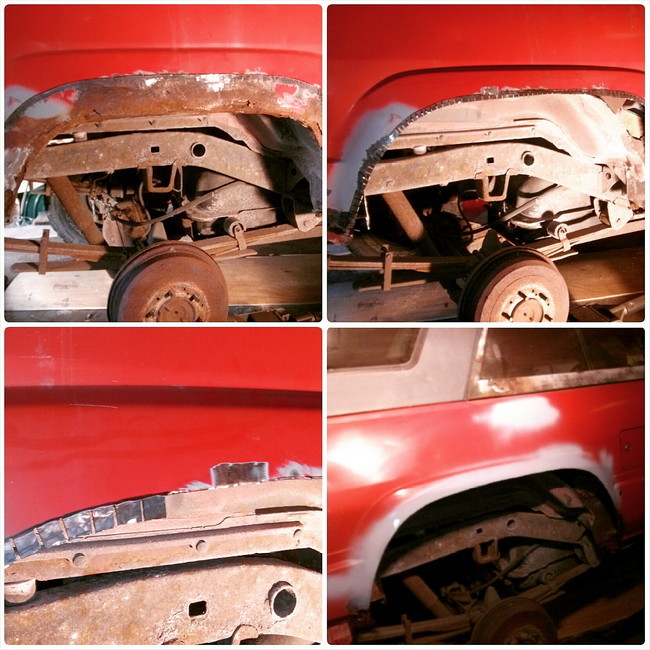
I cut just under the 3.5" line and then cut notches, bent the notches inward, and will weld the patch in from the inside. From what I've read thats easiest. Feelin pumped about how its turning out so far!!

I cut just under the 3.5" line and then cut notches, bent the notches inward, and will weld the patch in from the inside. From what I've read thats easiest. Feelin pumped about how its turning out so far!!
Last edited by crashburnoveride; 01-16-2015 at 05:22 PM.
01-17-2015, 03:15 PM
#17
Registered User
Thread Starter
Did more work today. Im not too worried about making it look amazing. I'm gonna cover everything in durabak anyways.
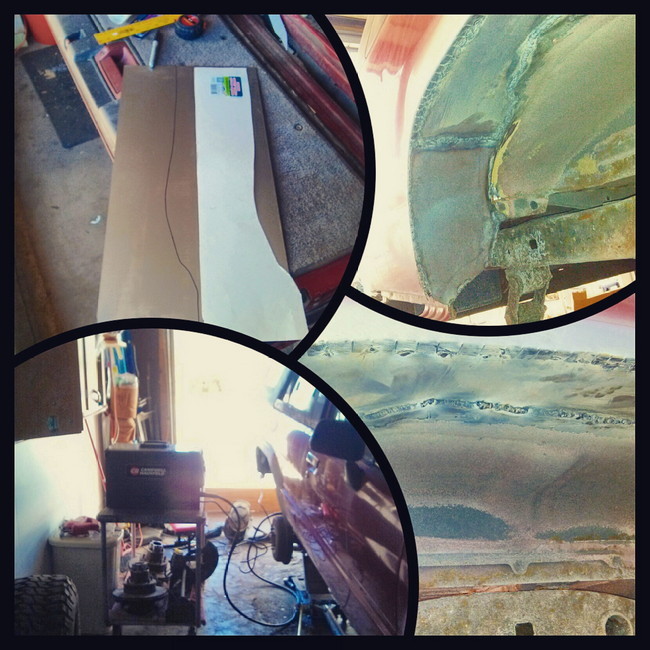
It's actually a ton of work. I think I put in 10 hours today. However, I do tend to work slowly. Gotta figure out what to do in the bottom rusted out corners still, but then this sides done! Soon to be rust free son!!

It's actually a ton of work. I think I put in 10 hours today. However, I do tend to work slowly. Gotta figure out what to do in the bottom rusted out corners still, but then this sides done! Soon to be rust free son!!


