B4Runner's 1988 4Runner Build-Up Thread
 02-03-2010, 05:20 PM
#1
Registered User
Thread Starter
B4Runner's 1988 4Runner Build-Up Thread
Okay, so I have officially ran out of room in my signature to list all my mods. So here are all the mods to my truck as of today, 2/23/11:
-3-point rear seat-belts.
-Removed front sway-bar.
-Cobra 25 LTD Classic.
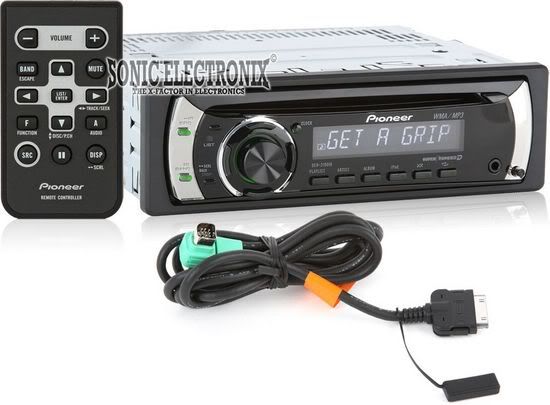
-Pioneer DEH-2100IB.
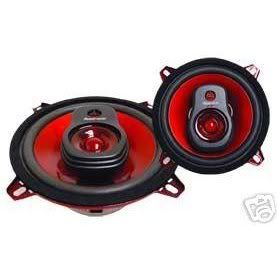
-2 12" Pioneer subs.
-Aux. reverse lights.
-KC Daylighters on hood.
-Reverse alarm.
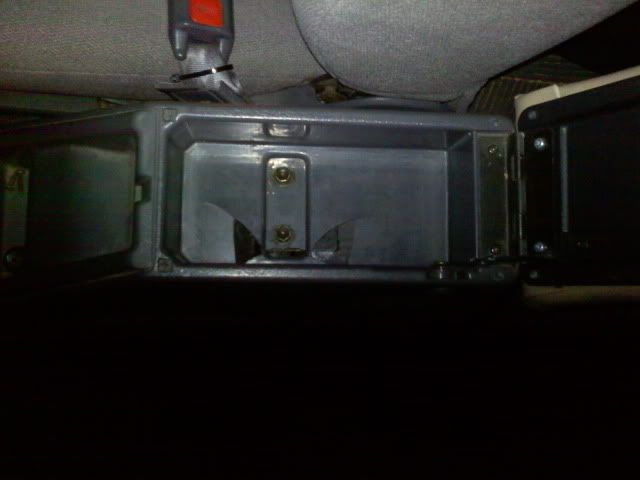
-Locking amo can console.
-Always hot front and rear cigarette lighters.
-Fuel cut-off switch.
-Front and rear set of 80's Chevy truck horns.
-3" body lift.
-Blinkers added in running lights.
-Manual window cranks.
-Always hot front and rear rear-window switches.
-Always hot switched front and rear lighting.
-No key buzzer.
-Grant steering wheel.
-EGR vacuum bypassed.
-Removed shell windshield wiper and added AM/FM antenna.
My Mods:
Here are a list of my mods. Some have been done, some are in progress, some are to come, and the majority of them are small mods that will be easy to be done. I'm a huge fan of small mods that can be made to look stock to a Yoter who would know that they aren't. If there aren't pix already, they will come soon or as soon as I have completed the mod. All linked mods in the section below have been completed.
All Mods:
- Rear Window Switch in Cargo Area
- Extra Cab Light in Rear.
- Door Light Switch for Tailgate.
- Hot Rear Window Switch
- Pioneer Head Unit & VR3 speakers
- Addicted Off Road Bumpers
- KC Off Road Lights
- Blazeland LT & 63" Chevy Spring Swap
- 33" Tires
- 4.88 Gears
- 3-Point Seatbelts
- Sway Bar Removal
Completed Mods:
Rear window switch in cargo area:
I did this mod almost immediately after I bought my truck. Every other thread I've seen on this mod has been done a different way than I did it. Apparently, all the others found it easier to tap into the the wires in the tailgate for the new switch and then run the wires from the tailgate to the switch. That seemed harder to me. I found a wiring diagrams online, one for the switch and one for the wiring harness, and tapped into the main wiring harness right inside the paneling. I only had to use 1' of wire for each wire and that gave me plenty of slack. The switch is constant hot and works perfectly. In time, I plan to tap into a wire that runs off the dimmer when the headlights are on and run it to the switch so that the switch will illuminate with the the rest of the lights. I also plan on trimming down a bit of the paneling behind the edges of the switch so that it can be a bit recessed and flush like the rest. Here is a link to a post with more explanation.
Mods in progress:
Pioneer headunit and VR3 speakers:
Got a nice Pioneer HU for Chrismas and 2 of my VR3 3-way speakers. I got the other 2 on my own. My truck previously had an aftermarket system that was taken out, so the wiring under the dash is a little messed up. I'm going to find the constant hot and the switched hot, and then run my own wires for the speakers. Since the speakers are 6.5" and I have full-window doors, the front speakers will need to be mounted to the doors in shallow speaker boxes where the map holders are. For the time being, the rear speakers will also be placed in some speaker boxes. The head unit comes with a special wire for iPods that plug into the back of it. I'm going to run the iPod receiver end through a hole in my console.
More on the mod: https://www.yotatech.com/51364105-post7.html
Mods to come:
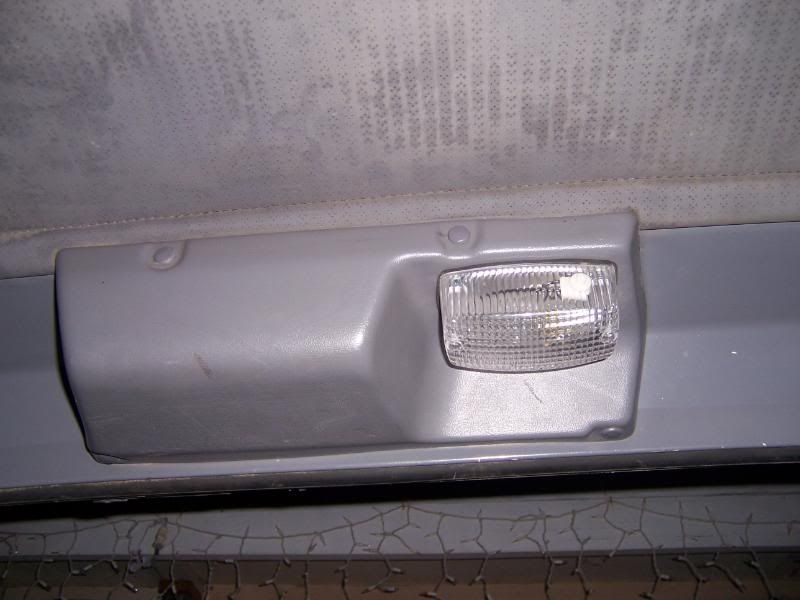
Extra cab light in rear:
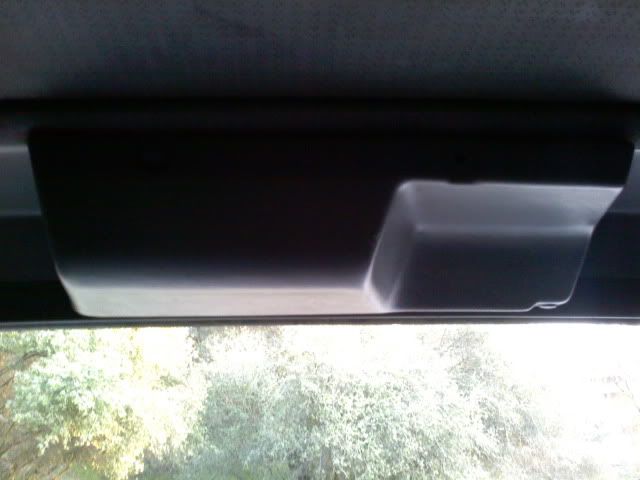
This is a mod I'm anxious to do. This mod and the next go together, but they will be done individually and can work independently. Have you ever noticed that when you get in to your truck at night, there isn't much light in the rear? Or if you need to get something out of the back, you can't see, even with the front door open to activate the cab light? This is where this mod comes in. I'm going to install a stock cab light the the rear wiper housing and and tap its wires into those of the stock cab light. Now, there will be a light in the rear when you open the door.
Door light switch for tailgate:
But what happens now when you want to get something out of the back of the truck when it's dark. You have the light back there now, but you still have to open a front door to activate the light and then close it once done. So, my solution is to take a door light button and install it in the back for the tailgate. And once again, wire it to one of the other door light buttons. Now, you can go and drop the tailgate, and automatically have light.
Hot rear window switch:
It kinda sucks when you go to your truck to get something out of the back and realize that you left your keys upstairs in your work clothes that are now put away for the night. The tailgate switch requires the key and the switch in the console requires that the ignition be switched on. So, I'm going to snip the switched hot wire to the window switch and tap in into the constant hot for the clock.
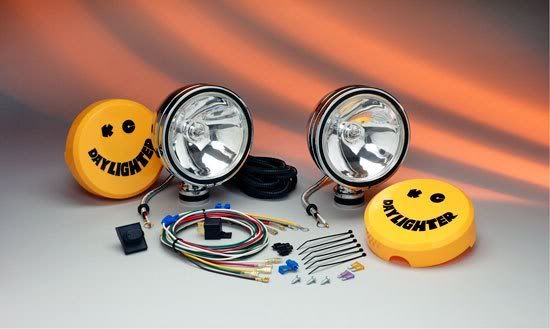
KC off road lights:
I was just given these really nice KC lights for my birthday from my uncle. I'm not sure yet how they are going to be mounted, but I do know how they are going to be wired. The lights come with their own switch that you must mount inside your vehicle. But as stated above, I like everything to look as stock as possible. On the console, there are three switches: rear wiper, rear window, and rear window lock. I want to use a defroster switch as the switch for my lights. Also, I find that rear window switch completely redundant. All it does in lock the rear window. I could go into detail about how pointless that is and why, but I'm sure you could figure it out for yourself. So, I'm going to hide that switch under the console and mount my KC's for light switch in its position.
-3-point rear seat-belts.
-Removed front sway-bar.
-Cobra 25 LTD Classic.
-Pioneer DEH-2100IB.
-2 12" Pioneer subs.
-Aux. reverse lights.
-KC Daylighters on hood.
-Reverse alarm.
-Locking amo can console.
-Always hot front and rear cigarette lighters.
-Fuel cut-off switch.
-Front and rear set of 80's Chevy truck horns.
-3" body lift.
-Blinkers added in running lights.
-Manual window cranks.
-Always hot front and rear rear-window switches.
-Always hot switched front and rear lighting.
-No key buzzer.
-Grant steering wheel.
-EGR vacuum bypassed.
-Removed shell windshield wiper and added AM/FM antenna.
My Mods:
Here are a list of my mods. Some have been done, some are in progress, some are to come, and the majority of them are small mods that will be easy to be done. I'm a huge fan of small mods that can be made to look stock to a Yoter who would know that they aren't. If there aren't pix already, they will come soon or as soon as I have completed the mod. All linked mods in the section below have been completed.
All Mods:
- Rear Window Switch in Cargo Area
- Extra Cab Light in Rear.
- Door Light Switch for Tailgate.
- Hot Rear Window Switch
- Pioneer Head Unit & VR3 speakers
- Addicted Off Road Bumpers
- KC Off Road Lights
- Blazeland LT & 63" Chevy Spring Swap
- 33" Tires
- 4.88 Gears
- 3-Point Seatbelts
- Sway Bar Removal
Completed Mods:
Rear window switch in cargo area:
I did this mod almost immediately after I bought my truck. Every other thread I've seen on this mod has been done a different way than I did it. Apparently, all the others found it easier to tap into the the wires in the tailgate for the new switch and then run the wires from the tailgate to the switch. That seemed harder to me. I found a wiring diagrams online, one for the switch and one for the wiring harness, and tapped into the main wiring harness right inside the paneling. I only had to use 1' of wire for each wire and that gave me plenty of slack. The switch is constant hot and works perfectly. In time, I plan to tap into a wire that runs off the dimmer when the headlights are on and run it to the switch so that the switch will illuminate with the the rest of the lights. I also plan on trimming down a bit of the paneling behind the edges of the switch so that it can be a bit recessed and flush like the rest. Here is a link to a post with more explanation.
Mods in progress:
Pioneer headunit and VR3 speakers:
Got a nice Pioneer HU for Chrismas and 2 of my VR3 3-way speakers. I got the other 2 on my own. My truck previously had an aftermarket system that was taken out, so the wiring under the dash is a little messed up. I'm going to find the constant hot and the switched hot, and then run my own wires for the speakers. Since the speakers are 6.5" and I have full-window doors, the front speakers will need to be mounted to the doors in shallow speaker boxes where the map holders are. For the time being, the rear speakers will also be placed in some speaker boxes. The head unit comes with a special wire for iPods that plug into the back of it. I'm going to run the iPod receiver end through a hole in my console.
More on the mod: https://www.yotatech.com/51364105-post7.html
Mods to come:
Extra cab light in rear:
This is a mod I'm anxious to do. This mod and the next go together, but they will be done individually and can work independently. Have you ever noticed that when you get in to your truck at night, there isn't much light in the rear? Or if you need to get something out of the back, you can't see, even with the front door open to activate the cab light? This is where this mod comes in. I'm going to install a stock cab light the the rear wiper housing and and tap its wires into those of the stock cab light. Now, there will be a light in the rear when you open the door.
Door light switch for tailgate:
But what happens now when you want to get something out of the back of the truck when it's dark. You have the light back there now, but you still have to open a front door to activate the light and then close it once done. So, my solution is to take a door light button and install it in the back for the tailgate. And once again, wire it to one of the other door light buttons. Now, you can go and drop the tailgate, and automatically have light.
Hot rear window switch:
It kinda sucks when you go to your truck to get something out of the back and realize that you left your keys upstairs in your work clothes that are now put away for the night. The tailgate switch requires the key and the switch in the console requires that the ignition be switched on. So, I'm going to snip the switched hot wire to the window switch and tap in into the constant hot for the clock.
KC off road lights:
I was just given these really nice KC lights for my birthday from my uncle. I'm not sure yet how they are going to be mounted, but I do know how they are going to be wired. The lights come with their own switch that you must mount inside your vehicle. But as stated above, I like everything to look as stock as possible. On the console, there are three switches: rear wiper, rear window, and rear window lock. I want to use a defroster switch as the switch for my lights. Also, I find that rear window switch completely redundant. All it does in lock the rear window. I could go into detail about how pointless that is and why, but I'm sure you could figure it out for yourself. So, I'm going to hide that switch under the console and mount my KC's for light switch in its position.
Last edited by B4Runner; 02-23-2011 at 12:20 AM.
 02-03-2010, 06:00 PM
#3
Contributing Member
hey man , here is a picture of the light i installed . Its always hot and has a switch on it.Its really bright , i picked it up at kragen auto parts .
can simplify some of your light mods.
can simplify some of your light mods.
02-03-2010, 06:12 PM
#4
Registered User
Thread Starter
thanks rma! the light looks great! but for my wiring, i actually want to do this just for fun bc i love to mess with electric stuff. and this is a simple, creative, and effective way for me to do so. thanks for the advice tho!
02-03-2010, 06:16 PM
#5
Registered User
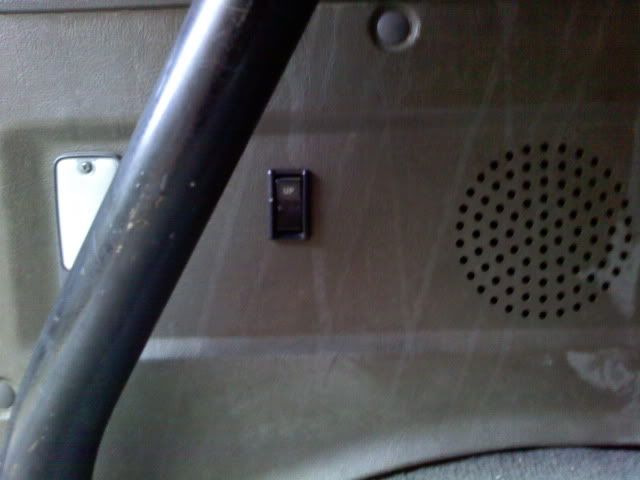
I'm also putting a light in the wiper housing in the rear cargo area. It's a factory cargo light but I plan on an LED bulb or conversion. Next to that, also in the housing, is going to be my extra rear window switch. When I go camping I sleep back there and it's a pain to get the window down in the mornings.
02-03-2010, 06:23 PM
#6
Registered User
Join Date: Oct 2008
Location: Fort Campbell, KY
Posts: 76
Likes: 0
Received 0 Likes
on
0 Posts
Excellent ideas! I'm kind of a idiot when it comes to electrical stuff though. I would love to do some of these mods though. A moron-proof write-up for any of them would be awesome, if you're willing.
02-12-2010, 09:53 PM
#7
Registered User
Thread Starter
Well I got a bit further on my stereo system, and got a new mod done.
Mods in progress:
Pioneer headunit and VR3 speakers:
I got my rear speaker wires in today. Ran them on the passanger side. You cant even see them at all, except for under the rear seats. For the left speaker, I ran the wire under the little bit of carpet that tucks under the seats. The wires come up from the carpet at the role bar. I have about a foot of wire for each speaker. And very soon, I'm going to snip the wires and at little plugs so they can be disconnected. The reason for this is because I'm going to make removable 2-yard extentions so they can be taken out through a window in the shell and set on top of the truck if I want to listen to music outside while camping or something. My thanks go out to Dark_Fairytales for this fabulous idea. I also ran my iPod cable today. It fits nicely in the console with the iPod and gives plenty of slack to comfortably navigate the iPod while driving. And if the iPod is enclosed in the console, you would know it was there. The wire is ran under the console and shifter bezel.
Completed Mods:
Console switches:
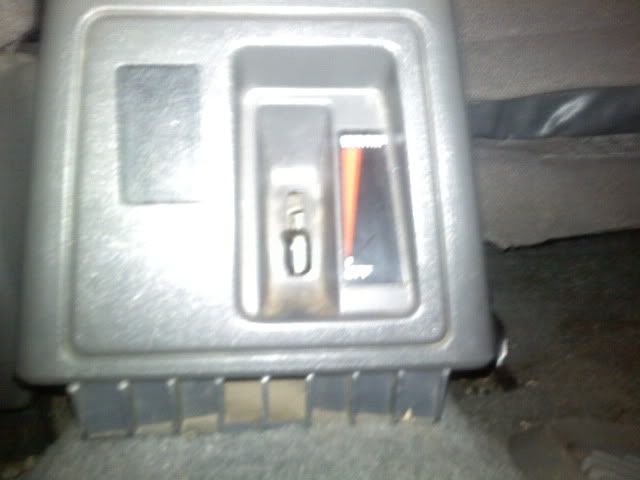
So, I'm pretty sure all agree that the rear window lock switch is absolutely redundant and pointless; all it does is lock the window switch right next to it. How pointless. And second, what about the rear heater switch? It's on the very back of the console at foot level so that the passengers can control it. Well, first, they are never going to know it;s there. It took me a while to even realize it. And second, what if there's no one in back to turn it on for me and I want it on to heat up my truck while not having to subject my face to a heat blast from the main heater. So, I killed to birds with one stone. I'd love to have taken the rear window switch lock out, but it needs to be plugged in for the rear window switch itself to work. So, no biggie, I just made sure the lock was off and hit it under the console. I then moved the rear heater switch up into one of the three slots in the main part of the console. I stole a switch hole tab from my 1986 Corolla to fill in where the switch was. I will eventually get a grey tab so that it matches. It's not that big of a deal though, no one will notice it since it's at foot level.
Mods in progress:
Pioneer headunit and VR3 speakers:
I got my rear speaker wires in today. Ran them on the passanger side. You cant even see them at all, except for under the rear seats. For the left speaker, I ran the wire under the little bit of carpet that tucks under the seats. The wires come up from the carpet at the role bar. I have about a foot of wire for each speaker. And very soon, I'm going to snip the wires and at little plugs so they can be disconnected. The reason for this is because I'm going to make removable 2-yard extentions so they can be taken out through a window in the shell and set on top of the truck if I want to listen to music outside while camping or something. My thanks go out to Dark_Fairytales for this fabulous idea. I also ran my iPod cable today. It fits nicely in the console with the iPod and gives plenty of slack to comfortably navigate the iPod while driving. And if the iPod is enclosed in the console, you would know it was there. The wire is ran under the console and shifter bezel.
Completed Mods:
Console switches:
So, I'm pretty sure all agree that the rear window lock switch is absolutely redundant and pointless; all it does is lock the window switch right next to it. How pointless. And second, what about the rear heater switch? It's on the very back of the console at foot level so that the passengers can control it. Well, first, they are never going to know it;s there. It took me a while to even realize it. And second, what if there's no one in back to turn it on for me and I want it on to heat up my truck while not having to subject my face to a heat blast from the main heater. So, I killed to birds with one stone. I'd love to have taken the rear window switch lock out, but it needs to be plugged in for the rear window switch itself to work. So, no biggie, I just made sure the lock was off and hit it under the console. I then moved the rear heater switch up into one of the three slots in the main part of the console. I stole a switch hole tab from my 1986 Corolla to fill in where the switch was. I will eventually get a grey tab so that it matches. It's not that big of a deal though, no one will notice it since it's at foot level.
Last edited by B4Runner; 02-12-2010 at 09:54 PM.
Trending Topics
02-18-2010, 08:19 AM
#10
Registered User
Thread Starter
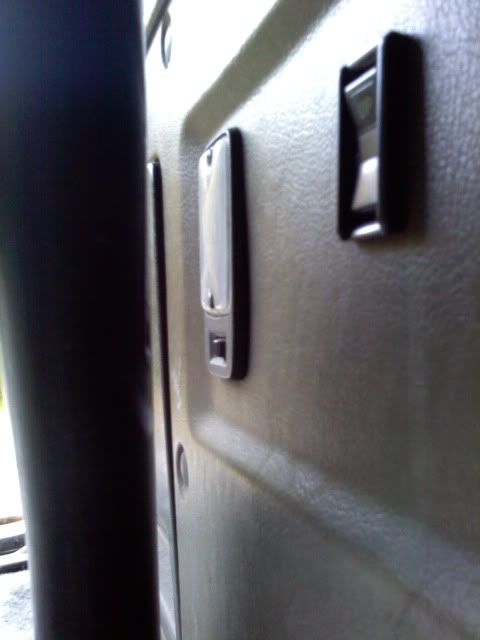
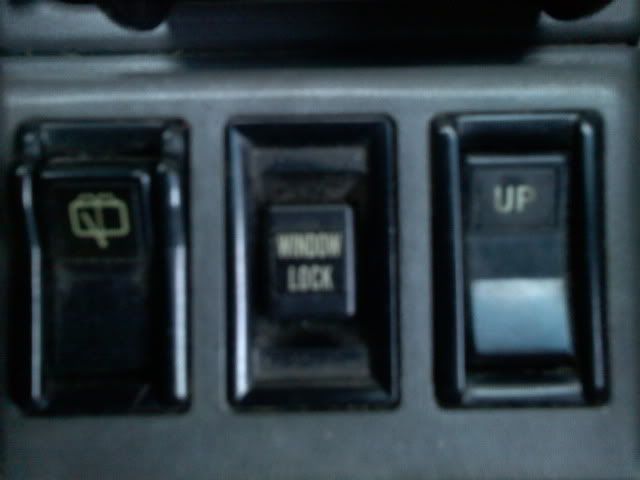
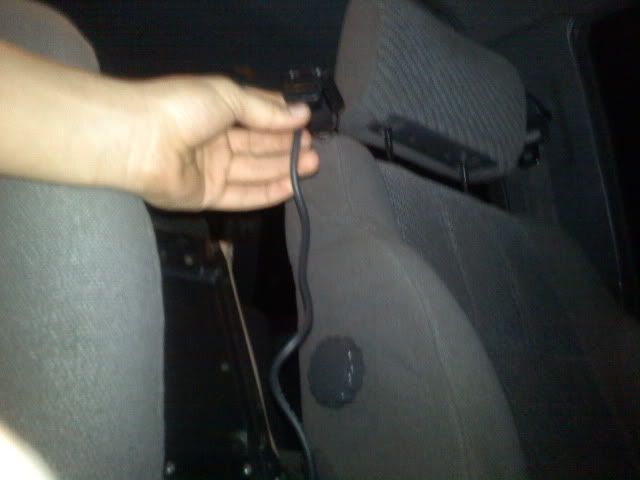
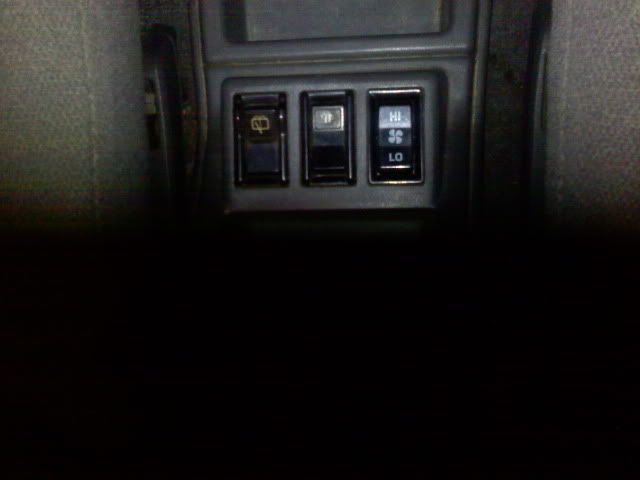
So I moved my switches around yet again. I also got my rear window switch in the front to be constantly hot, so no more having to rember keys before putting something into the truck or taking something out. Turns out that the up/down wires for the switch in its stock harness also are ignition regulated, so I had to take the hot, up, and down from the rear, and using the stock harness only for illumination.

Instead of just having more wires tapped into wires i added for the window switch in back, I remade my harness. The picture below shows what I like to call wishbones.
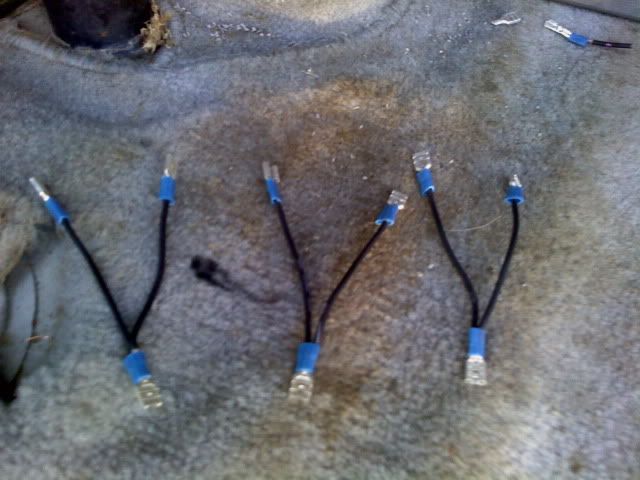
They slpit each of the hot, up, and down to go to both window switches.
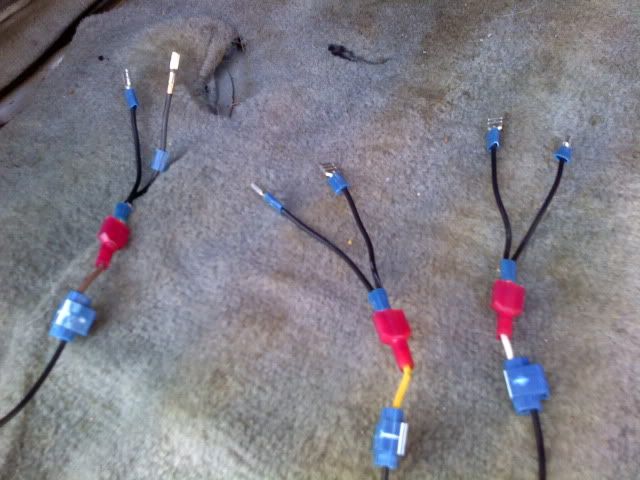
I'm saving the slot in the middle for a defroster switch like the one below for my off road lights. I'll probably relocate my rear wiper switch to the radio bezel.
And you might think, why don't I just leave the wiper switch there and put the defog/light switch in the radio bezel? It's because I'm OCD. Look at the wiper switch. See how edges of the rear wiper switch sits above the level of the console, where as the two on either side of perfectly sink into the hole. Well, i can't stand how the wiper switch does, so it has to go.

And my new defroster switch, when i get it, will also sink nicely in.
Instead of just having more wires tapped into wires i added for the window switch in back, I remade my harness. The picture below shows what I like to call wishbones.
They slpit each of the hot, up, and down to go to both window switches.
I'm saving the slot in the middle for a defroster switch like the one below for my off road lights. I'll probably relocate my rear wiper switch to the radio bezel.
And you might think, why don't I just leave the wiper switch there and put the defog/light switch in the radio bezel? It's because I'm OCD. Look at the wiper switch. See how edges of the rear wiper switch sits above the level of the console, where as the two on either side of perfectly sink into the hole. Well, i can't stand how the wiper switch does, so it has to go.
And my new defroster switch, when i get it, will also sink nicely in.
02-18-2010, 01:16 PM
#12
Registered User
Thread Starter
02-18-2010, 08:52 PM
#14
Registered User
Thread Starter
03-17-2010, 09:32 PM
#16
Registered User
Thread Starter
I'm finally back to update. I've gotten several things done. I would have updated a few days earlier, but I had an accident that prevented me from using my right hand, and I wasn't about to type all this with one hand.
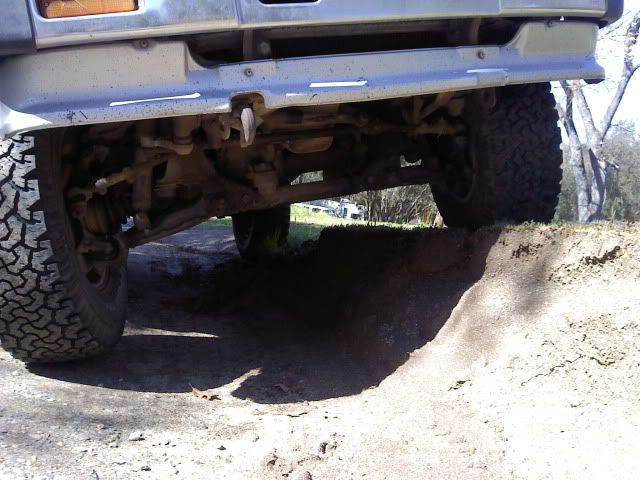
Friday, I got my truck onto the rack at school, during a long period, and, along with bleeding my brakes, removed the sway bar. I love the ride and performance. It flexes much better and I still go around 45mph mountain turns at 55mph with no fear. It's awesome.
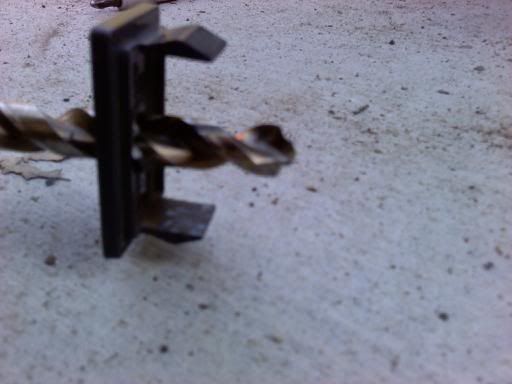
Sunday, 3-14, I got my KC lights mounted. $18.18 at True Value. Just used a couple of T-brackets for each light and hardware. I'm thinking I want to add to more to each side for more support, giving each side four brakets. As I was drilling a whole in a switch-hole tab, I drilled into my hand. Going from 1/2" up to 3/8", and as soon as the bit was all the way through, it caught like a screw, pulled my hand up and dug right into my hand. I have a nice 3/8" hole that is 1cm deep in my left hand that is in the process of healing. And since the rest of my day was killed by urgent care, I had to finish the wiring on Monday with one hand. Yes, it took a while. Ha.
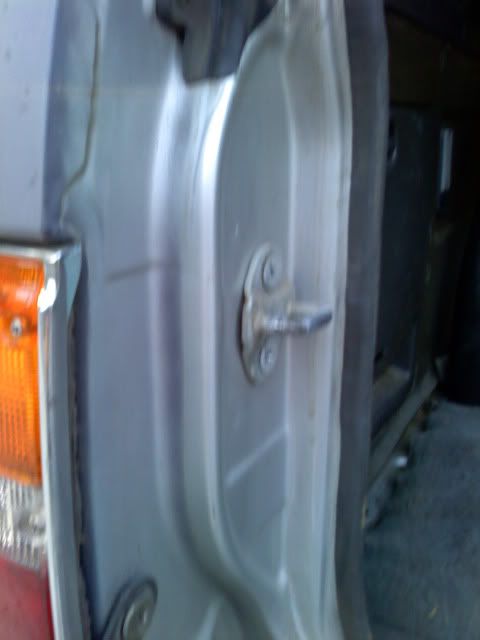
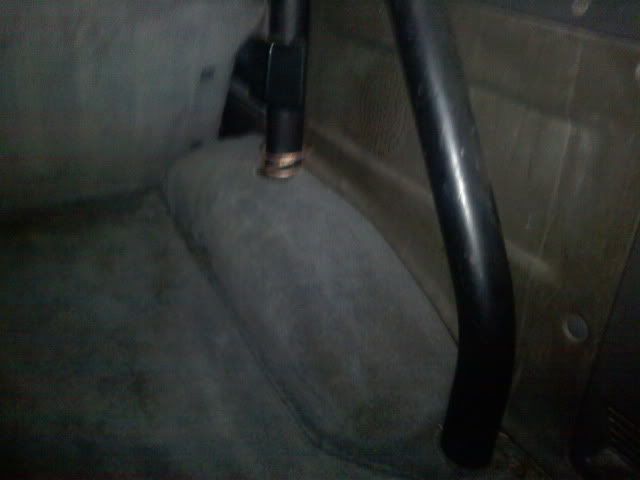
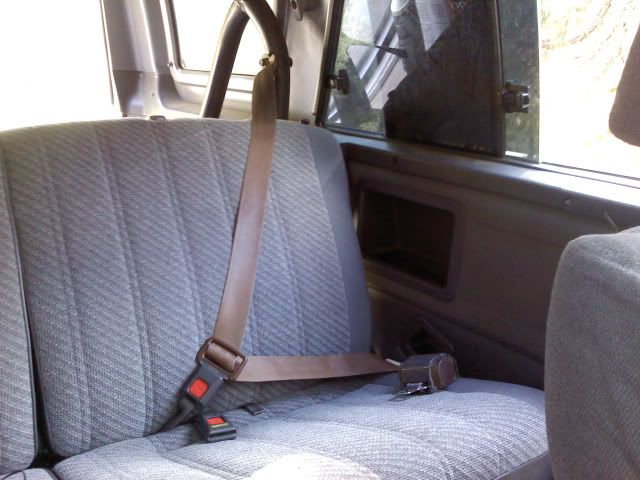
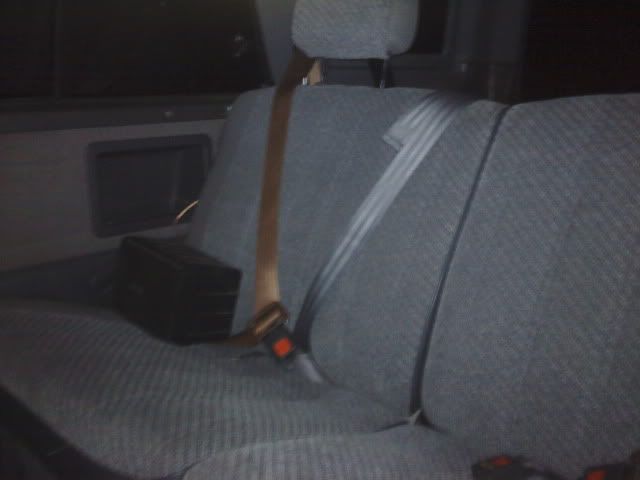
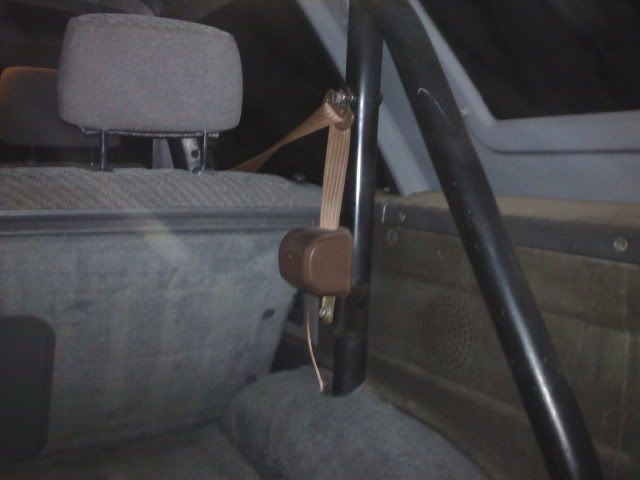
The next thing, which I did just today, was install front seatbelts in the rear seats. Huge thanks to Malteserunner for the seatbelts! It seriously took like 10 minutes max. to do the whole swap and install.
To start, here are some improved IFS flex pics:

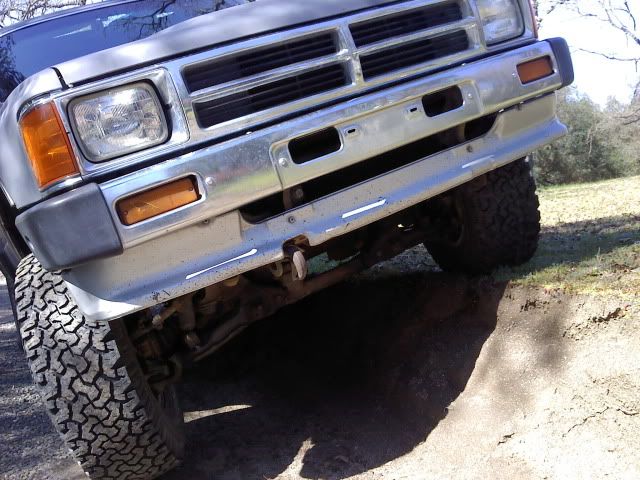
(That's my favorite flex pic. ^^)
The lights:
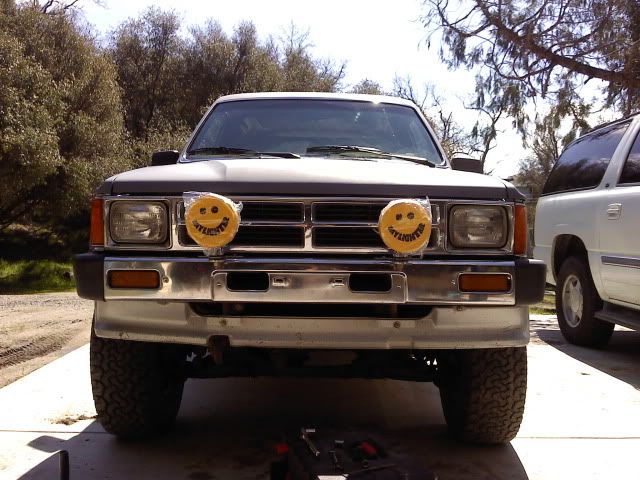
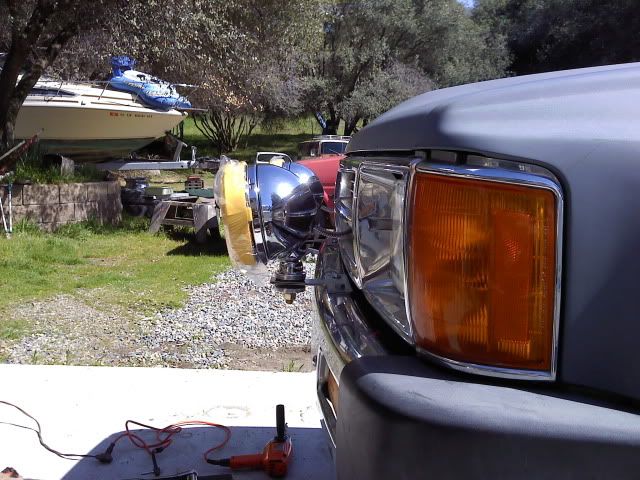

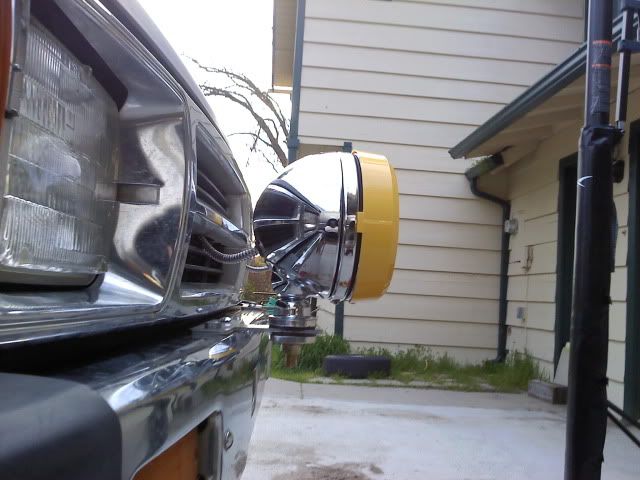
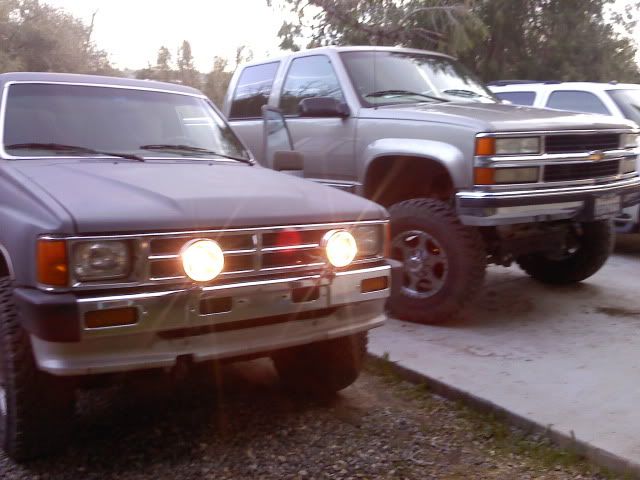
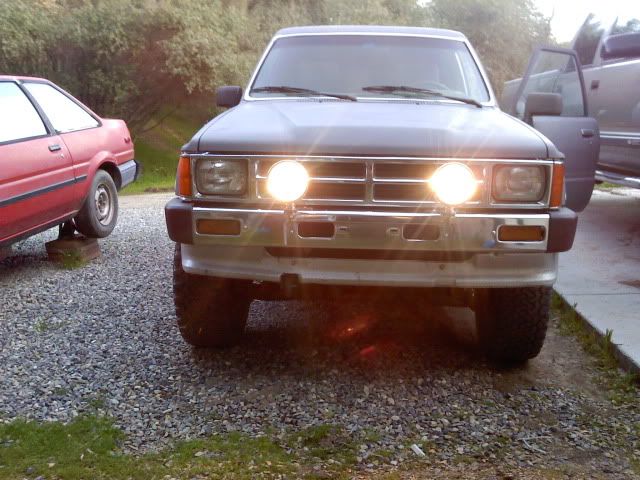
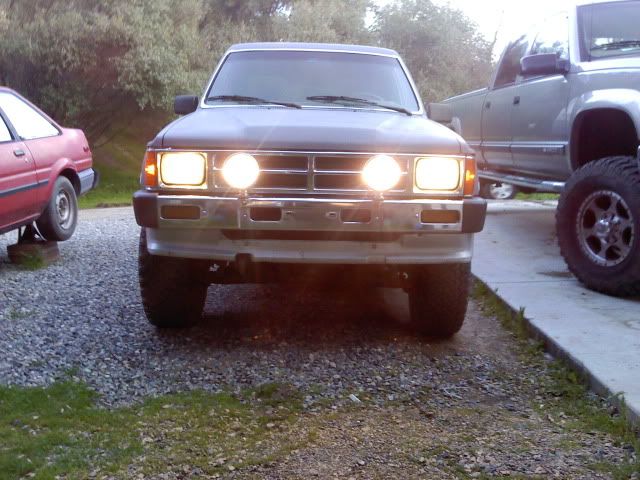
(Favorite light pic. ^^)
The wound:
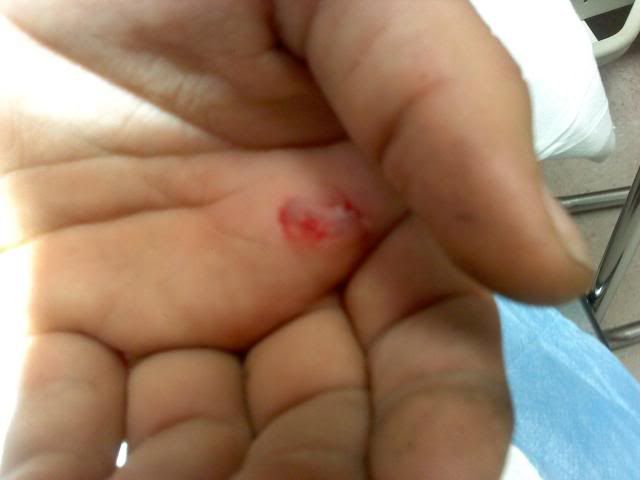
(Right after the Doc finished cleaning. Pic doesn't do justice.)


(Just to show how swolen it is after I got the bandaging off on Tuesday.)
The awesome saftyness:
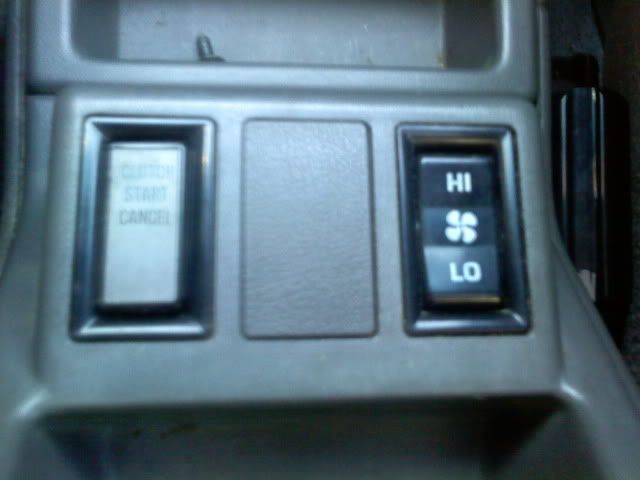
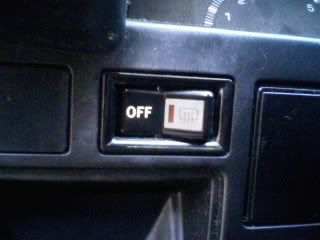
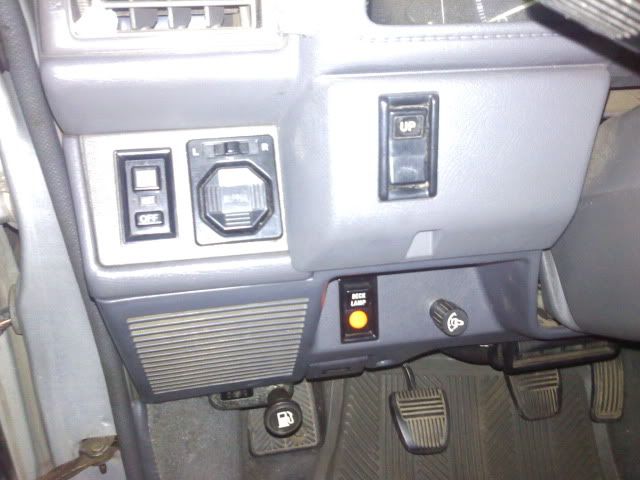
I'm also planning some more switch mods. I finally figured out how I want everything. Turns out, I don't need any kind of extra defroster switch. One was needed to control my future fog lights, but I decided that they will be constant on with the key in the "on" position. The normal defroster stays there. You already know that the rear window switch is constant hot and in the stock position of the "clutch cancel start" button. I'm going to make the deck light have constant power to its own switch, so there is no need for that switch. I'm going to put the rear wiper switch in its place. You see in the console the switch that caused my drilled hand; its temporary. As soon as the deck light switch is freed, its going to take the place of the supplied KC switch to keep a nice stock look.
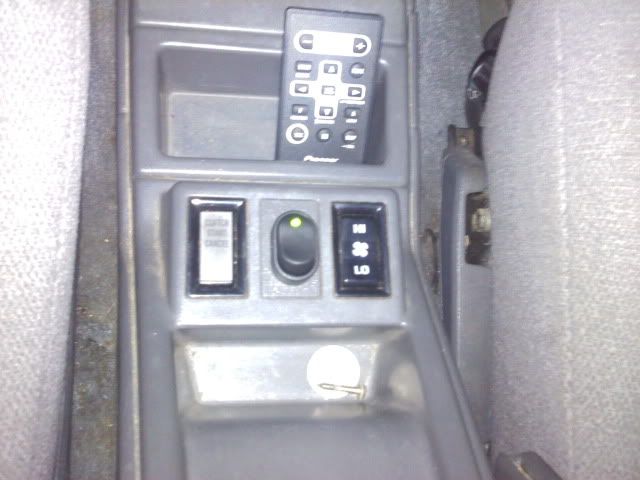
(My EnV3 sits perfectly right next to the stereo remote.)
I also want to do two more things. I saw in the "Cheap Mods" thread a really cool idea for a cupholder, which is to screw a bottle holder for a bike to the dash. Maybe I can get it right behind the left of the sterring wheel, next to the rear window switch. The only other good, flat mounting spot would be on the glove box, but its just too much of an angle.
And lastly, I had to remove my iPod from the center console. It just got WAY to hot from sitting in there after a nice drive. So, it's currently in the glove box. I'm OCD, and it is going to drive me crazy to not have anywhere to fit snugly in the glove box. Example of my OCD is why I chose to originaly have it in the center colsole and the reason why it amazes me that the stereo remote and phone fit perfectly side by side in that little tray in the console. So, I thought about the ashtray. It fits perfectly width wise, but my iPod Video is just a bit to long. So I'm probably just going to but out the back from it enough so that cable can fit though the back and have the iPod fit perfectly. Never need that stupid ashtray anyways. What better to use it for than the iPod?

I should be getting to the deck light power bypass pretty soon, therefore the KC switch too. I'm getting excited from what I've just done and what's soon to come. Let me know what you think. Thanks!
Friday, I got my truck onto the rack at school, during a long period, and, along with bleeding my brakes, removed the sway bar. I love the ride and performance. It flexes much better and I still go around 45mph mountain turns at 55mph with no fear. It's awesome.
Sunday, 3-14, I got my KC lights mounted. $18.18 at True Value. Just used a couple of T-brackets for each light and hardware. I'm thinking I want to add to more to each side for more support, giving each side four brakets. As I was drilling a whole in a switch-hole tab, I drilled into my hand. Going from 1/2" up to 3/8", and as soon as the bit was all the way through, it caught like a screw, pulled my hand up and dug right into my hand. I have a nice 3/8" hole that is 1cm deep in my left hand that is in the process of healing. And since the rest of my day was killed by urgent care, I had to finish the wiring on Monday with one hand. Yes, it took a while. Ha.
The next thing, which I did just today, was install front seatbelts in the rear seats. Huge thanks to Malteserunner for the seatbelts! It seriously took like 10 minutes max. to do the whole swap and install.
To start, here are some improved IFS flex pics:
(That's my favorite flex pic. ^^)
The lights:
(Favorite light pic. ^^)
The wound:
(Right after the Doc finished cleaning. Pic doesn't do justice.)
(Just to show how swolen it is after I got the bandaging off on Tuesday.)
The awesome saftyness:
I'm also planning some more switch mods. I finally figured out how I want everything. Turns out, I don't need any kind of extra defroster switch. One was needed to control my future fog lights, but I decided that they will be constant on with the key in the "on" position. The normal defroster stays there. You already know that the rear window switch is constant hot and in the stock position of the "clutch cancel start" button. I'm going to make the deck light have constant power to its own switch, so there is no need for that switch. I'm going to put the rear wiper switch in its place. You see in the console the switch that caused my drilled hand; its temporary. As soon as the deck light switch is freed, its going to take the place of the supplied KC switch to keep a nice stock look.
(My EnV3 sits perfectly right next to the stereo remote.)
I also want to do two more things. I saw in the "Cheap Mods" thread a really cool idea for a cupholder, which is to screw a bottle holder for a bike to the dash. Maybe I can get it right behind the left of the sterring wheel, next to the rear window switch. The only other good, flat mounting spot would be on the glove box, but its just too much of an angle.
And lastly, I had to remove my iPod from the center console. It just got WAY to hot from sitting in there after a nice drive. So, it's currently in the glove box. I'm OCD, and it is going to drive me crazy to not have anywhere to fit snugly in the glove box. Example of my OCD is why I chose to originaly have it in the center colsole and the reason why it amazes me that the stereo remote and phone fit perfectly side by side in that little tray in the console. So, I thought about the ashtray. It fits perfectly width wise, but my iPod Video is just a bit to long. So I'm probably just going to but out the back from it enough so that cable can fit though the back and have the iPod fit perfectly. Never need that stupid ashtray anyways. What better to use it for than the iPod?
I should be getting to the deck light power bypass pretty soon, therefore the KC switch too. I'm getting excited from what I've just done and what's soon to come. Let me know what you think. Thanks!

 03-18-2010, 02:33 PM
#19
Registered User
Thread Starter
 I'm going to have passangers this weekend to give them their first official use in my truck.


