'94 Pickup extra 22RE w/ 5spd swap then maybe Diesel
 09-08-2016, 07:00 PM
#1
Registered User
Thread Starter
'94 Pickup extra 22RE w/ 5spd swap then maybe Diesel
Hi YotaTech! Excited to get more involved in this community which I have admired for a long time.
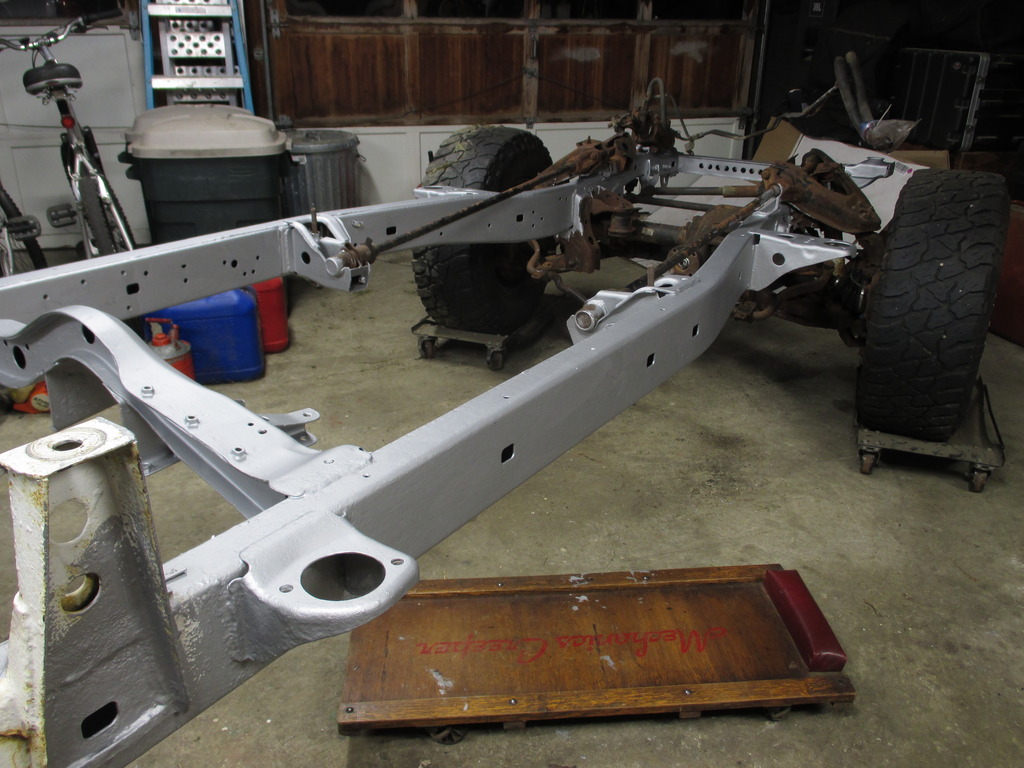
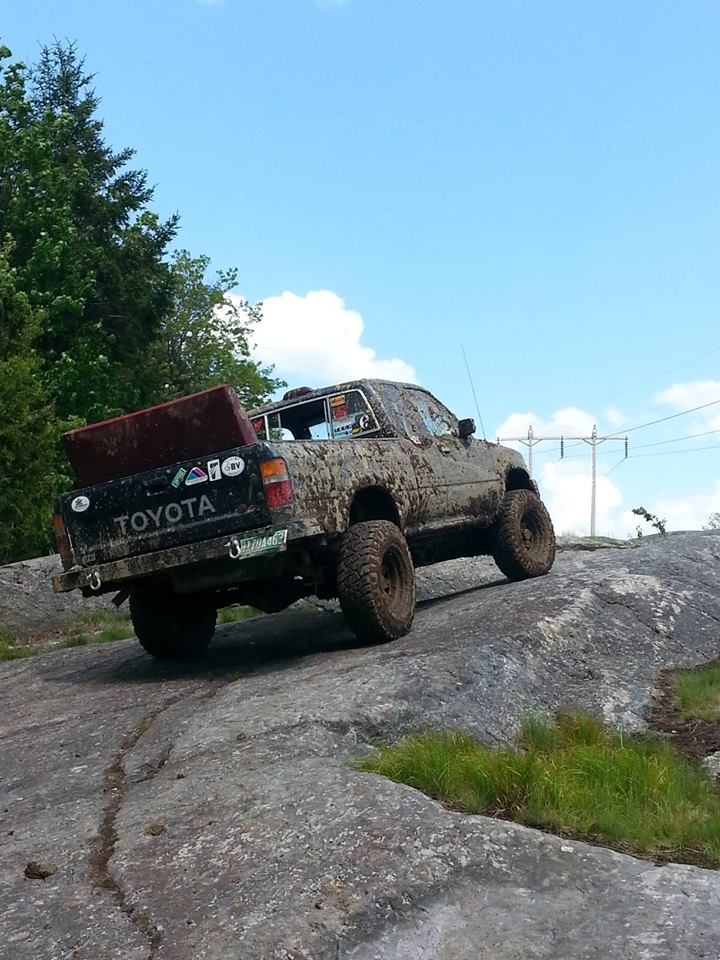
Backstory: bought this truck w/ 60k (I'm the second owner!) a few years ago (joined YotaTech the day I bought it ) and of course it's been fantastic. '94 Extra 3.slow Auto 4x4. Bed was rusted pretty bad did a temp fiberglass fix for a while then went to a wood flat bed. When I made the flatbed I sandblasted the frame and axle and put on a couple coats of mastercoat silver and white enamel + OME 2.25 lift HD leaf set. Truck has 100k now.
The Plan: 22re swap w/ 5sp from '95 doner w/ 160k runs nice shifts nice. Sticking with the 4.556 axles. 2" BJ spacers to level the frame with the OMEs. 2" body lift to clear high rock sliders, make cleaning the truck easier (top of frame and stuff) and to clear 35s. PowerTrax gear locker for the rear. Home fab bumper w/ hitch receiver.
Reason: #1 Automatics are the bane of humanity. #2 22RE means hopefully less problems as the miles tick away and I'm also considering a diesel swap and the 22RE should be easier to pop out.
Future Plans: SAS 3 link front 4 link rear with maybe a diesel swap
The Begining!
Spent a couple hours here and there breakin 'er down to the base elements just cuz that's how I start on things.
Nice body:
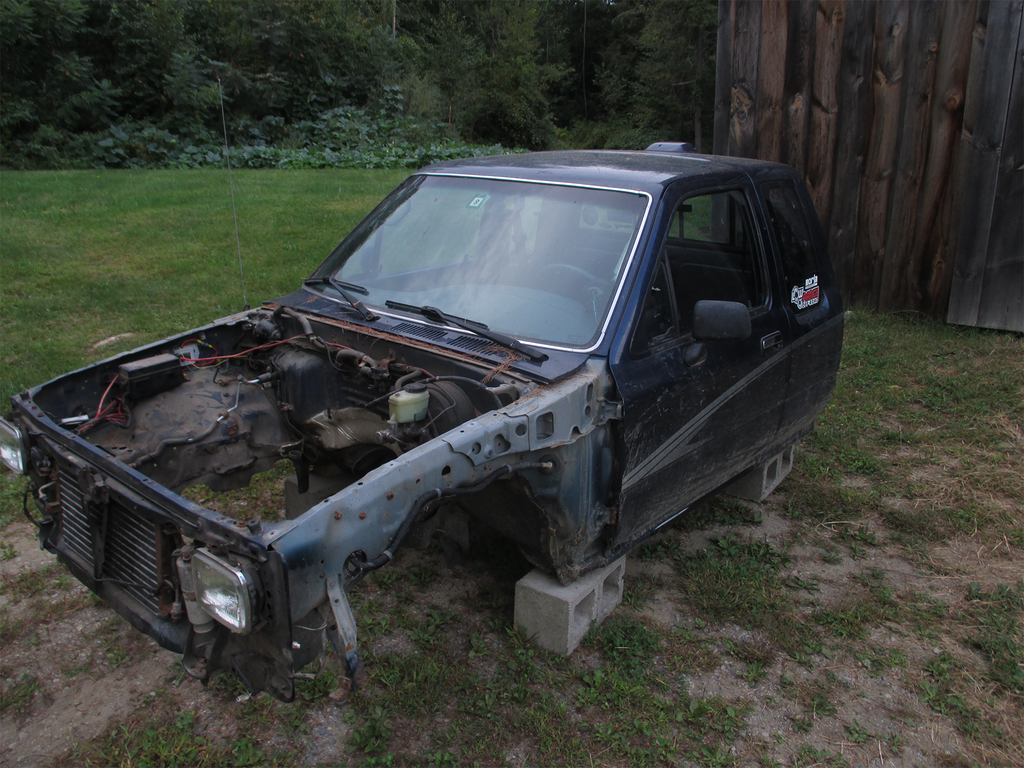
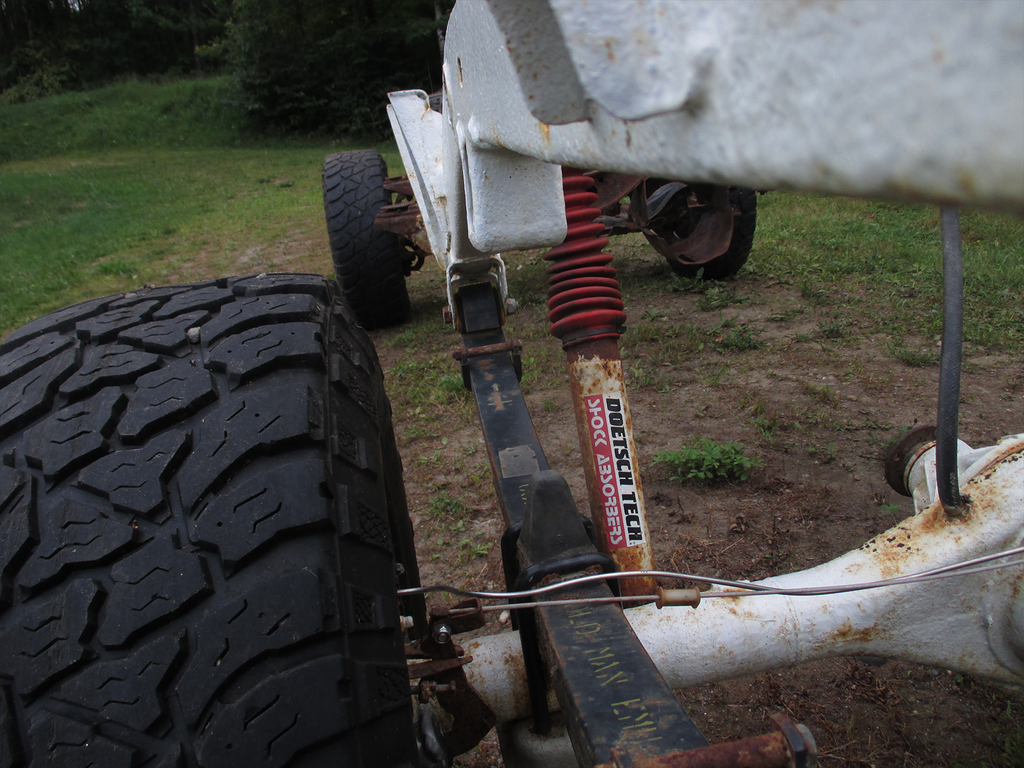
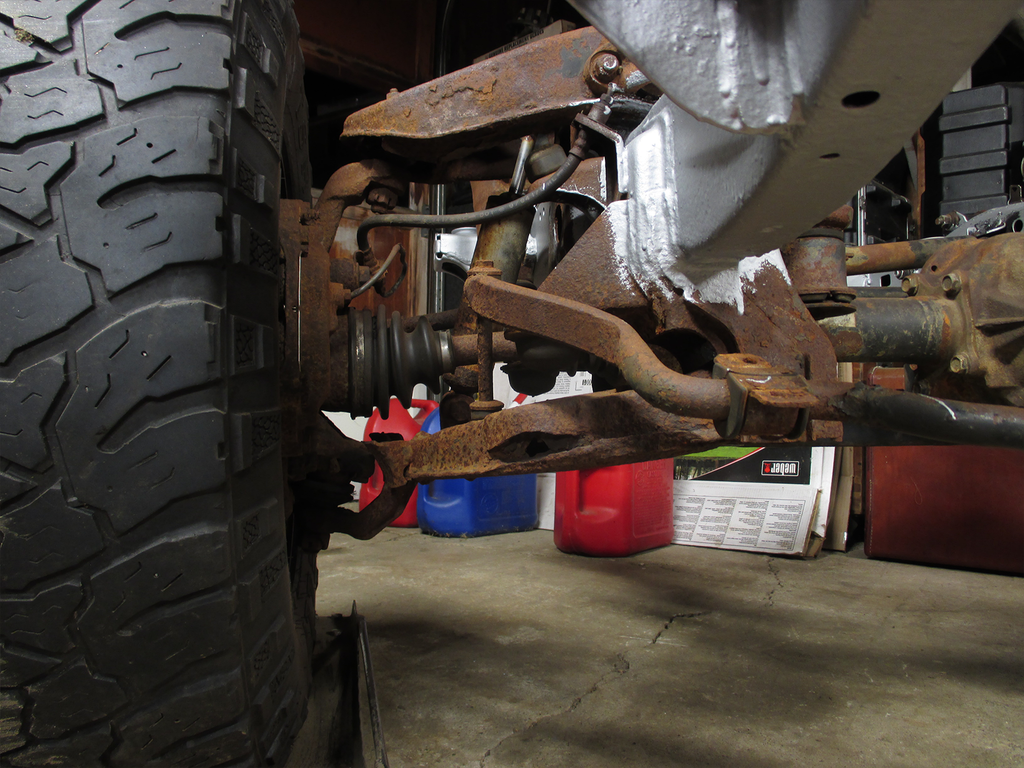
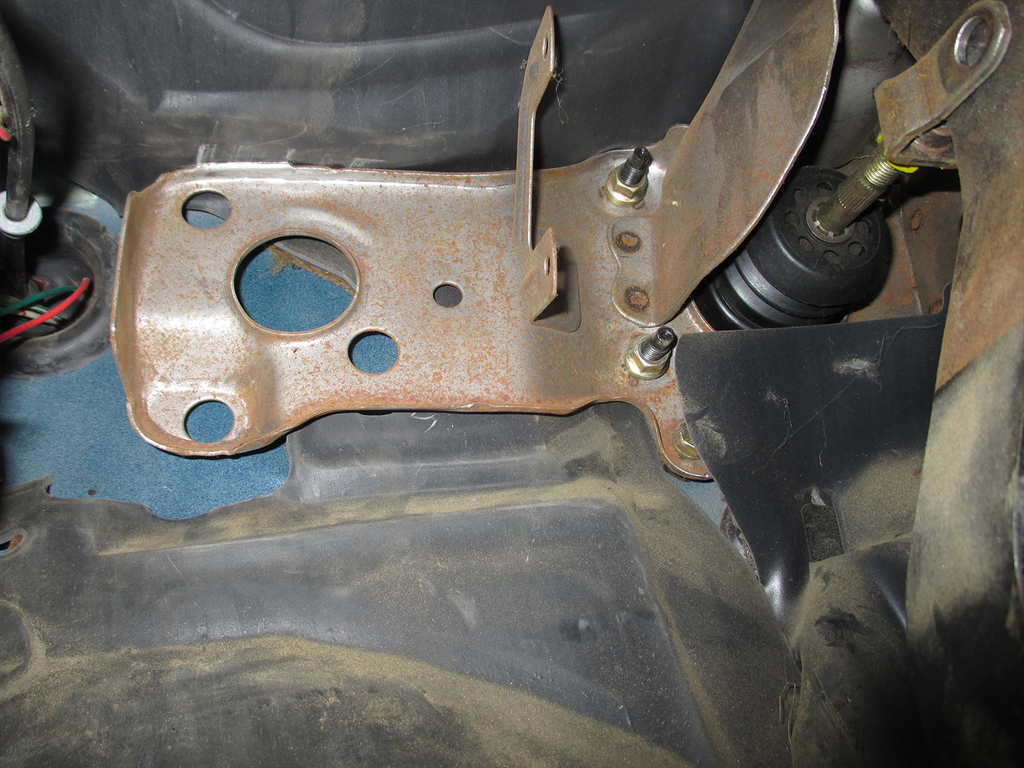
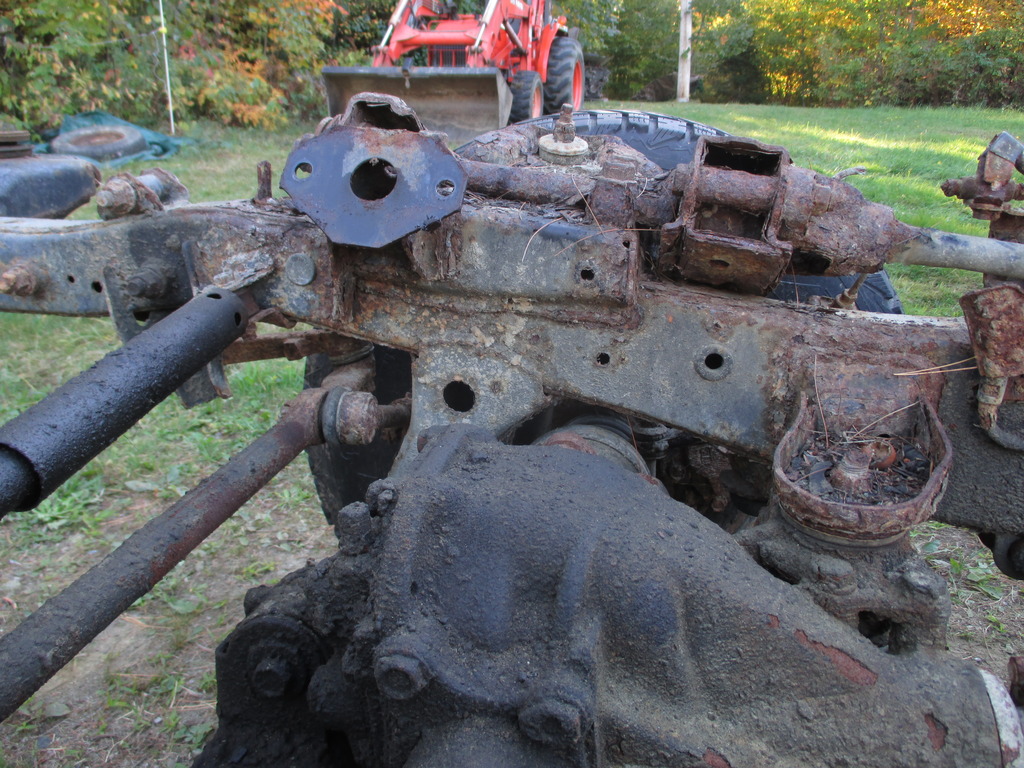
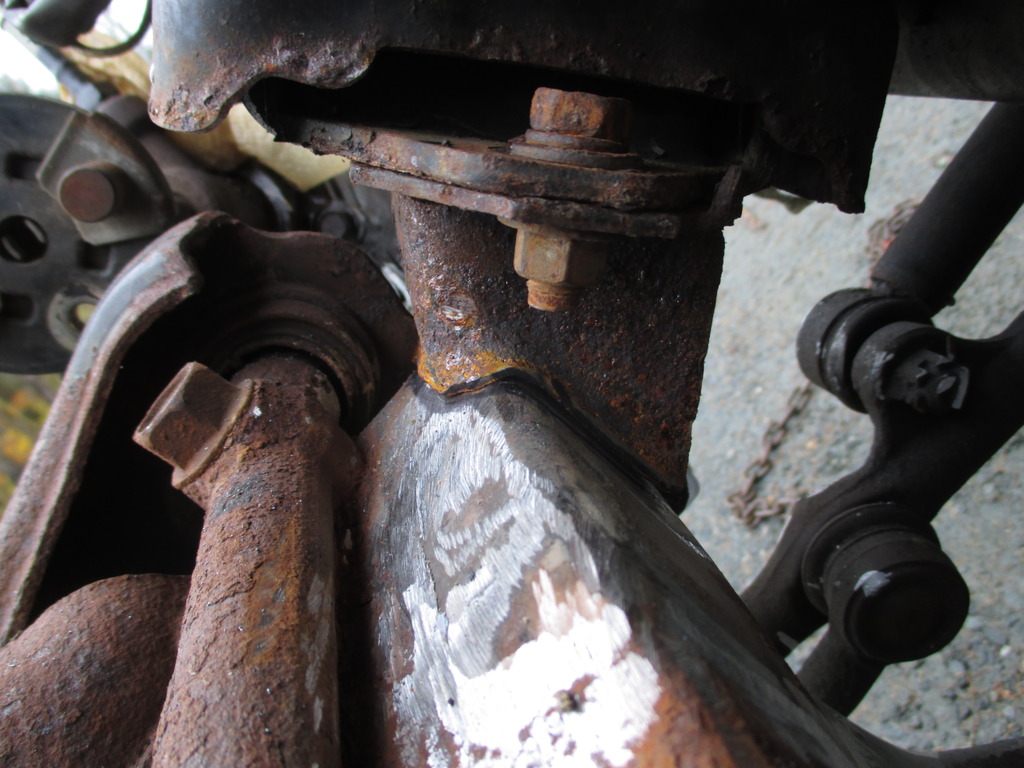
Undercarriage is decent but could use a little how's your father:
Well cared for rear frame:

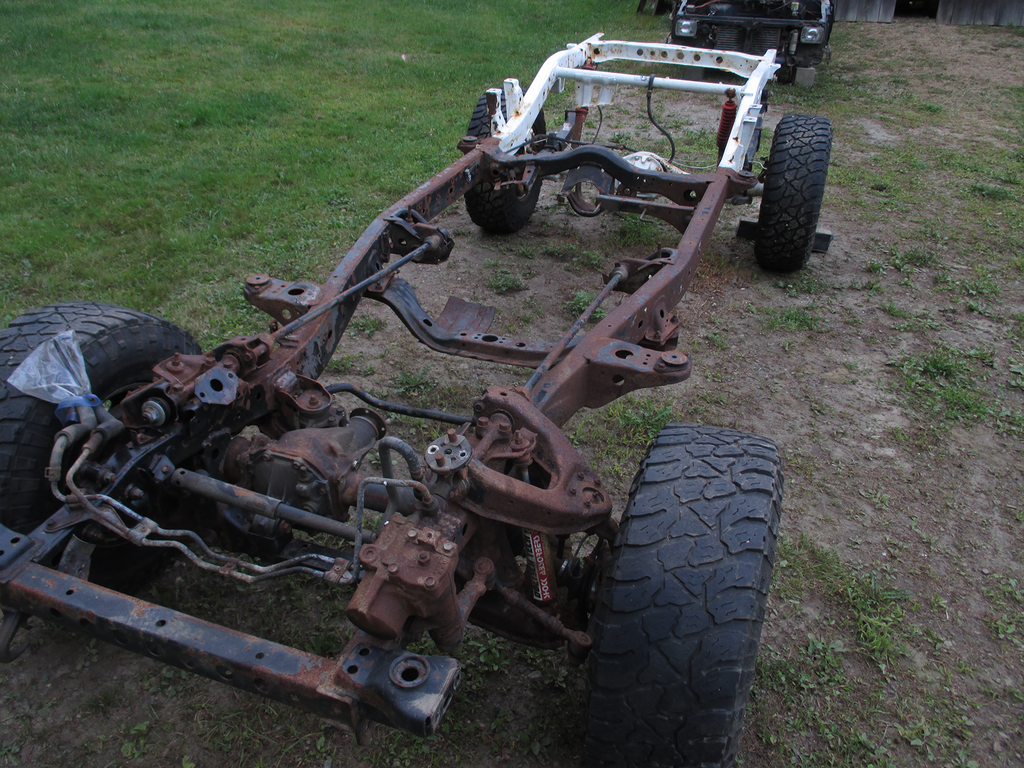
Cancer frame donor rig (nice shape 160k paid $500 no unnatural mods except the camo ):
):

Future speed wagon peeking out from behind :
:

Backstory: bought this truck w/ 60k (I'm the second owner!) a few years ago (joined YotaTech the day I bought it
) and of course it's been fantastic. '94 Extra 3.slow Auto 4x4. Bed was rusted pretty bad did a temp fiberglass fix for a while then went to a wood flat bed. When I made the flatbed I sandblasted the frame and axle and put on a couple coats of mastercoat silver and white enamel + OME 2.25 lift HD leaf set. Truck has 100k now.The Plan: 22re swap w/ 5sp from '95 doner w/ 160k runs nice shifts nice. Sticking with the 4.556 axles. 2" BJ spacers to level the frame with the OMEs. 2" body lift to clear high rock sliders, make cleaning the truck easier (top of frame and stuff) and to clear 35s. PowerTrax gear locker for the rear. Home fab bumper w/ hitch receiver.
Reason: #1 Automatics are the bane of humanity. #2 22RE means hopefully less problems as the miles tick away and I'm also considering a diesel swap and the 22RE should be easier to pop out.
Future Plans: SAS 3 link front 4 link rear with maybe a diesel swap
The Begining!
Spent a couple hours here and there breakin 'er down to the base elements just cuz that's how I start on things.
Nice body:

Undercarriage is decent but could use a little how's your father:

Well cared for rear frame:


Cancer frame donor rig (nice shape 160k paid $500 no unnatural mods except the camo
):
Future speed wagon peeking out from behind
:
 09-14-2016, 07:11 PM
#3
Registered User
Thread Starter
Got the frame sand blasted. Took about 6 hrs with our little blaster but it came out great:
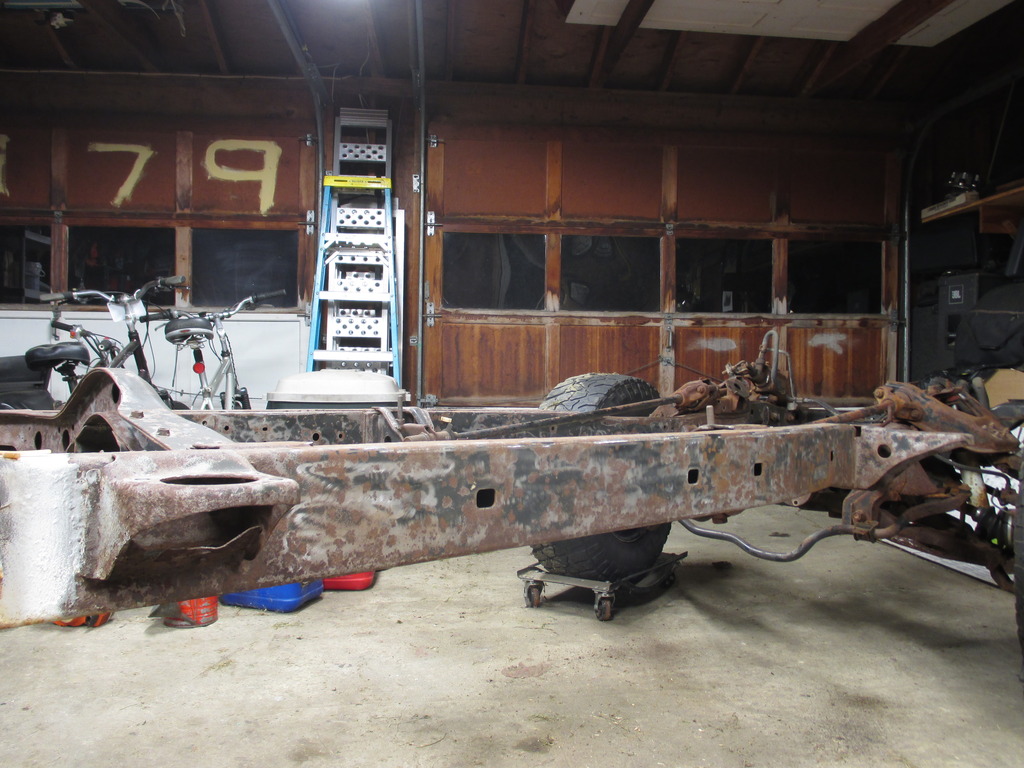
This stuff is incredible. The way it coats sharp edges is impressive and it performed very well through a salty winter on the back half of my frame.
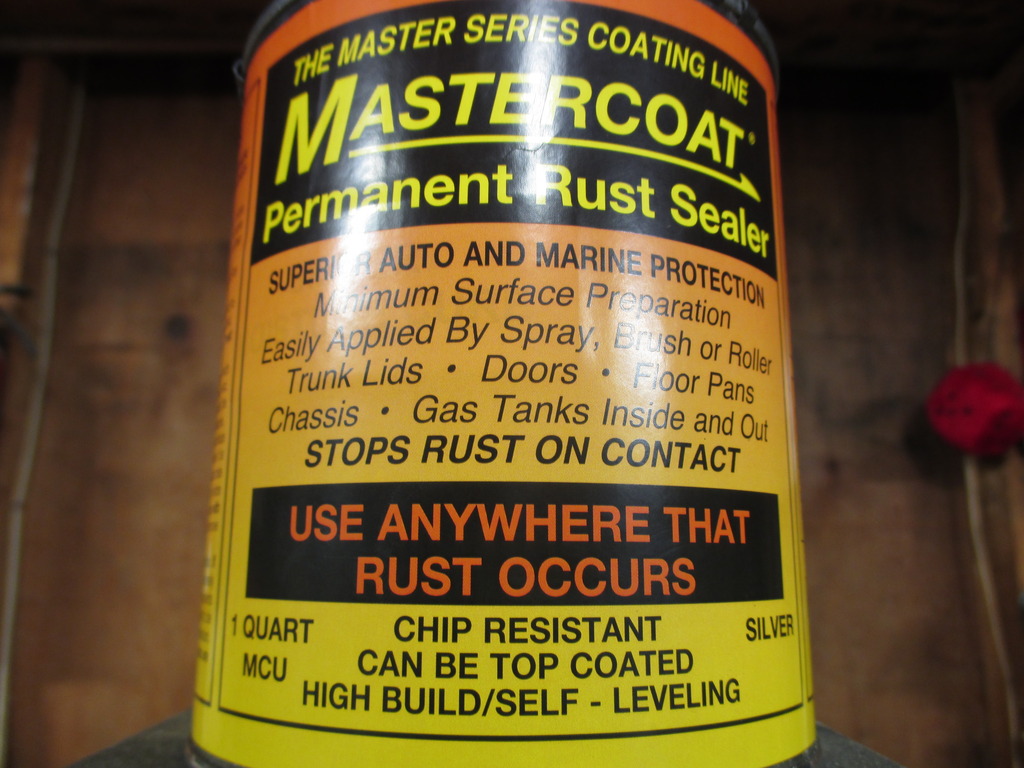
Two coats of Mastercoat. Next up: white tractor enamel. I like white because it makes rust spots easy to see so I can fix them before they get out of control. I'm not going to bother painting the IFS because it'll get cut off next year and it's really not it good enough shape to make it worth painting anyway.
 09-15-2016, 12:34 PM
#4
09-15-2016, 03:49 PM
#5
Registered User
Thread Starter
Thanks Terry! Yea I'm looking forward to fixing a bunch of little things. Hopefully I'll end up with a real nice rig! I'll be designing and machining some parts so hopefully it's an interesting thread too.
09-20-2016, 08:02 PM
#6
Registered User
Thread Starter
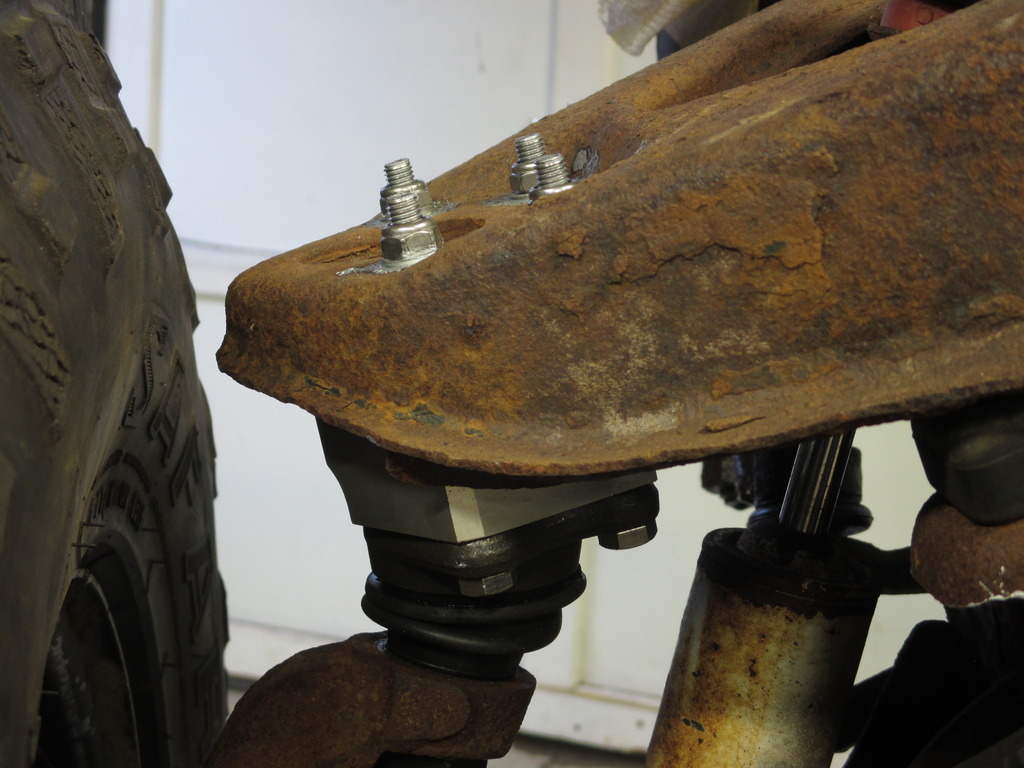
I'm going to start working on BJ spacers for the upper control arm. I've seen the spacers people commonly use and since I'm machining my own anyway I thought I'd see if there is any better way to design them.
I looked around on the internet and here a little bit but couldn't find the exact factory control arm geometry so I just took some rough measurements which should be enough to help me figure out if making fancy BJ spacers is worth the effort.
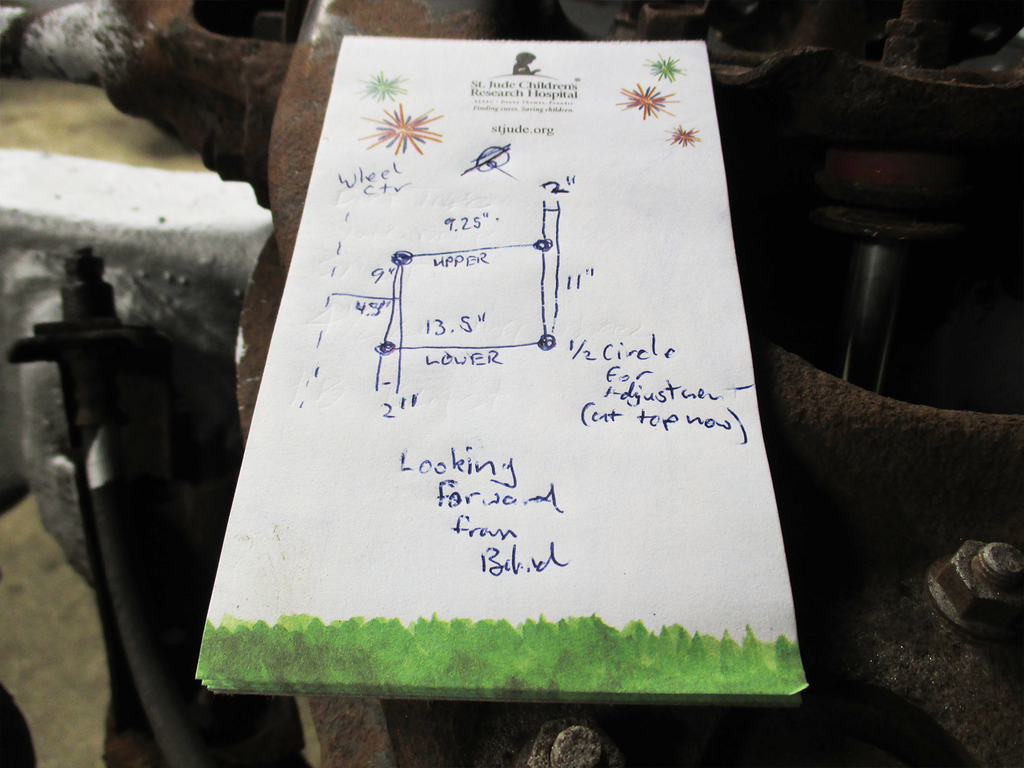
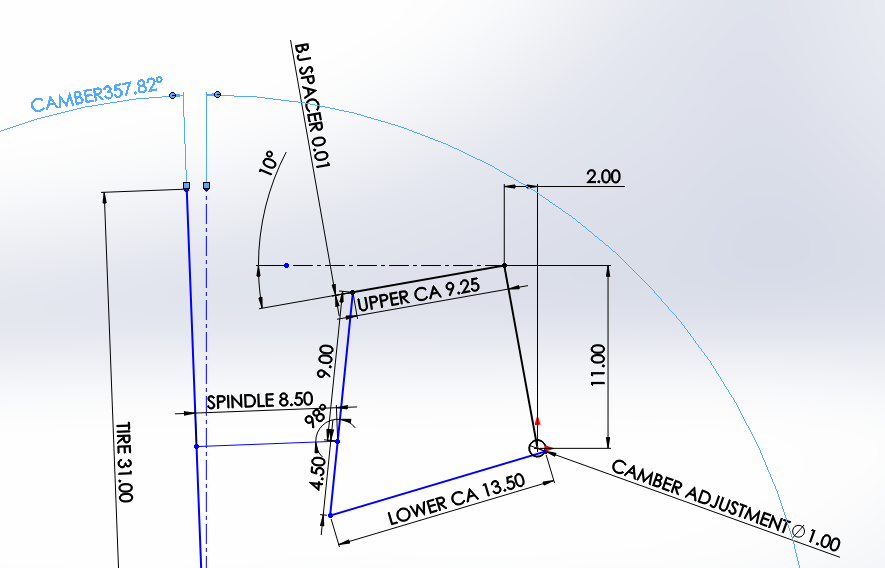
I don't know anything about camber and control arm geometry but here's what I'm figuring out. I modeled the measurements to see whats up with this set up and how it works to adjust camber and it seems pretty straight forward. The camber adjuster is that little circle on the lower control arm. I measured that it moves the pivot point in about an inch diameter circle. Here's how the camber adjustment works at a set torsion bar angle:
Moving the adjuster away from the truck makes negative camber:
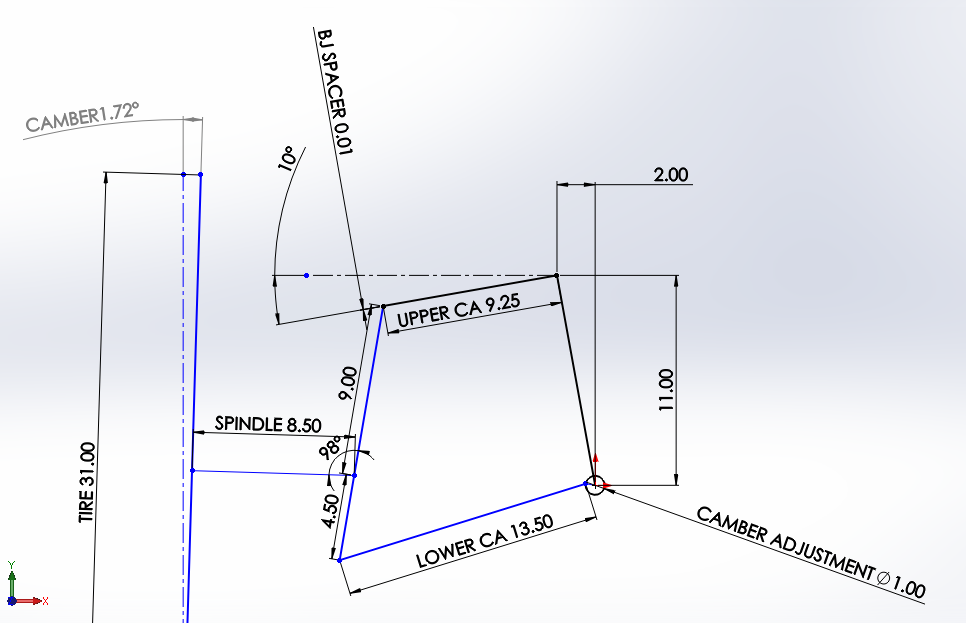
Moving the adjuster towards the truck makes positive camber:
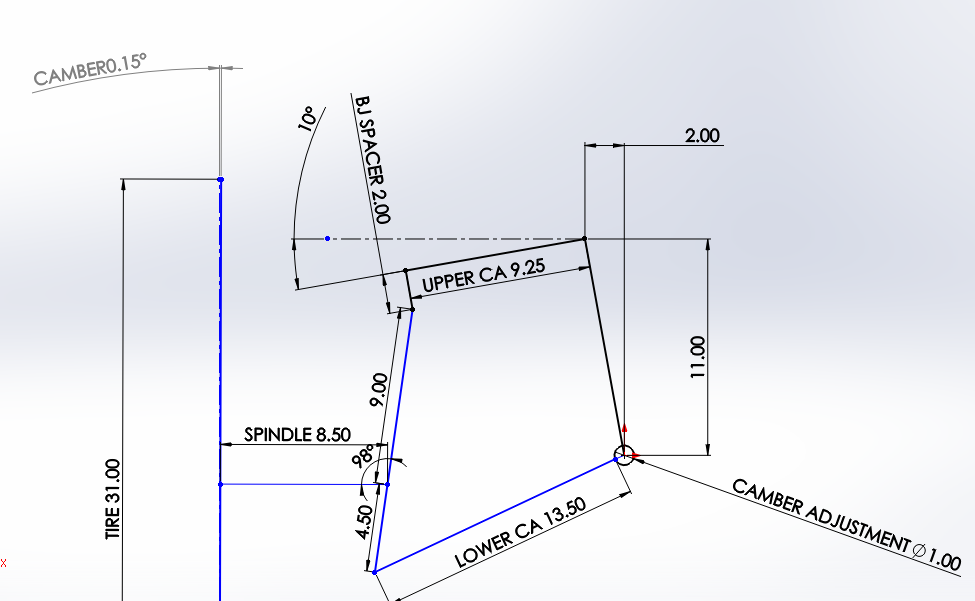
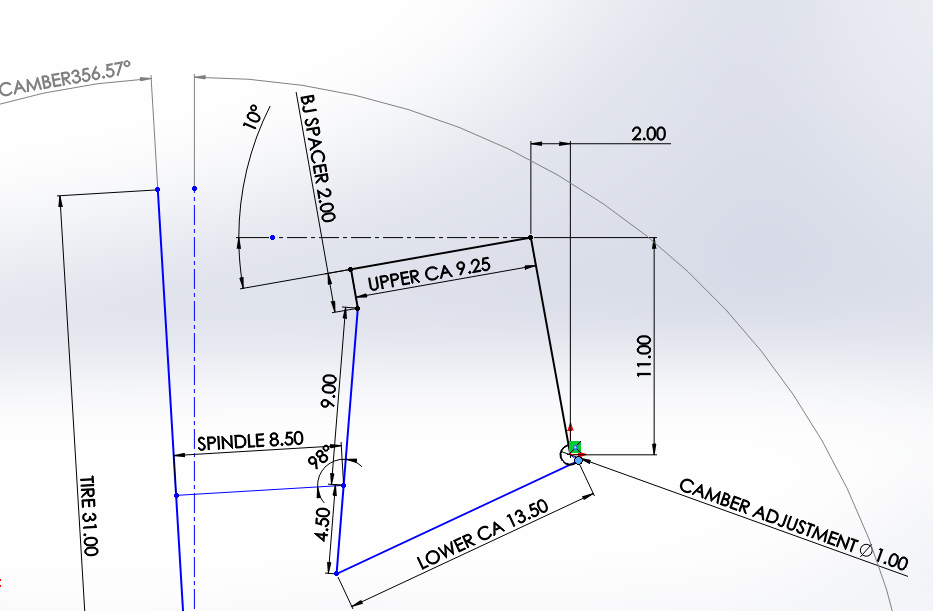
Now I added the common 2" BJ spacer at the same upper control arm angle and it made it difficult to make much negative camber:
But I could make a lot of positive camber:
I don't know what angle my upper CA's will be at so I'm wondering if I angle the BJ spacer so it isn't moving the upper BJ perpendicular to the upper CA would that give me better camber adjustment in both directions? I'm going to try some differnt angles and see if any work.

I looked around on the internet and here a little bit but couldn't find the exact factory control arm geometry so I just took some rough measurements which should be enough to help me figure out if making fancy BJ spacers is worth the effort.

I don't know anything about camber and control arm geometry but here's what I'm figuring out. I modeled the measurements to see whats up with this set up and how it works to adjust camber and it seems pretty straight forward. The camber adjuster is that little circle on the lower control arm. I measured that it moves the pivot point in about an inch diameter circle. Here's how the camber adjustment works at a set torsion bar angle:
Moving the adjuster away from the truck makes negative camber:

Moving the adjuster towards the truck makes positive camber:

Now I added the common 2" BJ spacer at the same upper control arm angle and it made it difficult to make much negative camber:

But I could make a lot of positive camber:

I don't know what angle my upper CA's will be at so I'm wondering if I angle the BJ spacer so it isn't moving the upper BJ perpendicular to the upper CA would that give me better camber adjustment in both directions? I'm going to try some differnt angles and see if any work.
09-20-2016, 08:17 PM
#7
Registered User
Thread Starter
Playing around with these two set ups makes me think I got the measurements pretty close. Without the BJ spacer I can set the upper CA angle to anywhere from 1 degree to 30 degrees and still get plenty of camber adjustment in either direction when I spin the camber adjuster around. However when I add the BJ spacer the same thing happens as does above but at all different upper CA angles, it makes it difficult to get barely any negative camber.
Trending Topics
09-20-2016, 08:50 PM
#8
Registered User
Thread Starter
I've found that if I angle the BJ spacer in about 20 degrees from perpendicular it makes the imaginary upper CA shorter which makes the camber adjustment much more equal in both directions through the whole range of upper CA angles:
Negative camber:

Positive camber:
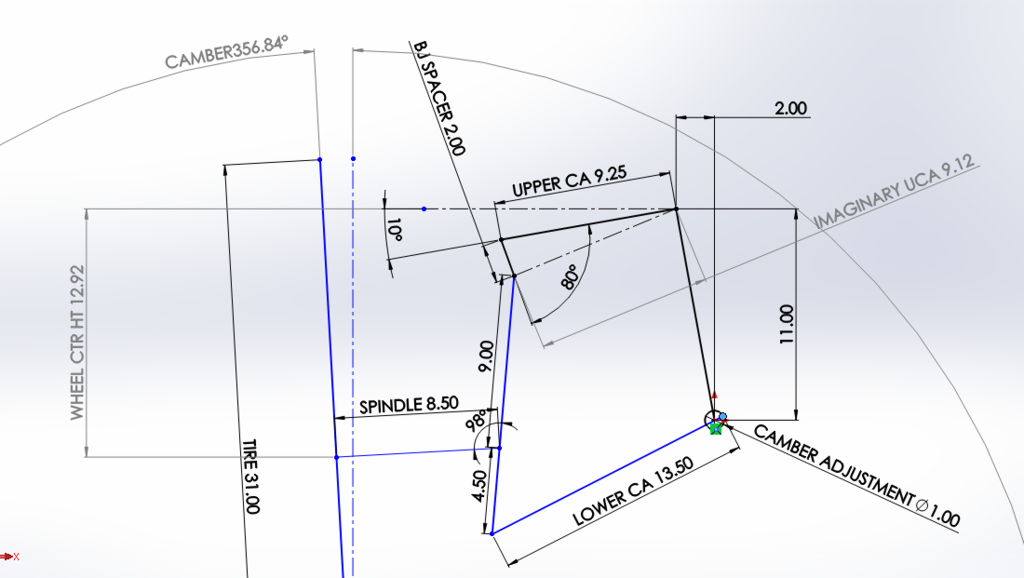
Even though it seems to make the camber adjustment much better I still don't know if I should try making angled in BJ spacers since the normal ones seem to work fine for people anyway and I shouldn't have any clearance issues since my back spacing on these wheels leaves me plenty of room. Guess I'll sleep on it.
09-28-2016, 07:40 PM
#9
Registered User
Thread Starter
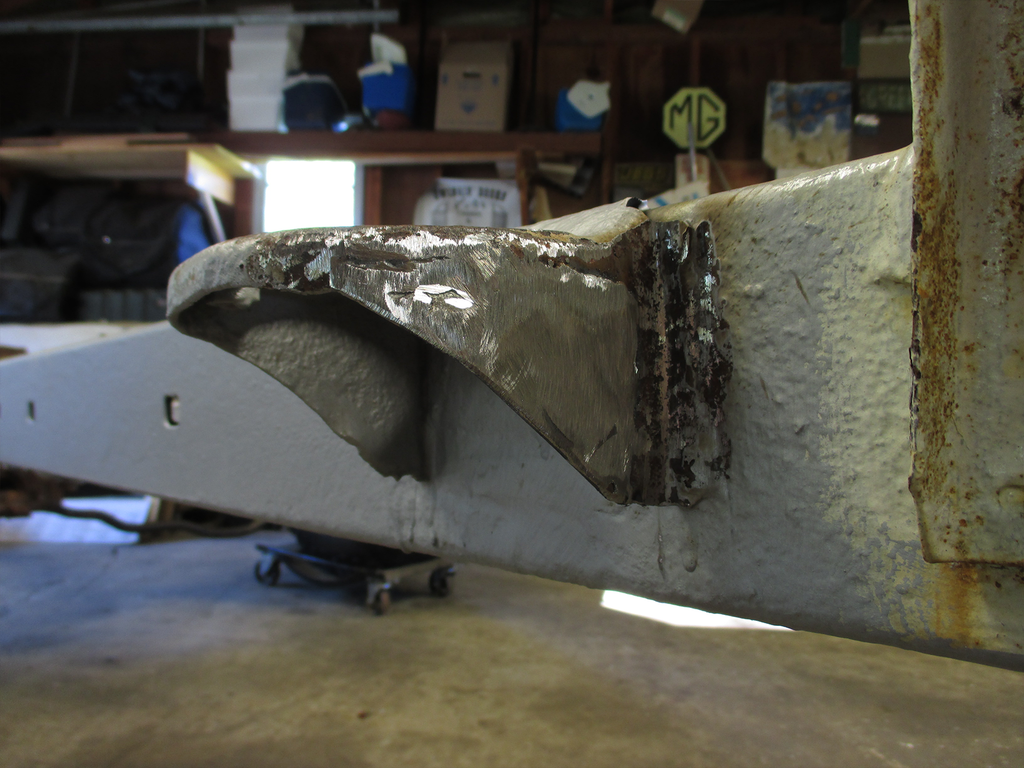
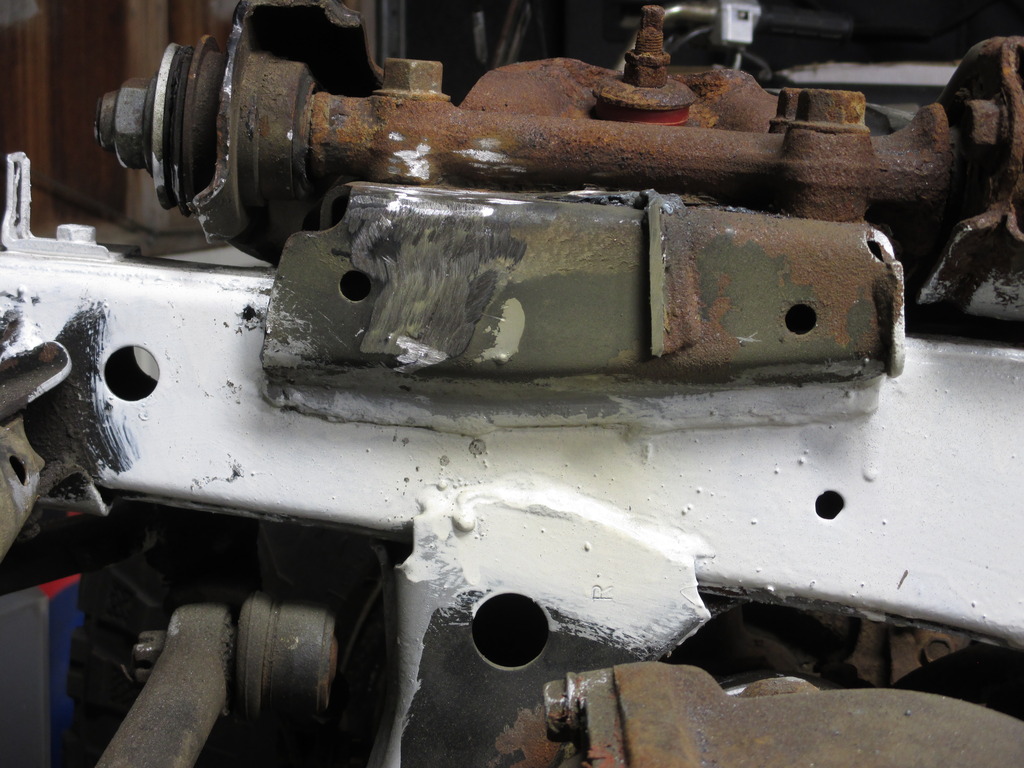
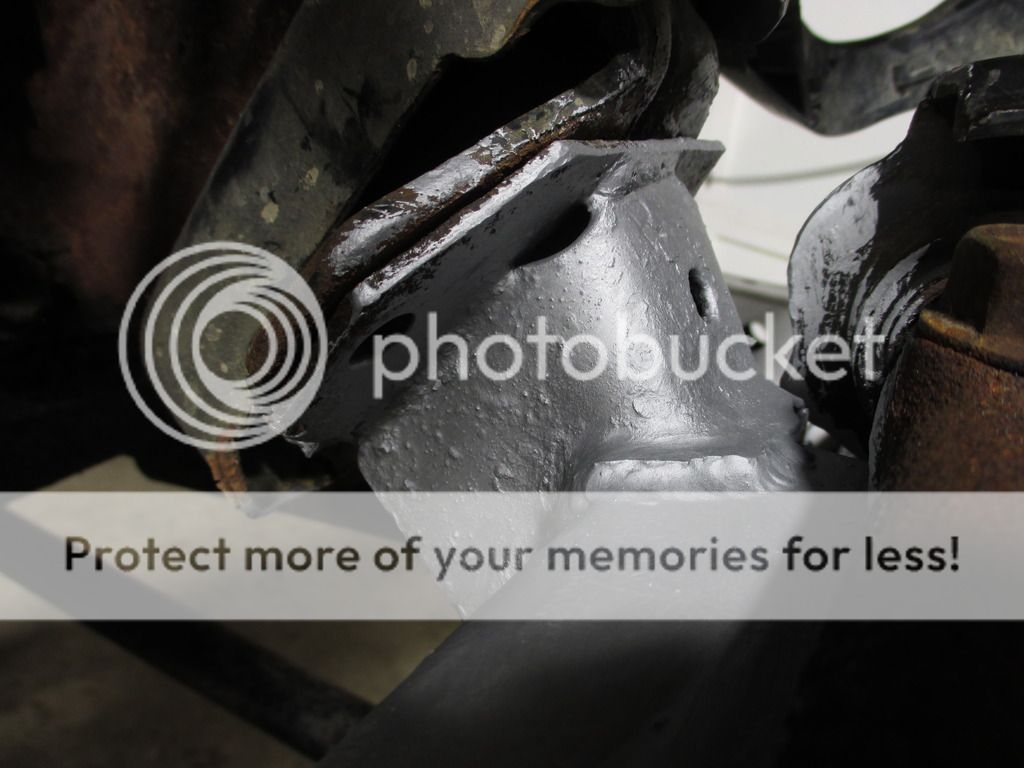
This weekend I dragged the frame over to my friend's house and we replaced a thin rusted section of the drivers rear cab mount. It's nice that was the only small spot on the frame that needed any fab attention.
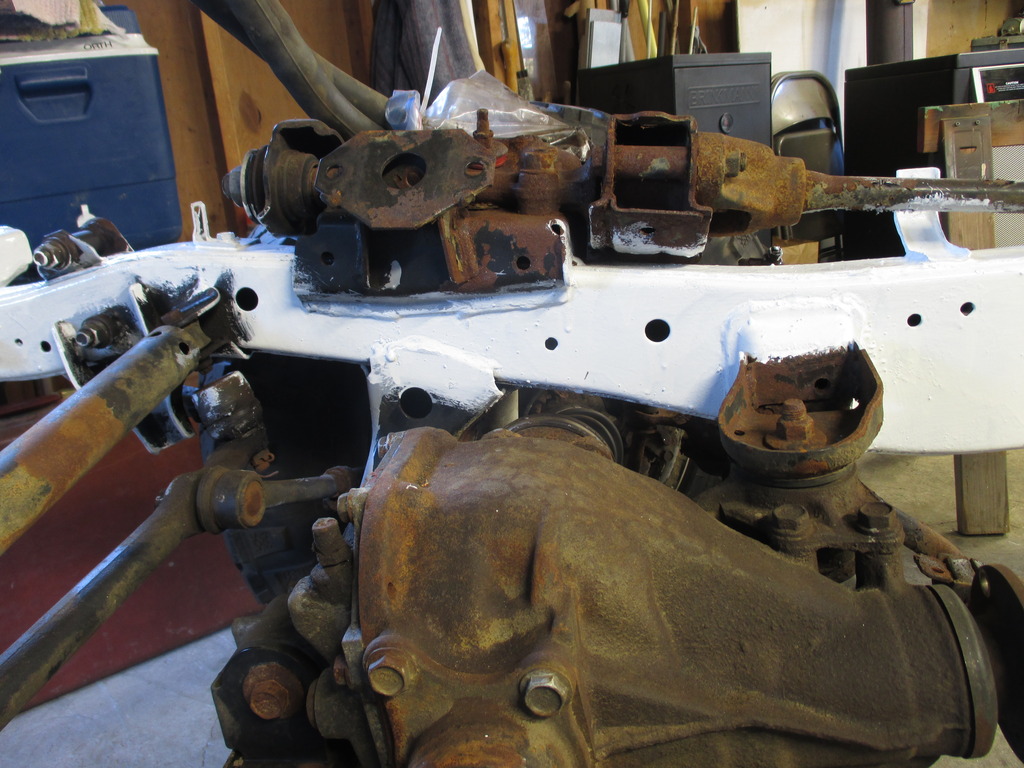
After That was fixed I finished the two coats of Mastercoat and put on a top coat of what I guess I'll call my signature gloss white frame enamel.
I didn't realize how easy it would be to put the clutch master cylinder in. They use the same plate that goes against the firewall for both the automatic and manual pedal assemblies:
So before I took the brake pedal assembly out I marked where the holes were from the inside with a punch then drilled them from the outside (I drilled them bigger than this picture shows. I was 1/8" off center):
After the holes for the master cylinder were drilled the manual pedal assembly and master cylinder from my donor rig bolted right in. My cab even had the extra threaded hole for the bolt above the clutch pedal!:
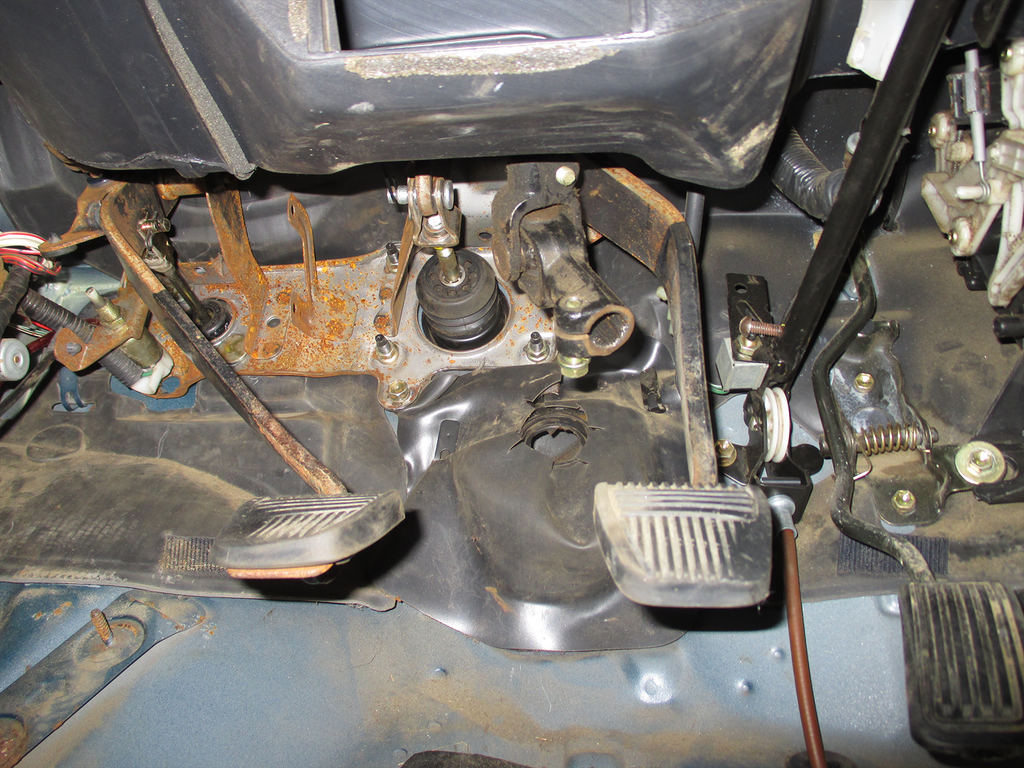
I put some gasket material on the master cylinder and tightened everything up good to go!
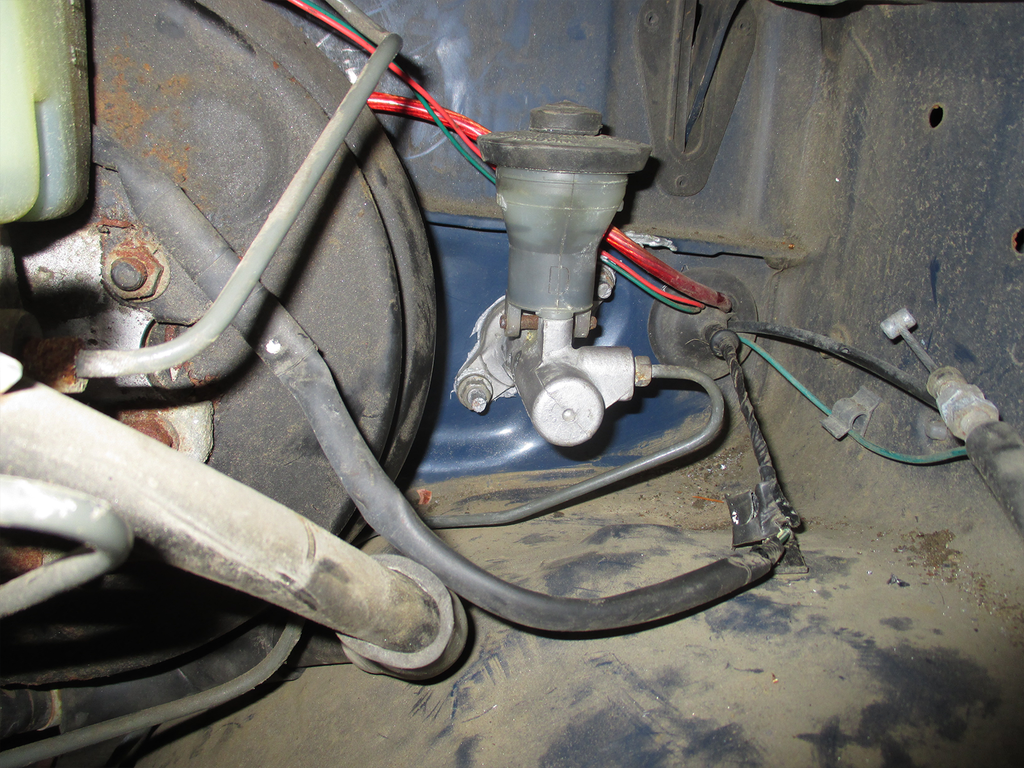
The brake line mounts even have the extra spot for the clutch line! Sweet!
Now I'm back to working on the BJ spacers

After That was fixed I finished the two coats of Mastercoat and put on a top coat of what I guess I'll call my signature gloss white frame enamel.

I didn't realize how easy it would be to put the clutch master cylinder in. They use the same plate that goes against the firewall for both the automatic and manual pedal assemblies:

So before I took the brake pedal assembly out I marked where the holes were from the inside with a punch then drilled them from the outside (I drilled them bigger than this picture shows. I was 1/8" off center):

After the holes for the master cylinder were drilled the manual pedal assembly and master cylinder from my donor rig bolted right in. My cab even had the extra threaded hole for the bolt above the clutch pedal!:

I put some gasket material on the master cylinder and tightened everything up good to go!

The brake line mounts even have the extra spot for the clutch line! Sweet!

Now I'm back to working on the BJ spacers
09-28-2016, 09:01 PM
#11
Registered User
Thread Starter
I was planning on cutting off and welding the 22RE mounts on my 3VZ frame from the moment I saw they were different. Of course when I bought the truck many people recommended the 5VZ swap which I totally agree with but I never caught that great of a deal on one when I looked here and there especially not with a manual trans. So when a 22RE 5sp with 170K (good running great shifting) showed up for $500 in my friend's driveway I picked it up. No time searching or wondering about parts I might need so I figured it was worth it. I have considered rebuilding the 3VZ and bolting it to the 5spd but I don't really mind if the truck is real slow because I have a 2015 1L ford hatch for a daily summer (driving 120 mi a day I couldn't afford used plus 38 mpg the way I drive it is some decent savings) and a carolla all trac wagon for the winter months.
Anyway I thought I should reference this post here:
https://www.yotatech.com/forums/f116...p-22re-151424/
Anyway I thought I should reference this post here:
https://www.yotatech.com/forums/f116...p-22re-151424/
09-28-2016, 09:12 PM
#12
Registered User
Thread Starter
Thanks! I started checking out your build thread, looking forward to reading through it! I really like the 1st gen runners (I constantly have a bench seat on a frame bolted on my bed so I kind of made one anyway haha)
 09-29-2016, 08:49 PM
#13
Registered User
Thread Starter
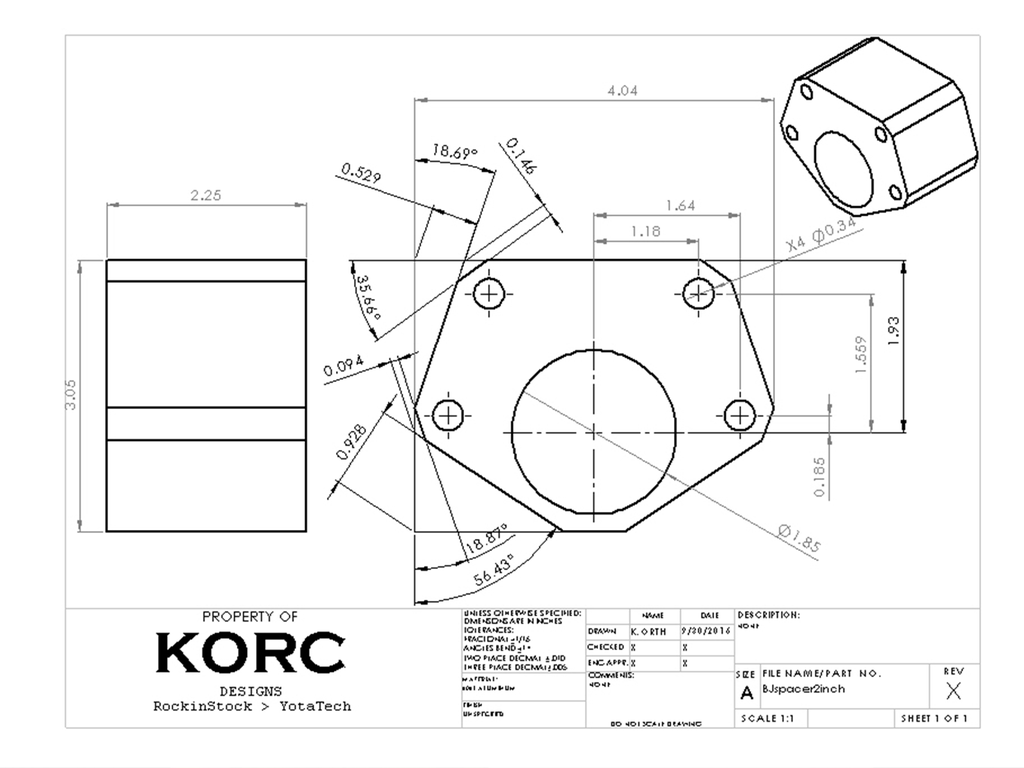
Designed some BJ spacers. Decided to go with the same style as the commonly available ones. After some more tinkering around with my CAD model of the control arms it was evident that trying to angle the spacers in to keep the lever arm length of the upper control arm wasn't worth it because i'd have to trim more and it looks like I'll just barely get the camber right. However my measurements aren't that accurate so it could be better or worse. I'd have to make angled shims for under the bolt heads too and i just don't like the thought of those pushing the screws to the edges of the holes in the UCA when I tighten them down. So I designed these based on measurements I took from all the inside edges of the holes on the UCA so it should be pretty accurate. I'll print it out and check before I make em though! Don't have a CNC so they'll take me a bit on the manual mill but hey just had to buy some bolts so much cheaper than buying spacers.
 12-11-2016, 03:38 PM
#14
Registered User
Thread Starter
This project is going very well... I have many photos to organize and upload. Already had the truck in the woods a bit! However my gas tank patch from a couple years ago is now leaking. The seam seems to be rusting from the inside out and the lines for the pump are very very tender. I'm thinking a 30 or so gallon poly tank mounted under the bed somewhere. Maybe from a bronco or something. Gotta do some research.
12-30-2016, 04:56 AM
#16
Registered User

Join Date: Jun 2015
Location: WI
Posts: 147
Likes: 0
Received 0 Likes
on
0 Posts
Great teardown!!! I also used Masterseries Silver. How long would you say your rear end was painted with it to this point? I know you said 100,000 miles but just curious on timeframe. Hoping to get many years without rust on mine
02-24-2017, 03:27 PM
#17
Registered User
Thread Starter
That was only about a year and half later when I took the flat bed back off (through the winter) and the paint looked perfect still which I expected but it was good to see I had got good coverage. The only rust I saw was where I leaked out from inside. I'm very confident in this paint!!
03-11-2017, 04:07 PM
#19
Registered User
Thread Starter
update finally
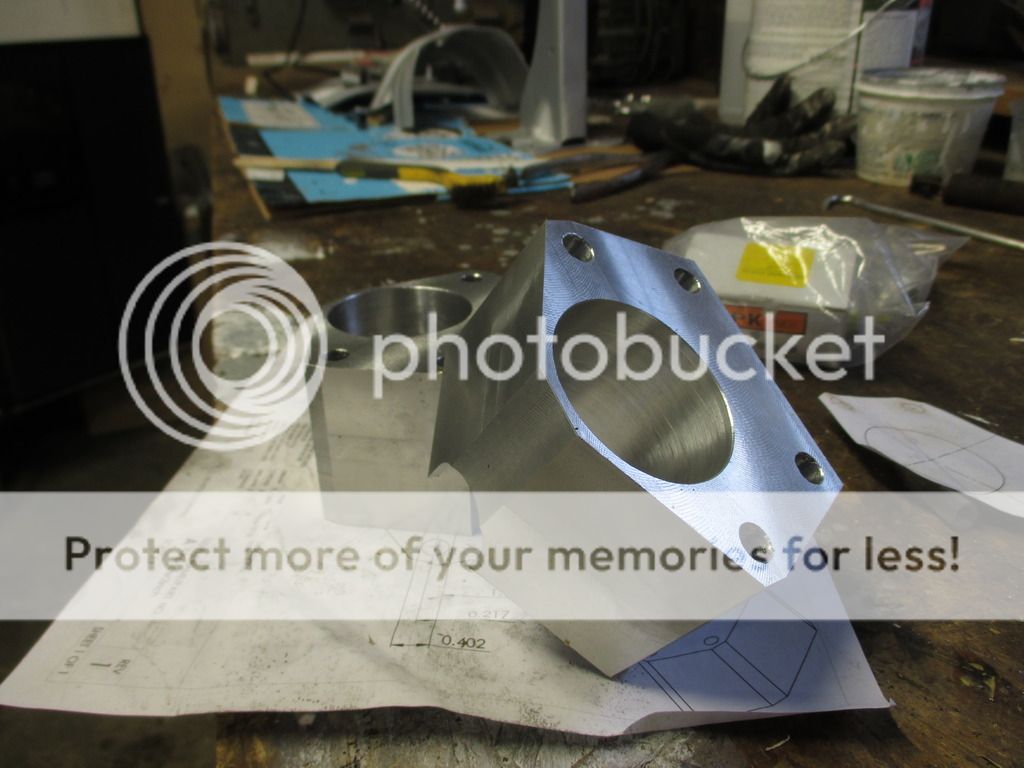
I machined these spacers at work and they came out pretty good! I ended up making them 2.25" deep and used 18-8 stainless hardware.
Next is the 22RE w/ 5sp install so I had to cut the motor mounts off my donor frame and use cross member off the donor as well.
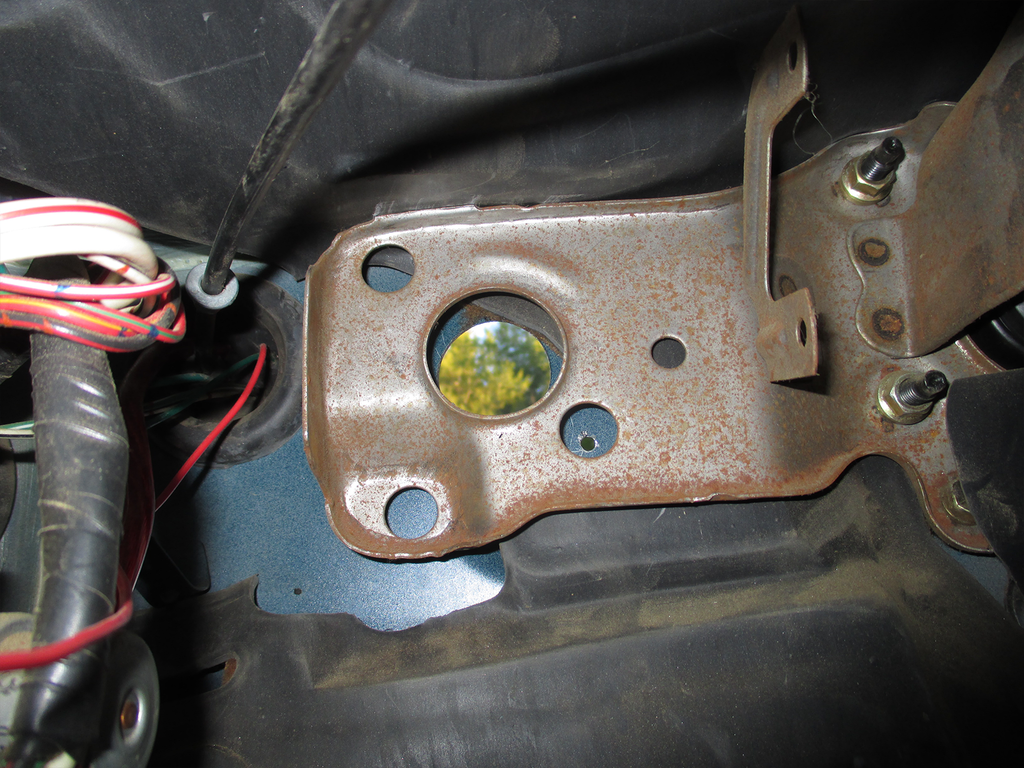
Here's the difference between the mounts as noted in many swap posts before
22RE Frame Motor Mount Location:
3VZ Frame Motor Mount Location:
The 22R mount is an inch or two forward from the 3VZ so I torched off the 22R mounts, cleaned them up, cut off and cleaned the 3VZ frame. Then I bolted the 22R mounts on the motor and set it on the frame with the 22R cross member so I could mark the mount location and weld them on.
Thanks to a good friend who's a welder!
This went pretty well but it seems like I got the mounts about a half inch too far forward and I had to drill out the cross member mount holes a little bit so the transmission mount lined up correctly.
It was good though because when I installed the 3VZ extra cab driveshaft (was an automatic) the front part of the driveshaft was just a bit too long so I had to drill new holes for the carrier bearing mount. Overall length of the 3VZ rear driveshaft is fine though and I used the front driveshaft out of the 22R.
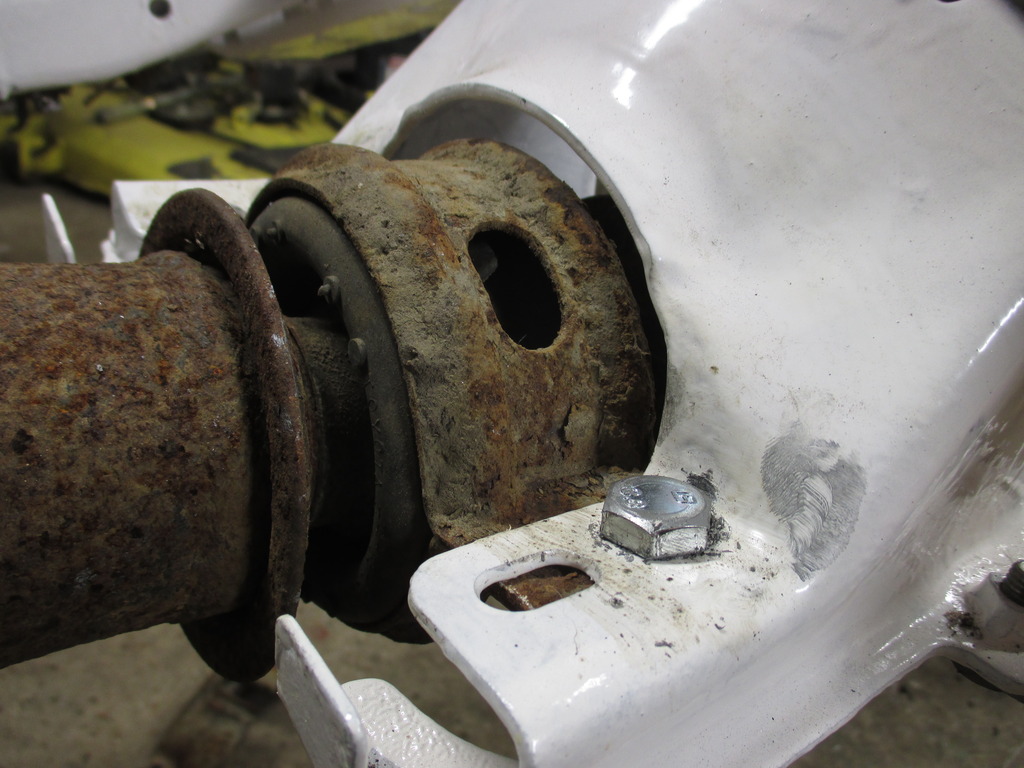
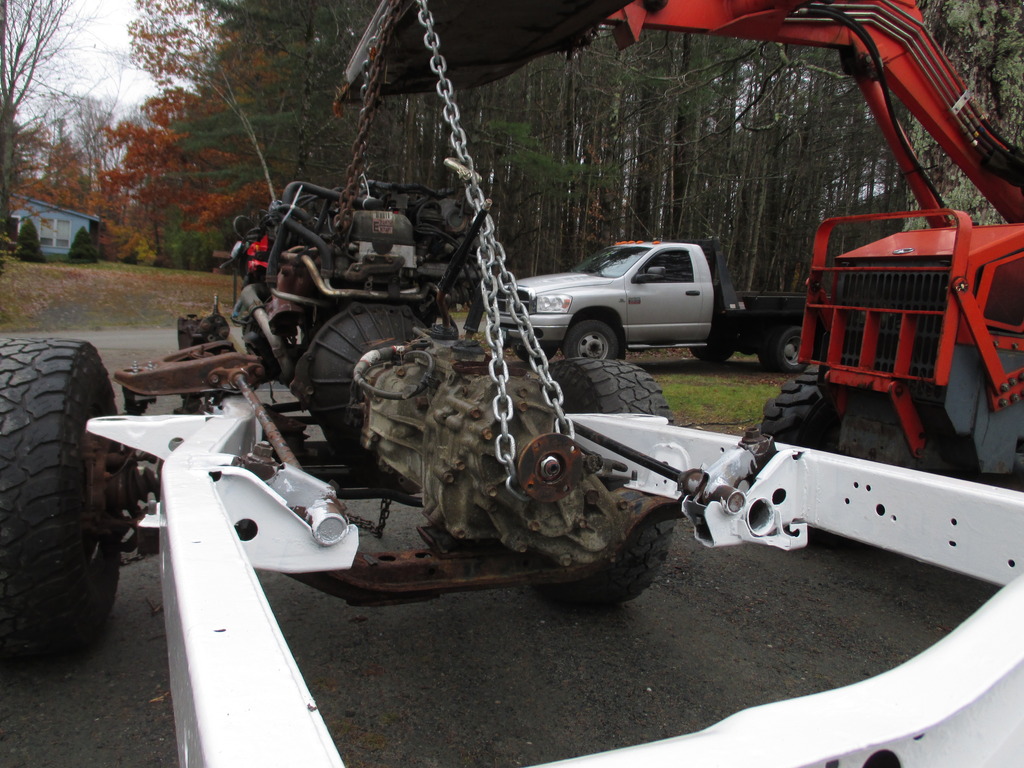
Next the body!! I got new energy suspension body mounts and machined 2" body spacers for the extra frame cleaning and next sub-project: body rust proofing.
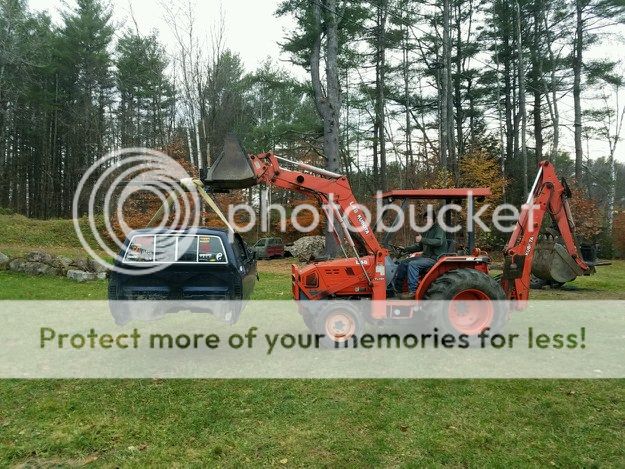
Thanks to a great cousin who shares his tractor!!

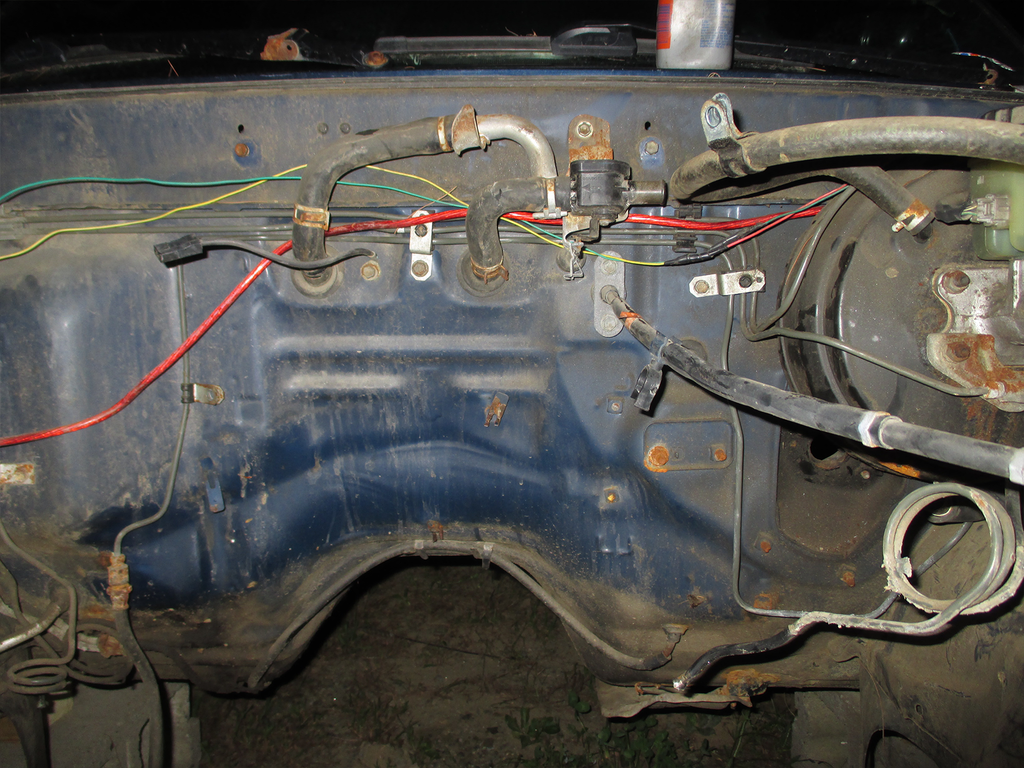
After the body was on I ran nickle-copper fuel and brake lines. No compatibility issues with the 22RE ECU and 3VZ dash electrical!! No clutch start switch required either!
Had bad throttle and idle problems and was running very hot. I discovered the timing was wayyyyy out. So far out I couldn't adjust it in. I found out the distributor was a tooth off retarded so I very carefully pulled it and turned it the correct way and then got the timing in perfectly:
http://www.4crawler.com/4x4/CheapTri...CheckConnector
I cleaned/checked the IACV:
http://4x4wire.com/forums/ubbthreads...s/1006346.html
And adjusted the idle and throttle screws as well as the TPS:
http://www.4crawler.com/4x4/CheapTricks/TPS/index.shtml
Now it idles and runs mint!! Needs a valve adjustment possibly ticks a bit. Also found out this motor only has 120k from the owners, dash said 165k but they did a swap.
Next: Alignment
I took it to a shop to get aligned and they were butt hurt about the BJ spacers but I understand. I'm just going to do it myself for now:
https://www.yotatech.com/forums/f128...ite-up-163666/
Almost ready for the road!

Next is the 22RE w/ 5sp install so I had to cut the motor mounts off my donor frame and use cross member off the donor as well.
Here's the difference between the mounts as noted in many swap posts before
22RE Frame Motor Mount Location:

3VZ Frame Motor Mount Location:

The 22R mount is an inch or two forward from the 3VZ so I torched off the 22R mounts, cleaned them up, cut off and cleaned the 3VZ frame. Then I bolted the 22R mounts on the motor and set it on the frame with the 22R cross member so I could mark the mount location and weld them on.
Thanks to a good friend who's a welder!


This went pretty well but it seems like I got the mounts about a half inch too far forward and I had to drill out the cross member mount holes a little bit so the transmission mount lined up correctly.
It was good though because when I installed the 3VZ extra cab driveshaft (was an automatic) the front part of the driveshaft was just a bit too long so I had to drill new holes for the carrier bearing mount. Overall length of the 3VZ rear driveshaft is fine though and I used the front driveshaft out of the 22R.

Next the body!! I got new energy suspension body mounts and machined 2" body spacers for the extra frame cleaning and next sub-project: body rust proofing.
Thanks to a great cousin who shares his tractor!!


After the body was on I ran nickle-copper fuel and brake lines. No compatibility issues with the 22RE ECU and 3VZ dash electrical!! No clutch start switch required either!
Had bad throttle and idle problems and was running very hot. I discovered the timing was wayyyyy out. So far out I couldn't adjust it in. I found out the distributor was a tooth off retarded so I very carefully pulled it and turned it the correct way and then got the timing in perfectly:
http://www.4crawler.com/4x4/CheapTri...CheckConnector
I cleaned/checked the IACV:
http://4x4wire.com/forums/ubbthreads...s/1006346.html
And adjusted the idle and throttle screws as well as the TPS:
http://www.4crawler.com/4x4/CheapTricks/TPS/index.shtml
Now it idles and runs mint!! Needs a valve adjustment possibly ticks a bit. Also found out this motor only has 120k from the owners, dash said 165k but they did a swap.
Next: Alignment
I took it to a shop to get aligned and they were butt hurt about the BJ spacers but I understand. I'm just going to do it myself for now:
https://www.yotatech.com/forums/f128...ite-up-163666/
Almost ready for the road!
08-22-2017, 08:37 PM
#20
Registered User
Thread Starter
Really happy with the truck, took it on a trip to PA (down through mass across the tappan zee) and got 21 mpg! It's got the 4.56 gears with 31's so with the 22re + 5spd the speedo is just about bang on according to gps, had not trouble holding 70-75 mph on the highway. Also my garage alignment seems fine, still haven't taken it to get measured but my tire chop seems to be flattening out a bit so it must be good enough. My phone camera is terrible and I keep forgetting my camera when I go out so no good "out in the wild" shots yet unfortunately. People at the gas stations seem to like the white frame, I do too. I was going to try to get 35's but I'm so happy with the fuel economy and driving performance I'm going to hold off. Might have to drive it a couple years before I get the mod itch again 


