When you click on links to various merchants on this site and make a purchase, this can result in this site earning a commission. Affiliate programs and affiliations include, but are not limited to, the eBay Partner Network.
Man...I bought 15x10 steelies with a 4" back space, 33x12.50 BFGs, and 4crawler is currently putting together a 3" body lift for me.
After reading through this build thread for the second time, it really makes me wanna get BJ spacers and shackles and cut that body lift down to a 1". Hmm....whats your opinion on this?
Even with the 1.5" spacers, my tires rub on the bottoms of my fenders. I would think with a 1" or 1.5" body lift and 33s, i would think it would rub in a similar amount. I wouldn't go any higher than 1.5" for a body lift because after that, you have to start extending brake lines, extending shifters, etc, along with the fact that the frame hangs down and the taller spacers are rough on body mounts. But thats personal opinion.
Even with the 1.5" spacers, my tires rub on the bottoms of my fenders. I would think with a 1" or 1.5" body lift and 33s, i would think it would rub in a similar amount. I wouldn't go any higher than 1.5" for a body lift because after that, you have to start extending brake lines, extending shifters, etc, along with the fact that the frame hangs down and the taller spacers are rough on body mounts. But thats personal opinion.
Yeah...I'm contemplating on running your exact setup with the addition of a 1" body lift. Hopefully giving me around 2.5" of lift.
So last Wednesday, I'm on my way home from night classes when my drivers side low beam quits working. Literally not a mile and a half down the road, I get pulled over. Cop was cool about it and gave me a warning. 4th time I've been pulled over, 4th time I got a warning. I must be the luckiest unlucky person on the planet.
Anyway, since I have 100/90w bulbs, I had to order a new set online and after reading reviews, I chose Nokya Cosmic White 5000k 100/90w bulbs. The reviews were a hit or a miss but they were cheap and I was curious whether they were actually a pure white, unlike some bulbs that claim to be bright white buy end up being yellow.
While I was at it, I ordered new ceramic H4 plugs since the ones I installed were cheap plastic ones from Autozone. The ones from Autozone also had built in wires which were very thin. I wanted a plug that I had to install my own wires. I also ordered a male plug since I never used a male plug when I built my wire harness. How did I build the harness without a male plug? Don't ask. It was ghetto at its finest.
The only way I could compare the Autopal bulbs to the Nokya bulbs was to compare just the passenger side since my drivers side was blown out. As you can see, the results are somewhat disappointing.
This pic is a bad comparison since it is my old sealed beam lights against the Nokya bulbs. For the life of me, I can't find the garage shots from when I installed the Autopals.
This last shot is a bit concerning. This shot shows the low beam cutoff, or lack thereof. The Autopal bulbs had a much crisper cutoff. This is a bad cellphone shot, but I feel it illustrates my point.
Once I find my better camera, I will take some better comparison shots.
Since I'm here, I added a new sticker. All of us around here love stickers
You have a great looking ride. I really like the fact that you painted it yourself in your garage. It has a nice stance with a clean factory look. The paint on mine has been dead, cracked, and peeling off for years. I don't have any air tools. Just a good ol' palm sander and elbow grease and I'll get her done someday.
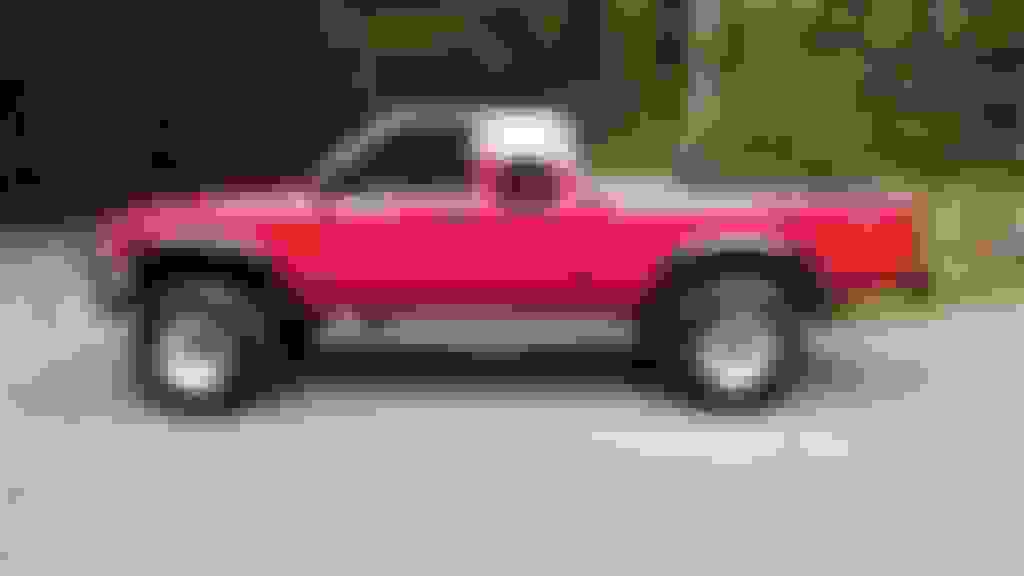
So it's been a while since an update. I haven't felt like spending much money on the truck, so it's pretty much the same. The exhaust system rotted away except for the Magnaflow muffler, so I welded up a new one and added a 22" long 3.5" tip to the end. I moved the rear-facing lights on my toolbox to under the bed. I swapped the stock stereo and speakers to all Pioneer and I also changed the blue LEDS to white inside. Other than that, the little bit of work to the truck is just general maintenance: keeping up with rust, headlight bulbs, checking plug gap, checking spark plug wire resistance, oil changes, etc. It's a Toyota. It doesn't need that much work to keep it running.
Pictures, because why not?
Oh, and I also bought a 2016 Hyundai Elantra Value Edition back in December. Yes, I love red.
That's all for now
Last edited by 93Xtra-Cab; 09-01-2016 at 08:38 AM.
Damn those things are bright, they hurt my eyes even though the monitor. How did you do your interior lights?
Looks Good! I would also like to know how you did your interior lights, as I have wanted to do something similar to this for a long time. Care to share?
So it's been a while since an update. I haven't felt like spending much money on the truck, so it's pretty much the same. The exhaust system rotted away except for the Magnaflow muffler, so I welded up a new one and added a 22" long 3.5" tip to the end. I moved the rear-facing lights on my toolbox to under the bed. I swapped the stock stereo and speakers to all Pioneer and I also changed the blue LEDS to white inside. Other than that, the little bit of work to the truck is just general maintenance: keeping up with rust, headlight bulbs, checking plug gap, checking spark plug wire resistance, oil changes, etc. It's a Toyota. It doesn't need that much work to keep it running.
Pictures, because why not?
Oh, and I also bought a 2016 Hyundai Elantra Value Edition back in December. Yes, I love red.
That's all for now
I ordered some of those Jungle Flares after seeing them on your truck, they look fantastic on your truck by the way. Well they came in the other day and I think I am going to get mine painted to match the truck. The debate I am having with myself is over my wheels. I have a 15X8 0 offset steelie wheel on there now and am debating 15X8 -19 offset or a 15X10 -43 offset wheel. I see that yours are 15X10, do you happen to remember the offset or backspacing on them?
Thanks in advance
The rims have a 4" backspace. The tires still rub the fenders near full lock because there isn't enough backspacing. I bought these rims used without checking the width or backspacing because I was just a stupid kid at the time. IIRC, the correct rims backspacing for a 10" rims on these trucks is 4.5" (or 4.75"?) and for a 8" rim it is 3.75". The 32" tires look good on the 10" rim IMO, but they are more susceptible to slipping off the bead when you air them down to go offroad.
Damn those things are bright, they hurt my eyes even though the monitor. How did you do your interior lights?
Originally Posted by Old Red 94
Looks Good! I would also like to know how you did your interior lights, as I have wanted to do something similar to this for a long time. Care to share?
Thanks! The dome light is a 48 LED panel with the festoon bulb adapter so it would connect to the dome light housing. The map lights are 12 LED festoons. The floor lights are just the cheap 20 LED 12" strips. There are 2 in each footwell, one mounted under the dash and one mounted under the seat on the frame pointed forward. They are all cool white IIRC. I had all blue LEDs in it, but it was such a strain on my eyes I had to convert to white.
Originally Posted by Gizler00
Man I love how clean your truck is!!
Thanks! It doesn't look now as it does in the pictures. Both doors and rocker panels are starting to rot a bit which I will have to fix, but I still try to keep up that shine
I ordered some of those Jungle Flares after seeing them on your truck, they look fantastic on your truck by the way. Well they came in the other day and I think I am going to get mine painted to match the truck. The debate I am having with myself is over my wheels. I have a 15X8 0 offset steelie wheel on there now and am debating 15X8 -19 offset or a 15X10 -43 offset wheel. I see that yours are 15X10, do you happen to remember the offset or backspacing on them?
Thanks in advance
Originally Posted by 93Xtra-Cab
The rims have a 4" backspace. The tires still rub the fenders near full lock because there isn't enough backspacing. I bought these rims used without checking the width or backspacing because I was just a stupid kid at the time. IIRC, the correct rims backspacing for a 10" rims on these trucks is 4.5" (or 4.75"?) and for a 8" rim it is 3.75". The 32" tires look good on the 10" rim IMO, but they are more susceptible to slipping off the bead when you air them down to go offroad.
Thanks, I ended up going with the 15X10 wheels, looks pretty good! Now to get some body work done and get it all painted (including the flares). I'm planning on upgrading to 4runner side mirrors as wel, just not sure if I want to do chrome or color match.....
This post was going to be a write-up of how I did my EGR/PAIR delete, but I had to repair another problem and I ended up not taking enough pictures to make a step-by-step walk-through. It's now more of a story than anything.
I wanted to clean up the engine bay so it is easier to get to the rear two spark plugs on the passenger side head. Plus, it's ugly and a PITA to work on with all of that in the way. So I bought the EGR removal kit from LCE Performance. What is included in the kit is the EGR and PAIR block-off plates for the exhaust manifold and a block-off plate for where the EGR bolts to the intake manifold. It also contains four 1/8" vacuum caps, one 5/8" vacuum cap, a 5.7k ohm resistor, a 10k ohm resistor, a decal, and instructions. 20170621_152729.jpg?t=1498095632
I started by trying to unbolt the EGR port on the exhaust manifold and I ended up rounding off the lower bolt. I fussed around with that for a little while before I gave up and moved onto removing the EGR vacuum modulator on the front of the intake manifold.
Once that was removed, I took off the rubber vacuum lines that connect the hardlines to the EGR ports on the throttle body and installed two 1/8" vacuum caps on the throttle body.
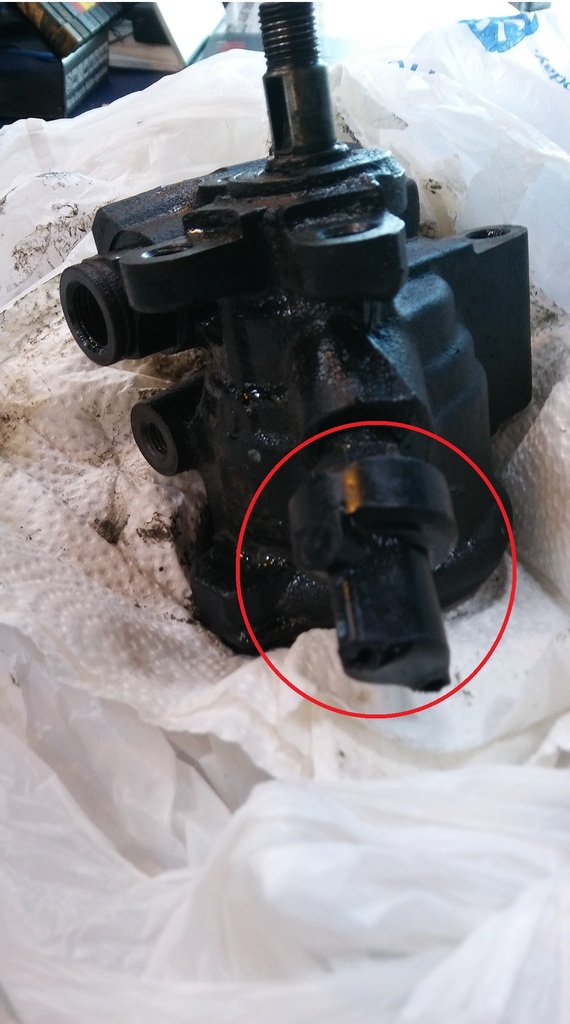
Then I went back to the rounded bolt and the only solution was to take out the battery and remove the power steering pump to get to the bolt. The first thing I did was make match marks on the banjo bolt and the high pressure hose so I knew when I put it back together, the hole in the banjo bolt would line up to the hose. I don't know if that is the correct way to do it, but that's what I did and it worked out in the end. Now, while removing the banjo bolt, the power steering hose rotated and broke off one of the two vacuum ports on the air control valve. The next picture is of the old pump after it was removed from the truck with the air control valve attached with two broken off vacuum ports (red circle). I ended up breaking the other one off at some point later. I knew I had to replace it so I didn't care to be gentle with it.
With the banjo bolt off, the vacuum lines taken off the air control valve and the return line removed from the reservoir tank and the ATF drained, I took the tank off the pump. At this point, I was ready to take the pump off the the brackets. After loosening the bolts, I realized I needed to take the pulley off the the pump in order for one of the bolts to be removed. So I tried to put the belt back on and tighten the pump back on the brackets so when I try to crank on the pulley nut, the pulley wouldn't rotate. However, even hosed with PB Blaster, the pulley nut wouldn't budge. I could crank on the nut, but it would just turn over the engine and since the truck was in gear, the truck actually rolled backwards. I tried a cold chisel and a hammer to work the nut loose with no luck. Since there is little room between the pulley and the radiator, I couldn't get an impact wrench in there to try to loosen it, so I ended up just removing all of the brackets off the block and removed the pump and brackets as a unit. I ended up getting the nut off with an impact gun on the work bench.
At this point, I cleaned up all the brackets and then went to the auto parts store to buy a new pump. The old pump was leaking and made noise and I knew I was going to have to replace it at some point, so I guess breaking off the vacuum ports on the air control valve was somewhat of a blessing in disguise. What I didn't know was that a new pump from the auto parts store didn't come with the air control valve, so I had to buy that separate. $51 for the pump and $84 for the valve. (Seriously?) I bought a rounded nut extractor kit and a tube of JB Kwik. The plan was to JB Kwik the 12mm socket onto the rounded nut if the extractor set didn't work. I also got a tube of Permatex Ultra Copper to seal up the block-off plates and a new nut for the pulley and new nuts for the plates. I know this might be obvious, but I feel like it may be important to note that the new pumps also do not come with an adjusting bracket, so you will have to remove the bracket from your pump and reuse it if you go to replace yours.
Back in the garage, I broke out the nut extractor and luckily I had the nut off in about a minute. It worked great. That was the last thing in my way of removing the EGR valve. I didn't know that there was a tube on the EGR valve that goes into the intake manifold about 6" or so. I didn't have enough room to pull that tube out of the intake manifold, so I ended up cutting it off of the EGR valve with a hacksaw and removed them as two pieces. I intended on keeping everything intact in case I ever needed to put it back together, but it didn't work out that way.
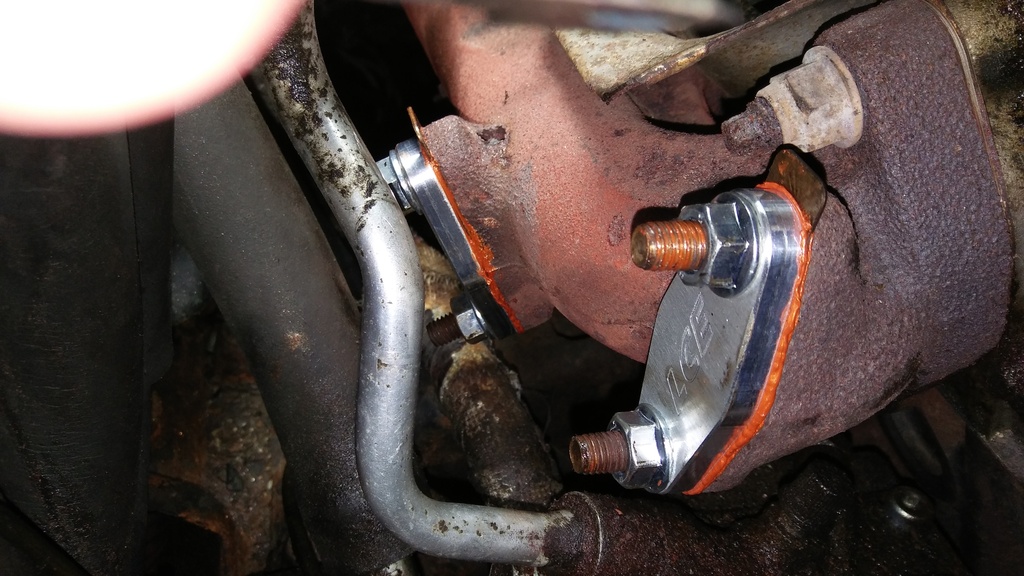
I took the old gaskets and cleaned them up and then smeared a coat of the Ultra Copper sealant on both sides and installed the block-off plates with the new nuts. It was nice to see parts finally going back on the truck. I love the LCE logo milled into the plates. The simple things that excite me...
With the plates attached, I could install the new pump. I started by installing the new air control valve to the new pump. I only assumed you couldn't put the vacuum hoses in whichever of the two ports you wanted, so I made sure to install the new valve in the same orientation as the old one.
Then I installed the brackets to the block and installed the adjusting bracket to the new pump. I then used the two old bolts to install the pump to the brackets. I installed the woodruff key to the shaft of the pump and then pressed the pulley back onto the pump shaft. Then, I put the belt around the pulley and removed enough slack out of it so I could tighten the pulley nut without the pulley spinning. I reinstalled the high pressure line to the pump, making sure the marks I made on the hose lined up with the banjo bolt. I was delighted to see the new pump also came with new crush washers to seal the banjo bolt connection. Never reuse the old crush washers. Then I reinstalled the fluid reservoir with the new o-ring that was supplied with the pump, reinstalled the return line onto the reservoir, connected the vacuum lines on the air control valve, and added some ATF to the reservoir.
I capped off the remaining open lines with the 1/8" vacuum caps and capped off the PAIR hardline at the back off the block under the intake manifold with the 5/8" vacuum cap. The last thing to do is to add the resistor to the plug that connects to the EGR VSV to fool the ECU into thinking that the EGR valve is still there and functioning. Now, don't do what I did and try clipping the wires on the resistor. On the directions supplied the LCE, it shows the resistor in the plug, but it looked to me like they clipped the wire so it would fit flush in the plug opening. I didn't know that the entire wire on both ends of the resistor would fit down into the plug. So I clipped the wires on the smaller blue resistor that they supplied. They supplied a smaller bodied blue resistor and a larger bodied tan resistor. It didn't say in the instructions which one was the 10k ohm and which was the 5.7k ohm, but based on the stripes, I figured the smaller blue one was the 10k ohm, so I started with that. But I clipped the leads too short and it wouldn't stay in to plug. So I stuck the other one in there. I've only ran the truck to bleed the power steering system, check for leaks, and then drove about 1/4 mile to the end of my neighborhood to get the mail. So far, there is no check engine light, but I don't know if that is something that would pop up instantaneously.
Anyway, this is what I have right now. You can actually see and get to the rear-most spark plug with ease now. I'm going to buy some more vacuum caps so I can cap off the lines going to the EGR and PAIR VSVs and then remove the VSVs from the engine bay. That should clean it up a bit more.
Last edited by 93Xtra-Cab; 06-22-2017 at 07:14 PM.
Ok, I'm having a problem. I noticed when I'm driving the truck on the road, I'm hearing this slight whistling/chirping/squeaking sound (I know it's hard to diagnose noises over the internet) whenever I give the truck more gas. However, it does not make the noise if I rev the truck when I'm coasting or standing still. It also does not make the sound while decelerating. It only makes the noise when the truck is under load and it increases as the RPMs increase. To me, that sounds like it would be a vacuum leak. If it were a power steering problem, I figure it would make the noise whenever you revved the truck, whether or not it is under load. Just to be sure, I did adjust the belt tension on the power steering pump, but there was no change.
So, I went back through the FSM and made sure all of the vacuum hoses were routed correctly, and removed the hoses I didn't need from the PAIR and EGR VSVs. I have plugged all of the un-used vacuum ports. There are two hoses coming out of the air control valve attached to the power steering pump. One is supposed to suck clean air in from behind the VAFM to the pump and one is supposed to blow air into the intake plenum. So I reversed those hoses thinking I could have had them backwards and the air control valve was blowing air into the intake behind the VAFM, but the noise was still there.
There is a bolt that attaches the EGR vacuum modulator to the front of the intake plenum. That bolt does not bottom out and it goes all the way through to the inside of the plenum. If that bolt is left out, it would create a huge leak. However, I checked that and it is tight.
The only thing left I can think of is that one or a few of the block-off plates isn't sealed all the way. It doesn't sound like an exhaust leak, however I did not let the Ultra Copper sealant fully cure before running the truck, so I'm thinking it could be a possibility.
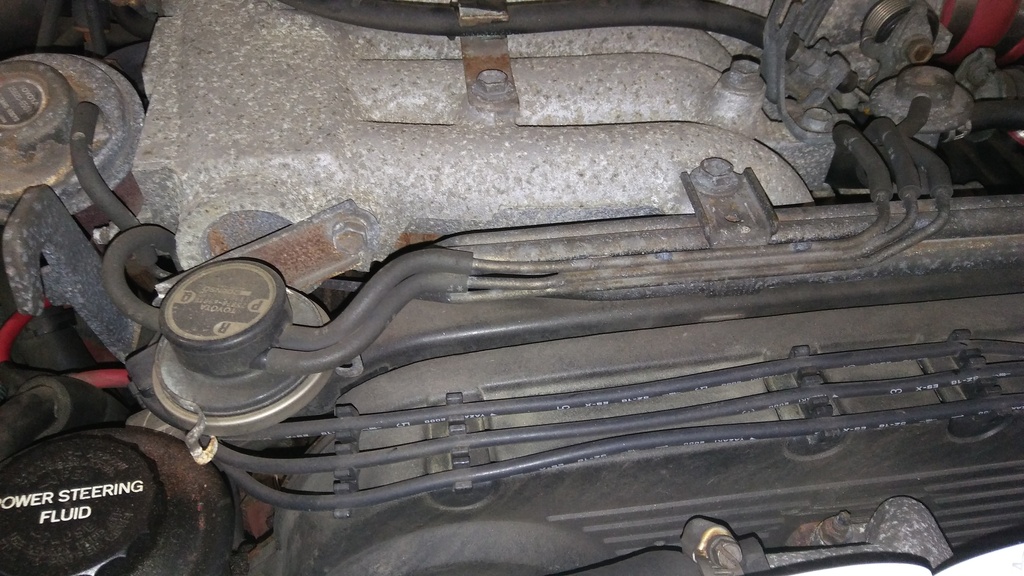
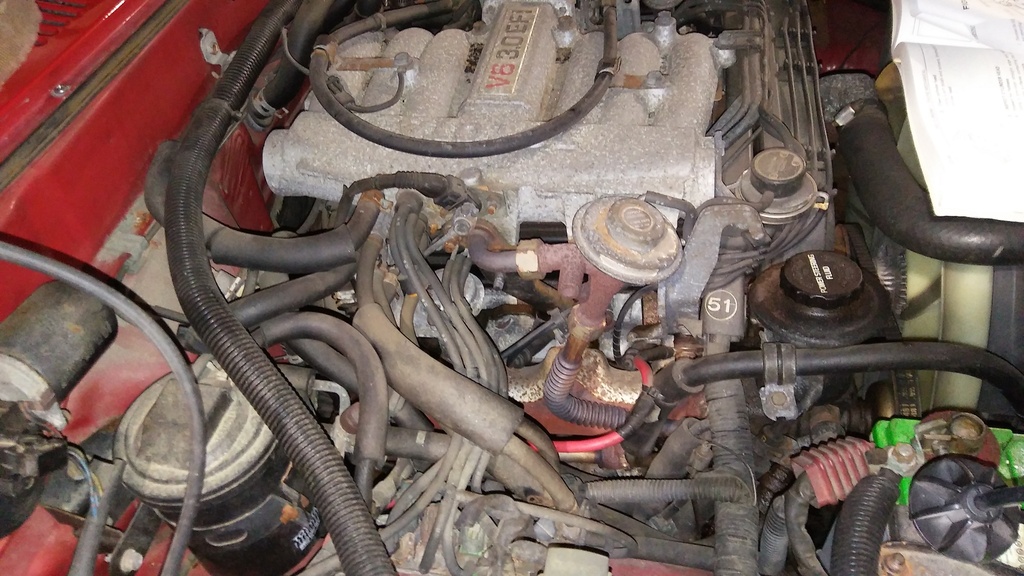
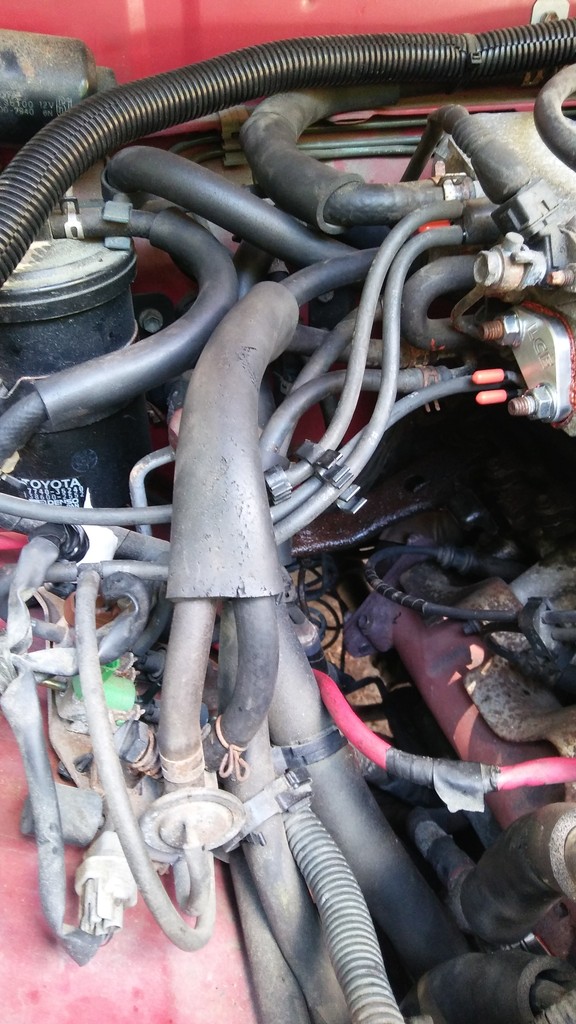
For reference, this is what the engine looked like before I did the EGR/PAIR removal, back when it wasn't making the noise.
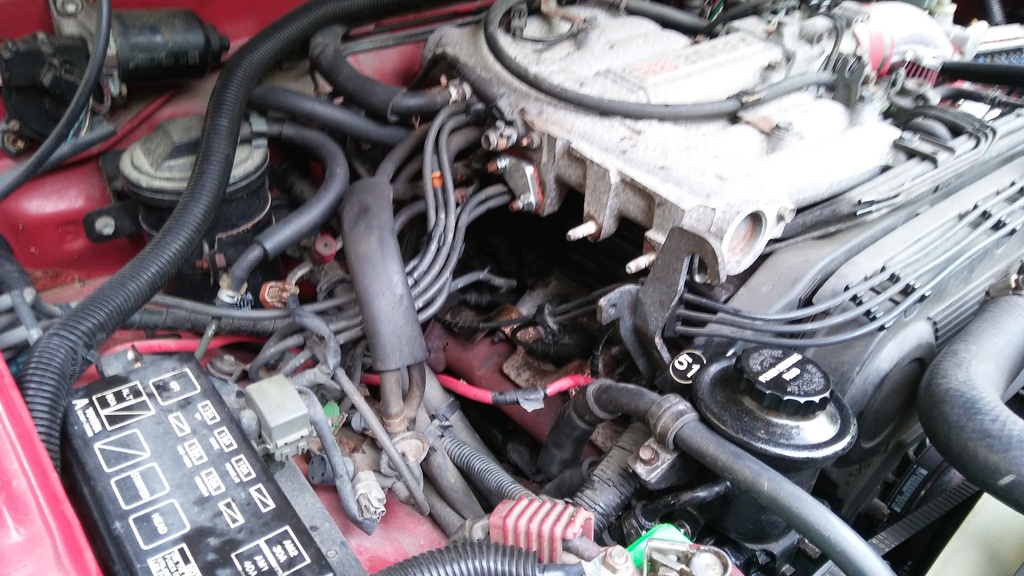
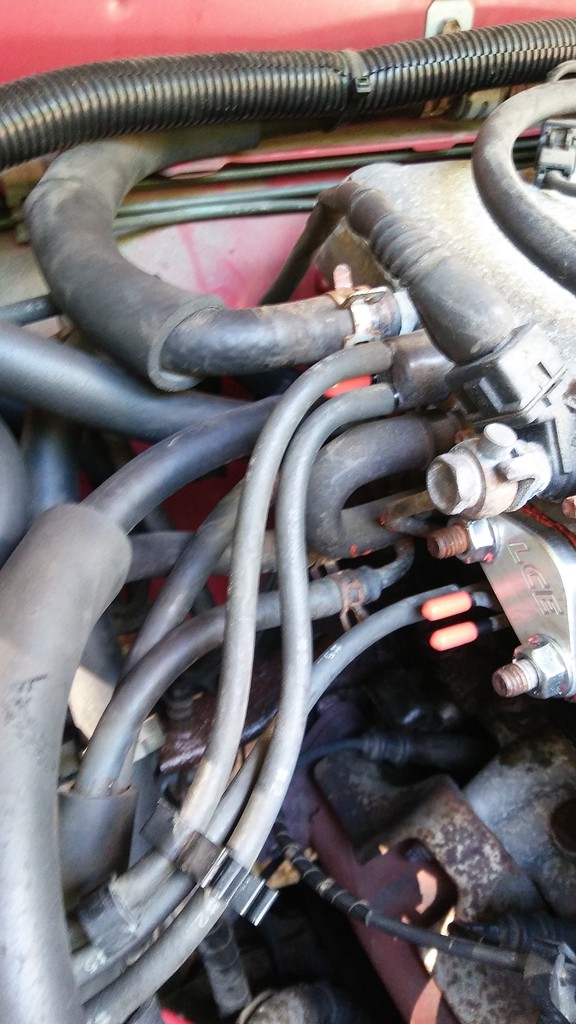
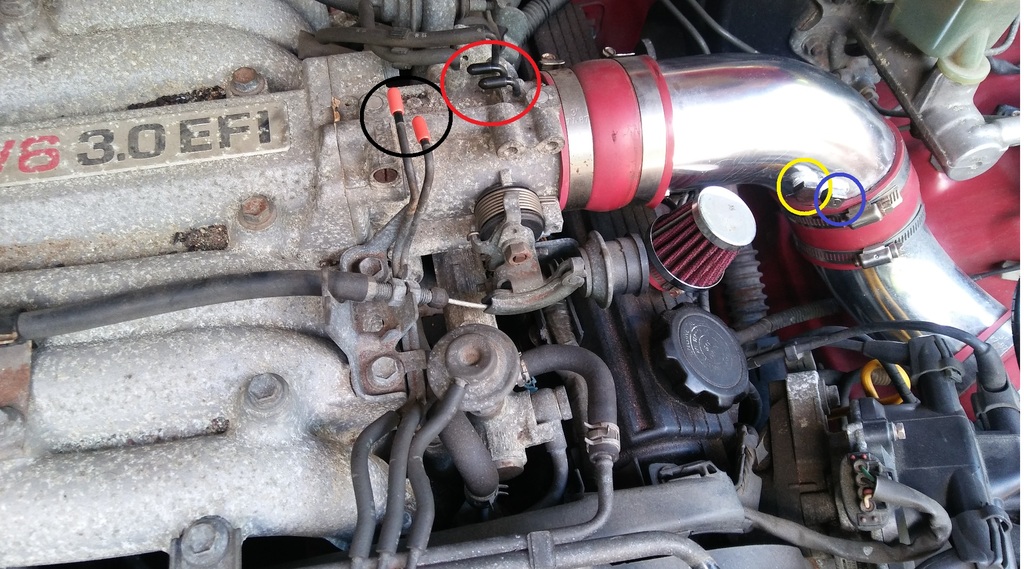
Here is what I am working with right now.
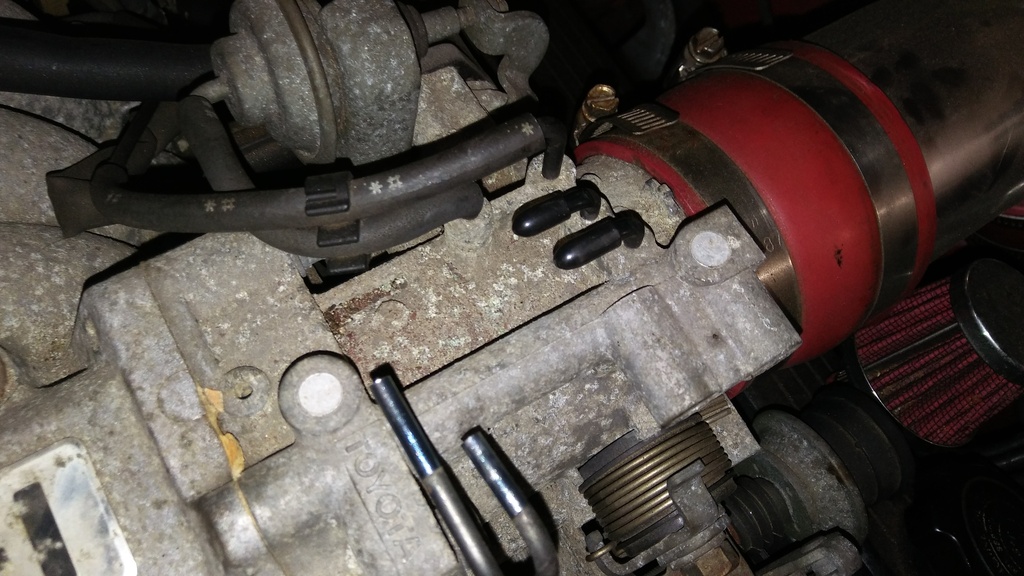
This picture shows the hoses I took off the now un-used PAIR and EGR VSVs (blue circles).
The middle VSV is for the fuel pressure regulator. It still has hoses connected to it which T into another valve that's to the right of the EGR VSV (the arrow with "What is this?"). This mystery valve also has hoses that lead to the intake plenum which I also reversed which made no difference.
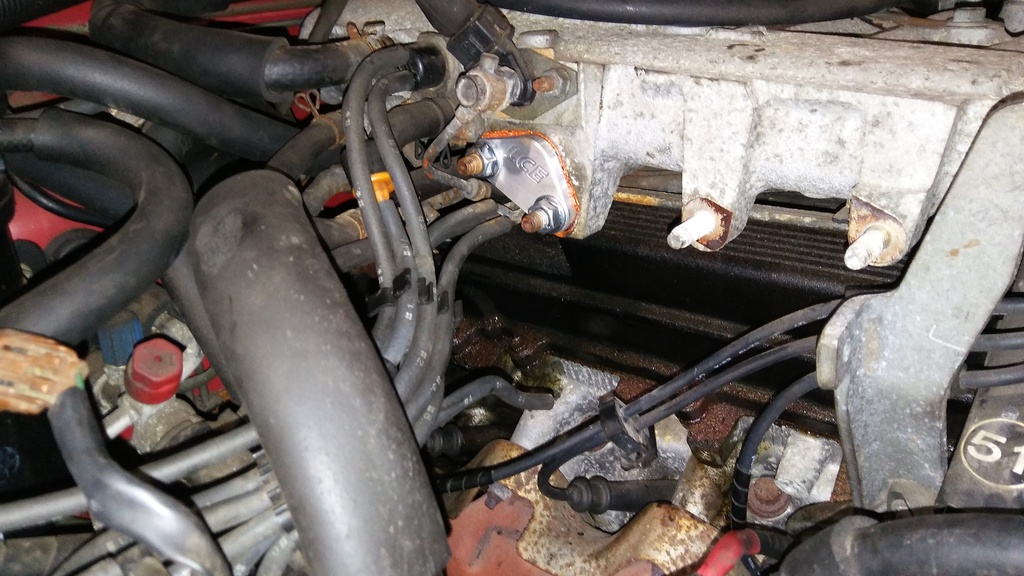
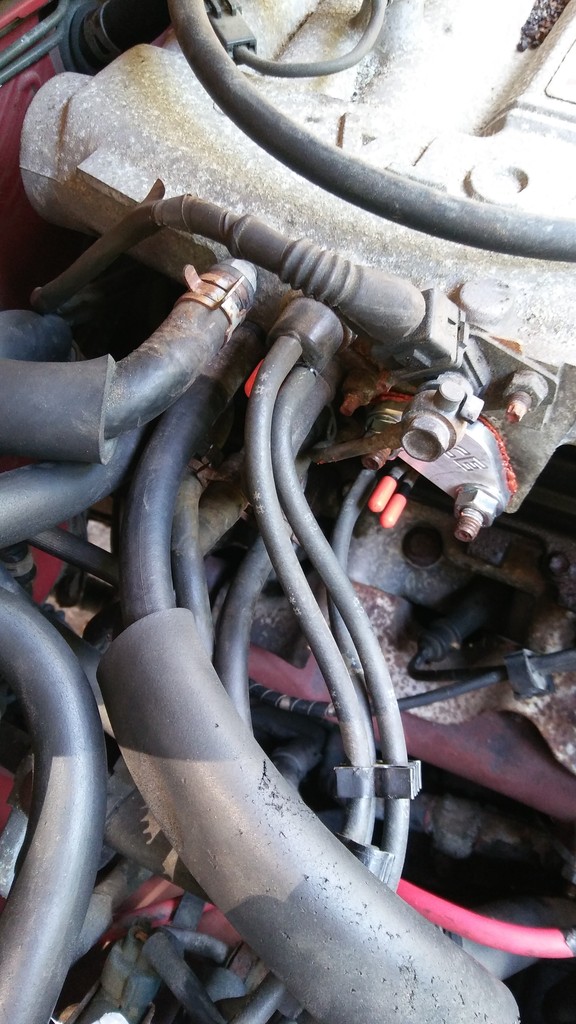
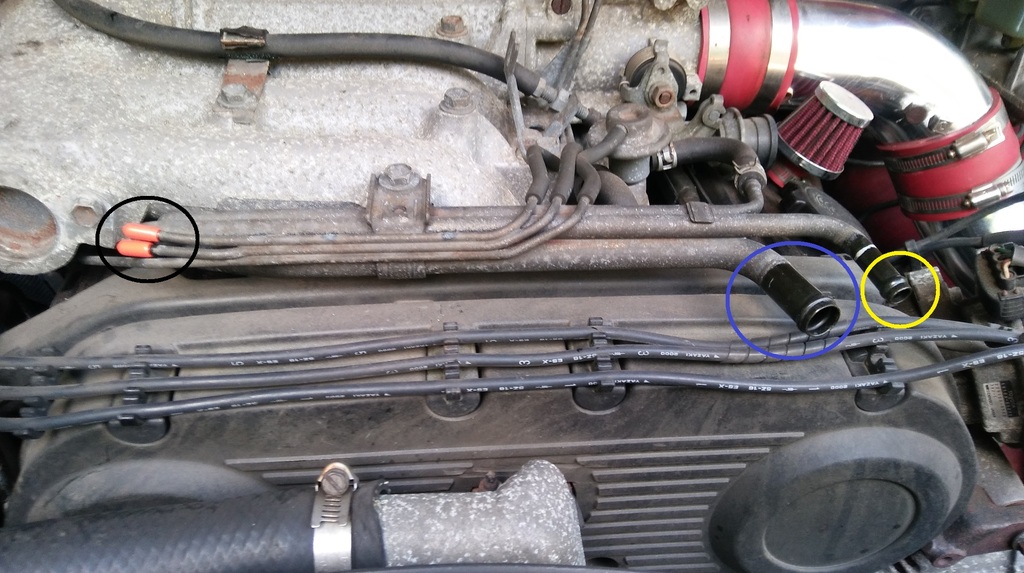
These next two pictures show the hardlines which I capped.
In the BLACK circles are the two lines that ran to the throttle body, but are now capped at both ends.
In the RED circle is the throttle body caps.
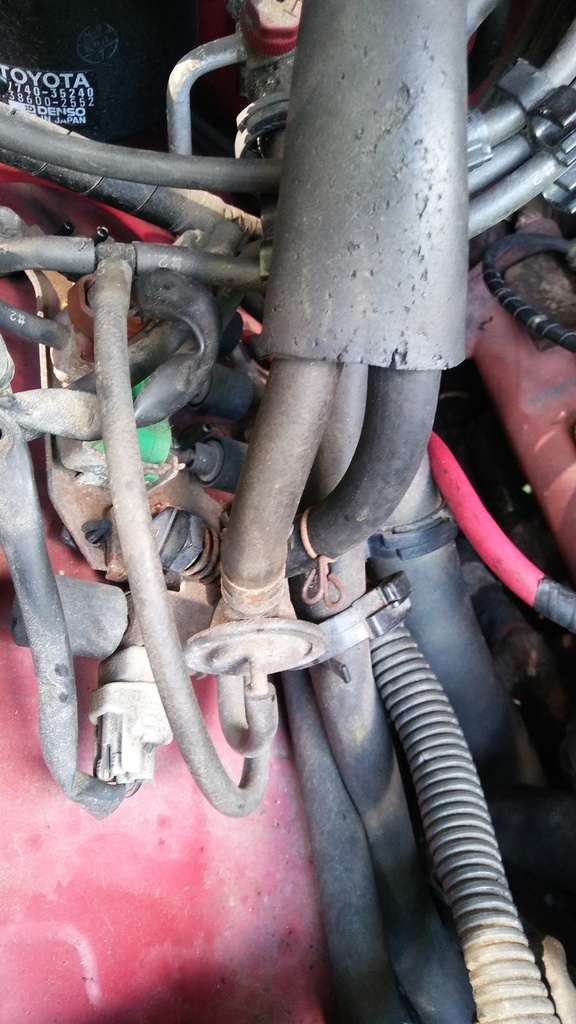
There was a rubber hose that connected the part of the intake tube and the hardline that are both circled in BLUE. I capped the part of the intake tube because that hose ran to the PAIR valve which is no longer there.
There also what a rubber hose that connected the two YELLOW circles. Even with the rubber hose connected, it still made the noise, but I found a split in the hose, so I capped the intake tube until I can find a new hose or a filter that will go over that hardline. That hardline is still used as it is connected to the one valve that is labeled "what is this?" in the above picture.
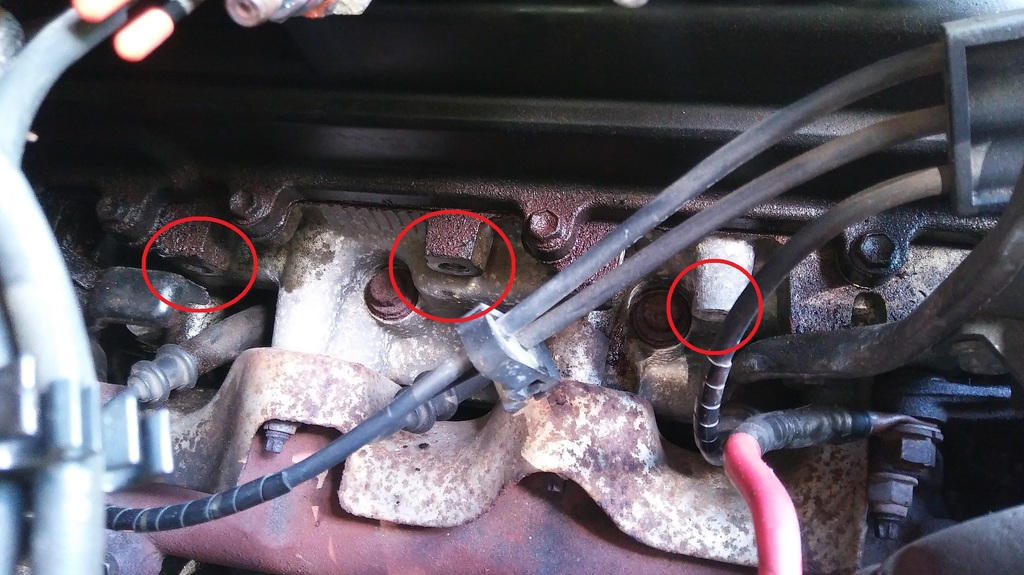
This last picture has three RED circles and they represent unused bolt holes that held the EGR and PAIR valves. AFAIK, the holes do not go all the way through and if they did, I can't imagine it would cause an air leak. However, I am exercising all options.
If anything here looks wrong, please let me know. I've gone over this thing multiple times and at this point, I wouldn't even be mad if it is something really stupid. Thank you in advance.
Last edited by 93Xtra-Cab; 06-25-2017 at 01:12 PM.
Turns out it was one of the block-off plates leaking. When I originally installed them, I spread the silicone on the plates and the exhaust manifold then immediately tightened them up. Then after I finished buttoning up the power steering pump install, I immediately fired it up to bleed the system. Two no-no's. So yesterday, I took them off, cleaned them up, reapplied the silicone then re-installed. This time I followed the directions and let them set an hour before I tightened them up and then I waited until this afternoon to finally fire it. No more chirping noise
 03-24-2015, 06:35 AM


 I would also like to know how you did your interior lights, as I have wanted to do something similar to this for a long time. Care to share?


