Plainview's '84 SR5 Pickup Driver Project
 04-27-2015, 09:40 PM
#1

Plainview's '84 SR5 Pickup Driver Project
Well, might as well jump in and post up about my project.
It has 217K on the clock and I want to make a fun, reliable truck I can drive daily, haul lumber & gravel & stuff, take camping and skiing and explore some of the 4WD roads around here. I want to keep it as efficient as possible in the hopes I'll be able to squeeze decent gas mileage out of it and I don't have any plans for real serious wheeling, so the name of the game is moderation.
I posted a couple pics of what it looked like when I first bought it 12 years ago over in the new members introduction section but I'll repeat one here for good measure:

It needed brakes and all new seals and I didn't like the looks of the puny non-vented rotors so I converted to FJ rotors and IFS calipers when I rebuilt the knuckles:

Then the engine started knocking and lots of stuff changed in my life, but I hung onto the truck for over ten years 'til I felt like tackling it again.
First up was an engine rebuild/upgrade to a 20/22R hybrid.
The seats in the 20R head were cut for oversize valves which left some nasty ridges in the bowls, so a little porting was done:

That looks better:


I then bought a smallish cam (they call it their "260" grind) and rebuilt rocker shaft assembly from Delta Cams in Tacoma. I installed that onto a bored over shortblock that's basically a stock rebuild with ARP rod bolts and a double-row timing set with steel backed guides.

One snag I ran into was that the block I rebuilt was an early 22R (early '84 and older) and I had ordered bearings for an '84+. For some reason Toyota changed the locations of the tangs on the main bearings in early '84 so the bearings I had wouldn't work with this block:


Once I acquired the appropriate bearings (which are only available as fully grooved, not half grooved like the later ones, unfortunately) the assembly went without issue.
A few shiny bits from LCEngineering took care of the EGR, O2 sensor, and rerouting the water passages on the intake manifold:

A header is in the future but for now I needed to make the stock exhaust manifold work, so a pipe tap and some brass plugs took care of the AIR ports.

The next snag was the water neck. When I started this build I didn't know there were both electric and mechanical fuel pump offerings for the 20R and on top of that I had no idea they'd design two different intake manifolds for them. I bought the intake separate from the head and I figured I could reuse a 22R water neck I had on hand, but nope, that wasn't going to work.

As you can see, the 20R clocks the water neck at a different angle than the 22R and aims it right at the fuel pump. On top of that, the 22R water neck is a different shape at the mounting flange than the 20R so even if I used an electric pump it wouldn't seal up properly.

Another day down calling around to wrecking yards to find someone who'd sell me a water neck off a 20R with mechanical fuel pump. After that was taken care of I also discovered the temp sensor bung is in a bad place on this manifold but fortunately the temp sensor just barely fits in there and by bending the tab over 90 degrees I was able to put the plug on it and it works.


Since I'm building a little hotrod 4-cylinder it needed a Weber carb, but since I want it to be as efficient as possible I went with the 32/36 which needs a pressure regulator with a stock pump, so Summit Racing had the answer for that:

There's even a convenient bolt hole on the manifold on which to mount it:

Once the carb was mounted I discovered a problem that Weber really should have discovered first. There's a tab on the bottom of the linkage that hits the adapter plate and binds the linkage up. Pull the carb back off and get busy with the grinder...

Finally, after what seemed like far too much screwing around, the engine ended up back in the truck.

And that's all for tonight. More later.
It has 217K on the clock and I want to make a fun, reliable truck I can drive daily, haul lumber & gravel & stuff, take camping and skiing and explore some of the 4WD roads around here. I want to keep it as efficient as possible in the hopes I'll be able to squeeze decent gas mileage out of it and I don't have any plans for real serious wheeling, so the name of the game is moderation.
I posted a couple pics of what it looked like when I first bought it 12 years ago over in the new members introduction section but I'll repeat one here for good measure:
It needed brakes and all new seals and I didn't like the looks of the puny non-vented rotors so I converted to FJ rotors and IFS calipers when I rebuilt the knuckles:
Then the engine started knocking and lots of stuff changed in my life, but I hung onto the truck for over ten years 'til I felt like tackling it again.
First up was an engine rebuild/upgrade to a 20/22R hybrid.
The seats in the 20R head were cut for oversize valves which left some nasty ridges in the bowls, so a little porting was done:
That looks better:
I then bought a smallish cam (they call it their "260" grind) and rebuilt rocker shaft assembly from Delta Cams in Tacoma. I installed that onto a bored over shortblock that's basically a stock rebuild with ARP rod bolts and a double-row timing set with steel backed guides.
One snag I ran into was that the block I rebuilt was an early 22R (early '84 and older) and I had ordered bearings for an '84+. For some reason Toyota changed the locations of the tangs on the main bearings in early '84 so the bearings I had wouldn't work with this block:
Once I acquired the appropriate bearings (which are only available as fully grooved, not half grooved like the later ones, unfortunately) the assembly went without issue.
A few shiny bits from LCEngineering took care of the EGR, O2 sensor, and rerouting the water passages on the intake manifold:
A header is in the future but for now I needed to make the stock exhaust manifold work, so a pipe tap and some brass plugs took care of the AIR ports.
The next snag was the water neck. When I started this build I didn't know there were both electric and mechanical fuel pump offerings for the 20R and on top of that I had no idea they'd design two different intake manifolds for them. I bought the intake separate from the head and I figured I could reuse a 22R water neck I had on hand, but nope, that wasn't going to work.
As you can see, the 20R clocks the water neck at a different angle than the 22R and aims it right at the fuel pump. On top of that, the 22R water neck is a different shape at the mounting flange than the 20R so even if I used an electric pump it wouldn't seal up properly.
Another day down calling around to wrecking yards to find someone who'd sell me a water neck off a 20R with mechanical fuel pump. After that was taken care of I also discovered the temp sensor bung is in a bad place on this manifold but fortunately the temp sensor just barely fits in there and by bending the tab over 90 degrees I was able to put the plug on it and it works.
Since I'm building a little hotrod 4-cylinder it needed a Weber carb, but since I want it to be as efficient as possible I went with the 32/36 which needs a pressure regulator with a stock pump, so Summit Racing had the answer for that:
There's even a convenient bolt hole on the manifold on which to mount it:
Once the carb was mounted I discovered a problem that Weber really should have discovered first. There's a tab on the bottom of the linkage that hits the adapter plate and binds the linkage up. Pull the carb back off and get busy with the grinder...
Finally, after what seemed like far too much screwing around, the engine ended up back in the truck.
And that's all for tonight. More later.
 04-30-2015, 06:05 PM
#4
Thanks for the comments! There's more to write but been pretty busy the last couple days. In the meantime, here's how the engine looks now. Been driving the truck to work all week and it's running pretty good but that Weber carb is NOT impressing me. Too many QC issues, which I'll outline in future posts.


Provided some of the parts that I need get here, I'll be installing new suspension over the weekend.

Lots of little detail stuff to take care of - I want to clean up the wire bundles, install an electric fan, etc. but the biggest priorities are taking care of things that make the truck run and drive good.
I really need to get the new suspension under it 'cause I bought some new shoes for it and there really isn't enough clearance for 32s. It had 30s on it in that first pic.

I have a question about the springs - which leaf to remove? I posted over in the Off Road Tech section about this so if anyone has any input I'd sure appreciate it.
Provided some of the parts that I need get here, I'll be installing new suspension over the weekend.
Lots of little detail stuff to take care of - I want to clean up the wire bundles, install an electric fan, etc. but the biggest priorities are taking care of things that make the truck run and drive good.
I really need to get the new suspension under it 'cause I bought some new shoes for it and there really isn't enough clearance for 32s. It had 30s on it in that first pic.
I have a question about the springs - which leaf to remove? I posted over in the Off Road Tech section about this so if anyone has any input I'd sure appreciate it.
Last edited by Plainview; 04-30-2015 at 06:14 PM.
04-23-2016, 05:50 PM
#6
Guess I haven't been very good about updating things on this forum...
I got the suspension all installed and dealt with last year and have just been enjoying driving it since then.
Here's a pic taken just after the suspension was installed:

It actually gave a little over 4" lift from where it was sitting on the original 210K mile factory springs. I suspect these OME springs give a little more lift than advertised, along with the obvious fact the factory springs had sagged pretty badly.
Next up, I wanted to improve the cargo carrying abilities of the bed and make it safer to carry my dogs back there, so built some bed extenders or "fences."


After that, I wanted better headlights, so installed some VisionX H4 conversion housings with some high output H4 bulbs. I also found a set of old-school Dick Cepek wire covers for cheap on Ebay so threw those on there too.


I'm pretty much done collecting the parts to build my own headlight relay harness with a third relay to control a set of extra driving lights and when that's done I'll post about it in the tech section.
Unfortunatley, something in the transmission or transfer case started making noise today, so I'm going to be forced to deal with that next.
I got the suspension all installed and dealt with last year and have just been enjoying driving it since then.
Here's a pic taken just after the suspension was installed:
It actually gave a little over 4" lift from where it was sitting on the original 210K mile factory springs. I suspect these OME springs give a little more lift than advertised, along with the obvious fact the factory springs had sagged pretty badly.
Next up, I wanted to improve the cargo carrying abilities of the bed and make it safer to carry my dogs back there, so built some bed extenders or "fences."
After that, I wanted better headlights, so installed some VisionX H4 conversion housings with some high output H4 bulbs. I also found a set of old-school Dick Cepek wire covers for cheap on Ebay so threw those on there too.
I'm pretty much done collecting the parts to build my own headlight relay harness with a third relay to control a set of extra driving lights and when that's done I'll post about it in the tech section.
Unfortunatley, something in the transmission or transfer case started making noise today, so I'm going to be forced to deal with that next.
Trending Topics
04-24-2016, 12:44 PM
#8

How's the motor running? Sweet truck
04-25-2016, 09:18 PM
#9
Thanks for the kind words!
the motor runs okay, but I don't think it was balanced properly. It has a very "buzzy" feel to it at higher RPMs. It lacks higher RPM power too, though I still have some things to do to it. I never opened up the intake under the carb spacer and it's still exhausting through the stock manifold which looks like an efficient design (It's the 4-into-2 manifold with the two secondary pipes that go down under the truck) but where the secondary pipes meet it necks down to a pretty small pipe. The cam is Delta Cam's 260 "torque" cam, too, so might not be set up to make power at higher RPMs. It's good off idle to about 4000 RPM.
The carb needs work too.
I was planning to tackle all this stuff in the next couple of weeks but I'm being forced to deal with the transmission instead.
I picked up a complete W56-C and transfer case last Sunday and will be getting started installing that this weekend.
One other little appearance/utility thing I've done that I don't have pictures of yet is I found a rear Smitty Bilt tube bumper with a 2" Class V receiver on Craigslist and put that on.
04-26-2016, 09:55 AM
#10
I see..Well sounds like you have a good plan
 05-12-2016, 08:49 PM
#13
Thanks again for the kind words!
I really have no idea on the power. Less than I'd hoped. Maybe 110-120 hp at this point? But, see the post above where I explain some issues that might be costing me power.
Then there's the fact it's an old school 2.4L carb'd 4-cylinder and it's pushing around a stock geared truck with 32" tires...
I've been dealing with drivetrain issues for the last couple of weeks which derailed my plans to deal with the carb spacer and exhaust issues.
I was driving down the freeway when all of a sudden something started vibrating and making a loud noise from somewhere underneath me. It was vehicle speed dependent, didn't matter what gear or engine RPM and was worse under load, so I slowed down and drove the few miles home. It was making a decent knocking noise at low speeds on surface streets.
The first thing I noticed when I got under it and looked around is that the output flange on the transfer case was moving around more than I'd like to see and there was oil sprayed all over the underside of the truck above the flange. The flange is actually moving on the output shaft, the output shaft itself doesn't seem to move much.
So, I figured that was the problem (and it definitely was *a* problem that needed to be addressed) and as luck would have it a guy was selling a W56-C on Craigslist for a good price. This tranny has been gone through by someone at some point (red sealer on the mid-plate and a dual pattern front driveshaft flange) though the seller didn't know anything about it. It's very tight with no leaks and everything seems to work smoothly though I haven't had a chance to test it under load yet...
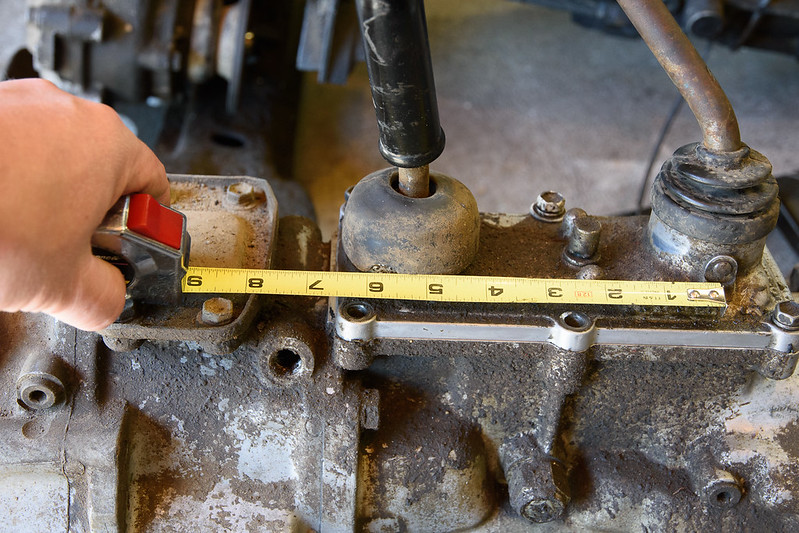
I knew the shifters were different, but didn't know by how much or whether it would really make a difference until I got it home and took some measurements.
Here are the original G52 shifters as measured from the top shift block off plate on the T-case:
 DSC_1343 by Will Baker, on Flickr
Here's the W56 shifters measured the same way.
 DSC_1342 by Will Baker, on Flickr
As you can see, the trans shifter is in the same place but the t-case shifter is almost an inch further back on the W56. Looking at the hole in the floor and in the console I figured there was plenty of room and I was more than pleasantly surprised by the end result.
Here's the W56 installed with the shifters sticking through the floor:
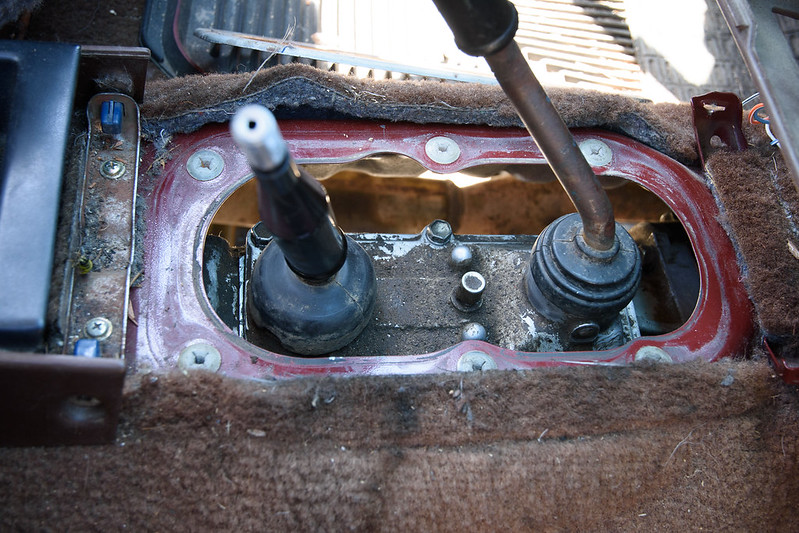 DSC_1391 by Will Baker, on Flickr
While the t-case shifter is further back, the angle of the lever is also different and puts it right where it needs to be.
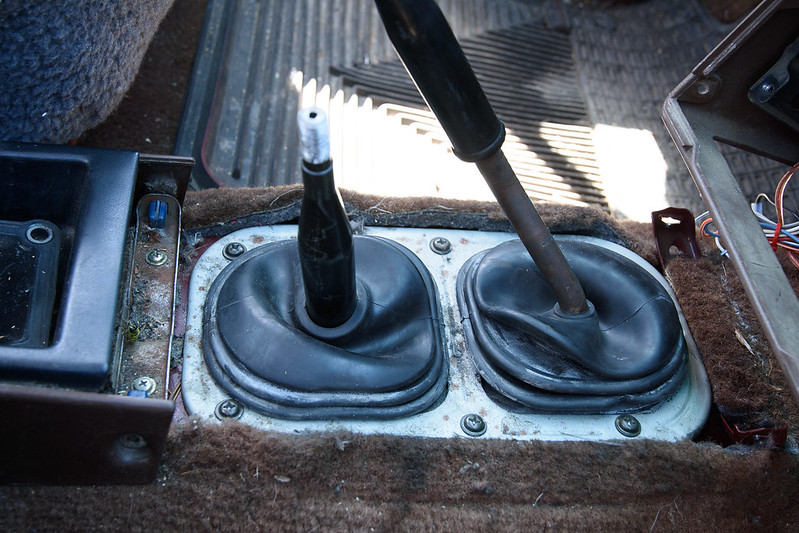 DSC_1395 by Will Baker, on Flickr
The shift levers are angled the opposite way of the G52 levers so the rubber boot is a little scrunched when installed but as you can see its really no big deal.
Here's the console and boots reinstalled. I apologize for the nasty rattiness of the boots... LOL I just discovered the new ones that are on Ebay and ordered one a few days ago so this will look a lot better soon.
But, as you can see, the shifters look like they came from the factory in this truck.
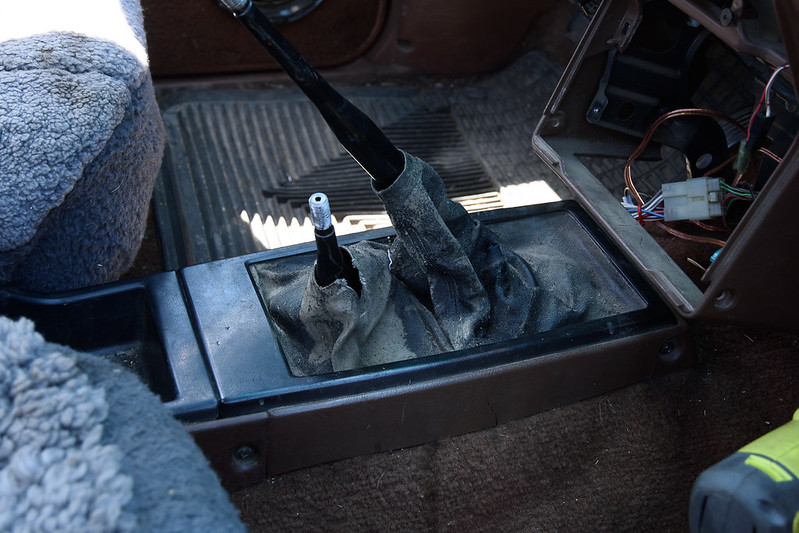 DSC_1396 by Will Baker, on Flickr
Once the tranny was all installed I took it for a test drive and didn't get any further than about 100 feet as it was still making a bad clunking noise. Back into the driveway with it and this time I put the rearend up on jackstands and spun the wheels and sure enough, the noise is coming from the differential.
So, I pulled the differential and found this:
 DSC_1403 by Will Baker, on Flickr
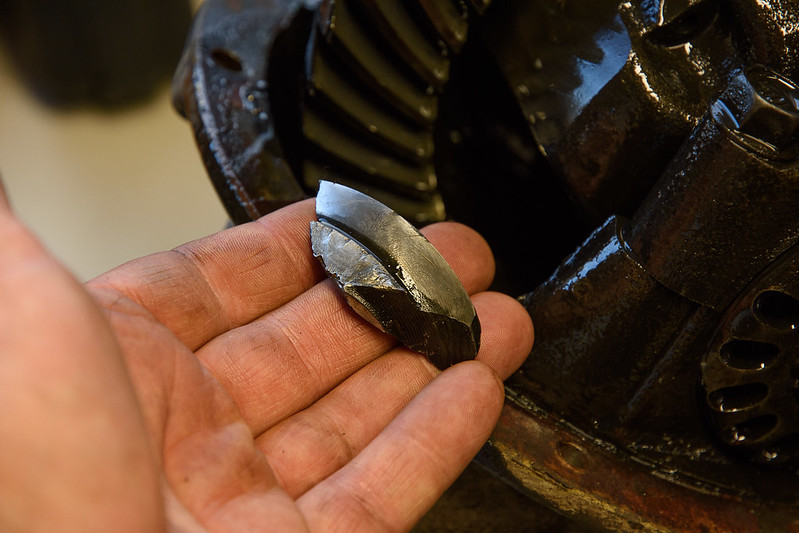 DSC_1400 by Will Baker, on Flickr
I need the truck back on the road ASAP and figured the quickest/easiest way was to find another complete 3rd member. After calling around to wrecking yards for two days and scouring Craigslist I was beginning to think I was just going to have to bite the bullet and pay for a rebuild with gears I didn't really want. The wrecking yards around here want $350 for a 3rd member if they even have one! Finally found one from a member on another forum who was local to me and for a really good price.
Got it installed yesterday. Still need to put in oil, bleed the brakes, put new U-joints in the driveshaft and get the driveshaft back in. No big deal, but I didn't have time to do it today.
Now I'm actively keeping my eyes open for an '88 - '95 V6 third member. I want to go to 4.56 gears and a true-trac and plan to upgrade to V6 down the road so the stronger third member will be the way to go.
I really have no idea on the power. Less than I'd hoped. Maybe 110-120 hp at this point? But, see the post above where I explain some issues that might be costing me power.
Then there's the fact it's an old school 2.4L carb'd 4-cylinder and it's pushing around a stock geared truck with 32" tires...
I've been dealing with drivetrain issues for the last couple of weeks which derailed my plans to deal with the carb spacer and exhaust issues.
I was driving down the freeway when all of a sudden something started vibrating and making a loud noise from somewhere underneath me. It was vehicle speed dependent, didn't matter what gear or engine RPM and was worse under load, so I slowed down and drove the few miles home. It was making a decent knocking noise at low speeds on surface streets.
The first thing I noticed when I got under it and looked around is that the output flange on the transfer case was moving around more than I'd like to see and there was oil sprayed all over the underside of the truck above the flange. The flange is actually moving on the output shaft, the output shaft itself doesn't seem to move much.
So, I figured that was the problem (and it definitely was *a* problem that needed to be addressed) and as luck would have it a guy was selling a W56-C on Craigslist for a good price. This tranny has been gone through by someone at some point (red sealer on the mid-plate and a dual pattern front driveshaft flange) though the seller didn't know anything about it. It's very tight with no leaks and everything seems to work smoothly though I haven't had a chance to test it under load yet...
I knew the shifters were different, but didn't know by how much or whether it would really make a difference until I got it home and took some measurements.
Here are the original G52 shifters as measured from the top shift block off plate on the T-case:
DSC_1343 by Will Baker, on FlickrHere's the W56 shifters measured the same way.
DSC_1342 by Will Baker, on FlickrAs you can see, the trans shifter is in the same place but the t-case shifter is almost an inch further back on the W56. Looking at the hole in the floor and in the console I figured there was plenty of room and I was more than pleasantly surprised by the end result.
Here's the W56 installed with the shifters sticking through the floor:
DSC_1391 by Will Baker, on FlickrWhile the t-case shifter is further back, the angle of the lever is also different and puts it right where it needs to be.
DSC_1395 by Will Baker, on FlickrThe shift levers are angled the opposite way of the G52 levers so the rubber boot is a little scrunched when installed but as you can see its really no big deal.
Here's the console and boots reinstalled. I apologize for the nasty rattiness of the boots... LOL I just discovered the new ones that are on Ebay and ordered one a few days ago so this will look a lot better soon.
But, as you can see, the shifters look like they came from the factory in this truck.
DSC_1396 by Will Baker, on FlickrOnce the tranny was all installed I took it for a test drive and didn't get any further than about 100 feet as it was still making a bad clunking noise. Back into the driveway with it and this time I put the rearend up on jackstands and spun the wheels and sure enough, the noise is coming from the differential.
So, I pulled the differential and found this:
DSC_1403 by Will Baker, on FlickrDSC_1400 by Will Baker, on FlickrI need the truck back on the road ASAP and figured the quickest/easiest way was to find another complete 3rd member. After calling around to wrecking yards for two days and scouring Craigslist I was beginning to think I was just going to have to bite the bullet and pay for a rebuild with gears I didn't really want. The wrecking yards around here want $350 for a 3rd member if they even have one! Finally found one from a member on another forum who was local to me and for a really good price.
Got it installed yesterday. Still need to put in oil, bleed the brakes, put new U-joints in the driveshaft and get the driveshaft back in. No big deal, but I didn't have time to do it today.
Now I'm actively keeping my eyes open for an '88 - '95 V6 third member. I want to go to 4.56 gears and a true-trac and plan to upgrade to V6 down the road so the stronger third member will be the way to go.
Last edited by Plainview; 05-12-2016 at 08:50 PM.
05-15-2016, 08:18 PM
#15
Well, I think I'd rather break a diff than blow an engine or transmission. They're a lot easier to replace, and cheaper too.
Of course, replacing the diff couldn't go completely smooth. It was from a 1st gen and the bolt pattern on the pinion flange was different (and the holes were smaller, too) so I had to drill 4 new holes in the pinion flange with a hand drill while laying under the truck. Not a huge deal, but not much fun, either. A 25/64 drill bit is the perfect size for this.
Been driving it around a little the last couple of days and am noticing a vibration that's pretty strong in 2nd gear when the engine is between 2000-2600 RPM, under light throttle/light load conditions. Seems to smooth out with heavy throttle and when coasting. Not sure what's up with that...???
Will drive it to work tomorrow and see how it does on the freeway.
The following users liked this post:
YotaPkup87 (04-15-2024)
05-23-2016, 09:08 PM
#16
Been driving it around for a week now and with the new tranny and 3rd member it's overall smoother than it was before but it has this one distinct vibration that crops up right at 25 - 30 MPH. It feels like driving on a washboarded road, though it's not that strong. Imagine a very lightly washboarded road... LOL. Anyway, I don't have a clue what's causing that so am learning to ignore it for now as otherwise it's running fine.
In the meantime, I'm continuing to plan for installing a relay harness for the headlights and auxiliary lights. Here's a schematic I worked up. Anyone see any problems with it?
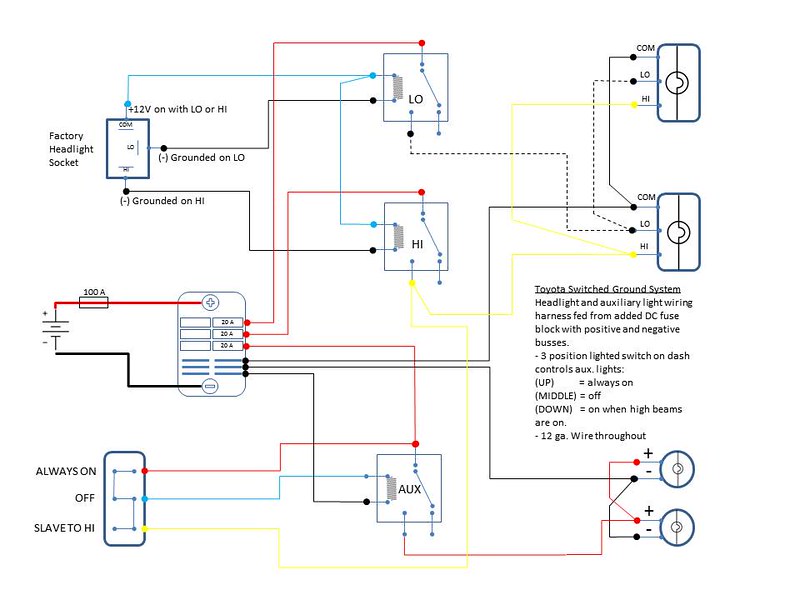 HeadlightRelayHarness by Will Baker, on Flickr
In the meantime, I'm continuing to plan for installing a relay harness for the headlights and auxiliary lights. Here's a schematic I worked up. Anyone see any problems with it?
HeadlightRelayHarness by Will Baker, on Flickr

Thread
Thread Starter
Forum
Replies
Last Post
Regency
General Electrical & Lighting Related Topics
20
01-03-2020 07:43 PM
WTB[WestCanada]: 1989 4runner stock front bumper and other items
lledwod
Items Wanted
1
08-30-2016 01:03 PM


