When you click on links to various merchants on this site and make a purchase, this can result in this site earning a commission. Affiliate programs and affiliations include, but are not limited to, the eBay Partner Network.
Had some slow days at work, so I also got in & tackled the passenger window regulator. I'd looked up & found that one is not available from Toyota; the driver's side is still available, though pricey.
On the way in, got a better look at the 3 speakers that were in the door.
They were nice Pyle Drivers at one time, but now the cones are destroyed/rotted out. Then I found that one of them was probably partly to blame for the window problem. The PO was quite the audio guy at one time, but probably not a sharp mechanic. The speaker that was cut into the lower rear portion interfered with the arm of the window regulator, bending it and causing some of the teeth to strip out.
Straightened the bent portion, here you can see where it was scraping.
The stripped part was at the fully closed position, so the window would slip down a bit & leave a gap. This was getting pretty annoying at freeway speeds, and we may be getting more rain eventually. The passenger side is actually staying up now, but I'll be looking for a used regulator.
Also replaced the hard & dry oil cap o-ring with a new one.
Then, I started tackling the driver's window. Found similar issues with the speakers, except the offending one had a screen/cover over it, but had been gutted.
It looks like I also need to source a set of door panels, or make some. That's as far as I got with that side before I had to go do some other work.
Guess I'll go ahead and update this. Last we checked, I had done a temporary repair on the passenger window regulator. Not long after that, I picked up a pair of complete doors to pull parts off of (plan is to keep some of the parts, and sell others), so I tackled the driver regulator next.
It was in a lot worse shape!
Once in place, and greased up, it works nicely. Now I can use the drive through at Starbuck's.
I hope to use the other doors as donors for repairing the original ones, eventually piecing the sheet metal together in a somewhat professional manner.
A couple more things I addressed started with these pictures I took while driving.
The pedal pads were an easy fix, and feel much nicer.
The windshield needs a new seal, as there are many cracks all the way around. For now, I just filled in all the holes with Toyota FIPG. :gap:
I need to get some newer pictures of that repair, and there are a couple other things to update as well.
Got ready to do some major work, but I had to get space cleared out in my garage. The plan was to do this while the kids were on winter break, but my oldest started back on January 9th, and we got it pulled in the next night.
Now, you're all going to be asking what work will be happening...and the videos & pics give some clues. Besides pulling the trans & transfer case to do the rear main seal, I still need to rebuild the power steering pump, the radiator started leaking the other day, and those axle seals have gotten really bad. Many other things should be done "while I'm there", so we'll see how this progresses.
My photographer didn't get the camera set up for video in time, so we didn't document the trans & transfer removal, but it went pretty well just balanced on a floor jack.
The oil leak accumulation can be seen on the back of the engine.
You're welcome. I've heard that from a few people about how much it would go for here or there. Not sure if we're in a low priced area, but some that I see on Craigslist aren't going for a significant amount.
One evening after work, I took a run up to Fresno with the whole chunk loaded in the back of my Camry. Marlin was waiting for me, and in his usual helpful way, spent more time going over it than he would ever charge for. We started with throwing the clutch, flywheel, & pressure plate in his parts washer, then got the transmission & transfer case up on the bench.
After looking at the serial numbers, it appears that the transmission was swapped at some point. My truck was built February 1982, the transfer case is the same, but the trans has a date of November 1981. Pulling the top cover & nosecone confirmed that I have the earlier, small-case L50, so that was a letdown.
Marlin sold me on upgrading to the larger front bearing and we talked about the center bearing and fifth gear a little bit. Fortunately, after splitting the transfer case from the trans, we found that fifth gear has already been upgraded. Marlin commented that whoever built it actually knew a little bit of what they were doing. He will make his own improvements to things like the shift forks, rebuild the whole thing, and hopefully get some 4.70 gears into the transfer case.
With the clutch & pressure plate cleaned up, it looks like I will be reusing them. Marlin also machined my flywheel to spec, and signed it for me (so thankful I thought to bring those along).
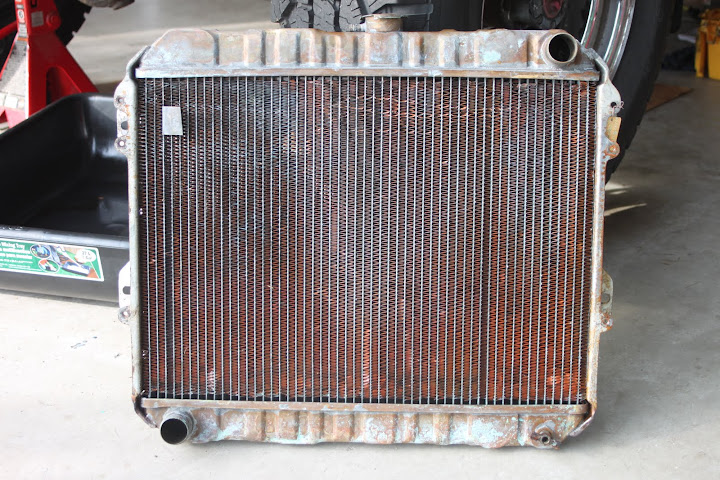
Pulled the radiator and took it into the shop. They called me the next day and said it's not repairable.
It's leaking from the core, and with the price of metal, a new core would be over $500.
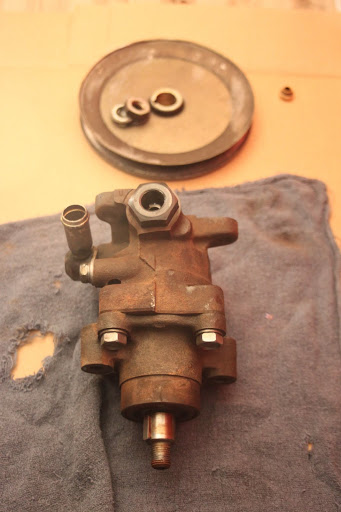
I've also been working at getting the P/S pump out. The pressure hose is giving me trouble.
I checked with all the older techs at work and none of them had a 17mm line wrench. One of them had a pair of long pliers he said works well on things like that, and a cheater pipe to slide over the handle, which I brought home tonight.
I ended up finding another line wrench in the toolbox that I have in my Cruiser. It's an S-K brand, but fit tighter and had more bulk around the head than my Mac. Using it with the cheater pipe and holding the outlet with a 1 1/16" open end, it popped loose.
Someone had used a pair of pliers on it before, as evidenced by the scars, but it's still usable.
I also meant to mention that wrench was given to me by my brother-in-law, who is a luthier (violin-maker). He and a friend bought a "lot" of toolboxes full of tools at auction. They thought they were bidding on just one, but got all of them at a bargain, then had to haul them off. I think they each kept one box, sold the rest for a profit, then had were a few tools left over that I got.
A lot of the work right now is cleaning parts; either nuts & bolts for reassembly time, or parts that are having paint/rust removed and repainted.
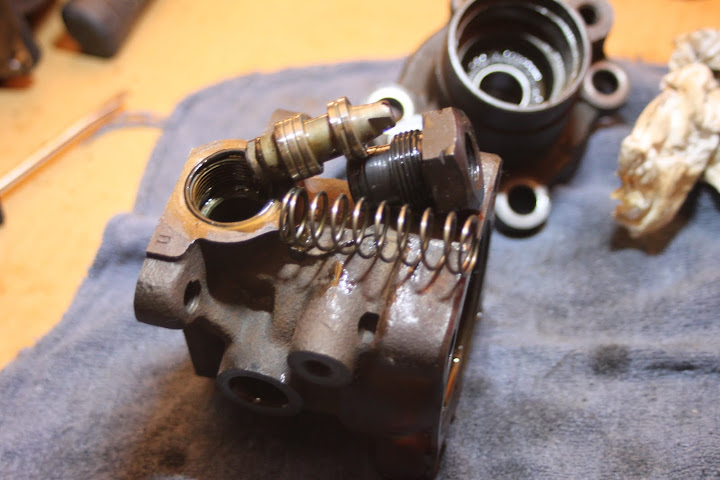
Here's the power steering pump rebuild progress so far.
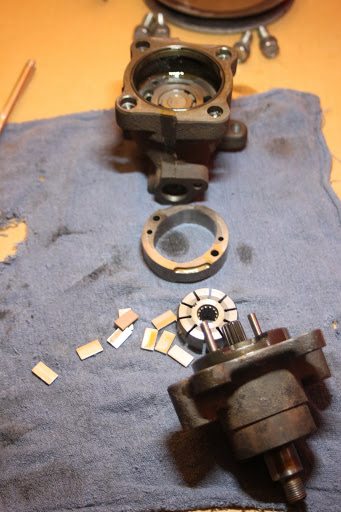
Getting the front seal out was quite a chore, but once started, it had to be done. The repair manual actually says to cut the rubber of the seal from around the shaft, then pry the rest out.
Under the seal is a snap ring, which I had to remove with a couple screwdrivers, since my snap ring pliers were at work.
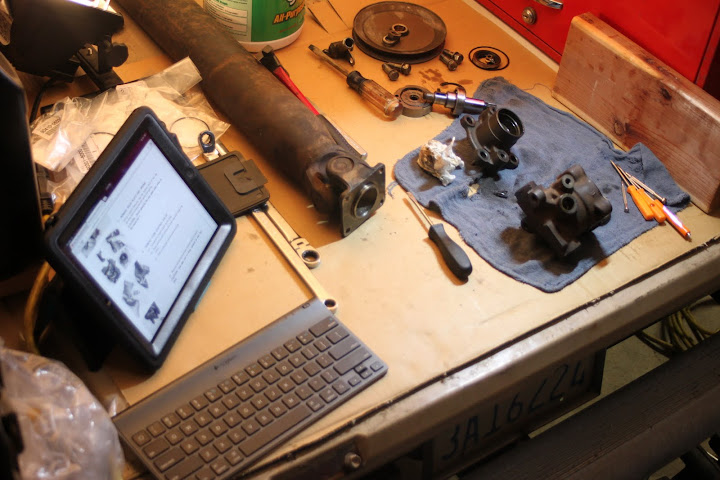
Most of these pictures I took for my own benefit when reassembling.
We were doing this in the back of the truck, had the FSM on the iPad, and other parts stashed all around.
Everything was still available from Toyota, including o-rings, gaskets, etc. just not in kit form anymore. Of course, the bushing inside the housing has never been available separately, and mine shows some wear (too hard to photograph), but I will just have to run with it.
I also have the rear main seal housing cleaned & prepped for reassembly.
New seal installed.
The EGR Cooler mounts to the back of the cylinder head, and seemed to be the source of one of my leaks.
It allows exhaust gasses to pass next to the coolant passage before entering the combustion chamber. Both portions need to be sealed properly, and Marlin gave me a recommendation for improving the coolant portion.
Many of the water pumps on newer Toyota vehicles have similar grooves for the FIPG to seal into, so it should help here as well.
I did some work on a guy's FJ Cruiser, and he has a bead blaster sitting in his garage. He normally uses it for refinishing firearms as a side hobby, but was kind enough to clean up a couple of my parts.
This is much better than the wire wheel and sandpaper I was using.
The inside of the oil pan still has some rust, so I went ahead and oiled it when I was priming and painting.
Just one fuzzy picture of it piled in the back of the truck with everything else.
Here's my 16 month old "helping" in the garage. He actually already knows how a screwdriver works.
So, on my day off this week, I decided to try to get everything else back together as well.
First, i finished cleaning up the back of the head.
Then, I got the plate ready for install. I used FIPG for oil around the EGR ports, and the green tube is what Toyota uses with the newer coolants.
Installed! The sealant oozed out a bit and looks messy, but it should hold. I was also concerned about the cam plug possibly leaking, so added some sealant under its flap.
That was about all I accomplished on my day off, because the bolts for the rear main seal retainer went missing. Today I scavenged some from around the shop and brought them home, with just enough time before dinner to install the retainer & the oil pan.
Those are Fleet Runner belts that Napa gets from Gates. All except the narrow one.
I got the u-joints done on the rear driveshaft and painted it all up.
Then on 7/10/16 at 7:00 PM, it pulled out of the garage under its own power.
Still working on the front driveshaft, and having a few issues. Some parts are all nicely painted.
Others I'm still working on.
The plug for the sliding portion of the shaft was missing. I had a newer shaft that I popped the plug out of, but it was slightly larger diameter. I used the bench grinder with a pocket magnet holding the plug.
It fit almost perfectly, with a little bit of FIPG to seal it up and a restake to hold it in place.
Also working on the CV ball joint that goes in the middle of the double cardan joint. I tried to get it out with the seal puller and a hammer.
The seal popped out, but the joint stayed in until I got a small Torx bit to put in the grease hole, and used the press.
That actually only got the ball out, then I had to use the puller on the race. Using the kit from Precision (613) that it calls for, but the new seal is a smaller diameter. Found out these kits all come from Rockford Driveline, and they have an adapter ring that it looks like I need. http://www.rockforddriveline.com/toyota.pdf I called them, got great customer service, and now one is on its way.
Before you go pulling the tranny looking for leaks in the rear main seal, check the valve cover gasket first. I had an oil leak that I thought was coming from my rear main seal. I had just rebuilt my engine, so I knew that the main seals were good so I got the mirror out and started looking around the back of the engine. Turns out that it was actually coming from the "half moon" gasket on the rear of the valve cover, dripping down around the the tranny and even a little between the torque plate and tranny, then dropping from the lowest point of the bellhousing onto the garage floor. It was basically a few drips eveny night, but enough to piss me off given the fact that my truck was always kept spotless and in pristine condition. I even had a very slight leak in the front "half moon" gasket as well. I ended up pulling the valve cover and applying some FIPG to all sides of the half moon gaskets and re-installing them. LCE actually recommends this and does this on all of their builds. Problem fixed! Hopefully that is your problem as well.
Installed! The sealant oozed out a bit and looks messy, but it should hold. I was also concerned about the cam plug possibly leaking, so added some sealant under its flap.
I had done the valve cover gasket awhile back, and resealed the cam plugs with FIPG. When I looked up there with the trans out, I got to thinking maybe I should have replaced them, but just did some more sealer under the flap as posted above. I will definitely take a look at it again, though.
 02-24-2016, 03:29 PM