RobotMoose stops being lazy and starts a slow-moving build thread.
 05-27-2015, 05:14 AM
#1
Registered User
Thread Starter
iTrader: (1)
Join Date: Jul 2012
Location: Calistoga, CA
Posts: 639
Likes: 0
Received 0 Likes
on
0 Posts
RobotMoose stops being lazy and starts a slow-moving build thread.
Hey folks,
I'm RobotMoose, you can also call me Doc, it's my trail name. Many of you know me, I've posted up here intermittently over the last couple of years, and I've had a few project threads begin and go dead because I'm usually stretched way thin on classes and funds. I'm hoping this won't be the case with this one.
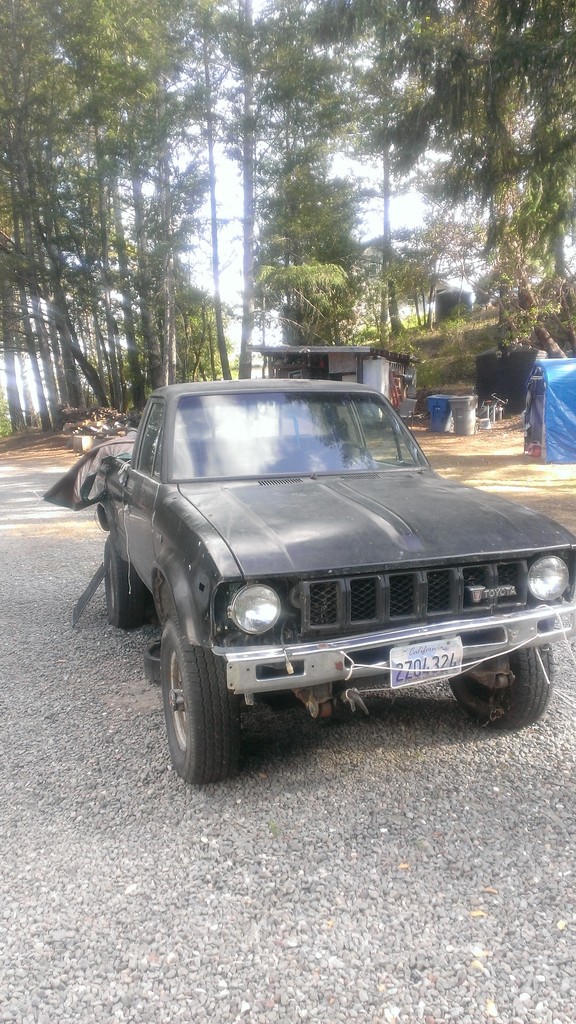
Anywho, I've got an '83 4x4 that has been in my possession for five years now, and an object of my misplaced affections for about six or seven.
Here she is, I believe hauling firewood on my folks' property:
S6300697.jpg?t=1342082076
To give a little background, I've grown up around compact trucks, my Dad's pet truck was an '86 S10 4x4 with a gutless 2.8 liter 60* V6. It was almost fanatical in its simplicity, but in return it's functionality was just immense. Between a childhood spent riding center-hump in "The Little White Truck" as we called it, or cruising the El Dorado County back country in my Uncle's Round-fender, I got hooking by the 4X4 life hard.
This truck, I found at my local Toyota-only shop. It had sat for a few years and racked up substantial registration fees and penalties. They crew at Yodaman fluffed her up for sale, but nobody bit because of those fees. I happened to be in the shop one evening and just fell in love with it, it just reminded me of both Dad's old truck and Uncle Steve's old CJ.
I drove it as a DD for a solid two years, it was a fair-conditioned truck, but having sat for so long, it just had the usual issues a disused vehicle that's suddenly thrust into the hands of a busy student tend to have. I lost wheel seals, I lost u-joinds, I lost master and slave cylinders, eventually a front U-Joint which tore the lobe off the T-case on a highway and blew up the bearings in the transmission. I also listened to "old mechanic's tales" and switched over to a 20-weight oil because it was a "high-mileage motor" which I'm pretty sure robbed this engine of its last cylinder cross-hatching.
Lesson there: 22Rs don't like high-weight oil, even the high-mileage ones.
After that, the truck sat for a bit. I bought a used Corolla to DD and loathe and just let the truck sit for a few years until I realized that I finally needed to poop or get off the pot.
Sorry for how verbose this first page has turned out to be. I promise future posts will certainly be briefer.
I'm RobotMoose, you can also call me Doc, it's my trail name. Many of you know me, I've posted up here intermittently over the last couple of years, and I've had a few project threads begin and go dead because I'm usually stretched way thin on classes and funds. I'm hoping this won't be the case with this one.
Anywho, I've got an '83 4x4 that has been in my possession for five years now, and an object of my misplaced affections for about six or seven.
Here she is, I believe hauling firewood on my folks' property:
S6300697.jpg?t=1342082076
To give a little background, I've grown up around compact trucks, my Dad's pet truck was an '86 S10 4x4 with a gutless 2.8 liter 60* V6. It was almost fanatical in its simplicity, but in return it's functionality was just immense. Between a childhood spent riding center-hump in "The Little White Truck" as we called it, or cruising the El Dorado County back country in my Uncle's Round-fender, I got hooking by the 4X4 life hard.
This truck, I found at my local Toyota-only shop. It had sat for a few years and racked up substantial registration fees and penalties. They crew at Yodaman fluffed her up for sale, but nobody bit because of those fees. I happened to be in the shop one evening and just fell in love with it, it just reminded me of both Dad's old truck and Uncle Steve's old CJ.
I drove it as a DD for a solid two years, it was a fair-conditioned truck, but having sat for so long, it just had the usual issues a disused vehicle that's suddenly thrust into the hands of a busy student tend to have. I lost wheel seals, I lost u-joinds, I lost master and slave cylinders, eventually a front U-Joint which tore the lobe off the T-case on a highway and blew up the bearings in the transmission. I also listened to "old mechanic's tales" and switched over to a 20-weight oil because it was a "high-mileage motor" which I'm pretty sure robbed this engine of its last cylinder cross-hatching.
Lesson there: 22Rs don't like high-weight oil, even the high-mileage ones.
After that, the truck sat for a bit. I bought a used Corolla to DD and loathe and just let the truck sit for a few years until I realized that I finally needed to poop or get off the pot.
Sorry for how verbose this first page has turned out to be. I promise future posts will certainly be briefer.
 05-27-2015, 05:46 AM
#2
Registered User
Thread Starter
iTrader: (1)
Join Date: Jul 2012
Location: Calistoga, CA
Posts: 639
Likes: 0
Received 0 Likes
on
0 Posts
As I mentioned, I'm a student, and I'm getting ready to move on to the next phase of my educational career, and the only way this rig is coming with me is under its own power, so I'm starting a summer-long crash rebuild with the hopes that it'll be in the shop for a new motor by the first weeks of the fall semester.
My primary fields of study are history and geology. I hope to eventually hold a professorship that would allow me to discuss mining history. Until then, much of the next few years will be cruising out to look at rocks, mines or townsites and documenting finds as well as taking historic maps and applying them to present-day topos. You can't really do that with a Corolla, and even if I were to sink 20 grand into this truck it'll still be 8 grand cheaper that a new stripper-package Taco or Heep.
This is my overall plan for this rig:
- A well-built 22R. Crunching the numbers; one with the right head work, ignition, cam profile, exhaust and intake work, should push into the realm of 115-120 horsepower (assuming a conservative 5-8% power increase for each item).
- 4.88 gearsets and Yukon Zip Lockers F&R. Simplicity value-per-dollar is key
- OME HD suspension
- Trail armor
- Marlin's low-range gears
- 33" tires I'm shooting for steeper gears than necessary for extra power pulling hills.
- Upgrade brakes because stopping is pretty important. Sometimes.
- Camper shell with custom sleep/organizing systems
- a fresh coat of paint.
In addition to facilitating my geological-nerdery, I'm a fanatical backpacker, interesting in overlanding and wheeling and just generally want to make something I could live out of and off of in case I just want to meander through whatever National Forests I happen to find. Just a general go-anywhere-do-anything rig.
Here are some concept drawings I've produced on Sketchup:
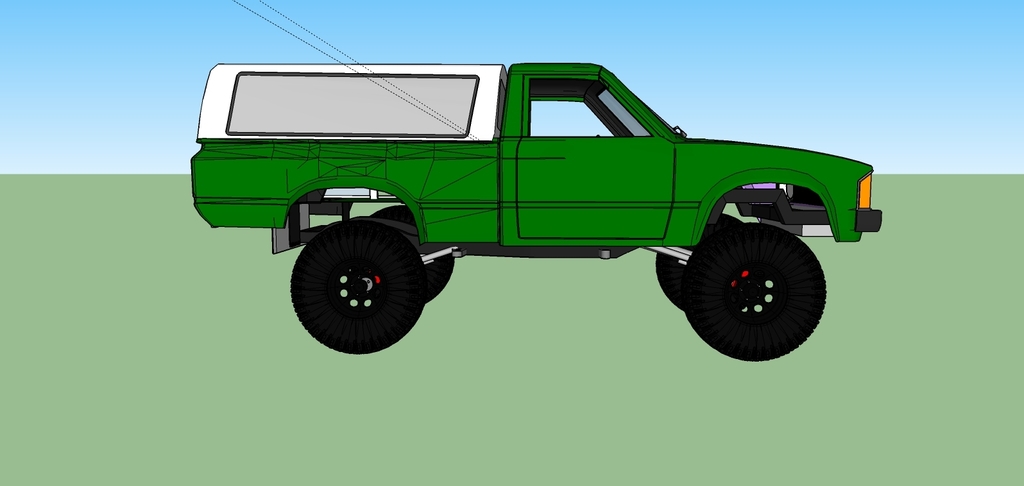
Pretty basic. I don't like to advertise myself, and I really don't like the notion of people passing by and knowing I might have camping goodies to steal.
Inside view of the sleep system:

Again, very simple, keeping as much as possible out of sight and out of mind.
And exploded:
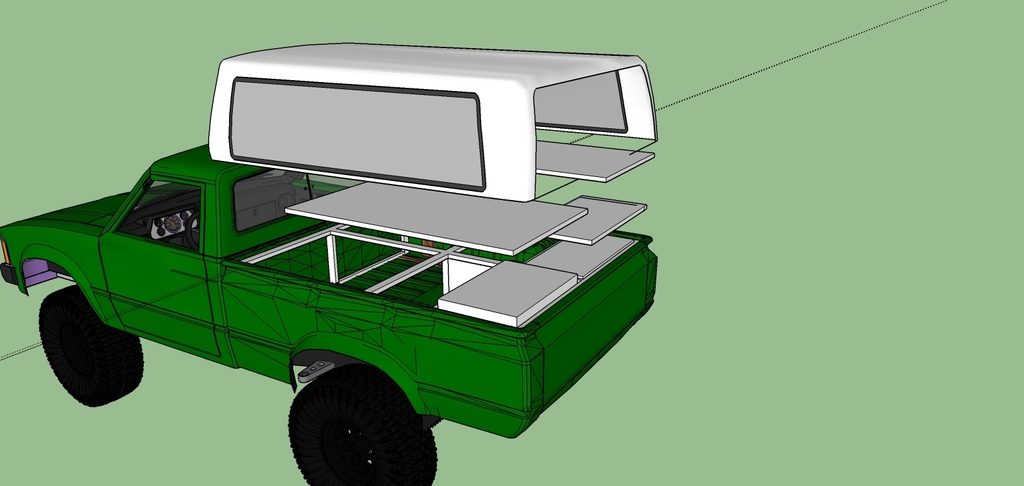
80% of this is just storage, but the compartment on the front R/H side will hold an EvaKool fridge and be insulated to keep noises under control. It will also have an exhaust vent and fan to keep the fridge happy.
the L/H front will hold my Coleman cooler.
I'm thinking of using the EK primarily as a freezer for storing frozen goods and ice packs to keep the cooler at fridge temps. It should work fine.
As far as accessories go, I've got a line on some cool 12V DC goodies, like a crockpot, electric "oven" and tea kettle. The kinds of things truckers use. I also have my backpacking stove and Dutch Ovens.
Simplicity is a beautiful thing.
My primary fields of study are history and geology. I hope to eventually hold a professorship that would allow me to discuss mining history. Until then, much of the next few years will be cruising out to look at rocks, mines or townsites and documenting finds as well as taking historic maps and applying them to present-day topos. You can't really do that with a Corolla, and even if I were to sink 20 grand into this truck it'll still be 8 grand cheaper that a new stripper-package Taco or Heep.
This is my overall plan for this rig:
- A well-built 22R. Crunching the numbers; one with the right head work, ignition, cam profile, exhaust and intake work, should push into the realm of 115-120 horsepower (assuming a conservative 5-8% power increase for each item).
- 4.88 gearsets and Yukon Zip Lockers F&R. Simplicity value-per-dollar is key
- OME HD suspension
- Trail armor
- Marlin's low-range gears
- 33" tires I'm shooting for steeper gears than necessary for extra power pulling hills.
- Upgrade brakes because stopping is pretty important. Sometimes.
- Camper shell with custom sleep/organizing systems
- a fresh coat of paint.
In addition to facilitating my geological-nerdery, I'm a fanatical backpacker, interesting in overlanding and wheeling and just generally want to make something I could live out of and off of in case I just want to meander through whatever National Forests I happen to find. Just a general go-anywhere-do-anything rig.
Here are some concept drawings I've produced on Sketchup:
Pretty basic. I don't like to advertise myself, and I really don't like the notion of people passing by and knowing I might have camping goodies to steal.
Inside view of the sleep system:
Again, very simple, keeping as much as possible out of sight and out of mind.
And exploded:
80% of this is just storage, but the compartment on the front R/H side will hold an EvaKool fridge and be insulated to keep noises under control. It will also have an exhaust vent and fan to keep the fridge happy.
the L/H front will hold my Coleman cooler.
I'm thinking of using the EK primarily as a freezer for storing frozen goods and ice packs to keep the cooler at fridge temps. It should work fine.
As far as accessories go, I've got a line on some cool 12V DC goodies, like a crockpot, electric "oven" and tea kettle. The kinds of things truckers use. I also have my backpacking stove and Dutch Ovens.
Simplicity is a beautiful thing.
Last edited by RobotMoose; 05-27-2015 at 06:12 AM. Reason: Photobucket doesn't know the meaning of copy and paste.
 05-28-2015, 03:45 AM
#4
Registered User
Thread Starter
iTrader: (1)
Join Date: Jul 2012
Location: Calistoga, CA
Posts: 639
Likes: 0
Received 0 Likes
on
0 Posts
I've pretty much finished up my drawings for now, and I think I'm satisfied with the overall direction. A friend of mine is a fabricator and has offered to help me convert an old rear bumper from a previous project into an offroad bumper.
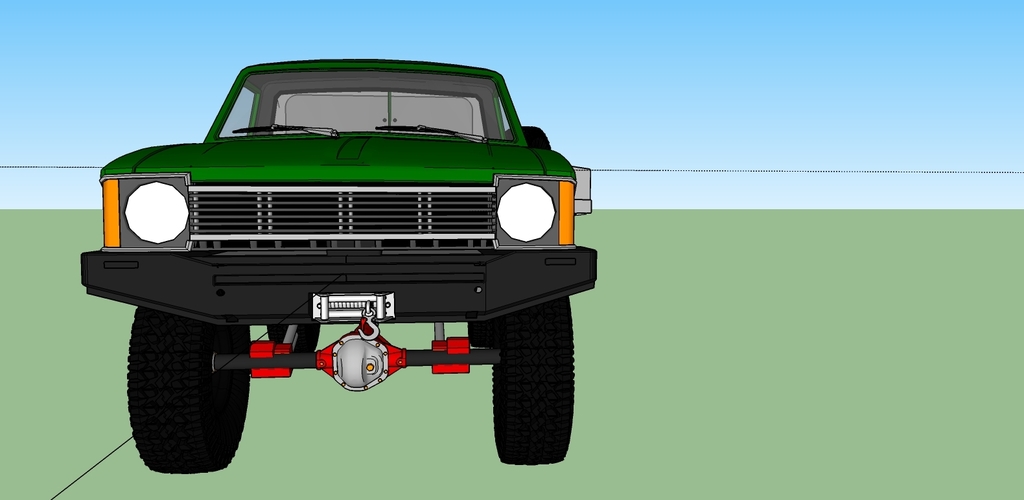
I just slapped in a generic ARB style bumper into the model. I'm seriously considering the SORD 2nd-gen front unit, if it will fit.

Dabbling with the swingout design. I've decided that the cooler would be better carried outside, freeing up room inside for gear and provisions. I'll probably use Metal-Tech's basket for that.

The swingout all buttoned up. The rear bumper is an old Bardon bumper from my first truck. I want to carry it over as a small memorial to my uncle, who'd sold me the truck.
The bumper will also house brake and signal LEDs as well as a single high-powered backup light.
In the real world, I've just finished pulling the bed back enough to and down the back of the cab, and my second order of Spectrum has arrived to finish sound-proofing my fenders. I'll probably drop the tank tomorrow. Things are shaping up.
I just slapped in a generic ARB style bumper into the model. I'm seriously considering the SORD 2nd-gen front unit, if it will fit.
Dabbling with the swingout design. I've decided that the cooler would be better carried outside, freeing up room inside for gear and provisions. I'll probably use Metal-Tech's basket for that.
The swingout all buttoned up. The rear bumper is an old Bardon bumper from my first truck. I want to carry it over as a small memorial to my uncle, who'd sold me the truck.
The bumper will also house brake and signal LEDs as well as a single high-powered backup light.
In the real world, I've just finished pulling the bed back enough to and down the back of the cab, and my second order of Spectrum has arrived to finish sound-proofing my fenders. I'll probably drop the tank tomorrow. Things are shaping up.
05-28-2015, 04:41 AM
#6
Registered User
Thread Starter
iTrader: (1)
Join Date: Jul 2012
Location: Calistoga, CA
Posts: 639
Likes: 0
Received 0 Likes
on
0 Posts
I downloaded this model from the Sketchup 3D Warehouse, and the creator had been tinkering with the worst 4-link designs I'd ever seen.
Also, if you look, those axles are D60s, too.
05-28-2015, 05:00 PM
#7
nice work on the sketch up .
just a quick question , or maybe a suggestion .
I don't know how big of a guy you are ? I had a truck much like this back in the mid 80's I use to sleep in once in a while .. cab height topper .
I ran the plywood "shelf" basically at the top of the box rail height , exactly where your drawings show you want it .
I gotta tell you , it was not a good sleep , just to close to the top of the roof for me , my shoulders almost hit the roof , and after a night of sleeping the roof was always wet from the moister in the air . extra curricular activities we're also reduced to "spooning"
my recommendations would be a roof top vent , and either a taller topper , or relocate lower the height of the main structure
just my 2C , if it helps at all
.
Trending Topics
05-28-2015, 08:00 PM
#8
Registered User
Thread Starter
iTrader: (1)
Join Date: Jul 2012
Location: Calistoga, CA
Posts: 639
Likes: 0
Received 0 Likes
on
0 Posts
nice work on the sketch up .
just a quick question , or maybe a suggestion .
I don't know how big of a guy you are ? I had a truck much like this back in the mid 80's I use to sleep in once in a while .. cab height topper .
I ran the plywood "shelf" basically at the top of the box rail height , exactly where your drawings show you want it .
I gotta tell you , it was not a good sleep , just to close to the top of the roof for me , my shoulders almost hit the roof , and after a night of sleeping the roof was always wet from the moister in the air . extra curricular activities we're also reduced to "spooning"
my recommendations would be a roof top vent , and either a taller topper , or relocate lower the height of the main structure
just my 2C , if it helps at all
.
just a quick question , or maybe a suggestion .
I don't know how big of a guy you are ? I had a truck much like this back in the mid 80's I use to sleep in once in a while .. cab height topper .
I ran the plywood "shelf" basically at the top of the box rail height , exactly where your drawings show you want it .
I gotta tell you , it was not a good sleep , just to close to the top of the roof for me , my shoulders almost hit the roof , and after a night of sleeping the roof was always wet from the moister in the air . extra curricular activities we're also reduced to "spooning"
my recommendations would be a roof top vent , and either a taller topper , or relocate lower the height of the main structure
just my 2C , if it helps at all
.
I'm searching for a taller shell than the one shown, but my options are limited in what I can play with in Sketchup. Coincidentally, I just read about those rooftop vents, and I'm definitely leaning in that direction.
Thanks for the feedback!
05-30-2015, 01:13 AM
#9
Registered User
Thread Starter
iTrader: (1)
Join Date: Jul 2012
Location: Calistoga, CA
Posts: 639
Likes: 0
Received 0 Likes
on
0 Posts
I've been cranking away all this week, and it feels pretty good.
Saturday, I'm hoping to start laying out my homebrew aux harness and start shooting some primer.
Here's where I'm at right now:
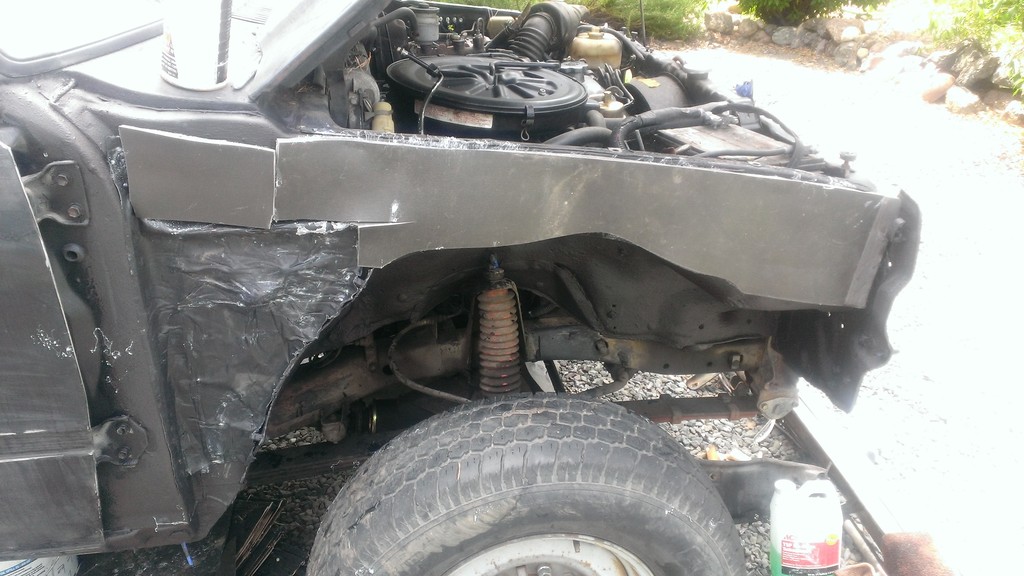
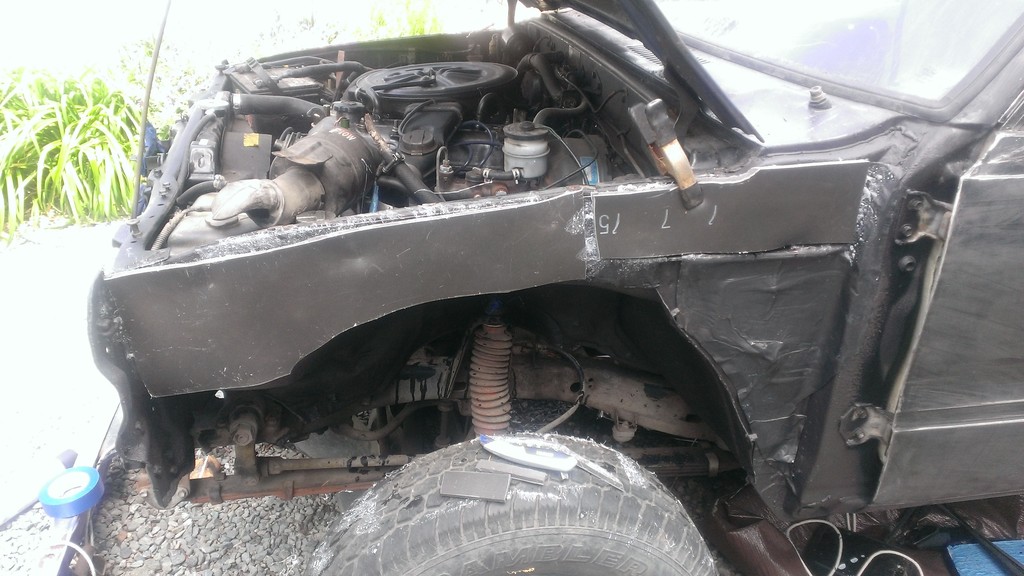
Front inner fenders and wheel wells have been thoroughly coated with Dupli-color roll-on bedliner. This is a product I've received mixed reviews on, but my own experiences have been positive. As long as you prep properly, it seems to hold out, and it's very affordable.
Following the liner, they were given three thick coats of Second Skin's Spectrum, which is a roll-on or spray-on vibration canceling liner. I've coated the insides of my doors and cabin floors with it, and the results were phenomenal. I also rolled on their Damplifier, which is something akin to Dynamat, but more affordable.
Finally, those grey blocks are strips of their Luxury Liner, which also helps to absorb and control vibrations. The big idea here is to mute as much road noise in the wheel wells as possible, since that's an area that conducts noise directly into the cab. It looks sloppy, but the fenders will hide it all, anyway.
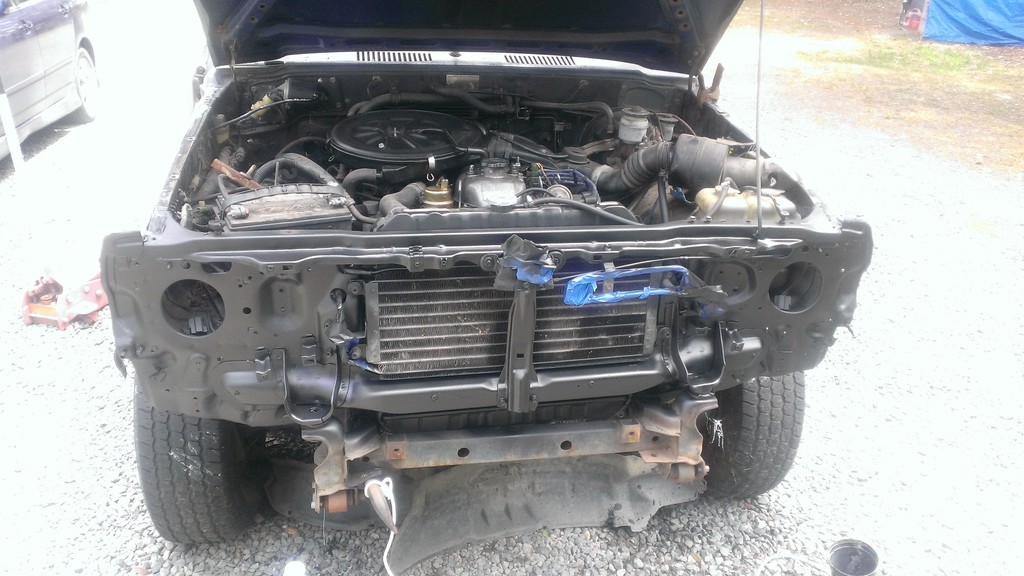
Front bib, sanded, stripped of unnecessary brackets and shot with Dupli-Color spray-on bedliner.
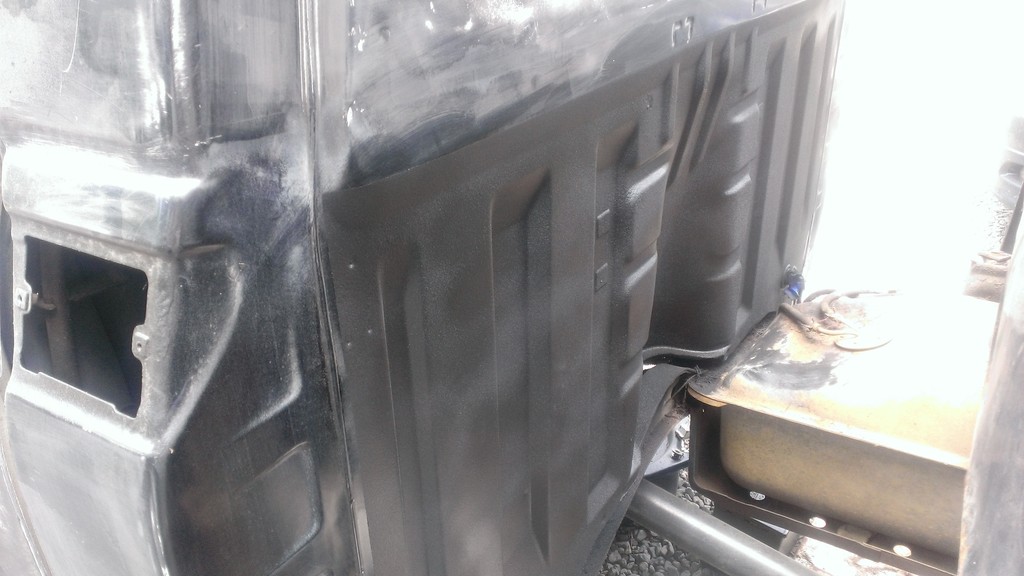
Rear firewall, sanded, cleaned and sprayed with the same liner.
Not shown is how much sanding I've done. I've been really working hard to get this thing ready to prime. Knowing the materials I have, I should be able to pull the hood to clean it up and soundproof it in the next few days.
Saturday, I'm hoping to start laying out my homebrew aux harness and start shooting some primer.
Here's where I'm at right now:
Front inner fenders and wheel wells have been thoroughly coated with Dupli-color roll-on bedliner. This is a product I've received mixed reviews on, but my own experiences have been positive. As long as you prep properly, it seems to hold out, and it's very affordable.
Following the liner, they were given three thick coats of Second Skin's Spectrum, which is a roll-on or spray-on vibration canceling liner. I've coated the insides of my doors and cabin floors with it, and the results were phenomenal. I also rolled on their Damplifier, which is something akin to Dynamat, but more affordable.
Finally, those grey blocks are strips of their Luxury Liner, which also helps to absorb and control vibrations. The big idea here is to mute as much road noise in the wheel wells as possible, since that's an area that conducts noise directly into the cab. It looks sloppy, but the fenders will hide it all, anyway.
Front bib, sanded, stripped of unnecessary brackets and shot with Dupli-Color spray-on bedliner.
Rear firewall, sanded, cleaned and sprayed with the same liner.
Not shown is how much sanding I've done. I've been really working hard to get this thing ready to prime. Knowing the materials I have, I should be able to pull the hood to clean it up and soundproof it in the next few days.
Last edited by RobotMoose; 05-30-2015 at 01:15 AM.
06-13-2015, 04:19 AM
#10
Registered User
Thread Starter
iTrader: (1)
Join Date: Jul 2012
Location: Calistoga, CA
Posts: 639
Likes: 0
Received 0 Likes
on
0 Posts
Progress still continues, however I never remember to charge my trusty point-and-shoot and my mobile just does not handle glare or detail very well.
I've always thought of this truck as being kind of a miniature FJ75 or FJ45, and mulling over that thought while nursing a Moose Drool the other evening I had a major monkey-touch-monolith moment: Why not paint the roof from the gutters-up gloss white? Between the white FJ60 wagon wheels I have waiting for this truck and the white roof, and the dark forest green of the main body this truck could really rock the old-iron look with just a little bit of effort.
I have a friend with a DSLR and itchy trigger fingers, so I'm thinking I may collaborate with him on a tech article on doing a rattle-can paintjob in your driveway, since I still have my cab to shoot.
Last edited by RobotMoose; 06-13-2015 at 04:23 AM.
06-14-2015, 12:05 AM
#11
Registered User
Thread Starter
iTrader: (1)
Join Date: Jul 2012
Location: Calistoga, CA
Posts: 639
Likes: 0
Received 0 Likes
on
0 Posts
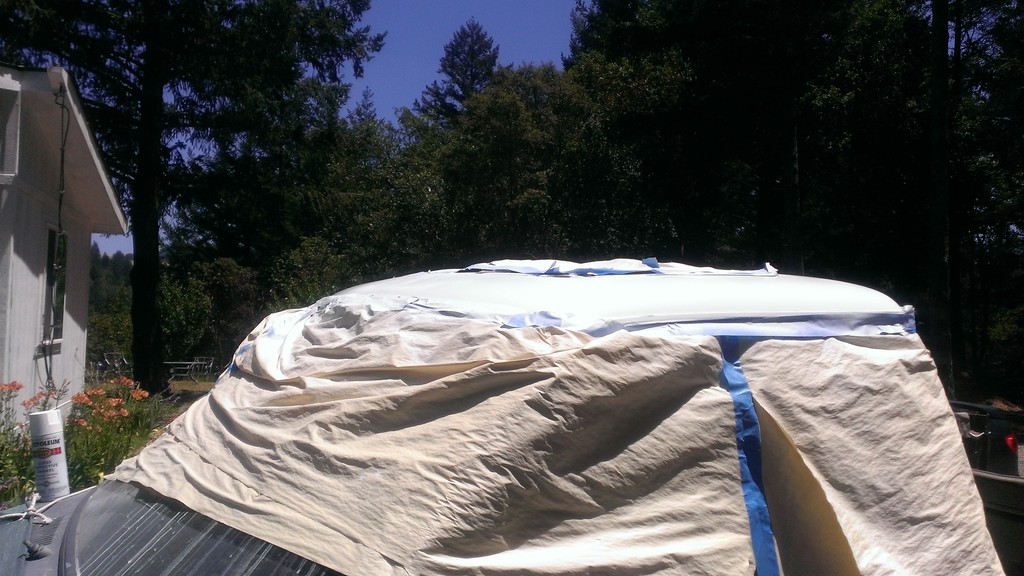
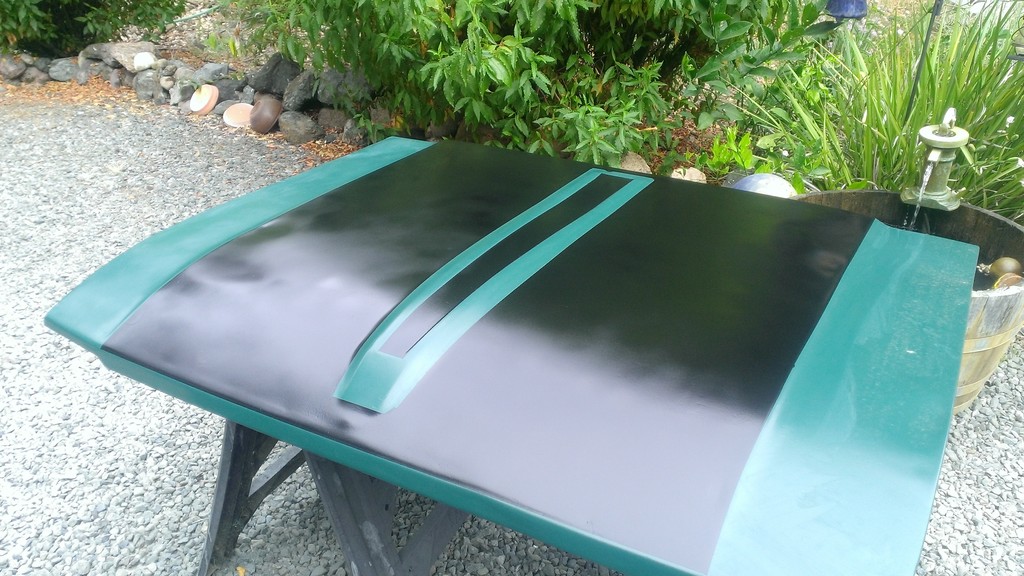
Roof after enamel coat #3. Wet sanding with 1500 grit has really helped keep it smooth and control orange peel.
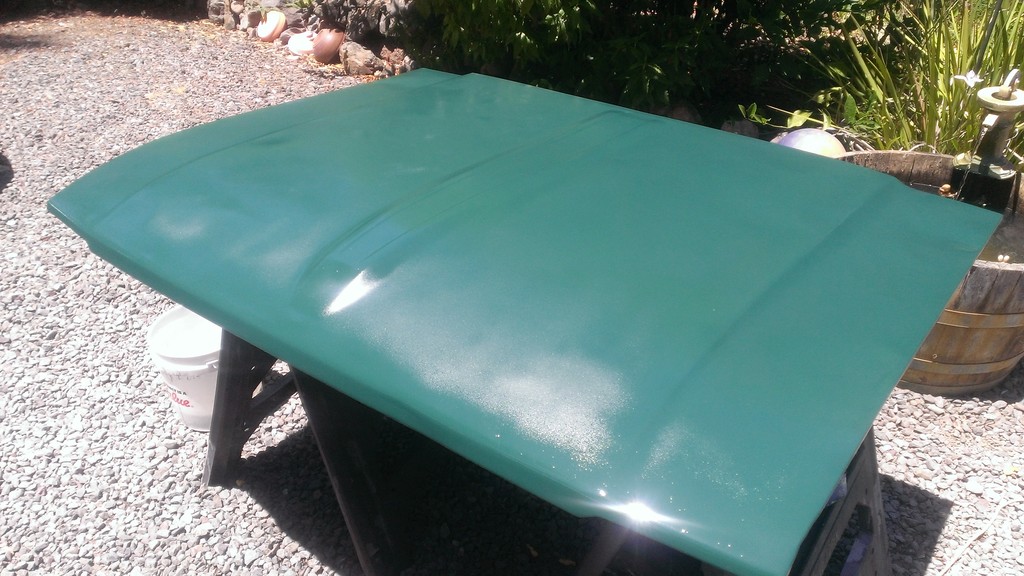
First coat of enamel for the hood. I swear the PO actually walked on this thing, it's dented and mangled in all sorts of places. I cannonballed the thickest coat of enamel over this thing I've ever seen to hopefully buy me some protection on the high spots, and crossed my fingers that I wouldn't get any runs or stretching. I checked it out tonight on my way to work, and by flashlight it looks good. It'll still take a fair amount of sanding to get it squared away.
06-19-2015, 06:04 AM
#13
Registered User
Thread Starter
iTrader: (1)
Join Date: Jul 2012
Location: Calistoga, CA
Posts: 639
Likes: 0
Received 0 Likes
on
0 Posts
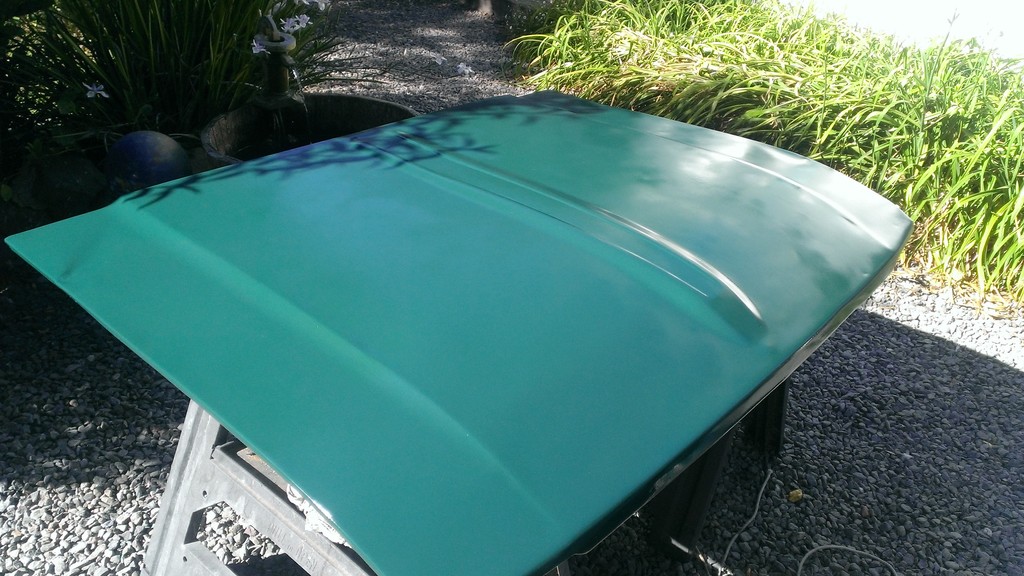
This is after coat #3. I think some 2000 grit and polishing should make it look good. Ultimately, I figured this would be kind of a "warts and all" type project; not a full restore so I didn't chase any of the lumps and dents in it. Ultimately, I'm wishing I'd at least spent some time with filler primer to even things out, first.
 07-05-2015, 08:47 PM
#17
Registered User

Join Date: Jul 2015
Posts: 6
Likes: 0
Received 0 Likes
on
0 Posts
I like your style! My truck is used to get me places where I can collect fungi, as I'm a mycology nerd. Within my barn-like camper shell you'll find microscopes and other nerdy stuff like monographs and chemical reagents.
You should be served well I reckon provided everything comes together, and I 'spect it will. Just takes time, money, and dedication!
Cool to learn other science nerds are behind the wheels of old Toyotas!
You should be served well I reckon provided everything comes together, and I 'spect it will. Just takes time, money, and dedication!
Cool to learn other science nerds are behind the wheels of old Toyotas!
07-05-2015, 10:39 PM
#18
Registered User
Thread Starter
iTrader: (1)
Join Date: Jul 2012
Location: Calistoga, CA
Posts: 639
Likes: 0
Received 0 Likes
on
0 Posts
I like your style! My truck is used to get me places where I can collect fungi, as I'm a mycology nerd. Within my barn-like camper shell you'll find microscopes and other nerdy stuff like monographs and chemical reagents.
You should be served well I reckon provided everything comes together, and I 'spect it will. Just takes time, money, and dedication!
Cool to learn other science nerds are behind the wheels of old Toyotas!
You should be served well I reckon provided everything comes together, and I 'spect it will. Just takes time, money, and dedication!
Cool to learn other science nerds are behind the wheels of old Toyotas!
The little barn you've got on your rig is just such a cool idea, too. Ever since I'd seen your picture, I've been doodling one in Sketchup. There's some real potential in a design like that.
07-05-2015, 11:21 PM
#19
Registered User
Thread Starter
iTrader: (1)
Join Date: Jul 2012
Location: Calistoga, CA
Posts: 639
Likes: 0
Received 0 Likes
on
0 Posts
Well, except for some touch-up work to be done soon, the cab is finished.
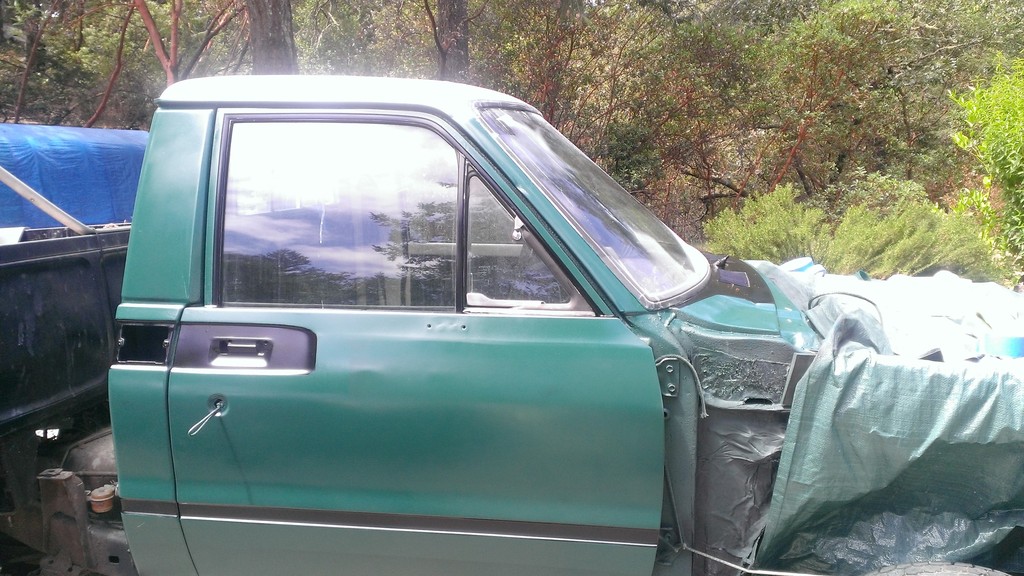
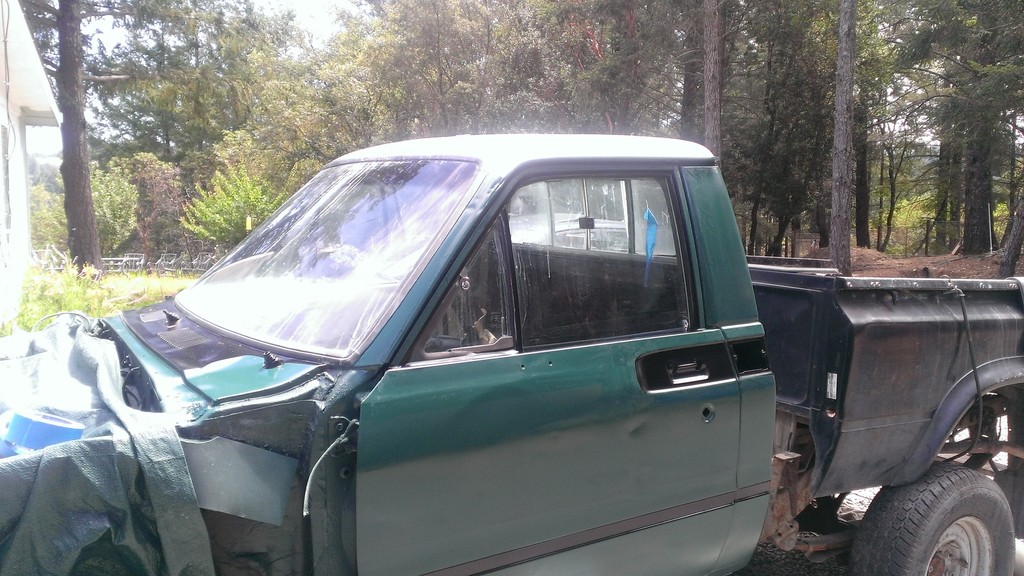
Gained at least 50 HP with these stripes:
I'm getting ready to email Toyota Fiberglass and order up some fenders to finish the front end.
Gained at least 50 HP with these stripes:
I'm getting ready to email Toyota Fiberglass and order up some fenders to finish the front end.
07-06-2015, 08:50 AM
#20
Registered User

Join Date: Feb 2012
Posts: 17
Likes: 0
Received 0 Likes
on
0 Posts
RobotMoose stops being lazy and starts a slow-moving build thread.
I used to live in a van and I can definitely recommend that sleeping space should have more than 6 inches between your face and the ceiling. If you have a habit of sitting up when you wake up your forehead will definitely thank you.


