KawaZX636's 1983 Toyota Pickup Restoration
 02-11-2013, 04:50 AM
#21
Thanks Corey! I'll be looking your way probably by late summer for a fiberglass bed to be delivered in the fall or early winter. The more I search for decent original beds, the less I find. Plus I have a feeling by the time I get the frame and the bodywork on the cab done that I won't want to mess with bodywork on a bed. Meanwhile, I'll probably just put the old stepside bed on for the summer so I don't miss out on using it. How is the fiberglass cab project coming along??
 02-20-2013, 06:55 PM
#22
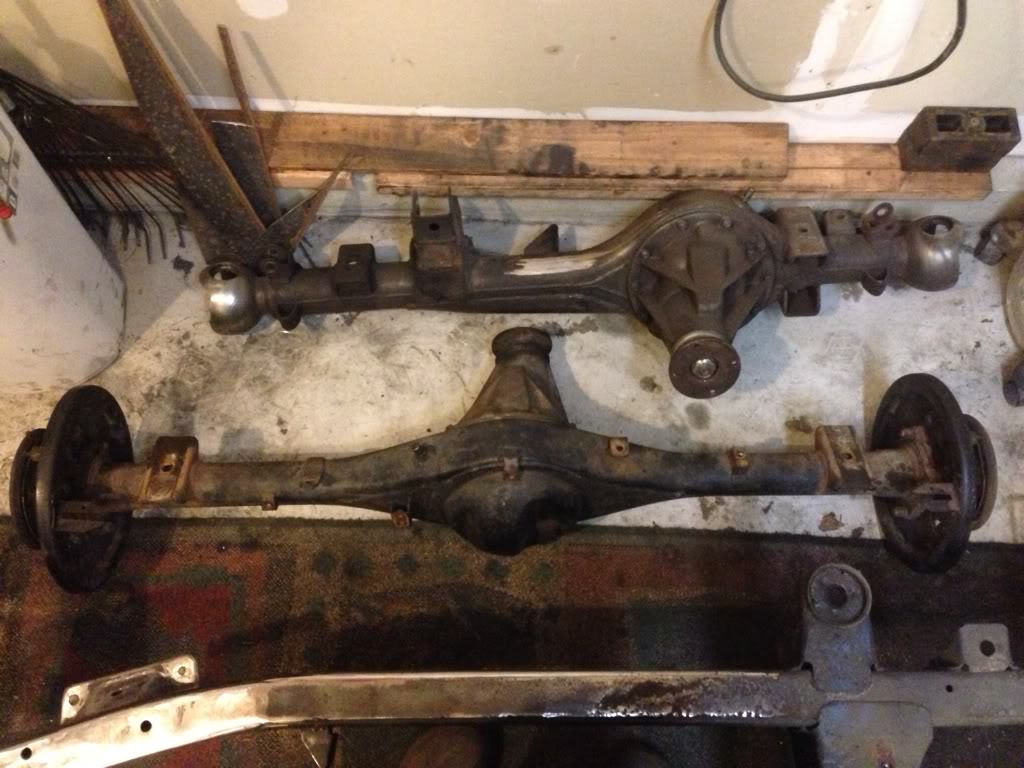
Finally finding time to make some progress on my truck. Dropped the front axle and started cleaning the axle, spindles, knuckles, birfs, hardware, brake dust shields, hub locks etc...if you watched my 22R rebuild, you know how meticulous I am when it comes to cleaning parts! I ordered some hub hardware from Low Range Off-Road since I destroyed the hub studs and those pesky cones. While I was at it, I decided I've get a new flywheel, 1.5 wheel spaces and new rotors. Just some more stuff to add to the growing parts pile! If you guys haven't bought from Low Range Off-Road yet, I would highly recommend them. I've placed several orders there with no problems and their prices are better than most other places.
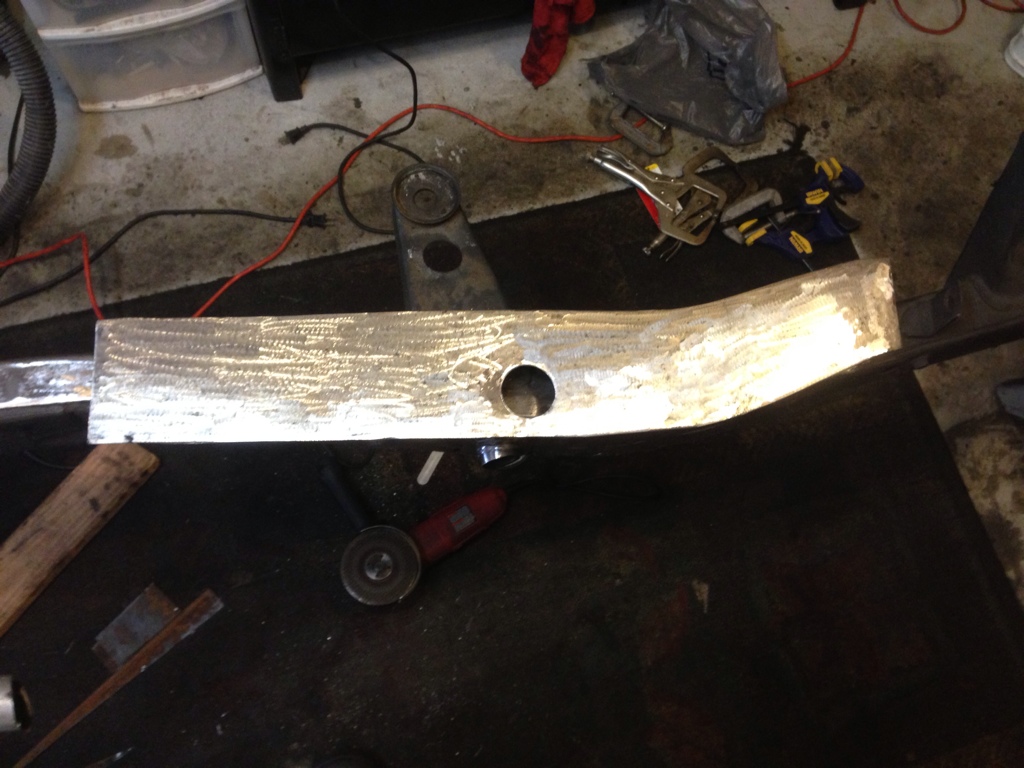
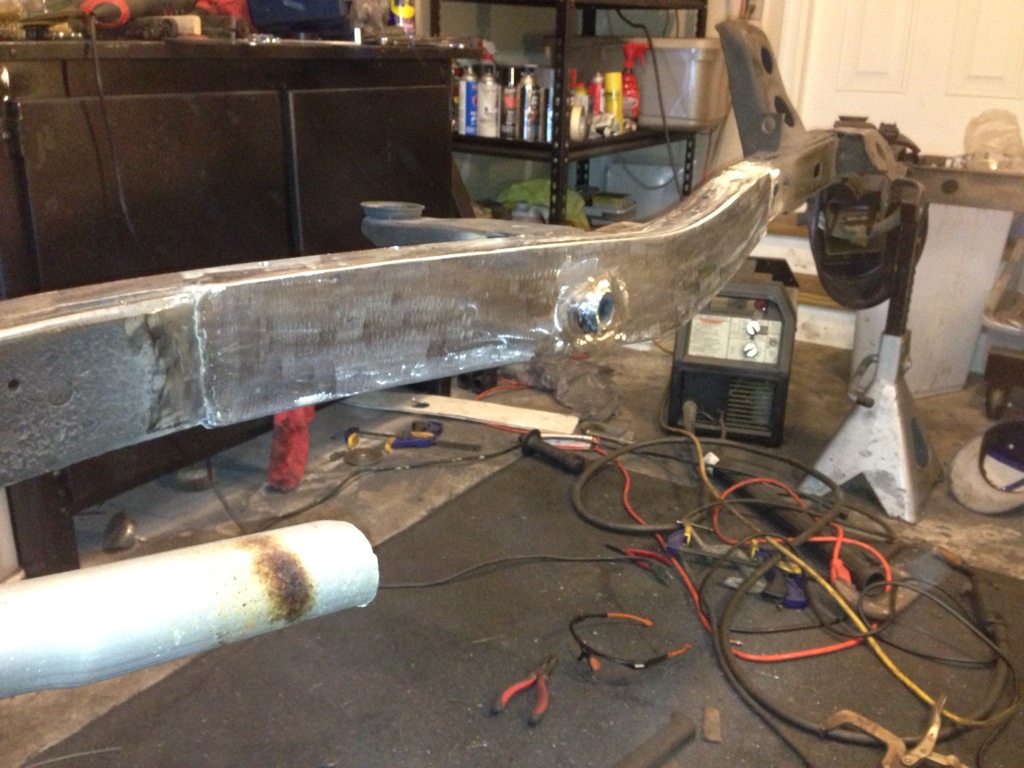
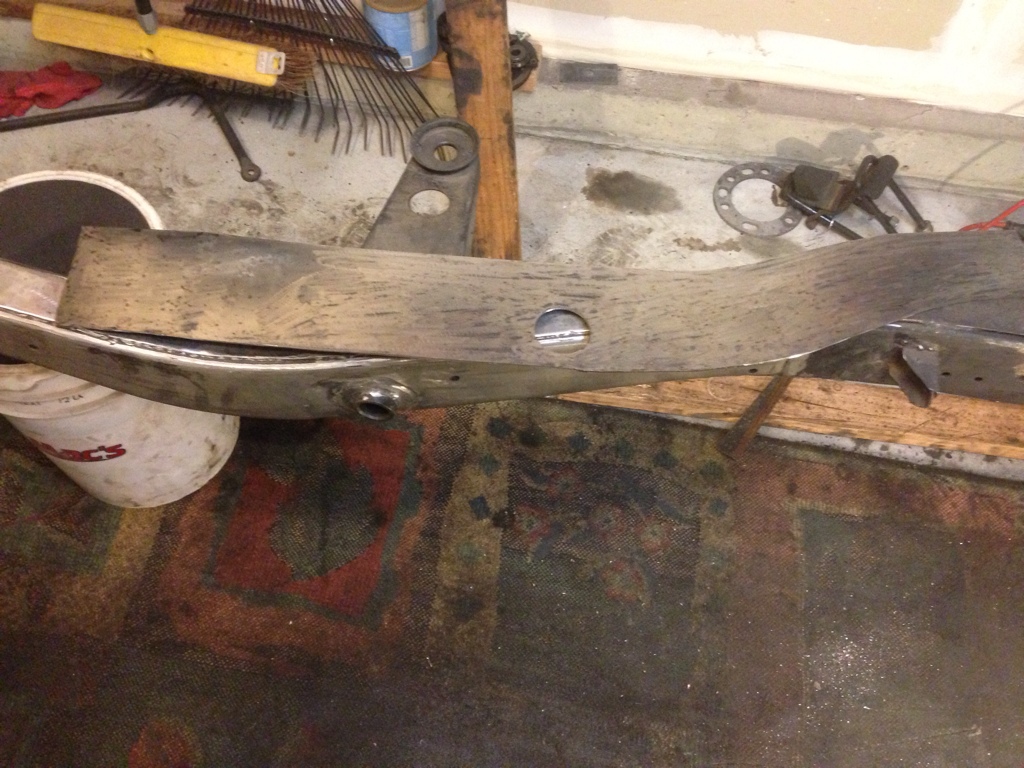
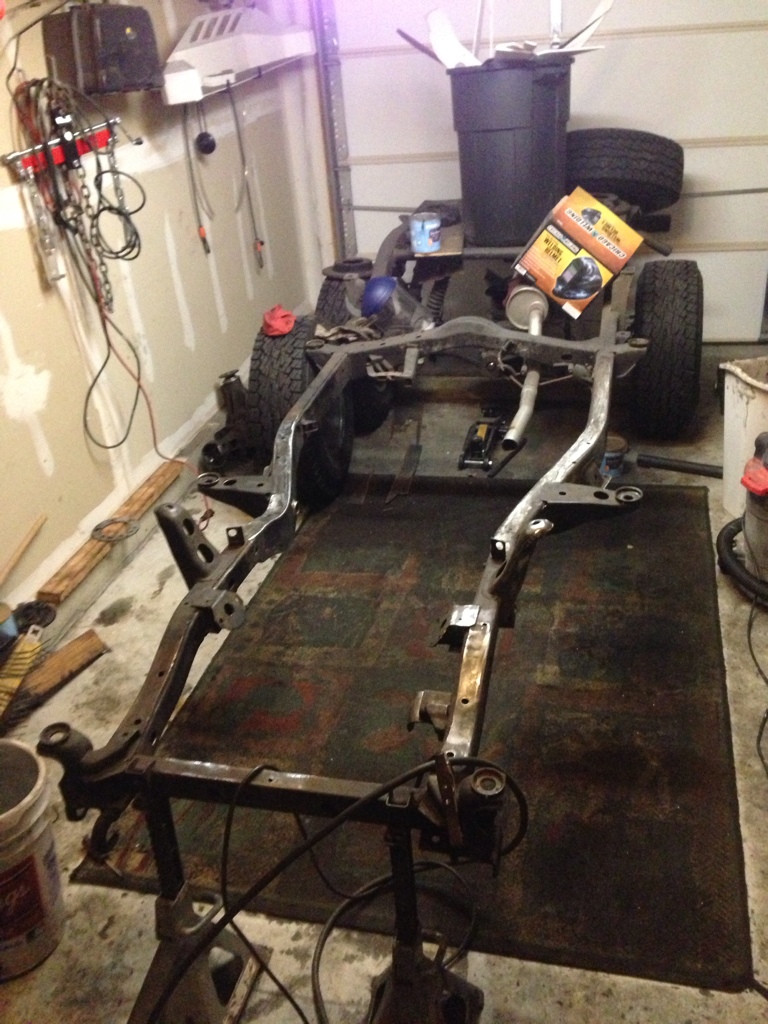
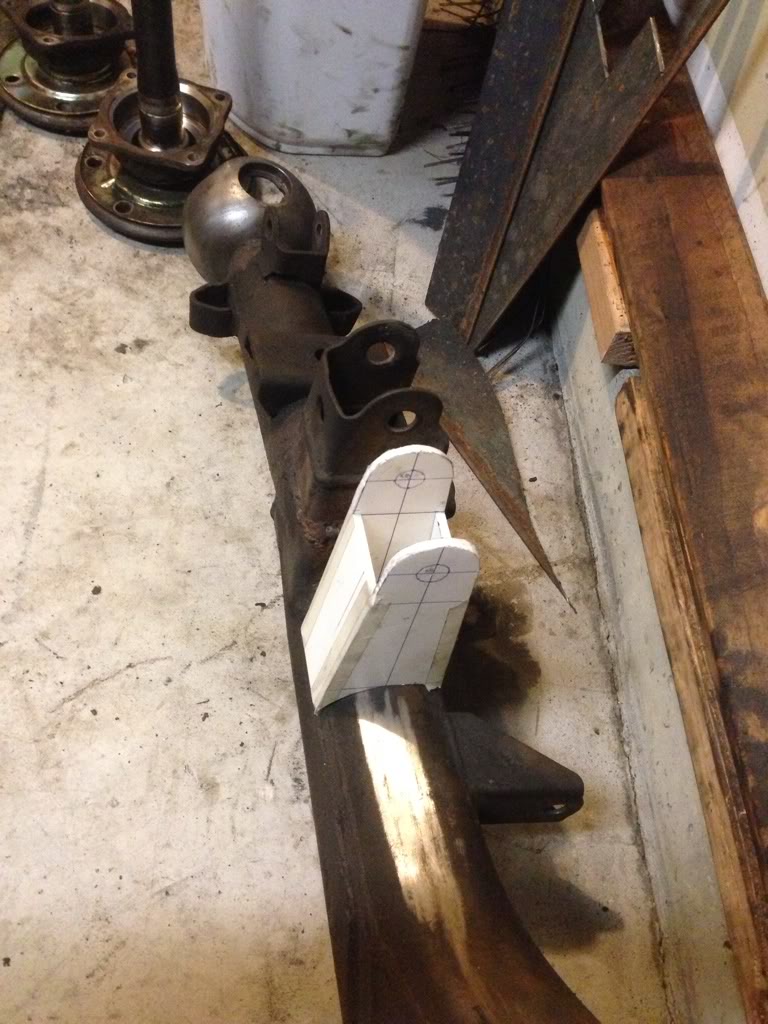
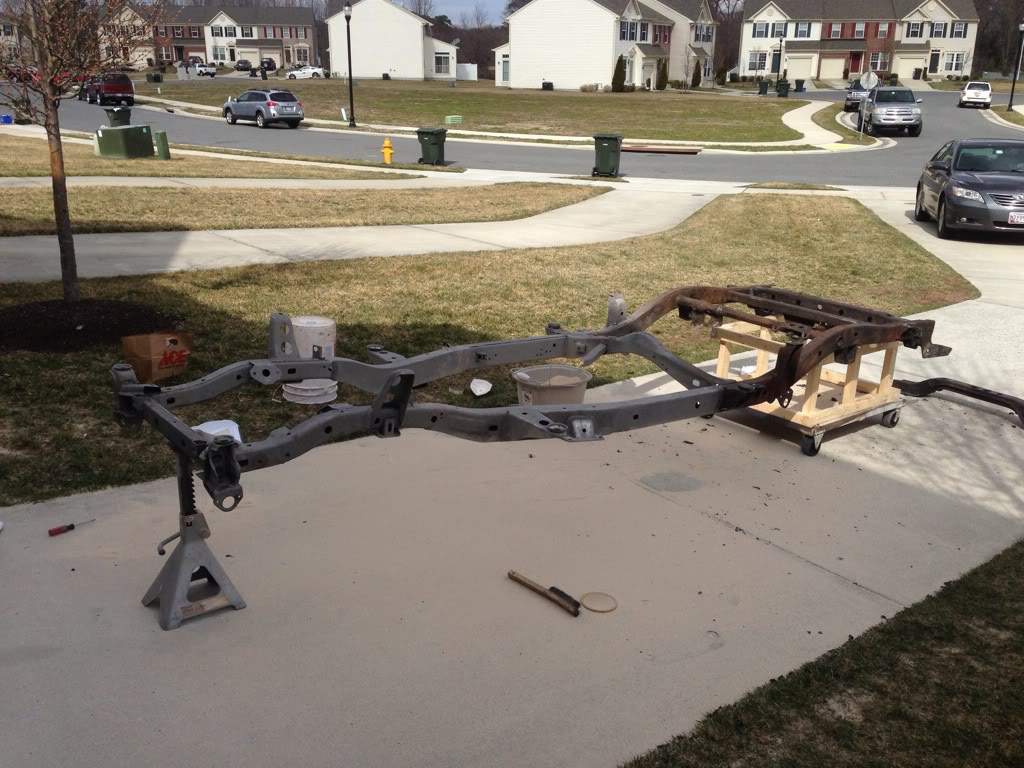
I forgot to snap a picture of the awful frame rot repair job that the PO did on the passenger side frame rail, but it was essentially a couple pieces of 3" angle iron welded to the sid of the frame with really bulky and thick welds. So after my hand healed from when my grinder attacked it, I got back to working on removing the patch job the PO did. It actually took me longer to cut off and clean up the bad patch then it did to actually repair it. Here's the extent of the frame rot on the driver side after I cleaned up the metal to accept a good weld:
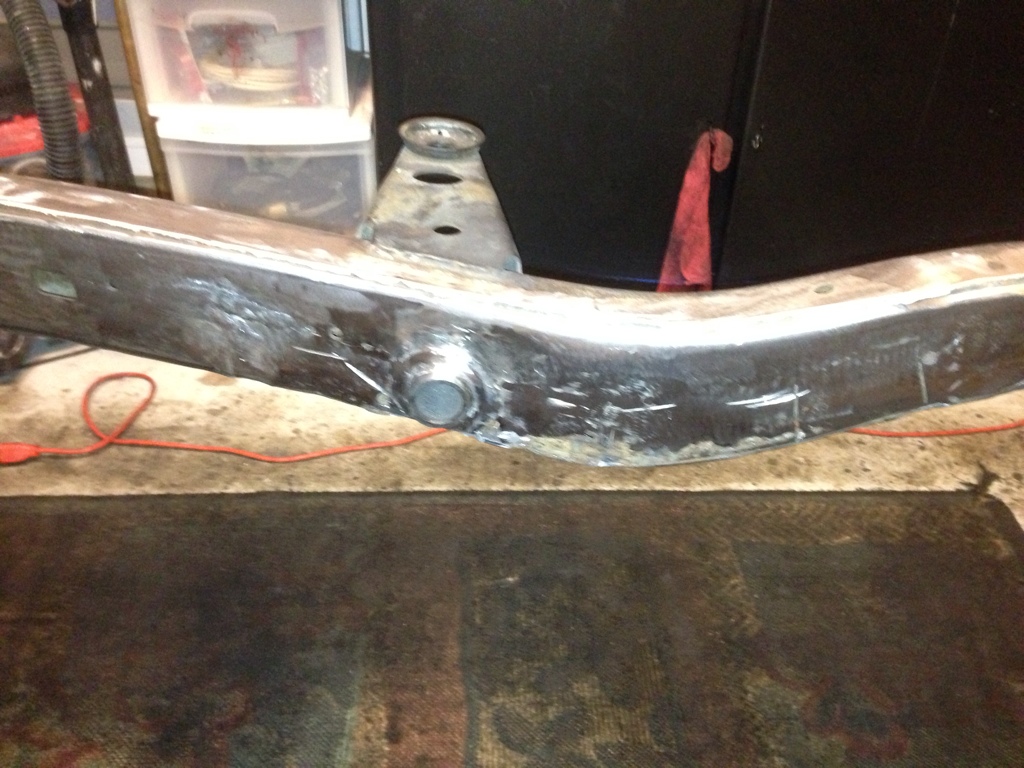
It was pretty bad, the pictures don't really show it well. Since the frame rot encompasses the frame rail on front and rear of the shackle mount on the inside of the frame rail, I decided to box the inner and under side of the frame rail. There was hardly any frame rot on the under side and was primarily isolated to the inside of the frame rail which is kind of strange, but I guess that's a good thing. I cut a piece of 1/8" flat bar to match the profile of the frame rail. Drill a 2" hole for the shackle eye to poke through and to reinforce it further. I extended the patch well beyond the extent of the frame rot.
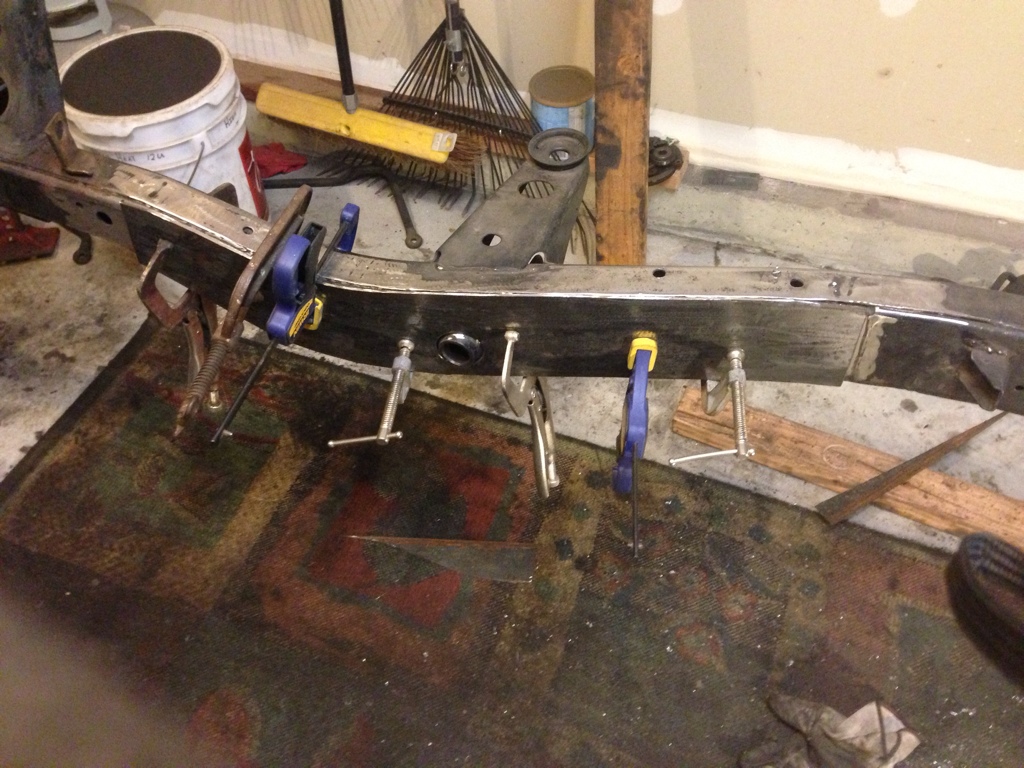
The patch:
Clamped and tacked on:
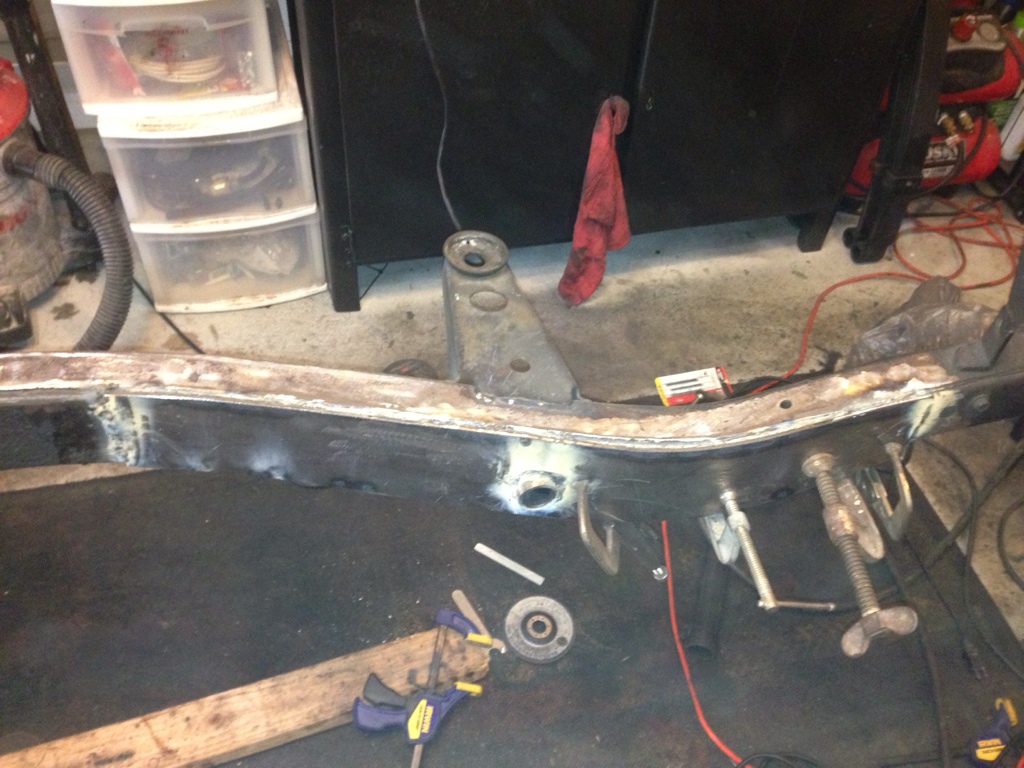
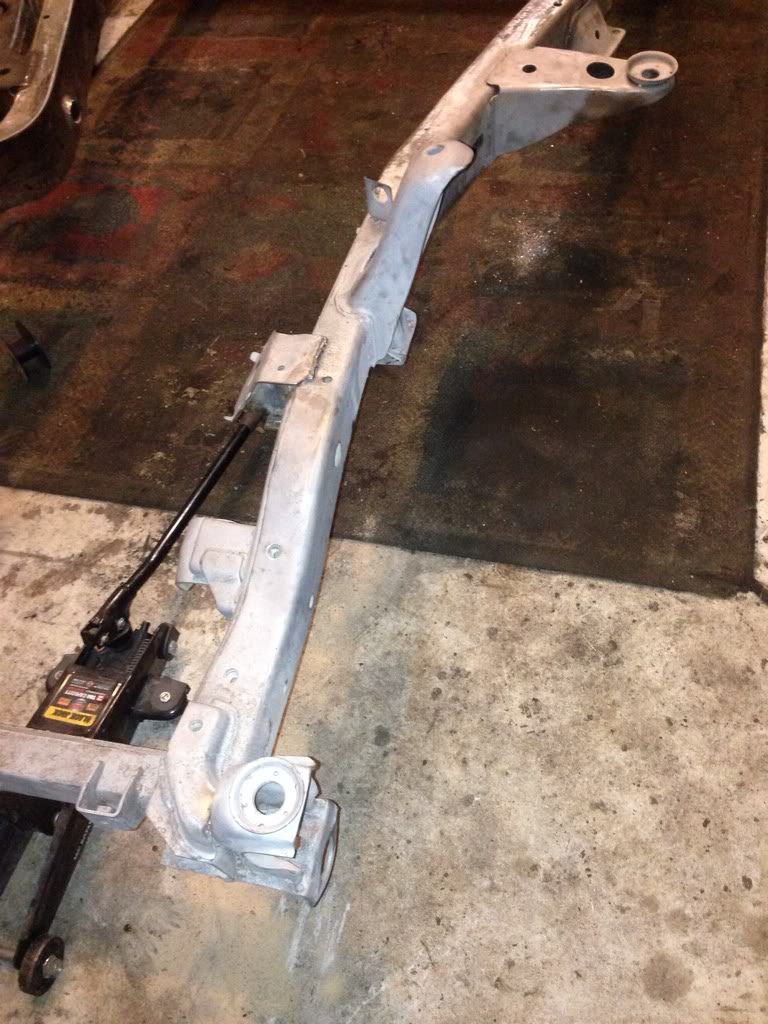
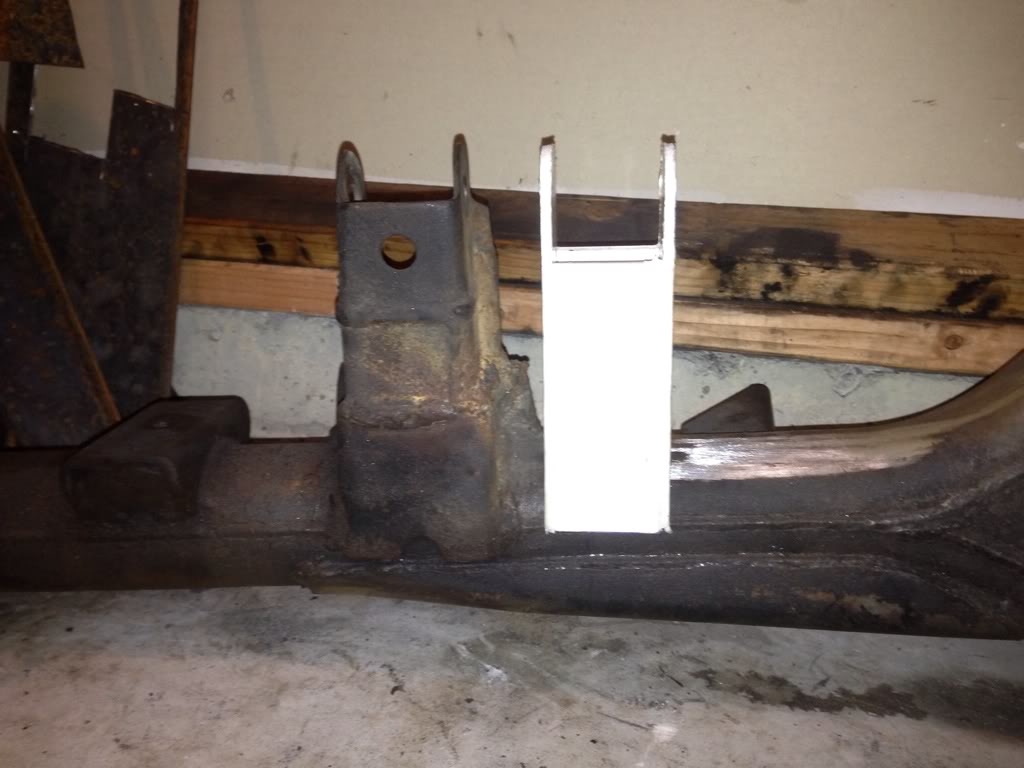
I cut the bottom plate to cover the mounting bracket for the tranny crossmember. I'll drill new hole and weld on new nuts for the tranny crossment to bolt through.
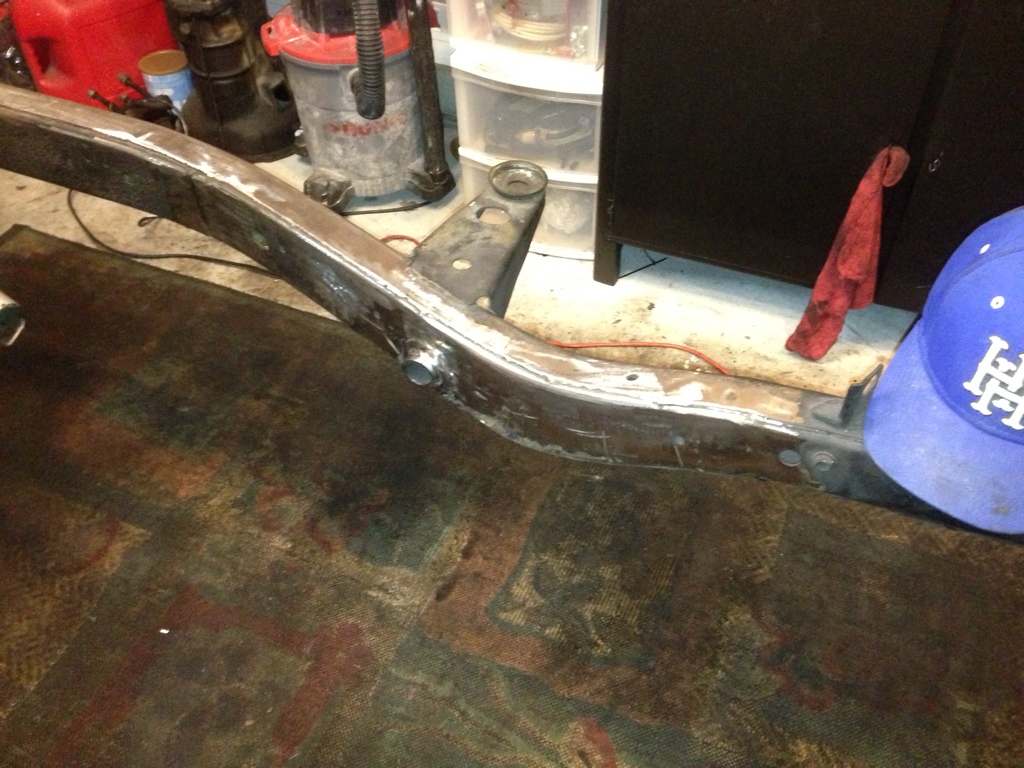
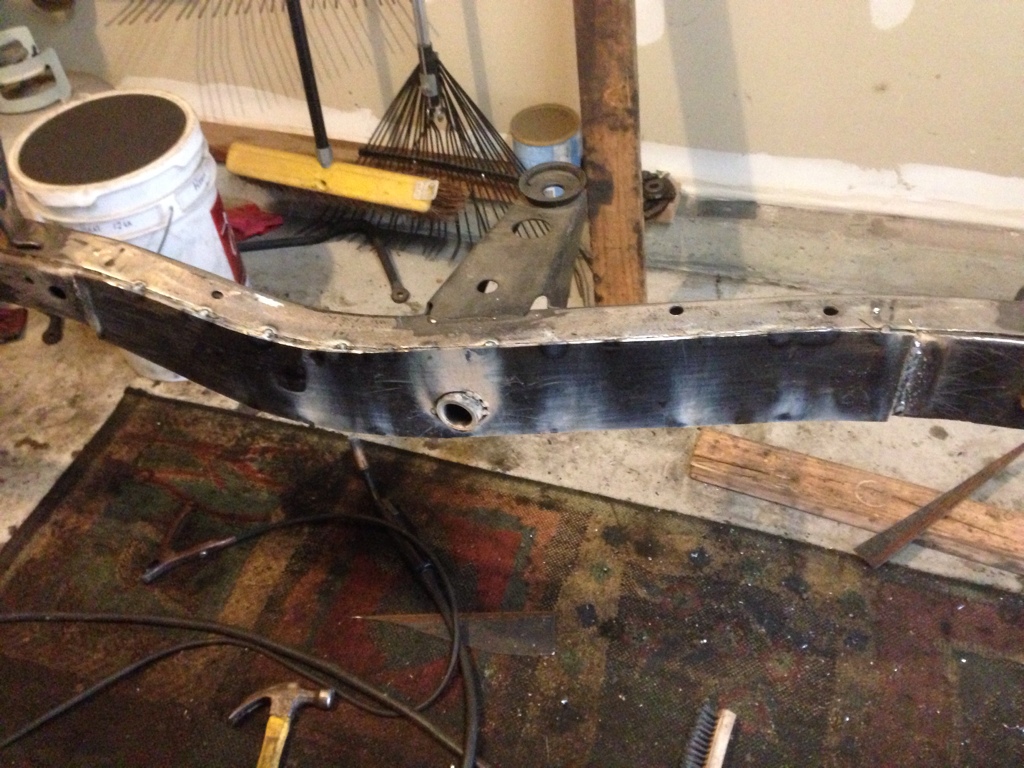
Driverside completed:
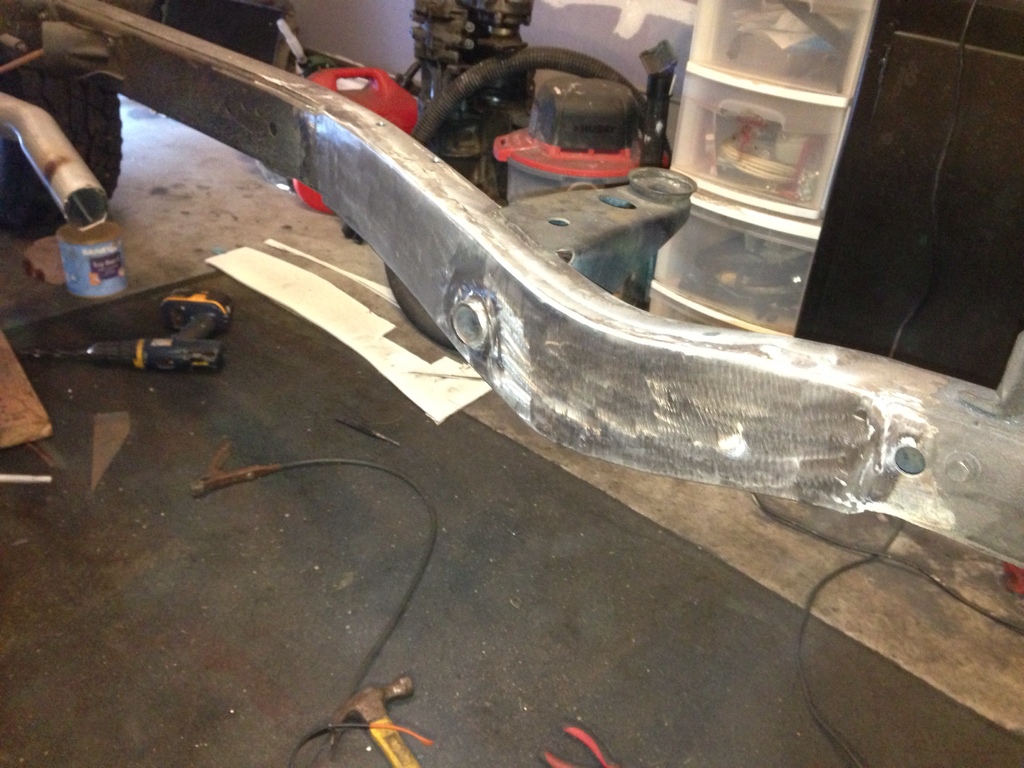
I have a little bit of touchup to do, but for the most part the driverside is done. I know this isn't the "right" way to patch frame rot, but the location and orientation of the frame rot to the shackle eye doesn't give me an easy option to cut out the section and weld a patch in place. This turned out good and clean - Definitely much better than the PO's BS attempt.
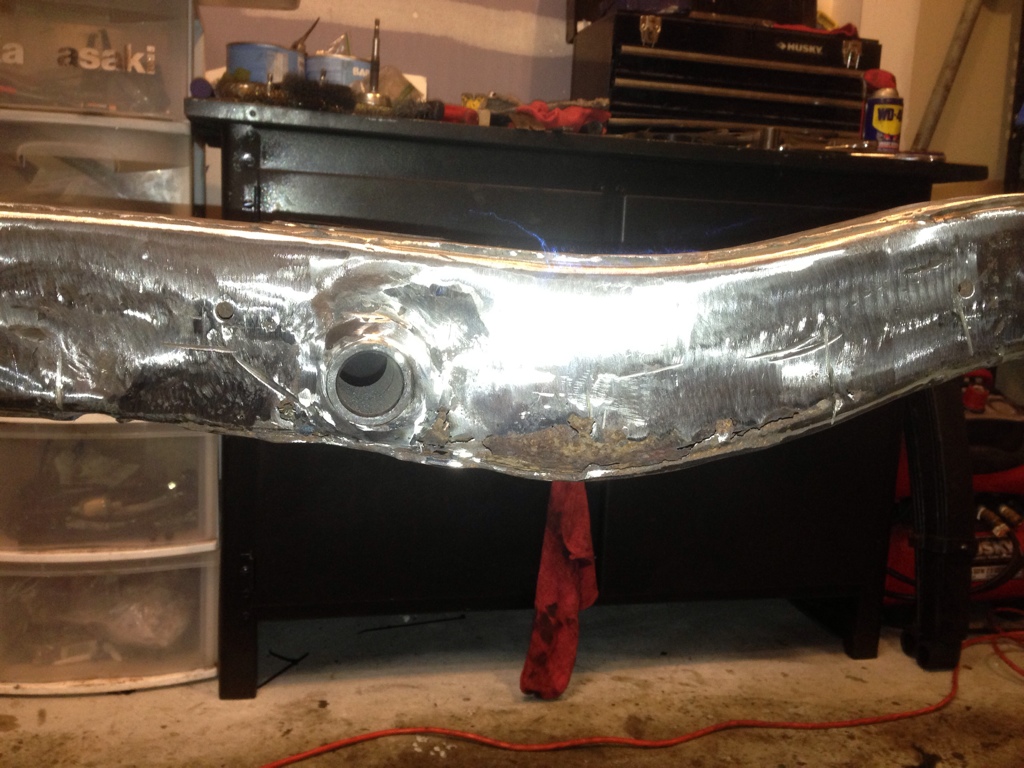
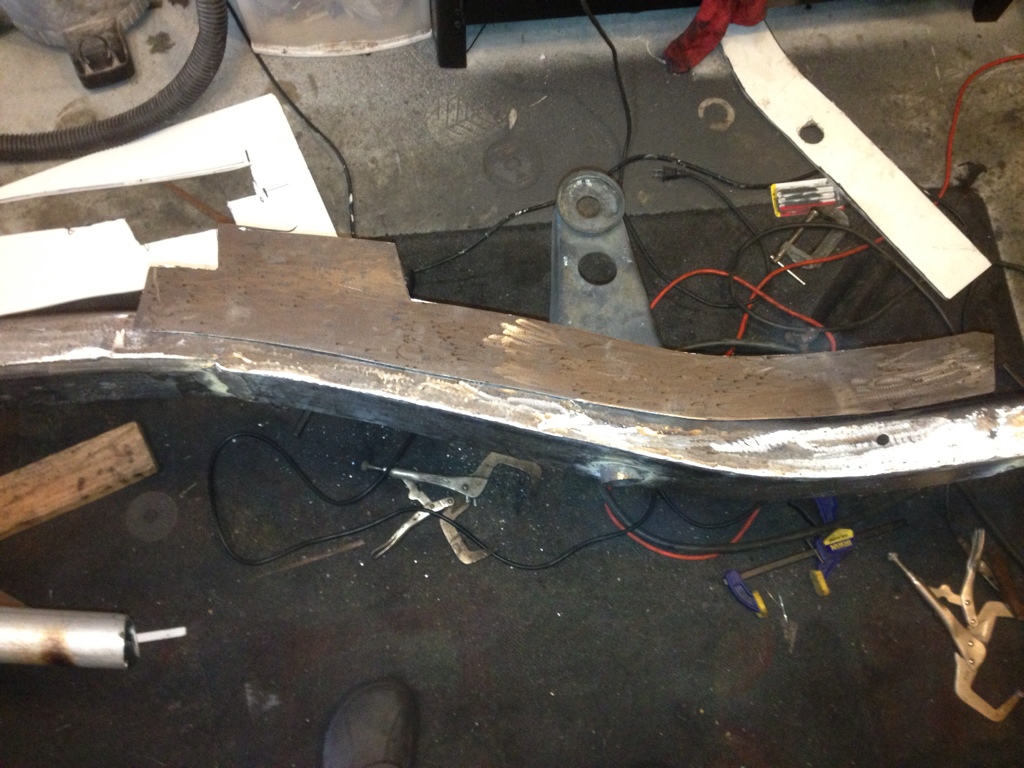
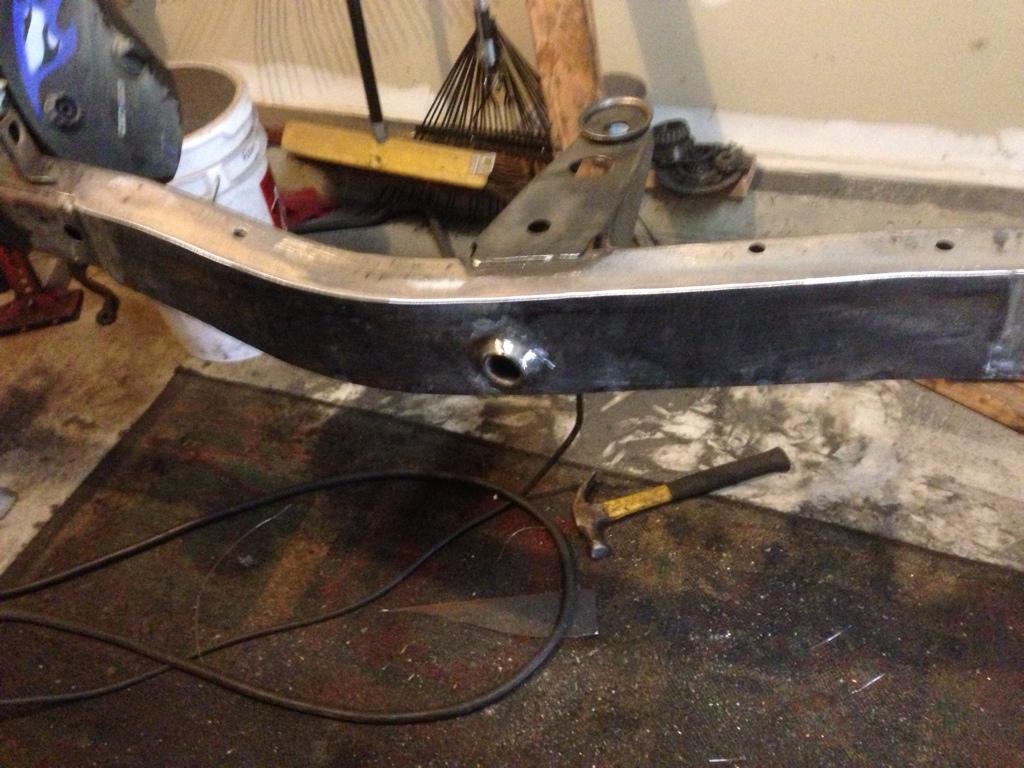
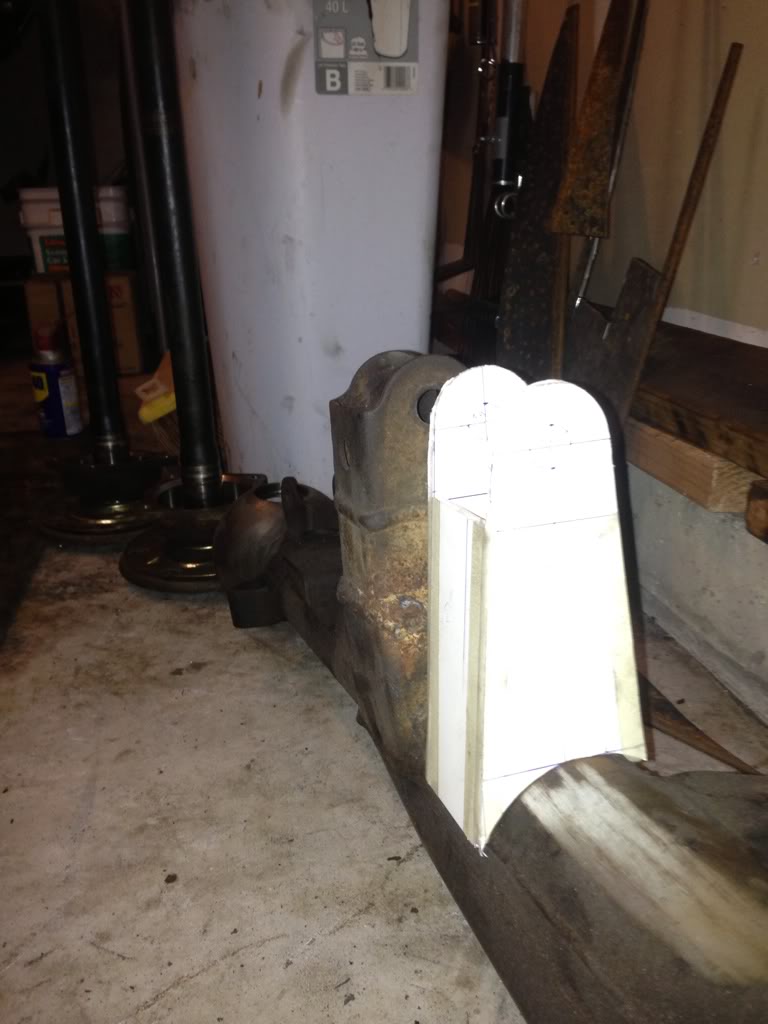
The passenger side is ok as is, but I'm going to match it up to the driverside for symetry and strength. It's already cleaned up and ready to go, I just need some time to weld the plates:
To prevent future rust problems I'm going to spray undercoating inside the frame rails and drill drain holes in the portions where water tends to pool inside the frame.
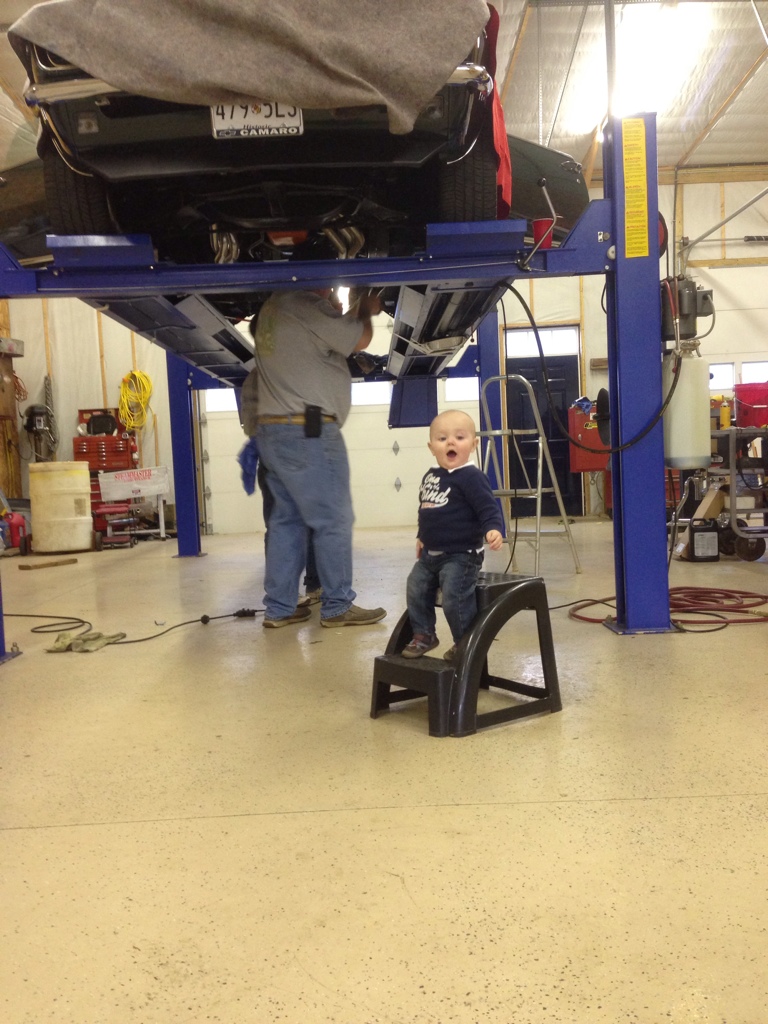
It's just a matter of having the time to work on it. When I do have the time, somebody else wants to steal it from me! Like my dad deciding that he wanted to pull his 4spd manual tranny and install a 3spd automatic tranny in his 68' Camaro - such a pain in the ass! Good thing my son was there to keep everybody calm:
More to come....
I forgot to snap a picture of the awful frame rot repair job that the PO did on the passenger side frame rail, but it was essentially a couple pieces of 3" angle iron welded to the sid of the frame with really bulky and thick welds. So after my hand healed from when my grinder attacked it, I got back to working on removing the patch job the PO did. It actually took me longer to cut off and clean up the bad patch then it did to actually repair it. Here's the extent of the frame rot on the driver side after I cleaned up the metal to accept a good weld:
It was pretty bad, the pictures don't really show it well. Since the frame rot encompasses the frame rail on front and rear of the shackle mount on the inside of the frame rail, I decided to box the inner and under side of the frame rail. There was hardly any frame rot on the under side and was primarily isolated to the inside of the frame rail which is kind of strange, but I guess that's a good thing. I cut a piece of 1/8" flat bar to match the profile of the frame rail. Drill a 2" hole for the shackle eye to poke through and to reinforce it further. I extended the patch well beyond the extent of the frame rot.
The patch:
Clamped and tacked on:
I cut the bottom plate to cover the mounting bracket for the tranny crossmember. I'll drill new hole and weld on new nuts for the tranny crossment to bolt through.
Driverside completed:
I have a little bit of touchup to do, but for the most part the driverside is done. I know this isn't the "right" way to patch frame rot, but the location and orientation of the frame rot to the shackle eye doesn't give me an easy option to cut out the section and weld a patch in place. This turned out good and clean - Definitely much better than the PO's BS attempt.
The passenger side is ok as is, but I'm going to match it up to the driverside for symetry and strength. It's already cleaned up and ready to go, I just need some time to weld the plates:
To prevent future rust problems I'm going to spray undercoating inside the frame rails and drill drain holes in the portions where water tends to pool inside the frame.
It's just a matter of having the time to work on it. When I do have the time, somebody else wants to steal it from me! Like my dad deciding that he wanted to pull his 4spd manual tranny and install a 3spd automatic tranny in his 68' Camaro - such a pain in the ass! Good thing my son was there to keep everybody calm:
More to come....
The following users liked this post:
faber (07-18-2020)
03-04-2013, 07:02 PM
#23
I had some family issues pop up (Grandmother passed away) so I've had very little time to work on my truck. I was able to break away from the chaos for some little R&R, AKA working on my truck!
So I finished cleaning up the metal on the passenger side frame rail. The passenger side was no where near as bad as the driver side frame rot, but there was still some rust trying to poke through here and there. Plus the reinforcement at that portion of the frame isn't too bad of an idea.
So I cut a piece of 1/8" steel to fit on the inside of the frame rail with a 2" hole for the shackle hanger (just like the driver side above):
Bent it to form and clamped it up. Ready for welding:
Tacked it up:
I cut a bottom plate (not shown) so the frame will be boxed on 2 of the 4 sides like the driver side. Welded it together nice and hot for good penetration so I could grind down the welds for a good clean look:
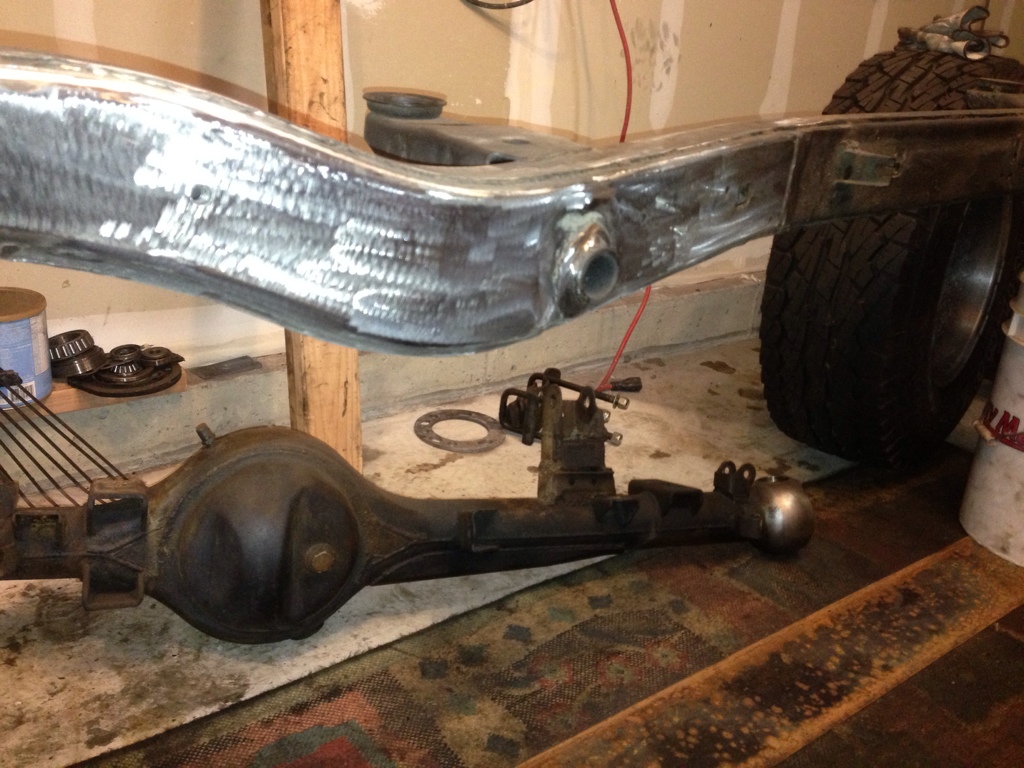
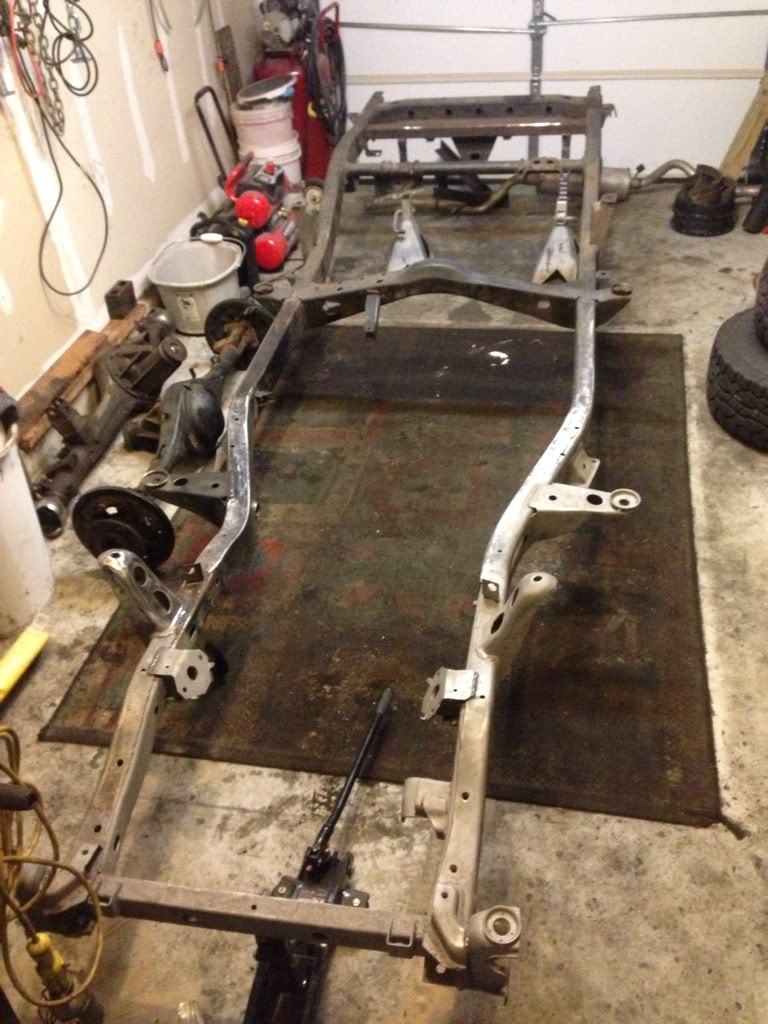
Here's how the frame sits now:
Hopefully I can get the front half cleaned up and ready for some POR-15 tomorrow (assuming there aren't any surprises). My plan is to get the front half of the frame cleaned up and painted so that I can mount the front axle and rebuild the knuckles on the truck. I'll also mount the engine and tranny since my garage at home is a bit small and I'm running out room to stash parts. From there, I'll move on to cleaning up and painting the rear half of the frame.
I also ordered some more parts last week:
-New flywheel
-4 New leaf spring angle pins for the front and rear (auto zone had them cheap!)
-New brake rotors
-New tranny mount
-New front shackles
Still trying to decide on leaf springs. Right now, I'm leaning towards Old Man Emu springs. I'm not planing on doing any extreme off-roading or wheeling, but I want a good ride without having to relocate the hangers. From my research, OME reviews say that it provides a decent ride on the road with acceptable off-road behavior and I'll probably couple that with some Bilstein shocks.
Hopefully tomorrow I'll have some pictures of the front half of the fram ready to paint!
So I finished cleaning up the metal on the passenger side frame rail. The passenger side was no where near as bad as the driver side frame rot, but there was still some rust trying to poke through here and there. Plus the reinforcement at that portion of the frame isn't too bad of an idea.
So I cut a piece of 1/8" steel to fit on the inside of the frame rail with a 2" hole for the shackle hanger (just like the driver side above):
Bent it to form and clamped it up. Ready for welding:
Tacked it up:
I cut a bottom plate (not shown) so the frame will be boxed on 2 of the 4 sides like the driver side. Welded it together nice and hot for good penetration so I could grind down the welds for a good clean look:
Here's how the frame sits now:
Hopefully I can get the front half cleaned up and ready for some POR-15 tomorrow (assuming there aren't any surprises). My plan is to get the front half of the frame cleaned up and painted so that I can mount the front axle and rebuild the knuckles on the truck. I'll also mount the engine and tranny since my garage at home is a bit small and I'm running out room to stash parts. From there, I'll move on to cleaning up and painting the rear half of the frame.
I also ordered some more parts last week:
-New flywheel
-4 New leaf spring angle pins for the front and rear (auto zone had them cheap!)
-New brake rotors
-New tranny mount
-New front shackles
Still trying to decide on leaf springs. Right now, I'm leaning towards Old Man Emu springs. I'm not planing on doing any extreme off-roading or wheeling, but I want a good ride without having to relocate the hangers. From my research, OME reviews say that it provides a decent ride on the road with acceptable off-road behavior and I'll probably couple that with some Bilstein shocks.
Hopefully tomorrow I'll have some pictures of the front half of the fram ready to paint!
 03-06-2013, 12:40 PM
#25
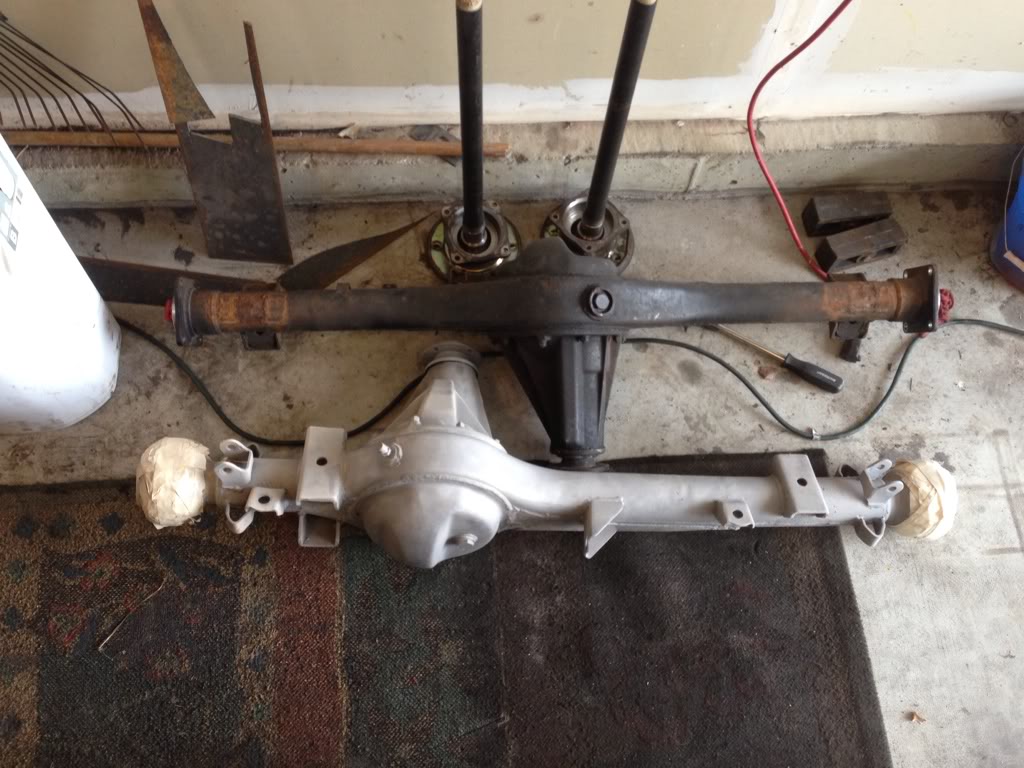
I started sandblasting yesterday and got ran inside by the rain so I had to put it on hold. But I did get a lot of the front half of the frame blasted:
So far no surprises! But then when I was sandblasting I had a moment...I didn't even think about sand getting all over my motor if I were to do the front and mount the motor before I did the rear. I'm not even too sure why I was thinking about doing that other than getting some parts mounted and out of the way. So I went ahead and tore off the rear axle. Everything came off the frame fairly quick and easy
I also plucked the drums off the rear axle since I was already messy.... What a PITA!! After beating the crap out of the drums with a BFH for about an hour they finally came off!!
The drum hardware and springs are probably about the tightest workspace that I've ever worked on! Not looking forward to reassembly so I'm seriously contemplating going with a rear disc brake conversion. Anybody know of any reputable disc brake conversion kits?
03-06-2013, 01:27 PM
#26
Registered User
I have a Downy rear disc brake system. As you know they are no longer in business. I would find a good set of caliber brackets, preferably cast or forged units and then call LC Engineering for the rotors and calibers. Get the calibers with the rear hand brake (GM) and a set of Lokar rear brake cables. If you want, I will bring my truck down to you and you can take photos, measurements, etc. I also have a set of instructions for my rear disc brake setup.
Last edited by suncomb1; 03-06-2013 at 01:28 PM.
03-12-2013, 09:05 PM
#27
Thanks for the info Don. I think that I am going to go with the rear disc brake conversion bracket from Sky Manufacturing using the 82' Monte Carlo calipers and the late 80's Chevy light duty rotors. Did you upgrade to the late 80's Toyota 1" bore master cylinder for your conversion?
As for the e-brake, I think I'll eventually go with a transfer case e-brake. In the interest of priority I may install a hydro line lock for the interim. I'd love to scope out your truck the next time you're in the area. Keep me post the next time you head down to Ocean City.
Tonight, I finished breaking down the rear axle. Removed the axle shaft assembly, banged out all of the axle flange studs, pressed out the axle shaft from the bearing retainer and drum backing plate, pressed out the bearings from the bearing retainers and removed the seals. Obviously, I don't have a slew of SST's so pressing out the axle shaft was a bit of a PITA-the drum backing plate and the axle shaft flange makes setting up my press a bit difficult and ackward. Not sure what I'm going to do with the bearing retainer, it's looking pretty rough. The inside where the bearing seats is good, but the outside is fairly rusty. They may be getting replaced if a quick attempt to clean them up doesn't yield desirable results. Low Range Off-Road has them for somewhere around $30. The bearings and seals were shot so they'll be getting replaced as well.
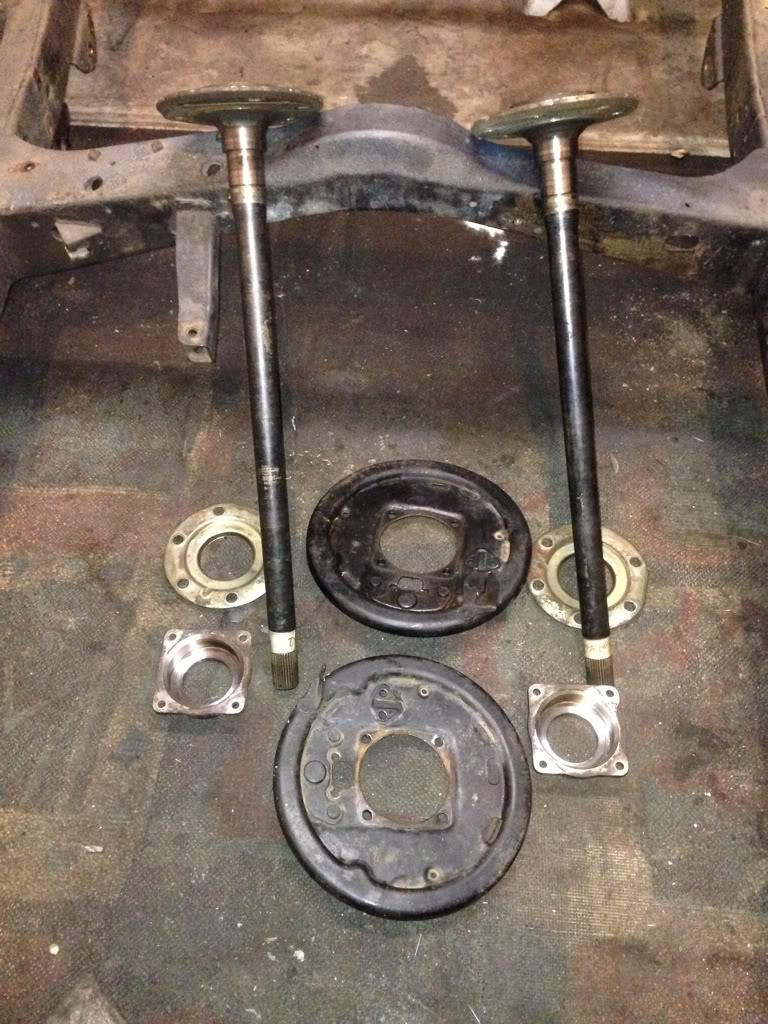
(If anybody needs those drum backing plates, let me know.)
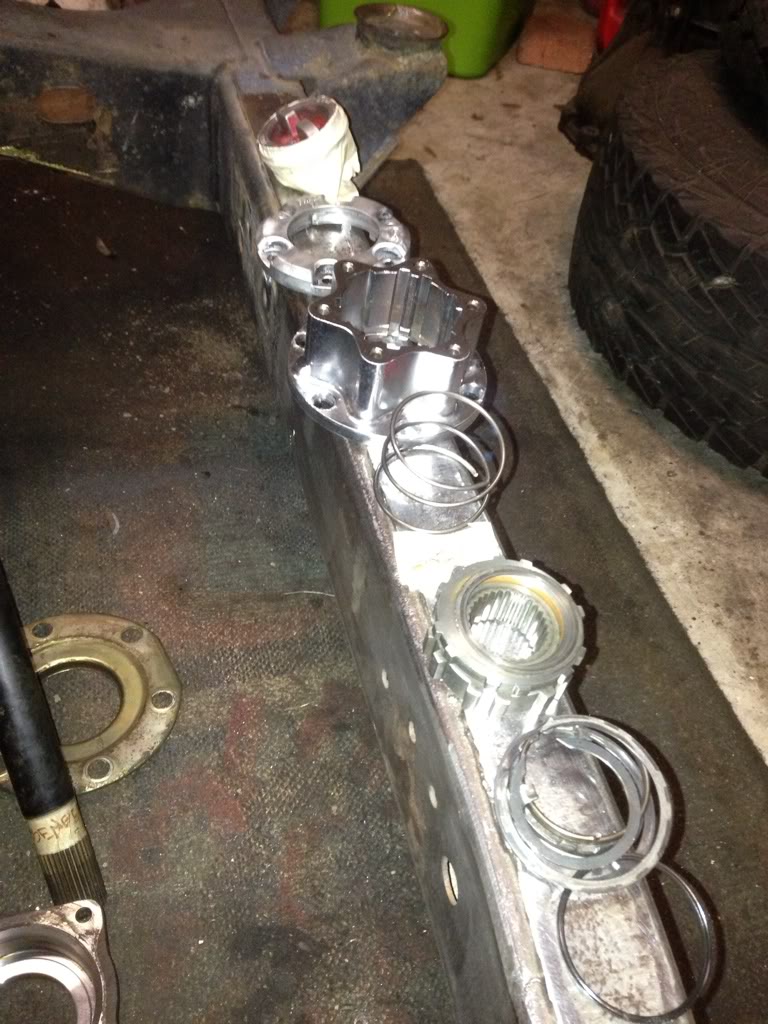
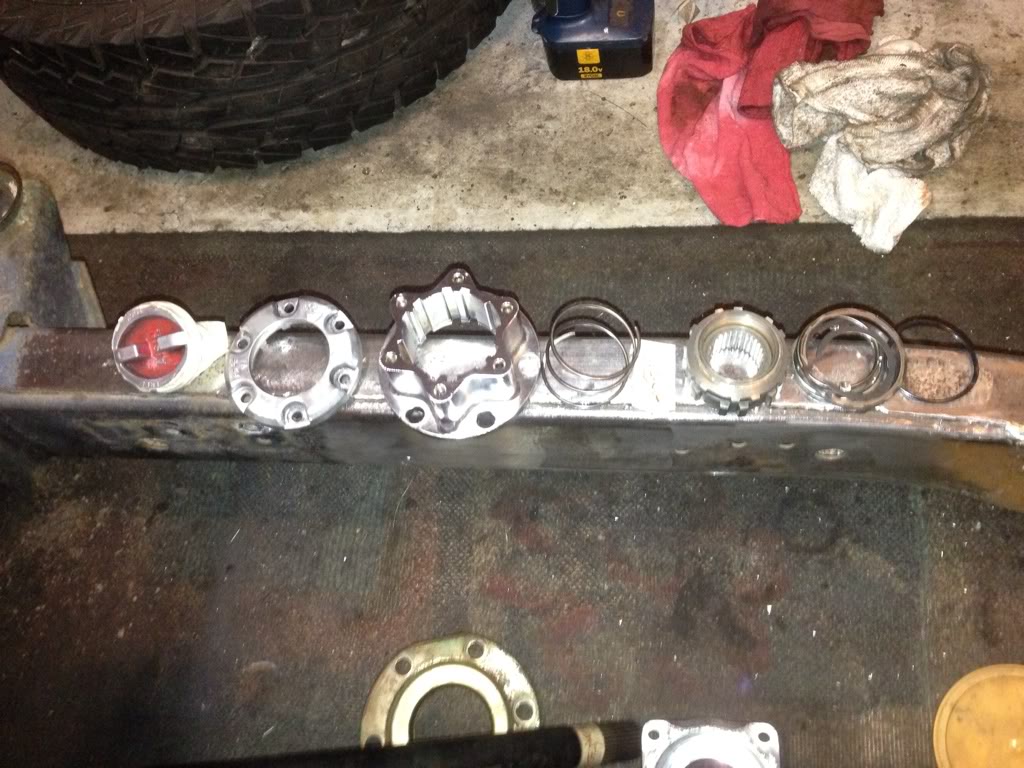
Also finished breaking down and cleaning the front Aisin hub locks. I got most of the old paint off the dials and outter rings with a wire wheel and some emory paper. Still need to do some light soda blasting to the dails (thus the masking tape). I managed to loose one of the detent balls so that'll have to get ordered along with the new dial o-rings. The hub bodies cleaned up extremely well - gotta love chromoly! 30 year old hubs will look like infants when I'm done!
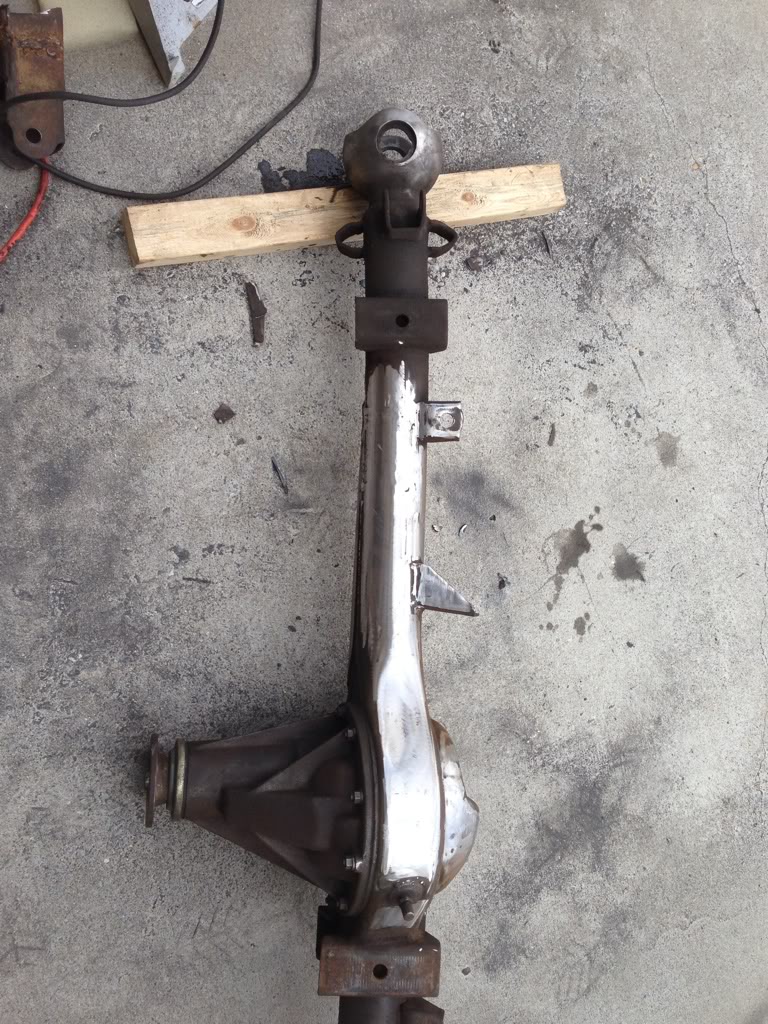
Since I'm sort of in a holding pattern until I get some nice weather to get outside to do some sand blasting, I decided to mock up the new torque rod mount on the front axle. As you can see below, the previous owner decided to hack up the mount to accommodate his ridiculous 7" lift. I'm planning on cutting off that monstrosity and fabricating a removeable/adjustable torque rod bracket. The dimensions will be about the same as the factory bracket, but I will be making a base plate that will contour the shape of the axle housing and will attach with U-bolts. That way I can easily remove it if I go to a Hi-Steer or make minor adjustments in the bracket angle to accommodate my suspension height. I also plan on modifying the torque rod so it too is adjustable.
That's it for now.
As for the e-brake, I think I'll eventually go with a transfer case e-brake. In the interest of priority I may install a hydro line lock for the interim. I'd love to scope out your truck the next time you're in the area. Keep me post the next time you head down to Ocean City.
Tonight, I finished breaking down the rear axle. Removed the axle shaft assembly, banged out all of the axle flange studs, pressed out the axle shaft from the bearing retainer and drum backing plate, pressed out the bearings from the bearing retainers and removed the seals. Obviously, I don't have a slew of SST's so pressing out the axle shaft was a bit of a PITA-the drum backing plate and the axle shaft flange makes setting up my press a bit difficult and ackward. Not sure what I'm going to do with the bearing retainer, it's looking pretty rough. The inside where the bearing seats is good, but the outside is fairly rusty. They may be getting replaced if a quick attempt to clean them up doesn't yield desirable results. Low Range Off-Road has them for somewhere around $30. The bearings and seals were shot so they'll be getting replaced as well.
(If anybody needs those drum backing plates, let me know.)
Also finished breaking down and cleaning the front Aisin hub locks. I got most of the old paint off the dials and outter rings with a wire wheel and some emory paper. Still need to do some light soda blasting to the dails (thus the masking tape). I managed to loose one of the detent balls so that'll have to get ordered along with the new dial o-rings. The hub bodies cleaned up extremely well - gotta love chromoly! 30 year old hubs will look like infants when I'm done!
Since I'm sort of in a holding pattern until I get some nice weather to get outside to do some sand blasting, I decided to mock up the new torque rod mount on the front axle. As you can see below, the previous owner decided to hack up the mount to accommodate his ridiculous 7" lift. I'm planning on cutting off that monstrosity and fabricating a removeable/adjustable torque rod bracket. The dimensions will be about the same as the factory bracket, but I will be making a base plate that will contour the shape of the axle housing and will attach with U-bolts. That way I can easily remove it if I go to a Hi-Steer or make minor adjustments in the bracket angle to accommodate my suspension height. I also plan on modifying the torque rod so it too is adjustable.
That's it for now.
03-14-2013, 07:56 PM
#30
Corey, do you mean inside the cab? If so, I was planning on using POR-15 on the interior and then bedliner on top of that for the flooring. I want the interior to look nice, but also be rugged at the same time since I track in dirt and mud from hunting and sandy from surfing. I want be able to lightly spray the floors with a hose and that doesn't work too well with carpet! (I hate vinyl so that's not an option)
03-17-2013, 09:35 AM
#33
Registered User
Short of grinding the welds out, separating the rails, POR15'ing, and welding the rails back together, there's not much you can do. If I were you I'd just plug up the holes as good as you can so they can't get filled with water and salt.
03-30-2013, 05:49 AM
#36
The weather decided to cooperate with me today so I got some sand blasting done on my frame. The rear end of the frame is super caked up with rubberized undercoating and several other attempts to paint the frame so the sand blaster just wasn't cutting it. I went out and grabbed some aircraft stripper to remove the bulk of the gunk. I've got a little over half the frame cleaned up now:
While the aircraft stripper was doing it's thing, I got the front axle housing cleaned up. Cut off the torque rod bracket:
Sandblasting went easy:
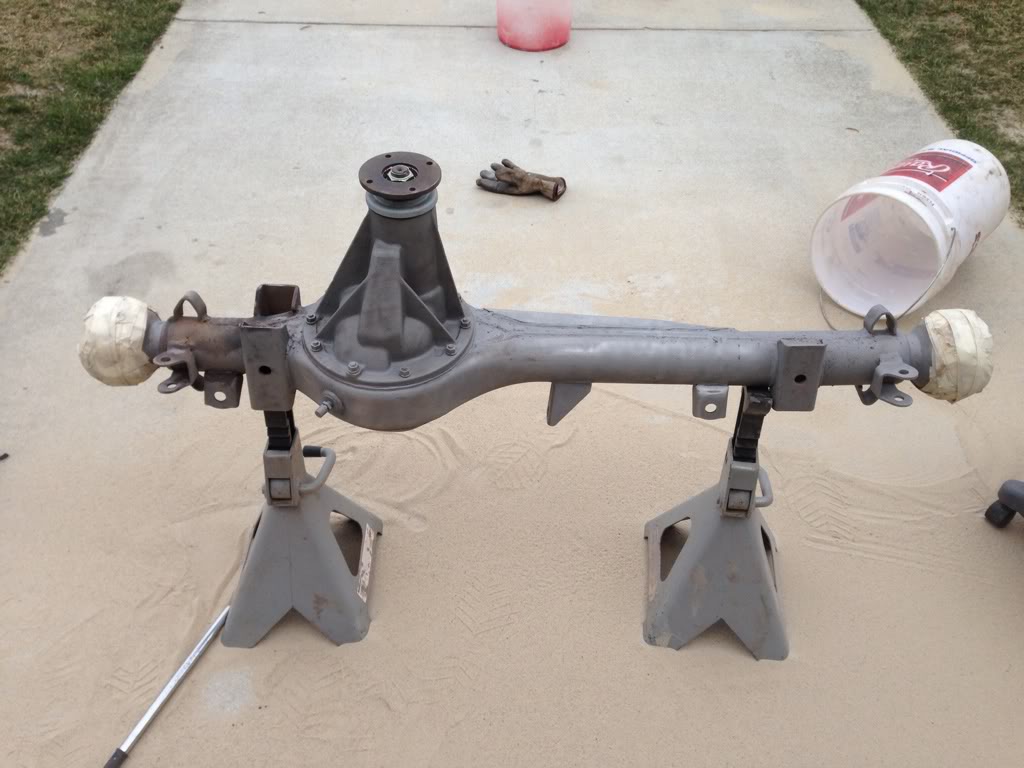
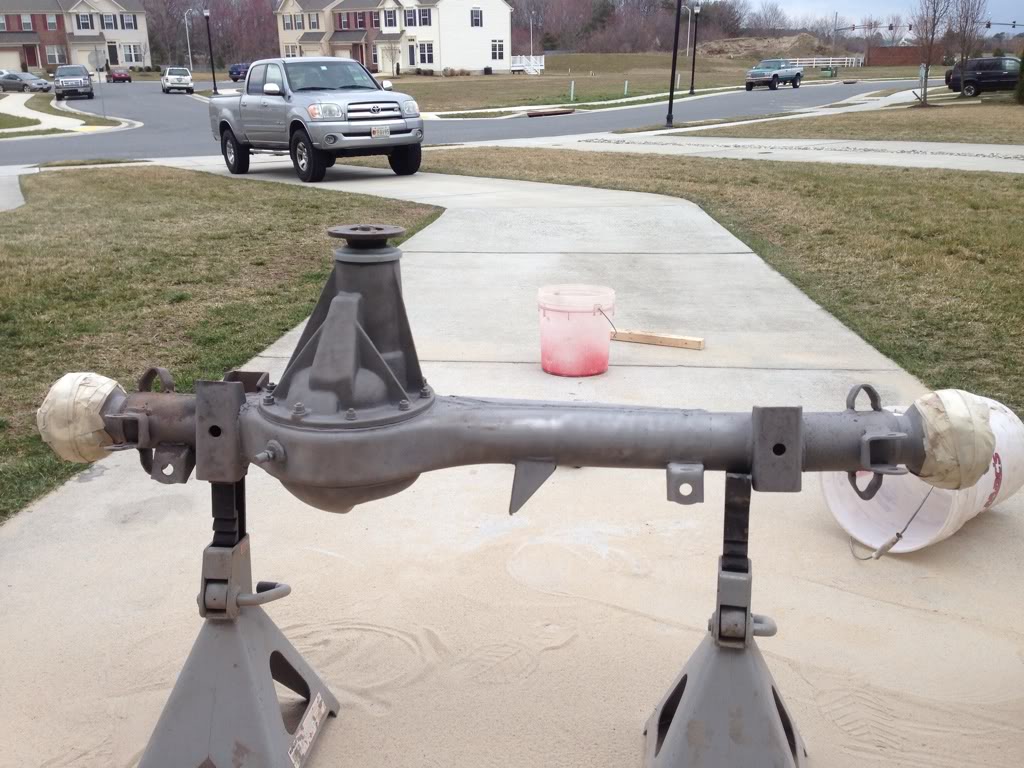
Compared to what the rear axle looks like:
Everything is coming alon well
While the aircraft stripper was doing it's thing, I got the front axle housing cleaned up. Cut off the torque rod bracket:
Sandblasting went easy:
Compared to what the rear axle looks like:
Everything is coming alon well
Last edited by kawazx636; 03-30-2013 at 05:53 AM.
04-17-2013, 10:24 AM
#40
I'm at a little bit of a stand still right now with the frame. Every time I have a chance to finish up the sandblasting, the weather is crap so I can't get outside to finish the job - I only have about 25% left to do, but it's the harder 25% with more caked on grease and old paint.
I did, however, manage to score a decent used oven for $25 off craigslist to do the powder coating. I bought Eastwood's Hotcoat powder coating kit to do some of the smaller parts like the steering knuckles, aisin hubs, brake shields, etc. I may even go back and remove some of the brackets on my engine, strip the high temp paint and powdercoat them as well. Supposedly it's a pretty good and convenient system to use.
I dropped by the Toyota dealer today to pick up some o-rings for my aisin hubs so I can get them back together in my down time waiting for a sunny day to sandblast. Also ordered new detent balls for the dials from an industrial supplier, but had to get 200 of them for $5 so if anybody needs any of those pesky detent balls that seem to go flying and M.I.A. when you rebuild your hubs just let me know and I'll mail you a few... I've only got 198 to spare!
Hopefully next time I check back in I'll have a cleaned frame ready for paint, if not, axle assembly may be bumped up on the list.


