When you click on links to various merchants on this site and make a purchase, this can result in this site earning a commission. Affiliate programs and affiliations include, but are not limited to, the eBay Partner Network.
I had a Pacesetter header on my truck, the collector burnt through in less than a year.
It burnt on the header side, so I cut it out and welded it straight. That lasted until I changed engines.. If you can afford it, save up and buy a good header. You will thank yourself later.
Thanks. I was lucky to find one that lived in the desert, with good choices for front bumper guard and hitch receiver/rear bumper. Even the transmission and transfer case are good.
Now that I have it in the midwest, the clock is ticking, so I have to clean and seal up the frame soon. Also clean up and repaint the bucket and cab.
I did not know that the pacesetter was so thin walled. I installed two LCE complete systems on '94s. One was 4x4, the other 4x2. Aside from difficult fit because of the bend on the rear pipe section on the 4x2 (close to axle), the quality was good. Never had to do anything to either one after install.
I park the truck in Winter around here. Too much salt on the roads. But I'm not just doing nothing. I did get my compressor mounted on the tank. It's a 3 cylinder Eaton. I was able to test it and it fills FAST. I'll get photos when I add the moisture/particulate filter. I did get a new pressure switch, gauge, relief valve, etc. This was an old industrial compressor tank, and the compressor was toast (frozen solid), with a 3 phase motor! The thing is huge, and weighs like 800 lbs. It squashed my old '94 2WD dragging it back from the east coast.
I also bought a sandblaster from Tractor Supply Corp. It came with a deadman valve and a set of 4 nozzles. I have two other looming projects but won't let them keep this from moving forward. I want to lift the bucket off and remove all rear drive/suspension gear... sandblast and then seal it up. I don't know how much I can do next Summer. We'll see.
Rock Auto sent out a notice of a close-out sale on parts for my truck.
They sent a customized this list for my '83.
Some of the parts were an excellent deal, so I went ahead and ordered some...
I got a rear brake hardware kit and a set of shoes (total for both-$15.13)- nice.
They had master cylinder rebuild kits (brakes). These normally run over $40 at least, so I got one for half that price. I also got a new slave cylinder (clutch) for less than 6 bucks!
They had those wire retainers for front brake pads (pin retainers and those other springy things) so I picked up a couple of sets. I just put new pads on a few hundred miles ago and those clips were on the edge of useless.
They had exhaust manifold gaskets for less than $8 and fuel pump spacers/gaskets too. Couldn't resist at the prices.
Rounded it off with a Sylvania headlamp for $7. Gee, that's cheap.
Some stuff was not an outstanding deal, just cheap. I did check prices and availability on things like rotors, drums, lug nut studs, and decided not to go for them. They had an alternator for like $33, but those are available for just about that anyday. I probably should get a couple of rear brake slave cylinders (like $5). Mine seem fine, but as time goes by, you know these parts will just get harder and harder to find!
All told $70 including shipping. These are spare parts that will get installed during build-up, or eventually used.
I am still trying to find a proportioning valve solution. Mine's leaking. I am not going to bypass it. When I am loaded, I want those rear brakes to engage fully, and when I am not loaded, I do NOT want them to! I wish they made a rebuild kit for those.
If you have installed an aftermarket universal proportional valve, I'd like to hear about it. I haven't even begun to look into how it is connected or which way fluid flows, or how to adjust it.
Last edited by 83pingpong; 10-24-2014 at 04:02 AM.
Rock Auto did the same thing to me one day with all these closeout parts and I scored big on some Bosch parts for cheap. They are my preferred company to order parts from.
Solid axle trucks generally have bad braking as it is. It would be nice if I can get the rear axel to brake more substantially when loaded, but not lock up on hard braking when unloaded. I've seen universal load sensing proportional valves, but I don't know if they work with the rod link that adjusts the stock valve. I don't mind a little extra work to have it adjust for load.
If I can't figure out how to mount one, I'll go for a fixed proportion valve like that one at Summit.
Pingpong, thanks for the heads up on the RockAuto deals. I've been looking for steering column u-joints for some while now and I just scored a pair from them for $5.57!
I'm sticking with stock rear drum brakes, so I got two replacement cylinders to install with the shoes and rear brake kits I already get last month.
I also got a clutch master cylinder (got the slave last month), and decided to get the steering column unis as well. I didn't know they had them at Rock auto (closeout) until Dave mentioned them (last post). Thanks for the heads up... they were not in the list Rock Auto sent me, and I didn't think to look for them.
Snow and sleet in Kansas City this weekend, and more predicted next week. It will all just have to wait
Last edited by 83pingpong; 02-01-2014 at 09:01 AM.
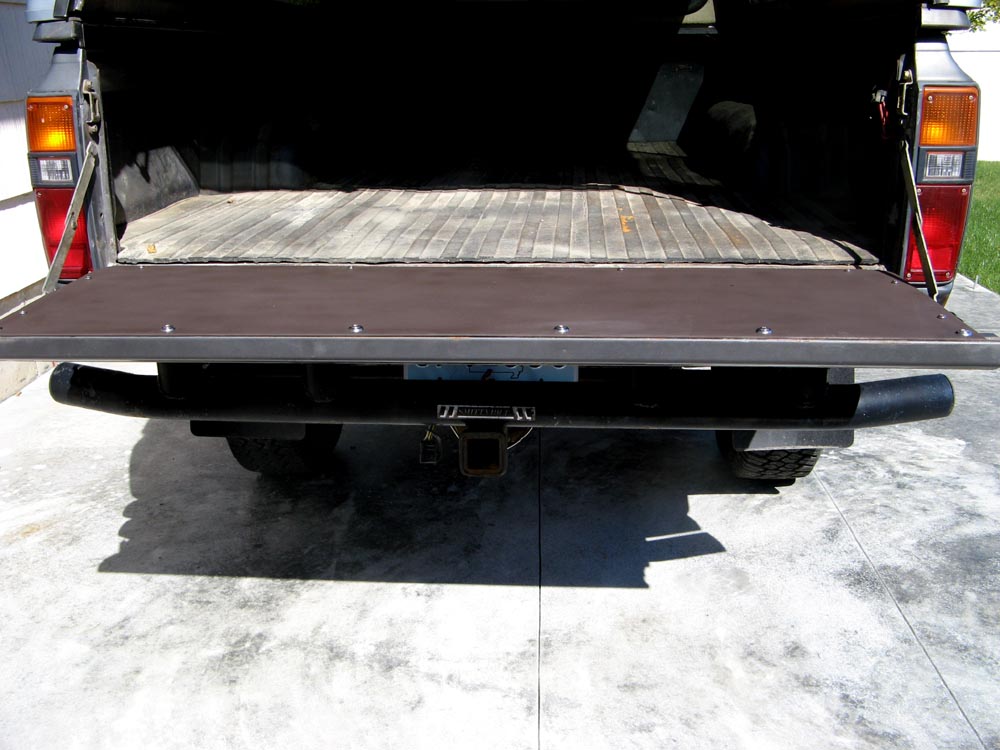
My tailgate is not rusted at all, but the top lip flexes and the welds were in bad shape (and a little rust developing on the flex-points). There was an aluminum lip guard rivetted on there, but it did nothing to prevent it from flexing, just covering the top.
I've been planning to do something about this for a long time, but finally did!
I got some plate steel and had it cut 16"x 51". I had to belt sand it with a coarse grit belt to remove the rust (junk yard plate steel!). After a good cleaning and scrubbing with coarse steel wool, I gave it a quick simple coat of Rustoleum Camo Brown. This will stain easily and grind off with use, but I don't care. I might do a better job on the finish if I EVER get around to redoing the frame and paint job
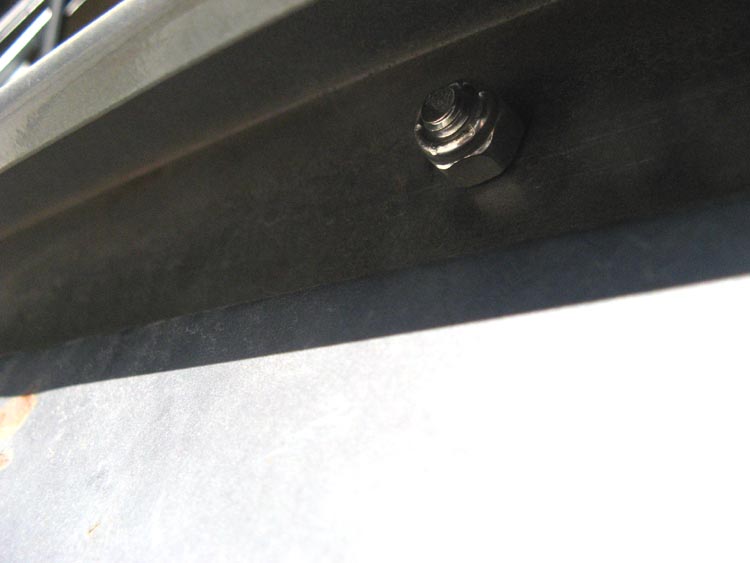
But this worked GREAT! I used stainless bolts with trim washers and nylon insert type lock nuts (6 of them) on the lip, but just used heavy metal screws hold the plate in place on the lower bumper area (8 of them). The tailgate plate completely stiffens it-no flex at all, and opens/closes with more deliberate action. This will add years to my tailgate's life.
Last edited by 83pingpong; 10-13-2014 at 04:39 AM.
I like your approach to the tires (to a lot of things, actually; good build so far!) How's the rolling resistance or fuel economy with them? If the suspension's stock, do they ever rub?
I like your approach to the tires (to a lot of things, actually; good build so far!) How's the rolling resistance or fuel economy with them? If the suspension's stock, do they ever rub?
I think suspension is all stock. I have not tried any extreme flex, but I did some wheeling on a wet clay road up and down a mountain with some deep pits I had to traverse, including on some steep inclines. These tires bit into the clay incredibly well, and I did not hear or feel any rub. Some of the ruts were too deep for the axles, and I had to ride the ridges on soggy clay. It was a nailbiter at first, then I realized how well these tries stick. No floating at all. Awesome! My passenger was ˟˟˟˟ting bricks on the way up but just had to walk around the truck and look at it when we got to the top!
Fuel economy suffers a little from the weight of these things. The wheels AND the tires are made to support a much bigger work truck or commercial van. The truck has a more solid and stiff feel to the ride. The gear ratio is also taller and the speedometer error is about 10%. Corrected fuel economy on the highway is about 20-22 mpg now. Probably 17-18 in town. It was more like 23-24mpg highway before the change. Not bad really.
Last edited by 83pingpong; 10-21-2014 at 04:51 AM.
May I ask what the set of tires cost? I'm looking for something similar.
These are 16" LT245 75R ($163 each at tire rack). I don't think the price has changed since I got them.
I had to get narrow 16 inch wheels to accommodate them, so I settled on Blackrock Lobo series 950 number (#950676040 16x7 6x5.5). These are zero offset. Fit perfectly. They cost me about $85 apiece. They have THICK plate steel in the spokes, and rated for 2000lb load. Way more than I'll ever need. The combination of those tires on these wheels transformed the ride...a little slower, but feels more stable. Goes through rough stuff more comfortably. The tires were aired up to maximum by the tire place when I had them mounted (80psi). It was too hard. After they set in for a month or so, I dropped it to 35psi. I can confidently drop to 20-25 for more extreme off-road conditions. I am sure they won't slip.
As far as tire size options go, there is only one 15" size (LT235 75R) at about $140 apiece. You'll need a 7" wheel for those too. In 16", 225 or 235 are viable options as well.
But every time I drive the truck, especially off-road, I am really glad I chose these wheels and tires. Look good, traction and stability like crazy.
Last edited by 83pingpong; 10-24-2014 at 04:05 AM.
Removed my clutch throwout bearing by soaking strips of newspaper in water and stuffing it into the recess behind the bearing in the flywheel. I used this 19mm bolt as a punch to pack it. Added more wet newspaper and packed it in until it forced the bearing out from behind. Takes minutes and it works great! This was my 94 2WD actually, but posting this here anyway. It really is an easy solution.
Here's the flywheel after removal. It cleans out the recess at the same time.
When I bought this truck it had this "wow wow" transition when I hit ~45 mph. It was probably still there at highway speed, but I could not figure out what could be causing it.
So I've hauled maybe 25 trailer loads of 1 yard of crushed limestone (AB3), topsoil, or fill. Also add trailered building materials for a complete 24'x16' insulated shop with drywall internal walls, gabled roof, roofing materials, gutters, etc. And loads of bagged cement and more building materials for preparing for an add-on garage. Also hauled two yards of premixed Cement in a dump trailer this Summer to make garage slab apron. Also crossing Kansas twice to get to Northern NM after driving it from Pheonix to Kansas City when I bought it. This truck has been cheap, and useful.
About $250 in registration fees for the period, and other stuff you see in this thread. Insurance is about $120 annual for basic coverage, and I paid $3000 for it.
So the "wow wow" got worse this week. Turned into a wobble that just got worse and worse. I could NOT figure out what it was. Universals OK, no evidence of engine or drive train mounts failing, but it got severe this morning bringing back a door from the Home Depot, and failed catastrophically.
So I can move it around with the front end engaged, but the diff need to be rebuilt. I should do the entire axel with bearings and seals while I am at it.
Damn. I have no time, no money to spare for this.
I'll drain it, remove the drive shaft and pull the cover to remove the metal chunks and see what's in there.
Any suggestions as to how to proceed . What is the usual fail here? pinion gear? pinion gear bearing obvious primary culprit I suppose.
Last edited by 83pingpong; 11-03-2015 at 04:00 AM.
Tow service? Unbolt the rear driveshaft, put it in 4Hi, and enjoy your front-wheel-drive truck.
Cover? You mean the whole diff? The axles and hubs have to be unbolted first (four studs behind the brake backing plate), slid out a little, then the third member pulls out of the axle housing. The rear wheel bearings are sealed, expensive, and very strong. Personally I wouldn't bother with them unless the diff failure damaged them somehow, especially if there are time and money constraints. The one part I'd replace is the O-rings sealing between the hub/brake assembly and the axle housing.
I've only once seen a failed Toyota diff, and never seen the act of failing, so I'm curious to see what you find as well. I once bought a Tacolocker with good bearings but the main gearset was destroyed. My hunch is that the backlash grew over time to the point that the gearset saw too much impact and shredded some teeth. On the other hand, the wowow noise would be consistent with a bearing failure, so... rip it out and let's see!
I've never been in there. So, if the pinion gear bearing failed catastrophically, and there's damage to the differential, a full rebuild is presumably required.
If I had worked on it last week before this failure, maybe the bearing/seals would be enough.
Yes, it is shocking to see a failure in my opinion. Gear oil was up and clean last year, and STILL no leaks anywhere. 230k miles, 30 plus years. Maybe not so shocking. No idea who put the first 200k on the truck, and how.
 12-01-2013, 02:15 PM

 These are spare parts that will get installed during build-up, or eventually used.


 ). It was too hard. After they set in for a month or so, I dropped it to 35psi. I can confidently drop to 20-25 for more extreme off-road conditions. I am sure they won't slip.


