Yaw Rate and Acceleration Sensor Zero Point Calibration
 09-01-2010, 12:21 PM
#1
Registered User
Thread Starter
Join Date: Feb 2008
Posts: 4
Likes: 0
Received 0 Likes
on
0 Posts
Yaw Rate and Acceleration Sensor Zero Point Calibration
EDIT: Here are the steps for performing Zero Point Calibration taken from the 5th Gen 4Runner Repair Manual.
IF your 4Runner is equipped with either DAC or Crawl Control, you must complete steps 4 and/or 5 or you will get a DTC and the slip indicator will always be lit.
I highly recommend this calibration if you think the VSC on your 4Runner kicks in too much, before or after lift. Mine was overreacting both before and after the lift, now for daily driving don't even know its there.
PERFORM YAW RATE AND ACCELERATION SENSOR AND STEERING ANGLE SENSOR ZERO POINT CALIBRATION (When Using SST Check Wire)
NOTICE:
* While obtaining the zero points, keep the vehicle stationary and do not vibrate, tilt, move, or shake it (do not start the engine).
* Be sure to perform this procedure on a level surface (with an inclination of less than 1%).
(a) Clear the zero point calibration data.
(1) Turn the ignition switch off.
(2) Check that the steering wheel is centered.
(3) Check that the shift lever is in P.
(4) Turn the ignition switch to ON.
(5) The ABS warning light and slip indicator light come on for 3 seconds to indicate that the initial check is completed.
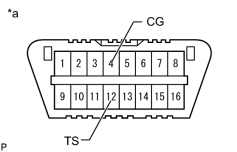
(6) Using SST, connect and disconnect terminals 12 (TS) and 4 (CG) of the DLC3 4 times or more within 8 seconds.
Front view of DLC3
(7) Check that the slip indicator light comes on.
(b) Perform zero point calibration of the yaw rate and acceleration sensor.
(1) Turn the ignition switch off.
(2) Check that the steering wheel is centered.
(3) Check that the shift lever is in P.
NOTICE:
* DTCs 36 (Zero Point Calibration of Yaw Rate Sensor Undone) and 39 (Zero Point Calibration of Acceleration Sensor Undone) are stored if the shift lever is not in P.
* If a DTC is output that indicates zero point calibration is incomplete, repeat the procedure starting at the step for clearing the zero point calibration data and system information.
(4) Using SST, connect terminals 12 (TS) and 4 (CG) of the DLC3.
Front view of DLC3
(5) Turn the ignition switch to ON.
(6) Keep the vehicle stationary on a level surface for 5 seconds or more.
(7) Check that the slip indicator light comes on for several seconds and then blink in the test mode pattern (0.125 seconds on and 0.125 seconds off).
HINT:
* If the slip indicator light does not blink, perform zero point calibration again.
* The zero point calibration is performed only once after the system enters test mode.
* Calibration cannot be performed again until the stored data is cleared.
(8) Turn the ignition switch off and disconnect SST from the DLC3.
(c) Drive the vehicle straight ahead at 40 km/h (25 mph) or more for at least 10 seconds. (I was unable to do this task, just driving it around should be OK)
4. PERFORM DOWNHILL ASSIST CONTROL CALIBRATION (w/ Downhill Assist Control)
(b) Enter test mode (when using SST check wire).
(1) Turn the ignition switch off.
(2) Using SST, connect terminals 12 (TS) and 4 (CG) of the DLC3.
Front view of DLC3
(c) Turn the downhill assist control switch off.
(d) Push the downhill assist control switch and check that the downhill assist control indicator light is blinking.
(e) Turn the downhill assist control switch off.
(f) Turn the ignition switch off.
(g) Check if DTC C120A is output.
HINT:
If DTC C120A is not output, calibration was performed successfully.
5. PERFORM CRAWL CONTROL CALIBRATION (w/ Crawl Control)
(2) Using SST, connect terminals 12 (TS) and 4 (CG) of the DLC3.
Front view of DLC3
(c) Push the crawl ON/OFF switch and check that the crawl indicator light is on while the switch is being pushed.
Text in Illustration
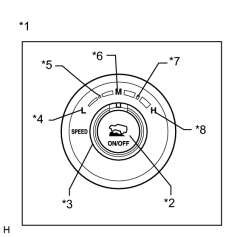
*1 Crawl Control Switch
*2 ON/OFF Switch
*3 Speed Selector Switch
*4 Low
*5 Medium-low
*6 Medium
*7 Medium-high
*8 High
(I pushed in the ON/OFF button while I turned the dial and kept pushed down till the end of the following steps)
(d) Turn the crawl ON/OFF switch off.
(e) Turn the speed selector switch to L (low).
(f) Turn the speed selector switch to medium-low.
(g) Turn the speed selector switch to M (medium).
(h) Turn the speed selector switch to medium-high.
(i) Turn the speed selector switch to H (high).
(j) Turn the speed selector switch to L (low).
(k) Turn the ignition switch off.
(l) Check if DTC C120A is output.
HINT:
If DTC C120A is not output, calibration was performed successfully.
IF your 4Runner is equipped with either DAC or Crawl Control, you must complete steps 4 and/or 5 or you will get a DTC and the slip indicator will always be lit.
I highly recommend this calibration if you think the VSC on your 4Runner kicks in too much, before or after lift. Mine was overreacting both before and after the lift, now for daily driving don't even know its there.
PERFORM YAW RATE AND ACCELERATION SENSOR AND STEERING ANGLE SENSOR ZERO POINT CALIBRATION (When Using SST Check Wire)
NOTICE:
* While obtaining the zero points, keep the vehicle stationary and do not vibrate, tilt, move, or shake it (do not start the engine).
* Be sure to perform this procedure on a level surface (with an inclination of less than 1%).
(a) Clear the zero point calibration data.
(1) Turn the ignition switch off.
(2) Check that the steering wheel is centered.
(3) Check that the shift lever is in P.
(4) Turn the ignition switch to ON.
(5) The ABS warning light and slip indicator light come on for 3 seconds to indicate that the initial check is completed.
(6) Using SST, connect and disconnect terminals 12 (TS) and 4 (CG) of the DLC3 4 times or more within 8 seconds.
Front view of DLC3
(7) Check that the slip indicator light comes on.
(b) Perform zero point calibration of the yaw rate and acceleration sensor.
(1) Turn the ignition switch off.
(2) Check that the steering wheel is centered.
(3) Check that the shift lever is in P.
NOTICE:
* DTCs 36 (Zero Point Calibration of Yaw Rate Sensor Undone) and 39 (Zero Point Calibration of Acceleration Sensor Undone) are stored if the shift lever is not in P.
* If a DTC is output that indicates zero point calibration is incomplete, repeat the procedure starting at the step for clearing the zero point calibration data and system information.
(4) Using SST, connect terminals 12 (TS) and 4 (CG) of the DLC3.
Front view of DLC3
(5) Turn the ignition switch to ON.
(6) Keep the vehicle stationary on a level surface for 5 seconds or more.
(7) Check that the slip indicator light comes on for several seconds and then blink in the test mode pattern (0.125 seconds on and 0.125 seconds off).
HINT:
* If the slip indicator light does not blink, perform zero point calibration again.
* The zero point calibration is performed only once after the system enters test mode.
* Calibration cannot be performed again until the stored data is cleared.
(8) Turn the ignition switch off and disconnect SST from the DLC3.
(c) Drive the vehicle straight ahead at 40 km/h (25 mph) or more for at least 10 seconds. (I was unable to do this task, just driving it around should be OK)
4. PERFORM DOWNHILL ASSIST CONTROL CALIBRATION (w/ Downhill Assist Control)
(b) Enter test mode (when using SST check wire).
(1) Turn the ignition switch off.
(2) Using SST, connect terminals 12 (TS) and 4 (CG) of the DLC3.
Front view of DLC3
(c) Turn the downhill assist control switch off.
(d) Push the downhill assist control switch and check that the downhill assist control indicator light is blinking.
(e) Turn the downhill assist control switch off.
(f) Turn the ignition switch off.
(g) Check if DTC C120A is output.
HINT:
If DTC C120A is not output, calibration was performed successfully.
5. PERFORM CRAWL CONTROL CALIBRATION (w/ Crawl Control)
(2) Using SST, connect terminals 12 (TS) and 4 (CG) of the DLC3.
Front view of DLC3
(c) Push the crawl ON/OFF switch and check that the crawl indicator light is on while the switch is being pushed.
Text in Illustration
*1 Crawl Control Switch
*2 ON/OFF Switch
*3 Speed Selector Switch
*4 Low
*5 Medium-low
*6 Medium
*7 Medium-high
*8 High
(I pushed in the ON/OFF button while I turned the dial and kept pushed down till the end of the following steps)
(d) Turn the crawl ON/OFF switch off.
(e) Turn the speed selector switch to L (low).
(f) Turn the speed selector switch to medium-low.
(g) Turn the speed selector switch to M (medium).
(h) Turn the speed selector switch to medium-high.
(i) Turn the speed selector switch to H (high).
(j) Turn the speed selector switch to L (low).
(k) Turn the ignition switch off.
(l) Check if DTC C120A is output.
HINT:
If DTC C120A is not output, calibration was performed successfully.
Last edited by iDRiVaT4R; 09-08-2010 at 09:52 AM.


Thread
Thread Starter
Forum
Replies
Last Post
altydog
86-95 Trucks & 4Runners
1
07-28-2015 10:20 AM


