1976 Ford Super Cab Restore
 09-02-2016, 10:16 AM
#1
Super Moderator
Staff
Thread Starter
iTrader: (1)
Join Date: Aug 2008
Location: Anderson Missouri
Posts: 11,788
Likes: 0
Received 21 Likes
on
19 Posts
1976 Ford Super Cab Restore
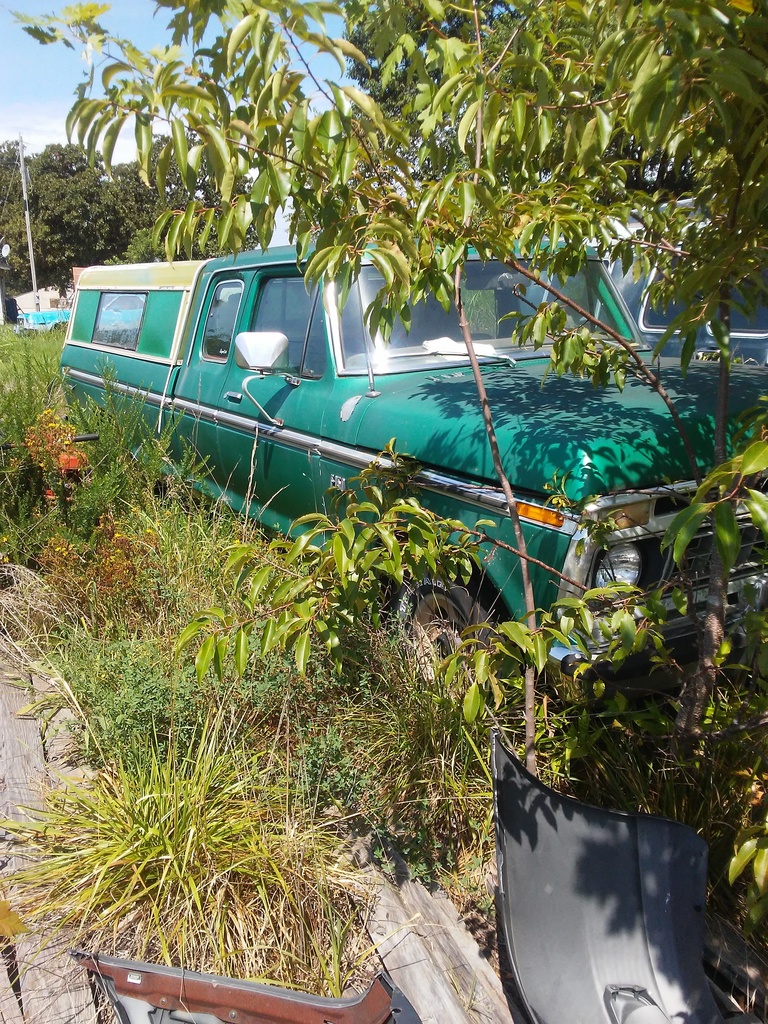
After getting my 85 Extra Cab restored, I was disappointed in the mileage I was getting of 15 miles to the gallon. I figured if I was going to get that bad of a mileage I may as well get into a bigger truck. At first what started out as a disappointment turned into a good thing. I got to thinking of what I wanted for my next build. I could not find a mid 70s Celica and the few I did find was nothing left of them or way over priced. Wow!!! those are expensive. So I got to thinking of a truck that would be easier to find parts for. I like the early 50s Fords and thought of that but then got to thinking I would like to pull a camper and those are not big enough for what I want it for. I like the mid 70s Fords and having hauled hay and wood in them as a kid, I remembered working for a farmer hauling hay in a green standard cab Ford. I always liked that truck and they were new then, I am getting to be an old geezer when a 70s truck was new.
September 24th starts my 10 year count down to partial retirement and 9 months after that I should be able to retire. Being 6 foot tall, standard cabs are crowded to me. I wanted an Super Cab to pull a 5th wheel camper so when it is hot, I can head North for cooler weather for a month or two and see the surrounding areas. When it is cold, I want to go to a place like Phoenix or some other area for the winter for a month or two and see the sights in areas like that. I am becoming a wimp on extreme temperature and would like to live in different parts of the country for short periods of time. Don't want to live to long from home but come back when the weather is better.
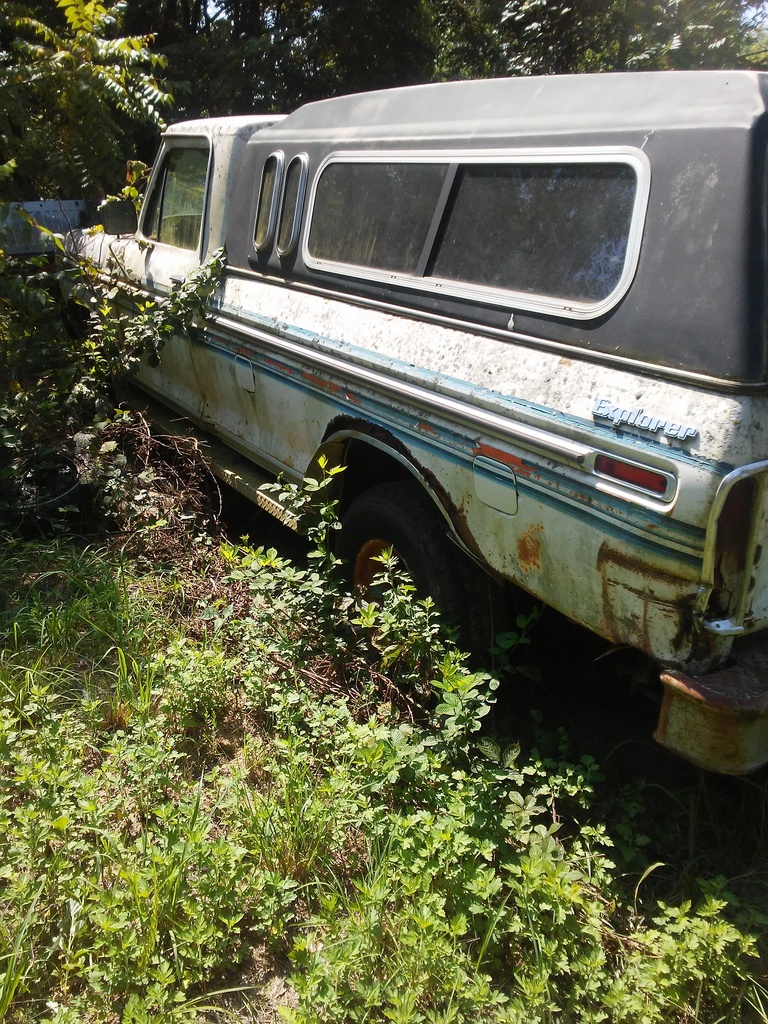
I have had to jump thru hoops. The previous owner died and his wife could not find the title. She had to file for a lost title. Her son was reluctant to part with it since it was his dads truck. It was parked due to high gas prices. These trucks do get thirsty as it has a 429 cubic inch C6 automatic transmission.
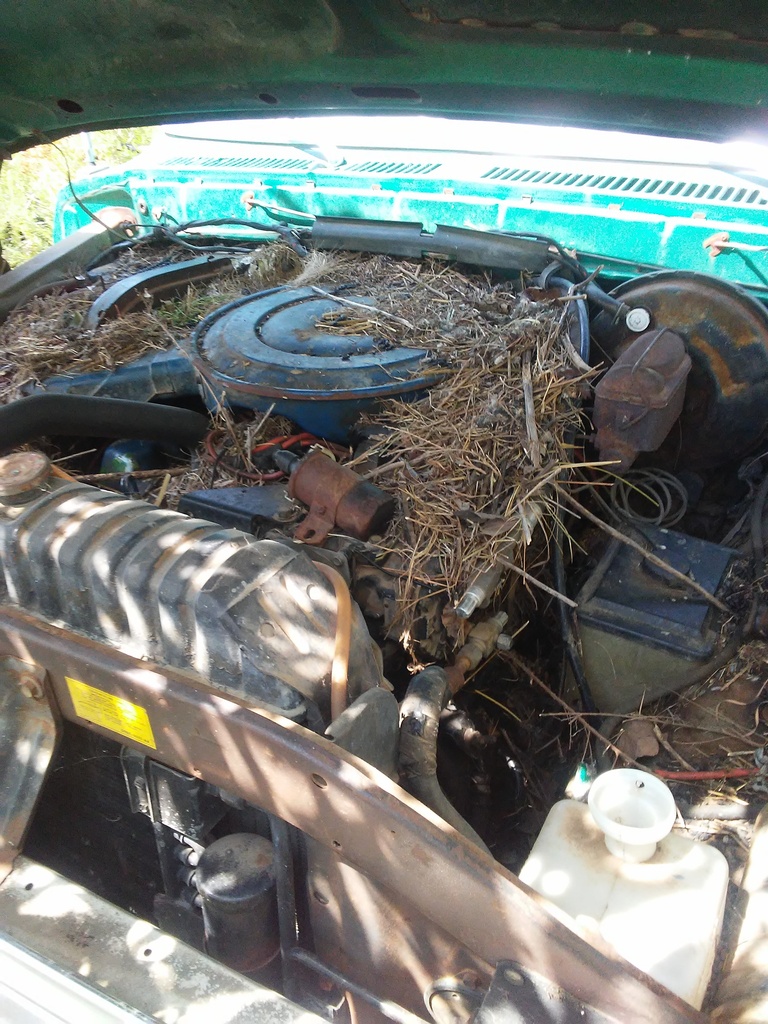
A packrat has gotten under the hood and from what I can see there is no damage. I did not have the heart to tell the previous owners that it will in a few years get a motor swap for something more economical such as a 12 valve Cummins or I would like to stay with a Ford motor. I am hoping I can get the mileage up to a more reasonable number. 8-10 miles per gallon is about what I am going to get with this setup. I am hoping I can swap in a newer model transmission with overdrive or even a 5 speed manual transmission.
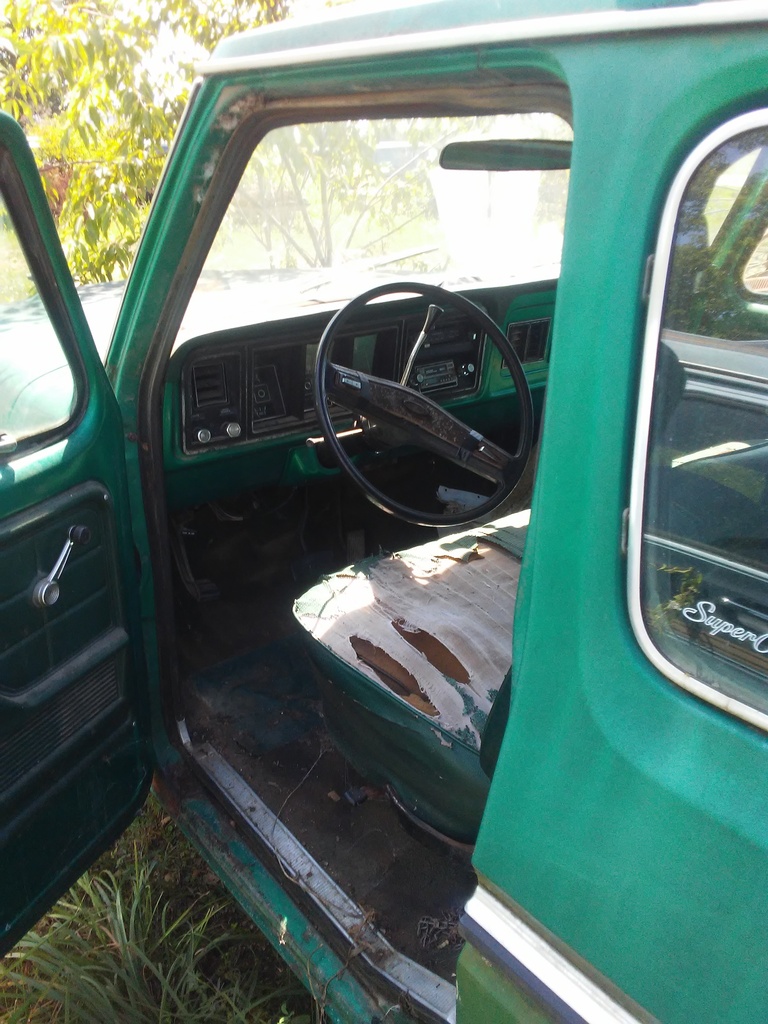
I am hoping the bench seat is comfortable and I want cloth seats and would like to find original material. I will swap in buckets if I have to but really don't want to. I will be adding carpet. I do not want rubber floor mat. On long trips I like to drive barefooted. This has factory air and cruise control. In the 70s that was an option at the time. Now even the base model trucks have ac and cruise that we take for granted. I will add trailer brakes and want to look into adding air bags to level the load when pulling things.
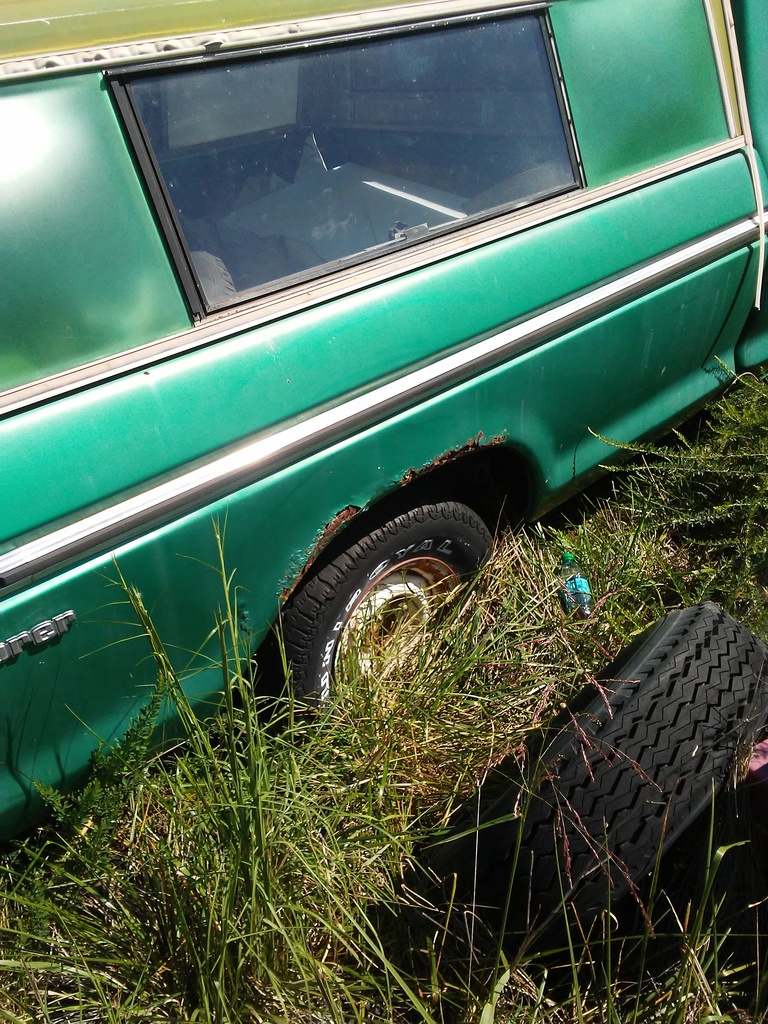
I paid $1100 for it. My dad thought is was a little high but finding a two wheel drive in the color and options I wanted would cost quite a bit more just to find the parts. I wanted 2 wheel drive and passed on some 4 wheel drives. I went on a 6 hour drive, 300 mile trip on a day just for 2 rims for my 85 pickup. It does have the typical rust in the rear wheel wells so that was to be expected. Everything looks to be in great shape unless Mr. Mouse did some damage under the hood. I will start this build by pulling the bed and cleaning the fuel tanks and while those are soaking, I will pull the spark plugs and get the cylinders soaking in Marvel Mystery Oil. This truck as sat for 15 years and there is a good chance of the rings rusted to the walls. The owners son wanted to know if I wanted the camper shell on it. I was going to scrap it out and he says he would trade me this shell for a fiber glass shell which I do like. 1970 can have their shell back. For a 5th wheel camper, I am hoping to find an paint a camper era specific and to match the truck. Truck will be getting a shade darker green when completed and may a tan center stripe.
Later on I might by this truck for parts. It has all the options mine has. It is rusted beyond economical repair but with the tanks, cruise, knobs, some chrome mine does not have, and other parts, a parts truck will pay for itself many times over, plus it is 4 wheel drive and I can part out the rest of the truck of what I don't need.. 76 have ugly gas caps on the drivers side of the bed and newer trucks have gas doors which is one thing I will have put on my truck. I will have to send it out to the body shop to replace wheel arches and gas doors but will do the rest myself. This truck has trim on the tail lights and tailgate and buying pieces one at a time can add up quickly.
September 24th starts my 10 year count down to partial retirement and 9 months after that I should be able to retire. Being 6 foot tall, standard cabs are crowded to me. I wanted an Super Cab to pull a 5th wheel camper so when it is hot, I can head North for cooler weather for a month or two and see the surrounding areas. When it is cold, I want to go to a place like Phoenix or some other area for the winter for a month or two and see the sights in areas like that. I am becoming a wimp on extreme temperature and would like to live in different parts of the country for short periods of time. Don't want to live to long from home but come back when the weather is better.
I have had to jump thru hoops. The previous owner died and his wife could not find the title. She had to file for a lost title. Her son was reluctant to part with it since it was his dads truck. It was parked due to high gas prices. These trucks do get thirsty as it has a 429 cubic inch C6 automatic transmission.

A packrat has gotten under the hood and from what I can see there is no damage. I did not have the heart to tell the previous owners that it will in a few years get a motor swap for something more economical such as a 12 valve Cummins or I would like to stay with a Ford motor. I am hoping I can get the mileage up to a more reasonable number. 8-10 miles per gallon is about what I am going to get with this setup. I am hoping I can swap in a newer model transmission with overdrive or even a 5 speed manual transmission.

I am hoping the bench seat is comfortable and I want cloth seats and would like to find original material. I will swap in buckets if I have to but really don't want to. I will be adding carpet. I do not want rubber floor mat. On long trips I like to drive barefooted. This has factory air and cruise control. In the 70s that was an option at the time. Now even the base model trucks have ac and cruise that we take for granted. I will add trailer brakes and want to look into adding air bags to level the load when pulling things.

I paid $1100 for it. My dad thought is was a little high but finding a two wheel drive in the color and options I wanted would cost quite a bit more just to find the parts. I wanted 2 wheel drive and passed on some 4 wheel drives. I went on a 6 hour drive, 300 mile trip on a day just for 2 rims for my 85 pickup. It does have the typical rust in the rear wheel wells so that was to be expected. Everything looks to be in great shape unless Mr. Mouse did some damage under the hood. I will start this build by pulling the bed and cleaning the fuel tanks and while those are soaking, I will pull the spark plugs and get the cylinders soaking in Marvel Mystery Oil. This truck as sat for 15 years and there is a good chance of the rings rusted to the walls. The owners son wanted to know if I wanted the camper shell on it. I was going to scrap it out and he says he would trade me this shell for a fiber glass shell which I do like. 1970 can have their shell back. For a 5th wheel camper, I am hoping to find an paint a camper era specific and to match the truck. Truck will be getting a shade darker green when completed and may a tan center stripe.

Later on I might by this truck for parts. It has all the options mine has. It is rusted beyond economical repair but with the tanks, cruise, knobs, some chrome mine does not have, and other parts, a parts truck will pay for itself many times over, plus it is 4 wheel drive and I can part out the rest of the truck of what I don't need.. 76 have ugly gas caps on the drivers side of the bed and newer trucks have gas doors which is one thing I will have put on my truck. I will have to send it out to the body shop to replace wheel arches and gas doors but will do the rest myself. This truck has trim on the tail lights and tailgate and buying pieces one at a time can add up quickly.

Last edited by Terrys87; 09-03-2016 at 11:36 PM.
 09-02-2016, 10:17 AM
#2
Super Moderator
Staff
Thread Starter
iTrader: (1)
Join Date: Aug 2008
Location: Anderson Missouri
Posts: 11,788
Likes: 0
Received 21 Likes
on
19 Posts
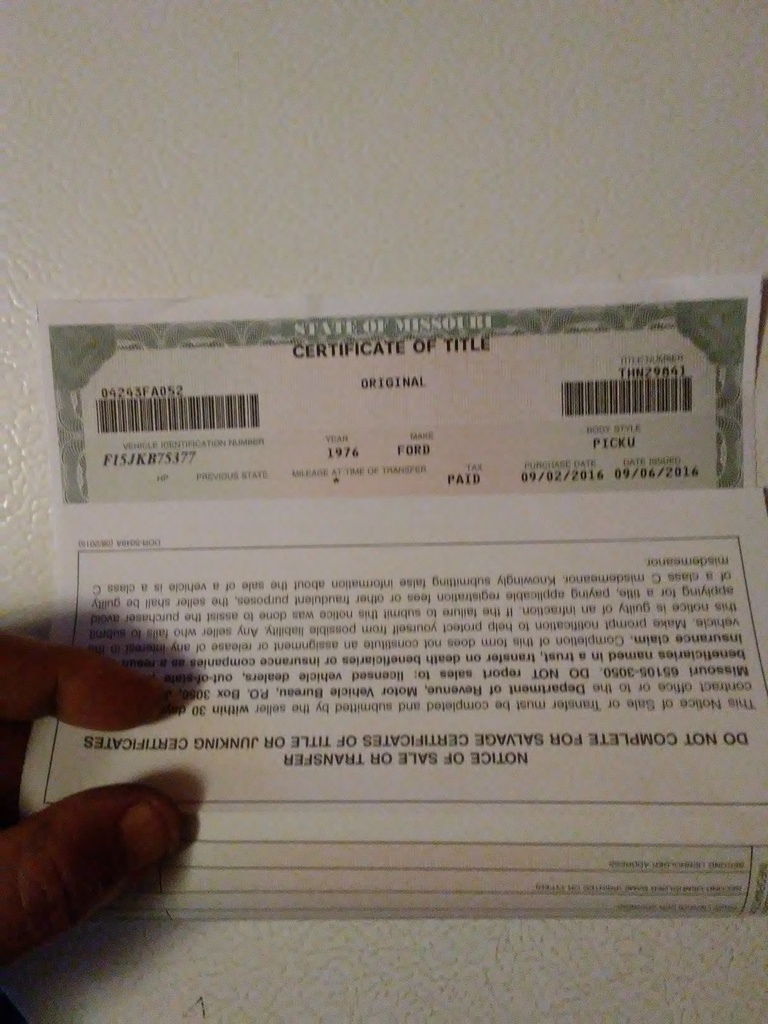
I still have not gotten the truck home but title is in my name and being sent from the DMV. Now just want to get it home!!!!
Alternator Upgrade... http://www.ford-trucks.com/forums/10...nd-tricks.html
Alternator Upgrade... http://www.ford-trucks.com/forums/10...nd-tricks.html
Last edited by Terrys87; 02-08-2017 at 12:35 AM.
09-10-2016, 07:50 PM
#3
Super Moderator
Staff
Thread Starter
iTrader: (1)
Join Date: Aug 2008
Location: Anderson Missouri
Posts: 11,788
Likes: 0
Received 21 Likes
on
19 Posts
I got the title in today. Normally I have the truck and then get the title. I have to get the truck drug out of the field and get it to where I can get a trailer to it. I am going to look up the VIN and see where it was produced at and what ever other information I can get from the VIN. I hope to have it home this week so I can start soaking several things and getting it cleaned up. I will start slow as I have to let the fuel tanks soak, nuts and bolts soak, cylinders soak and start seeing what other surprises are waiting me. There will be some, just have to find them.
http://www.ratwell.com/technical/Fue...storation.html

http://www.ratwell.com/technical/Fue...storation.html
Last edited by Terrys87; 09-14-2016 at 12:26 AM.
10-27-2016, 05:16 PM
#4
Super Moderator
Staff
Thread Starter
iTrader: (1)
Join Date: Aug 2008
Location: Anderson Missouri
Posts: 11,788
Likes: 0
Received 21 Likes
on
19 Posts
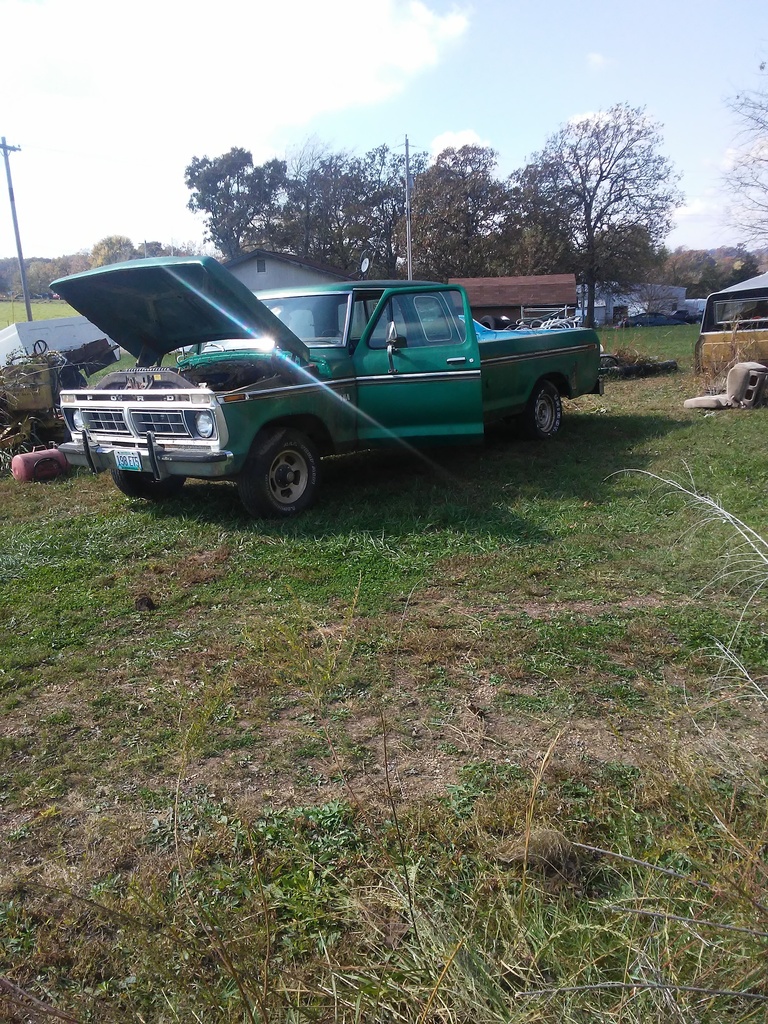
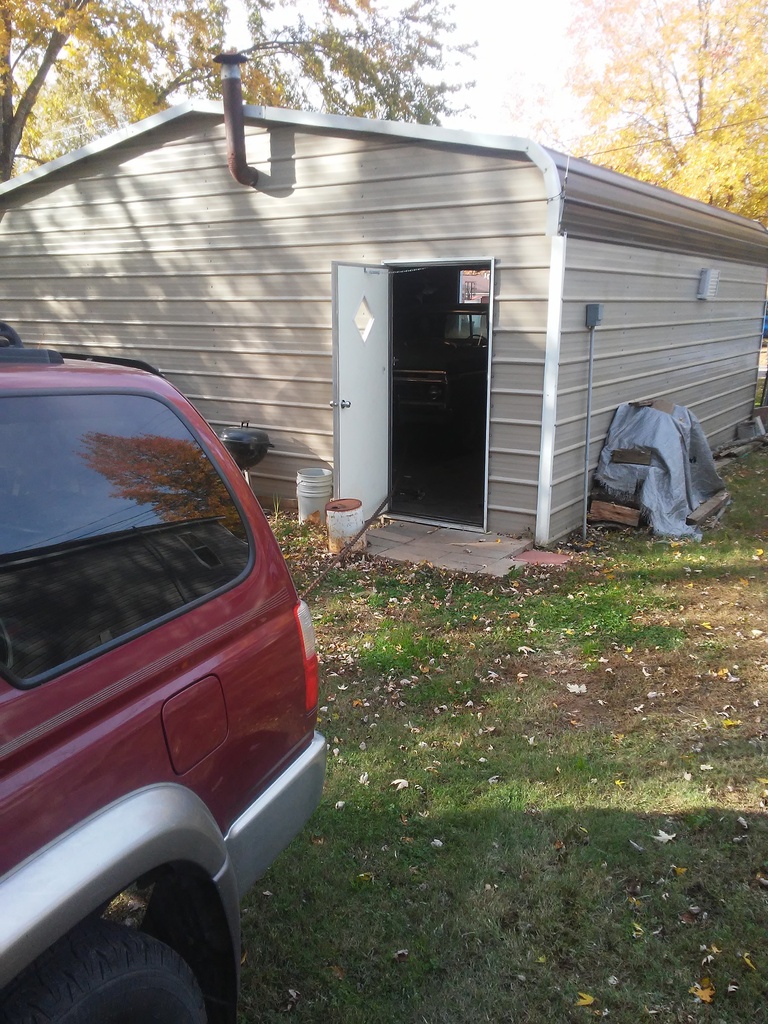
I finally got the truck dug out of its pit. I did have to air up a tire and just as soon as we got it pulled out the tire went flat. I am hoping to get it home tomorrow or maybe Saturday. My friends trailer brakes are not working and we have some hills to traverse that would make it very interesting in some cases. We worked on them quite a bit today and just unable to get them to operate. First time it has moved in 16 years. He wanted the camper shell which I was just going to scrap. I was impressed with the condition of the bed as it as seen very little use. He originally wanted the front rims and how now decided to let me have them and if I can find the rear rims and they match the front I will take them.
Getting closer to home.
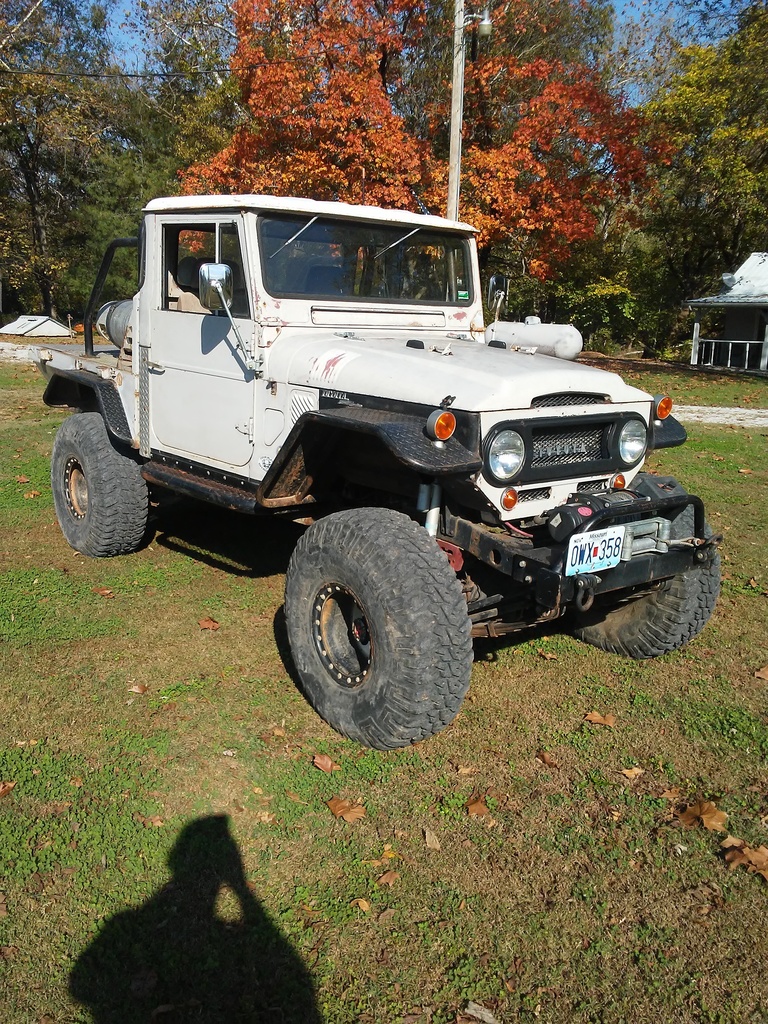
I did get to ride in a '65 FJ45. It was built as a rock crawler and the guy was afraid of damaging it. My friend is going to bring it back as a road worthy daily driver. There is some money spent on this truck. Way out of my budget but real rock solid for a 65 model and originally the truck came from California. No idea of why the picture is so out of whack. Will get a better picture later.

Last edited by Terrys87; 10-28-2016 at 04:36 AM.
11-07-2016, 12:17 PM
#6
Super Moderator
Staff
Thread Starter
iTrader: (1)
Join Date: Aug 2008
Location: Anderson Missouri
Posts: 11,788
Likes: 0
Received 21 Likes
on
19 Posts
Thanks Robb...The last time I was in at the PO place, I was thinking how big of a project I have gotten myself into just for the reasons of how I am wanting it to turn out. I could just get it running but I want it much better then that. It is overwhelming at times but I will take one piece at a time.
11-07-2016, 12:27 PM
#7
Super Moderator
Staff
Thread Starter
iTrader: (1)
Join Date: Aug 2008
Location: Anderson Missouri
Posts: 11,788
Likes: 0
Received 21 Likes
on
19 Posts
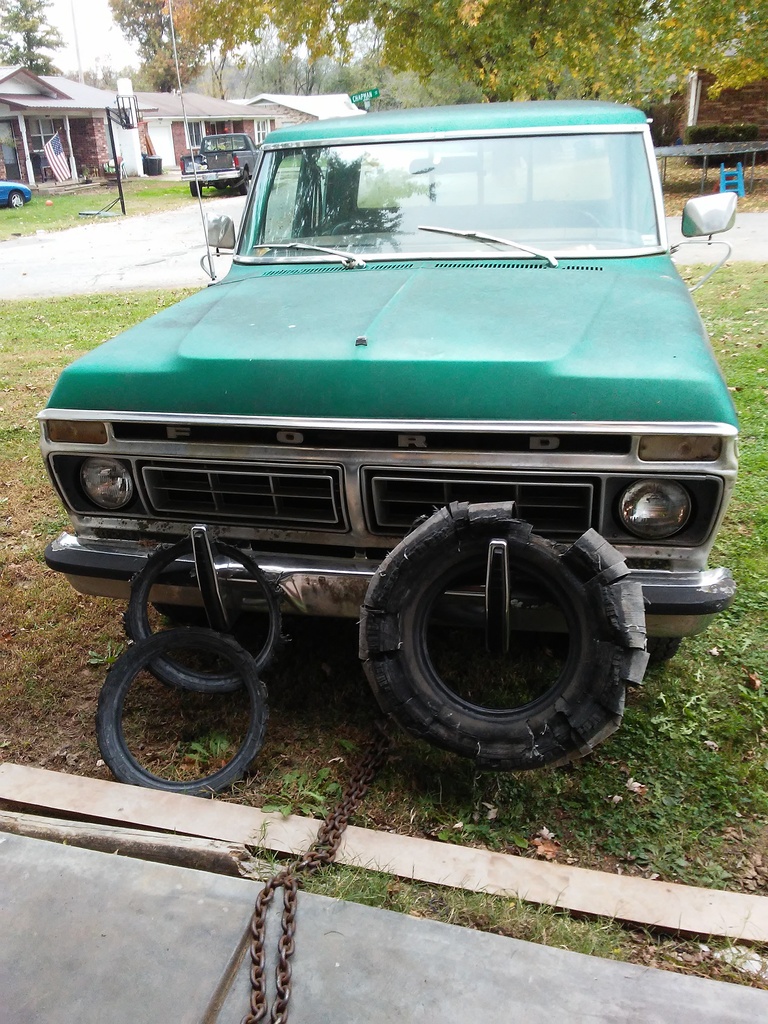
I finally got this pig home, but it was the trip from Hades. Got two flat tires on the trailer. One blew out and the spare was dry rotted. Luckily we were able to find a shop that had two 15 inch trailer tires. What should of been a 2 hour round trip took us 5 hours total and a lot of driving since we were out in the middle of nowhere.
What is left of the two tires. The bumper guards will not be going back on. I am sure it was an expensive option back when it was new.
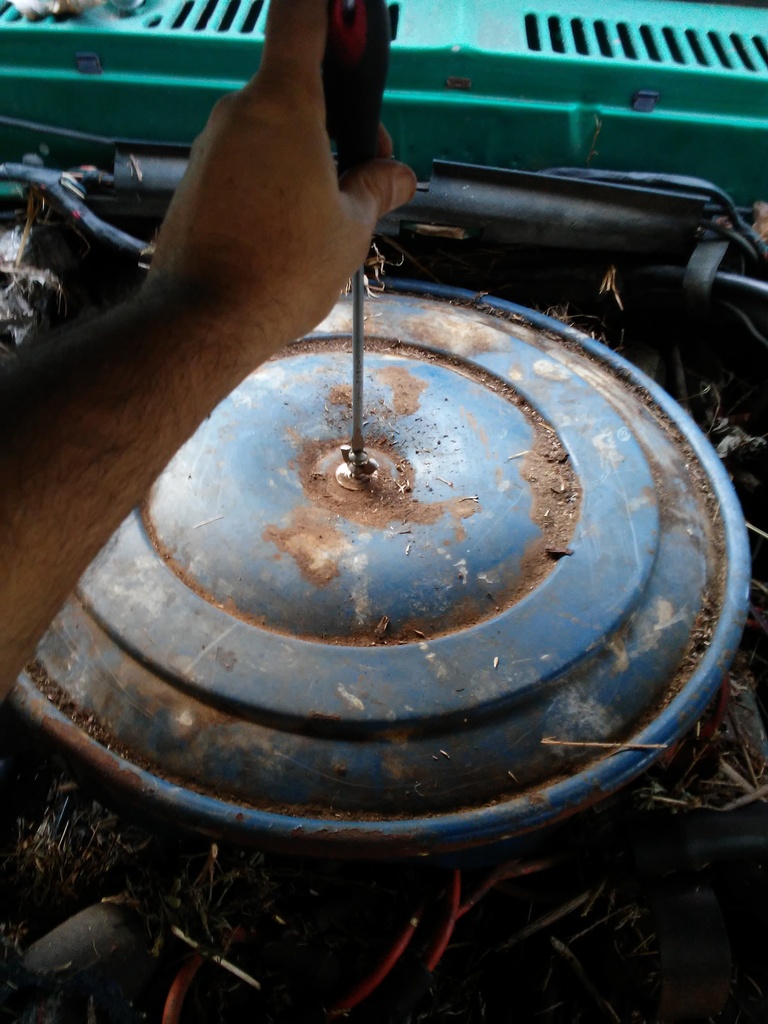
Yeah!!! first hack job I have found while cleaning the engine bay. Instead of getting the correct bolt to hold the air cleaner cover on, they used a long screw. Not the correct way to do it. For the most part this truck does not look like it has been butchered up.
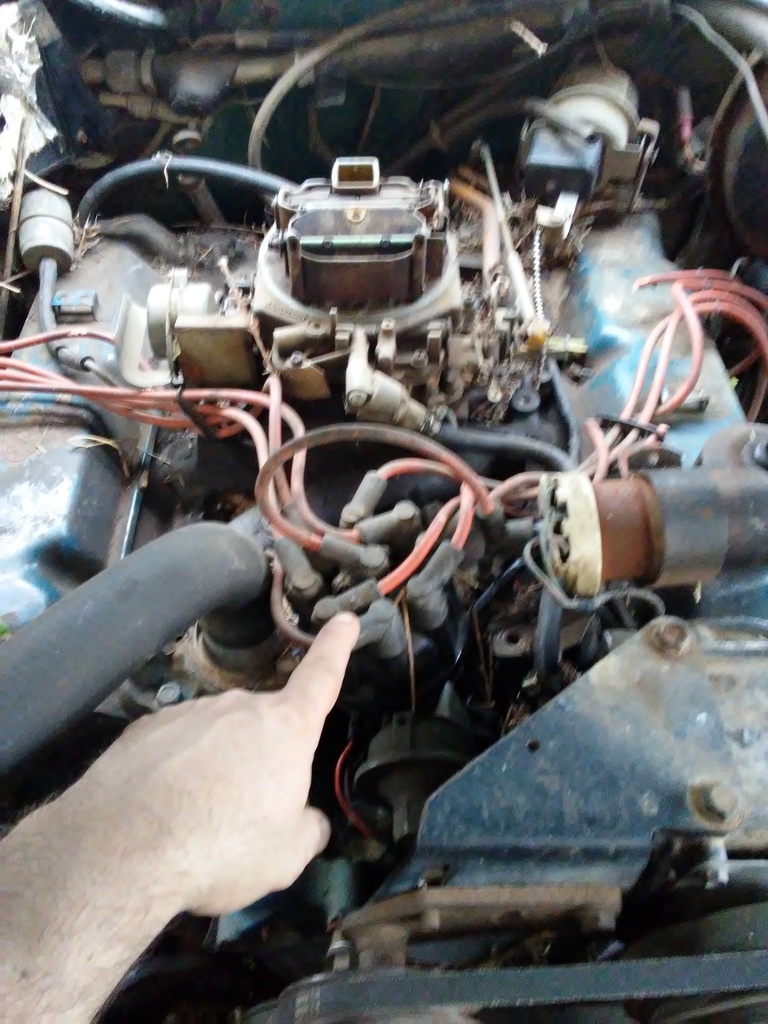
To show some of the cleaning I got done and one reason I like to work on Ford and Dodge is the distributor is up front and easy to get to. Two reasons I dont care to work on a Chevy is the distributor is in the rear and the exhaust is a pain to work on and getting to the spark plugs in some cases. This being a field truck, there was plenty of rat droppings in the engine bay. Probably 5 pounds worth. It will be sanitary when I get it completed. I have seen cars in the bone yard that were probably bigger health hazards from humans and one reason when I get a used car I clean it myself.

Last edited by Terrys87; 11-07-2016 at 10:19 PM.
Trending Topics
11-08-2016, 02:25 PM
#8
Super Moderator
Staff
Thread Starter
iTrader: (1)
Join Date: Aug 2008
Location: Anderson Missouri
Posts: 11,788
Likes: 0
Received 21 Likes
on
19 Posts
I got out and started soaking every nut and bolt that I could get to with PB Blaster. The doors were not opening as smooth as I would like so used WD-40 on hinges and the hood release and they are operating a little smoother now. Still will go out and soak them every few days until I get to the stage where I start pulling parts. I am hoping to pull the motor and transmission on my day off and try to get things in the shop before the cold weather sits in. I dont want the truck in the shop at this time as it will take up to much space.
As much as I would like to change the fluids and see if this truck will start up, I wont do that. I have seen motors that have sit for long periods of time and the rings rust to the cylinder walls. I think I have a 22re motor that I can get a picture of to show what I am talking about. The starter is powerful enough to break the rings free but usually it will break the ring and the broken ring will come out of the groove and gouge the cylinder wall and then you will need to bore the block with larger rings and pistons. I am going to pull the plugs and fill the cylinders with Marvel Mystery Oil and that can save you from an engine rebuild. You see on car shows where they start a motor as soon as possible. That is just looking for future problems.
I still need to get me a Haynes Manual. Every truck I have ever owned a Haynes will get you thru what you need. I have a Toyota Factory Service Manual and I use my Haynes more then the FSM. In fact I have worn out a Haynes Manual and had to buy another Toyota Haynes manual.
11-08-2016, 02:43 PM
#9
Registered User
Subscribed. I'm glad to see this begin.
11-10-2016, 12:41 PM
#10
Super Moderator
Staff
Thread Starter
iTrader: (1)
Join Date: Aug 2008
Location: Anderson Missouri
Posts: 11,788
Likes: 0
Received 21 Likes
on
19 Posts
Thanks Nervo19...It is going to be quite similar to my other builds, start out boring and slow but I will eventually get it done. It will be a major tear down.
11-10-2016, 12:52 PM
#11
Super Moderator
Staff
Thread Starter
iTrader: (1)
Join Date: Aug 2008
Location: Anderson Missouri
Posts: 11,788
Likes: 0
Received 21 Likes
on
19 Posts
I have not gotten a Haynes Manual yet and some of the things I will be posting will be a reference for me when I go back and reassemble things at a later time which could be a few months to a few years. One thing about build threads is notes you can post for yourself at a later time. Build threads can be the best tool available and a good place to place links for other information when looking on the net for information.
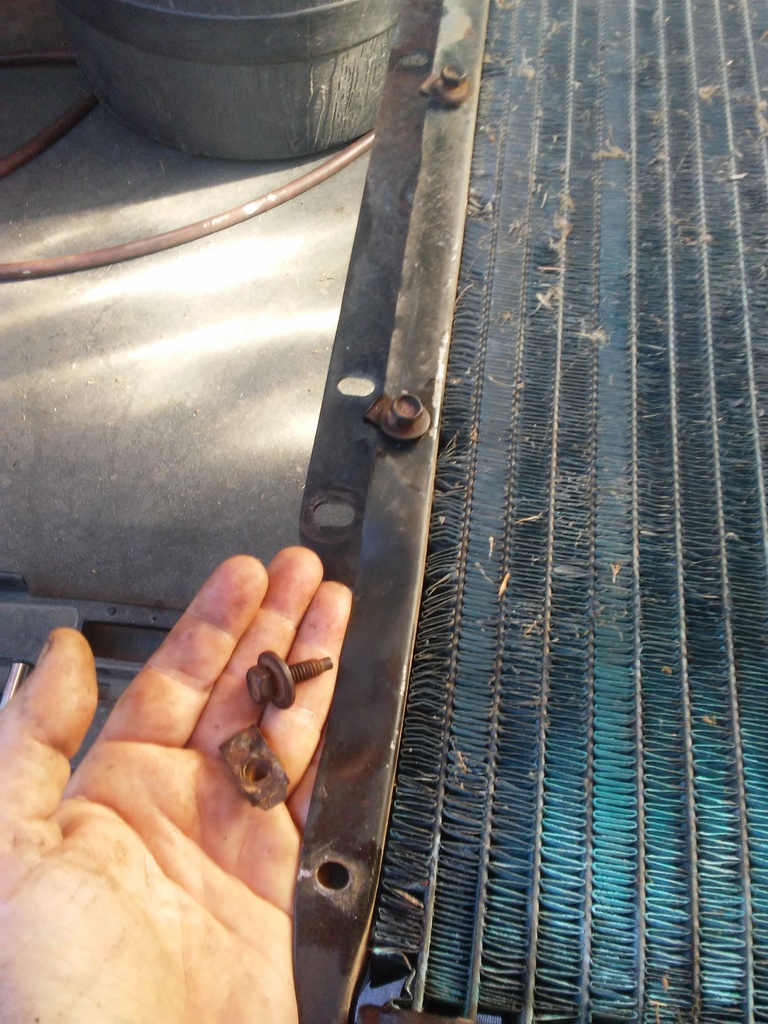
**Note for myself is to remove fan blade before removing before removing radiator. I also need a clip that that holds radiator to the core support. I tried to remove the radiator first and it would not come out. Need Fan clutch and radiator cap.
Just removing the radiator, I had 16 different bolts. You see on TV that people bag all of their bolts. I tried that one time and it turned into one big nightmare when trying to reassemble the truck. Now I put all of the bolts back into their correct place. I still have to use bags once in a while but only a few.
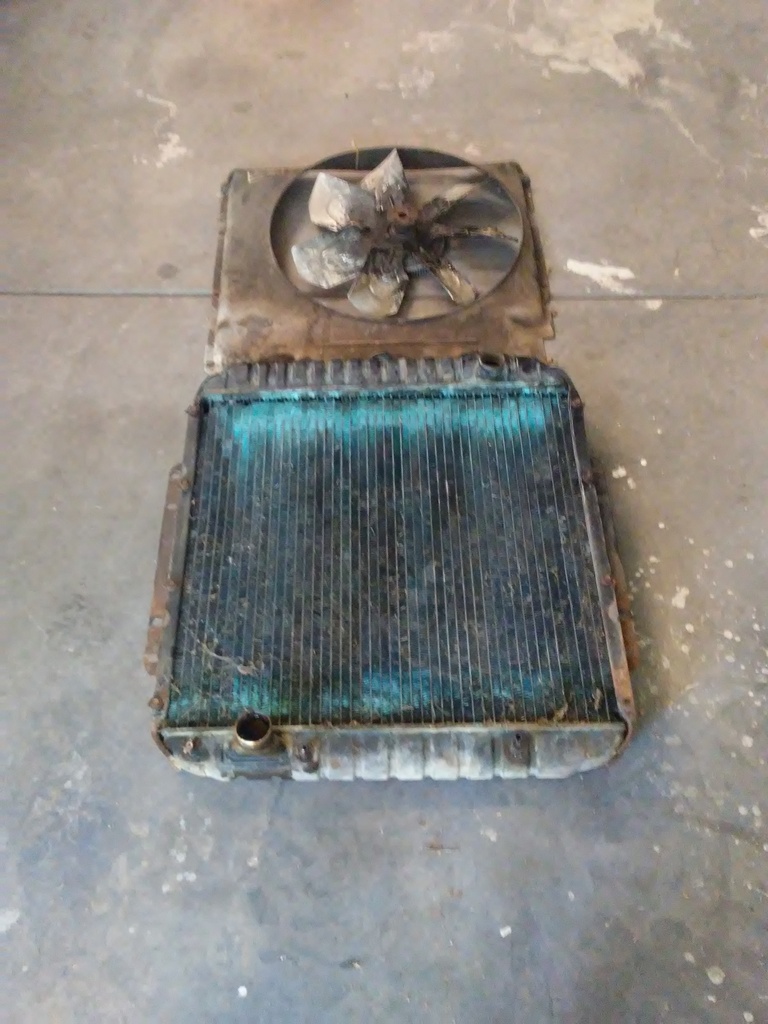
I got the Fan Shroud out, Fan, and Radiator. I will clean, test, and paint each piece as I go. It would be nice to just buy new parts but I got to use what parts I can to cut down build cost. Still soaking some bolts and hope to get the motor out in a week or so. Still have some cleaning to do from the rats former home.

Last edited by Terrys87; 11-12-2016 at 12:05 AM.
11-12-2016, 12:20 AM
#12
Super Moderator
Staff
Thread Starter
iTrader: (1)
Join Date: Aug 2008
Location: Anderson Missouri
Posts: 11,788
Likes: 0
Received 21 Likes
on
19 Posts
Not much exciting about this post but one day I will be able to go back and see when and how this build slowly started. I got the parts cleaned and found that I will need a new fan clutch and radiator cap which I did expect to replace as they are a consumable part. That will give me time to search the internet for the best price instead of running to the local part store. I have saved a lot of money just by searching sites and sometimes catch them on sale.
I flushed the radiator and think it is going to be ok. I will still send it to my local radiator shop and have them to power flush it out. The Prestone kit that you can buy just is not good enough to knock all of the crud loose from the inside. I have seen many Toyota radiators get flushed and it looks like mud coming out. I have seen it drop the temp gauge by as much as 1/4 on the gauge. Doing a project that has been sitting for quite sometime or an old truck you need to go thru every system. So much easier when doing a complete tear down. Also I dont care to work on projects when they become daily drivers and when I do, I dont care to get dirty working on them. I will still need to flush the block and heater core to get the complete cooling system back in shape.
Fan Clutch is falling a part at the shaft.

Fan shroud was covered with oil and grime. Radiator has some bumps and dings in it but looks to be usable. It usually cost me $25 to get it flushed and some minor repairs done to it. The radiator is big, looks big enough to cool a Freight Liner Truck.
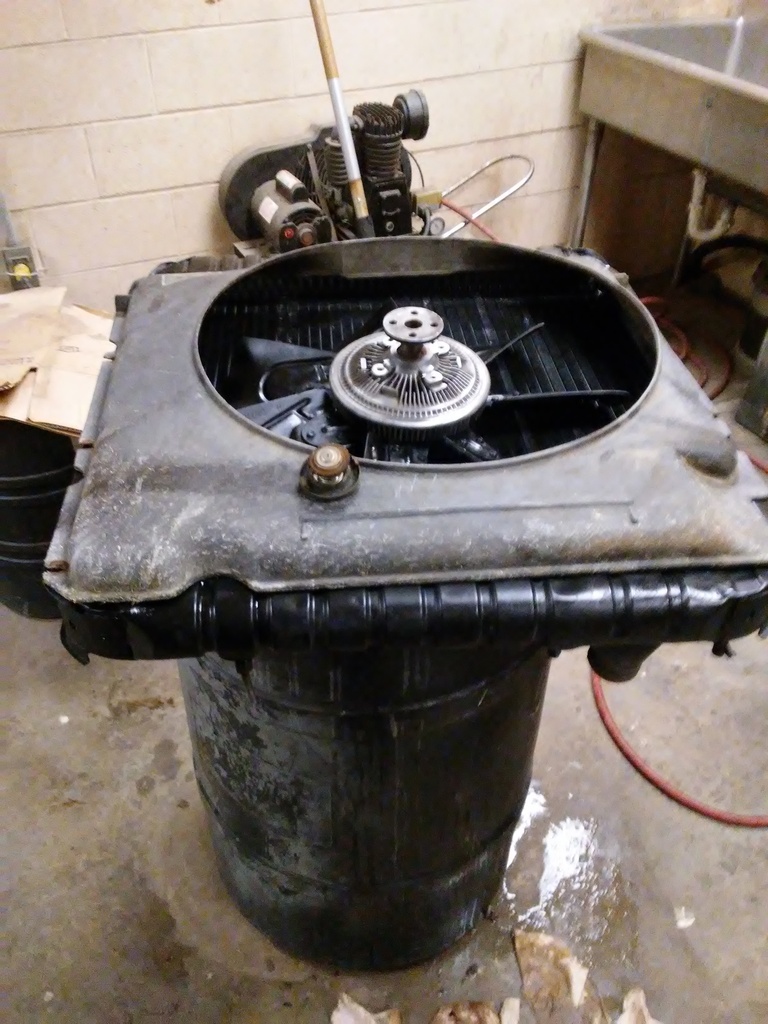
 11-12-2016, 12:23 AM
#13
Super Moderator
Staff
Thread Starter
iTrader: (1)
Join Date: Aug 2008
Location: Anderson Missouri
Posts: 11,788
Likes: 0
Received 21 Likes
on
19 Posts
Parts list.
Fan Clutch
Radiator Cap
Clip that holds Radiator to Core Support
Floor Boards
Fender bolts and clips.
One Front Core Support bolt.
Body Bushings.
Front Clip Removal http://www.ford-trucks.com/forums/13...l#post14696880
Fan Clutch
Radiator Cap
Clip that holds Radiator to Core Support
Floor Boards
Fender bolts and clips.
One Front Core Support bolt.
Body Bushings.
Front Clip Removal http://www.ford-trucks.com/forums/13...l#post14696880
Last edited by Terrys87; 11-21-2016 at 01:31 PM.
11-14-2016, 10:55 AM
#14
Super Moderator
Staff
Thread Starter
iTrader: (1)
Join Date: Aug 2008
Location: Anderson Missouri
Posts: 11,788
Likes: 0
Received 21 Likes
on
19 Posts
I got 3 set backs but what is to be expected when doing a project. I tried turning the motor and it turns to easily. Hoping it is not anything major but turning the crank with a wrench and easy as it turns, the pistons should have more resistance then what it having. I pulled up the rubber floor mat and it was dry rotted. Both floor boards will need to be replaced. I think LMC sells patch panels for a reasonable price. These trucks do have rust issues on the rear wheel wells, the extended cab, and floor boards is typical on these trucks. I have been asked why not just buy a newer truck in better shape. I soon build what I like instead of settling for something. I could defintley buy one cheaper then what I will have into this one but it would not be what I wanted and this is going to be a long term project. I was thinking 2 years on this project but think it just got bumped a year more.
I am already finding out that I need to invest in some more tools. I need some deep well standard sockets. Getting some of the body bolts off have longer bolts then what I have. I used another can of PB Blaster soaking all of the bolts. I started loosening some of the bolts to get the front clip off to make getting the motor out. So far but I have not broken any bolts off and am being patient with them.
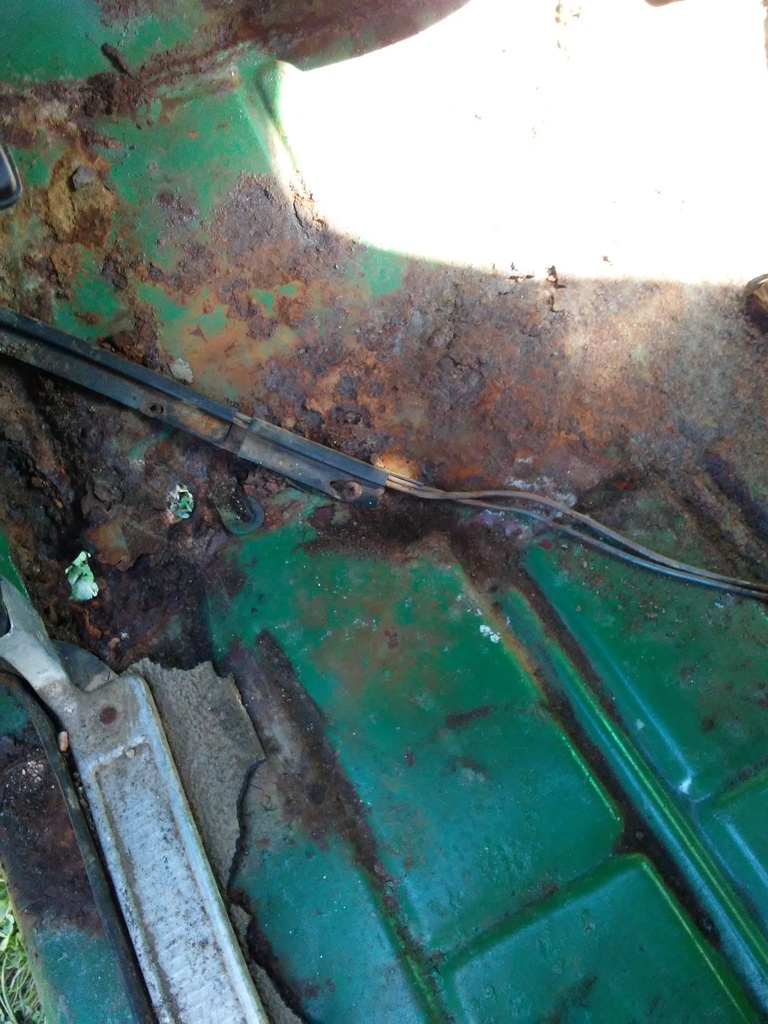
Drivers Floor Board is not as bad as passenger.
Passenger Floor Board. I think patch panels are easily available for these
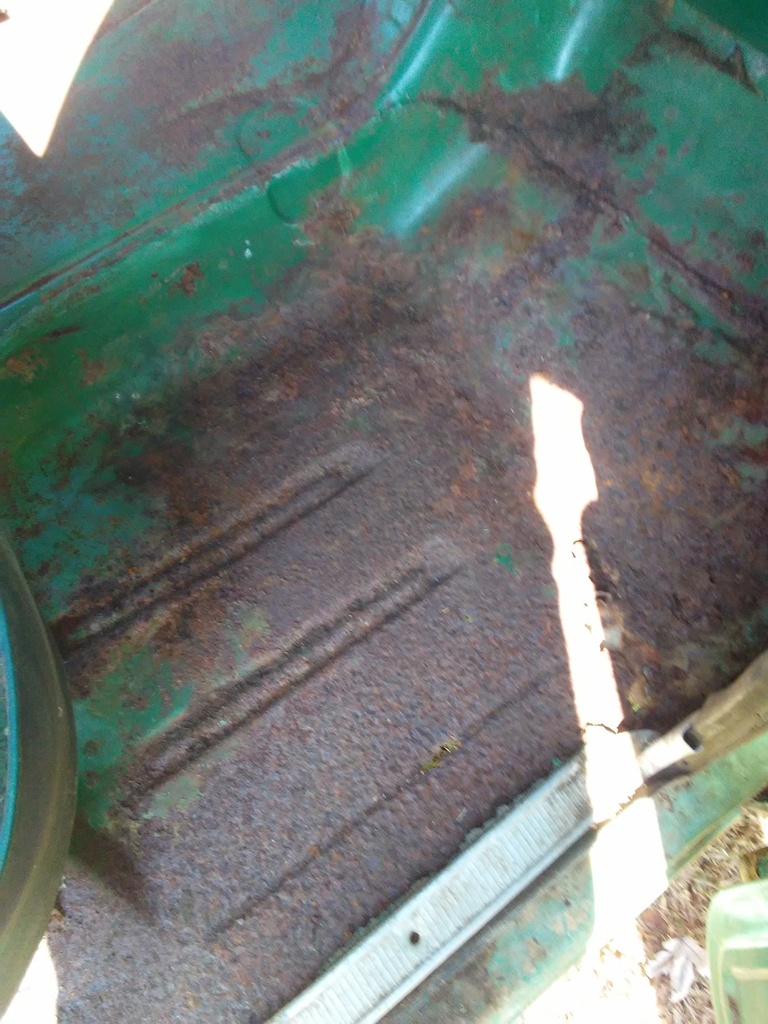
Just checked LMC and floor pans are $40 a piece.
I am already finding out that I need to invest in some more tools. I need some deep well standard sockets. Getting some of the body bolts off have longer bolts then what I have. I used another can of PB Blaster soaking all of the bolts. I started loosening some of the bolts to get the front clip off to make getting the motor out. So far but I have not broken any bolts off and am being patient with them.
Drivers Floor Board is not as bad as passenger.

Passenger Floor Board. I think patch panels are easily available for these

Just checked LMC and floor pans are $40 a piece.
Last edited by Terrys87; 11-14-2016 at 11:00 AM.
11-17-2016, 12:34 PM
#15
Super Moderator
Staff
Thread Starter
iTrader: (1)
Join Date: Aug 2008
Location: Anderson Missouri
Posts: 11,788
Likes: 0
Received 21 Likes
on
19 Posts
Getting the truck was a real pain in the rear as I loaned one of my chains out and need to get it back. I use a Come Along to get close enough to connect the chains I had to the 3rd Gen and get it hook up and drag it from the rear door. One year I will get a winch for dragging in non running trucks. I did bump the door with the chain a little bit but no damage to door.
It is in but not much room to spare. Might move my work bench to the side and angle the truck in and see if that gets me any more room I will have to eventually pull most of the truck back outside as it just takes to much room. Trying to get it in pieces before it gets cold and work on it a section at a time.

With the truck in the shop, I have about 6 inches from the rear door.

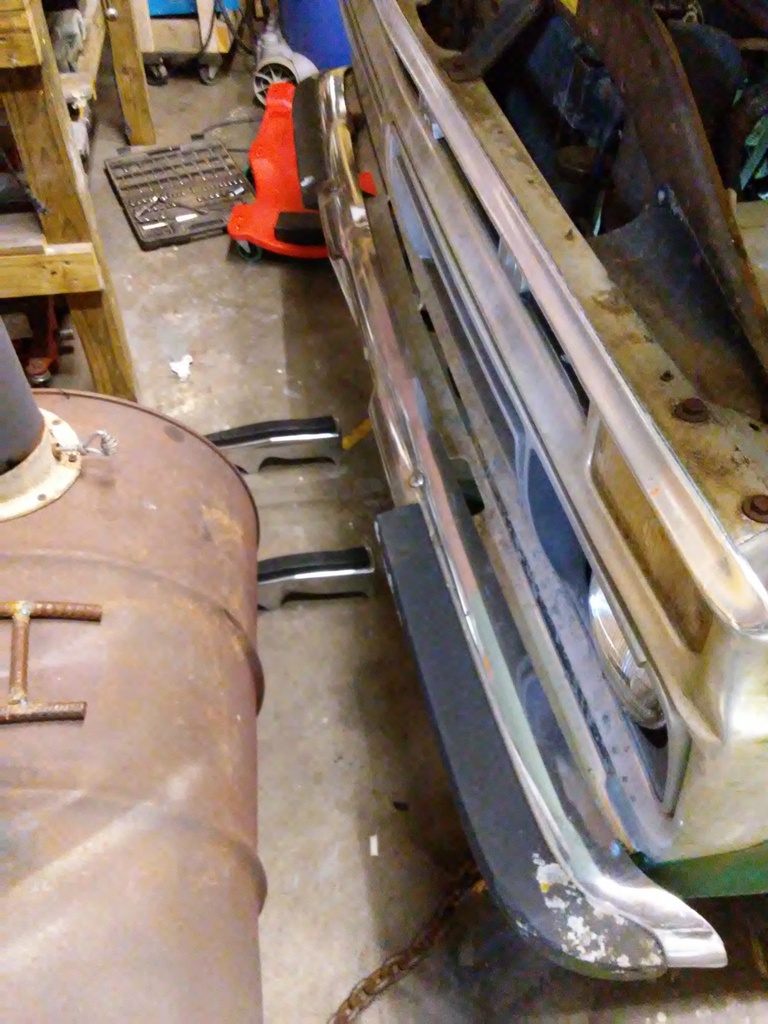
Desperation!!! I am trying to get the bumpers off to get some more room in the shop. 4 bolts hold the rear bumper to the frame and that would give me nearly a foot more to work around the shop. I soaked the bolt in penetrating oil and have a ratchet strap on the wrench and will try letting it soak over night with pressure on it. I am worried about stripping the bolt head or possibly snapping the bolt. It has a captured nut on the back side. Even if I had a cutting torch accessing the bolt would be a real pain and the gas tank is next to it. I am also working on getting the rear tank out. Making slowwww progress.

It is in but not much room to spare. Might move my work bench to the side and angle the truck in and see if that gets me any more room I will have to eventually pull most of the truck back outside as it just takes to much room. Trying to get it in pieces before it gets cold and work on it a section at a time.

With the truck in the shop, I have about 6 inches from the rear door.

Desperation!!! I am trying to get the bumpers off to get some more room in the shop. 4 bolts hold the rear bumper to the frame and that would give me nearly a foot more to work around the shop. I soaked the bolt in penetrating oil and have a ratchet strap on the wrench and will try letting it soak over night with pressure on it. I am worried about stripping the bolt head or possibly snapping the bolt. It has a captured nut on the back side. Even if I had a cutting torch accessing the bolt would be a real pain and the gas tank is next to it. I am also working on getting the rear tank out. Making slowwww progress.

Last edited by Terrys87; 11-17-2016 at 12:36 PM.
 11-18-2016, 06:39 AM
#18
Super Moderator
Staff
Thread Starter
iTrader: (1)
Join Date: Aug 2008
Location: Anderson Missouri
Posts: 11,788
Likes: 0
Received 21 Likes
on
19 Posts
Hello Robb... Just being able to use an Impact Wrench has already paid off. I am looking forward to get some things off to where I can start doing some real work on it.
Hello old87yota. I have about 4 feet or more on each side. It is the ends of the truck that is hurting me on space. I am hoping that once I get the bed and front clip off that it will make it fit in the shop. It is a monster in the shop. I can get 2 Toyotas in the shop but it isnt happening with this truck in the shop. I want to get some pieces off as I still need to get the 88 Runner in.
Hello old87yota. I have about 4 feet or more on each side. It is the ends of the truck that is hurting me on space. I am hoping that once I get the bed and front clip off that it will make it fit in the shop. It is a monster in the shop. I can get 2 Toyotas in the shop but it isnt happening with this truck in the shop. I want to get some pieces off as I still need to get the 88 Runner in.
11-18-2016, 06:54 AM
#19
Super Moderator
Staff
Thread Starter
iTrader: (1)
Join Date: Aug 2008
Location: Anderson Missouri
Posts: 11,788
Likes: 0
Received 21 Likes
on
19 Posts
I already like not having the bumperetts on it.
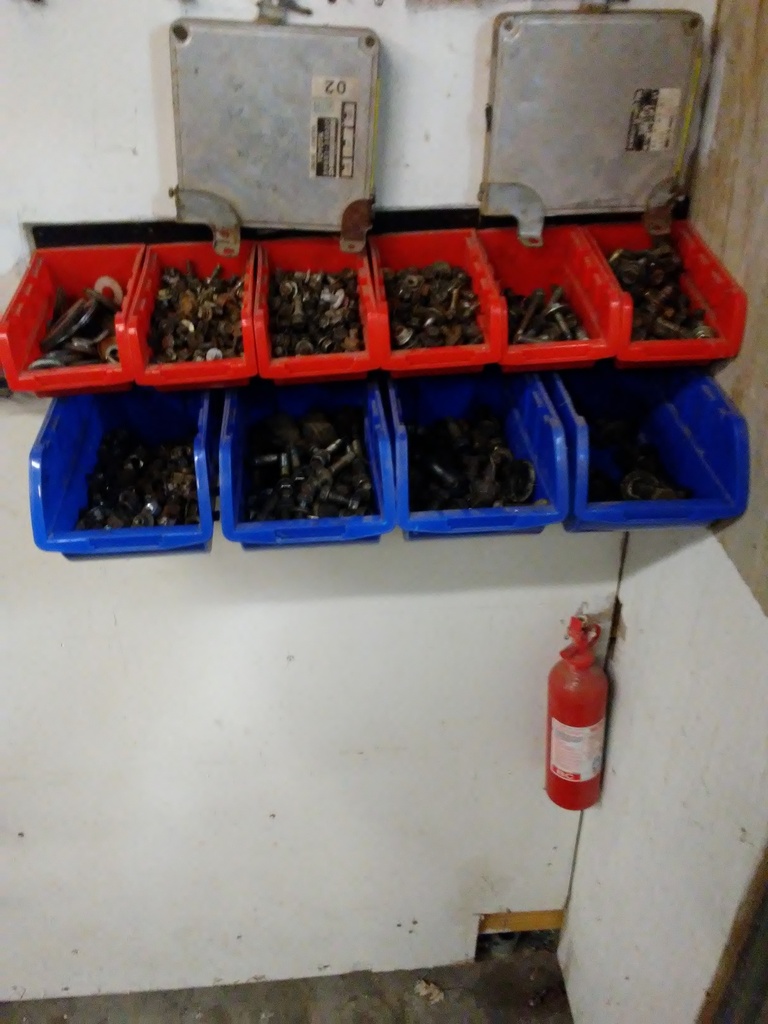
Here are my Toyota bolts. I will go to a bone yard and strip a Ford in the yard of just nuts and bolts and get the same baskets from Orshielins and make another row just below the Toyotas. I like to stay with factory hardware when possible and dont use big hardware store bolts unless just absolutely have to.
Way on down the road, I am going to put in a 5th wheel. This bed is in great shape. I will feel bad for having to cut the bed for a 5th wheel. Truck had an easy life with very little use. Later on I will install a fiberglass shell cap when not towing a trailer with it. I like a truck with fiberglass shells on them. Rubber strip will probably come off the bumper at a later time. Trying to keep all parts together when possible. I did re-install the bolts in the bumper to keep from loosening them. Something I would not remember where they go when I reassemble it. I also spend the time to give the bolts a quick cleaning. Temporarily store some parts in the bed until I get a place to store the parts elsewhere.

Normally I would drill some little pilot holes to help align the hood. Here I just did a quick marker. You can see where the bolts were not aligned correctly from a previous motor swap.
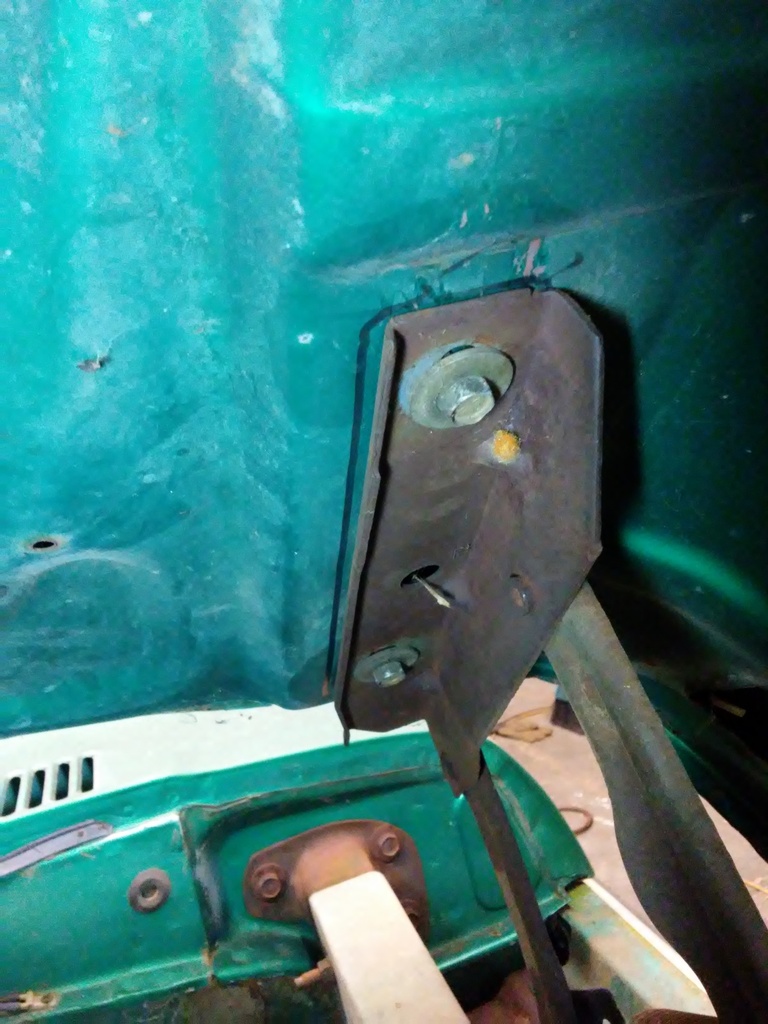
Not sure of the purpose of this ground strap. Something else I would not remember where this goes months/year later. Build threads are great for keeping pictures for future reference. May seem like some needless post but I will be going back to these pictures when I reassemble.
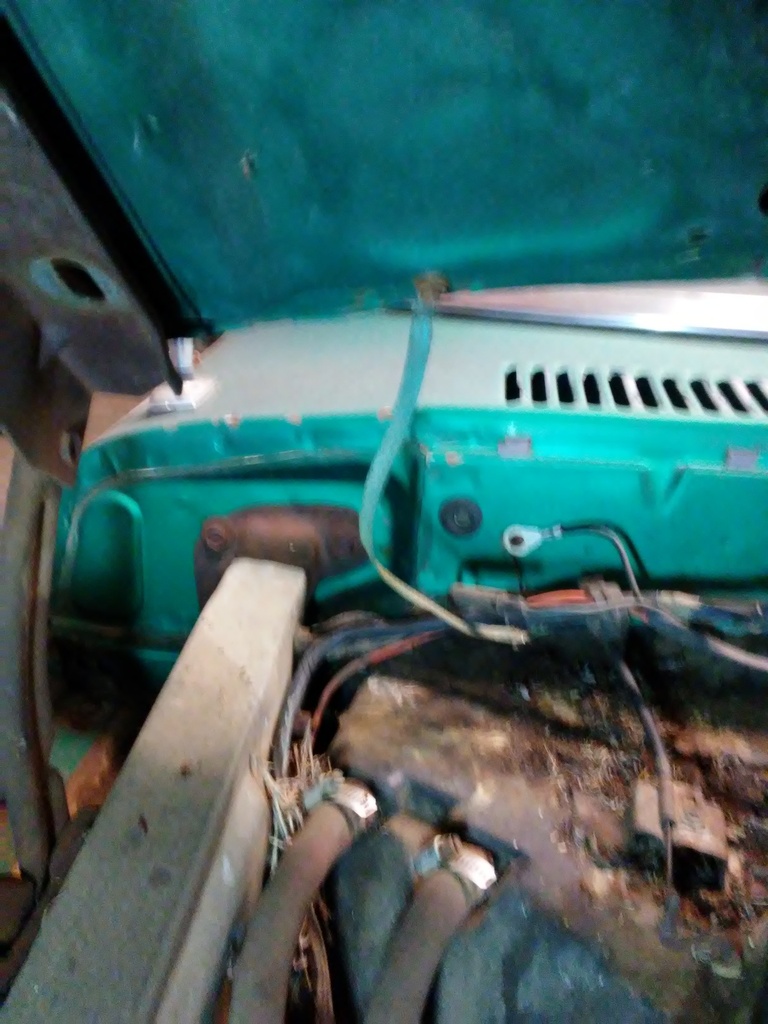
While waiting for the wife or someone to come help me lift of the hood, I marked some hoses as to where they go with a marker. In some places I will use rattle can spray paint to mark things. I am sure I will eventually do some spray paint and will post them for an example.
The front clip will be coming off in one piece eventually. These hoses will stay with the fire wall and is a reference for me. #3 and #4
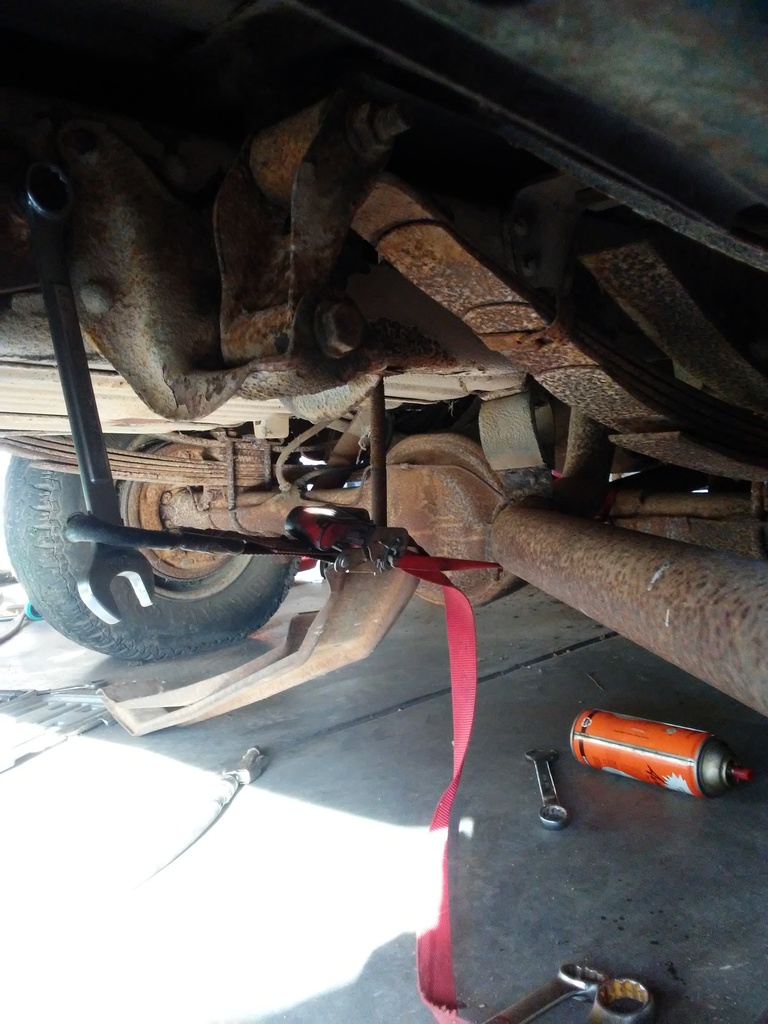
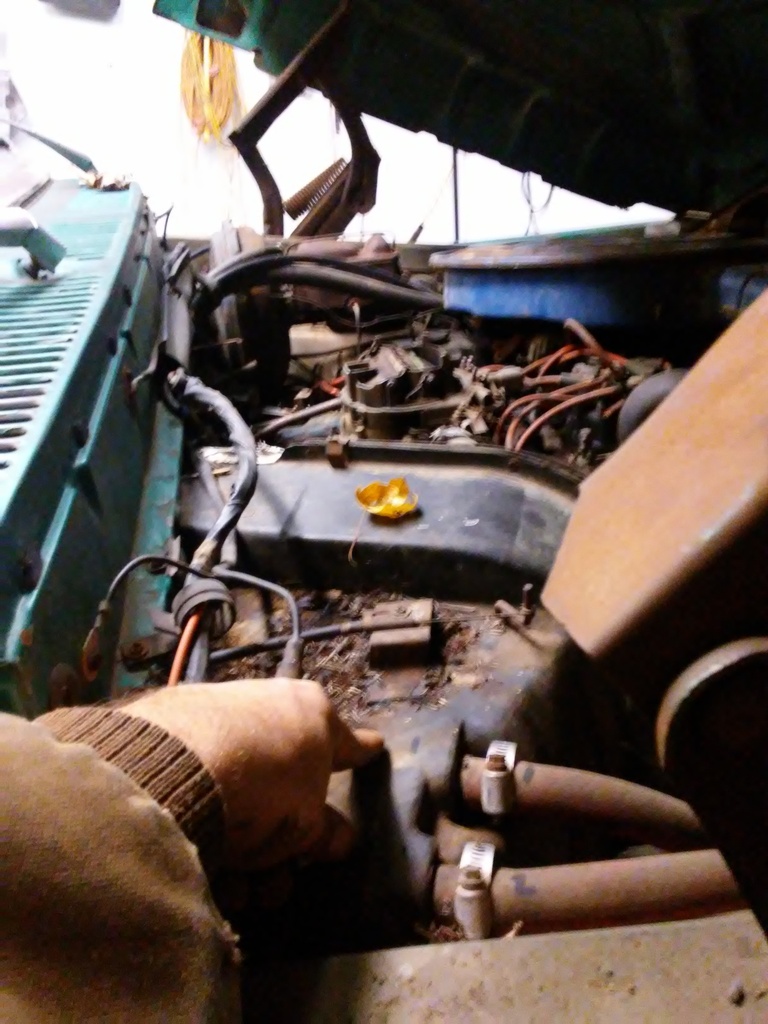
I got the drive shaft out. One bolt and clip to the Carrier Bearing is still in the frame as the clip will not come out due the gas tank being in the way. The other clip and bolt is in the Carrier Bearing Housing. I put the rear u-joint bolts back in the axle just to keep them in place and not need to keep track of them. Since I dont have a Thread Chaser, I just run the nuts on the bolts several times to clean the threads and bolts. I have a million tools and still not enough.
Usually when I bring a truck home, I like to get to the car wash and clean them the best that I can. A friend brought this truck home for me so I skipped the car wash. I clean as best as I can when they are on a trailer. Every little bit helps. Sure wish I could of done this truck. With the Impact Wrench I am getting all kinds of debris falling down on me. I can and have used a vice for swapping out U-Joints. It is something I will now just take to a shop and have them to due them. If I had a press, I would do them myself. It can be done at home but suggest having a shop to do U-Joints. Usually the local shop charges me $15 to do them. Well worth it to avoid the risk of one coming undone.
Driveshaft is out.

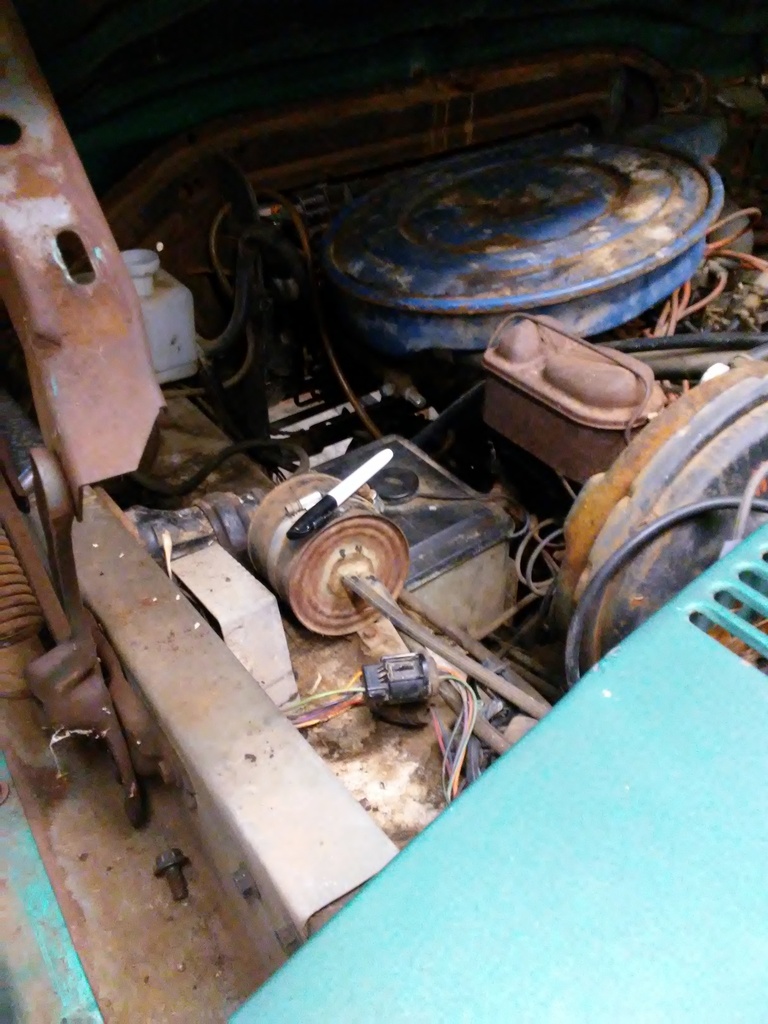
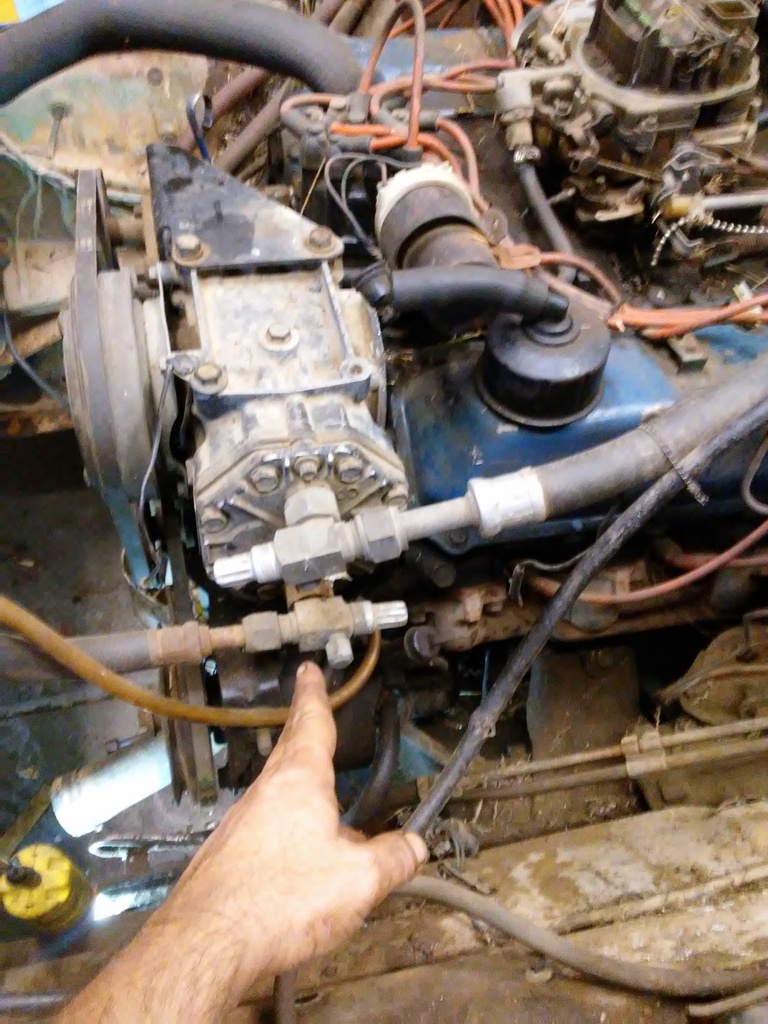
I worked on getting things loosened and what I know needs to be disconnected to get the motor out. The picture below is just a reminder of how the AC system goes on the motor and back together. I did wrap the ends of the lines with electrical tape to keep moisture out. After getting stuck on some bolts and other small issues, I just started cleaning the drive shaft and under hood in a few other small items.

Here are my Toyota bolts. I will go to a bone yard and strip a Ford in the yard of just nuts and bolts and get the same baskets from Orshielins and make another row just below the Toyotas. I like to stay with factory hardware when possible and dont use big hardware store bolts unless just absolutely have to.

Way on down the road, I am going to put in a 5th wheel. This bed is in great shape. I will feel bad for having to cut the bed for a 5th wheel. Truck had an easy life with very little use. Later on I will install a fiberglass shell cap when not towing a trailer with it. I like a truck with fiberglass shells on them. Rubber strip will probably come off the bumper at a later time. Trying to keep all parts together when possible. I did re-install the bolts in the bumper to keep from loosening them. Something I would not remember where they go when I reassemble it. I also spend the time to give the bolts a quick cleaning. Temporarily store some parts in the bed until I get a place to store the parts elsewhere.

Normally I would drill some little pilot holes to help align the hood. Here I just did a quick marker. You can see where the bolts were not aligned correctly from a previous motor swap.

Not sure of the purpose of this ground strap. Something else I would not remember where this goes months/year later. Build threads are great for keeping pictures for future reference. May seem like some needless post but I will be going back to these pictures when I reassemble.

While waiting for the wife or someone to come help me lift of the hood, I marked some hoses as to where they go with a marker. In some places I will use rattle can spray paint to mark things. I am sure I will eventually do some spray paint and will post them for an example.

The front clip will be coming off in one piece eventually. These hoses will stay with the fire wall and is a reference for me. #3 and #4

I got the drive shaft out. One bolt and clip to the Carrier Bearing is still in the frame as the clip will not come out due the gas tank being in the way. The other clip and bolt is in the Carrier Bearing Housing. I put the rear u-joint bolts back in the axle just to keep them in place and not need to keep track of them. Since I dont have a Thread Chaser, I just run the nuts on the bolts several times to clean the threads and bolts. I have a million tools and still not enough.
Usually when I bring a truck home, I like to get to the car wash and clean them the best that I can. A friend brought this truck home for me so I skipped the car wash. I clean as best as I can when they are on a trailer. Every little bit helps. Sure wish I could of done this truck. With the Impact Wrench I am getting all kinds of debris falling down on me. I can and have used a vice for swapping out U-Joints. It is something I will now just take to a shop and have them to due them. If I had a press, I would do them myself. It can be done at home but suggest having a shop to do U-Joints. Usually the local shop charges me $15 to do them. Well worth it to avoid the risk of one coming undone.
Driveshaft is out.

I worked on getting things loosened and what I know needs to be disconnected to get the motor out. The picture below is just a reminder of how the AC system goes on the motor and back together. I did wrap the ends of the lines with electrical tape to keep moisture out. After getting stuck on some bolts and other small issues, I just started cleaning the drive shaft and under hood in a few other small items.

Last edited by Terrys87; 11-18-2016 at 12:42 PM.


