Live4soccer7's 84runner 1UZ Swap
 04-04-2014, 10:01 AM
#41

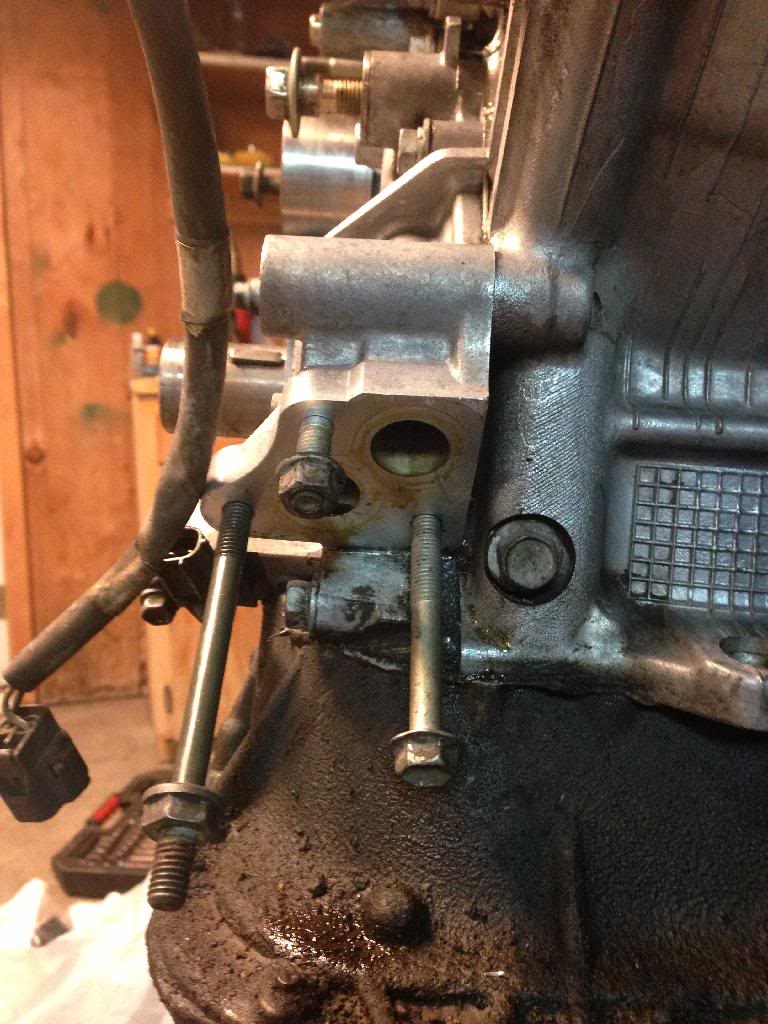
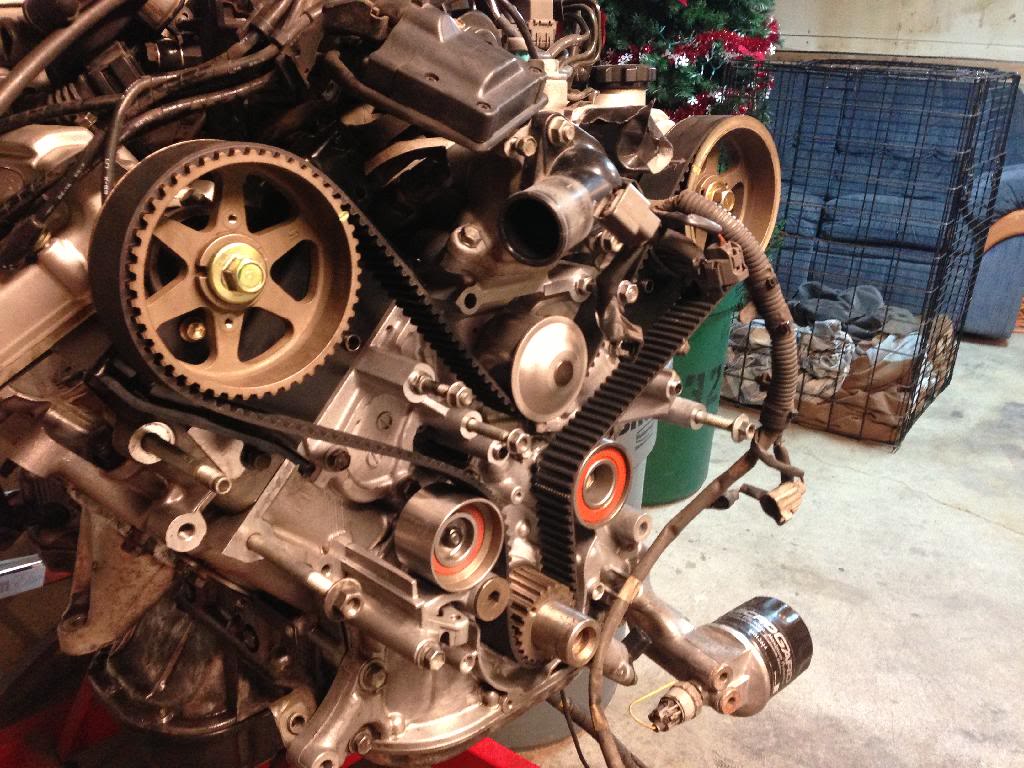
I have the engine about 90% cleaned up. I have put the SC400 oil filter housing in place of the LS400 one. I read in someone's thread that it was needed for clearance reasons in the 84-88/89 yotas. Weather it is or not, I have it and it is done.
I have the SC400 rear sump oil pan setup all ready to be installed too, just have to remove the LS400 setup, but need to grab a couple tools to install a seal and remove the timing belt tensioner bearing. Once I have those tools then I can get this thing back together and start on wiring for it.
A couple photos:
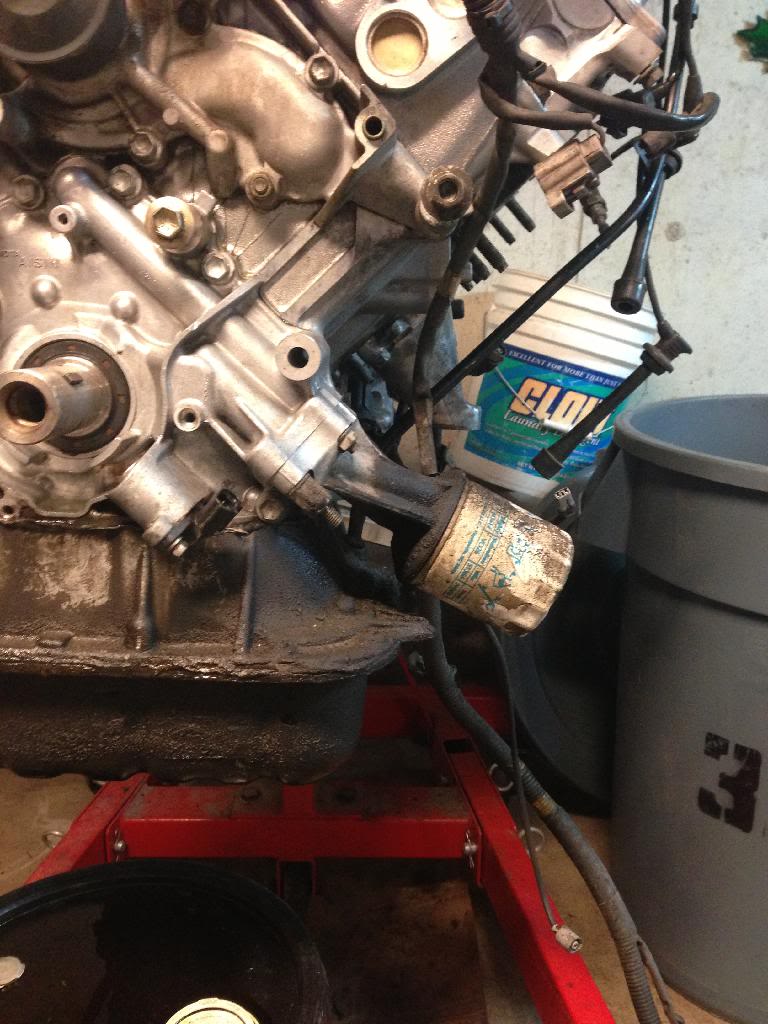
If you swap the housing, make sure you grab the bolt/stud on the left and the right. That actual stud that you see there (middle) is the only that will work with the SC400 filter housing.
I have the SC400 rear sump oil pan setup all ready to be installed too, just have to remove the LS400 setup, but need to grab a couple tools to install a seal and remove the timing belt tensioner bearing. Once I have those tools then I can get this thing back together and start on wiring for it.
A couple photos:


If you swap the housing, make sure you grab the bolt/stud on the left and the right. That actual stud that you see there (middle) is the only that will work with the SC400 filter housing.

 04-04-2014, 10:02 AM
#42
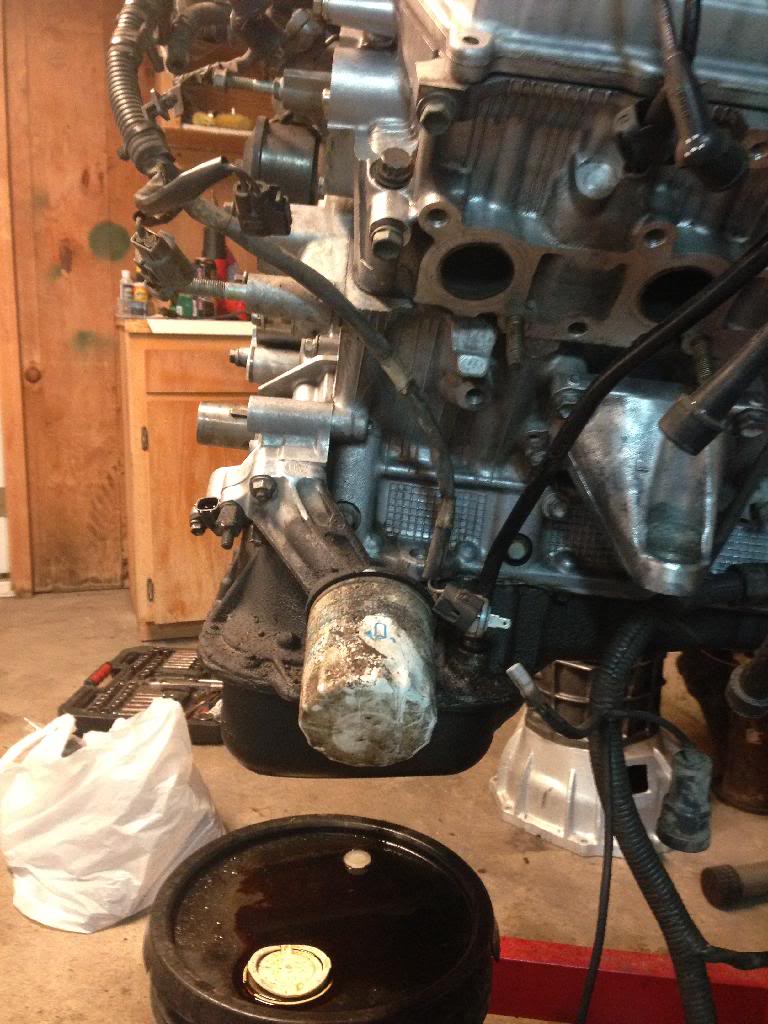
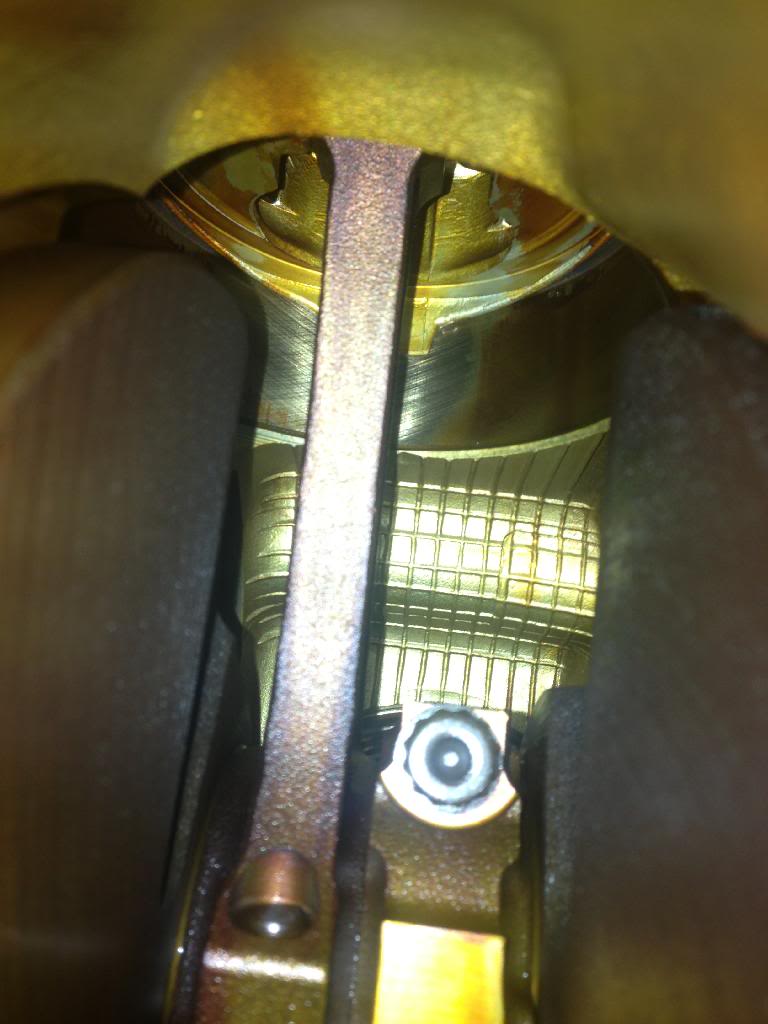
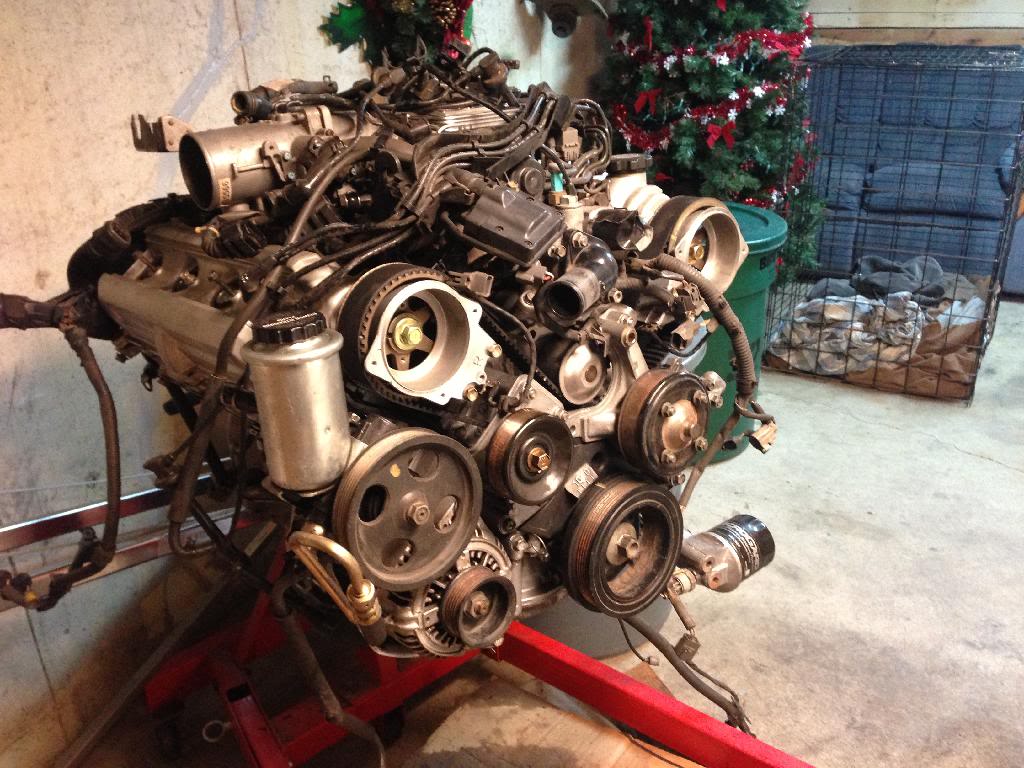
A shot of one of the cylinders. They all look like this from what I could see:
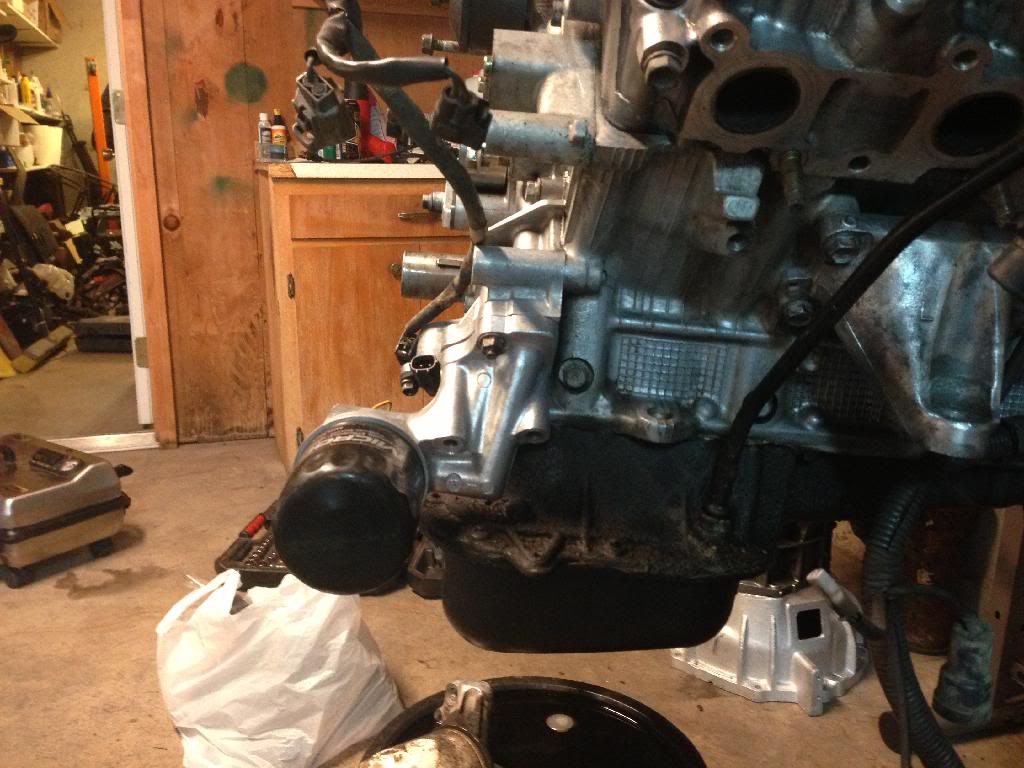
General overview of the underside
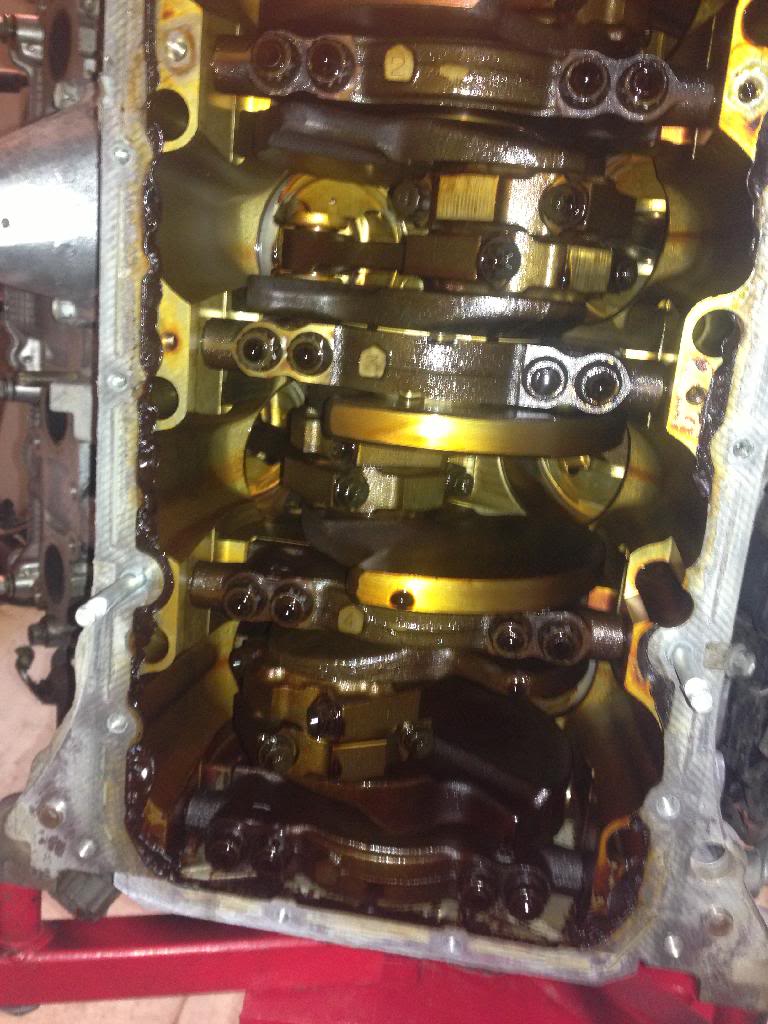
With the oil plan on with just a couple bolts while I wait for the front/rear main seals and the oil pickup/sump gasket to arrive. Somewhat essential.
As far as I can tell from going over the engine, it seems to be in pretty good condition and not a lot of buildup inside for 180k.
Note: if you get the rear sump setup, you should grab the associated bolts with it too. I think I have to change a few out. Luckily, I have box full of the Al bolts from the 1UZ and removing it from the car, so I should be able to find some that will work. If not, I have to order up a thermostat and I can get them for cheap over at sewell lexus. I'm not sure how I forgot to get the thermo.
If you make an account over at sewell and you register over at the club lexus forums, you get a substantial savings on parts there. I got a few random odds and ends vs the major things there, but still made a big difference in savings. Just a tip for anyone needing/wanting new genuine parts.

General overview of the underside

With the oil plan on with just a couple bolts while I wait for the front/rear main seals and the oil pickup/sump gasket to arrive. Somewhat essential.

As far as I can tell from going over the engine, it seems to be in pretty good condition and not a lot of buildup inside for 180k.
Note: if you get the rear sump setup, you should grab the associated bolts with it too. I think I have to change a few out. Luckily, I have box full of the Al bolts from the 1UZ and removing it from the car, so I should be able to find some that will work. If not, I have to order up a thermostat and I can get them for cheap over at sewell lexus. I'm not sure how I forgot to get the thermo.
If you make an account over at sewell and you register over at the club lexus forums, you get a substantial savings on parts there. I got a few random odds and ends vs the major things there, but still made a big difference in savings. Just a tip for anyone needing/wanting new genuine parts.
04-04-2014, 10:03 AM
#43
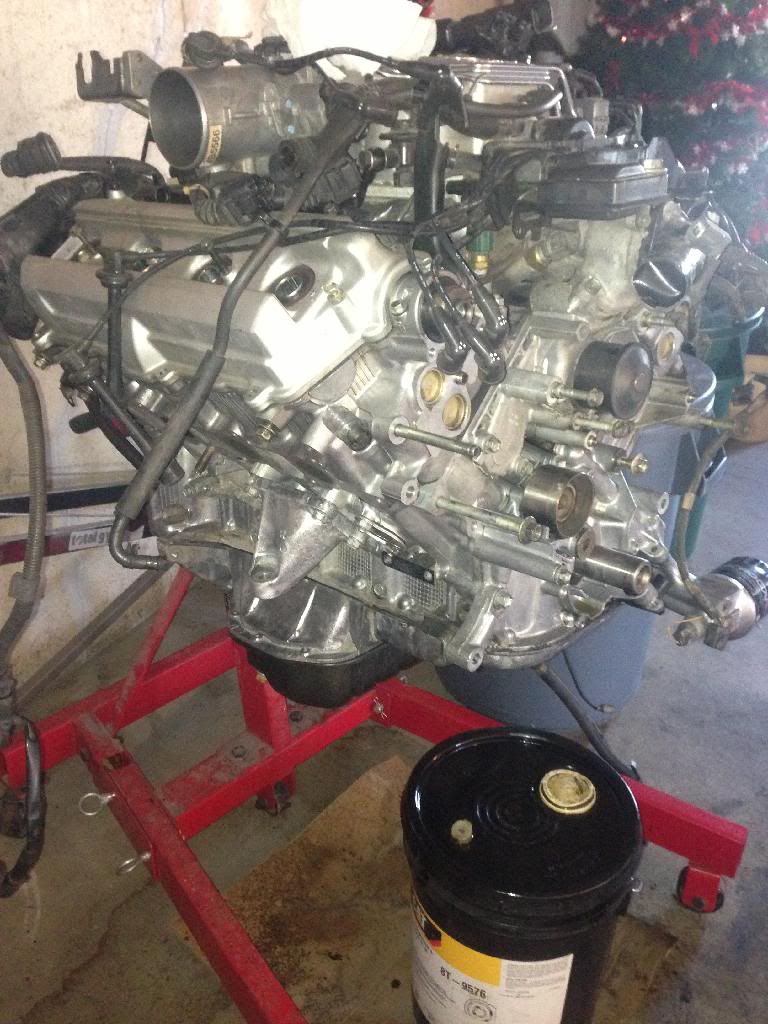
Got some more of it all assembled yesterday. The timing belt was one of the easiest and straight forward installs I have done. I will check the timing with a few full rotations to make sure all the marks continue to line up, but I'm quite confident it will be perfect. I ran out of time to continue cleaning and assembling last night. I may get around to it more today, but for sure tomorrow.
Interesting info for those that don't know. The early 1UZ engines (until 94) are non-interference. I believe, when they bumped the compression a little in 95 then it became an interference.

Interesting info for those that don't know. The early 1UZ engines (until 94) are non-interference. I believe, when they bumped the compression a little in 95 then it became an interference.
04-04-2014, 05:53 PM
#44
Registered User

Join Date: Nov 2011
Location: toledo, oh
Posts: 72
Likes: 0
Received 0 Likes
on
0 Posts
I'm glad to see your still rolling on this endeavor. I have around 6000 miles on mine so far. Still averaging 12 mpg city, only thing left to change is knock sensors and a manual swap.
04-05-2014, 10:46 AM
#45
I'm actually headed out to work on it now. I hope to have most of it all back together today. Then I can order the remaining BS parts I need from sewell to completely finish up on the motor. I want to start on the wiring, I've had enough of the greasy mess that thing has created. haha.
Thanks for chiming in!
04-05-2014, 07:15 PM
#46
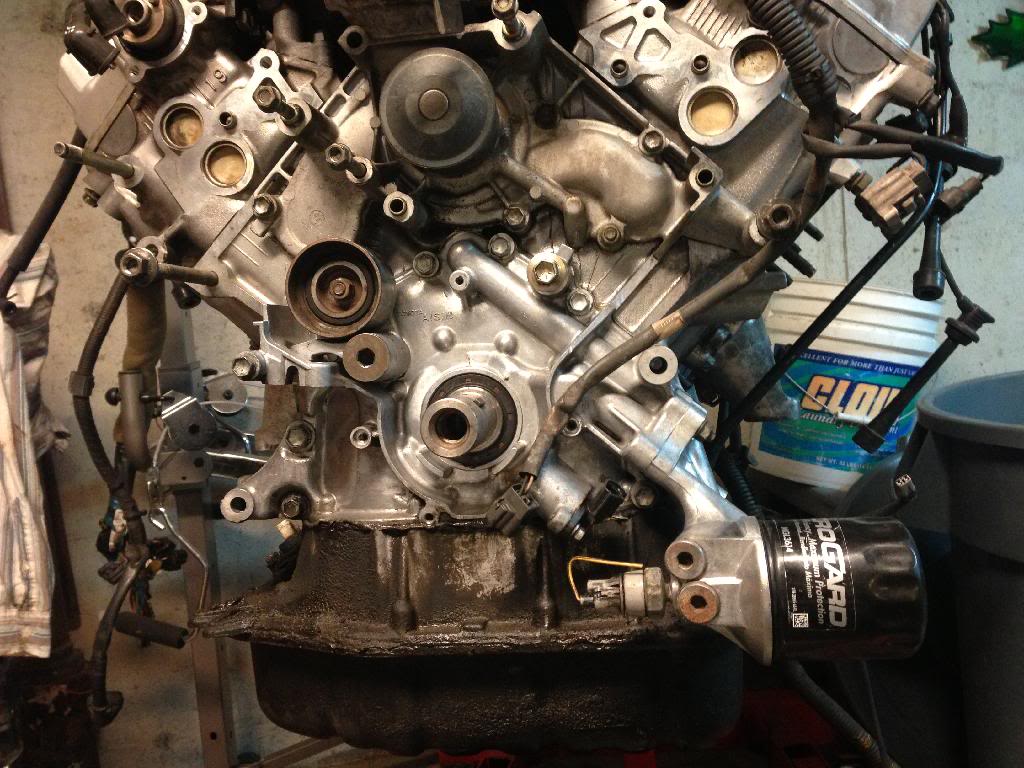
The engine is mostly wrapped up now:
Just have to do the thermostat, snag a couple little parts at the yard when an LS400 pops up, seal the oil pain and button up the valve covers. The oil pan being the largest of the jobs, but I'd say about 90% done and I have to order a few parts to finish all that up anyways, so I have a week to focus on something else. I may just start in on the wiring.

Just have to do the thermostat, snag a couple little parts at the yard when an LS400 pops up, seal the oil pain and button up the valve covers. The oil pan being the largest of the jobs, but I'd say about 90% done and I have to order a few parts to finish all that up anyways, so I have a week to focus on something else. I may just start in on the wiring.
04-06-2014, 06:35 PM
#47
I've got the main engine and cab harness from the LS400 laid out on the garage. Seems a bit daunting, but I have a good idea on how to tackle it. The idea I have here is to keep what is needed in the harness and remove the rest. I am going to start by identify each and every plug/connector via the FSM.
I believe I have found a good way through the FSM to 100% identify most all of the connectors. I should be able to put my theory to test this week. I will label them all and put the connector code on the label and an x next to the ones I will remove and a checkmark on the ones to keep. Once they have all been Identified then I will remove them and then seal up the harness again.
The idea is to be able to completely integrate the harness with the toyota components by splicing on the appropriate plugs. Since the 1st gen 4runners/trucks honestly don't have that many electronics, this shouldn't be toooooo bad once the harness sheds its weight.
If I ever wanted to switch trucks or if I totaled this one then i could simply remove the lexus harness and place it in another truck with a plug and play setup at that point.
Once I get a little ways along with the identification then I will create a list here of what to keep and not to keep so those that have any interest in doing it this way can know what to do. I understand this is not the easiest method, but it is how I have chosen to do it. I'm also sure I'll ask for some input on certain items as well.
 04-13-2014, 08:39 PM
#49
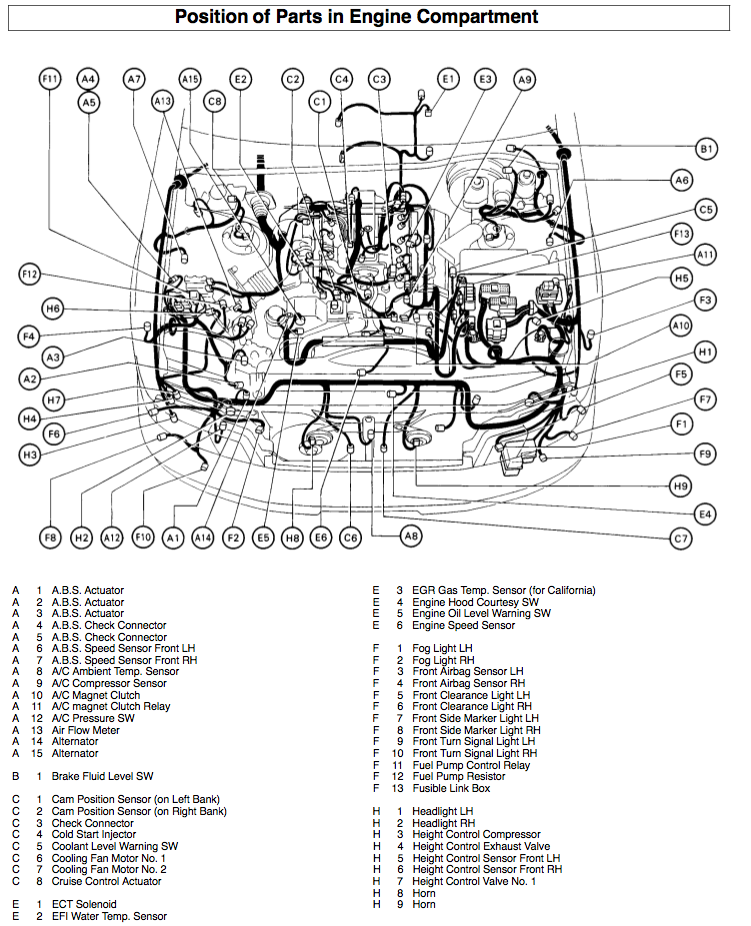
The wiring placement in the LS400 up to about 94
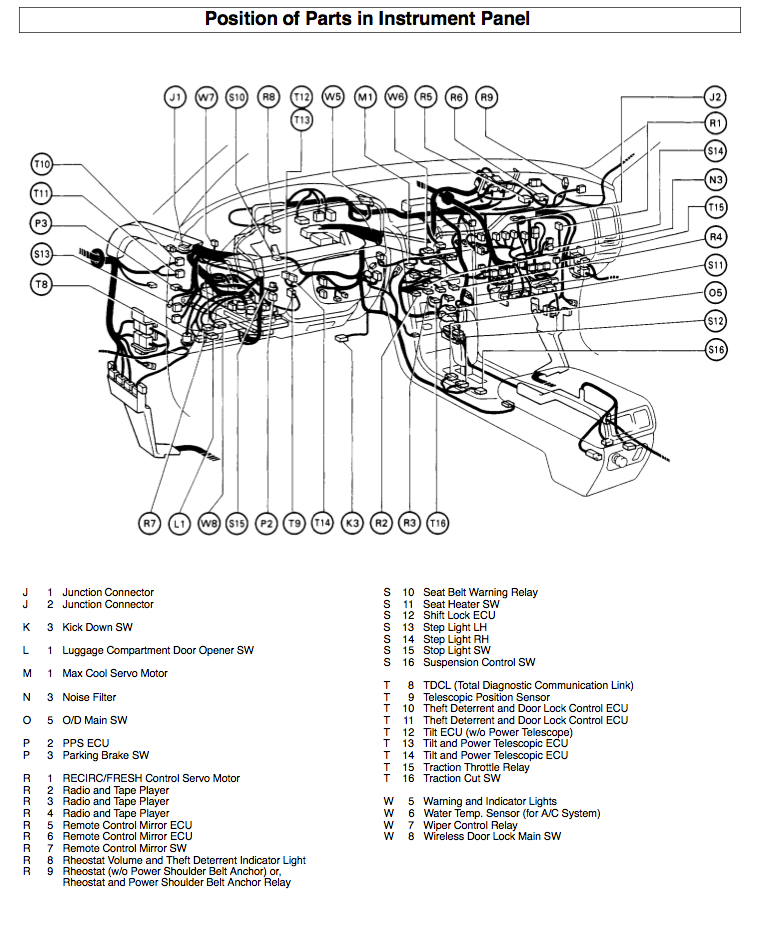
I will make a list of these that will be removed and those that will be kept. I'm sure I'll have some that I'm not sure about and perhaps someone more knowledgeable here on this sort of thing can chime in.


I will make a list of these that will be removed and those that will be kept. I'm sure I'll have some that I'm not sure about and perhaps someone more knowledgeable here on this sort of thing can chime in.
04-13-2014, 09:08 PM
#50
Keep in mind that I have completely removed the dash and engine harness from my 84 4runner as well and will replace it with the lexus harness.
This first list is for the interior dash. I will make a separate list in the same format for the engine bay
Unidentified
--------------
J1 Junction Connector
J2 Junction Connector
L1 Luggage Compartment Door Opener SW
M1 Max Cool Servo Motor
N3 Noise Filter
R1 Refresh Control Servo Motor (hvac)
W6 Water Temp Sensor for AC System
A24 AC Room Temp Sensor
A25 AC Power Transistor
A26 AC Power Transistor
A28 AC Evaporator Temp Sensor
B2 Blower Motor
B3 Blower Motor Resistor
D1 Diode (for brake fluid level)
I17 Integration Relay
Keeping
--------------
P3 Parking Brake Switch - will use wires for toyota parking brake lever/SW
R2 Radio and Tape Player - for installing a new stereo
R3 Radio and Tape Player - for installing a new stereo
R4 Radio and Tape Player - for installing a new stereo
S13 Step Light LH
S14 Step Light RH
S15 Stop Light Switch
T8 TDCL (Total Diagnostic Communication Link) - Not sure how useful it will be to me though
T9 Telescopic Position Sensor - I think it is for steering column
T12 Tilt ECU - steer column
T13 Tilt Power ECU - steer column
T14 Tilt Power ECU - steer column
W5 Warning and Indicator Lights - need to look more in to these to see exactly what they are
W7 Wiper Control Relay - No idea of I can wire this up to the existing motor. I can, but highly doubt the wiper will function properly.
A31 Air Vent Mode Control Servo Motor
C9 CD Player - Will need to look more in to this - might be for CD changer in trunk??
C11 Circuit Opening Relay
C12 Combination Meter - Cluster
C13 Combination Meter - Cluster
C14 Combination Meter - Cluster
C15 Combination SW - Steering Column
C16 Combination SW - Column
C17 Combination SW - Column
C18 Coolant Level Warning Switch - See if I can retain functionality, may be nice
C19 Cruise Control ECU
C20 Cruise Control ECU
E8/9/10/11 ECU for Engine and Tranny
F14 Cigarette Lighter
G1 Glove Box Light
G2 Glove Box Light Switch
H10 Hazard Switch
I14 Ignition Key Cylinder Light
I15 Ignition Main Relay
I16 Ignition SW Unlock Warning SW and Key Interlock Solenoid
Removing
--------------
O5 O/D Main S/W - installing manual tranny
P2 PPS ECU - Power steering ECU for lexus gear box
R5 Remote Control Mirror ECU
R6 Remote Control Mirror ECU
R7 Remote Control Mirror Switch
R8/9 Rheostat Volume and Theft Deterrent Indicator Light
S10 Seat Belt Warning Relay
S11 Seat Heater Switch
S12 Shift Lock ECU
S16 Suspension Control SW
T10 - Theft Deterrent and Door Lock Control ECU
T11 - Theft Deterrent and Door Lock Control ECU
T15 Traction Throttle Relay
T16 Traction Cut SW
W8 Wireless Dorr Lock Main SW
A16 ABS ECU
A17 ABS ECU
A18 ABS Traction ECU
A19 ABS Traction ECU
A20 ABS Traction ECU
A21 AC Control Assembly
A22 AC Control Assembly
A23 AC Control Assembly
A27 AC Solar Sensor
A29 Airbag Squib
A30 Air Mix Control Servo Motor
C10 Center Airbag Sensor Assembly
E7 ECT Pattern Select SW - for auto tranny remove
E12 Extra High Speed Relay for blower motor
F15 Fuel Lid Opener SW
Not Sure
--------------
K3 Kick Down Switch, no idea what this is so that's why it is in this category
04-13-2014, 09:35 PM
#51
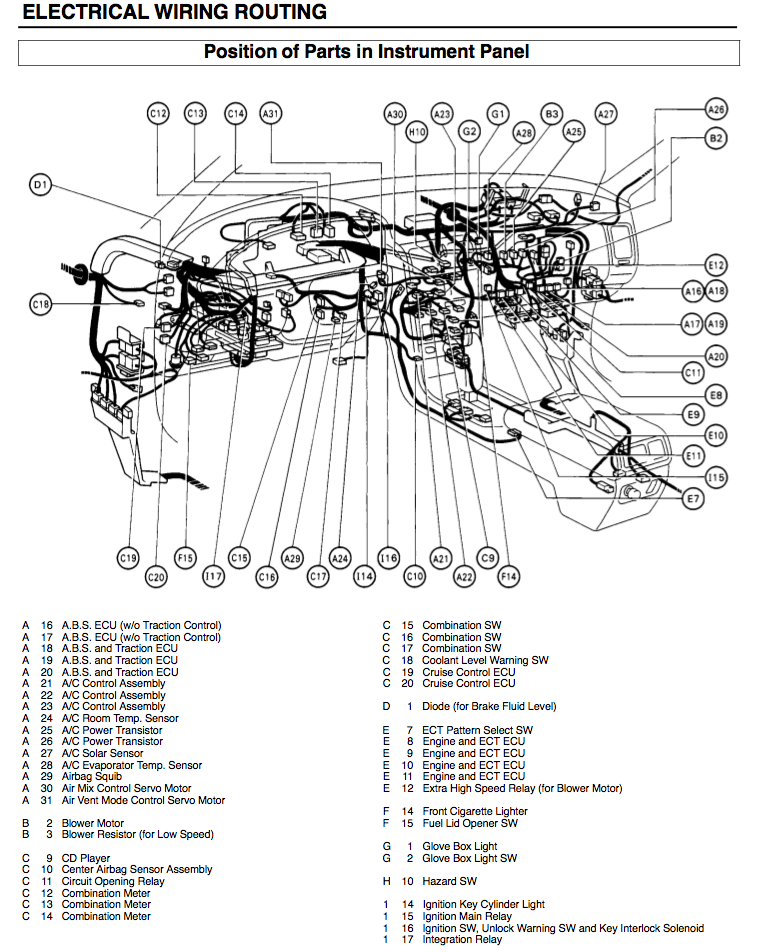
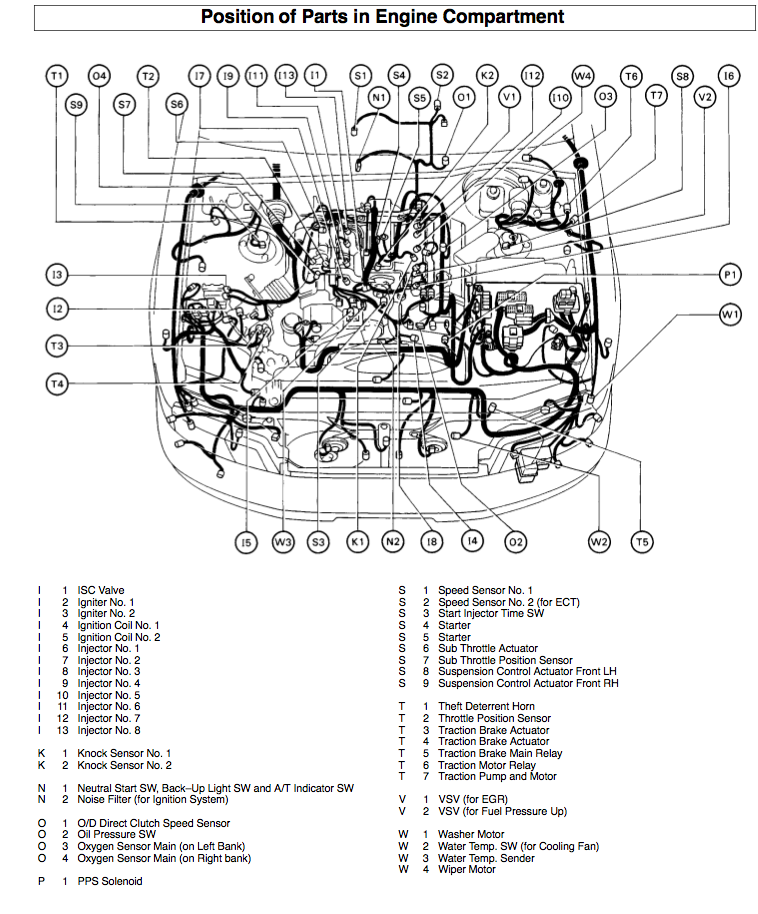
Engine Bay - If the connector/sensor is on the engine then it will just stay, it would be too much additional effort to strip down the harness of the motor. Anything on the motor that is not going to be used at all (open plugs from missing items like the tranny) then they will be removed to the furthest point back on the harness, cut, shrink wrapped and tidied up with the rest of the harness.
Unidentified
-------------
A12 AC Pressure Switch
Keeping
-------------
A9 AC Compressor Sensor
A10 AC Magnet Clutch
A11 AC Magnet Clutch Relay (I want to eventually install AC).
A13 Air Flow Meter
A14/15 Alternator
B1 Brake Fluid Level SW
C1 Cam Sensor
C2 Cam Sensor
C3 Check Connector
C4 Cold Start Injector
C5 Coolant Level Warning SW
C6/7 Cooling Fan Motor (can't I just use these for the fan motors)
C8 Cruise Control Actuator
E5 Engine Oil SW
E6 Engine Speed Sensor
F1 Fog Light LH - Figured I could use these for either some fog lights or wheel well rock lights
F2 Fog Light RH - Figured I could use these for either some fog lights or wheel well rock lights
F5 Front Clearance Light LH
F6 Front Clearance Light RH
F7 Front Side Marker Light LH
F8 Front Side Marker Light RH
F9 Front Turn Signal Light LH
F10 Front Turn Signal RH
F11 Fuel Pump Control Relay
F12 Fuel Pump Resistor Box
F13 Fusible Link Box
H1 Headlight LH
H2 Headlight RH
H8/9 Horn
I1-13 on engine and used
K1-2 on engine used
N1 will be used for back up light/switch
O2 Oil Pressure Switch
O3/4 Oxygen Sensor Mains
P1 - PPS Solenoid
S3 Start Injector time SW
S4/5 Starter
T2 Throttle Position Sensor
V1 VSV (FOR EGR)
V2 VSV (for Fuel Pressure up)
W1 Washer Motor
W2 Water Temp SW for Cooling Fan (incorporate this and I should be able to use the electric fan wiring already in the loom)
W3 Water Temp Sender
W4 Wiper Motor Plug
Removing
-------------
A1 ABS Actuator
A2 ABS Actuator
A3 ABS Actuator
A4 ABS Check Connector
A5 ABS Check Connector
A6 ABS Speed Sensor Front LH
A7 ABS Speed Sensor Front RH
A8 AC Ambient Temp Sensor
E3 EGR Gas Temp Sensor (For CA) - N/A
E4 Engine Hood Courtesy SW
F3 Front Airbag sensor LH
F4 Front Airbag sensor RH
H3 height control compressor
H4 Height control exhaust valve
H5 Height Control Sensor Front LH
H6 Height Control Sensor Front RH
H7 Height control valve No. 1
OD Direct clutch speed sensor
S6 Sub Throttle Actuator - Traction control I believe
S7 Sub Throttle Position Sensor
S8 Suspension control actuator Front LH
S9 Suspension control actuator Front RH
T1 Theft Deterrent Horn
T3 Traction brake actuator
T4 Traction brake actuator
T5 Traction brake main relay
T6 Traction motor relay
T7 Traction Pump and Motor
Not Sure
-------------
S1 Speed sensor No. 1 (know I need one or both, not sure which one feeds cluster)
S2 Speed Sensor No. 2 for ECT
04-14-2014, 11:57 AM
#52
A little digging in the manual shows that the kick down switch is when full depressing the accelerator and then sends a signal to the ECU/ECT and shifts the tranny aggressively toward acceleration for the corresponding action with the accelerator pedal.
Long story short, kick down SW (K3) is not needed at all since I will be swapping to R150F tranny
Long story short, kick down SW (K3) is not needed at all since I will be swapping to R150F tranny
04-14-2014, 04:17 PM
#53
glad you are still working on this.
I would really love to do a conversion like this sometime in my '81, especially after seeing 85Toyman's truck in person. His looks factory. I wish I had the $$ to just buy his truck..
Getting the complete donor lexus is the way to go..
I would really love to do a conversion like this sometime in my '81, especially after seeing 85Toyman's truck in person. His looks factory. I wish I had the $$ to just buy his truck..
Getting the complete donor lexus is the way to go..
04-14-2014, 04:22 PM
#54
Registered User
iTrader: (2)
Join Date: Oct 2009
Location: Centeral Willamette Valley Oregon
Posts: 1,044
Likes: 0
Received 5 Likes
on
5 Posts
glad you are still working on this.
I would really love to do a conversion like this sometime in my '81, especially after seeing 85Toyman's truck in person. His looks factory. I wish I had the $$ to just buy his truck..
Getting the complete donor lexus is the way to go..
I would really love to do a conversion like this sometime in my '81, especially after seeing 85Toyman's truck in person. His looks factory. I wish I had the $$ to just buy his truck..
Getting the complete donor lexus is the way to go..
When your ready Drop I would be happy to help you get this motor in your rig!!!!
 04-14-2014, 04:37 PM
#55
Thanks guys!!! The donor is definitely the way to go. I am keeping it around until I'm finished up with everything. That way I can snag any parts, nuts, bolts etc... that I need/want off it as I go along. Then if someone wants they car they can simply haul it away for free as I have not use for it and never bothered getting it licensed (reporting the purchase) because they wanted to charge up the A** in tax and I could not get a hold of the guy to have him sign a form saying it was a POS to devalue it.
You are a bit away from me over in OR. I'm practically in the Idaho/WA border.
I don't think it'll be too bad getting it in there compared to the rest of the swap. Fab up some motor mounts, position as far back as possible, check for clearances on the headers and get the mounts tac'd in, remove engine and fully weld.
I plan on having the tranny attached during this procedure so I can have the proper alignment for it to mount. I will use the stock mounting location and simply modify my TG dual case xmember. From what I've read, it is only about an inch difference or so from the stock mounting location (moved backwards).
At that point I'll bolt the engine in and then modify the xmember and bolt it all together in hopes I'll never to have take it out again.
Last edited by live4soccer7; 04-14-2014 at 04:39 PM.
04-14-2014, 05:01 PM
#56
Registered User
iTrader: (2)
Join Date: Oct 2009
Location: Centeral Willamette Valley Oregon
Posts: 1,044
Likes: 0
Received 5 Likes
on
5 Posts
We produce the motor mounts, 1" aluminum body lift ( yes you need to run a small 1" body lift for the heat to be able to dissipate correctly, radiator, ect.
If you need any of those parts, feel free to let me know.
Keep us posted on your progress, and as always feel free to ask for help if you run into problems.
If you need any of those parts, feel free to let me know.
Keep us posted on your progress, and as always feel free to ask for help if you run into problems.
04-14-2014, 06:50 PM
#57
Thanks!!! Unfortunately, 'it's a day late and a dollar short'. I have already removed the original mounts on the truck frame. I already have a 1" BL for simply creating a little extra room for working on stuff. It made one hell of a difference (in a good way).
I have already removed the original mounts on the truck frame. I already have a 1" BL for simply creating a little extra room for working on stuff. It made one hell of a difference (in a good way).
04-14-2014, 07:54 PM
#59
Thanks a ton for the offer!
I do have a question. I was thinking of retaining the original wiring for the electric cooling fans in the engine bay. There is also a coolant temperature switch that "trips" these fans that I could likely incorporate as well. What are your thoughts on this?
I started to strip the harness today. I didn't have much time, but was able to mostly strip the very front harness up by the radiator and includes the main relay/fuse box in the dash.
There are two plugs for the fans and I think most people end up going with a two fan setup, so It seemed that it would work out perfectly.
Last edited by live4soccer7; 04-14-2014 at 07:55 PM.
04-14-2014, 08:17 PM
#60
Registered User
iTrader: (2)
Join Date: Oct 2009
Location: Centeral Willamette Valley Oregon
Posts: 1,044
Likes: 0
Received 5 Likes
on
5 Posts
Thanks a ton for the offer!
I do have a question. I was thinking of retaining the original wiring for the electric cooling fans in the engine bay. There is also a coolant temperature switch that "trips" these fans that I could likely incorporate as well. What are your thoughts on this?
I started to strip the harness today. I didn't have much time, but was able to mostly strip the very front harness up by the radiator and includes the main relay/fuse box in the dash.
There are two plugs for the fans and I think most people end up going with a two fan setup, so It seemed that it would work out perfectly.
I do have a question. I was thinking of retaining the original wiring for the electric cooling fans in the engine bay. There is also a coolant temperature switch that "trips" these fans that I could likely incorporate as well. What are your thoughts on this?
I started to strip the harness today. I didn't have much time, but was able to mostly strip the very front harness up by the radiator and includes the main relay/fuse box in the dash.
There are two plugs for the fans and I think most people end up going with a two fan setup, so It seemed that it would work out perfectly.
I believe that this feature was only available on SC engines which run a hydraulic fan setup. If memory serves me correctly people who have tried this have run into issues with the correct temp sense readings as your not going to be running the hydraulic fan setup are you? The ECU ran into issues reading things correctly.


