96 Auto meet 91 Manual...
 03-20-2012, 10:27 PM
#21
looks great. You're progressing faster that me....I'm still dealing with wires.
I did the mod on the tach already ( search) and added the OBDII connector to the driver side. I'm not sure how to mount it yet. Right now, it's just poking out under the steering column.
I did the mod on the tach already ( search) and added the OBDII connector to the driver side. I'm not sure how to mount it yet. Right now, it's just poking out under the steering column.
 03-21-2012, 10:20 PM
#22
Registered User
Thread Starter
II1 not needed on 96 4Runner M/T?!?!
Thanks, this is one of those projects that I'd rather take a little longer and do things "right" (clean things up and replace parts that are easy access with the engine on a stand but a complete PITA with the engine installed).
I haven't gotten around to doing the 10K tach mod yet, but compared to some of the surface mount parts I've done at work, I'm not too worried about it.
And now for the inevitable wiring questions (just one for now)....
I've gone through both EWDs (96 4Runner) and (91 4Runner), probably dozens of times now over the last couple of months, trying to document all the relevant circuits in both applications and what all needs to be spliced together.
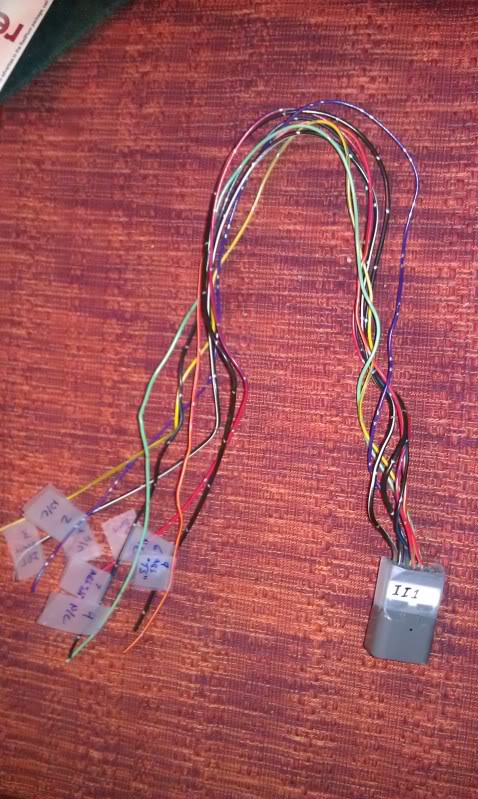
It looks like II1 (again for the 96 4Runner, other applications may be called other names), this is the 2x5 dark grey connector on the 3.4L engine harness that connects to the 96 4Runner dash harness, only has circuits needed for the auto transmission, cruise control, and ABS.
With that, the entirety of the II1 connector has nothing to connect to on a 96/97 (same pinnouts) A/T, 4WD, 3.4L engine harness converted to M/T, and thus not needed.
Could anyone who has converted a '96/'97 4Runner auto harness to manual confirm this for me or let me know if I'm completely off my rocker .
.
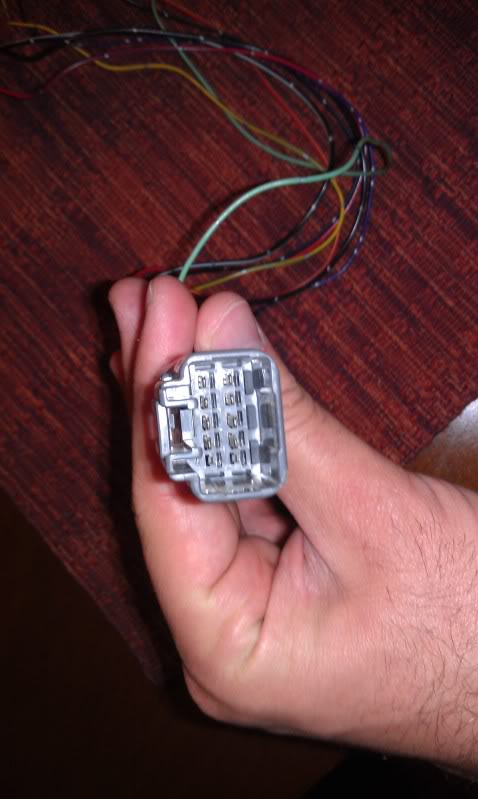
II1 dash side connector:
I haven't gotten around to doing the 10K tach mod yet, but compared to some of the surface mount parts I've done at work, I'm not too worried about it.
And now for the inevitable wiring questions (just one for now)....
I've gone through both EWDs (96 4Runner) and (91 4Runner), probably dozens of times now over the last couple of months, trying to document all the relevant circuits in both applications and what all needs to be spliced together.
It looks like II1 (again for the 96 4Runner, other applications may be called other names), this is the 2x5 dark grey connector on the 3.4L engine harness that connects to the 96 4Runner dash harness, only has circuits needed for the auto transmission, cruise control, and ABS.
- Since I'm converting this harness to work with a 5 speed, the 4 A/T wires are not used (pins 1, 2, 4, and 6).
- The wiring for the 3.0L cruise control (at least on my 91) resides entirely within the body/dash harness with no 3.0L ECU connections, and the only connection the 3.4L ECU is expecting is from a solenoid on at A/T and not used with the M/T; so again, there's another unused wire (pin 3).
- The wiring for the 3.0L ABS also resides entirely within the 91 4Runner body/dash harness (including the ABS ECU, relay, and check connector). The 3.4L M/T ECU does not expect to see any connection to the ABS system. That's the last 3 wires in II1 (pins 7, 8, and 9).
With that, the entirety of the II1 connector has nothing to connect to on a 96/97 (same pinnouts) A/T, 4WD, 3.4L engine harness converted to M/T, and thus not needed.
Could anyone who has converted a '96/'97 4Runner auto harness to manual confirm this for me or let me know if I'm completely off my rocker
.II1 dash side connector:
03-22-2012, 08:32 AM
#24
There's a few wires that you don't need from the auto harness.....like P/N switch, 1,2, D, ....Speed sensor. I have mechanical speed cable that goes to the instrument cluster.
I think I need to run a speed signal from the instrument cluster to the computer some how...right?
I think I need to run a speed signal from the instrument cluster to the computer some how...right?
03-22-2012, 08:49 AM
#25
The mechanical speedo goes from the transfer case to the speedometer. Then the computer gets the necessary VSS from the speedometer. The speedo converts the mechnical to electrical signal.
FWIW, the reading the the ECU gets from the speedo isn't necessary from what I've read. There's another, main VSS that the ECU needs, but I believe that's already contained in the engine harness. I do have a CEL for a VSS PO500 i think, but it doesn't affect the way the engine runs.
FWIW, the reading the the ECU gets from the speedo isn't necessary from what I've read. There's another, main VSS that the ECU needs, but I believe that's already contained in the engine harness. I do have a CEL for a VSS PO500 i think, but it doesn't affect the way the engine runs.
03-22-2012, 09:49 AM
#26
Registered User
Thread Starter
And yeah, I knew there would be a bunch of extra wires/connections converting auto to manual, but I was surprised to see that an entire connector could be eliminated.
03-22-2012, 04:08 PM
#28
Registered User
The ecm is going to have to know the speed of the vehicle via the Vss. Otherwise, I don't think it would ever run any of the tests for the various systems and thus none of the monitor tests would ever run and that would be a fail.
The Vss stuff should be in your passenger kick panel. I havent done one with a mechanical speedo though so I am not sure.
The Vss stuff should be in your passenger kick panel. I havent done one with a mechanical speedo though so I am not sure.
03-22-2012, 06:30 PM
#29
I'm thinking out loud here....about the speed signal if you have gear driven speedometer...
How does the ECU knows not to switch to 4 hi when traveling over 45 MPH? Is there something to stop someone from doing it?
I know the cruise control module just looks at the t-body position...I think.
How does the ECU knows not to switch to 4 hi when traveling over 45 MPH? Is there something to stop someone from doing it?
I know the cruise control module just looks at the t-body position...I think.
05-23-2012, 09:58 PM
#30
Registered User
Thread Starter
Long overdue update
Update time...I've made progress but it's been slow, I somehow keep managing to find other things to do most weekends. I think I've been averaging one 4-6 hour day a week for the last couple months working on the swap.
Going way back to mid-March, I began looking at how to run the transmission/transfercase/O2 sensor wires down the driver's side of the block and just didn't like how it looked, and every option I mentally ran through eventually came back to the same conclusion: those wires are going to have to run dangerously close to the exhaust. I checked out my brother's 4Runner (97, v6, 4x4, A/T...almost identical to my donor's factory setup) to see how it was originally ran and in one of those embarrassingly stupid "d'oh!!!" moments remembered the 3.4 originally had the exhaust on the other side of the block. So in my mind the only logical thing to do was to dissect the engine harness enough to remove the A/T only plugs and wires, then begin the tedious task of backing the remaining wires out through the center hard plastic race-ways so they could drop down the passenger side rear of the motor. I'm not sure how the harnesses were assembled, but it was amazing just how twisted some of those wires became, I ended up having to cut and solder more than I would have liked, but aside from the O2 signal wire they're all carrying either GND or +12V for switch closures and powering the O2s.
All wrapped up in a new plastic sleeve wrapped in electrical tape, with 3.0 transmission/transfer case plugs:

Dropping down from the engine bay:
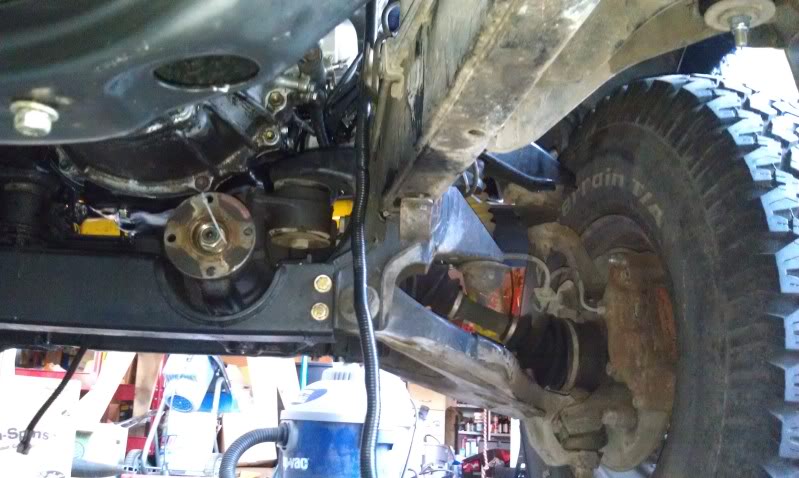
I still need to wrap some reflective tape around the loom where it gets close to the exhaust manifold and secure it all out of the way.
Heater hoses....FML...heater hoses!!! I don't know if I'm doing something wrong (probably) but I had more trouble finding a combination of hoses that would fit and allow me to still plumb in the rear heater, clear the heater valve, and clear the upper intake plenum and all its various vacuum lines. Turns out I don't have a good picture of it, and the ones I do have are from earlier attempts that didn't work out so well, but I do have one that kind of, sort of shows where I was going.
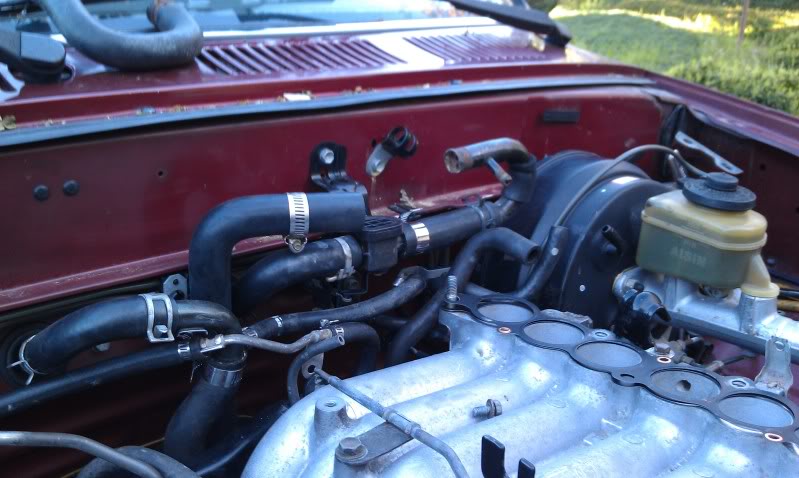
With the heater hoses figured out (well, not all figured out), it was time to start putting the intake back together:
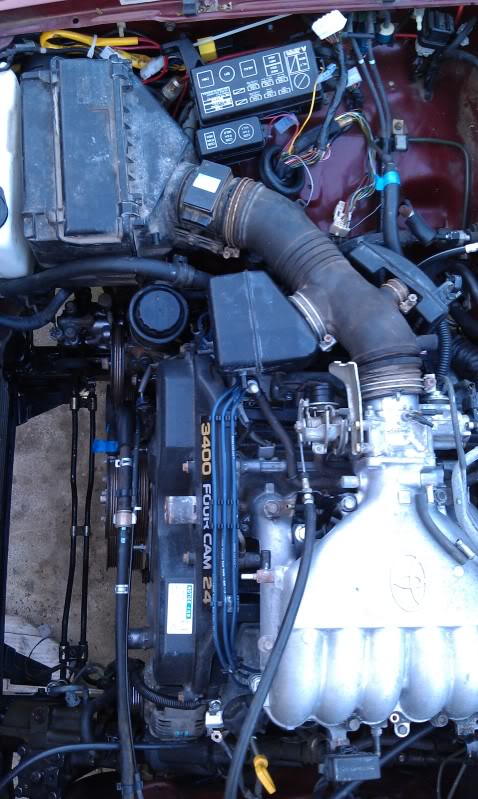
After cutting off all the original mounts and test fitting the air box, I really didn't like how it was fitting. Some years back when I bought a headlight relay harness I added a fuse block to the inside of the fender hiding behind the battery, and as it turns out, this was exactly where the air box was expecting to find a hole in the fender for fresh air.
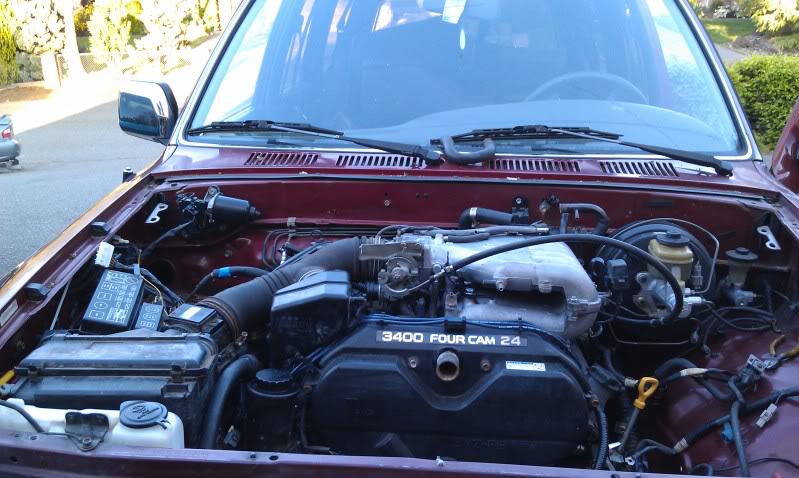
I looked around a bit, dug deep into the CARB list of approved intakes (K&N, Injen, Air Raid, Weapon 9, and a few others) for a 96 v6 4Runner, put in yet another call to the SMOG ref just to make sure I could add an aftermarket intake, I ended up getting the Injen offering in "Wrinkle Black." I found the EO number that CARB gave it, yet they don't list it on their web site, or include a sticker in the box, after an email to Injen, I just have to send an picture of it installed in my truck along with a picture of the VIN from the door jam and they *should* send me a sticker, but I'm not quite there yet.
OEM style intake:
Really bad angle but you can see a bunch of wires in the fender where the battery used to be:
Injen test fit (with heater hoses "finished"):
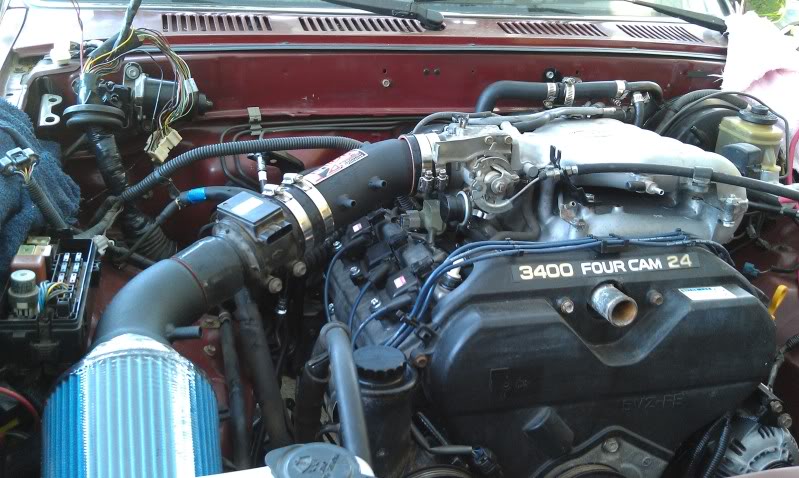
You can see there is next to no room between tube the filter attaches to and the fuse box, I ended up having to cut off the "extra" box that used to be there that housed all the A/C relays and fuse, its now tucked away between the fender, filter, and main fuse box.
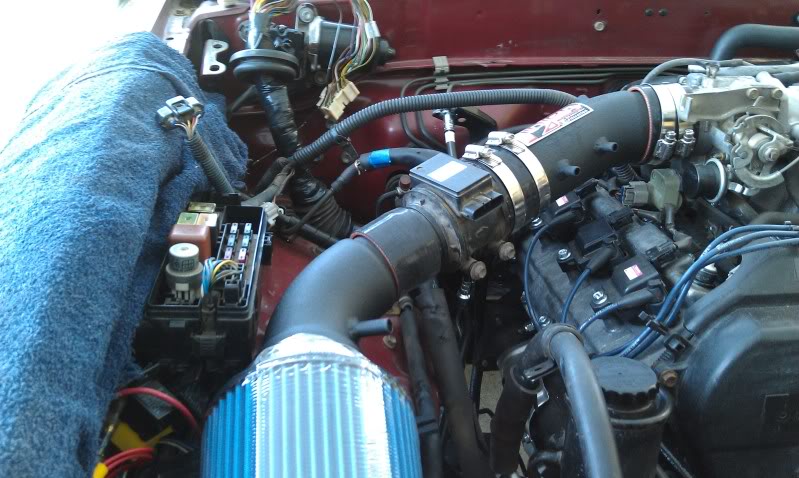
Closer look:
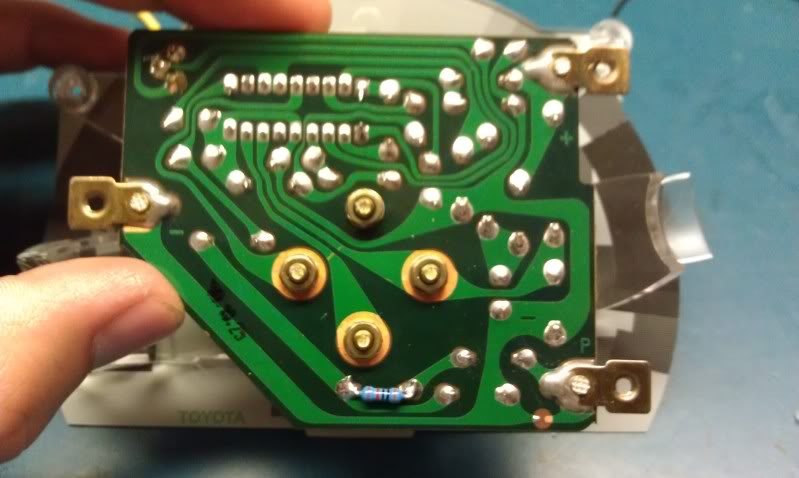
And somewhere in the last couple of months I finally got around to adding the 10K resistor to the tach, was able to get one from work (our cost was less than $0.01 5 years ago, none of our new gear uses those "big" through hole parts, it's all tiny surface mount stuff now).
Bare, unaltered tach:
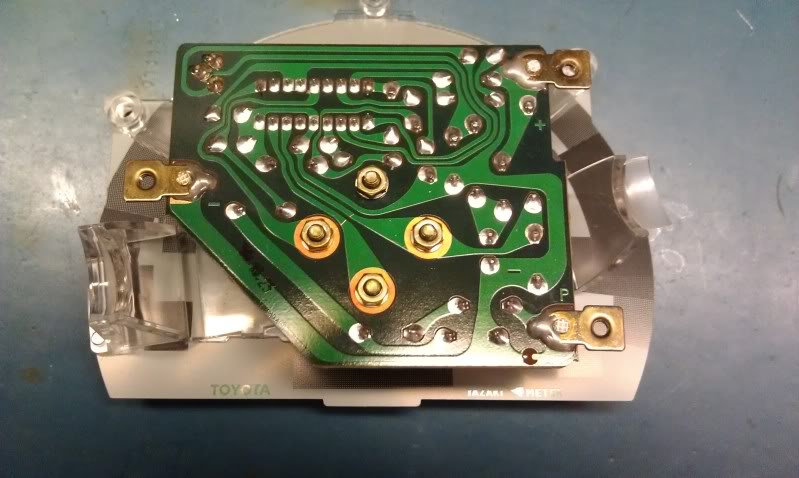
with 10K added:
Now left to do:
Going way back to mid-March, I began looking at how to run the transmission/transfercase/O2 sensor wires down the driver's side of the block and just didn't like how it looked, and every option I mentally ran through eventually came back to the same conclusion: those wires are going to have to run dangerously close to the exhaust. I checked out my brother's 4Runner (97, v6, 4x4, A/T...almost identical to my donor's factory setup) to see how it was originally ran and in one of those embarrassingly stupid "d'oh!!!" moments remembered the 3.4 originally had the exhaust on the other side of the block. So in my mind the only logical thing to do was to dissect the engine harness enough to remove the A/T only plugs and wires, then begin the tedious task of backing the remaining wires out through the center hard plastic race-ways so they could drop down the passenger side rear of the motor. I'm not sure how the harnesses were assembled, but it was amazing just how twisted some of those wires became, I ended up having to cut and solder more than I would have liked, but aside from the O2 signal wire they're all carrying either GND or +12V for switch closures and powering the O2s.
All wrapped up in a new plastic sleeve wrapped in electrical tape, with 3.0 transmission/transfer case plugs:
Dropping down from the engine bay:
I still need to wrap some reflective tape around the loom where it gets close to the exhaust manifold and secure it all out of the way.
Heater hoses....FML...heater hoses!!! I don't know if I'm doing something wrong (probably) but I had more trouble finding a combination of hoses that would fit and allow me to still plumb in the rear heater, clear the heater valve, and clear the upper intake plenum and all its various vacuum lines. Turns out I don't have a good picture of it, and the ones I do have are from earlier attempts that didn't work out so well, but I do have one that kind of, sort of shows where I was going.
With the heater hoses figured out (well, not all figured out), it was time to start putting the intake back together:
After cutting off all the original mounts and test fitting the air box, I really didn't like how it was fitting. Some years back when I bought a headlight relay harness I added a fuse block to the inside of the fender hiding behind the battery, and as it turns out, this was exactly where the air box was expecting to find a hole in the fender for fresh air.
I looked around a bit, dug deep into the CARB list of approved intakes (K&N, Injen, Air Raid, Weapon 9, and a few others) for a 96 v6 4Runner, put in yet another call to the SMOG ref just to make sure I could add an aftermarket intake, I ended up getting the Injen offering in "Wrinkle Black." I found the EO number that CARB gave it, yet they don't list it on their web site, or include a sticker in the box, after an email to Injen, I just have to send an picture of it installed in my truck along with a picture of the VIN from the door jam and they *should* send me a sticker, but I'm not quite there yet.
OEM style intake:
Really bad angle but you can see a bunch of wires in the fender where the battery used to be:
Injen test fit (with heater hoses "finished"):
You can see there is next to no room between tube the filter attaches to and the fuse box, I ended up having to cut off the "extra" box that used to be there that housed all the A/C relays and fuse, its now tucked away between the fender, filter, and main fuse box.
Closer look:
And somewhere in the last couple of months I finally got around to adding the 10K resistor to the tach, was able to get one from work (our cost was less than $0.01 5 years ago, none of our new gear uses those "big" through hole parts, it's all tiny surface mount stuff now).
Bare, unaltered tach:
with 10K added:
Now left to do:
- Build/mount a battery box
- Build/mount the charcoal canister
- Have a power steering hose made to work with ABS and keep the idle up valve (this has turned out to be a huge ordeal)
- Install belts, radiator, radiator hoses
- Fill with coolant
- Turn the key and see what happens...
Last edited by SacRunner; 05-28-2012 at 09:23 PM. Reason: Grammar clean-up
06-26-2012, 09:09 PM
#31
Registered User
Thread Starter
Exciting Weekend
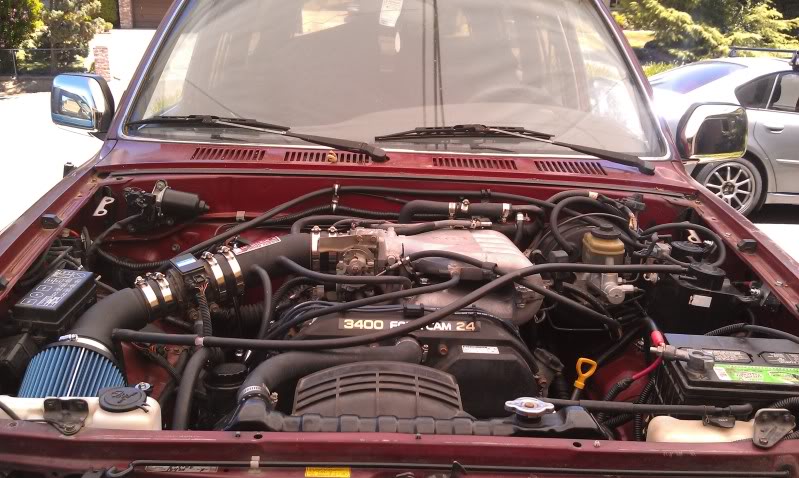
Over the last few weekends I've been able to slowly start wrapping things up: evap canister mounted, had a custom power steering hose made from the 3.4 pump fitting (with idle-up valve) on one end and the 3.0 ABS actuator fitting on the other, had a battery tray built, installed the radiator, drive accessories, fan belts, fan, filled with fluids, etc., etc.
So Saturday was a big day, after finding out that the combination of my new battery tray and old batter sat a little too high and would hit the hood, and discovering I somehow managed to foobar up one of the ECU connectors preventing it from plugging all the way into the ECU, I decided to see what would happen when I turned the key.
First things first, connect up the battery, and the door-open lights came on, turn the key to "run" and could hear the 3.4 COR kick on and the fuel pump started right up. I got out and walked around looking for any sort of gas leak and couldn't see anything, so far so good, lets try to start it!
I get back in the cab, and attempt to start: starter kicks in right away and the engine shakes, turns over maybe 1/16 or less of a rotation and stops. OH !! So I get back out walk around looking for anything mechanical that could be stopping it from turning over. I see nothing, so I try it a couple of more times with the same result.
By this point I'm starting to get really pissed and go inside for a bit and start thinking of what it could be, did I use the wrong flywheel bolts and that's keeping it from turning over? No, the flex plate (A/T) bolts from the 3.4 are shorter (about 1/2" long) whereas the flywheel bolts from my old 3.0 (about 1" long), so that's not it. By this point, it'd just be best if I call it a day (about 5:00 pm) because I was considering pulling the transmission to see if there was anything in there.
Sunday, I get back to it with a new, different perspective, lets pull the fan belts to make sure none of the accessories are keeping it from turning over, and just for kicks, I decided to pull the spark plugs. 5 of the 6 spark plugs come out looking brand new, but one, the #3 cylinder, had some moisture on it that smelled like gas, but down at the base of the insulator I could see some faint pink and I got that sinking feeling in my gut.
So now with all the belts off and spark plugs out, I give it one more shot. Sure enough it now turned over nice and easy but in the process shot "a bunch" of new Toyota red coolant out of the spark plug tube. A few choice words were exclaimed, then I walked over to look at the coolant spray.
Being the proud owner of a 4Runner that had a 3.0, I knew exactly what I was now looking at, best case scenario bad head gasket. For the next few minutes I stare blankly into the engine bay considering my options; pull the heads and fix it, pull the motor and try my luck with a junkyard/jdm/craigs list long block, or (god-forbid) scrap/sell the whole thing.
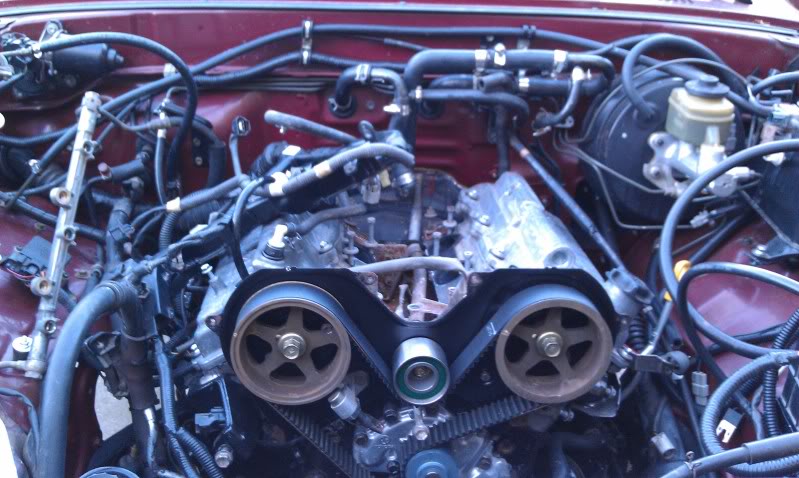
So, I calmly walk into the house grab a , walk back out and begin to disassemble everything. By the end of Sunday, I had the whole intake, plenums, wiring harness, fuel rail, intake manifold, drive accessories, belts, and radiator out of the way. Hopefully this weekend I can get the NEW timing belt pulled out without damaging it, finish pulling everything out/off from around the heads, then get the heads out and off to the machine shop on Monday.
I stopped by the local Toyota parts department this morning and picked up another several hundred dollars worth of parts to rebuild the top end. We'll see how this goes.
The only pictures from the weekend:
All buttoned up and ready to go:
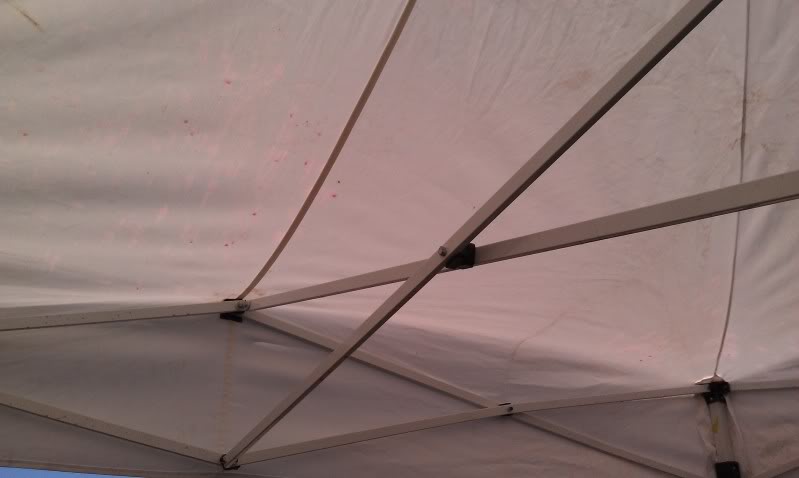
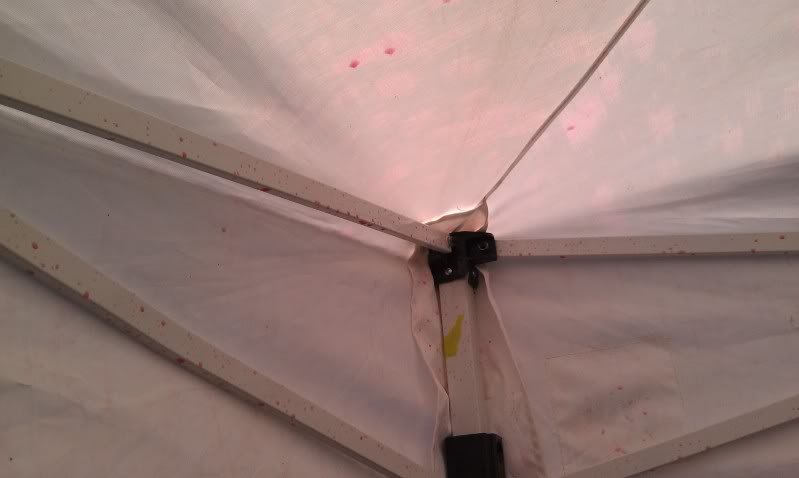
And a couple of aftermath shots of the EZ-up I had over the truck and all the coolant splattered on it:
So, now just as I thought I was finishing up this project, it takes a HUGE step backwards. This should be fun and interesting though...
So Saturday was a big day, after finding out that the combination of my new battery tray and old batter sat a little too high and would hit the hood, and discovering I somehow managed to foobar up one of the ECU connectors preventing it from plugging all the way into the ECU, I decided to see what would happen when I turned the key.
First things first, connect up the battery, and the door-open lights came on, turn the key to "run" and could hear the 3.4 COR kick on and the fuel pump started right up. I got out and walked around looking for any sort of gas leak and couldn't see anything, so far so good, lets try to start it!
I get back in the cab, and attempt to start: starter kicks in right away and the engine shakes, turns over maybe 1/16 or less of a rotation and stops. OH
!! So I get back out walk around looking for anything mechanical that could be stopping it from turning over. I see nothing, so I try it a couple of more times with the same result.By this point I'm starting to get really pissed and go inside for a bit and start thinking of what it could be, did I use the wrong flywheel bolts and that's keeping it from turning over? No, the flex plate (A/T) bolts from the 3.4 are shorter (about 1/2" long) whereas the flywheel bolts from my old 3.0 (about 1" long), so that's not it. By this point, it'd just be best if I call it a day (about 5:00 pm) because I was considering pulling the transmission to see if there was anything in there.
Sunday, I get back to it with a new, different perspective, lets pull the fan belts to make sure none of the accessories are keeping it from turning over, and just for kicks, I decided to pull the spark plugs. 5 of the 6 spark plugs come out looking brand new, but one, the #3 cylinder, had some moisture on it that smelled like gas, but down at the base of the insulator I could see some faint pink and I got that sinking feeling in my gut.
So now with all the belts off and spark plugs out, I give it one more shot. Sure enough it now turned over nice and easy but in the process shot "a bunch" of new Toyota red coolant out of the spark plug tube. A few choice words were exclaimed, then I walked over to look at the coolant spray.
Being the proud owner of a 4Runner that had a 3.0, I knew exactly what I was now looking at, best case scenario bad head gasket. For the next few minutes I stare blankly into the engine bay considering my options; pull the heads and fix it, pull the motor and try my luck with a junkyard/jdm/craigs list long block, or (god-forbid) scrap/sell the whole thing.
So, I calmly walk into the house grab a
, walk back out and begin to disassemble everything. By the end of Sunday, I had the whole intake, plenums, wiring harness, fuel rail, intake manifold, drive accessories, belts, and radiator out of the way. Hopefully this weekend I can get the NEW timing belt pulled out without damaging it, finish pulling everything out/off from around the heads, then get the heads out and off to the machine shop on Monday.I stopped by the local Toyota parts department this morning and picked up another several hundred dollars worth of parts to rebuild the top end. We'll see how this goes.
The only pictures from the weekend:
All buttoned up and ready to go:
And a couple of aftermath shots of the EZ-up I had over the truck and all the coolant splattered on it:
So, now just as I thought I was finishing up this project, it takes a HUGE step backwards. This should be fun and interesting though...
 06-27-2012, 08:31 AM
#33
Registered User
Thread Starter
He told me he was parting it out because "it was hit while parked on the street" and the 4Runner did look like it was in an accident when I picked up the motor so I had no real reason to doubt him.
I'm still kicking myself for not having him do a compression test before pulling the motor and for me not doing anything to check it while it was on the stand (not really sure how I would have anyways). Oh well, live and learn...
I'm still kicking myself for not having him do a compression test before pulling the motor and for me not doing anything to check it while it was on the stand (not really sure how I would have anyways). Oh well, live and learn...
 06-29-2012, 08:11 PM
#35
Registered User
Thread Starter
Heads Off
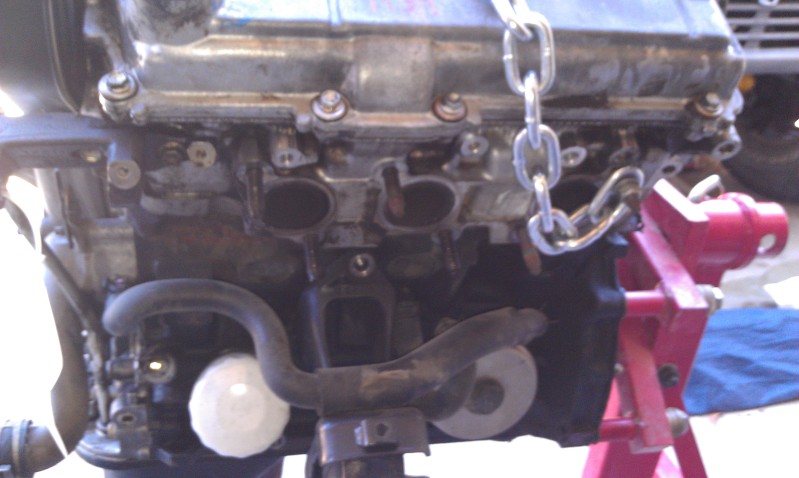
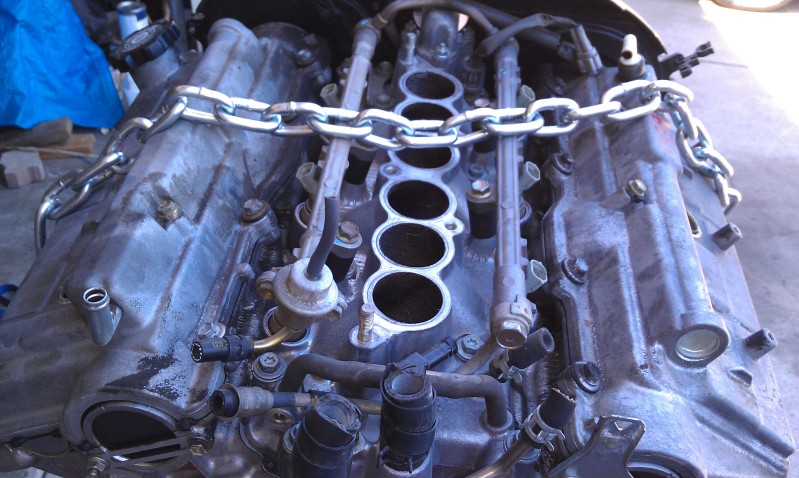
Over the last couple of nights I managed to pull the timing belt and everything else on the front of the motor that touched the heads. Then it was off to the exhaust manifolds and cross over, as soon as I began to loosen the passenger side of the cross over (same side as the suspected leak) lots of coolant began to drain out. I will say, even with a 1.5" body lift disconnecting the cross over from the exhaust manifolds was a bit of a pain.
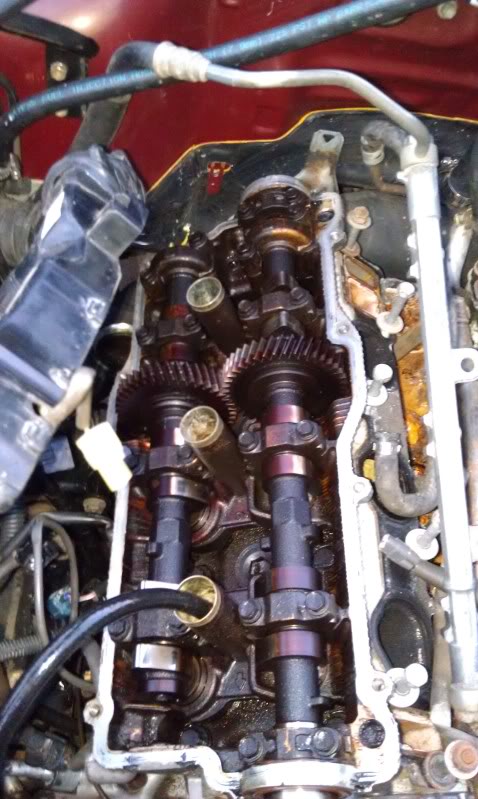
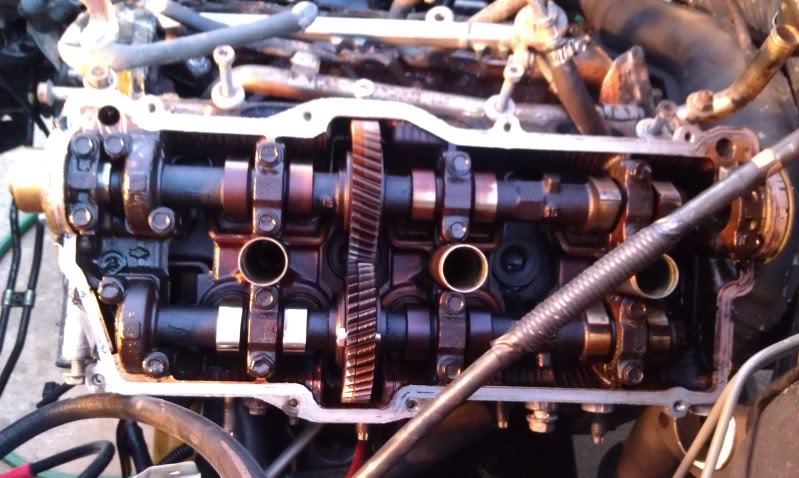
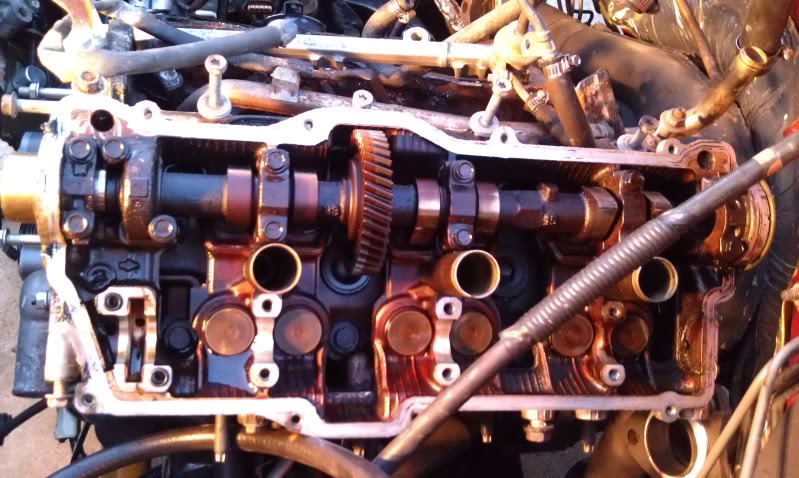
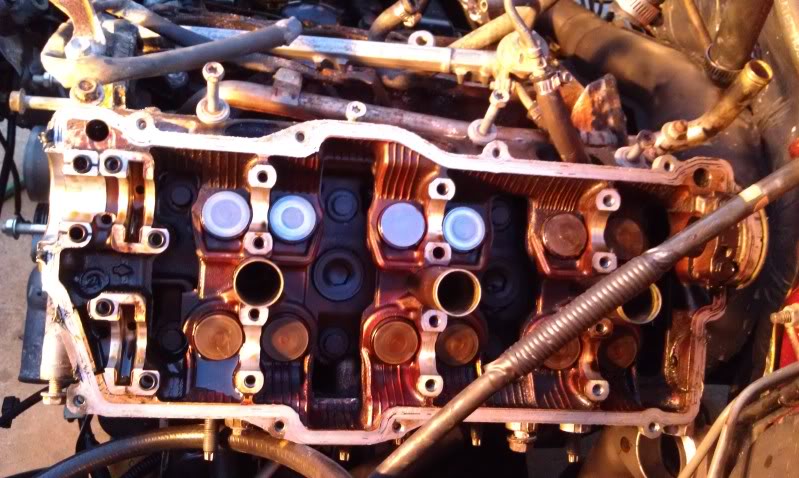
With everything cleared away from the heads it was time to remove the valve cover, pull the cams (with a 6x1.0x20mm service bolt in the exhaust cam), then pull the heads. The cam bearing bolts weren't bad, I just took my time removing them, trying to loosen all the bolts evenly as per the FSM.
The head bolts on the other hand, took quite a bit of work to loosen. I ended up using a 1/2" drive 12-point 12mm socket with two 3" 1/2" drive extensions (to clear the spark plug tubes), a 15" 1/2" drive breaker bar with a 3' jack handle sipped over the end. Again, following the FSM, you're supposed to loosen all 8 head bolts evenly and in an X pattern; each time each of the bolts began to move they let out a loud "pop." I went through and turned each bolt 1 "pop" at a time until they stopped making noise then turned them 1/8 of a turn until they were all loose, then just backed them out by hand.
Once the heads were out, I reinstalled the cams and bearing but only tightened the bolts until they were snug/finger tight, then into their own card board box in the trunk of my Legacy to go to the machine shop.
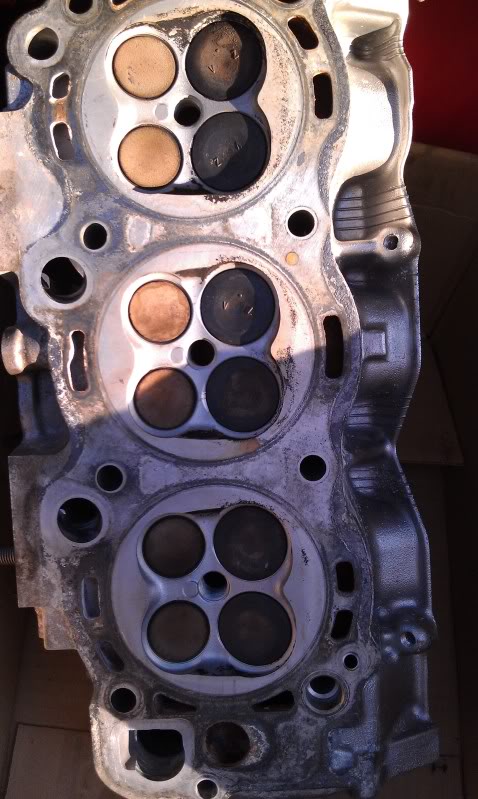
And now onto the pics...
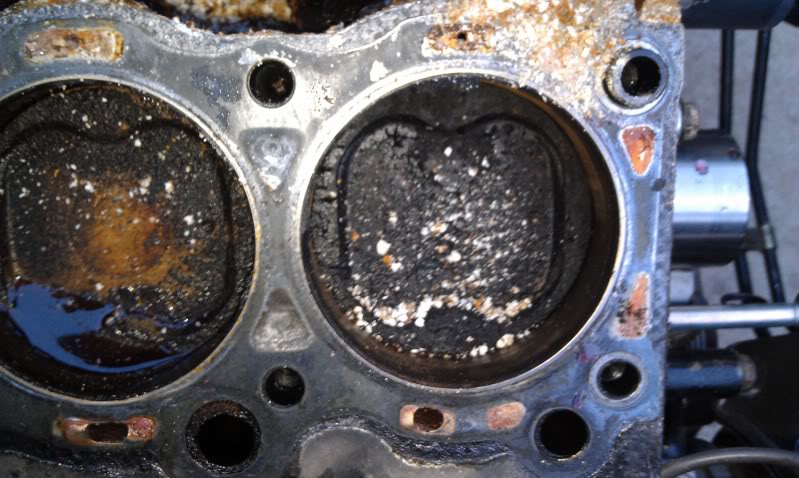
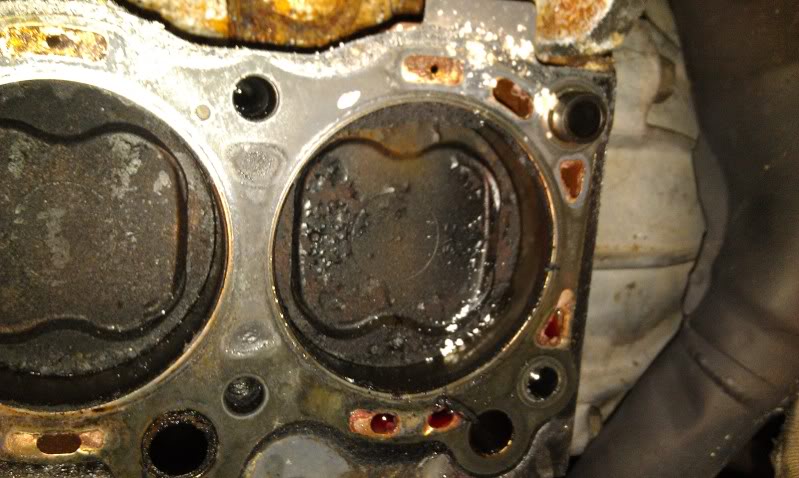
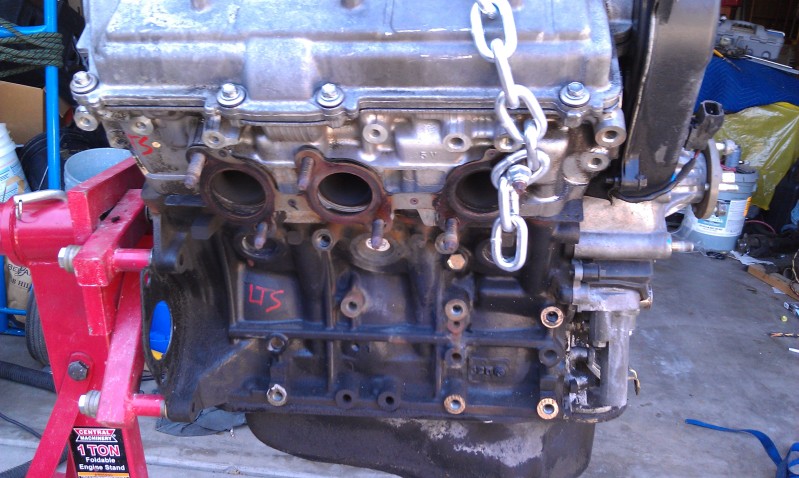
Passenger side:
(with a compression tester stuck in the #1 cylinder...I got it out after I pulled the head)
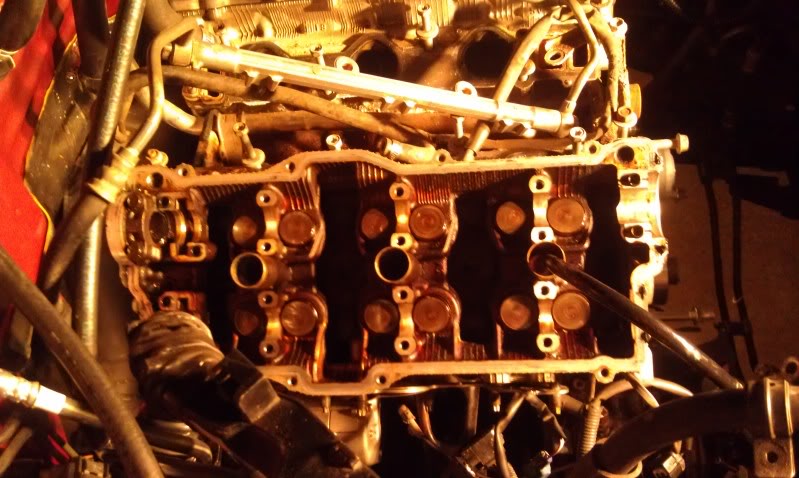
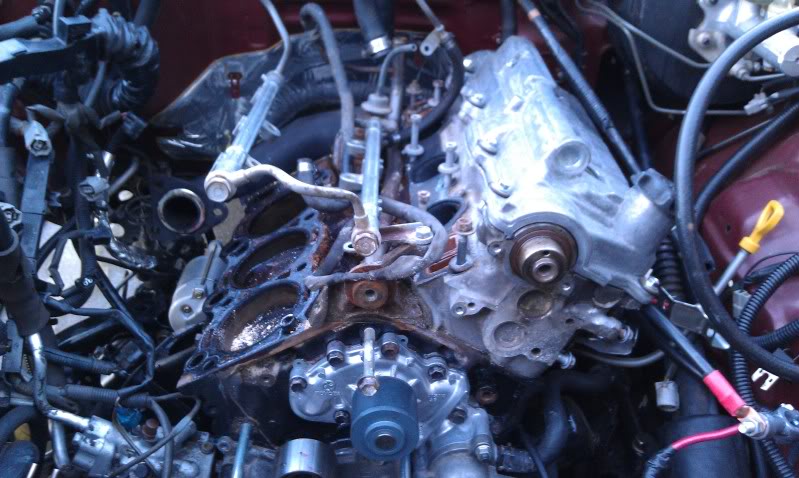
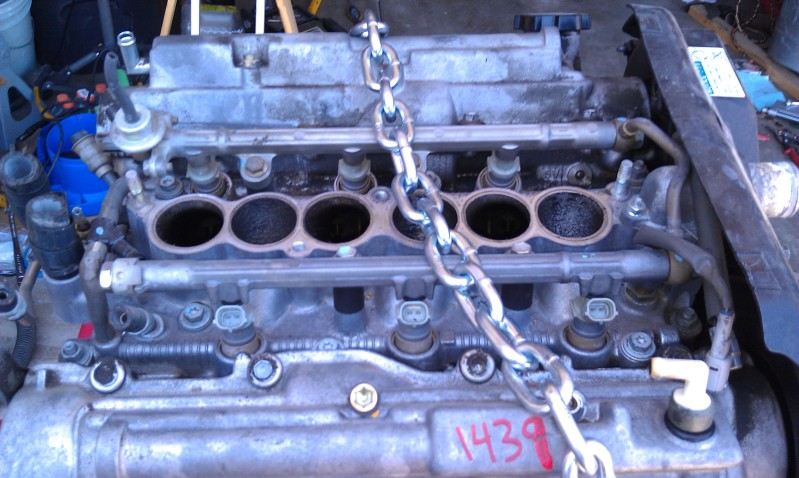
Driver's Side:
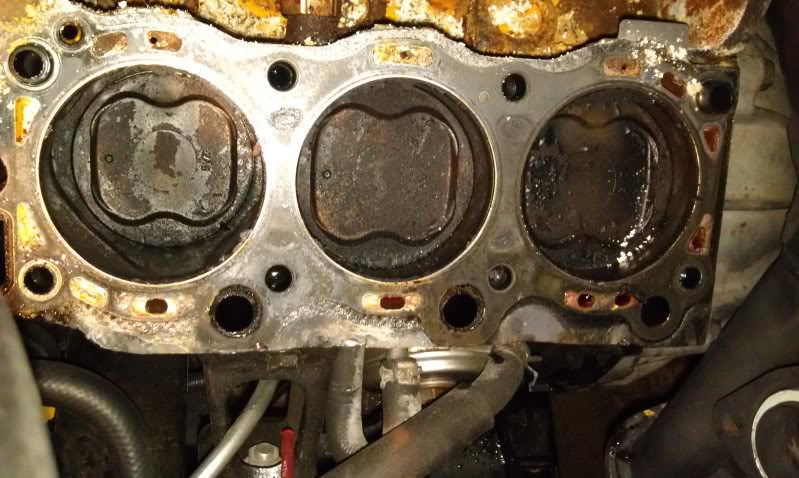
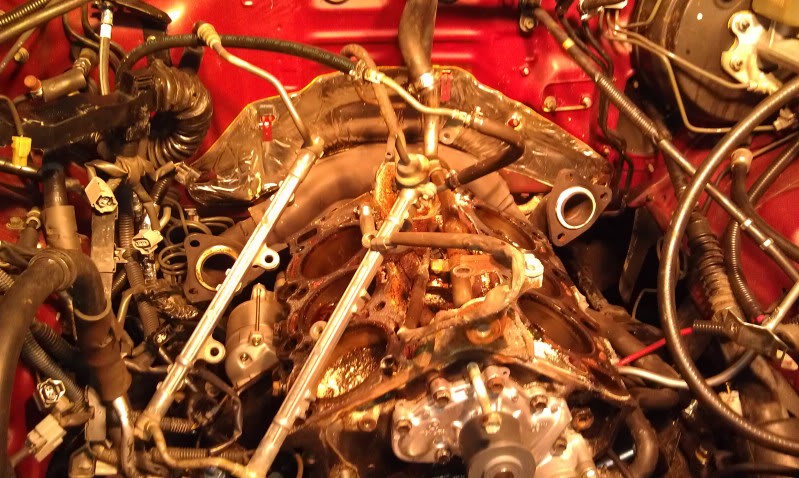
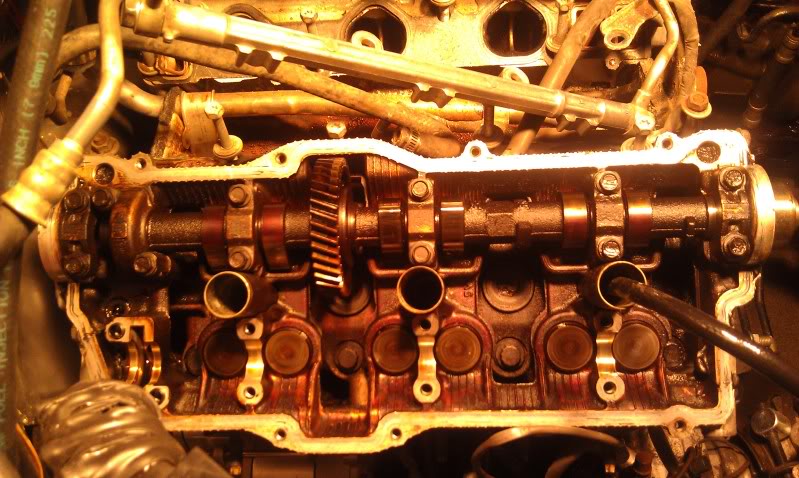
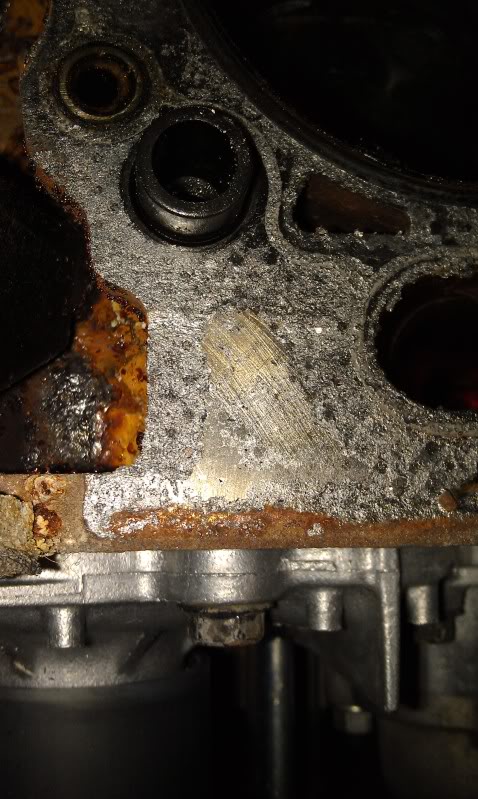
It looks like the driver's side head gasket may have been replaced already, only because there appears to be some scratch marks in the block under the gasket (but I don't really know what I'm looking at to know for sure):
With everything cleared away from the heads it was time to remove the valve cover, pull the cams (with a 6x1.0x20mm service bolt in the exhaust cam), then pull the heads. The cam bearing bolts weren't bad, I just took my time removing them, trying to loosen all the bolts evenly as per the FSM.
The head bolts on the other hand, took quite a bit of work to loosen. I ended up using a 1/2" drive 12-point 12mm socket with two 3" 1/2" drive extensions (to clear the spark plug tubes), a 15" 1/2" drive breaker bar with a 3' jack handle sipped over the end. Again, following the FSM, you're supposed to loosen all 8 head bolts evenly and in an X pattern; each time each of the bolts began to move they let out a loud "pop." I went through and turned each bolt 1 "pop" at a time until they stopped making noise then turned them 1/8 of a turn until they were all loose, then just backed them out by hand.
Once the heads were out, I reinstalled the cams and bearing but only tightened the bolts until they were snug/finger tight, then into their own card board box in the trunk of my Legacy to go to the machine shop.
And now onto the pics...
Passenger side:
(with a compression tester stuck in the #1 cylinder...I got it out after I pulled the head)
Driver's Side:
It looks like the driver's side head gasket may have been replaced already, only because there appears to be some scratch marks in the block under the gasket (but I don't really know what I'm looking at to know for sure):
06-29-2012, 08:23 PM
#36
Registered User
Thread Starter
I dropped the heads and intake manifold off at the machine shop the local Toyota dealer sends their work for hot-tanking, inspection, resurfacing and a valve job if needed. I had the 2 intake plenums and valve covers hot-tanked earlier during my initial engine "refresh" (not quite a rebuild, but more than just a cleaning).
Tomorrow I'll be cleaning the old gasket material off the block with a razor blade held perpendicular to the mating surface (per the machinist's recommendation...if anyone knows a better approach please let me know), de-rusting the "valley" between the two heads and putting down some fresh engine paint.
I suppose the only silver lining in all of this is a new-found motivation to get it done and back on the road. I'm still keeping my finger's crossed that I don't find out through all of this that I bought a $1,200 non-salvagable motor and end up having to find a long block to replace it.
07-13-2012, 06:18 PM
#37
Registered User
Thread Starter
Woo hoo!
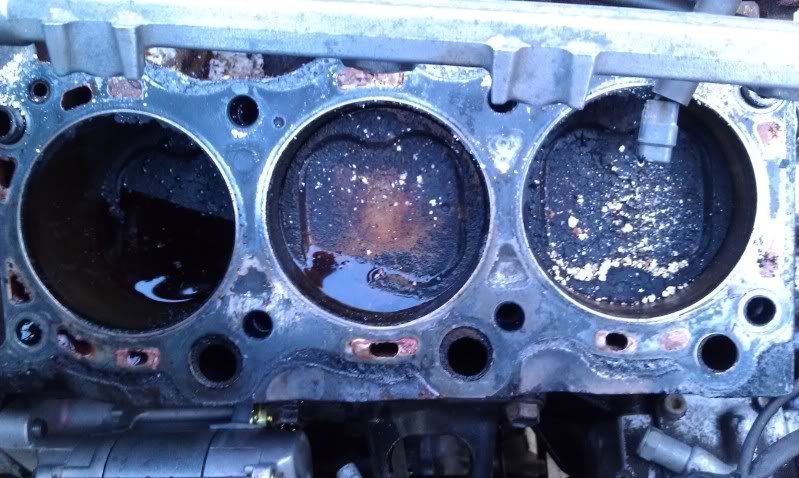
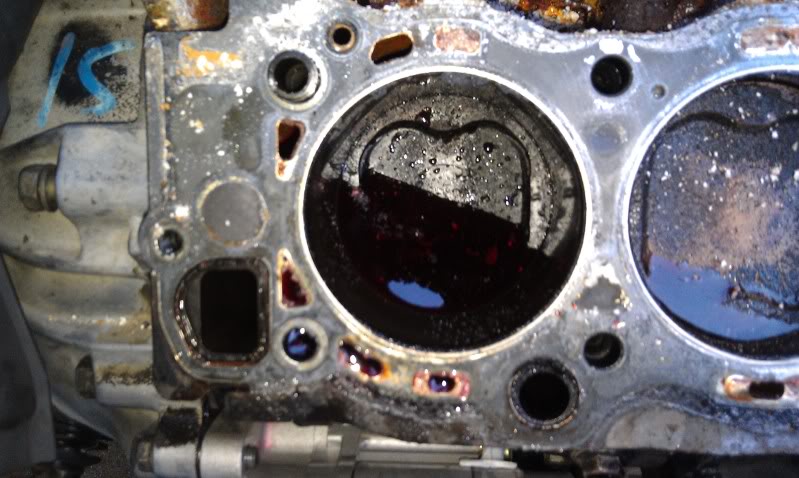
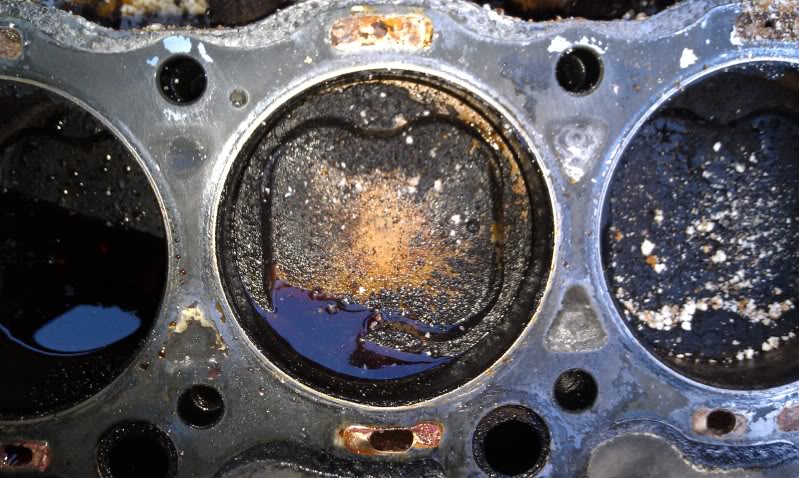
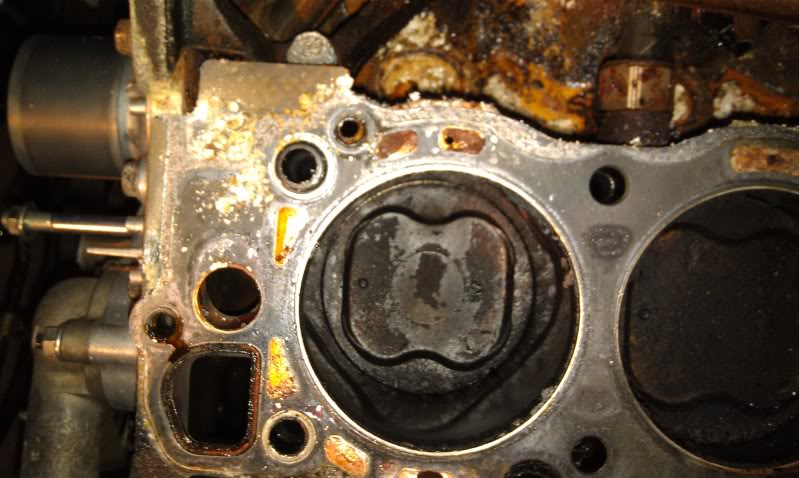
So, I'm pretty sure I found out why this guy was selling the motor, both heads are cracked in multiple places.
Passenger side head:
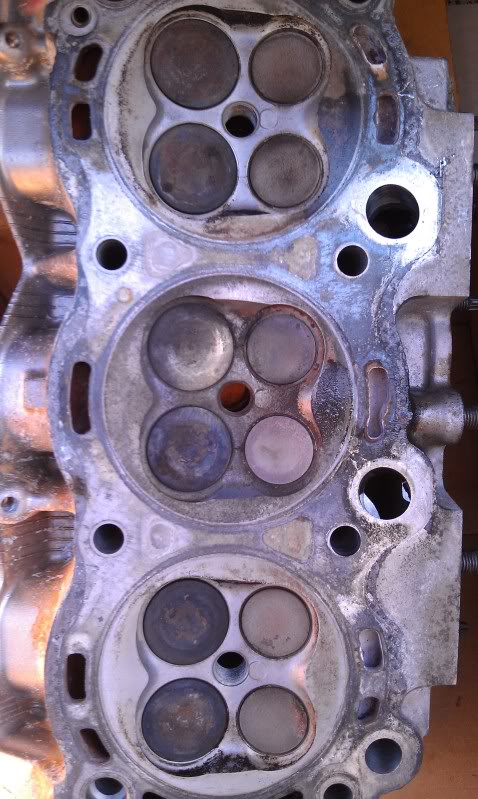
Driver side head:
#1 Cylinder (EDIT: one small hairline crack at the bottom left of the spark plug hole):
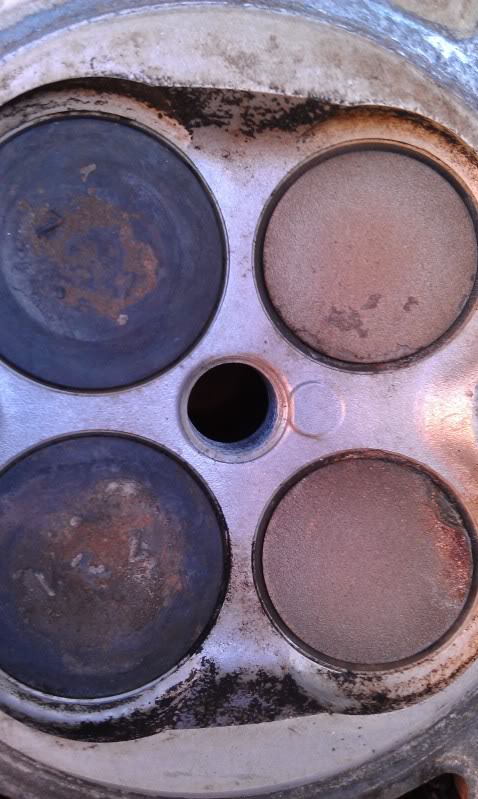
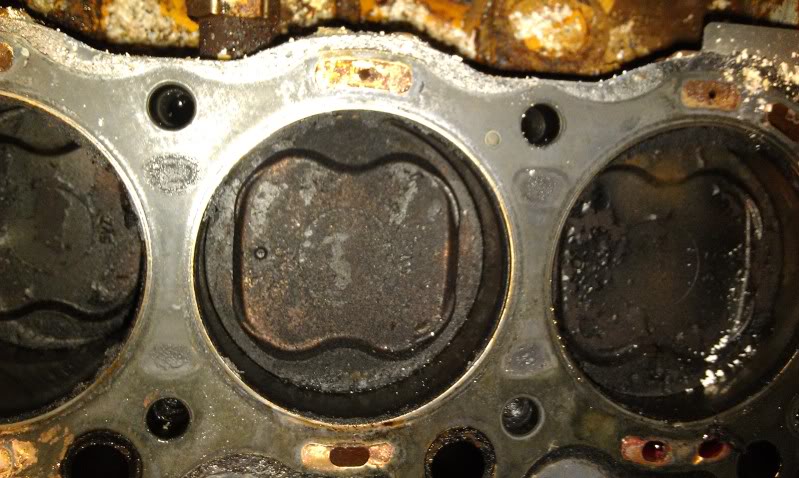
#3 Cylinder (2 cracks):
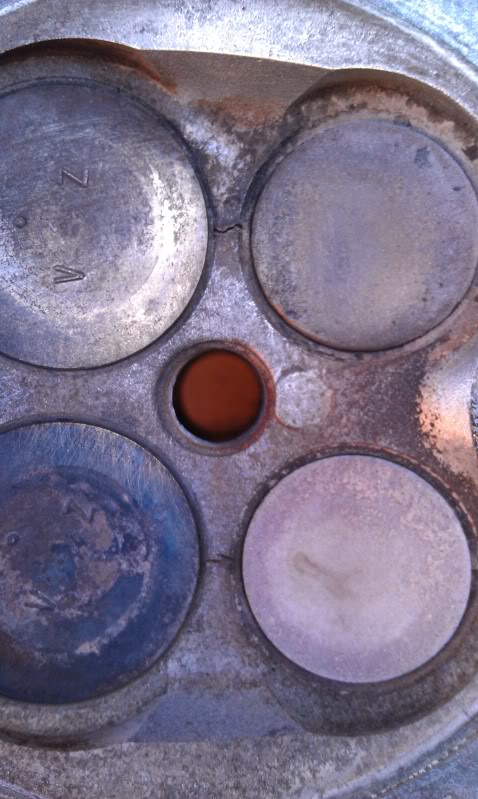
#5 Cylinder (1 crack):
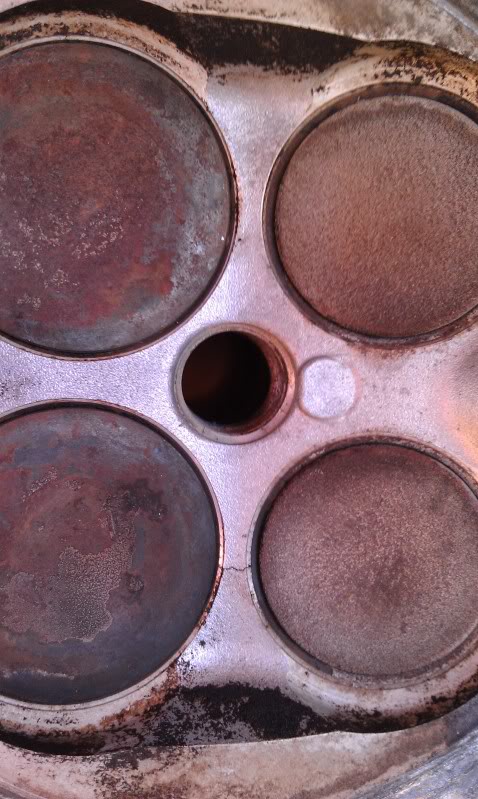
#2 Cylinder (no cracks):
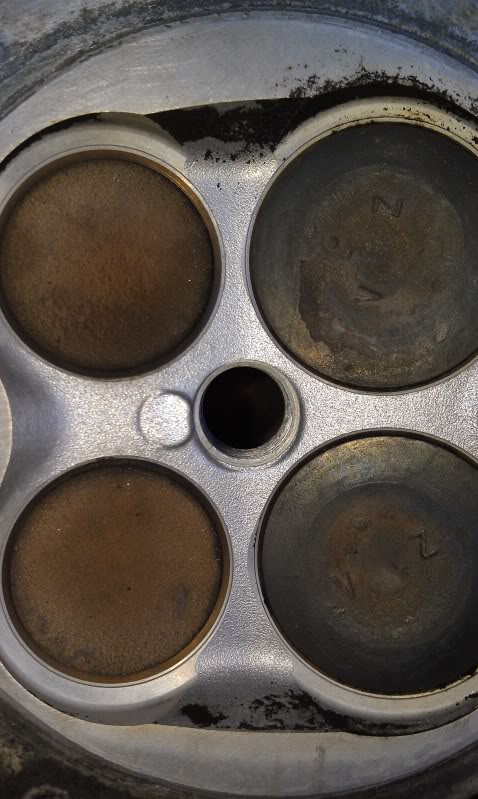
#4 Cylinder (3 cracks):

#6 Cylinder (no cracks):
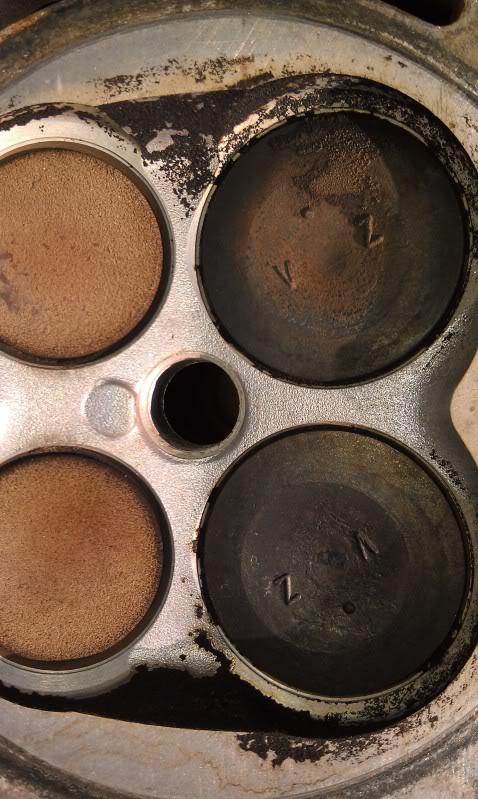
(sorry for all the vertical pictures)
And with just looking at how much nicer the driver side head (#2, 4, 6) cleaned up than the passenger side, I am convinced that head had been replaced at some point.
So now given everything I've found wrong with this particular engine, I'm begging to lose faith in it (i.e. I don't know if the crank, bearings, and various other internals are in similar shape) and strongly considering cutting my losses and start looking for a long block.
Needless to say, after all the time and money I've put into this engine, I can't believe it has turned out this way.
I'll get something figured out and get this swap wrapped up at some point.
Passenger side head:
Driver side head:
#1 Cylinder (EDIT: one small hairline crack at the bottom left of the spark plug hole):
#3 Cylinder (2 cracks):
#5 Cylinder (1 crack):
#2 Cylinder (no cracks):
#4 Cylinder (3 cracks):
#6 Cylinder (no cracks):
(sorry for all the vertical pictures)
And with just looking at how much nicer the driver side head (#2, 4, 6) cleaned up than the passenger side, I am convinced that head had been replaced at some point.
So now given everything I've found wrong with this particular engine, I'm begging to lose faith in it (i.e. I don't know if the crank, bearings, and various other internals are in similar shape) and strongly considering cutting my losses and start looking for a long block.
Needless to say, after all the time and money I've put into this engine, I can't believe it has turned out this way.
I'll get something figured out and get this swap wrapped up at some point.
Last edited by SacRunner; 07-13-2012 at 06:23 PM.
09-03-2012, 08:51 PM
#39
Registered User
Thread Starter
And now for a much over due update....
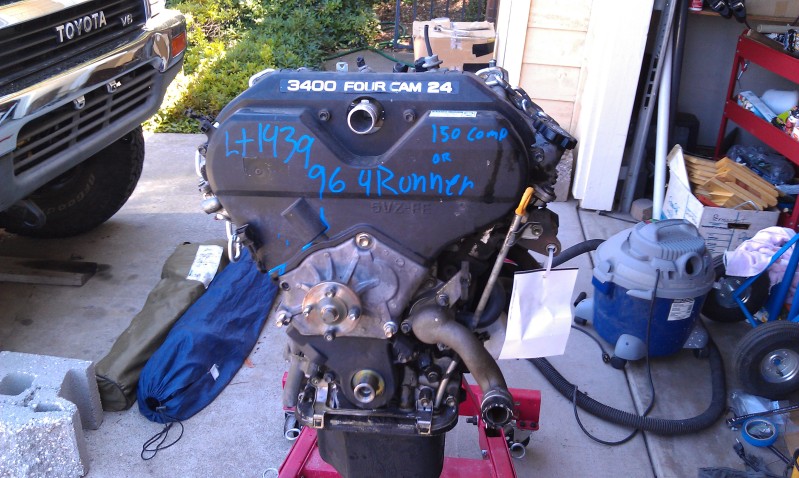
After finding out that BOTH heads were cracked even the driver side which looks like it had been replaced at some point and talking with various people (amongst others, the machinist and the mechanic's shop, owned by a good family friend, that we've been taking cars to for the past 15 years or so) I decided to "write off" that block; that is shove it into the corner of the garage/scrap pile with the 3.0L and go find another 3.4L.
The going rate for a 3.4L in the Sacramento area seems to be right at $1,200, whether it's some (other) guy parting out 2WD A/T Tacoma or the junk yards; and considering my luck with the private party, craigslist thing, I decided to go with a junk yard motor this time around. After ANOTHER $1,200 round 2 began (this time it was only the long block...I may have gotten screwed over, but whatever, I was after something that day and didn't feel like bickering too much over the price):
And just as an observation, its amazing the difference in the care taken to remove an engine between a junk yard and a private seller, no hoses were "removed" from the junk yard, they were ALL cut off.
Anyways, this block was in much better shape (far less corrosion than the original 3.4L) and considering I had already been through the exercise of painting the block and replacing the freeze plugs, I decided to omit that step and just degrease the block and call it good.
Over the course of a couple of free weekends, or as life would have it, a couple of free hours on a Saturday or Sunday, I was able to transfer all the "conversion" parts/modifications from the first/busted 3.4L to the new 3.4L. Then over the course of another [hungover] Sunday, my brother and I managed to swap all the clutch components to the new 3.4L, install it into the engine bay, and get the transmission bolted back up.
Now for one of the only picture I've taken in the last couple of weeks:
Last edited by SacRunner; 09-03-2012 at 09:43 PM.
09-03-2012, 09:33 PM
#40
Registered User
Thread Starter
Which brings us to this weekend (Labor Day weekend)...
I had picked up a 3 core radiator from Dave'z and was all excited about finding an all metal radiator (rather than the plastic and aluminum crap everyone seems to be carrying these days) until I went to test fit it (to see if there was any interference with the 1.5" 4Crawler radiator drop brackets). This radiator is about 2" shorter than the replacement 3.0L all metal radiator I had, which meant that the NAPA 7571 lower hose and 3.4L thermostat housing was not going to work; ok, I'll use the 3.0L thermostat housing and stock 3.0L lower radiator hose. That is until I pulled the radiator and laid the 3.0L fan shroud on top of the radiator, and realized that radiator isn't going to work; back to the 4+ year old 3.0L radiator.

So, moving on, I finish up putting the top end back together (at this point I can do this with my eyes closed), button up the front of the motor, all the drive accessories, belts, fan, hoses, and fill block/radiator with Toyota red coolant. Run down to the parts store and spend a good 30-45 minutes looking at the wall-o-batteries (and those in the back that didn't have a spot on the wall) before I found one that would fit the battery tray I had made (to arbitrary dimensions) based on the old battery I had, with some minor trimming of some superfluous plastic footings at the base.
After stalling for as long as possible, and as a nervous wreck (considering the wonderful out come the previous time around) it was time to turn the key. Well, the good news, it turns over, no coolant where it shouldn't be, but it didn't start. And after a day and a half, it still doesn't start.
Looking at the basics, all you need is air, fuel, and spark. With the hood off, I can step on the gas pedal and watch the throttle body open, so I assume, that I have air covered. My exhaust currently consists of the Toy Only Swaps crossover with part of the down pipe before the first O2 sensor and a piece of 2.5" flexible exhaust tubing routing the exhaust straight down. With the 3.4L COR plugged in, key turned to run I can hear the fuel pump run and there's no gas leaking anywhere; turn to start, I can smell gas and see some dripping down the exhaust. Fairly safe to say that I have gas, now lets check for spark. Pull a plug, have my brother hold it (grounded to the upper intake plenum) and sure enough, no spark.
Now, I know that I have a lot of reading to do, and a lot more debugging to do (but as a software engineer that does some hardware designs, this is the fun part for me), but so far I have +12V at all BATT and +B pins of the various components (ECU, MAF, Igniter, etc) and proper grounds where needed. I thought I had found the smoking gun when I ohm-ed out the 3 ignition coils (all primary coils read high: 1.2, 1.9, and 2.0 ohms while spec-ed for 0.67-1.05 ohms cold) but after swapping my 3 coils onto my brother's 97 4Runner and watching it start right up and run fine, I've decided to back-burner these "bad" parts (which will probably come back to bite me later, but that's a problem for future me).
I still want to try out my igniter and MAF on my brother's 4Runner to verify them as "good" and I do need to re-familiarize myself with the conversion harness to see if there's anything I could have done to break things. As a couple of other data points, with the key in the run position (before attempting to start) the check engine light never turns on, which I still need to manually ground (at the ECU connector) to verify the circuit outside the ECU is working correctly, and the OBD-II port is detected by my brother's hand-held OBD-II reader, but errors out while trying to read (I haven't tried to use my laptop reader or hook up an oscilloscope to see what's really going on).
Long story short, I think the junk yard M/T ECU may be bad; do these go bad very often? Does anyone know of a definitive way to test for a bad ECU or is it just a matter of process of elimination?
I know that's a lot of text, but thanks for reading, and any advice anyone has to offer is greatly appreciated (and I know I won't be able to work on the truck for the next 2 weekends) but I will get this figured out, its just a matter of how much time I need to spend working through everything.
I had picked up a 3 core radiator from Dave'z and was all excited about finding an all metal radiator (rather than the plastic and aluminum crap everyone seems to be carrying these days) until I went to test fit it (to see if there was any interference with the 1.5" 4Crawler radiator drop brackets). This radiator is about 2" shorter than the replacement 3.0L all metal radiator I had, which meant that the NAPA 7571 lower hose and 3.4L thermostat housing was not going to work; ok, I'll use the 3.0L thermostat housing and stock 3.0L lower radiator hose. That is until I pulled the radiator and laid the 3.0L fan shroud on top of the radiator, and realized that radiator isn't going to work; back to the 4+ year old 3.0L radiator.
So, moving on, I finish up putting the top end back together (at this point I can do this with my eyes closed), button up the front of the motor, all the drive accessories, belts, fan, hoses, and fill block/radiator with Toyota red coolant. Run down to the parts store and spend a good 30-45 minutes looking at the wall-o-batteries (and those in the back that didn't have a spot on the wall) before I found one that would fit the battery tray I had made (to arbitrary dimensions) based on the old battery I had, with some minor trimming of some superfluous plastic footings at the base.
After stalling for as long as possible, and as a nervous wreck (considering the wonderful out come the previous time around) it was time to turn the key. Well, the good news, it turns over, no coolant where it shouldn't be, but it didn't start. And after a day and a half, it still doesn't start.
Looking at the basics, all you need is air, fuel, and spark. With the hood off, I can step on the gas pedal and watch the throttle body open, so I assume, that I have air covered. My exhaust currently consists of the Toy Only Swaps crossover with part of the down pipe before the first O2 sensor and a piece of 2.5" flexible exhaust tubing routing the exhaust straight down. With the 3.4L COR plugged in, key turned to run I can hear the fuel pump run and there's no gas leaking anywhere; turn to start, I can smell gas and see some dripping down the exhaust. Fairly safe to say that I have gas, now lets check for spark. Pull a plug, have my brother hold it (grounded to the upper intake plenum) and sure enough, no spark.
Now, I know that I have a lot of reading to do, and a lot more debugging to do (but as a software engineer that does some hardware designs, this is the fun part for me), but so far I have +12V at all BATT and +B pins of the various components (ECU, MAF, Igniter, etc) and proper grounds where needed. I thought I had found the smoking gun when I ohm-ed out the 3 ignition coils (all primary coils read high: 1.2, 1.9, and 2.0 ohms while spec-ed for 0.67-1.05 ohms cold) but after swapping my 3 coils onto my brother's 97 4Runner and watching it start right up and run fine, I've decided to back-burner these "bad" parts (which will probably come back to bite me later, but that's a problem for future me).
I still want to try out my igniter and MAF on my brother's 4Runner to verify them as "good" and I do need to re-familiarize myself with the conversion harness to see if there's anything I could have done to break things. As a couple of other data points, with the key in the run position (before attempting to start) the check engine light never turns on, which I still need to manually ground (at the ECU connector) to verify the circuit outside the ECU is working correctly, and the OBD-II port is detected by my brother's hand-held OBD-II reader, but errors out while trying to read (I haven't tried to use my laptop reader or hook up an oscilloscope to see what's really going on).
Long story short, I think the junk yard M/T ECU may be bad; do these go bad very often? Does anyone know of a definitive way to test for a bad ECU or is it just a matter of process of elimination?
I know that's a lot of text, but thanks for reading, and any advice anyone has to offer is greatly appreciated (and I know I won't be able to work on the truck for the next 2 weekends) but I will get this figured out, its just a matter of how much time I need to spend working through everything.
Last edited by SacRunner; 09-03-2012 at 09:41 PM.


