
Write-up for repairing a broken temp. lever pivot
 04-16-2010, 06:54 PM
#1
Registered User
Thread Starter

Join Date: Mar 2010
Location: SE Kansas
Posts: 485
Likes: 0
Received 0 Likes
on
0 Posts
Write-up for repairing a broken temp. lever pivot
I finally found a great solution for repairing the broken pivot point on my temperature control lever. It has been broken ever since I bought the truck, and I finally came up with a solution to repair it without replacing the entire climate control module.
Before I begin, I would like to add that the tabs that hold the fan speed selector switch were all broken off. Some Loctite 2-part epoxy smeared all over the top side of the switch and held in place until it set up has attached the switch very securely in place. If you have to do this, make sure you clean both plastic surfaces before applying the epoxy. If I ever have to replace the switch, I will likely have to break down and buy a whole new module.
Now, on with the pivot fix:From what I have gathered, the factory pivot point for the temp. lever is a pretty weak design. It looks like a thin piece of plastic was the only thing holding it in place, besides the two tabs that hold the bottom side in. If the piece on top breaks, the lever can slide in and out, and didn't hold it's position when the fan was on high. My solution for this was to add a plate on the bottom side to act as a new pivot 'pin'. It actually worked great, and it didn't cost me a dime since our shop is full of spare hardware and junk.
The following pictures and text will describe how to make a plate of your own.I used aluminum plate about 1 mm thick. It was originally made as a cover for a small project box (from radio shack). There are two holes in the bottom of the climate module, on both sides of the pivot point. These holes are where the screws attach the plate in place.
Either punch a 'tab' into the middle of the plate (the hard way) or use a nut/bolt combo as a pin (probably the easy way). As you can see, I took the hard way, because I'm complicated.
On your plate, measure and mark out your reference points. Scribe a center line (long ways), the center point (perpendicular to long way), the screw holes, and overall dimensions.
Dimensions: Plate: 84 mm X 30 mm (or something close)
Pivot Point: Dead center
Screw Holes: 32 mm from center (both sides, or 64 mm apart)
You will need to find screws similar in size and thread type as shown in picture. Make sure they will fit in the holes without splitting the housing. I threaded them in all the way first without the plate to help cut the threads.You will also need a spacer of sorts to space the plate approximately 4.5 mm. I used a small lock washer and a nut, but whatever you have on hand will work.
To make an easy pivot pin (easier than how I did it), find a nut that will fit in the pivot hole on the lever with the least amount of slop. You don't want it to be tight or too loose. Find a short bolt with the same thread pitch as the nut, and a lock washer for good measure. You will want to drill the center hole on the plate to allow the threads of the bolt to slide through. Put the lock washer on the bolt and insert through the plate, then tighten the nut against the backside of the plate.
Then drill the screw holes on the plate to fit your screws. If you haven't already cut the overall dimension, cut the plate to size. I used tin snips to cut the aluminum plate relatively easily. For a little added safety, cut the corners to reduce the sharp edges. (Unless you file all of the edges and holes, there can still be sharp metal, so be careful.)
Holding the screws in the plate, add your spacers on the back side of the plate. Install the plate, ensuring the pivot pin is located inside the pivot hole before tightening the screws all the way. Check action of the temperature lever. It shouldn't slide in and out any more, and should hold it's position once again.
This picture shows the bottom of the control module.

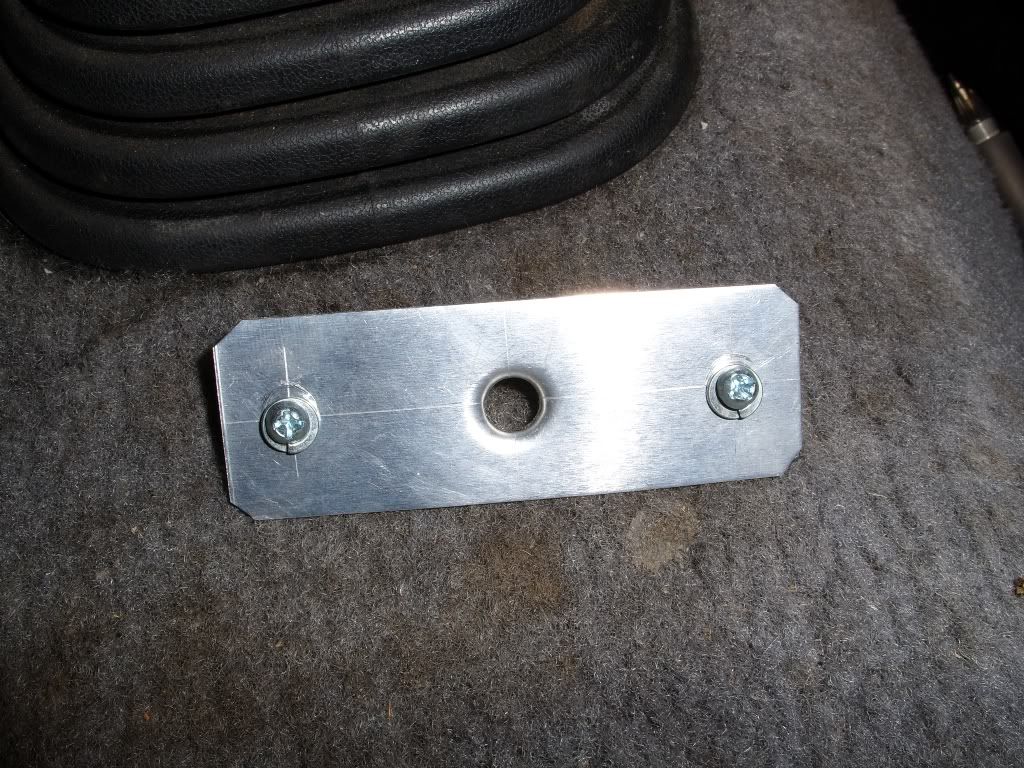
This picture shows the front side of the plate.
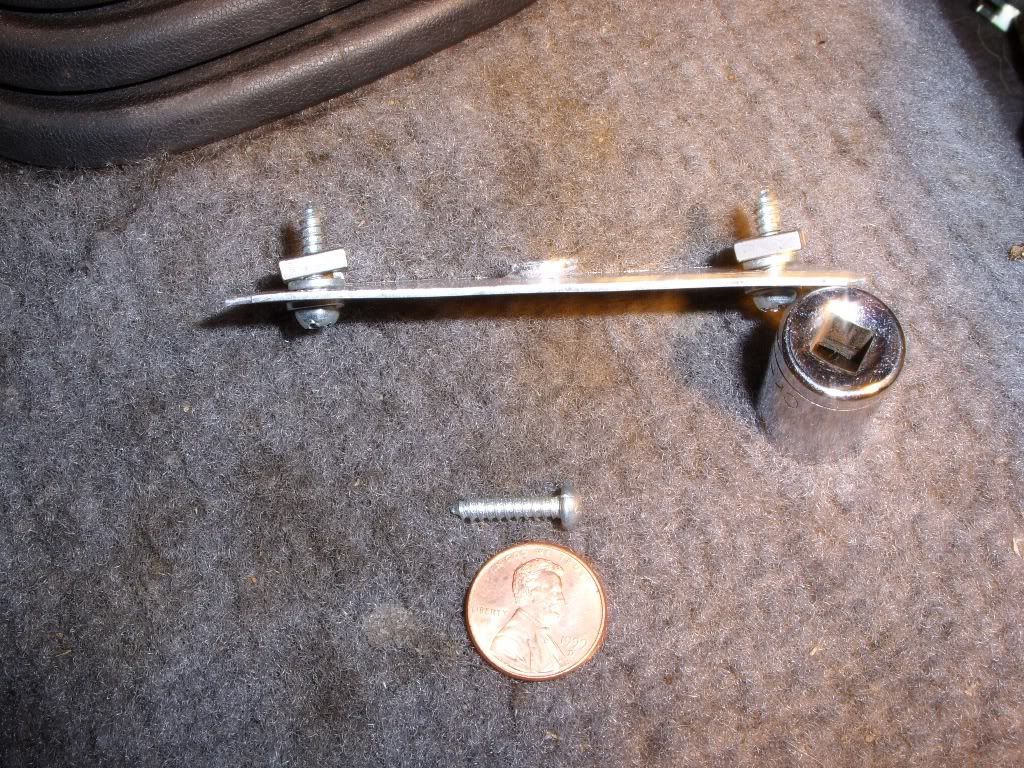
This pictures shows the profile of the plate. Note the lip in the center, this is what I used for my pivot. I don't recommend doing it this way, as it was a pain, and isn't as strong or secure as a nut and bolt. Also note the spacers. The screw that is sitting next to the penny is an extra, and is meant to show size and type of screw used.
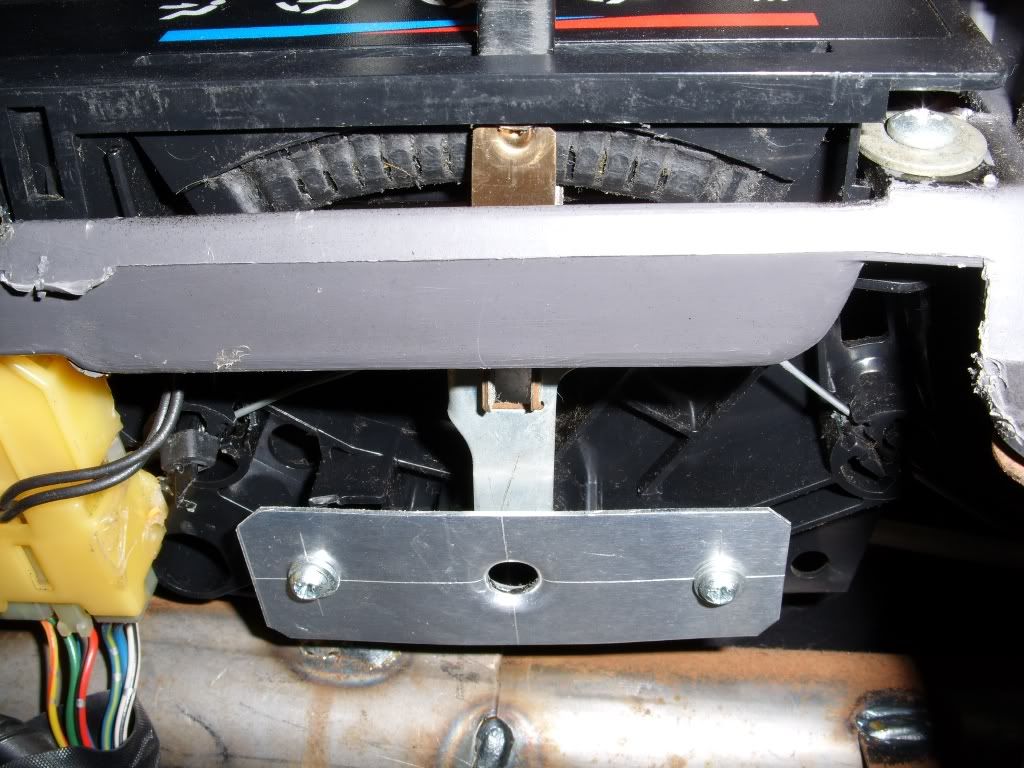
Finally, this picture shows everything installed. It's a little crooked, because I took this picture before I broke off the tab. It fits flat like it's supposed to now.
Hope this helps somebody out there!
Before I begin, I would like to add that the tabs that hold the fan speed selector switch were all broken off. Some Loctite 2-part epoxy smeared all over the top side of the switch and held in place until it set up has attached the switch very securely in place. If you have to do this, make sure you clean both plastic surfaces before applying the epoxy. If I ever have to replace the switch, I will likely have to break down and buy a whole new module.
Now, on with the pivot fix:From what I have gathered, the factory pivot point for the temp. lever is a pretty weak design. It looks like a thin piece of plastic was the only thing holding it in place, besides the two tabs that hold the bottom side in. If the piece on top breaks, the lever can slide in and out, and didn't hold it's position when the fan was on high. My solution for this was to add a plate on the bottom side to act as a new pivot 'pin'. It actually worked great, and it didn't cost me a dime since our shop is full of spare hardware and junk.
The following pictures and text will describe how to make a plate of your own.I used aluminum plate about 1 mm thick. It was originally made as a cover for a small project box (from radio shack). There are two holes in the bottom of the climate module, on both sides of the pivot point. These holes are where the screws attach the plate in place.
Either punch a 'tab' into the middle of the plate (the hard way) or use a nut/bolt combo as a pin (probably the easy way). As you can see, I took the hard way, because I'm complicated.
On your plate, measure and mark out your reference points. Scribe a center line (long ways), the center point (perpendicular to long way), the screw holes, and overall dimensions.
Dimensions: Plate: 84 mm X 30 mm (or something close)
Pivot Point: Dead center
Screw Holes: 32 mm from center (both sides, or 64 mm apart)
You will need to find screws similar in size and thread type as shown in picture. Make sure they will fit in the holes without splitting the housing. I threaded them in all the way first without the plate to help cut the threads.You will also need a spacer of sorts to space the plate approximately 4.5 mm. I used a small lock washer and a nut, but whatever you have on hand will work.
To make an easy pivot pin (easier than how I did it), find a nut that will fit in the pivot hole on the lever with the least amount of slop. You don't want it to be tight or too loose. Find a short bolt with the same thread pitch as the nut, and a lock washer for good measure. You will want to drill the center hole on the plate to allow the threads of the bolt to slide through. Put the lock washer on the bolt and insert through the plate, then tighten the nut against the backside of the plate.
Then drill the screw holes on the plate to fit your screws. If you haven't already cut the overall dimension, cut the plate to size. I used tin snips to cut the aluminum plate relatively easily. For a little added safety, cut the corners to reduce the sharp edges. (Unless you file all of the edges and holes, there can still be sharp metal, so be careful.)
Holding the screws in the plate, add your spacers on the back side of the plate. Install the plate, ensuring the pivot pin is located inside the pivot hole before tightening the screws all the way. Check action of the temperature lever. It shouldn't slide in and out any more, and should hold it's position once again.
This picture shows the bottom of the control module.
This picture shows the front side of the plate.
This pictures shows the profile of the plate. Note the lip in the center, this is what I used for my pivot. I don't recommend doing it this way, as it was a pain, and isn't as strong or secure as a nut and bolt. Also note the spacers. The screw that is sitting next to the penny is an extra, and is meant to show size and type of screw used.
Finally, this picture shows everything installed. It's a little crooked, because I took this picture before I broke off the tab. It fits flat like it's supposed to now.
Hope this helps somebody out there!


Thread
Thread Starter
Forum
Replies
Last Post
punks_is_4x4
86-95 Trucks & 4Runners
1
02-26-2016 04:29 PM
hiluxinargentina
86-95 Trucks & 4Runners
3
09-30-2015 05:51 PM


