Timing woes
 01-13-2010, 12:40 AM
#1
Registered User
Thread Starter
Join Date: Jul 2009
Location: HI
Posts: 97
Likes: 0
Received 0 Likes
on
0 Posts
Timing woes
Hey YT'ers,
I've been stuck on my timing belt/water pump job for the last 2 weeks and am hoping somebody can help me figure out what's wrong.
What I've got so far:
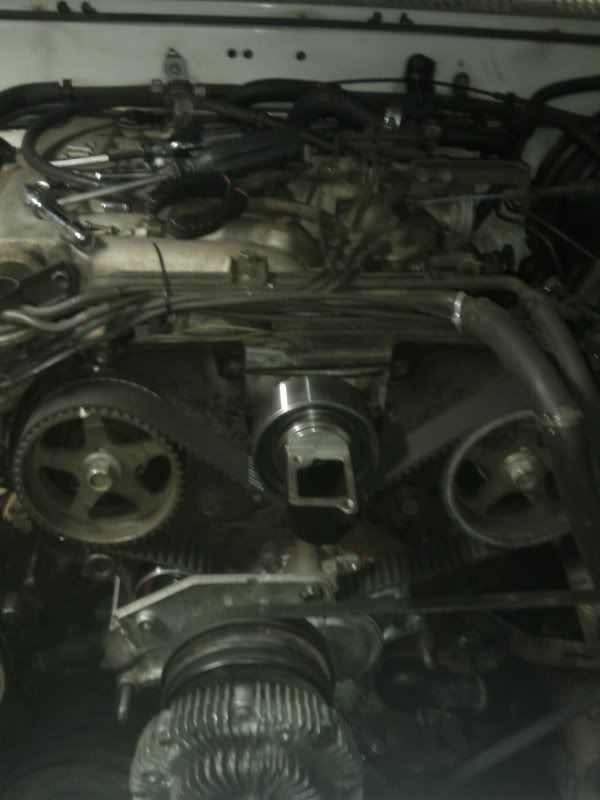
-Timing belt is on with no slack
-Crankshaft and both Camshaft marks line up and stay correct after turning the engine over by hand
-Spark plugs are new and all wires are routed to the correct plug
-Rotor's pointing at #1
The truck cranks and almost starts, but never starts. I'm thinking that the timing could be off 180 degrees, so I'm actually on the exhaust stroke instead of the compression stroke. Is this possible even if the rotor's pointing at #1? And how can I check for this? Tomorrow I'm gonna try removing the #1 spark plug and capping the spark plug hole with my finger while the engine's being cranked by hand to feel for compression.
If this is the problem, how do I correct it? Thanks in advance guys
I've been stuck on my timing belt/water pump job for the last 2 weeks and am hoping somebody can help me figure out what's wrong.
What I've got so far:
-Timing belt is on with no slack
-Crankshaft and both Camshaft marks line up and stay correct after turning the engine over by hand
-Spark plugs are new and all wires are routed to the correct plug
-Rotor's pointing at #1
The truck cranks and almost starts, but never starts. I'm thinking that the timing could be off 180 degrees, so I'm actually on the exhaust stroke instead of the compression stroke. Is this possible even if the rotor's pointing at #1? And how can I check for this? Tomorrow I'm gonna try removing the #1 spark plug and capping the spark plug hole with my finger while the engine's being cranked by hand to feel for compression.
If this is the problem, how do I correct it? Thanks in advance guys
 01-13-2010, 04:11 AM
#3
Registered User
3.0?? you have to set #1 cylinder to Top Dead Center...With the belt off turn crank and check #1 when ur marks on crank line up, you should be able to see and feel the top of piston on #1 (i usually use a pen and flashlight) at top of compression stoke, then adjust ur cams, then put on belt makin sure to keep ur marks in line, then adjust rotor, then drive and buy a repair manual
Last edited by WatsonToyota; 01-13-2010 at 04:30 AM.
01-14-2010, 11:15 PM
#4
Registered User
Thread Starter
Join Date: Jul 2009
Location: HI
Posts: 97
Likes: 0
Received 0 Likes
on
0 Posts
Yes its the 3vze, and I've got a Hanes manual as well as the factory service manual which is what I've used thus far. The #1 piston is at top dead center and all marks line up(crank + both cams), but if I'm not mistaken the piston can also be at top dead center with the exhaust valve open? Making it 180 degrees off
01-15-2010, 03:16 AM
#5
Registered User
i had the same problem doing the timing belt on my 88, had to tear it all apart and do it over...if i'm not mistaken the cams turn 2x as the crank turns once, so if ur 180 off, adjust cams accordingly, turn cams one revolution on the marks independently of the crank and try...what prompted the timing belt change??? how about some more history on the truck??
01-15-2010, 05:17 AM
#6
Registered User

Join Date: Nov 2007
Posts: 8
Likes: 0
Received 0 Likes
on
0 Posts
It is possible to have the timing out of phase by 180 degrees. The first thing you need to do is make sure that the you are at TDC on the compression stroke on the #1 cylinder. To do that, turn the crankshaft over until the #1 INTAKE valve begins to close. Continue rotating the crank until the piston approaches TDC (a piston stop would be useful if you have one). At this point, you should be close enough to check the distributor...if the rotor is pointing at the #1 contact, then you are in phase. If not, then your off 180 degrees and you'll need to reset the cam. It happens a lot!
01-15-2010, 06:34 AM
#7
Registered User

Join Date: Feb 2008
Location: West Virginia
Posts: 50
Likes: 0
Received 0 Likes
on
0 Posts
take off your valve covers i know its a pita on the 3vze and make sure you are on the intake stroke of the valves when you set them thats how i set mine and for the piston just stick a pen in the spark plug hole to make sure you are on the up stroke.
Trending Topics
01-15-2010, 07:05 AM
#8
Registered User
Join Date: Nov 2007
Posts: 8
Likes: 0
Received 0 Likes
on
0 Posts
It's just the opposite...on a 4-stroke engine, the CRANKSHAFT will turn two revolutions for one revolution of the camshaft. Setting proper timing requires that you line up the dots on the compression stroke.
Last edited by NOBR8KSS; 01-15-2010 at 07:08 AM.
01-15-2010, 09:31 AM
#9
Registered User
Thread Starter
Join Date: Jul 2009
Location: HI
Posts: 97
Likes: 0
Received 0 Likes
on
0 Posts
NOBR8KSS, how do I tell when the intake valve begins to close vs. the exhaust valve?
I hope I don't need to take the valve cover off Dan_P, but if I have to then so be it!!
And thanks guys this is very helpful.
01-15-2010, 11:48 AM
#10
Registered User
Join Date: Nov 2007
Posts: 8
Likes: 0
Received 0 Likes
on
0 Posts
The only way to be sure is to remove the valve cover. The intake valve will line up with the intake manifold ports...the exhaust valve with the exhaust manifold ports.
Keep in mind that you may have the same issue for one or both cams...requiring you to check the #1 and #2 pistons for cam phasing. If it were me, I would check them both before reassembling again.
Some folks might recommend capping the spark plug hole with your finger and checking for the compression stroke that way, but it won't work if the cam is out of phase.
JC
Last edited by NOBR8KSS; 01-15-2010 at 11:54 AM.
01-15-2010, 01:04 PM
#11
Registered User
Thread Starter
Join Date: Jul 2009
Location: HI
Posts: 97
Likes: 0
Received 0 Likes
on
0 Posts
Ok I'll probably be doing that tonight.. and just wondering, but why won't the finger check work if the cam is out of phase? Thanks JC and everyone else
Last edited by k808soljah; 01-15-2010 at 01:07 PM.
01-15-2010, 02:34 PM
#12
Registered User
Join Date: Dec 2009
Location: Austin, TX
Posts: 268
Likes: 0
Received 0 Likes
on
0 Posts
Just pull the spark plug and hold your finger over the hole while you turn the crankshaft. When it pushes air out, you're on the compression stroke; after that, just turn the crank a little more until the pulley marks line up. Don't pull the valve cover, too much trouble!
No idea what 'cam out of phase' means, but this method should work if you've got good compression.
No idea what 'cam out of phase' means, but this method should work if you've got good compression.
01-16-2010, 01:03 AM
#13
Registered User
Thread Starter
Join Date: Jul 2009
Location: HI
Posts: 97
Likes: 0
Received 0 Likes
on
0 Posts
I did the finger test and got everything lined up and the belt on good, etc. I tried starting it and everything sounds good but it just doesn't go all the way. I'm thinking it might be the distributor because we were retarding it a couple days ago to see if it'd help. So now I'm off to research how to fix the distributor.... hope this is it
01-16-2010, 01:52 AM
#14
Registered User
Thread Starter
Join Date: Jul 2009
Location: HI
Posts: 97
Likes: 0
Received 0 Likes
on
0 Posts
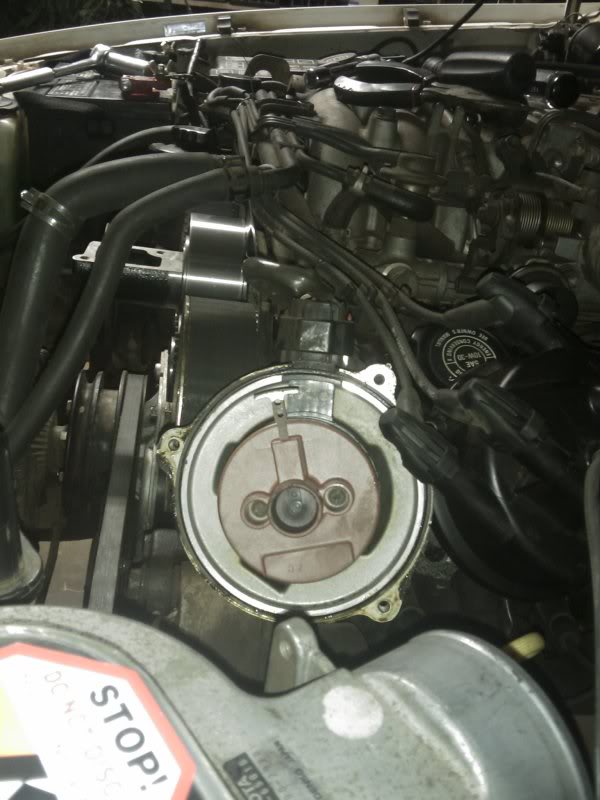
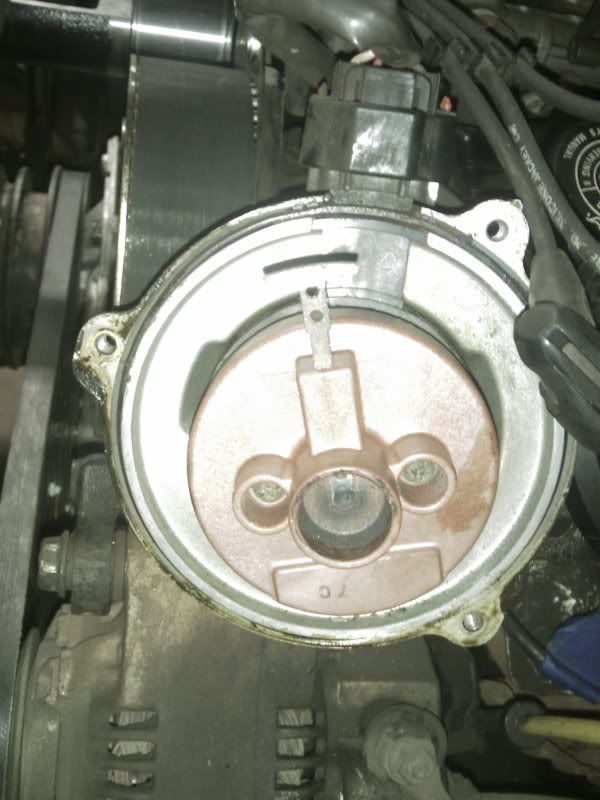
Set crank at TDC and removed the distributor cap. The rotor isn't pointing straight up, it's about 15 degrees to the left. My guess is that this is why it won't start.
So my next question is how do I turn the rotor? Remove it and re-install, or is there another method to turning it back so it points directly at #1
So my next question is how do I turn the rotor? Remove it and re-install, or is there another method to turning it back so it points directly at #1
Last edited by k808soljah; 01-16-2010 at 05:35 AM.
 01-16-2010, 07:59 AM
#16
Registered User
Join Date: Dec 2009
Location: Austin, TX
Posts: 268
Likes: 0
Received 0 Likes
on
0 Posts
Remove and reinstall. The driven gear is in the wrong position. Should look like this:
https://www.yotatech.com/attachments...tdc-small-.jpg
https://www.yotatech.com/attachments...tdc-small-.jpg
01-16-2010, 08:21 AM
#17
Registered User
Join Date: Jul 2008
Location: GA
Posts: 1,062
Likes: 0
Received 0 Likes
on
0 Posts
this is a pic of my dizzy rotor tip pointing to the #1 on the dizzy cap(if you look close inside the dizzy you can see a stamped #1 in the casing, at least mine has that) on TDC on compression stroke cams timed and 0* on the #1 timing belt cover

Last edited by buckz6319; 01-16-2010 at 08:46 AM.
01-16-2010, 11:44 AM
#18
Registered User
Thread Starter
Join Date: Jul 2009
Location: HI
Posts: 97
Likes: 0
Received 0 Likes
on
0 Posts
Thanks betelnut and buckz6319. I'll check to see if I have that stamped #1 but I don't remember seeing anything like that. Though it looks like my rotor's actually in time according to buckz6319's pic. If that's the case, anyone have any other ideas why it wont run?
01-16-2010, 12:05 PM
#19
Registered User

Join Date: Dec 2009
Posts: 20
Likes: 0
Received 0 Likes
on
0 Posts
timing
Hi,
If you get to the point where you think the timing is ok and it still wont start and you've been trying to start it a bunch, it might be a good idea to remove and clean the spark plugs. Also, check your wires and plugs to make sure they're ok. I had a similar problem recently and it turned out that one of the plugs was literally broken.
Maybe its the photo but the top photo looks to me like the white dot is off to the left a bit but it could just be the camera angle.
Did you line up the white dots on the top and put the bottom line at zero degrees? I believe it should be at zero and not 10.
I'm going to pm my phone number. You're welcome to call me . I went through a similar scenario recently and might be able to help.
I would check for loose connections, see if you have spark at coil & #1 etc...
GOOD LUCK
01-16-2010, 12:20 PM
#20
Registered User
Thread Starter
Join Date: Jul 2009
Location: HI
Posts: 97
Likes: 0
Received 0 Likes
on
0 Posts
I replaced all the plugs but I'll re-check all of the wires and connections, that could very well be it at this point. And if I've still got problems later today I'll definitely give you call, thanks qcabra!


