Timing Belt and Valve Cover Replacement Project
 03-18-2014, 11:08 AM
#1
Registered User
Thread Starter
Join Date: Apr 2013
Location: Pennsylvania, East
Posts: 101
Likes: 0
Received 0 Likes
on
0 Posts
Timing Belt and Valve Cover Replacement Project
This is just going to be my workshop thread on my project. I got my truck at an auction and although it appears to be in excellent condition, I have no idea when any kind of work was done to it. I peeled off the timing belt cover a bit last night and saw some scraggly looking "ITM" brand timing belt and became even more motivated to do this. I am planning on taking a long drive so I need everything in tip top shape.
I will be using my impact wrench and basic tools and then will figure out the pulley when I get to it.
I am going to do both valve cover gaskets which are leaking slightly. The PCV valve. Plenum and throttle body gasket. Crankshaft and camshaft seals. Water pump and all the rest of the timing belt stuff. If I can find a cheap OEM radiator I will do that too. Every part I will be using is OEM. Below are the OEM parts for the timing belt portion of the job, with numbers so you can find them easily if anyone else wants to do this.
1 Timing Belt Toyota 13568-69075 1 Idler Roller/Pulley NSK OE 13505-65040 1 Tensioner Roller KOYO OE 13503-65010 1 Tensioner Spring Toyota 90507-21001 1 Front Crankshaft Seal Toyota 90311-40022 2 Front Camshaft Seals Toyota 90311-42027 1 Water Pump Aisin OE 16100-69345 1 Water Pump Gasket Aisin Included 1 Hydraulic Tensioner Toyota 13540-65010 1 Thermostat (82�c) Toyota 90916-03079 1 Thermostat Gasket Aisin 16341-35010 1 Air Conditioning Belt Toyota 99332-10890-78 1 Alternator Belt Toyota 90916-02378-83 1 Power Steering Belt Toyota 90916-02196-83
I have a few questions for someone in the know. For the water pump specifically, I have read that they used to use FIPG sealant but then because of issues Toyota just started using straight gaskets. I have also read people using gaskets for the valve covers without sealant, just sealant and no gasket, or sealant with gasket. So what is the best way to do the valve covers and the water pump. Gasket or sealant or both?
Great writeup I will be using with the FSM: https://www.yotatech.com/forums/f116...s-pics-183911/
Last edited by Just_ Rollin'; 03-18-2014 at 12:07 PM.
 03-18-2014, 11:52 AM
#2
Registered User

Join Date: Sep 2007
Location: San Francisco East Bay
Posts: 8,252
Likes: 0
Received 820 Likes
on
648 Posts
On the valve cover gasket, the answer is "both." Follow the manual; you will be glad you did.
There are lots of ways to remove the crank pulley, but before you try something like using the starter: think. You still have to put that bolt back in. You'll need a tool to hold the crank while you tighten that bolt to 181 ftlbs. An impact wrench won't help; if it's big enough to reach 181 ftlbs, it's big enough to keep on going and shear the bolt. You need a torque wrench.
There are lots of good designs on this site; mine set me back all of $0.00.
03-18-2014, 12:00 PM
#3
Registered User
Thread Starter
Join Date: Apr 2013
Location: Pennsylvania, East
Posts: 101
Likes: 0
Received 0 Likes
on
0 Posts
On the valve cover gasket, the answer is "both." Follow the manual; you will be glad you did.
There are lots of ways to remove the crank pulley, but before you try something like using the starter: think. You still have to put that bolt back in. You'll need a tool to hold the crank while you tighten that bolt to 181 ftlbs. An impact wrench won't help; if it's big enough to reach 181 ftlbs, it's big enough to keep on going and shear the bolt. You need a torque wrench.
There are lots of good designs on this site; mine set me back all of $0.00.
There are lots of ways to remove the crank pulley, but before you try something like using the starter: think. You still have to put that bolt back in. You'll need a tool to hold the crank while you tighten that bolt to 181 ftlbs. An impact wrench won't help; if it's big enough to reach 181 ftlbs, it's big enough to keep on going and shear the bolt. You need a torque wrench.
There are lots of good designs on this site; mine set me back all of $0.00.
What is your opinion on the water pump though....
Also, the pulley puller thing is the one thing I am confused on. Is there a link for a good DIY on making a tool, would harbor freight's tool suffice?
What is the issue with using the impact to get the camshaft and crankshaft bolts off? I can see it being an issue with putting them back on when the seals are finished but is there harm in using it to get them off? I have the FSM and a torque wrench rated to 250lbs.
I am reading now on other posts and it seems I am a bit hazy on the puller vs the sst tool which I think is for keeping the pulley/gear from rotating?
Tool links for later reference:
https://www.yotatech.com/51094700-post10.html
https://www.yotatech.com/forums/f116...e-tool-191312/
https://www.yotatech.com/forums/f116...lt-job-122420/
https://www.yotatech.com/forums/f116...l-tool-186081/
https://www.yotatech.com/forums/f116...h-3vze-137934/
https://www.yotatech.com/forums/f116...ol-sst-161133/
Last edited by Just_ Rollin'; 03-18-2014 at 04:41 PM.
03-18-2014, 01:12 PM
#4
Registered User
Join Date: Sep 2007
Location: San Francisco East Bay
Posts: 8,252
Likes: 0
Received 820 Likes
on
648 Posts
You know, I can't remember if I used a gasket on the water pump. In the back of my mind I seem to recall that the replacement had a milled groove, which means to use sealant only.
You SHOULD NOT need to use a puller on the crankshaft sprocket. But it has a woodruff key, which is slightly half-moon shaped. So, if the key starts to come out with the sprocket, it will rotate in the shaft notch, and jam the sprocket. You can a) gently tap the key back in ever-so-slightly, and the sprocket will slide right off, or b) wail on it with a giant puller, destroying the sprocket and the crankshaft. Your choice.
My first HF impact wrench was also rated to 250 ftlbs, but it really petered out (with my air setup) at 75-90 ftlbs. Other than that, yours will probably work.
You don't need to do anything to the cam pulleys to replace the timing belt, but you will to replace the seals. I personally don't like the idea of using the "usual" tool to hold the cam pulleys from turning, because the entire load resisting the torque is carried through the tiny "knock pin" and the relatively light-weight sprockets (on mine, both knock pins were bent when I took them out, which I think is due to someone using an impact wrench in the past). Instead, there is a wrench flat in the middle of the camshaft. 27mm, which is not a common size, but 1 1/16" works perfectly. I don't think an adjustable wrench will work as there is not much room in the head, and you don't want ANY force on the aluminum casting.
You'll need to replace the gasket around the PCV valve. It will probably have the consistency of concrete.
Lots of smart people on this site swear by Toyota FIPG, but for me it sets up too damn fast. Great if you're charging by the hour, not so good if you're a duffer. I use blue RTV in contact with oil, and the grey RTV for the water connections. It takes overnight to set completely, so you'll have enough time to get everything in place. You just won't be able to test run it until the next morning.
03-18-2014, 01:51 PM
#5
Registered User
Join Date: Mar 2009
Location: Georgia
Posts: 390
Likes: 0
Received 0 Likes
on
0 Posts
i use an impact for crank and cam bolt, to remove and install. it might not be recommended, but im a hillbilly and seems to work just fine for me. the crank pulley should wiggle off using your hands, but if not some gentle assistance from a couple long screw drivers should get it. follow the manual as to where to put rtv for the valve covers and you'll be fine, i use parts store grey. on the water pump, i just use gaskets, never combine rtv and a gasket there.
03-18-2014, 04:54 PM
#7
Registered User
Join Date: Apr 2007
Location: Yuba City, CA
Posts: 568
Likes: 0
Received 0 Likes
on
0 Posts
This is just going to be my workshop thread on my project. I got my truck at an auction and although it appears to be in excellent condition, I have no idea when any kind of work was done to it. I peeled off the timing belt cover a bit last night and saw some scraggly looking "ITM" brand timing belt and became even more motivated to do this. I am planning on taking a long drive so I need everything in tip top shape.
I will be using my impact wrench and basic tools and then will figure out the pulley when I get to it.
I am going to do both valve cover gaskets which are leaking slightly. The PCV valve. Plenum and throttle body gasket. Crankshaft and camshaft seals. Water pump and all the rest of the timing belt stuff. If I can find a cheap OEM radiator I will do that too. Every part I will be using is OEM. Below are the OEM parts for the timing belt portion of the job, with numbers so you can find them easily if anyone else wants to do this.
1 Timing Belt Toyota 13568-69075 1 Idler Roller/Pulley NSK OE 13505-65040 1 Tensioner Roller KOYO OE 13503-65010 1 Tensioner Spring Toyota 90507-21001 1 Front Crankshaft Seal Toyota 90311-40022 2 Front Camshaft Seals Toyota 90311-42027 1 Water Pump Aisin OE 16100-69345 1 Water Pump Gasket Aisin Included 1 Hydraulic Tensioner Toyota 13540-65010 1 Thermostat (82�c) Toyota 90916-03079 1 Thermostat Gasket Aisin 16341-35010 1 Air Conditioning Belt Toyota 99332-10890-78 1 Alternator Belt Toyota 90916-02378-83 1 Power Steering Belt Toyota 90916-02196-83
I have a few questions for someone in the know. For the water pump specifically, I have read that they used to use FIPG sealant but then because of issues Toyota just started using straight gaskets. I have also read people using gaskets for the valve covers without sealant, just sealant and no gasket, or sealant with gasket. So what is the best way to do the valve covers and the water pump. Gasket or sealant or both?
Great writeup I will be using with the FSM: https://www.yotatech.com/forums/f116...s-pics-183911/
I will be using my impact wrench and basic tools and then will figure out the pulley when I get to it.
I am going to do both valve cover gaskets which are leaking slightly. The PCV valve. Plenum and throttle body gasket. Crankshaft and camshaft seals. Water pump and all the rest of the timing belt stuff. If I can find a cheap OEM radiator I will do that too. Every part I will be using is OEM. Below are the OEM parts for the timing belt portion of the job, with numbers so you can find them easily if anyone else wants to do this.
1 Timing Belt Toyota 13568-69075 1 Idler Roller/Pulley NSK OE 13505-65040 1 Tensioner Roller KOYO OE 13503-65010 1 Tensioner Spring Toyota 90507-21001 1 Front Crankshaft Seal Toyota 90311-40022 2 Front Camshaft Seals Toyota 90311-42027 1 Water Pump Aisin OE 16100-69345 1 Water Pump Gasket Aisin Included 1 Hydraulic Tensioner Toyota 13540-65010 1 Thermostat (82�c) Toyota 90916-03079 1 Thermostat Gasket Aisin 16341-35010 1 Air Conditioning Belt Toyota 99332-10890-78 1 Alternator Belt Toyota 90916-02378-83 1 Power Steering Belt Toyota 90916-02196-83
I have a few questions for someone in the know. For the water pump specifically, I have read that they used to use FIPG sealant but then because of issues Toyota just started using straight gaskets. I have also read people using gaskets for the valve covers without sealant, just sealant and no gasket, or sealant with gasket. So what is the best way to do the valve covers and the water pump. Gasket or sealant or both?
Great writeup I will be using with the FSM: https://www.yotatech.com/forums/f116...s-pics-183911/
On water pump, Toyota now supplies a hybrid metal/rubber gasket. I used the gasket, with a bit of gasket sealer.
Trending Topics
03-18-2014, 05:00 PM
#8
Registered User
Thread Starter
Join Date: Apr 2013
Location: Pennsylvania, East
Posts: 101
Likes: 0
Received 0 Likes
on
0 Posts
For the crankshaft and camshaft seals, I have heard if you screw in 2 wood screws about a 1/4" deep to each seal you can then pull them out?
Last edited by Just_ Rollin'; 03-18-2014 at 05:25 PM.
03-21-2014, 05:15 PM
#9
Registered User
Thread Starter
Join Date: Apr 2013
Location: Pennsylvania, East
Posts: 101
Likes: 0
Received 0 Likes
on
0 Posts
Started the tear down today. The radiator actually looks pretty good inside, no rust in the hoses and only some moderate lime deposits inside of the radiator. I went to take the two air hoses off as pictured, but they are both cracked. Does anyone know the name of them or a part number so I can order replacements? I have no idea what they are for.
03-22-2014, 09:13 AM
#10
Registered User
Thread Starter
Join Date: Apr 2013
Location: Pennsylvania, East
Posts: 101
Likes: 0
Received 0 Likes
on
0 Posts
Still can't identify these hoses. I am confused as well because it seems like in some pictures I am finding on google there is a 3rd hose with coolant to the left of the two I am pointing out in the picture?
03-22-2014, 04:52 PM
#11
Registered User
Thread Starter
Join Date: Apr 2013
Location: Pennsylvania, East
Posts: 101
Likes: 0
Received 0 Likes
on
0 Posts
Everything is moving alone nicely so far. I used the starter bump method to get that crankshaft bolt off. Came off instantly. You only need to hit the starter for an instant.
Also used some C clamps, the old timing belt, and some wood to get the cam bolts off. This was also not very difficult but it required a pipe extension as pictured.
Does anyone know of a suitable substitute for assembly lube for the camshaft/crankshaft seals? I have brake lube, oil, wd40 and would prefer to use something I already have on hand.
I got this truck from an auction but it seems like its in excellent shape now that I tore it down. Headgasket looks new-ish from what I can see from the front. Hardly any rust or crust in the cooling system. The oil cooler is definitely clogged up so I will tackle that tomorrow. The main idler bearing was failing. Water pump made by GMB? was looking ok, no leaks.
So far so good, not nearly as difficult of a job as I thought it would be. So if you are considering doing the timing belt but think its too much, it isn't. It takes the longest to learn the steps but doing it is not so bad.
Last edited by Just_ Rollin'; 03-22-2014 at 04:56 PM.
03-22-2014, 05:17 PM
#12
Registered User
Join Date: Sep 2007
Location: San Francisco East Bay
Posts: 8,252
Likes: 0
Received 820 Likes
on
648 Posts
While the molded hoses would undoubtedly work best, you could probably get by with just the correct diameter vacuum or fuel hose.
The larger tube is for the PAIR, and the smaller is for the AC and Power Steering idle-ups.
03-23-2014, 05:59 PM
#13
Registered User
Thread Starter
Join Date: Apr 2013
Location: Pennsylvania, East
Posts: 101
Likes: 0
Received 0 Likes
on
0 Posts
"Hose, Air 2" and "Hose, Air 3". Did that help? Take a look at this page: http://www.toyotapartsoverstock.com/...rimLevel=18292
While the molded hoses would undoubtedly work best, you could probably get by with just the correct diameter vacuum or fuel hose.
The larger tube is for the PAIR, and the smaller is for the AC and Power Steering idle-ups.
While the molded hoses would undoubtedly work best, you could probably get by with just the correct diameter vacuum or fuel hose.
The larger tube is for the PAIR, and the smaller is for the AC and Power Steering idle-ups.
Updates:
A word of warning doing the cam seals. I did not lubricate the housing it was going into enough and it sheared off a piece of the seal....sigh, riding my bike to Toyota tomorrow to get a new one.
I also have discovered my oil cooler is hopelessly clogged. I know this is an insanely expensive part and cannot be disassembled so I think I am going to see what some CLR does overnight. I imagine most of the rusty coolant ends up settling down in the oil cooler.
I think maybe a coolant filter with a magnet attached somewhere convenient would be a good investment. Anyone ever done anything like that?
I got the crankshaft pulley on with relative ease using some steel cable wrapped around the car frame and two screws screwed into the pulley.
The hardest thing thus far was removing the 14mm nut on the backside of the power steering bracket, step 1. I didn't have a ratcheting wrench for this so it was a pain in the ass.
I removed the seal by drilling in a small hole and then beginning to thread in a wood screw. You can then pry it off. Some people will flatten out the screw so it doesn't mar the back of the seal housing but if you are careful you can do it with a sharp screw.
Last edited by Just_ Rollin'; 03-23-2014 at 06:02 PM.
03-24-2014, 02:48 PM
#14
Registered User
Thread Starter
Join Date: Apr 2013
Location: Pennsylvania, East
Posts: 101
Likes: 0
Received 0 Likes
on
0 Posts
I think my timing is screwed up but I am not sure.....I lined up my Toyota OEM timing belt on the cam pulleys with both of them lined up. I also lined up the mark on the crankshaft with the mark on the timing belt. I installed the idler bearing and put a block of wood under it to act as a tensioner until I installed my hydraulic one. I put on the timing cover and the crankshaft pulley and it was lined up with 0.
The belt moved a few times while I was torquing down the crankshaft bolt but I don't think any teeth jumped. So now I have the tensioner installed and the fan cover back on and I go to crank it a few times and the "turn it twice and see if the marks are correct" thing isn't happening. The marks are progressively getting further off the mark by a tooth a turn.
I am going to turn the crank counter clock wise and see if I can go back about 5 rotations and see if the cam marks line up with the crankshaft mark. This is frustrating. It may be on but I can't conceptualize whats going on here.
I did read about the timing markings "hunting around" so they wont be on every rotation but after two rotations they do not line back up but rather they are moving further off by a tooth a turn.
Can anyone provide some expertise here? I don't have my thermostat yet so I can't put it all back together with coolant but I want to make sure its together correctly before I attempt that.
03-24-2014, 03:07 PM
#15
Registered User
Join Date: Sep 2007
Location: San Francisco East Bay
Posts: 8,252
Likes: 0
Received 820 Likes
on
648 Posts
... I go to crank it a few times and the "turn it twice and see if the marks are correct" thing isn't happening. The marks are progressively getting further off the mark by a tooth a turn. ...
I did read about the timing markings "hunting around" so they wont be on every rotation but after two rotations they do not line back up but rather they are moving further off by a tooth a turn.
...
I did read about the timing markings "hunting around" so they wont be on every rotation but after two rotations they do not line back up but rather they are moving further off by a tooth a turn.
...
(It's called "hunting pattern" on gearing; you never see gears made in an exact integer ratio (e.g., 3:1) because the same parts of the gears would mesh each (third) revolution.)
03-24-2014, 03:13 PM
#16
Registered User
Thread Starter
Join Date: Apr 2013
Location: Pennsylvania, East
Posts: 101
Likes: 0
Received 0 Likes
on
0 Posts
So if I am relatively certain the crankshaft mark and both camshaft marks lined up with the belt marks when I installed it, that should be sufficient?
The FSM says to check the valve timing by turning the crankshaft pulley two revolutions from TDC to TDC. I guess what I am doing wrong is looking at the belt marks as you say and instead what I should be doing is looking at the crankshaft mark and the camshaft marks and making sure they line up after two rotations. Is this correct>? (the crankshaft mark would be at 0 and the camshaft marks lined up every two rotations?)
The FSM says to check the valve timing by turning the crankshaft pulley two revolutions from TDC to TDC. I guess what I am doing wrong is looking at the belt marks as you say and instead what I should be doing is looking at the crankshaft mark and the camshaft marks and making sure they line up after two rotations. Is this correct>? (the crankshaft mark would be at 0 and the camshaft marks lined up every two rotations?)
03-24-2014, 03:57 PM
#17
Registered User
Join Date: Sep 2007
Location: San Francisco East Bay
Posts: 8,252
Likes: 0
Received 820 Likes
on
648 Posts
Yup.
Page 43 http://personal.utulsa.edu/~nathan-b...67timingbe.pdf
If you didn't remove the distributor, ignition timing should be as it was when you started.
Page 43 http://personal.utulsa.edu/~nathan-b...67timingbe.pdf
If you didn't remove the distributor, ignition timing should be as it was when you started.
03-24-2014, 06:23 PM
#18
Registered User
Thread Starter
Join Date: Apr 2013
Location: Pennsylvania, East
Posts: 101
Likes: 0
Received 0 Likes
on
0 Posts
Yup.
Page 43 http://personal.utulsa.edu/~nathan-b...67timingbe.pdf
If you didn't remove the distributor, ignition timing should be as it was when you started.
Page 43 http://personal.utulsa.edu/~nathan-b...67timingbe.pdf
If you didn't remove the distributor, ignition timing should be as it was when you started.
In other news I unplugged my oil cooler by letting some CLR sit in the spout overnight (which didn't work on its own). In the morning I hooked up a pressure nozzle and used the oil cooler hose that goes to the water pump, with the spring clamps, and blasted it out. That did the trick!
03-28-2014, 11:26 AM
#19
Registered User
Thread Starter
Join Date: Apr 2013
Location: Pennsylvania, East
Posts: 101
Likes: 0
Received 0 Likes
on
0 Posts
I bought some parts from an online Toyota store, that sells OEM parts. My thermostat has what looks like rust on it but upon scraping it with a screwdriver, it seems to be brass underneath....almost as if some kind of rust colored glue was used for some reason?
I am going to install it for now, but I thought I would post a picture and see if anyone had come across something like this before?
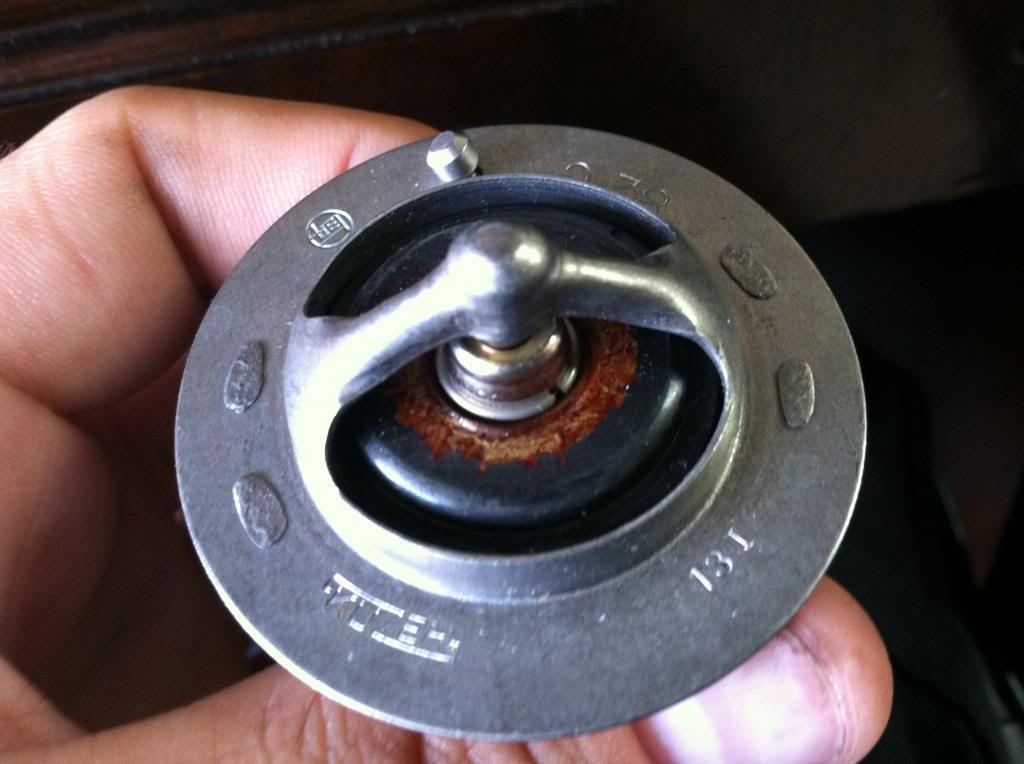
I am going to install it for now, but I thought I would post a picture and see if anyone had come across something like this before?


Thread
Thread Starter
Forum
Replies
Last Post
voiddweller
86-95 Trucks & 4Runners (Build-Up Section)
19
05-02-2016 09:10 PM
crazypaint
Buying & Selling Advice - Feeler/Gauging Interest
3
06-23-2015 03:27 AM


