
stuck valve?????
 04-02-2010, 09:04 PM
#1
Registered User
Thread Starter

Join Date: Jan 2010
Location: Grass Valley CA
Posts: 50
Likes: 0
Received 0 Likes
on
0 Posts
stuck valve?????
well just got done doing the head gasket's on my 3.0slow.... it fired right up but sounded like a old" cho-cho train.kinda of really sounded like the timing my be off. so first i checked all the vacuum lines(all good) then i check fuel(also all good) then checked TDI, and then i end up tearing back into it and reseting the timing (belt-marks-TDC) TWICE!!!! and it still does the same excact thing. so next i go after ignition first i check and re-gap all the plugs and throw in a new set of wires. but while i was doing that i decided to do a compression check... well all cylinders check out at 145-ish except for #3. it was at 25lbs so i double checked it and did a poor-man leak down and put a few drops of oil in the cylinder and re-did the test and it did not move stayed at 25lbs after 4 cranks. so i think(hope) i might have a stuck valve. but when i picked up the heads from the shop i asked if anything would need to be done the valves, they said "they looked good" and advised me that no need to mess with them. i did have them mill and pressure check the heads.
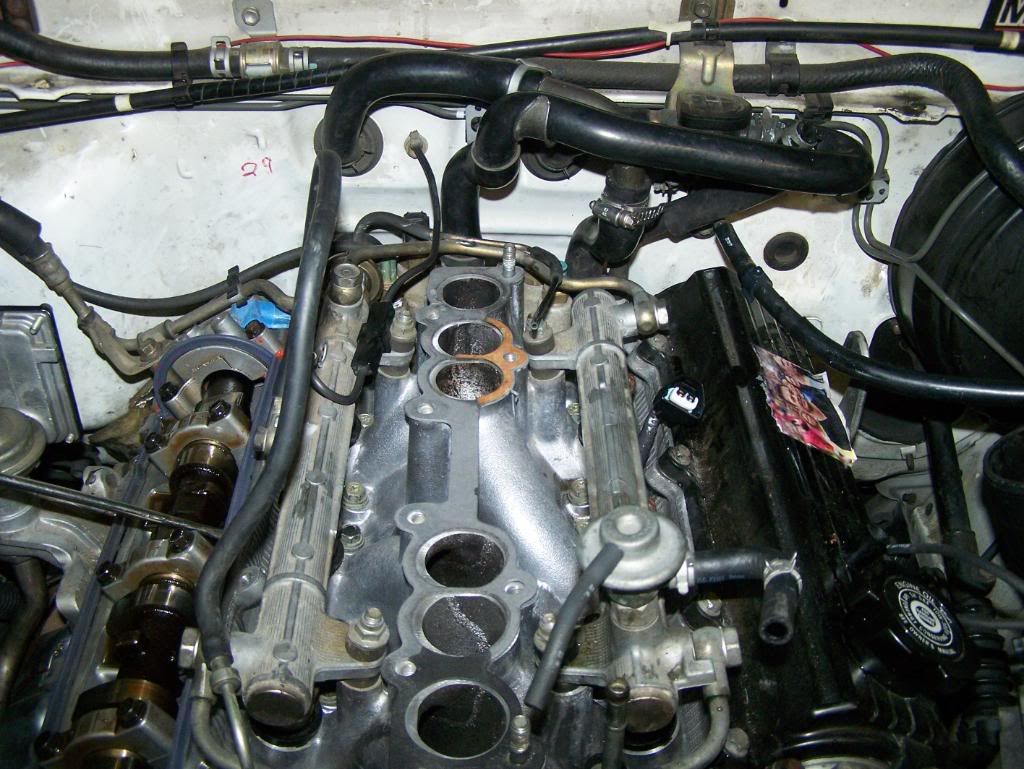
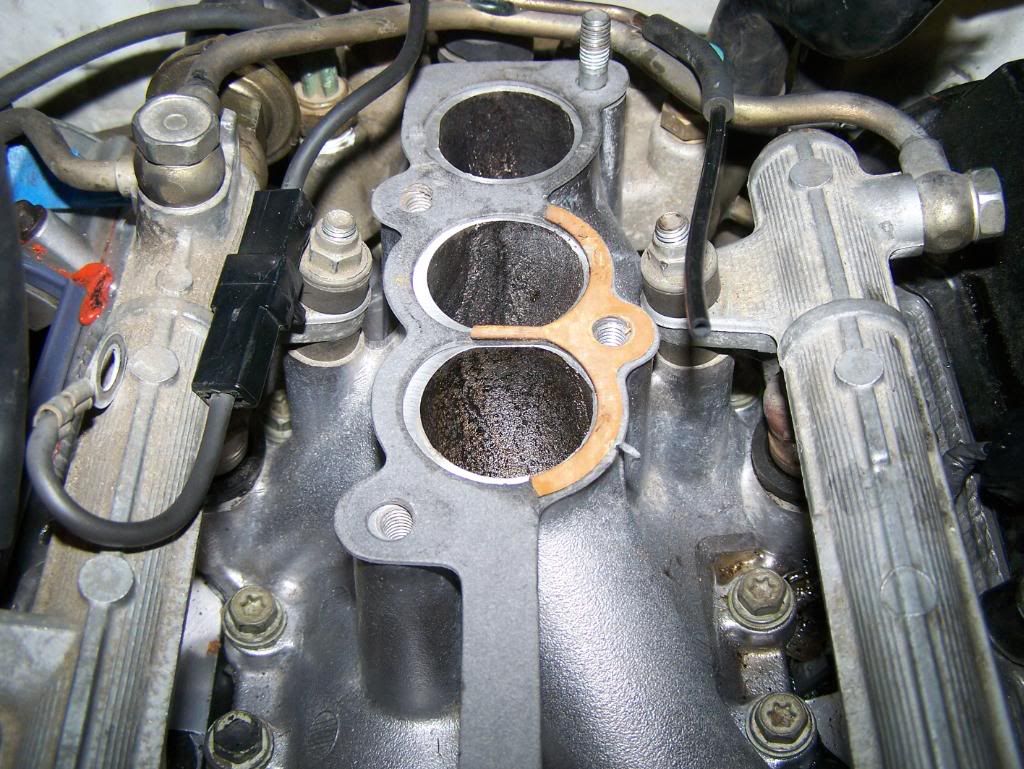
so today i decided to take off the intake manifold and valve cover to see if i could see anything but in the process i found this on my intake manifold gasket (PIC'S) looks like part of the old gasket my be causing air to leak. but it wasn't for #3 cylinder it looks like it would effect #4. so would this effect my low compression in #3 or just add to the rough running of the 3.0.. also does does it sound like a stuck valve and if so how would i go and un-stick it???
while i was in there i did replace the timing belt TOYOTA, water pump, all new gaskets by ROCK AUTO, all new pulleys, and hydraulic tensioner, some new hoses, wires, plugs NGK, PCV, new knock sensor wire, and a fuel filter..
any ideas would be great.....
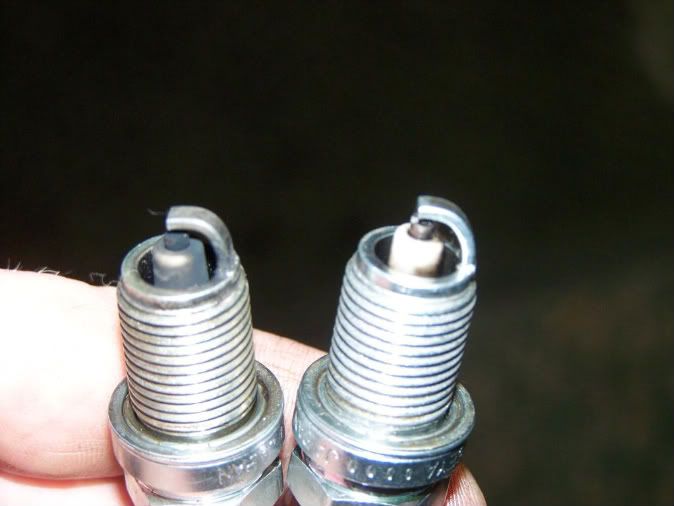
Here is a pic of #1 (left) and #3 (right) spark plugs. see how clean new looking the #3 still is.. they are both brand new and barley ran for more then 2hrs....
here are the pics of the extra gasket on my new gasket, that may of caused an air leak...
so today i decided to take off the intake manifold and valve cover to see if i could see anything but in the process i found this on my intake manifold gasket (PIC'S) looks like part of the old gasket my be causing air to leak. but it wasn't for #3 cylinder it looks like it would effect #4. so would this effect my low compression in #3 or just add to the rough running of the 3.0.. also does does it sound like a stuck valve and if so how would i go and un-stick it???
while i was in there i did replace the timing belt TOYOTA, water pump, all new gaskets by ROCK AUTO, all new pulleys, and hydraulic tensioner, some new hoses, wires, plugs NGK, PCV, new knock sensor wire, and a fuel filter..
any ideas would be great.....
Here is a pic of #1 (left) and #3 (right) spark plugs. see how clean new looking the #3 still is.. they are both brand new and barley ran for more then 2hrs....
here are the pics of the extra gasket on my new gasket, that may of caused an air leak...
 04-02-2010, 10:17 PM
#2
Registered User

Join Date: Mar 2010
Location: SE Kansas
Posts: 485
Likes: 0
Received 0 Likes
on
0 Posts
Well, that old gasket shouldn't be there, that's for sure!  Yes, that could cause an air-leak, but not low compression.
You said you did a poor-boy leakdown. Where was the air leaking from? If you still think it's a stuck valve, pull the valve cover off and look at the valves for that cylinder. If necessary, turn the motor by hand until both valves should be closed, near TDCC. Your valve clearance should be to spec. If a valve is stuck open, you will have a huge gap.
Since your getting 25 PSI, that tells me the valves are at least close to sealing. Could be a bent or burnt valve, incorrect valve clearance, or bad rings.
If it is stuck, I don't know of any ways of unsticking it without rebuilding the head, or at least repair the valve/guide/seat/seal.
Yes, that could cause an air-leak, but not low compression.You said you did a poor-boy leakdown. Where was the air leaking from? If you still think it's a stuck valve, pull the valve cover off and look at the valves for that cylinder. If necessary, turn the motor by hand until both valves should be closed, near TDCC. Your valve clearance should be to spec. If a valve is stuck open, you will have a huge gap.
Since your getting 25 PSI, that tells me the valves are at least close to sealing. Could be a bent or burnt valve, incorrect valve clearance, or bad rings.
If it is stuck, I don't know of any ways of unsticking it without rebuilding the head, or at least repair the valve/guide/seat/seal.
04-02-2010, 11:02 PM
#3
Registered User
I would lean more towards a valve clearance issue, rather than a burnt valve. The only way to tell is pull the valve cover. And, since there is a question, I would pull both of them and check all the clearances.
I had a valve seat fall out on the #6 intake valve. I had super compression in that cylinder and a loud tapping sound. The only way I figured it out was pulling the valve covers and measuring the valve clearance. That valve had no clearance. I then pulled the head to find the loose seat.
Good luck.
I had a valve seat fall out on the #6 intake valve. I had super compression in that cylinder and a loud tapping sound. The only way I figured it out was pulling the valve covers and measuring the valve clearance. That valve had no clearance. I then pulled the head to find the loose seat.
Good luck.
04-03-2010, 08:06 PM
#5
Registered User
When you do the measurements, just make sure that the cam lobe you are measuriing is pointing straight up. Also, lay the various feeler gauge thicknesses out in a nice ordered row. You will be grabbing and trying various thicknesses, it is good to have them organized and to put them back in order, makes it go faster.
If you need to get a shim out to measure it, what I found is that a 3/16" hex key (I think that is the right size) works great for compressing the bucket/valve spring downward. Use the short end of the hex key. Slip it in between the cast part of the camshafter and the outer lip of the bucket with the long part pointing straight up. Then rotate the long part of the hex key downward, this will push the bucket down and allow you to get the shim out.
To get the shim out I found that a very small flat bladed screw driver will pop the oil tension on it and that a wand magnet will grab it and allow you to pull it out.
After a few tries you will get the hang of this and be able to pull the shims out in no time.
Good luck,
Mike
04-06-2010, 01:11 PM
#6
Registered User
Thread Starter
Join Date: Jan 2010
Location: Grass Valley CA
Posts: 50
Likes: 0
Received 0 Likes
on
0 Posts
OK, finally got some time to check all the valve clearances and found that #3 exhaust to be super tight no Clarance, and also #6 exhaust to have no Clarance. all the rest are within spec.. so what next, should i attempt to adjust the shims they are $5 a pop and I would need to by a minimum of 4. or should i just get a valve job done since my motor is already half torn down again???
04-06-2010, 01:57 PM
#7
Registered User
OK, finally got some time to check all the valve clearances and found that #3 exhaust to be super tight no Clarance, and also #6 exhaust to have no Clarance. all the rest are within spec.. so what next, should i attempt to adjust the shims they are $5 a pop and I would need to by a minimum of 4. or should i just get a valve job done since my motor is already half torn down again???
Also, how many miles do you have on the motor in this condition, just to confirm?
If the mechanic did a valve job already and if you have not put many miles on it yet (less chance of a burnt valve), then I would try to adjust the shims. The problem with having no clearance at all is that you do not know what thickness of shim to buy, as you don't know where you are starting with valve clearance.
What you can do is pull the shims out for those two valves and measure them. Then, you can pull some other shims, at random, and try to find some that are thinner. Try those with the valves that have no clearance to see if you can get a clearance measurement to start with and then buy the correct shim.
If that does not work, or if it is too much work, you can pull the shims that on those two valve buckets, measure them, and buy something smaller with a SWAG (Scientific Wild Ass Guess). You know what the total valve clearance range is (can't remember right now). And you know that the shim is touching the cam lobe. So, the thickest shim you would buy is the 1/2 total clearance range subtracted from the shim that is already in there. If the shim is just touching, then this would put you in the middle of the range. But, given your issues, the valve is most likely not sealing all the way, so, you probably would have to guess a bit thinner than that. It is a guessing game until you get a clearance measurement and can then calculate the thickness you really need.
Good luck,
Mike
Trending Topics
04-06-2010, 02:20 PM
#8
Registered User
Thread Starter
Join Date: Jan 2010
Location: Grass Valley CA
Posts: 50
Likes: 0
Received 0 Likes
on
0 Posts
thanks mike...
all i had done to the heads was a pressure test and they where milled. when i went to pick them up, i asked if i need to clean the valves, they said that they looked good and theres no need to mess with them. there is 120k on the motor and i have not even drove it sense i put back tougher.
but i don't understand why #3 is at 25lbs and #6 is at 145lbs when both have no clearance on the exhaust side???
04-06-2010, 02:23 PM
#9
Registered User
Join Date: Mar 2010
Location: SE Kansas
Posts: 485
Likes: 0
Received 0 Likes
on
0 Posts
Reading this thread has made me appreciate the screw and locknut adjusters of my 22R-E! Sure I'm giving up a little performance, but I'm glad I don't have to buy shims to adjust my valves!
Mike asked a very important question. What exactly did the machine shop do? Why did they say they were good to go?
I would be very hesitant to start buying shims. Like Mike said, it's all a guessing game until you get clearance, then you can actually calculate what you need. After all that, you might find out the valves need work after all, then the heads need to come off, in spite of all the time and money you spend playing with shims.
I think it all boils down to what condition they were in before they were re-installed.
04-06-2010, 02:27 PM
#10
Registered User
Join Date: Mar 2010
Location: SE Kansas
Posts: 485
Likes: 0
Received 0 Likes
on
0 Posts
The fact that you have some compression in those cylinders tells me that they are just barely not closing all the way. If you want to change the shims, I would go .22 mm to .32 mm smaller than what is installed right now. That should get you close.
04-06-2010, 02:29 PM
#11
Registered User
Thread Starter
Join Date: Jan 2010
Location: Grass Valley CA
Posts: 50
Likes: 0
Received 0 Likes
on
0 Posts
yea I'm thinking to just have them do the valves and be done with it. everything I'm reading and hearing just sounds like a stuck/bent/burned valve, so i should just spend the money have it done... i should be good to go and i wouldn't have to do this sounds like fun game of adjusting the valves.
04-06-2010, 02:30 PM
#12
Registered User
Join Date: Mar 2010
Location: SE Kansas
Posts: 485
Likes: 0
Received 0 Likes
on
0 Posts
Someone can correct me if I'm wrong, but wouldn't a machine shop disassemble a head in order to mill it? If the shop disassembled it, that means they re-assembled it. It is up to them to ensure it is assembled correctly, and that means getting the shims back in the right spot, ending up with correct clearances.
04-06-2010, 02:31 PM
#13
Registered User
Thread Starter
Join Date: Jan 2010
Location: Grass Valley CA
Posts: 50
Likes: 0
Received 0 Likes
on
0 Posts
Someone can correct me if I'm wrong, but wouldn't a machine shop disassemble a head in order to mill it? If the shop disassembled it, that means they re-assembled it. It is up to them to ensure it is assembled correctly, and that means getting the shims back in the right spot, ending up with correct clearances.
04-06-2010, 02:33 PM
#14
Registered User
Join Date: Mar 2010
Location: SE Kansas
Posts: 485
Likes: 0
Received 0 Likes
on
0 Posts
Actually, if a valve was bent, you would have a lot more clearance than normal. A burnt valve *could* take up the clearance, but there is very little chance of it working that way. In all the motors I've worked on and been around, I don't think I've ever seen a stuck valve. Sure it can happen, but I think that is very rare.
I would be taking either the vehicle or the heads back to the shop and have them fix their mistakes, if in fact they messed something up, as mentioned in my previous post.
I would be taking either the vehicle or the heads back to the shop and have them fix their mistakes, if in fact they messed something up, as mentioned in my previous post.
04-06-2010, 02:46 PM
#15
Registered User
Just replace the two exhaust valve shims that are out of spec. The FSM has a good section on valve adjustment, including charts that tell you what shim to get.
Measure the current clearance, if there is any.
Remove the shim and measure it's thickness with a micrometer.
The difference between the current clearance (if any) and the required clearance is what you need to subtract from the current shim thickness to find what shim you need.
Subtract the required clearance difference from above (I'd use the max tolerance if there is no clearance because the shim is actually pushing the valve down some with the lobe straight up) from the thickness of the current shim. Order a new shim that is the correct thickness based on your measurements and calculations. This will probably put the clearance somewhere in the spec range
Example:
1. Original measured clearance to the nearest thousandth (sounds like yours is .000"): .001"
2. Thickness of current shim: .108"
3. Desired clearance: .011" (spec: .009 - 013")
4. Calculated difference: .011" minus .001" = .010"
5. Thickness of new shim: .108" minus .010" = .098"
6. From FSM (page EG2-23 in my FSM): .098" is shim #7 Order from dealer
04-06-2010, 02:59 PM
#16
Your "technically" supose to disasemble the head when any machine work is done to it but some shops don't. Did you mix up the cams? Try swaping the cams and checking clearances. Make sure the cam lobe is pointing straight up when checking clearnaces.
04-06-2010, 03:47 PM
#18
Registered User
Thread Starter
Join Date: Jan 2010
Location: Grass Valley CA
Posts: 50
Likes: 0
Received 0 Likes
on
0 Posts
yes the lobs where pointing straight up, i checked it all twice.... but i don't understand why the compression for #3 is at 25lbs and #6 is at 145lbs when both have no clearance on the exhaust sides???
also
when i took the heads to the shop i removed the spring buckets and keep them in order. so how would they be off if i put everything back the correct order???
also
when i took the heads to the shop i removed the spring buckets and keep them in order. so how would they be off if i put everything back the correct order???
Last edited by stb94tsi; 04-06-2010 at 03:57 PM.
04-06-2010, 04:29 PM
#20
Registered User
yes the lobs where pointing straight up, i checked it all twice.... but i don't understand why the compression for #3 is at 25lbs and #6 is at 145lbs when both have no clearance on the exhaust sides???
also
when i took the heads to the shop i removed the spring buckets and keep them in order. so how would they be off if i put everything back the correct order???
also
when i took the heads to the shop i removed the spring buckets and keep them in order. so how would they be off if i put everything back the correct order???
#3 exhaust is open a bit more, so, it loses more compression. It is not fully open, as you would have 0. So, most likely only open a touch, a few thousands at the most.
Once the shim is in contact with the cam lobe there is no way to tell how far the valve is open, and no way to calculate exactly what size shim to swap in there. For #6, I could be that you only need to step down 1/2 of the clearance range to get it at the midpoint of the range. For #3, it is something more than that, no telling what until you start swapping some shims in and get clearance.
I agree with the above, a stuck valve is a pretty low probability. Assuming the head shop actually looked at the valves, a burnt valve is probably not it either. Just a shimming issue.
Too bad you are not close, I have a bag of shims that I have picked up at the boneyard over time. I see a head open with no cam on it, I take all of the shims home with me.
Talk to your head shop (not that type of head shop, get your mind out of the smoke) and find out just what they did with the heads, did they disassemble the valves, did they inspect the valve seats. Did they get the valves back in the correct location? If it all checks out verbally, start swapping shims around, see if you can get a clearance measurement, go from there.
Good luck
.
Last edited by OutlawMike; 04-06-2010 at 04:35 PM. Reason: Edited to clarify what to talk to the shop about.


