Stanprophets Beater 89 Build
 03-08-2013, 01:46 PM
#1
Registered User
Thread Starter
Join Date: Feb 2013
Location: Hampton VA
Posts: 167
Likes: 0
Received 0 Likes
on
0 Posts
Stanprophets Beater 89 Build
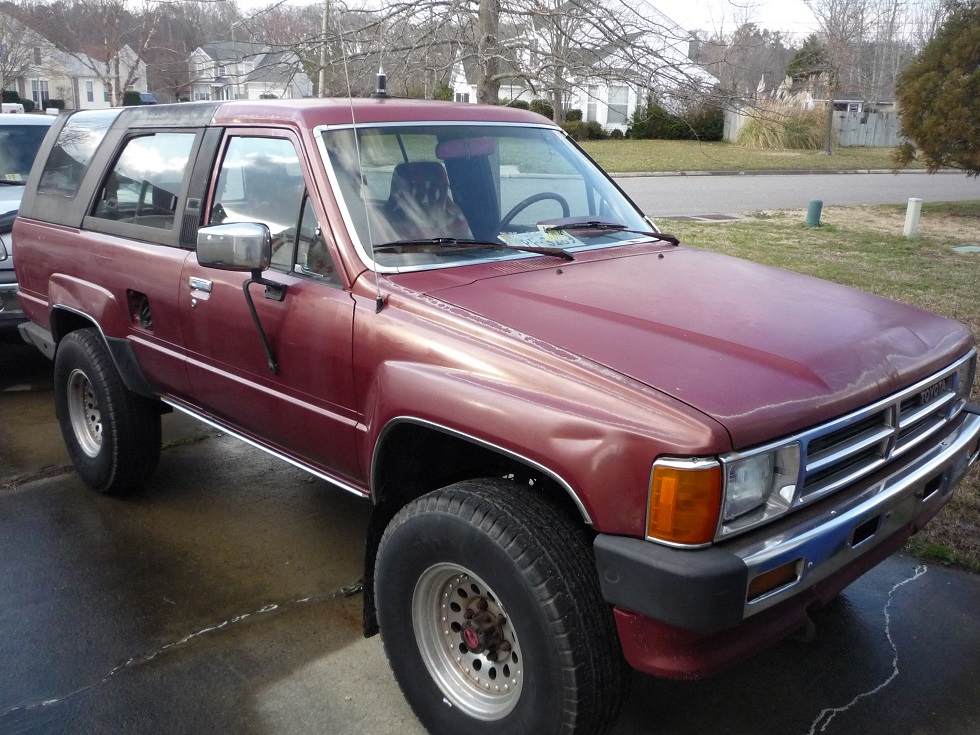
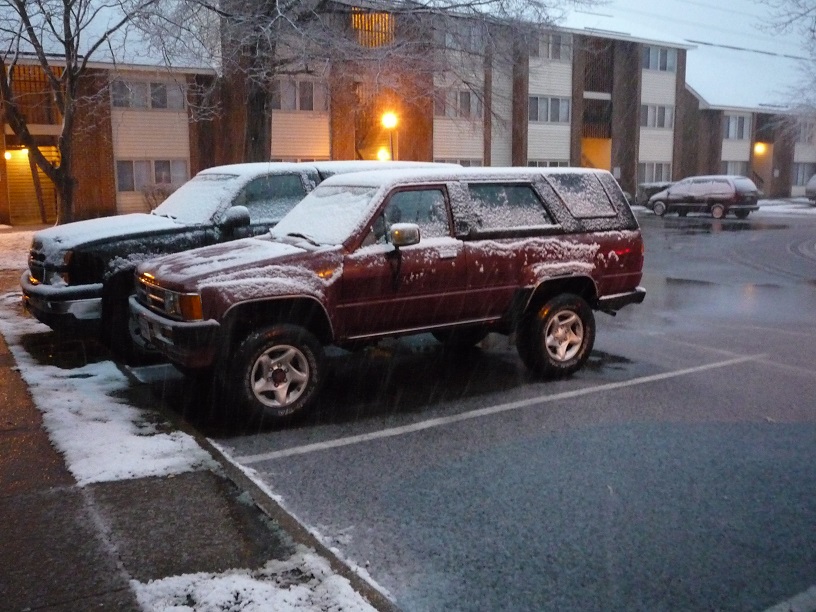
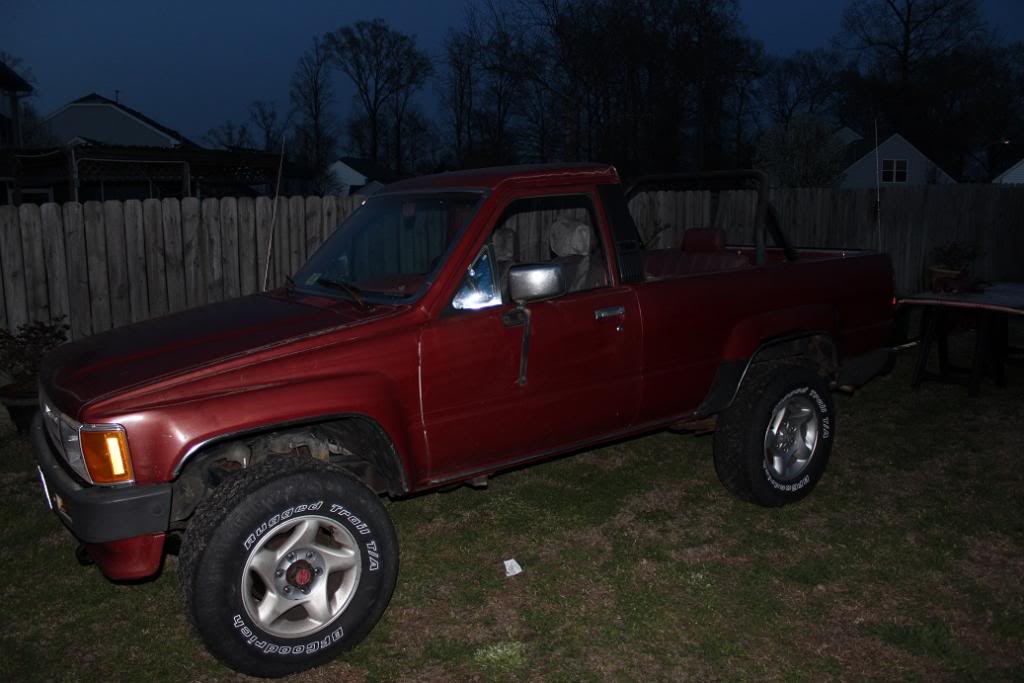
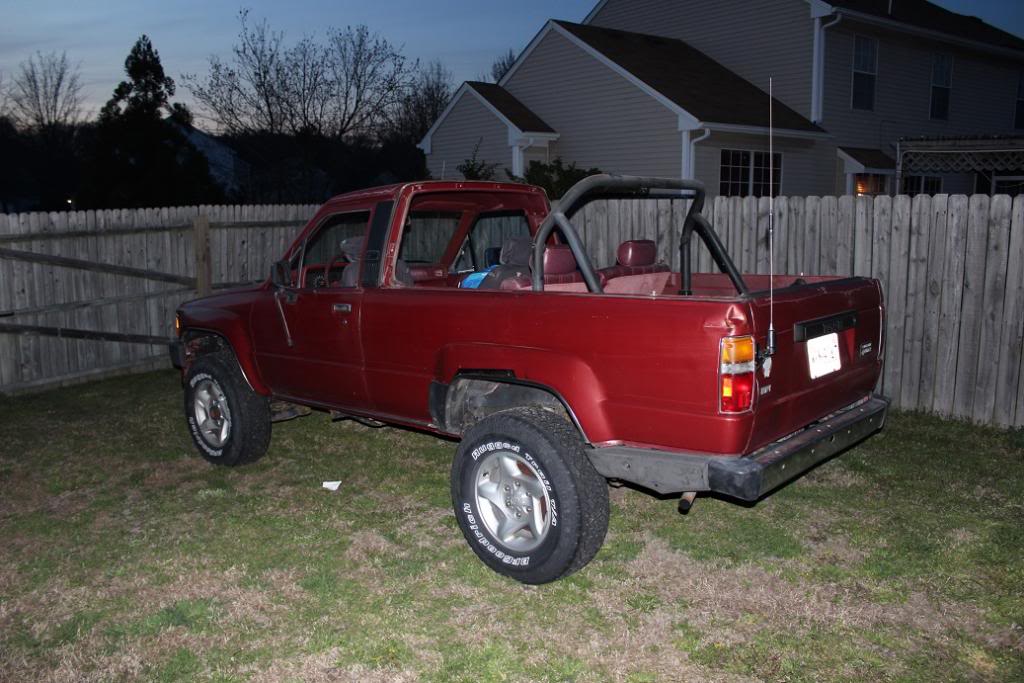
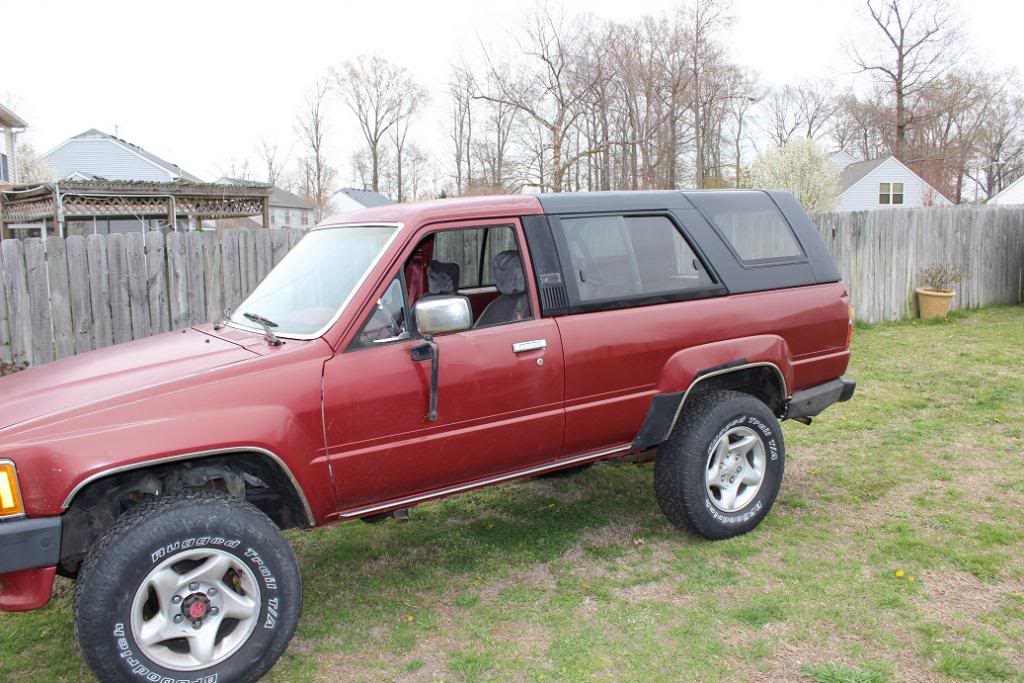
So I have been down to 1 vehicle for the family for a while, and have been looking for a second vehicle for some time. Currently the only one in the household working, and I am going to school full time. I had been looking for some beater ranger just as a backup vehicle, mainly because they can be found cheap around here. I have owned a 91 2wd little lowrider truck (First Vehicle and all) and an 89 truck with 35 inch tires. I loved my yota�s but the resale is so damn high on them I had not really considered looking for one.
I had a rifle listed for sale and happened to be contacted by a retired navy chief that had a bunch of vehicles and asked me if I wanted to trade for an 89 runner?
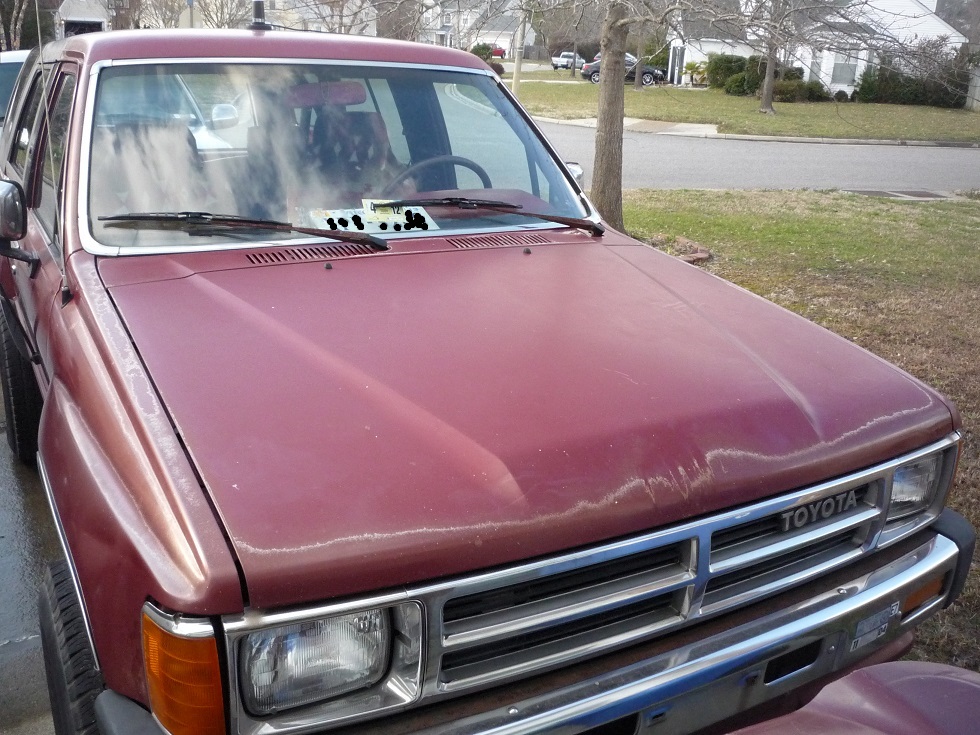
I really could not beat it, but the total value I had into the rifle was about 500 bucks. The truck was rough, had been sitting for a while and someone stole the battery out of it. But mechanically the motor and drive train are very strong. I threw a battery in the truck, and put some gas in it and drove it home. There were about 10 lights out on the truck, and the first thing I noticed was the gas gauge was not working and neither was the cooling gauge. The battery and brake light were coming on indicating a charging issue.
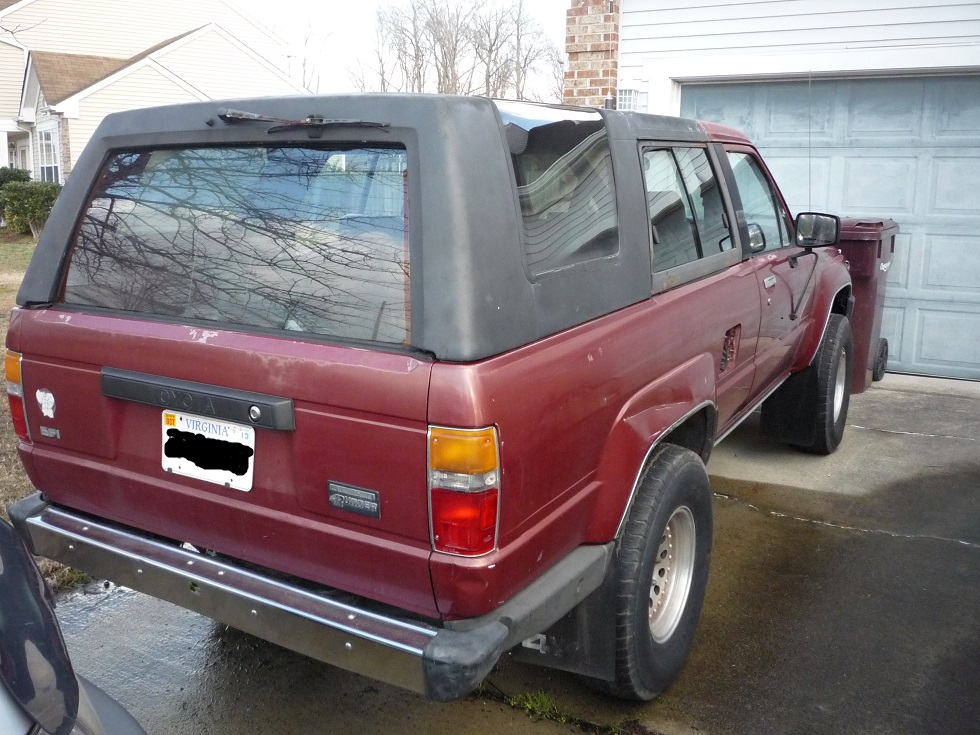
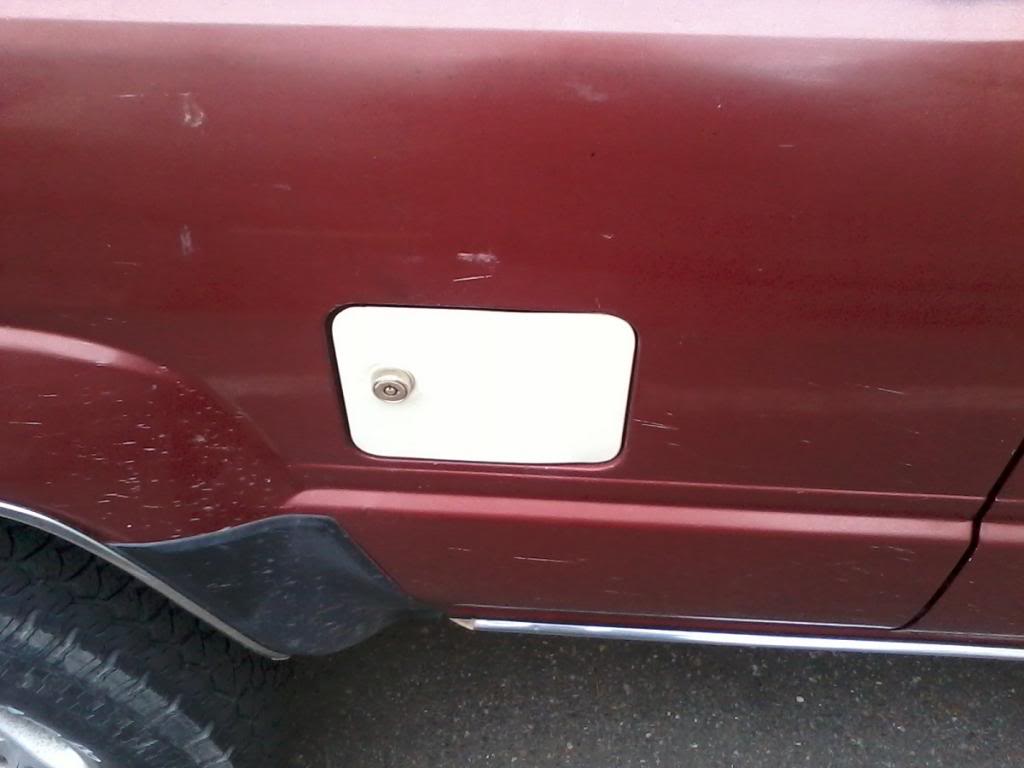
I drove it to my dads house and parked it knowing that it was going to need a lot of work. The tires were shot, the shocks were toast, it was squatting in the rear. There were all kinds of electrical issues, and one hell of a drivetrain vibration. Oh and as you can see the fuel door is missing.
So it sat there for a couple of days before I could get back over there to start the work. When I got over the battery was dead! So I started some parasitic draw testing, old aftermarket alarm was causing a 240ma draw, the alternator was causing a 5 amp draw!
So I started with an alternator, put a set of Rancho 5000�s on the front, changed a bunch of fuses, and pulled the cluster to find out why the dash lights were not working. I fixed a bad ground on the cluster, put a new cooling sending unit, and new thermostat, since the old one was stuck open.
I borrowed a set of spare rims from my dads tundra and drove it to work so I could get it on the lift. Found it needed a rear U-Joint, both lower ball joints, wiper blades, a headlight. So I went ahead and fixed that stuff, got it inspected and started driving it.
All I can say is I love this runner!
I had a rifle listed for sale and happened to be contacted by a retired navy chief that had a bunch of vehicles and asked me if I wanted to trade for an 89 runner?
I really could not beat it, but the total value I had into the rifle was about 500 bucks. The truck was rough, had been sitting for a while and someone stole the battery out of it. But mechanically the motor and drive train are very strong. I threw a battery in the truck, and put some gas in it and drove it home. There were about 10 lights out on the truck, and the first thing I noticed was the gas gauge was not working and neither was the cooling gauge. The battery and brake light were coming on indicating a charging issue.
I drove it to my dads house and parked it knowing that it was going to need a lot of work. The tires were shot, the shocks were toast, it was squatting in the rear. There were all kinds of electrical issues, and one hell of a drivetrain vibration. Oh and as you can see the fuel door is missing.
So it sat there for a couple of days before I could get back over there to start the work. When I got over the battery was dead! So I started some parasitic draw testing, old aftermarket alarm was causing a 240ma draw, the alternator was causing a 5 amp draw!
So I started with an alternator, put a set of Rancho 5000�s on the front, changed a bunch of fuses, and pulled the cluster to find out why the dash lights were not working. I fixed a bad ground on the cluster, put a new cooling sending unit, and new thermostat, since the old one was stuck open.
I borrowed a set of spare rims from my dads tundra and drove it to work so I could get it on the lift. Found it needed a rear U-Joint, both lower ball joints, wiper blades, a headlight. So I went ahead and fixed that stuff, got it inspected and started driving it.
All I can say is I love this runner!
Last edited by stanprophet; 03-08-2013 at 02:14 PM.
 03-08-2013, 01:55 PM
#2
Registered User
Thread Starter
Join Date: Feb 2013
Location: Hampton VA
Posts: 167
Likes: 0
Received 0 Likes
on
0 Posts
Last week I made an order for a Pro Comp AAL kit, a Viper Alarm, and a fuel sending unit from Toyota. I got done installing the Sending unit Wednesday evening after work, and got the fuel gauge working, I also was able to get free CD player from a buddy and get that installed. Thursday I added an Aux Fuse box behind the glove box, and used the existing Amplifier power cable to power it.
The fuse box will support my ham radio, power door actuators, alarm, and aux power ports that are to come. I went ahead and wired in my radio, and ran the magnent mount on the roof until I can get a proper NMO mount and drill the hole in the roof.

I pulled the front half of the busted center console out, and cut the front bracket off giving me room to mount the radio.
I will get some pictures of the fuse box and get them up, I do not have a ton of pictures since I was in a hurry to get it on the road, but I will start documenting this more.
The fuse box will support my ham radio, power door actuators, alarm, and aux power ports that are to come. I went ahead and wired in my radio, and ran the magnent mount on the roof until I can get a proper NMO mount and drill the hole in the roof.
I pulled the front half of the busted center console out, and cut the front bracket off giving me room to mount the radio.
I will get some pictures of the fuse box and get them up, I do not have a ton of pictures since I was in a hurry to get it on the road, but I will start documenting this more.
Last edited by stanprophet; 03-08-2013 at 02:22 PM.
03-08-2013, 02:08 PM
#3
Registered User
Thread Starter
Join Date: Feb 2013
Location: Hampton VA
Posts: 167
Likes: 0
Received 0 Likes
on
0 Posts
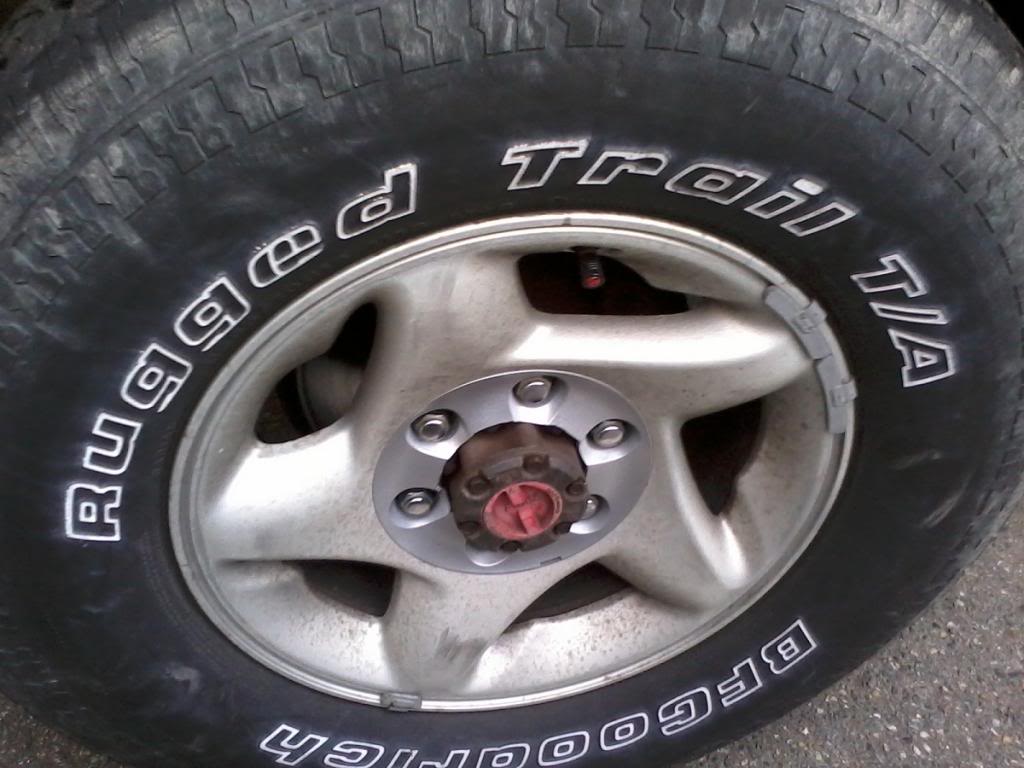
Last night I made a run to pick up a set of rims and tires from a leter model Tacoma. The guy had them on CL for 150 bucks with tires. So I hauled my but the 30 miles north and kindly paid the guy cash!
This style of rim

Guy had the center caps and lug nuts, with 4 good tires on them!
So today I took a trip down to my dads house, and changed out the rims, put the AAL on and installed the Viper alarm.
The old rims were aftermarket with 31x10.50's on them, I am now running 265/70/16.
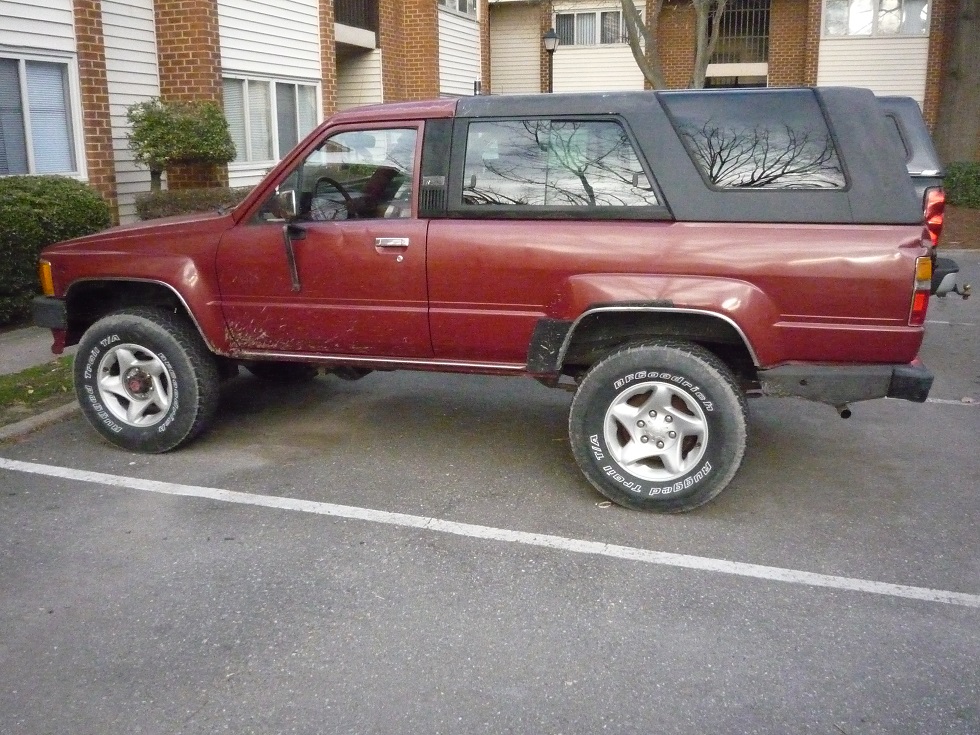

So far it rides sooooo much better, and looks a ton better than it did. I am still waiting on the Rear Shocks to come in, and the fuel door I just found on this forum.
I still have to wire in the door actuator, and relays so I can roll the rear window down with the alarm.
This style of rim
Guy had the center caps and lug nuts, with 4 good tires on them!
So today I took a trip down to my dads house, and changed out the rims, put the AAL on and installed the Viper alarm.
The old rims were aftermarket with 31x10.50's on them, I am now running 265/70/16.
So far it rides sooooo much better, and looks a ton better than it did. I am still waiting on the Rear Shocks to come in, and the fuel door I just found on this forum.
I still have to wire in the door actuator, and relays so I can roll the rear window down with the alarm.
03-08-2013, 02:25 PM
#4
Registered User
Thread Starter
Join Date: Feb 2013
Location: Hampton VA
Posts: 167
Likes: 0
Received 0 Likes
on
0 Posts
Here is a couple of more picutes, I has about 1.5 inches before the bump stops hit, and boy did they hit. And the leaf springs were flat on the overload spring. Now it is much better!


03-12-2013, 04:49 PM
#5
Registered User
Thread Starter
Join Date: Feb 2013
Location: Hampton VA
Posts: 167
Likes: 0
Received 0 Likes
on
0 Posts
Well did a little bit of work this week. I took 2 of the peeling center caps off my dads tundra, and gave him 2 of my nice center caps. Took the old ones and cut the center out to clear the manual locking hubs for the front. Then found some silver paint and painted them up.

I also built a wiring harness with 2 5 pin relays to operate the door actuator for the drivers side, and mounted the actuator in the door. I know have a power lock for the alarm on the drivers side. (Sorry no Pics)
Waiting on 2 more alarm parts to come it, the ultrasonic motion sensor, and the sound sensor. Getting this rig ready for a soft top!
Also have the gas door on the way this week, so it is coming along slow.


Trending Topics
03-15-2013, 03:58 PM
#10
Registered User
Thread Starter
Join Date: Feb 2013
Location: Hampton VA
Posts: 167
Likes: 0
Received 0 Likes
on
0 Posts
Ok, did some more work over the last couple of days to the truck. It has been throwing a CEL intermittently since I readjusted the timing. I noticed that the idle was not dropping when I jumped the connector. It was throwing a code 25,26,51,52.
I went ahead Thursday and finished some of the alarm features. I added a Glass break sensor, and a Proximity sensor for the rear part of the truck. Trying to get this thing ready for a soft top soon. I also rewired the interior widow switch to the rear switch so the interior switch would work with the ignition off.
While I was in there, I decided to test the auxiliary channels of the alarm with the rear window relay. I was able to tie the alarm in so I can now roll the window down and up with the alarm remote!
Today I cleaned the throttle body and reset the TPS, it was not adjusted correctly, I then reset the timing. It is running much better, but I need to address the timing chain pretty soon, I can hear the chain slapping the guides.
While I was working on that and relocating my antenna, the fuel door came in.
It did not have the lock, so I ran down to work and found my extra Snap-On tool box lock and some spare latches for the rear. To my surprise it fit the hole quite well. With a little cutting and bending I was able to get the door to work fine. It is too long to work with the interior door release, I will address that later.
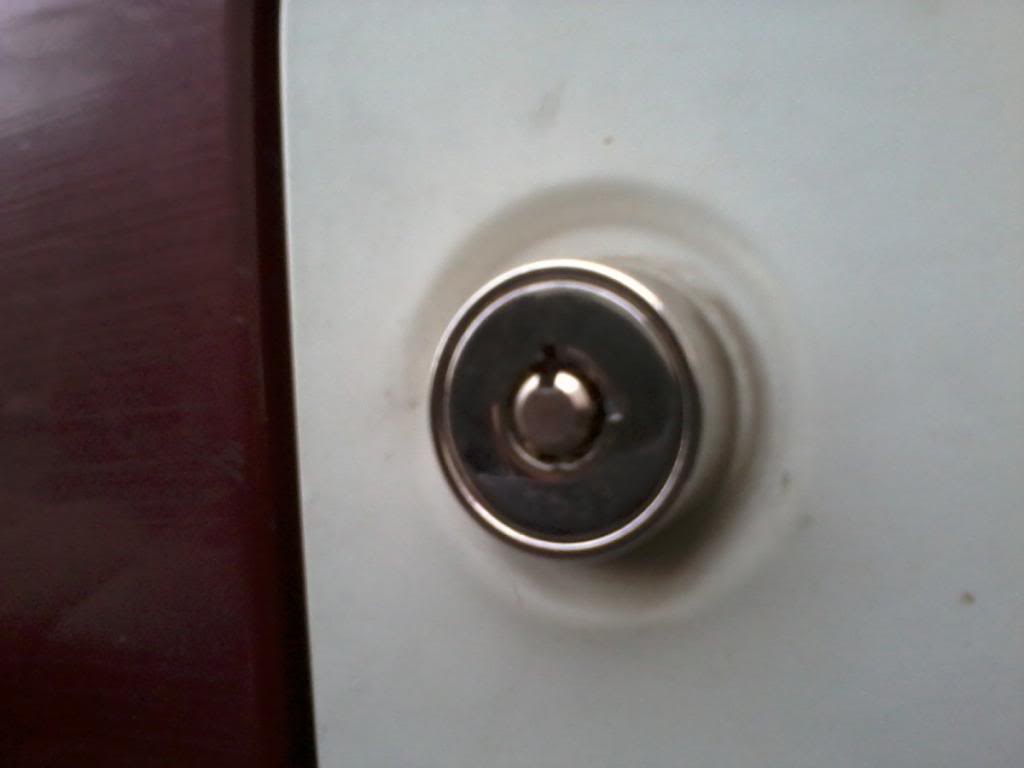
I like the look of the high security lock, I need to do a little work to the door since the post guy bent it a bit to get it in the mail box. I am also going to paint it just a flat black.
Here is the relocated antenna.
It looks better than the magnet mound, and actually is much better option on the RF side of things. Plus it keeps the profile lower, there are lots of tree's around here to take it out when offroad.
Got the center caps on.
Not the exact color, but it will work for now. Get some mud on them and you will not be able to tell the difference.
So I will have to drive it a bit and see if TPS adjustment helps the gas mileage and the 25,26 codes. It did get rid of the 51 code so that is a good thing. I think I am going to order the chain kit, and get this ready to roll. So chain kit, new tires, rear rock bumper, soft top and on the to do list.
I went ahead Thursday and finished some of the alarm features. I added a Glass break sensor, and a Proximity sensor for the rear part of the truck. Trying to get this thing ready for a soft top soon. I also rewired the interior widow switch to the rear switch so the interior switch would work with the ignition off.
While I was in there, I decided to test the auxiliary channels of the alarm with the rear window relay. I was able to tie the alarm in so I can now roll the window down and up with the alarm remote!
Today I cleaned the throttle body and reset the TPS, it was not adjusted correctly, I then reset the timing. It is running much better, but I need to address the timing chain pretty soon, I can hear the chain slapping the guides.
While I was working on that and relocating my antenna, the fuel door came in.
It did not have the lock, so I ran down to work and found my extra Snap-On tool box lock and some spare latches for the rear. To my surprise it fit the hole quite well. With a little cutting and bending I was able to get the door to work fine. It is too long to work with the interior door release, I will address that later.
I like the look of the high security lock, I need to do a little work to the door since the post guy bent it a bit to get it in the mail box. I am also going to paint it just a flat black.
Here is the relocated antenna.
It looks better than the magnet mound, and actually is much better option on the RF side of things. Plus it keeps the profile lower, there are lots of tree's around here to take it out when offroad.
Got the center caps on.
Not the exact color, but it will work for now. Get some mud on them and you will not be able to tell the difference.
So I will have to drive it a bit and see if TPS adjustment helps the gas mileage and the 25,26 codes. It did get rid of the 51 code so that is a good thing. I think I am going to order the chain kit, and get this ready to roll. So chain kit, new tires, rear rock bumper, soft top and on the to do list.
 03-17-2013, 11:04 AM
#14
Registered User
Thread Starter
Join Date: Feb 2013
Location: Hampton VA
Posts: 167
Likes: 0
Received 0 Likes
on
0 Posts
I was looking at the softtopper kit.
But I need to get a set of tires on this truck first. I am also getting some stuff ready for an OBA conversion. Although A/C comes in handy as hell here, I want OBA. I am not very far from the outer banks and I have a feeling I will be taking this rig to the beach more than the mountains.
Also need to address the flimsy bumper on the rear of the rig.
So the priorities:
New Tires
Timing Chain
Recovery Tools
OBA
Rear Bumper
Soft Top
 03-24-2013, 04:20 PM
#17
Registered User
Thread Starter
Join Date: Feb 2013
Location: Hampton VA
Posts: 167
Likes: 0
Received 0 Likes
on
0 Posts
Well got a little bit of an excuse to take the rig out and kick it in 4 wheel high. Not anything hardcore, but any excuse I will take.
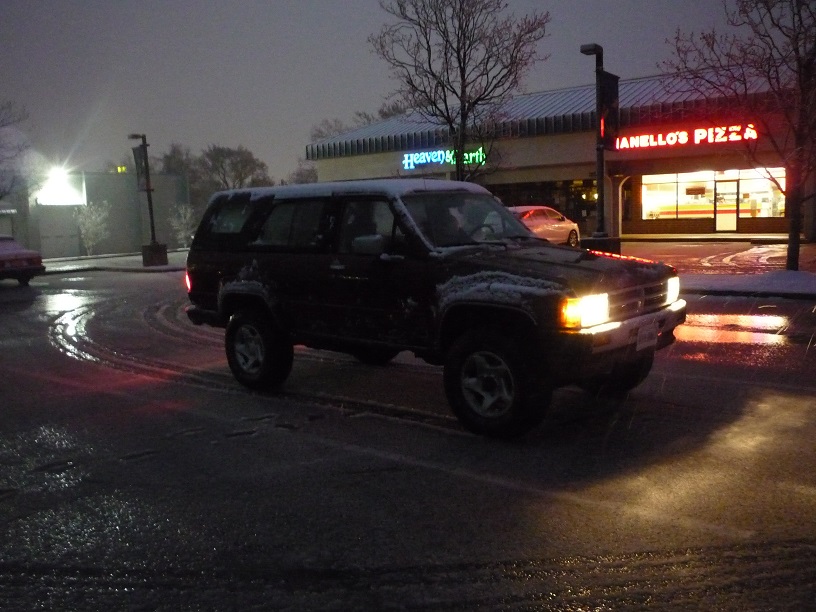
Anyways the 4wd is working good, and it was really easy to spin the tires in 2wd, very slushy and heavy wet snow. This was unexpected they were only calling for rain.
Anyways the 4wd is working good, and it was really easy to spin the tires in 2wd, very slushy and heavy wet snow. This was unexpected they were only calling for rain.
04-04-2013, 08:02 AM
#18
Registered User
Thread Starter
Join Date: Feb 2013
Location: Hampton VA
Posts: 167
Likes: 0
Received 0 Likes
on
0 Posts
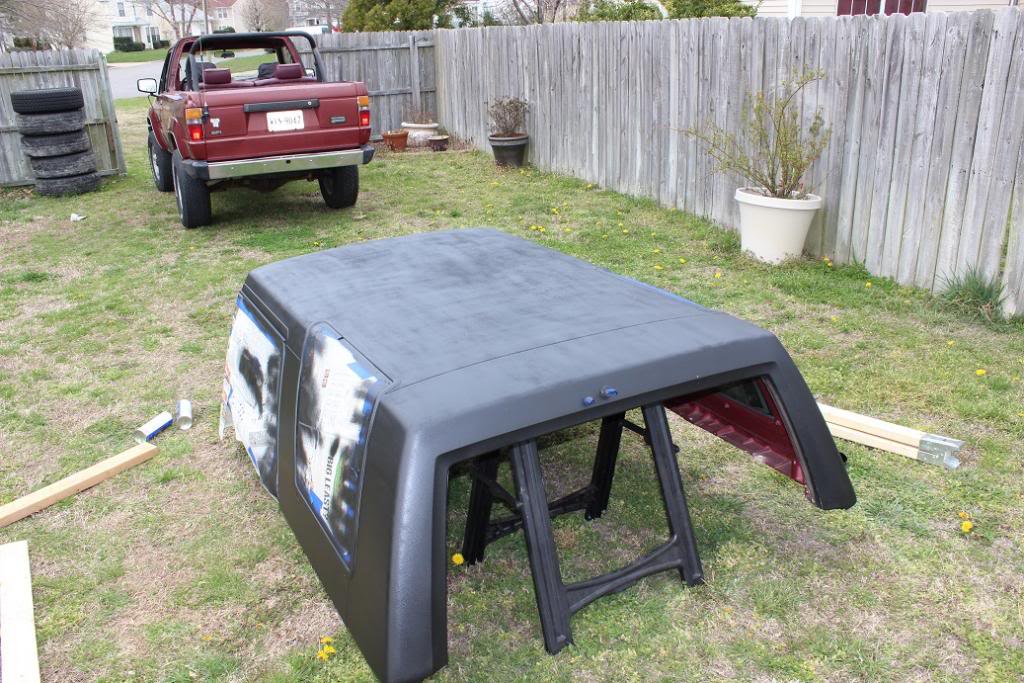
Pulled the top last night so I can refinish the top. It has seen better days, so I am going to spray it with bedliner.
I love this thing running topless, and I am highly motivated to get the soft top.
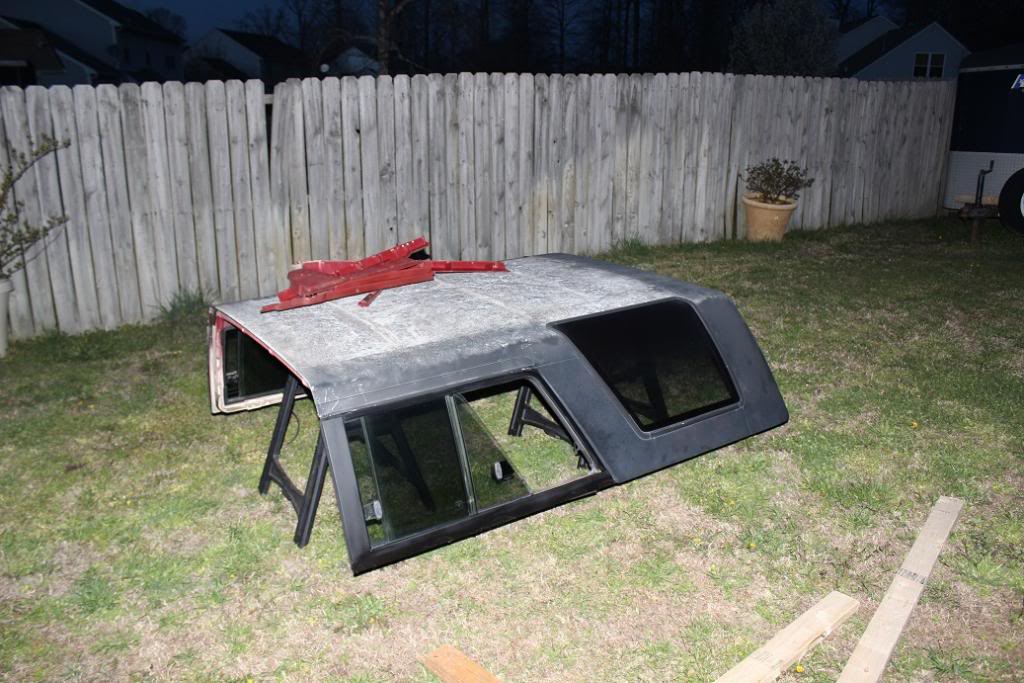
As you can see the fiberglass is not doing too well.
Ordered a trail gear rear bumper on Friday from Addicted Offroad, so hopefully it will be in soon and I can get it on there.
I will post updates when I am done refinishing the top.
I love this thing running topless, and I am highly motivated to get the soft top.
As you can see the fiberglass is not doing too well.
Ordered a trail gear rear bumper on Friday from Addicted Offroad, so hopefully it will be in soon and I can get it on there.
I will post updates when I am done refinishing the top.
04-04-2013, 12:40 PM
#19
Registered User
Thread Starter
Join Date: Feb 2013
Location: Hampton VA
Posts: 167
Likes: 0
Received 0 Likes
on
0 Posts
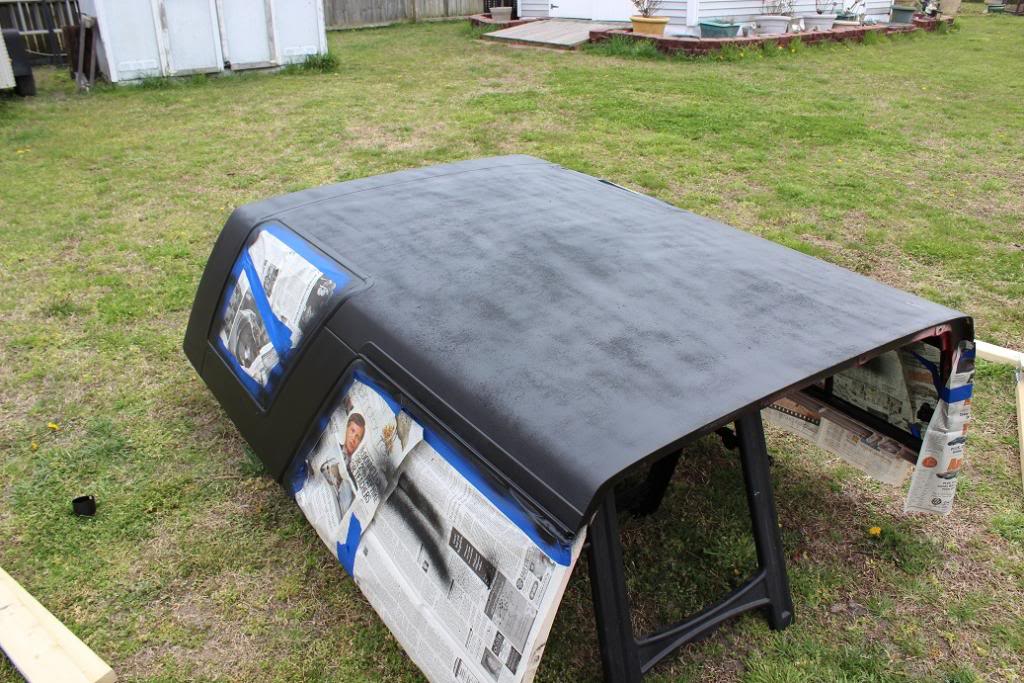
Well got the top sprayed with enough time before the rain that is suppose to get here. I still need a second coat for the top.
I can say that driving this thing without the top was awesome! I am sold on getting a soft top kit for it.
Although the top is not perfect, it looks so much better than what it did before. Plan is to hit it with a second coat on the top, then look at painting the top with a satin black with an HVLP gun.
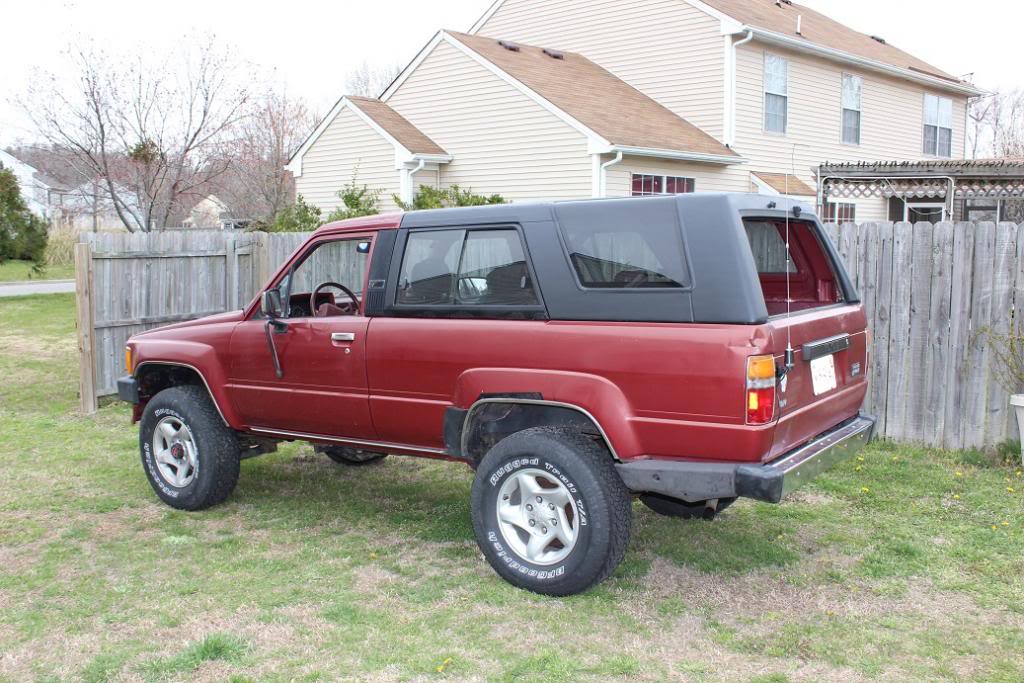
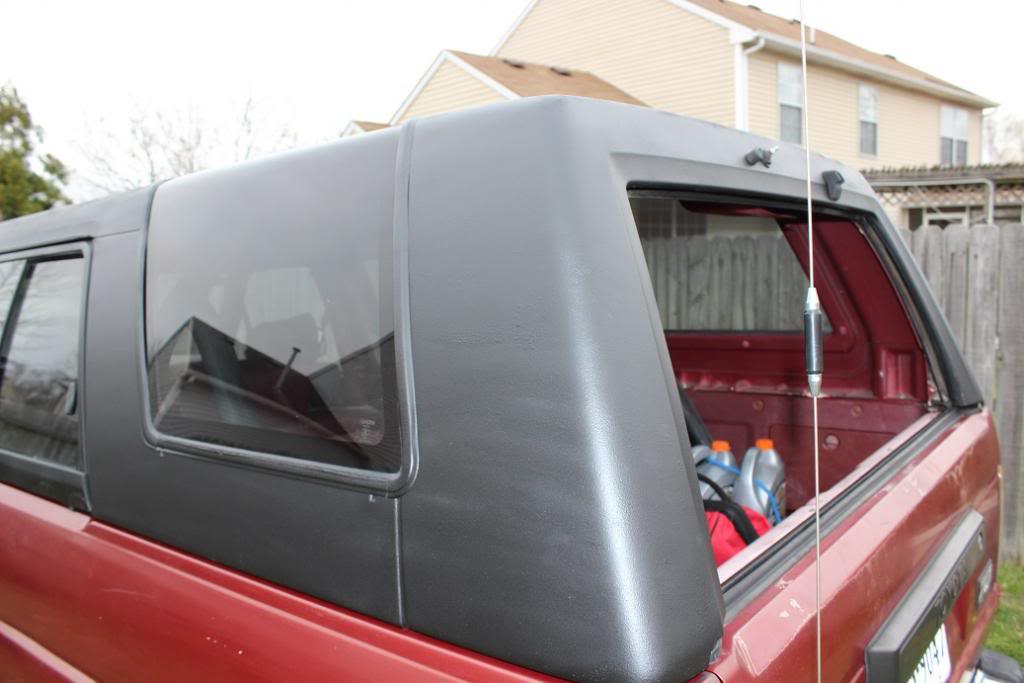
Overall I am very happy with how it turned out.
I can say that driving this thing without the top was awesome! I am sold on getting a soft top kit for it.
Although the top is not perfect, it looks so much better than what it did before. Plan is to hit it with a second coat on the top, then look at painting the top with a satin black with an HVLP gun.
Overall I am very happy with how it turned out.
04-04-2013, 06:21 PM
#20
Registered User
Good looking ride. The top turned out great.
Make sure to check out killertoytops.com...
I will suggest though, when you do the timing chain...replace the headgasket too. It sounds like you have the tools and the know how, so what's an extra 4 hours and $100 in a top end gasket kit from the dealer. Then you know what you have and what it can do.


