02-09-2016, 10:13 AM
Last edit by: IB Advertising
See related guides and technical advice from our community experts:
Browse all: Interior Guides
- Toyota 4Runner 1984-1995 How to Swap Gauge Cluster
Step by step instructions for do-it-yourself repairs
Browse all: Interior Guides

SR5 Gauge Cluster Swap - How-to, with pics!
12-21-2009, 09:13 PM
#61
Registered User
Join Date: Dec 2008
Location: DFW, Texas!
Posts: 1,015
Likes: 0
Received 0 Likes
on
0 Posts
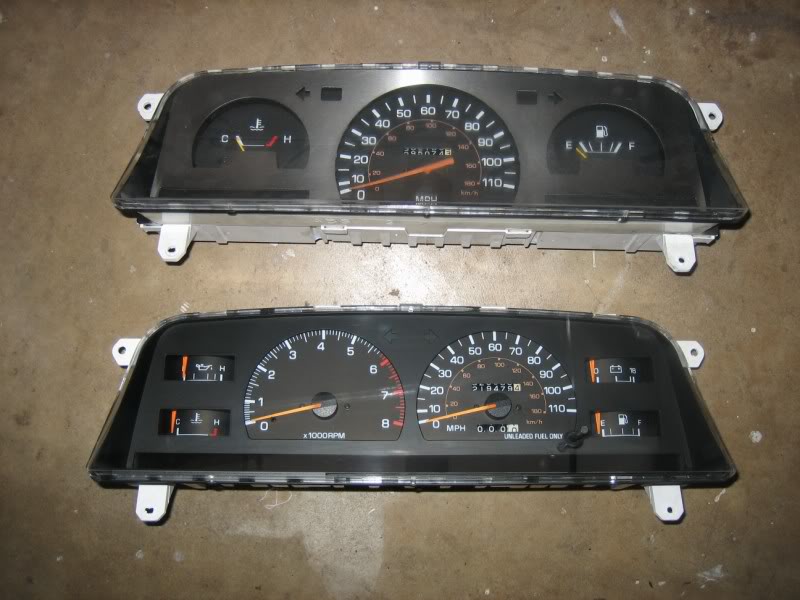
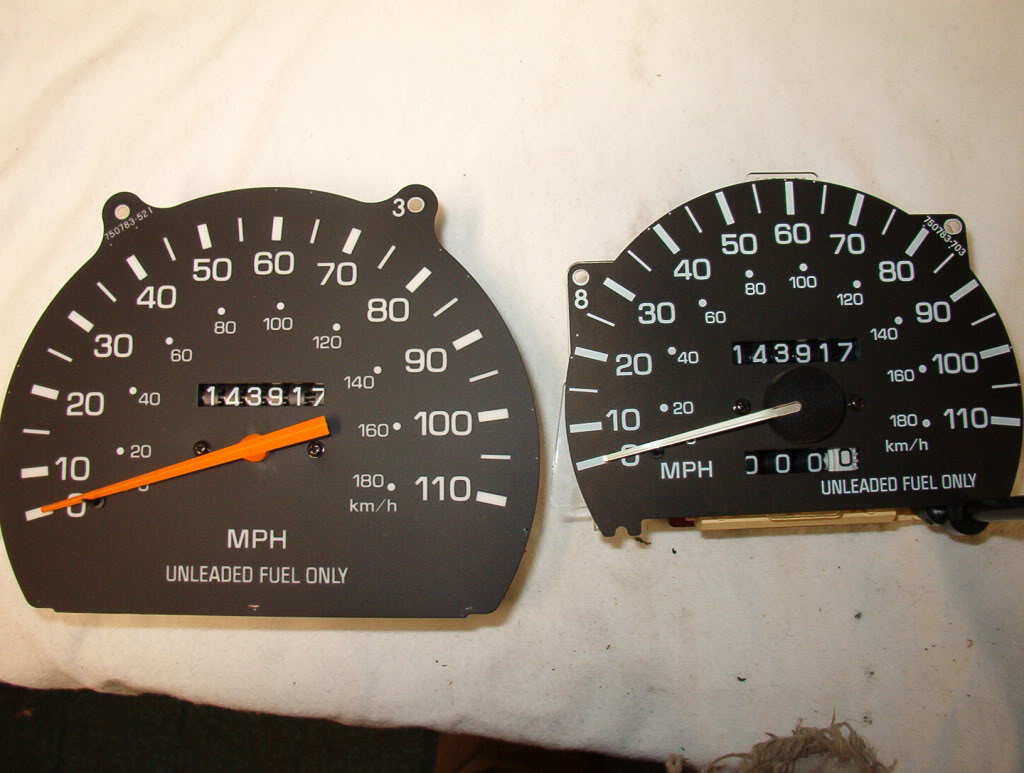
There are two sizes of bulbs in the SR5 gauge, best described as "big" and "small"  The "big" ones are about 1/4" in diameter and the "small" ones about 1/8".

The DLX Gauge only uses the "big" lights, the SR5 gauges use both sizes.

(DLX gauge is the upper one, SR5 is the lower one)
The SR5 gauges I bought had only a couple of the smaller lights in it (was short more than a handful required to be fully operational). I had to run down to the local Toyota dealer and jaw-flap with the counter guys until finally one brought out a box of "assorted dash lights" and let me finger through it, flipping out the small bulb+carrier assemblies that I thought would work.
Turns out the plastic carriers are semi-standard, Mazda also used the same basic design in their instrument clusters.
Counting the holes above, there are eight (8) small ones, eight (8) clear big ones, and three (3) tinted big ones (the three holes across the center are the ones you tint for instrument cluster color).
Some of the idiot lots aren't used from the factory, so not all of these holes are functional. The numbers above are good to use knowing that you'll have some extra. I filled every hole, thinking of the unused ones as "spares" for field emergencies.
The "big" ones are about 1/4" in diameter and the "small" ones about 1/8".The DLX Gauge only uses the "big" lights, the SR5 gauges use both sizes.
(DLX gauge is the upper one, SR5 is the lower one)
The SR5 gauges I bought had only a couple of the smaller lights in it (was short more than a handful required to be fully operational). I had to run down to the local Toyota dealer and jaw-flap with the counter guys until finally one brought out a box of "assorted dash lights" and let me finger through it, flipping out the small bulb+carrier assemblies that I thought would work.
Turns out the plastic carriers are semi-standard, Mazda also used the same basic design in their instrument clusters.
Counting the holes above, there are eight (8) small ones, eight (8) clear big ones, and three (3) tinted big ones (the three holes across the center are the ones you tint for instrument cluster color).
Some of the idiot lots aren't used from the factory, so not all of these holes are functional. The numbers above are good to use knowing that you'll have some extra. I filled every hole, thinking of the unused ones as "spares" for field emergencies.
Last edited by Windsor; 12-21-2009 at 09:26 PM.
 12-22-2009, 09:23 AM
#62
Registered User
Join Date: Jun 2009
Location: Helena Montana
Posts: 493
Likes: 0
Received 0 Likes
on
0 Posts
 with a wrench of coarse
 then the easy out broke in the hole in the center of that
12-22-2009, 09:33 AM
then the easy out broke in the hole in the center of that
12-22-2009, 09:33 AM
#63
Registered User

Join Date: Mar 2009
Location: just north of seattle, wa
Posts: 183
Received 0 Likes
on
0 Posts
wow, thanks! what to delux clusters look like, because although I have a delux truck, my cluster looks like the SR5 pics up above.
There are two sizes of bulbs in the SR5 gauge, best described as "big" and "small" The "big" ones are about 1/4" in diameter and the "small" ones about 1/8".
The DLX Gauge only uses the "big" lights, the SR5 gauges use both sizes.
(DLX gauge is the upper one, SR5 is the lower one)
The SR5 gauges I bought had only a couple of the smaller lights in it (was short more than a handful required to be fully operational). I had to run down to the local Toyota dealer and jaw-flap with the counter guys until finally one brought out a box of "assorted dash lights" and let me finger through it, flipping out the small bulb+carrier assemblies that I thought would work.
Turns out the plastic carriers are semi-standard, Mazda also used the same basic design in their instrument clusters.
Counting the holes above, there are eight (8) small ones, eight (8) clear big ones, and three (3) tinted big ones (the three holes across the center are the ones you tint for instrument cluster color).
Some of the idiot lots aren't used from the factory, so not all of these holes are functional. The numbers above are good to use knowing that you'll have some extra. I filled every hole, thinking of the unused ones as "spares" for field emergencies.
The "big" ones are about 1/4" in diameter and the "small" ones about 1/8".The DLX Gauge only uses the "big" lights, the SR5 gauges use both sizes.
(DLX gauge is the upper one, SR5 is the lower one)
The SR5 gauges I bought had only a couple of the smaller lights in it (was short more than a handful required to be fully operational). I had to run down to the local Toyota dealer and jaw-flap with the counter guys until finally one brought out a box of "assorted dash lights" and let me finger through it, flipping out the small bulb+carrier assemblies that I thought would work.
Turns out the plastic carriers are semi-standard, Mazda also used the same basic design in their instrument clusters.
Counting the holes above, there are eight (8) small ones, eight (8) clear big ones, and three (3) tinted big ones (the three holes across the center are the ones you tint for instrument cluster color).
Some of the idiot lots aren't used from the factory, so not all of these holes are functional. The numbers above are good to use knowing that you'll have some extra. I filled every hole, thinking of the unused ones as "spares" for field emergencies.
12-22-2009, 02:07 PM
#64
Registered User
Join Date: Dec 2008
Location: DFW, Texas!
Posts: 1,015
Likes: 0
Received 0 Likes
on
0 Posts
Seen earlier in this thread.
I should point out, my gauges are for '87, whereas superbleeder's are for '91. These are a bit different (compare my photo with other back-shot photos in this thread). The bulb count is probably a bit different from what I posted (sorry about that).
I should point out, my gauges are for '87, whereas superbleeder's are for '91. These are a bit different (compare my photo with other back-shot photos in this thread). The bulb count is probably a bit different from what I posted (sorry about that).
12-22-2009, 02:48 PM
#65
Contributing Member
Thread Starter
 well you took the same steps I would have, but now it's time to go to alternate methods... going to have to get the broken off easy-out outta there and try again... you REALLY don't want to have to drill that sucker out... all of the metal shavings are going to go right into the oil passages... and unless I'm mistaken, I'm not sure that the sensors are normally made out of a farris material, so a magnet might not pick them up
  maybe try the next size bigger easy-out, and really tap it in there with a hammer to get a good seat on it
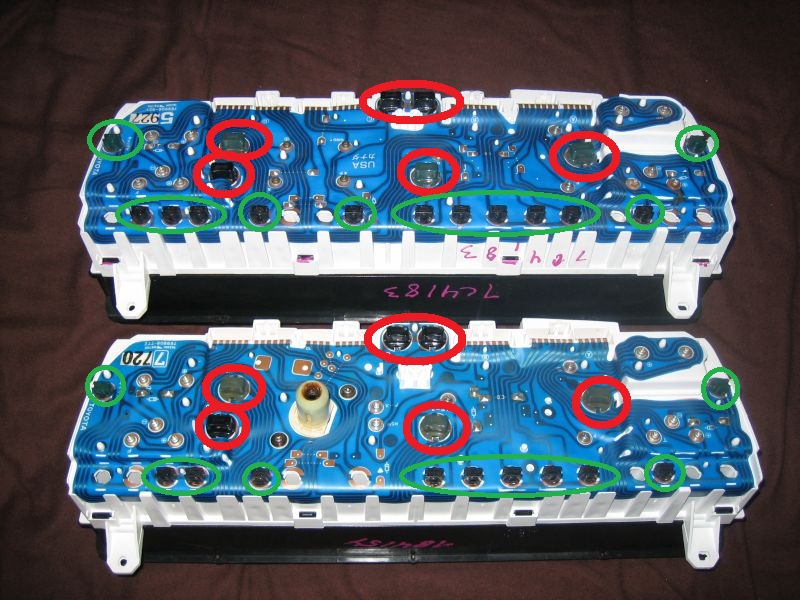
as far as how many there are, I'm not sure about the ealier years, but on 3rd gen trucks and 2nd gen Runners, on the SR5 clusters, there's a total of 5 large 194 bulbs (3 for gauge back-lighting, and 2 for turn signal indicators), and there can be up to 18 of the smaller 286 bulbs (2 are for back-lighting on the outter edges, and all of the rest are all for dummy-lights along the bottom of the cluster). Note that not all of the bottom lights will be used; for me, I didn't need to put bulbs in the spots for the ABS light and so on
circled in RED are the large 194 bulb locations, and circled in GREEN are the smaller 286 bulb locations; electronic speedometer version on top, cable driven version on the bottom; both have the same bulb count and location:
Last edited by iamsuperbleeder; 12-22-2009 at 02:51 PM.
12-22-2009, 03:16 PM
#66
Registered User
more specifically, the "large" bulbs are #194's, and the small bulbs are #286's, and they pop out of that little twist-lock housing. your local auto parts store should carry plenty
as far as how many there are, I'm not sure about the ealier years, but on 3rd gen trucks and 2nd gen Runners, on the SR5 clusters, there's a total of 5 large 194 bulbs (3 for gauge back-lighting, and 2 for turn signal indicators), and there can be up to 18 of the smaller 286 bulbs (2 are for back-lighting on the outter edges, and all of the rest are all for dummy-lights along the bottom of the cluster). Note that not all of the bottom lights will be used; for me, I didn't need to put bulbs in the spots for the ABS light and so on
as far as how many there are, I'm not sure about the ealier years, but on 3rd gen trucks and 2nd gen Runners, on the SR5 clusters, there's a total of 5 large 194 bulbs (3 for gauge back-lighting, and 2 for turn signal indicators), and there can be up to 18 of the smaller 286 bulbs (2 are for back-lighting on the outter edges, and all of the rest are all for dummy-lights along the bottom of the cluster). Note that not all of the bottom lights will be used; for me, I didn't need to put bulbs in the spots for the ABS light and so on
Oh and I looked at my title and my rig is a DLX also but it has the SR5 badges on it. Of course my tail gate is red, the front drivers panel and hood are black (underneath the Royal Blue) so I'm guessing when the PO said it had some minor body damage at one point what he meant was that it was hit hard front and rear. No worries though since it tracks straight and the frame is still the way it should be.
12-22-2009, 03:34 PM
#67
Registered User
Join Date: Dec 2008
Location: DFW, Texas!
Posts: 1,015
Likes: 0
Received 0 Likes
on
0 Posts
as far as how many there are, I'm not sure about the ealier years, but on 3rd gen trucks and 2nd gen Runners, on the SR5 clusters, there's a total of 5 large 194 bulbs (3 for gauge back-lighting, and 2 for turn signal indicators), and there can be up to 18 of the smaller 286 bulbs (2 are for back-lighting on the outter edges, and all of the rest are all for dummy-lights along the bottom of the cluster). Note that not all of the bottom lights will be used; for me, I didn't need to put bulbs in the spots for the ABS light and so on
To clarify, I didn't have carriers for the 286 bulbs, which is why I had to head to the Toyota dealer.
12-22-2009, 06:02 PM
#69
Contributing Member
Thread Starter
no problem guys
yeah the larger 194 bulbs that are used for back-lighting the gauges will have the green condoms on them to tint the light green, as well as the two outter smaller ones as well. They're not really neccesary, they just give the gauges that original green tint; if you leave them off, they might actually be a bit brighter, but the green tint will go away, and they may actually come off as a little on the yellowish side.
You can get amber bulbs to put in there, for the larger 194's for sure; they're used a lot in turn signals and marker lights. The smaller 286 bulbs though, you may have a more difficult time finding those in amber; they're pretty much only used in guage clusters, simply because of their size.
But of coarse, if you want to throw some crazy lighting in there, there's always the alternative
01-01-2010, 07:31 AM
#70
Registered User

Join Date: Jan 2010
Posts: 6
Likes: 0
Received 0 Likes
on
0 Posts
91 toyota 22re tachometer
I just did a sr5 gauge swap on my 91 22re and everything works but the tach and it doesn't move at all. Does anyone know if I have to run a wire and where from and to?
Thanks?
Thanks?
01-01-2010, 03:48 PM
#72
Registered User
Join Date: Jan 2010
Posts: 6
Likes: 0
Received 0 Likes
on
0 Posts
22re tach wire
I have checked several posts and it looks like the 22r and the 22 re have different wiring harnesses for the tach and I can't find the tach wire for the 22re. Anyone know were it is?
01-02-2010, 08:37 AM
#73
Registered User
Join Date: Nov 2009
Location: Hopkinton, MA
Posts: 62
Likes: 0
Received 0 Likes
on
0 Posts
I remember reading somewhere you dont even need the wiring harness. Some came from the factory pre-wired for the tach and some didn't. You could hook it up like you would an aftermarket tach gauge. I believe there are 2 or 3 contacts on the back of the tach on the circuit board where you can solder your ground wire and then solder another that you can connect to your ignition coil (I think?). If i remember correctly it doesn't matter which contacts you solder your wires to.
Look here: http://www.siestaoffroad.com/clustertech.html
Down the pge a little shows the locations of the contacts to attach wires so that you don'the wiring ha need the wiring harness.
Look here: http://www.siestaoffroad.com/clustertech.html
Down the pge a little shows the locations of the contacts to attach wires so that you don'the wiring ha need the wiring harness.
Last edited by 92 2wd; 01-02-2010 at 08:41 AM.
 not sure about how those came and all.... sorry
  01-03-2010, 03:15 AM
#76
Registered User

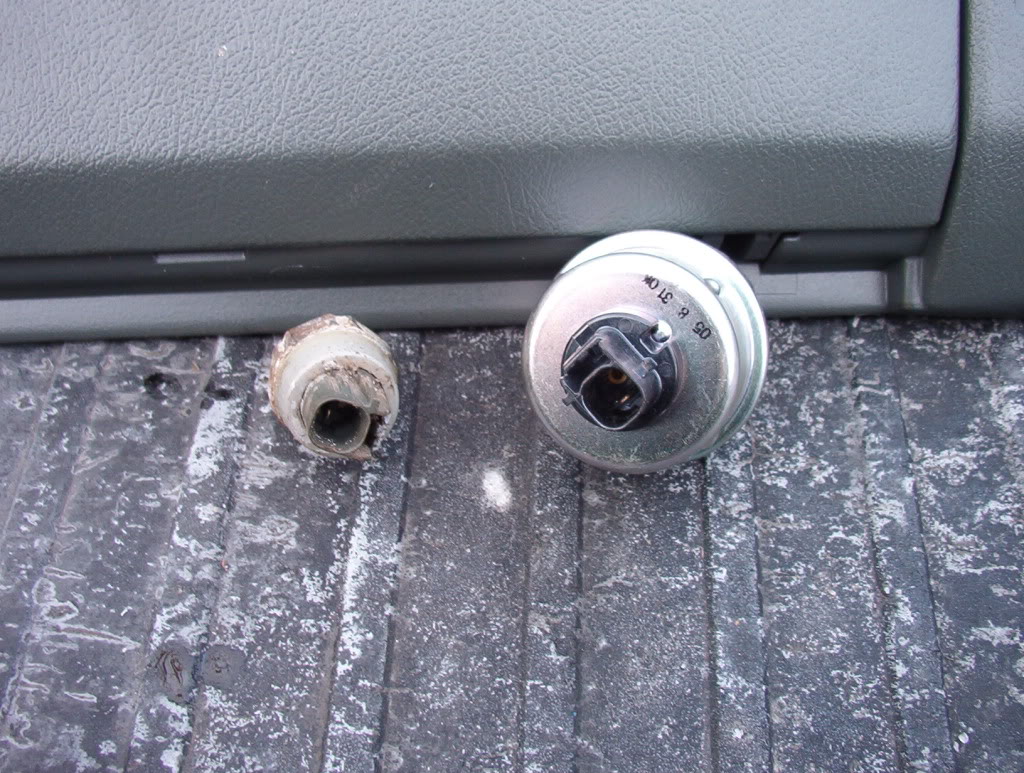
If you are interested there is another way to change the milage on the register.
From your first picture where you have the register out of the speedometer assembly and you are looking at the grease spread around you will notice a silver rod that holds the keepers of the number cylinders in place. If you take a pair of needle nose pliers or vice grips and open up the crimps on each end of the rod you can slide the rod out. Then there is enough side play on the number cylinders to readjust your mileage to what your previous cluster was. Re-align the tabs slide the rod back in and recrimp the ends. You don't have to worry about stretching the spring ar breaking the indicator arm.
I've done this to several Toyotas over the years and Fords before that, with no problems with the register after this mod.
01-03-2010, 03:27 AM
#77
Registered User
I forgot to add, the number registers are meant to move in only one direction and if you try to turn the numbers back (as was suggested earlier in this post) without doing what I said above you will break the the tabs off and the numbers will show white between the cylinders. If you ever see white between the cylinders of a register you will know immediately that someone has turned it back.
01-14-2010, 02:03 PM
#78
Contributing Member
Join Date: Jan 2004
Location: Trafford, Pa
Posts: 1,202
Likes: 0
Received 0 Likes
on
0 Posts
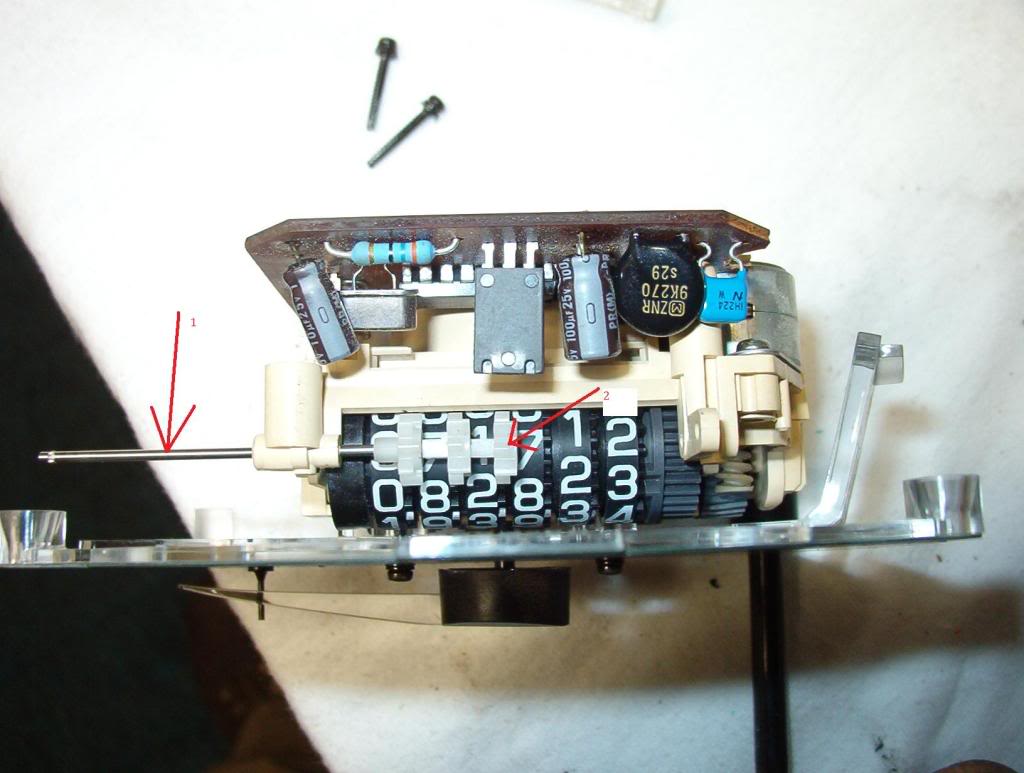
Thanks for the great writeup. I'd thought I would add some photos of a electronic odometer swap. I changed my miles this way without removing the speedometer needle.
Picture of a electronic piece:
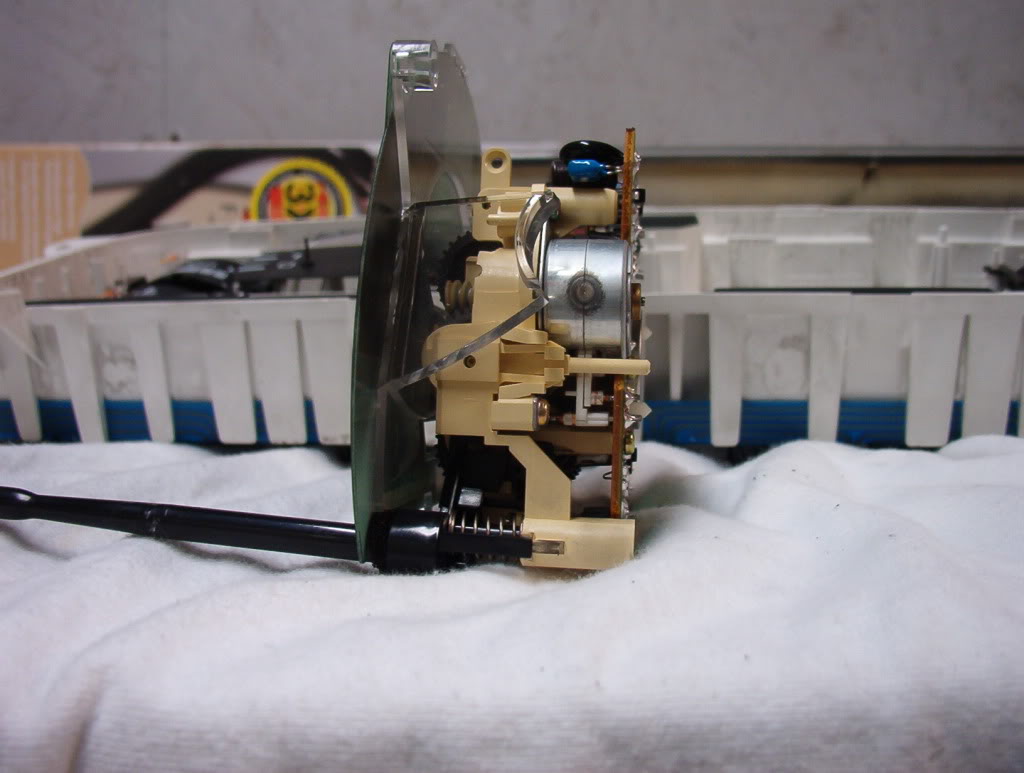
Remove this black finger looking piece first. Just pops right out.
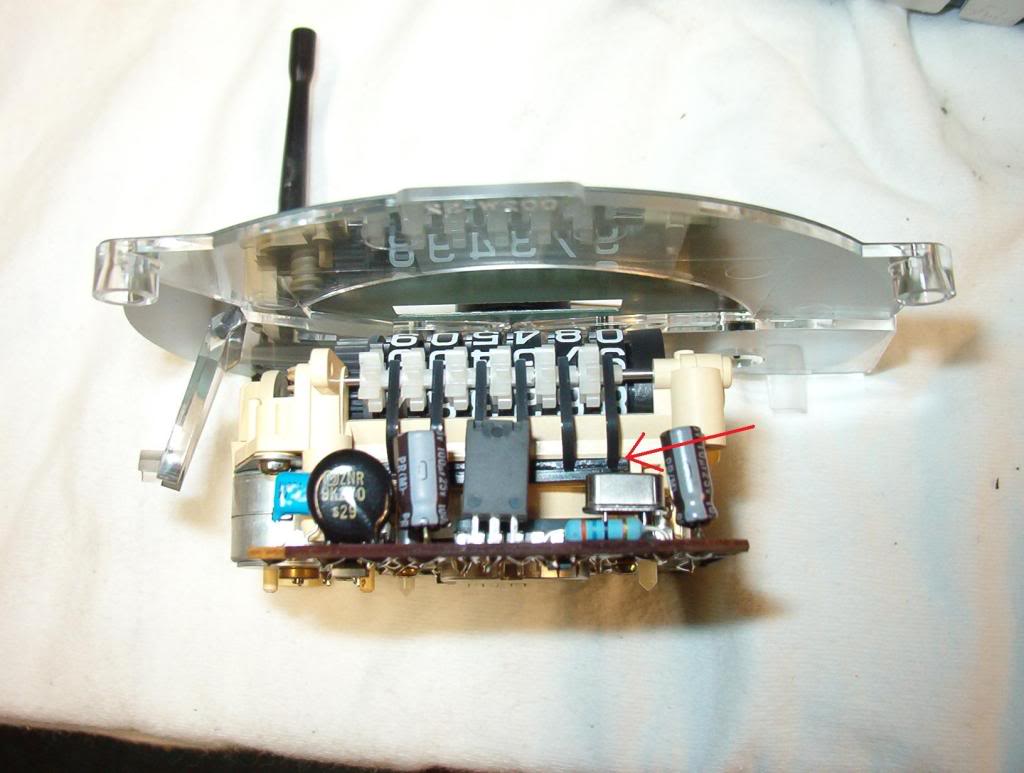
I used a ice pick to push out the rod(no. 1)
Remove the white gears(No. 2)
You should be able to set the miles to the correct reading by just turning them freely. You'll need some patient putting it back together. Slide the rod back in while placing the white gears on one at a time. Keep checking to make sure the miles are still reading correctly. Put the black finger thing in.
Picture of a electronic piece:
Remove this black finger looking piece first. Just pops right out.
I used a ice pick to push out the rod(no. 1)
Remove the white gears(No. 2)
You should be able to set the miles to the correct reading by just turning them freely. You'll need some patient putting it back together. Slide the rod back in while placing the white gears on one at a time. Keep checking to make sure the miles are still reading correctly. Put the black finger thing in.