She's Alive (Very Pic Heavy)
 11-27-2011, 07:41 PM
#1
Registered User
Thread Starter

Join Date: Dec 2010
Location: Temecula, CA
Posts: 25
Likes: 0
Received 0 Likes
on
0 Posts
She's Alive (Very Pic Heavy)
Some of you might have seen previous posts where i rolled my 87'. Took it as an opportunity to clear up all the rust, and get everything back into a solid chasis before beginning to upgrade for the trail. So heres a little photo storyline. Feel free to ask any questions reguarding the body swap, feel like i know the inside and out of these 1st gens pretty well by now.
As she sat when i first towed her home w/ a blown head gasket. Obviously has the saggy butt syndrom, paint was pretty oxidized and quite a few rust spots eating through the fenders.

Went through and fixed the headgaset. And went ahead with a valve job, and added a engnbldr cam.


Did the Zuk Mod to fix the saggy back end, and replaced the warn out rancho shocks with a full set of KYB Monomax.

Shortly After the suspension upgrade she went skirt up. Was being dumb, and went a bit too fast around a corner, the passenger side tire poped off the bead, and The girlfriend and me went a whole 1/2 of a roll.


Found out just how bad the rust was, had eaten most of its way through the a-pillars, lucky it didn't crush more than it did.

Found a donor body off an 89 automatic V6 (mine is a 22re 5sp) in very clean and rust free shape.

Old Body off

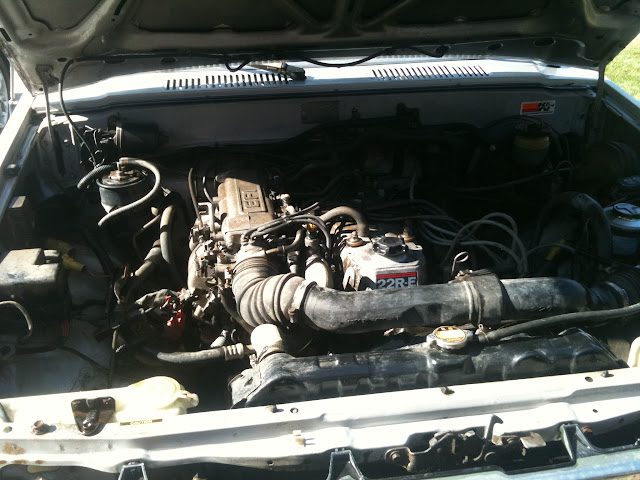
New 140 amp toyota alt installed (off a jaguar, plug and play)

Thorley Header found on Craigslist for $30. Cleaned up and painted and installed.

New Body on, primed.

....And im getting Lazy, so as she sits today, $50 roll on rustoleum paint job.

Sorry for all the pics, and the long post, but I always loved seeing what others have done on this forum and the steps they took. Hope this inspires others to rebuild their own, and just enjoy these 1st Gens.
As she sat when i first towed her home w/ a blown head gasket. Obviously has the saggy butt syndrom, paint was pretty oxidized and quite a few rust spots eating through the fenders.
Went through and fixed the headgaset. And went ahead with a valve job, and added a engnbldr cam.
Did the Zuk Mod to fix the saggy back end, and replaced the warn out rancho shocks with a full set of KYB Monomax.
Shortly After the suspension upgrade she went skirt up. Was being dumb, and went a bit too fast around a corner, the passenger side tire poped off the bead, and The girlfriend and me went a whole 1/2 of a roll.
Found out just how bad the rust was, had eaten most of its way through the a-pillars, lucky it didn't crush more than it did.
Found a donor body off an 89 automatic V6 (mine is a 22re 5sp) in very clean and rust free shape.
Old Body off
New 140 amp toyota alt installed (off a jaguar, plug and play)
Thorley Header found on Craigslist for $30. Cleaned up and painted and installed.
New Body on, primed.
....And im getting Lazy, so as she sits today, $50 roll on rustoleum paint job.
Sorry for all the pics, and the long post, but I always loved seeing what others have done on this forum and the steps they took. Hope this inspires others to rebuild their own, and just enjoy these 1st Gens.
 11-27-2011, 09:22 PM
#3
Registered User
Thread Starter
Join Date: Dec 2010
Location: Temecula, CA
Posts: 25
Likes: 0
Received 0 Likes
on
0 Posts
Thanks, Yea its definitely got some orange peel, but for what im going to use it for I am more than happy with the paint job.
The alt is actually a 120amp...i think off an older xj jaguar...ill look up the part number to let you know for sure. But it has the same connecter as our stock alt. but is a bit larger. Also came with serpentine pully, so just had to swap on the v-belt pulley and it was good to go. I hate having to cut up stock wiring unless i absolutely need to.
The alt is actually a 120amp...i think off an older xj jaguar...ill look up the part number to let you know for sure. But it has the same connecter as our stock alt. but is a bit larger. Also came with serpentine pully, so just had to swap on the v-belt pulley and it was good to go. I hate having to cut up stock wiring unless i absolutely need to.
11-28-2011, 01:02 PM
#7
Registered User
Definitely want to hear more about this jaguar alternator.
Good job fixing the flop right, most people on here would half-harass the repair and call it a mud buggy.
Good job fixing the flop right, most people on here would half-harass the repair and call it a mud buggy.
Trending Topics
 11-28-2011, 06:17 PM
#12
Registered User
More detail on the paint! Was it the Roll, sand, roll, sand, roll, sand, roll, sand, roll, sand one? Or just a quick roll on? Either way, it looks great. I've been considering a roll on black job for my 87', but i'm not excited about that much sanding, cause i'm lazy  . I've always noticed that rustoleum dries pretty smooth even if rolled on pretty thick. Probably because it takes 6 months to dry...
. I've always noticed that rustoleum dries pretty smooth even if rolled on pretty thick. Probably because it takes 6 months to dry...
11-28-2011, 06:48 PM
#13
Registered User
Thread Starter
Join Date: Dec 2010
Location: Temecula, CA
Posts: 25
Likes: 0
Received 0 Likes
on
0 Posts
Thanks guys on the compliments on the paint.
It was a roll on. 2 coats, color sand, repeat. I tried to color sand it down then buff it out, but was having alot of problems burning through the edges. Ended up just putting on 2 more coats over a pretty flat painted surface and keeping it there. Still hasn't had a polish put over it. It definitely is not a fast process, but alot cleaner than spraying it.
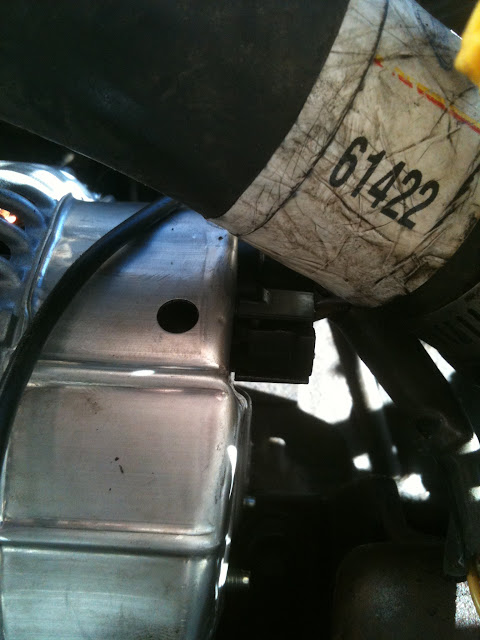
As far as the Alt goes, its Denso Part number 210-0406. And from what I can find is off a 93-37 XJ6. My Dad works at a shop that rebuilds alts and starters for Denso, and found this one plugs right in.
Again it comes with a serpentine belt pulley originally, so he had to swap a v-belt pulley onto it ( I think he had to enlarge the hole on the pulley a little for it to fit, not too hard).
As far as fitment goes, it is a larger alt all together, but it does bolt up to the stock location. Its a tight squeeze with the water inlet, and i had to bend the pulley mount a little up to get it to match, but I can adjust the belt its full range.
I went ahead and upgraded the "big 3" alt power, and ground to keep up with the extra amps when i start upgrading to offroad lights and a winch.
Here are a few pics for comparison.


It was a roll on. 2 coats, color sand, repeat. I tried to color sand it down then buff it out, but was having alot of problems burning through the edges. Ended up just putting on 2 more coats over a pretty flat painted surface and keeping it there. Still hasn't had a polish put over it. It definitely is not a fast process, but alot cleaner than spraying it.
As far as the Alt goes, its Denso Part number 210-0406. And from what I can find is off a 93-37 XJ6. My Dad works at a shop that rebuilds alts and starters for Denso, and found this one plugs right in.
Again it comes with a serpentine belt pulley originally, so he had to swap a v-belt pulley onto it ( I think he had to enlarge the hole on the pulley a little for it to fit, not too hard).
As far as fitment goes, it is a larger alt all together, but it does bolt up to the stock location. Its a tight squeeze with the water inlet, and i had to bend the pulley mount a little up to get it to match, but I can adjust the belt its full range.
I went ahead and upgraded the "big 3" alt power, and ground to keep up with the extra amps when i start upgrading to offroad lights and a winch.
Here are a few pics for comparison.
11-29-2011, 06:43 AM
#16
Paint looks great! Good job!! Thanks for the alt.info. ill be doing that eventually. You mentione the plug is identical but bigger? So does it still plug in fine? Also,what pulley did you use, the stock one from the old alt.?
Last edited by streetlancer; 11-29-2011 at 06:51 AM.


