Rear Disc Swap
 02-19-2007, 04:18 PM
#1
Contributing Member
Thread Starter
Rear Disc Swap
Rear Disc Brake Swap
Vehicles: 86-95 Pickup or 4Runner
This swap: '91 4Runner, SAS with rear leaf swap
I found the factory Toyota drum brakes to be cumbersome, difficult to work on and prone to getting packed with all sorts of unfriendly elements once out on the trails. I made a mental note that the next time I needed to disassemble my rear axle for maintenance I would look into upgrading the rear brake system to discs. When my ARB locker started to leak I decided there was no time like the present.
There are many different ways to do this swap and I researched the options thoroughly before diving in. I found there were many threads with parts of the puzzle, but few showed the whole process. That is exactly what I have tried to do here. Present all the bits and pieces along with the steps involved so others can use this information should they attempt such an upgrade.
As a warning, braking systems are nothing to be taken lightly. It is not only your own safety but that of other road and trail users you must take into consideration. The following is how I did my swap, and is not the only way, but simply one way. I would strongly suggest against attempting such a swap unless you are fully confident in your mechanical abilities and thoroughly understand the process.
No short cuts should be taken. Responsibility for success is solely your own.
A few notes:
The following steps do not have to be taken in the exact order, just happened to be the way it worked for me.
Make sure all the fittings you order thread together and are correct before you begin. Some of the adapters won't be found at your local auto or hardware store and could cause significant delays.
Brake fluid eats paint. Keep rags handy and do not let fluid sit on any surface you care about.
I did not mention, but you may/ will need differential oil, lots of brake fluid, brake pads for your GM calipers, 12" to 20" sections of hard line (for rear axle), flare wrenches, good selection of metric tools, a few standard tools and one 3/8" allen wrench. An angle grinder or similar cutting tool wouldn't hurt either.
This project would be a good time to replace your rear axle bearings and related seals since both axles will be removed to complete the job.
This project took me a full day once I had everything together. Cost came in at under $400. I am not the fastest wrench and I got lucky on a few parts, your time and costs may vary.
Here is a quick overview of the steps involved:
Order parts
Order or find your GM calipers
Remove LSPV
Eliminate ABS routing (if applicable)
Remove rear axles
Remove drum brake assemblies
Remove backing plates
Install caliper brackets
Install rotors, calipers, hard and soft lines
Replace master cylinder
Install proportioning valve
Bleed brake system
Road test and adjust
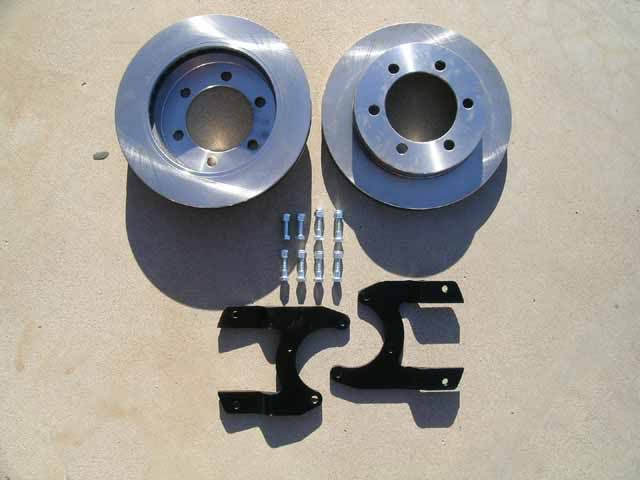
Step 1: I chose to purchase the caliper brackets and rotors from Sky Manufacturing (http://www.sky-manufacturing.com/toyota.htm) You can get the rotors on your own, but you will have to have the centers turned out to accept the Toyota axle center. This dimension can vary between model years, so measure accurately. I felt the price from Sky for modified rotors was reasonable and would save me some time.
From Sky I bought the following:
TOY-RDB-001 (Qty 1pr): disc caliper brackets and hardware
TOY-RDR-001 (Qty 1pr): modified Chevy rotors
This is what UPS brought me from Sky Manufacturing:
Vehicles: 86-95 Pickup or 4Runner
This swap: '91 4Runner, SAS with rear leaf swap
I found the factory Toyota drum brakes to be cumbersome, difficult to work on and prone to getting packed with all sorts of unfriendly elements once out on the trails. I made a mental note that the next time I needed to disassemble my rear axle for maintenance I would look into upgrading the rear brake system to discs. When my ARB locker started to leak I decided there was no time like the present.
There are many different ways to do this swap and I researched the options thoroughly before diving in. I found there were many threads with parts of the puzzle, but few showed the whole process. That is exactly what I have tried to do here. Present all the bits and pieces along with the steps involved so others can use this information should they attempt such an upgrade.
As a warning, braking systems are nothing to be taken lightly. It is not only your own safety but that of other road and trail users you must take into consideration. The following is how I did my swap, and is not the only way, but simply one way. I would strongly suggest against attempting such a swap unless you are fully confident in your mechanical abilities and thoroughly understand the process.
No short cuts should be taken. Responsibility for success is solely your own.
A few notes:
The following steps do not have to be taken in the exact order, just happened to be the way it worked for me.
Make sure all the fittings you order thread together and are correct before you begin. Some of the adapters won't be found at your local auto or hardware store and could cause significant delays.
Brake fluid eats paint. Keep rags handy and do not let fluid sit on any surface you care about.
I did not mention, but you may/ will need differential oil, lots of brake fluid, brake pads for your GM calipers, 12" to 20" sections of hard line (for rear axle), flare wrenches, good selection of metric tools, a few standard tools and one 3/8" allen wrench. An angle grinder or similar cutting tool wouldn't hurt either.
This project would be a good time to replace your rear axle bearings and related seals since both axles will be removed to complete the job.
This project took me a full day once I had everything together. Cost came in at under $400. I am not the fastest wrench and I got lucky on a few parts, your time and costs may vary.
Order parts
Order or find your GM calipers
Remove LSPV
Eliminate ABS routing (if applicable)
Remove rear axles
Remove drum brake assemblies
Remove backing plates
Install caliper brackets
Install rotors, calipers, hard and soft lines
Replace master cylinder
Install proportioning valve
Bleed brake system
Road test and adjust
Step 1: I chose to purchase the caliper brackets and rotors from Sky Manufacturing (http://www.sky-manufacturing.com/toyota.htm) You can get the rotors on your own, but you will have to have the centers turned out to accept the Toyota axle center. This dimension can vary between model years, so measure accurately. I felt the price from Sky for modified rotors was reasonable and would save me some time.
From Sky I bought the following:
TOY-RDB-001 (Qty 1pr): disc caliper brackets and hardware
TOY-RDR-001 (Qty 1pr): modified Chevy rotors
This is what UPS brought me from Sky Manufacturing:
Last edited by Elvota; 08-13-2008 at 09:46 AM.

The following users liked this post:
hatowner (07-31-2020)
02-19-2007, 04:18 PM
#2
Contributing Member
Thread Starter
Step 2: Sky's kit is designed to work with calipers from a 79-85 Monte Carlo or Cadilac Eldorado (your personal research may reveal other options as well) Either front or rear calipers will work.
During my research, I was unable to find any successful write-up mating the GM parking brake rear calipers to the stock Toyota parking brake cable and lever. Evidently, there is a significant amount of tension required for the GM parking brake to work, and would require modifications of the Toyota parking brake lever and control cable. Not impossible, but not covered in this write up. I would however be interested in learning how it can be done, so let me know if your give it a try.
I ended up finding some front calipers from an '85 Cadillac Seville.
'85 Seville calipers and bolts:

Tip: Bring the Sky caliper brackets with you to the salvage yard to confirm caliper compatibility.
Tip: These calipers require a 3/8" allen wrench to remove. Without one, you will have a frustrating salvage yard experience to say the least.
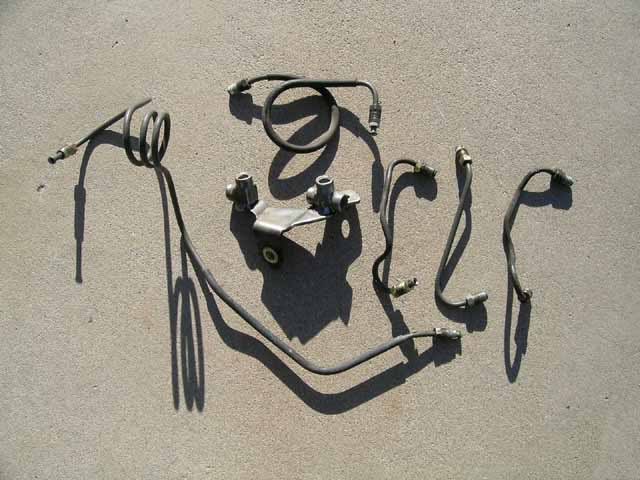
Tip: While at the salvage yard, it will be helpful to get several different sections of hard-line from Toyota vehicles. For example, you'll find these necessary when connecting the proportioning valve to the master.
What I ended up walking away with (note extra junction block in middle of pic):
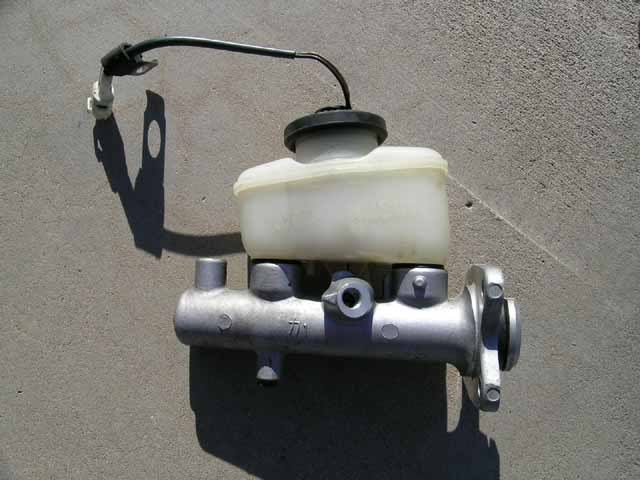
Step 3: Master cylinder. There are many options for the master, but the most swaps use one from a Toyota FJ80. A recommended source for this master is WabFab Offroad (www.wabfab.org) or username "waskillywabbit" here on Yotatech. Although I chose another route, he was very helpful in regards to answering questions I had about a disc swap and would highly recommend him as a source for the necessary parts.
For my swap, I happened across a master from a '88 Toyota Supra. These vehicles come equipped with four wheel disc brakes and the master has a 1" bore. The salvage price was to low to pass by, and the part has worked out very well. The bolt pattern from this Supra master to the 4Runner booster is identical and does not require an adapter, just bolts right in place. I'd imagine the same would hold true for truck boosters as well. As an added bonus, the original 4Runner reservoir cap and sensor fit on the '88 Supra reservoir.
'88 Supra master cylinder:
During my research, I was unable to find any successful write-up mating the GM parking brake rear calipers to the stock Toyota parking brake cable and lever. Evidently, there is a significant amount of tension required for the GM parking brake to work, and would require modifications of the Toyota parking brake lever and control cable. Not impossible, but not covered in this write up. I would however be interested in learning how it can be done, so let me know if your give it a try.
I ended up finding some front calipers from an '85 Cadillac Seville.
'85 Seville calipers and bolts:
Tip: Bring the Sky caliper brackets with you to the salvage yard to confirm caliper compatibility.
Tip: These calipers require a 3/8" allen wrench to remove. Without one, you will have a frustrating salvage yard experience to say the least.
Tip: While at the salvage yard, it will be helpful to get several different sections of hard-line from Toyota vehicles. For example, you'll find these necessary when connecting the proportioning valve to the master.
What I ended up walking away with (note extra junction block in middle of pic):
Step 3: Master cylinder. There are many options for the master, but the most swaps use one from a Toyota FJ80. A recommended source for this master is WabFab Offroad (www.wabfab.org) or username "waskillywabbit" here on Yotatech. Although I chose another route, he was very helpful in regards to answering questions I had about a disc swap and would highly recommend him as a source for the necessary parts.
For my swap, I happened across a master from a '88 Toyota Supra. These vehicles come equipped with four wheel disc brakes and the master has a 1" bore. The salvage price was to low to pass by, and the part has worked out very well. The bolt pattern from this Supra master to the 4Runner booster is identical and does not require an adapter, just bolts right in place. I'd imagine the same would hold true for truck boosters as well. As an added bonus, the original 4Runner reservoir cap and sensor fit on the '88 Supra reservoir.
'88 Supra master cylinder:
Last edited by Elvota; 08-13-2008 at 09:47 AM.
02-19-2007, 04:21 PM
#3
Contributing Member
Thread Starter
Note: Research your master cylinder options. There are many different manufacturers to choose from although some may require adapters to mate to your vehicles brake booster.
Note: The master and booster you choose to use can and will affect final braking performance. You may need to experiment with different combinations to achieve the results you desire.
Very detailed info on boosters and masters: http://home.4x4wire.com/erik/4runner/brakes/
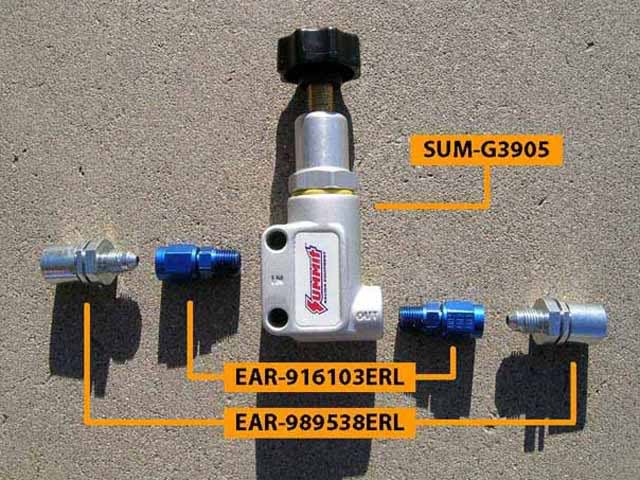
Step 4: In order for the final brake system to work properly, you will need to add a proportioning valve that will allow for manual adjustment of brake line pressure between the front and rear calipers. It is challenging to work with both standard and metric threaded lines as well as mate the several different types of flaring each manufacturer has used. I purchased the proportion valve and necessary adapter fittings from Summit Racing (www.summitracing.com)
From Summit Racing I bought the following:
EAR-989538ERL (Qty 2): Adapter -3 AN to 10mm x 1.0 Inverted Flare
EAR-916103ERL (Qty 2): -3 AN Female to 1/ 8 in. NPT Male
SUM-G3905 (Qty 1): Brake Proportioning Valve, 1/ 8 in. NPT, Single Inlet/ Outlet
With these parts, you can adapt the 1/8" NPT fitting on the prop valve to the Toyota 10mm x 1.0 inverted flare found on the factory brake lines.
It all assembles like this:
Tip: While placing your order from Summit, pickup a set of "SpeedBleeders" for the front and rear calipers. They are very slick and make the brake bleeding process extremely fast and simple.
SpeedBleeder part numbers:
RUS-639560 (Qty 1pr): 10mm x 1.0 Thread, 35mm length (Toyota)
RUS-639580 (Qty 1pr): 10mm x 1.5 Thread, 30mm length (GM, calipers may vary)
Step 5: Rear soft lines. As mentioned before, the trickiest part of this swap can be meshing all the standard and metric components together. You'll find even the GM calipers themselves come with a mix of metric and standard threads, all the ingredients for a major headache. There is however the perfect brake line. The answer is a brake line for a '80 - '82 Nissan 200SX. These brake lines have a standard banjo fitting on one end, and a female 10mm x 1.0 IF fitting on the other. They will mate the factory Toyota hard lines to your new GM caliper! Very sweet. You will also need longer banjo bolts (the new 200SX banjo is thicker than the GM) and two pair copper compression washers. I chose to get these parts from NAPA (http://www.napaonline.com)
From NAPA I bought the following:
38149 (Qty 2): 1980-82 Nissan 200SX brake line
82700 (Qty 2): 10mm x 1.5 banjo bolt
NAPA brake lines and bolts:
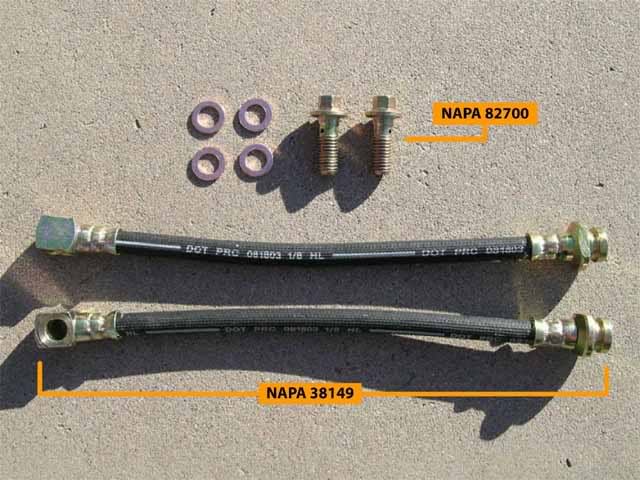
Tip: You may wish to purchase the brake pads for your calipers from the same source you get your lines.
Tip: I had some difficulty in locating the copper compression washers. Make note that they are needed and will not be included with either the brake lines or banjo bolts mentioned above. They are shown in the picture for reference only.
Step 6: ABS and LSPV system. Not all '86-'95 Toyota's came equipped with ABS. Mine did, but had essentially been deactivated with the removal of the speed sensor on my rear diff some time ago. With this swap, I decided to remove the rest of the system as well. The following is a diagram of the brake line routing that was found in my '91 4Runner.
ABS Diagram:
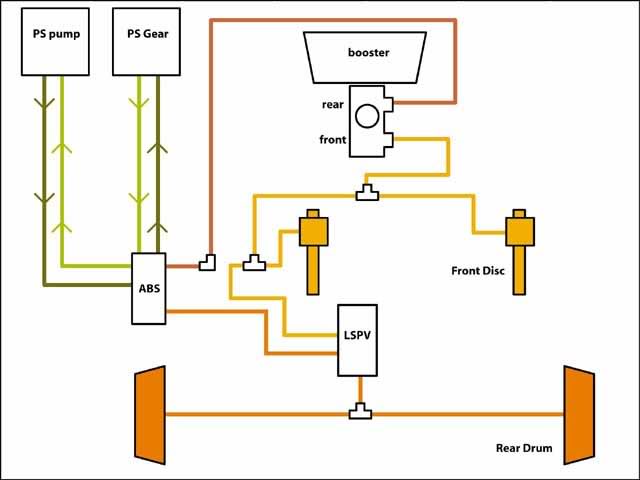
Tip: Diagram shows "T" and 90 degree junction fittings referenced throughout this writeup.
Note: The master and booster you choose to use can and will affect final braking performance. You may need to experiment with different combinations to achieve the results you desire.
Very detailed info on boosters and masters: http://home.4x4wire.com/erik/4runner/brakes/
Step 4: In order for the final brake system to work properly, you will need to add a proportioning valve that will allow for manual adjustment of brake line pressure between the front and rear calipers. It is challenging to work with both standard and metric threaded lines as well as mate the several different types of flaring each manufacturer has used. I purchased the proportion valve and necessary adapter fittings from Summit Racing (www.summitracing.com)
From Summit Racing I bought the following:
EAR-989538ERL (Qty 2): Adapter -3 AN to 10mm x 1.0 Inverted Flare
EAR-916103ERL (Qty 2): -3 AN Female to 1/ 8 in. NPT Male
SUM-G3905 (Qty 1): Brake Proportioning Valve, 1/ 8 in. NPT, Single Inlet/ Outlet
With these parts, you can adapt the 1/8" NPT fitting on the prop valve to the Toyota 10mm x 1.0 inverted flare found on the factory brake lines.
It all assembles like this:
Tip: While placing your order from Summit, pickup a set of "SpeedBleeders" for the front and rear calipers. They are very slick and make the brake bleeding process extremely fast and simple.
SpeedBleeder part numbers:
RUS-639560 (Qty 1pr): 10mm x 1.0 Thread, 35mm length (Toyota)
RUS-639580 (Qty 1pr): 10mm x 1.5 Thread, 30mm length (GM, calipers may vary)
Step 5: Rear soft lines. As mentioned before, the trickiest part of this swap can be meshing all the standard and metric components together. You'll find even the GM calipers themselves come with a mix of metric and standard threads, all the ingredients for a major headache. There is however the perfect brake line. The answer is a brake line for a '80 - '82 Nissan 200SX. These brake lines have a standard banjo fitting on one end, and a female 10mm x 1.0 IF fitting on the other. They will mate the factory Toyota hard lines to your new GM caliper! Very sweet.
You will also need longer banjo bolts (the new 200SX banjo is thicker than the GM) and two pair copper compression washers. I chose to get these parts from NAPA (http://www.napaonline.com)From NAPA I bought the following:
38149 (Qty 2): 1980-82 Nissan 200SX brake line
82700 (Qty 2): 10mm x 1.5 banjo bolt
NAPA brake lines and bolts:
Tip: You may wish to purchase the brake pads for your calipers from the same source you get your lines.
Tip: I had some difficulty in locating the copper compression washers. Make note that they are needed and will not be included with either the brake lines or banjo bolts mentioned above. They are shown in the picture for reference only.
Step 6: ABS and LSPV system. Not all '86-'95 Toyota's came equipped with ABS. Mine did, but had essentially been deactivated with the removal of the speed sensor on my rear diff some time ago. With this swap, I decided to remove the rest of the system as well. The following is a diagram of the brake line routing that was found in my '91 4Runner.
ABS Diagram:
Tip: Diagram shows "T" and 90 degree junction fittings referenced throughout this writeup.
Last edited by Elvota; 08-13-2008 at 09:49 AM.
02-19-2007, 04:22 PM
#4
Contributing Member
Thread Starter
Without going into to much detail as to how the LSPV and ABS systems operate, my goal was to remove the LSPV and related ABS components and simplify the system. The LSPV would no longer connect the front and rear brake systems together and each would operate separately instead.
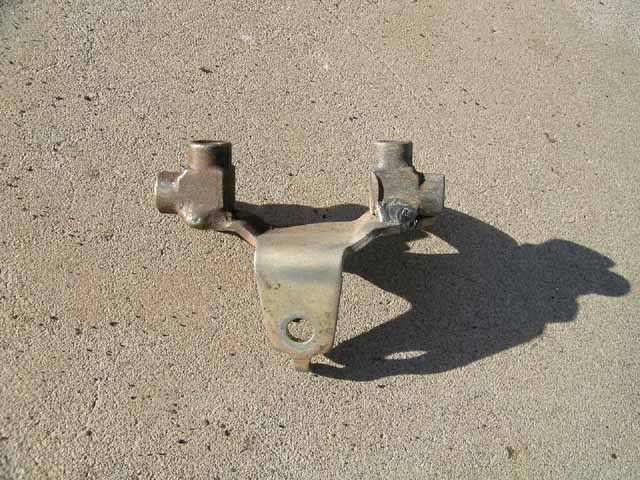
If your vehicle is equipped with ABS, you will notice a 90 degree junction as well as a "T" junction mounted to the PS frame rail. The "T" allows line pressure to feed both the front calipers as well as add to the rear braking power as dictated by the LSPV. I wanted to terminate this connection and decided to eliminate the "T" by replacing it with another 90 degree fitting.
Original PS junction block, single 90 degree and single "T" fitting:
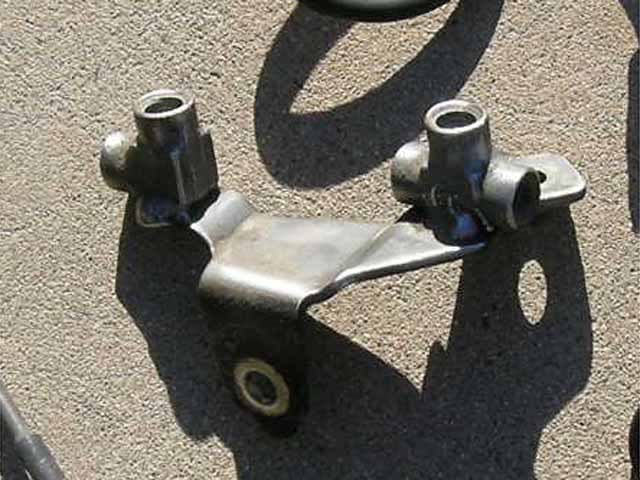
To achieve this, I found an additional junction plate from a similar Toyota pickup. I cut off the "T" fitting and replaced it with the extra 90 degree elbow from the donor vehicle.
Modified PS junction block, double 90 degree fittings:
Tip: You can plug the "T" with a bolt or choose to weld up the hole entirely to achieve the same result.
As you can see, I now had the ability to run one brake line from the master to both the rear calipers, and one brake line directly to the PS front (DS front is fed directly from master already). The original lines in and out of the ABS/ PS block were abandoned. I now had two unused lines running from this junction block to the LSPV at the rear of the vehicle, one of which I would use to run the rear feed from the master.
Step 7: Removal of LSPV. The LSPV has three lines. Two coming in from the front of the vehicle and one going out to the rear drum brakes. This allows the LSPV to control rear brake pressure as well as receive alternating pressure from the ABS circuit. At this point, I disconnected all three lines from the LSPV and removed it from the vehicle. You will need to evaluate which of the two lines leading from the PS junction block will be easier to attach to your new 90 degree fitting. I found the line marked "F" on the LSPV was the easiest for me to work with, so I connected that line to the 90 at the junction block and the other to a stainless flex housing that I could route down to the rear axle.
Tip: Stainless flex line can be purchased from WabFab (www.wabfab.org). One end needs to be female to tie into existing brake line that was once attached to the LSPV, the other end will be male to thread into the existing "T" junction block on the axle housing.
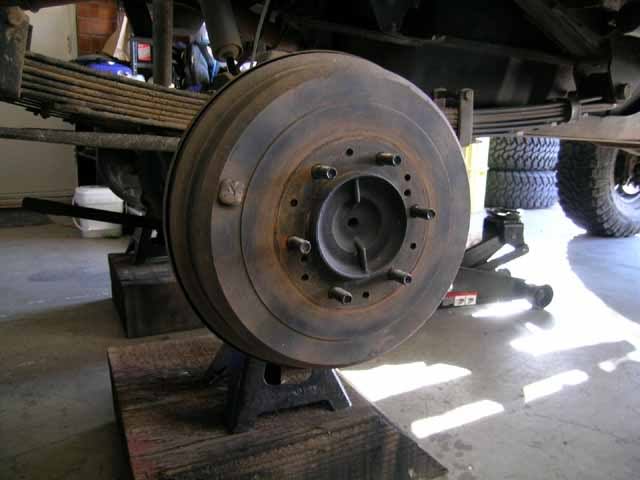
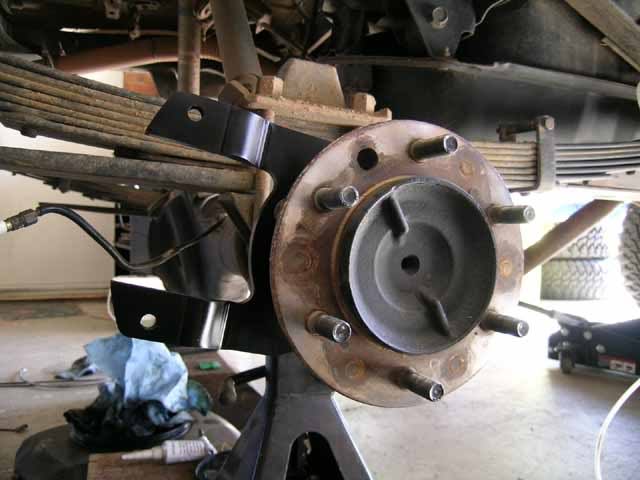
Step 8: Removal of axles and drum brakes. Basically, it's out with the old drums and in with the new rotors. If you have ever done a rear brake job on these vehicles you should be familiar with most of the process. With vehicle securely off the ground on your trusty jackstands, remove the wheels. You'll be looking at something like this.
Final look at your drum brakes:
If your vehicle is equipped with ABS, you will notice a 90 degree junction as well as a "T" junction mounted to the PS frame rail. The "T" allows line pressure to feed both the front calipers as well as add to the rear braking power as dictated by the LSPV. I wanted to terminate this connection and decided to eliminate the "T" by replacing it with another 90 degree fitting.
Original PS junction block, single 90 degree and single "T" fitting:
To achieve this, I found an additional junction plate from a similar Toyota pickup. I cut off the "T" fitting and replaced it with the extra 90 degree elbow from the donor vehicle.
Modified PS junction block, double 90 degree fittings:
Tip: You can plug the "T" with a bolt or choose to weld up the hole entirely to achieve the same result.
As you can see, I now had the ability to run one brake line from the master to both the rear calipers, and one brake line directly to the PS front (DS front is fed directly from master already). The original lines in and out of the ABS/ PS block were abandoned. I now had two unused lines running from this junction block to the LSPV at the rear of the vehicle, one of which I would use to run the rear feed from the master.
Step 7: Removal of LSPV. The LSPV has three lines. Two coming in from the front of the vehicle and one going out to the rear drum brakes. This allows the LSPV to control rear brake pressure as well as receive alternating pressure from the ABS circuit. At this point, I disconnected all three lines from the LSPV and removed it from the vehicle. You will need to evaluate which of the two lines leading from the PS junction block will be easier to attach to your new 90 degree fitting. I found the line marked "F" on the LSPV was the easiest for me to work with, so I connected that line to the 90 at the junction block and the other to a stainless flex housing that I could route down to the rear axle.
Tip: Stainless flex line can be purchased from WabFab (www.wabfab.org). One end needs to be female to tie into existing brake line that was once attached to the LSPV, the other end will be male to thread into the existing "T" junction block on the axle housing.
Step 8: Removal of axles and drum brakes. Basically, it's out with the old drums and in with the new rotors. If you have ever done a rear brake job on these vehicles you should be familiar with most of the process. With vehicle securely off the ground on your trusty jackstands, remove the wheels. You'll be looking at something like this.
Final look at your drum brakes:
Last edited by Elvota; 08-13-2008 at 09:51 AM.
02-19-2007, 04:24 PM
#5
Contributing Member
Thread Starter
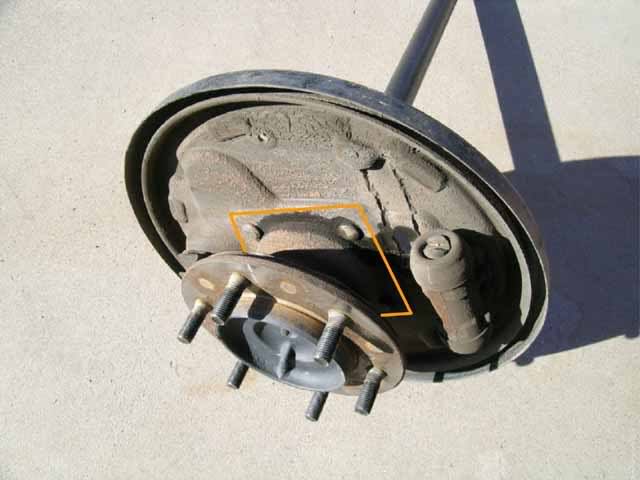
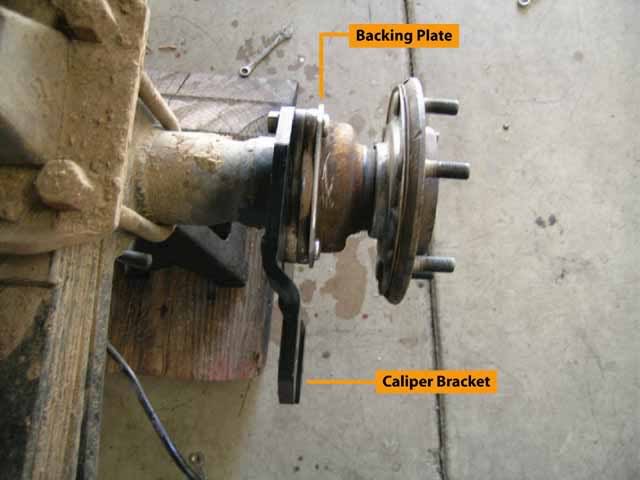
If you need clarification, there are several steps here that can be found in a Toyota factory or Haynes manual. Basically, you will need to remove the parking brake, drums, brake hardware, pads and pull the axles out of your housing. At this point, you should have two axles and a bare backing plate attached to each.
Axle, drum brake hardware removed (cut line shown):
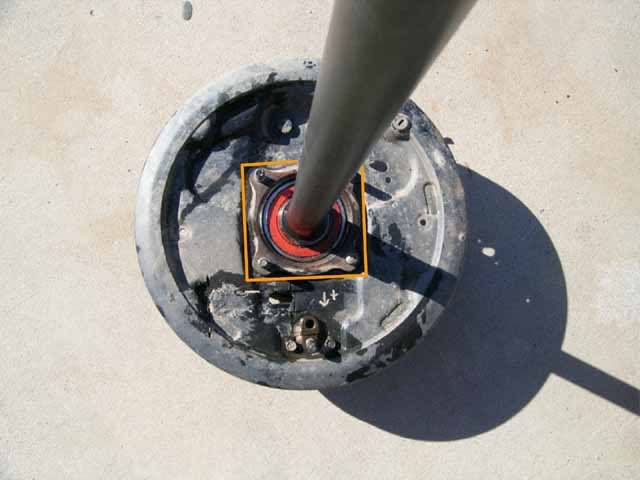
Step 9: Remove backing plates. In my research, I found many options to remove the backing plate. Cutting, torching, pressing off the bearings and removing said plate, etc. Since I had replaced the axle bearings within the last six months I just decided to cut the backing plates off with them still attached to the axle. This step was actually much easier than I thought and my trusty DeWalt 5" angle grinder was more than up to the task.
Image of cut lines:
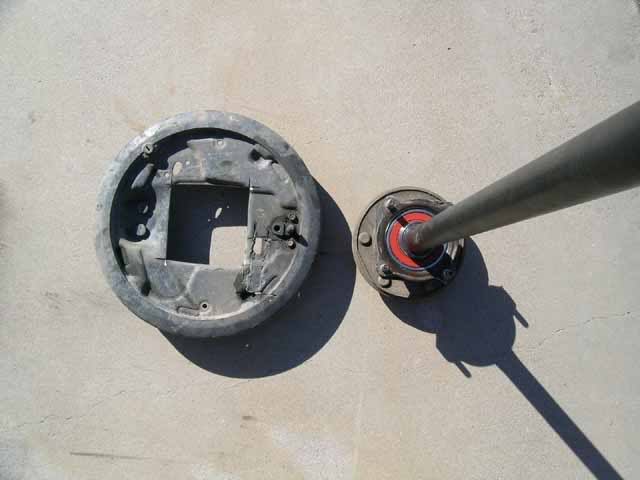
Backing plate just slides right off:
Tip: If your bearings are old this is the time to replace them. Unless you have access to a press, you will probably have to source this work to a local automotive machine shop. When they reassemble the axle, just instruct them to leave the backing plates off.
Tip: Now is the time to replace the axle housing inner seals as well as the large external housing O-ring.
Step 10: Re-install axles, mount caliper brackets. Sky sends their kit with hardware. I found that the four original axle studs would do the job just fine and would not require me to press the studs out of the axle. However, for additional security I would recommend purchasing the necessary metric nylock nuts instead of using the factory nuts. Since these photos, I have replaced mine with nylock versions.
Axle back in place, caliper bracket installed:
Axle, drum brake hardware removed (cut line shown):
Step 9: Remove backing plates. In my research, I found many options to remove the backing plate. Cutting, torching, pressing off the bearings and removing said plate, etc. Since I had replaced the axle bearings within the last six months I just decided to cut the backing plates off with them still attached to the axle. This step was actually much easier than I thought and my trusty DeWalt 5" angle grinder was more than up to the task.
Image of cut lines:
Backing plate just slides right off:
Tip: If your bearings are old this is the time to replace them. Unless you have access to a press, you will probably have to source this work to a local automotive machine shop. When they reassemble the axle, just instruct them to leave the backing plates off.
Tip: Now is the time to replace the axle housing inner seals as well as the large external housing O-ring.
Step 10: Re-install axles, mount caliper brackets. Sky sends their kit with hardware. I found that the four original axle studs would do the job just fine and would not require me to press the studs out of the axle. However, for additional security I would recommend purchasing the necessary metric nylock nuts instead of using the factory nuts. Since these photos, I have replaced mine with nylock versions.
Axle back in place, caliper bracket installed:
Last edited by Elvota; 08-13-2008 at 09:52 AM.
02-19-2007, 04:26 PM
#6
Contributing Member
Thread Starter
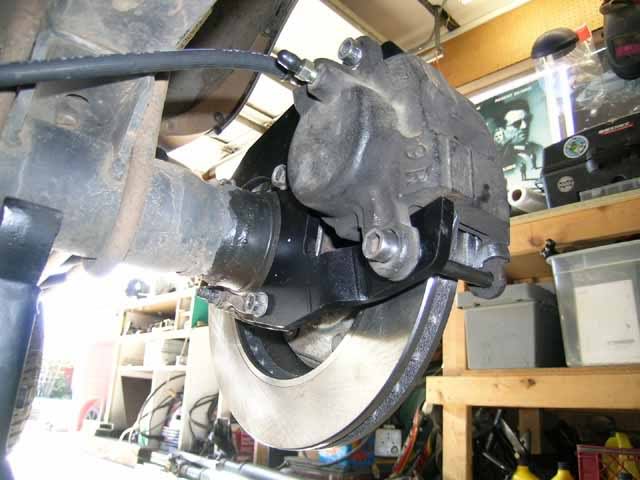
Upper view. (note remnants of backing plate):
Caliper and rotor installed:
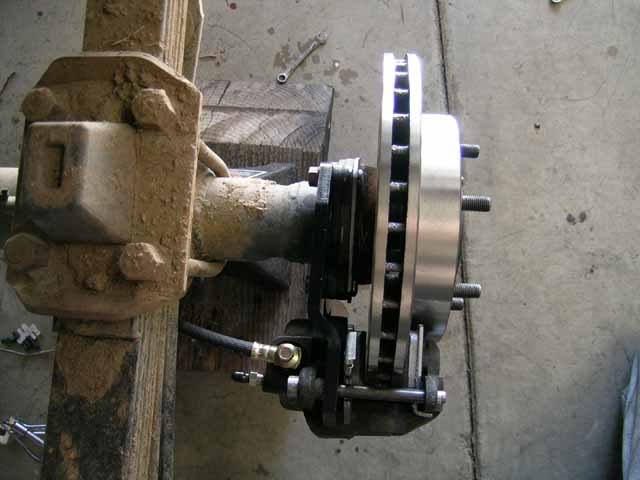
Caliper and rotor installed (lower view):
Step 11: Master and proportioning valve install. Depending on the master you have decided to use, these steps might be slightly different. For the purpose of this write up, I'll stick with the '88 Supra master I chose to go with. Basically, I just unbolted the original and re-bolted the Supra master in its place. I was able to use the original reservoir cap so I didn't have to splice the sensor wires, they just plugged right back in. Using some of the extra Toyota brake lines I had scavenged before (told you they would come in handy ) I routed, twisted and installed the Summit prop valve next to the master controlling the rear circuit.
Summit Proportioning Valve:
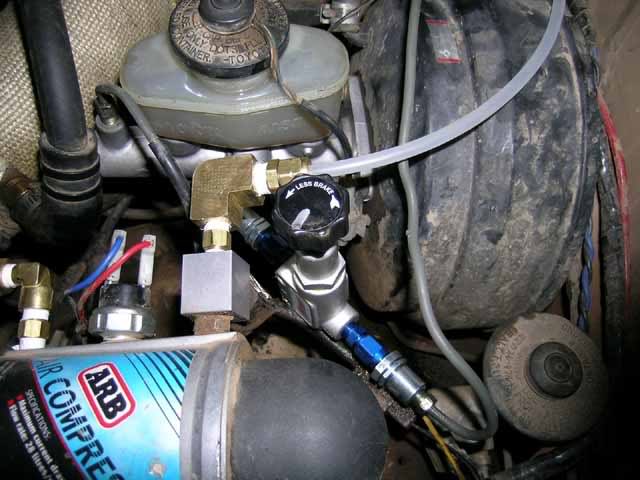
Tip: Be sure to bench bleed your new master before install
Tip: A metric double flaring tool can be used to shorten or modify the factory brake lines. These old lines can become hard and difficult to work with however.
Step 12: Securing brake lines. You will need to keep hard lines from undue stress and secure them accordingly. This is a judgment call and will vary from every application. Your goal is to not stress the hard lines in anyway, especially in a repetitive manner as this will fatigue the lines and cause them to fail. I chose to run my soft caliper lines under the springs, and to weld a tab to the housing where they connected to the hard lines.
Finished product:
Caliper and rotor installed:
Caliper and rotor installed (lower view):
Step 11: Master and proportioning valve install. Depending on the master you have decided to use, these steps might be slightly different. For the purpose of this write up, I'll stick with the '88 Supra master I chose to go with. Basically, I just unbolted the original and re-bolted the Supra master in its place. I was able to use the original reservoir cap so I didn't have to splice the sensor wires, they just plugged right back in. Using some of the extra Toyota brake lines I had scavenged before (told you they would come in handy
) I routed, twisted and installed the Summit prop valve next to the master controlling the rear circuit.Summit Proportioning Valve:
Tip: Be sure to bench bleed your new master before install
Tip: A metric double flaring tool can be used to shorten or modify the factory brake lines. These old lines can become hard and difficult to work with however.
Step 12: Securing brake lines. You will need to keep hard lines from undue stress and secure them accordingly. This is a judgment call and will vary from every application. Your goal is to not stress the hard lines in anyway, especially in a repetitive manner as this will fatigue the lines and cause them to fail. I chose to run my soft caliper lines under the springs, and to weld a tab to the housing where they connected to the hard lines.
Finished product:
Last edited by Elvota; 08-13-2008 at 09:53 AM.
02-19-2007, 04:26 PM
#7
Contributing Member
Thread Starter
Note: This 4Runner has had a rear leaf conversion. Stock 4Runner coil suspension may require different line routing.
Tip: I purchased additional lengths of hard-line from my local auto parts store. It may be possible to re-flare or re-route original lines to achieve the same goal.
Step 13: Bleed the system. Start from farthest to closest. Basically, RDS, RPS, FPS, FDS. Those "SpeedBleeders" you paid extra for will already be showing their value. Dare I say they almost make bleeding your brakes fun?
Step 14: Check and double check all your fittings, hardware, fluid level and brake pressure before your leave the safety of your garage. Check for leaks. Make sure your pedal holds pressure and that all air has been evacuated from the system. Be prepared for your brake system to exhibit different behaviors than stock.
Step 15: Adjust proportioning valve. Ideally, you want to try this new brake system out on a desolate dirt road at low speeds. There is a strong possibility that your rear wheels will lock easily before you get the prop valve adjusted to where you want it to be. Keep this in mind and drive accordingly. The correct setup would be to have the front brakes lock just before the rears do.
Tip: Most people state that the minimum amount of rear flow is about perfect
Tip: The Summit prop valve decreases fluid flow by turning knob counter clockwise, which seemed counterintuitive to me.
I am very happy with this upgrade. For once I actually feel like the vehicle stops with confidence. With the addition of 35" tires, armor, winch and various mods it's nice to have the additional power slowing me down. I am looking forward to the ease maintenance the disc setup will afford me in the future.
Last edited by Elvota; 02-19-2007 at 04:55 PM.
Trending Topics
 02-19-2007, 04:56 PM
#10
Registered User

Overall great job.
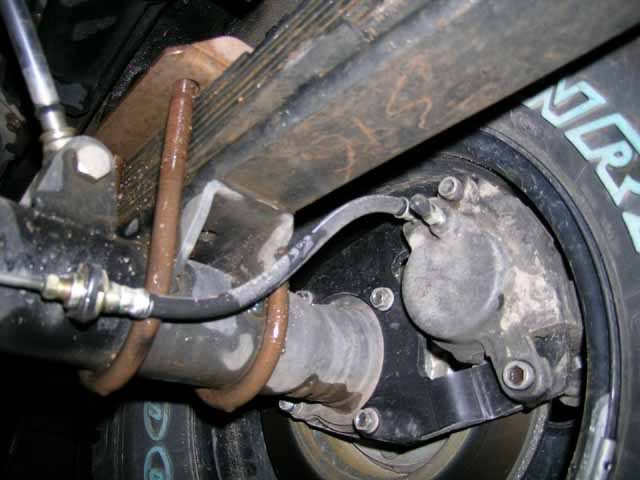
One thing though is where you have the hardline to soft line connection located.
It's too low and unprotected on the rear axle and you will have problems with it like that.
Suggest changing the location, maybe moving it up higher, or adding some armor to it.

Fred
One thing though is where you have the hardline to soft line connection located.
It's too low and unprotected on the rear axle and you will have problems with it like that.
Suggest changing the location, maybe moving it up higher, or adding some armor to it.
Fred
02-19-2007, 06:03 PM
#12
Registered User
02-19-2007, 06:41 PM
#16
Registered User
Yup, that's what I though, right at the entrance to Upper Woodpecker.
Been there a lot.
Here's a photo of me going through it in the Jeep.
Been though it a lot and never touched:

Devils Back, Upper Woodpecker:

Here I am cresting Devils Back in Upper Woodpecker:

And here I am heading up the Fire Hole in Upper Woodpecker:

And a shot from the bottom of me going up the Fire Hole, Upper Woodpecker:

Fred
Been there a lot.
Here's a photo of me going through it in the Jeep.
Been though it a lot and never touched:
Devils Back, Upper Woodpecker:
Here I am cresting Devils Back in Upper Woodpecker:
And here I am heading up the Fire Hole in Upper Woodpecker:
And a shot from the bottom of me going up the Fire Hole, Upper Woodpecker:
Fred
02-19-2007, 06:55 PM
#17
Contributing Member
Thread Starter
Thanks for the compliments everyone. Hopefully it will help someone out in the future.
FredTJ... that Firehole is intimidating, but maybe one day I'll work up the nerve. Maybe we'll see you in a Toyota next time on those lines.
FredTJ... that Firehole is intimidating, but maybe one day I'll work up the nerve. Maybe we'll see you in a Toyota next time on those lines.
02-19-2007, 06:59 PM
#18
Registered User
I have a '95 4Runner that I'm starting a buildup on...
The Fire Hole is fun.
Going up it isn't the "hard" part. It's getting out at the top.
It tends to be pretty snarly at the top.
We run all the obstacles in Upper Woodpecker evertime we run it.
Fred
02-20-2007, 06:05 AM
#20
Registered User
Join Date: Jul 2005
Location: Calgary, AB, Can
Posts: 687
Likes: 0
Received 0 Likes
on
0 Posts
Very nice job on the write up, nice and through. What do you plan on doing for an e-brake, or seeing that it looks like a pretty much trail rig, are you even worrying about it?


