
Quick, Easy, Painless 3vze Intake Plenum and Upper Engine Cleaning and TuneUp
 08-08-2013, 07:50 PM
#1
Registered User
Thread Starter

Quick, Easy, Painless 3vze Intake Plenum and Upper Engine Cleaning and TuneUp
I like to do things the easy way. And removing the plenum, knocking out the freeze plugs, several cans of carb cleaner, using a drill or some other extension tool to clean 20 years of crud out of the plenum seemed like an awful project.
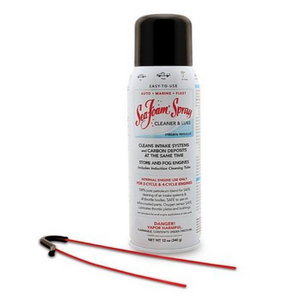
So instead, I first decided to use the Seafoam Spray. It didn't do much to clean anything out of the upper plenum. However, the application straw is critical for the next step. The straw looks like this:
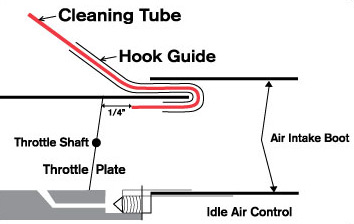
And you use it by locating it at 12 o'clock and running the engine at ~2500 RPM to ensure your throttle plate is open wide enough to allow the spray past and not damage your TPS -- to adjust the straw length, you need to open and close your throttle plate, and I think only about 1/2" of the straw extended past the the black pinch protector for me. Like this:
Like I said seafoam didn't do much for the way of cleaning. It did make a fair bit of smoke, but I think that's the seafoam mostly, just burning itself off. Perhaps some cleaning within the engine cylinders but little to no cleaning of the upper plenum... (On the 3vze, fwiw you have to do the spray not the vacuum hose w/ standard seafoam method due to the nature of the intake design -- all of the vacuum hoses hit only the rear 3 intakes, so your front 3 will stay dirty.)
So seafoam was mostly a bust.
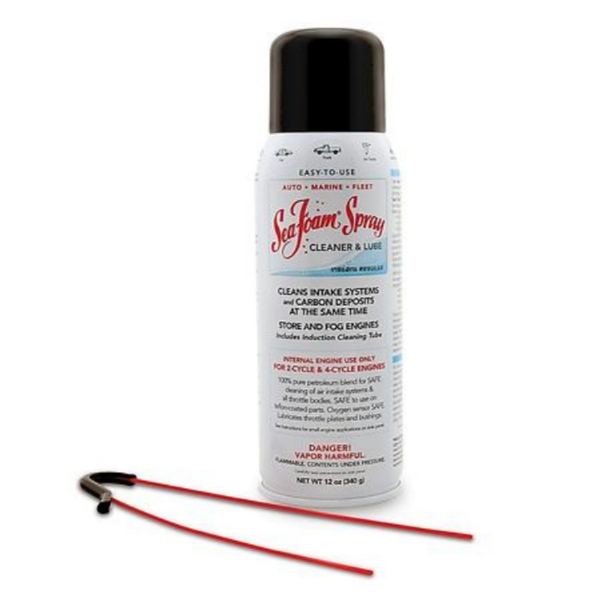
I was ordering a couple of other items from Amsoil, and figured I'd give their Power Foam a try since folks online said it was as effective as the marine foams but specifically designed for automotive engines. You can find it here: http://www.amsoil.com/shop/by-produc...?code=APFSC-EA
What I did is as follows:
-2 cans that come with straight straw hoses. Directions from Amsoil are to:
But I did what Yotatech-ers do and modified...
-The first can I connected up the seafoam spray hose between throttle and intake tube. I had my hood up and just brought the cold engine up to operating temperature, which means the plenum was only slightly above air temperature. Set rpms to ~2500, and then sprayed half the can in and then let it sit for 15 minutes. Then I started the truck, let it run at idle for a couple minutes to burn off/clear out the first round, reset RPM to 2500, and then sprayed in the remainder of the can. Turned off and let sit for 15 minutes. While waiting, I disconnected intake tube and removed the Seafoam hose, and reinstalled intake tube. Once 15 minutes came, I went for a drive. I got a little white smoke both times on this one, but I was a little disappointed as the Seafoam seemed to smoke a lot more than the Amsoil. I brought it back and inspected, and the upper intake was still at least 2/3rds as dirty as when I started...
-Somewhat discouraged, I figured what the heck, let's try can number two.
The second can went as follows on the now scalding hot engine and upper plenum. (And if you follow this procedure you can probably get by with just one can).
1. I disconnected intake tube, opened throttle and sprayed a little cleaner (using straight straw provided w/ Amsoil Power Foam), a 3-4 second spray, into back of intake and closed throttle plate. (Fumes almost immediately started venting through throttle plate.) Reconnected intake tube. Put hood down (to keep the heat in). Then let it sit for 15 minutes. Then I turned on and ran the truck for a couple minutes.
2. Turn truck off. Repeat step 1.
3. Disconnect intake tube and install seafoam spray applicator tube.
4. Install intake. Turn on engine and run at 2500 rpms. Spray 1/3rd of can into the intake. Turn off immediately and walk away for 15 minutes.
4. Repeat step 4.
5. Repeat step 4 with the exception of disconnecting seafoam spray tube and allowing it to soak for 30 minutes.
6. Go for a 30 minute drive in the truck. This time it was really smoking out of the tail pipe -- darker smoke and more of it.
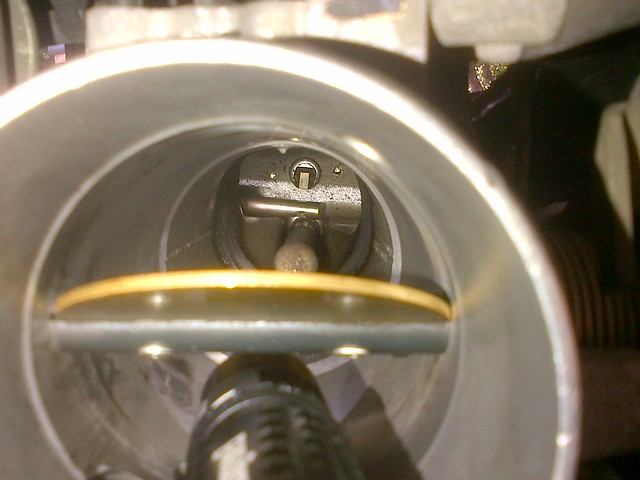
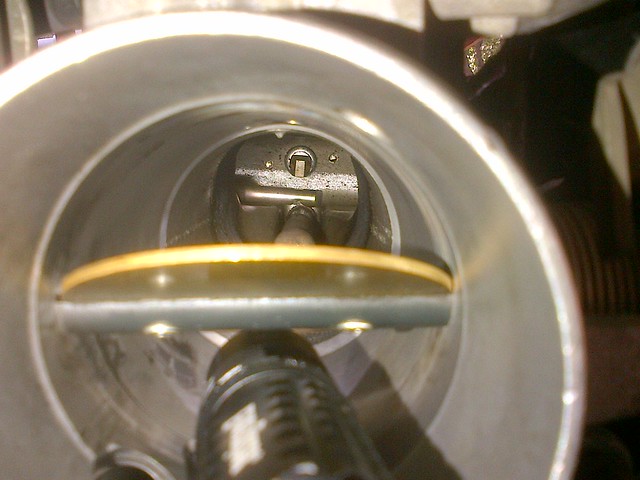
Upon returning from the second drive, I was very surprised by the amount of cleaning that had been done. My upper plenum looked like this when back from driving after the second can (unfortunately, I didn't think to take before pics as I wasn't expecting much -- but halfway up that white tube at the bottom of the rear intake was covered with crud -- at least 1/4" or more):
*** should note that I flipped the pictures when I should have rotated (used my camera phone upside down due to the space) so they're actually mirror images of what you'll see (idle tube hole to rear not front as it appears in the pics), but still accurately show the cleaning...
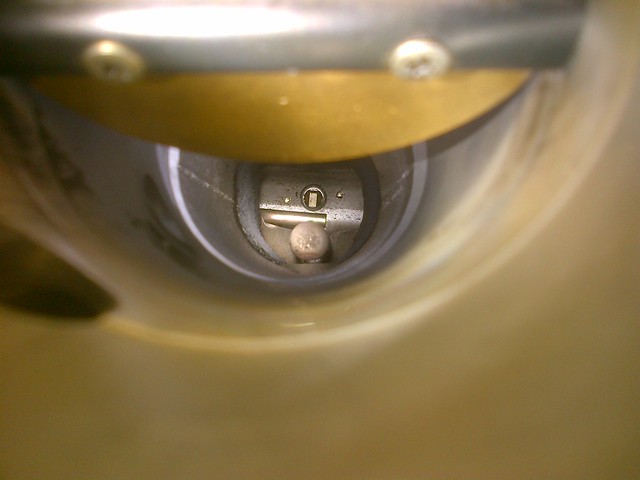
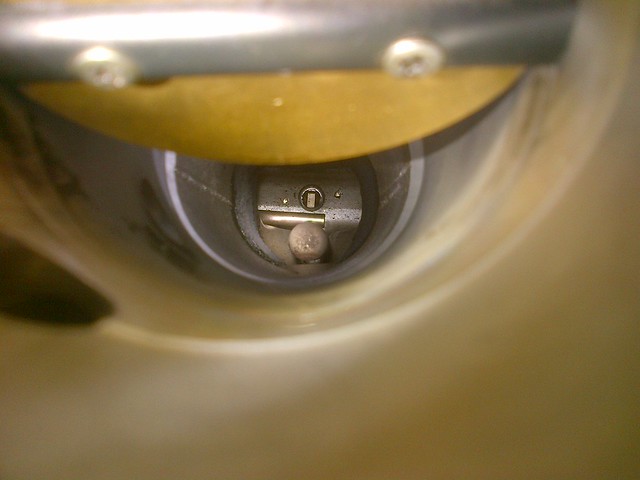
The second time worked way better. What appears to have happened was that the hot engine converted the cleaning foam from foam/liquid to a gas that served to dissolve all of that crud. Combined with increased soaking times, it worked amazingly well. And the gases also cleaned my throttle plate.
The next steps I'd recommend would be to get a good fuel injector cleaner too and run it through your next tank -- these upper intake cleaners like to deposit carbon and crud on your injectors. I like redline: http://www.redlineoil.com/product.aspx?product=60103
After that tank finishes, pull your spark plugs and replace if need be as they tend to attract deposits too (but a good injector cleaner like Redline should have helped to clean them off...).
And finally, replace your 02 sensor (save money on Denso) as much of that crud tends to deposit there and your 02 sensor's accuracy reduces over time w/o throwing a code anyways (and properly working at original spec will save you $ on gas): If you've recently replaced your 02 sensor, put your old one back in for this project and then swap your new one back in once done.
After swapping your 02 sensor, pull your ECM fuse (under dash) to reset your ECM to new configuration.
So instead, I first decided to use the Seafoam Spray. It didn't do much to clean anything out of the upper plenum. However, the application straw is critical for the next step. The straw looks like this:
And you use it by locating it at 12 o'clock and running the engine at ~2500 RPM to ensure your throttle plate is open wide enough to allow the spray past and not damage your TPS -- to adjust the straw length, you need to open and close your throttle plate, and I think only about 1/2" of the straw extended past the the black pinch protector for me. Like this:
Like I said seafoam didn't do much for the way of cleaning. It did make a fair bit of smoke, but I think that's the seafoam mostly, just burning itself off. Perhaps some cleaning within the engine cylinders but little to no cleaning of the upper plenum... (On the 3vze, fwiw you have to do the spray not the vacuum hose w/ standard seafoam method due to the nature of the intake design -- all of the vacuum hoses hit only the rear 3 intakes, so your front 3 will stay dirty.)
So seafoam was mostly a bust.
I was ordering a couple of other items from Amsoil, and figured I'd give their Power Foam a try since folks online said it was as effective as the marine foams but specifically designed for automotive engines. You can find it here: http://www.amsoil.com/shop/by-produc...?code=APFSC-EA
What I did is as follows:
-2 cans that come with straight straw hoses. Directions from Amsoil are to:
- Protect painted surfaces and mass airflow sensors (MAF) from spray.
- Ensure application is in a well-ventilated area.
- Run engine to normal operating temperature and remove air cleaner assembly.
- While engine is running, spray foam directly into throttle body as fast as possible without stalling engine.
- Shut off engine and allow to sit for 10-15 minutes.
- Replace air cleaner.
- Restart engine. Repeat application of Power Foam as needed.
But I did what Yotatech-ers do and modified...
-The first can I connected up the seafoam spray hose between throttle and intake tube. I had my hood up and just brought the cold engine up to operating temperature, which means the plenum was only slightly above air temperature. Set rpms to ~2500, and then sprayed half the can in and then let it sit for 15 minutes. Then I started the truck, let it run at idle for a couple minutes to burn off/clear out the first round, reset RPM to 2500, and then sprayed in the remainder of the can. Turned off and let sit for 15 minutes. While waiting, I disconnected intake tube and removed the Seafoam hose, and reinstalled intake tube. Once 15 minutes came, I went for a drive. I got a little white smoke both times on this one, but I was a little disappointed as the Seafoam seemed to smoke a lot more than the Amsoil. I brought it back and inspected, and the upper intake was still at least 2/3rds as dirty as when I started...
-Somewhat discouraged, I figured what the heck, let's try can number two.
The second can went as follows on the now scalding hot engine and upper plenum. (And if you follow this procedure you can probably get by with just one can).
1. I disconnected intake tube, opened throttle and sprayed a little cleaner (using straight straw provided w/ Amsoil Power Foam), a 3-4 second spray, into back of intake and closed throttle plate. (Fumes almost immediately started venting through throttle plate.) Reconnected intake tube. Put hood down (to keep the heat in). Then let it sit for 15 minutes. Then I turned on and ran the truck for a couple minutes.
2. Turn truck off. Repeat step 1.
3. Disconnect intake tube and install seafoam spray applicator tube.
4. Install intake. Turn on engine and run at 2500 rpms. Spray 1/3rd of can into the intake. Turn off immediately and walk away for 15 minutes.
4. Repeat step 4.
5. Repeat step 4 with the exception of disconnecting seafoam spray tube and allowing it to soak for 30 minutes.
6. Go for a 30 minute drive in the truck. This time it was really smoking out of the tail pipe -- darker smoke and more of it.
Upon returning from the second drive, I was very surprised by the amount of cleaning that had been done. My upper plenum looked like this when back from driving after the second can (unfortunately, I didn't think to take before pics as I wasn't expecting much -- but halfway up that white tube at the bottom of the rear intake was covered with crud -- at least 1/4" or more):
*** should note that I flipped the pictures when I should have rotated (used my camera phone upside down due to the space) so they're actually mirror images of what you'll see (idle tube hole to rear not front as it appears in the pics), but still accurately show the cleaning...
The second time worked way better. What appears to have happened was that the hot engine converted the cleaning foam from foam/liquid to a gas that served to dissolve all of that crud. Combined with increased soaking times, it worked amazingly well. And the gases also cleaned my throttle plate.
The next steps I'd recommend would be to get a good fuel injector cleaner too and run it through your next tank -- these upper intake cleaners like to deposit carbon and crud on your injectors. I like redline: http://www.redlineoil.com/product.aspx?product=60103
After that tank finishes, pull your spark plugs and replace if need be as they tend to attract deposits too (but a good injector cleaner like Redline should have helped to clean them off...).
And finally, replace your 02 sensor (save money on Denso) as much of that crud tends to deposit there and your 02 sensor's accuracy reduces over time w/o throwing a code anyways (and properly working at original spec will save you $ on gas): If you've recently replaced your 02 sensor, put your old one back in for this project and then swap your new one back in once done.
After swapping your 02 sensor, pull your ECM fuse (under dash) to reset your ECM to new configuration.
Last edited by RSR; 08-11-2013 at 03:28 PM.
 08-08-2013, 07:59 PM
#2
Registered User
Thread Starter
I'll add that if someone does before and after pics, I'd be stoked to see them as I just have memories...
Again, the keys are a piping hot engine and plenum, and allowing time to soak (allowing the gases/foam to spend more time and to dissolve the crud in the upper intake instead of running straight through to the upper engine cylinders).
And don't forget the final tuneup items to get the full benefit from your now clean and less restrictive plenum.
Last edited by RSR; 08-09-2013 at 12:04 PM.
08-11-2013, 11:59 AM
#4
Registered User
Thread Starter
Yes, I was extremely, pleasantly surprised as well.
According to Amsoil, it is: "Power Foam is safe for fuel injectors, catalytic converters and emission control devices."
But I'm always skeptical about purging my system of a bunch of crud all at once... It's not all going to go out the tailpipe and some will deposit along the way.
Usually what I like to do w/ a new old vehicle to minimize damage to the cat is as follows (02 sensors are relatively cheap and makes sense to replace them anyways if it hasn't been done recently -- usually aren't, or swap in an old spare for the cleaning before putting the new one back on):
1. Run a good injector cleaner like Redline through, a whole tank. Helps to clean upper engine too, but gradually.
2. Next tank run an intake cleaner through -- now that I know how well amsoil works -- I might run Seafoam first. Drive around for a couple days and then run the Amsoil through. Again, the goal being to more gradually rather than a shock cleaning.
3. Run another tank w/ Redline injector cleaner to clean injectors and spark plugs.
4. Check spark plugs, and replace if necessary. Check cap and rotor and wires too while you're there. Check that all spark sensors are w/ in spec too...
5. Replace 02 sensor.
6. And then change your oil w/ an engine flush like Amsoil optional: http://www.amsoil.com/shop/by-produc...code=FLSHCN-EA
Last edited by RSR; 08-11-2013 at 12:01 PM.
08-16-2013, 11:54 AM
#5
Registered User
Thread Starter
I wanted to add that the Amsoil engine flush (http://www.amsoil.com/shop/by-produc...mission-flush/) seems to work as well.
I run synthetic in my truck (Castrol, previous owner did Mobil1), so there shouldn't have been a lot of gunk to clean out -- or at least a lot of gunk compared to conventional dino oil.
Before I dumped and ran the engine flush into my oil, my oil was a darker amber/iced tea color. After running the engine flush through on idle for 12 minutes, my oil came out the color of coffee...
I gave the engine flush a quick sniff and it smelled something like gasoline, but Amsoil really seems to get their chemistry right (and with a warranty on a lot of their items, doubt they'd sell anything that could kaboom your engine), so I'd recommend just buying theirs... Again over gas, seafoam (roughly the same price), or some of the other options out there.
Edit: I also wanted to add that at idle, my engine seems to run smoother which much less tumbling or tremoring (not sure how to describe). It might be a little quieter, but after having my valves recently adjusted most of my valve noise is gone anyways... (The first startup after this oil change was a little rougher than usual however -- and I even pulled the ignition coil wire to allow the oil pump to start pushing some oil through before the engine fully started and fresh oil made its way through the engine...)
Here's Amsoil's writeup:
AMSOIL Engine and Transmission Flush (FLSH) helps restore fuel economy, increase operating efficiency and reduce emissions in gasoline and diesel engines, and automatic transmissions. Its potent, detergent-based formula cleans sludge and deposit build-up, promoting lower operating temperatures and reduced oil consumption. AMSOIL Engine and Transmission Flush is safe on parts and can be easily disposed of with waste oil.
Restores Vehicles to Like-New
New engines and transmissions run more efficiently, but over time they gather harmful deposits that cause power and performance loss. Stop-and-go driving, prolonged idling, short trips that do not allow the engine to reach full operating temperature, towing, the ingestion of airborne dirt, fuel dilution, water condensation and oxidized oil all can promote sludge build-up in motor oil and transmission fluid. As it settles, sludge clogs narrow oil passages, restricting oil flow to vital parts, especially the upper valve train area.
In transmissions, deposits can form on clutch plates, causing hesitation and erratic shifting. Ultimately clutch glazing can set in, reducing the life of the transmission. Deposits in engines and transmissions can accelerate wear, causing power loss and increased fuel consumption.
Cleans engines and transmissions for improved efficiency, fuel economy and lower emissions
Prolongs equipment life
Detergent-based formula more environmentally friendly
Compatible with seals and gaskets
One-treatment results
Easily disposed of with waste oil
Installing new oil or transmission fluid into a dirty vehicle may not be enough to remove deposits and increase efficiency. The detergents and dispersants in some lubricants may not be able to handle leftover sludge and deposits, and the new lubricant soon becomes unfit for service, accelerating the formation of even more harmful deposits.
AMSOIL Engine and Transmission Flush Benefits
Unlike many flush products, AMSOIL Engine and Transmission Flush features a multi-use formulation that dissolves and disperses sludge, varnish and deposits in both engines and automatic transmissions. Due to its detergent-based formulation, used AMSOIL FLSH can be easily disposed of with waste oil, making it more user-friendly. Its advanced formula of light base oil technology, powerful detergents and dispersants provides safe cleaning action. AMSOIL FLSH is compatible with both petroleum and synthetic oils, preparing poorly maintained equipment for installation of new oil. It represents the first step toward restoring neglected equipment to top-notch performance. AMSOIL Engine and Transmission Flush provides the following benefits in only one treatment:
Gasoline and Diesel Engines
Helps loosen sticky valves and rings, minimizing blow-by and reducing emissions
Helps quiet lifter noise
Promotes lower operating temperatures through sludge removal
Easy disposal
Automatic Transmissions
Cleans deposits in oil cooler and ports
Helps unclog fluid passages
Cleans deposits and varnish from clutch plates, helping improve efficiency
Promotes smoother operation and transmission life through reduced shift delay
Applications
AMSOIL Engine and Transmission Flush is recommended for diesel and gasoline engines, and automatic transmissions. It is not recommended for CVT transmissions or differentials.
Directions for Use
Though it works in one treatment, AMSOIL Engine and Transmission Flush is safe enough to be used at every oil change. If using a flushing machine, follow the manufacturer’s recommendation. Otherwise, use the following guidelines:
Engine: Add 16 oz. bottle of AMSOIL Engine and Transmission Flush to engine oil fill port. Idle the engine for 10-15 minutes, then immediately drain the oil. Ensure enough time for the system to completely
drain. Remove and replace the engine oil filter. Refill engine with new engine oil in the viscosity grade recommended by the manufacturer.
Transmission: Engage emergency brake. Add 16 oz. bottle of AMSOIL Engine and Transmission Flush to transmission oil fill port. Idle for 10-15 minutes; shift through drive and reverse. Do NOT place vehicle under heavy load. Drain entire transmission and torque converter of fluid. FILTER MUST BE CHANGED prior to refilling with new transmission fluid.
NOTE: It is not recommended to flush transmissions that do not have a removable pan or access to the transmission filter.
Last edited by RSR; 08-16-2013 at 03:02 PM.
08-16-2013, 12:40 PM
#6
Registered User

Join Date: Aug 2012
Location: Orange County, CA
Posts: 368
Likes: 0
Received 0 Likes
on
0 Posts
Do you have any worries that running the flush through will cause oil leaks? I would like to convert my truck over to synthetic, but have heard that it can be bad for seals and such to go from dino to syn after 21 years.
Granted, at this point about the only seals I have not changed are the oil pan gasket and rear main crank seal. Maybe now would be a good time to get syn in there.
Granted, at this point about the only seals I have not changed are the oil pan gasket and rear main crank seal. Maybe now would be a good time to get syn in there.
08-16-2013, 02:59 PM
#7
Registered User
Thread Starter
The short answer is no, here's the longer.
My cam plug/seals have been recently replaced. My valve cover gaskets have been recently replaced. I fixed an oil cooler gasket leak in the process of this oil change. My rear crank gasket was replaced a couple years ago. I think my oil pan gasket is the only one that hasn't been relatively recently replaced -- and I'm pretty sure Toyota recommends fipg on the oil pan (which I appear to have), not oil pan cork gaskets as those not only cost more but tend to leak much more quickly as well -- so I"m hoping I won't/shouldn't have any new leaks... And I was already running full synthetic, so I should be good.
I guess you can start with a flush, and then try a partial synthetic and if no issues try a full synthetic... If you haven't read up on oil, head over to BobistheOilGuy and read their 10 or so part intro to oil series (this was a tremendous education for me -- and why I run the best filter I can find, pay more for synthetic, and installed the magnetic drain plug -- I'm going to install a TopDogV bypass at some point too as much for add'l oil cooling and oil capacity as for the add'l filtration [prob won't make too much of a difference on engine wear and tear at this point, though I just hit 150k on my engine, relatively low mileage compared to the rest of you]). Back to Bob, essentially the first number of oil doesn't matter to whether your engine can support -- it's just the oil's viscosity at cold engine temps. A higher number will help if you have a constant leak as the oil will be thicker at cold/air temperature, but that thicker (higher first number) oil will also allow for more wear and tear to your engine than a lower first number would as it's not as good at lubricating/circulating when thick. The second number is the viscosity at operating temperature, and that's the one you want to keep matching manufacturer's recommendations (if you find you're having to use oil higher than manufacturer's recommendations -- and there might be power/performance reasons to do so -- but for most of us needing to use higher is a sign for the need of a lower engine rebuild).
Amsoil also advertises this detergent flush as seal and gasket safe too...
Last edited by RSR; 08-16-2013 at 06:01 PM.
Trending Topics
10-22-2013, 03:15 PM
#8
Registered User
Thread Starter
I ran the Amsoil Engine Flush through our 4cyl 95 Accord, just about to hit 200k. It's typically seen only standard dino oil, but also runs much cooler than the 3vze.
Before and after oil samples are on this paper towel. On my 3vze pickup, I'd say the oil was 2-3 shades darker than hers despite getting the synthetic oil treatment.
Roughly, pre-oil change and pre-Amsoil on left and pre-oil change, post-Amsoil on right:
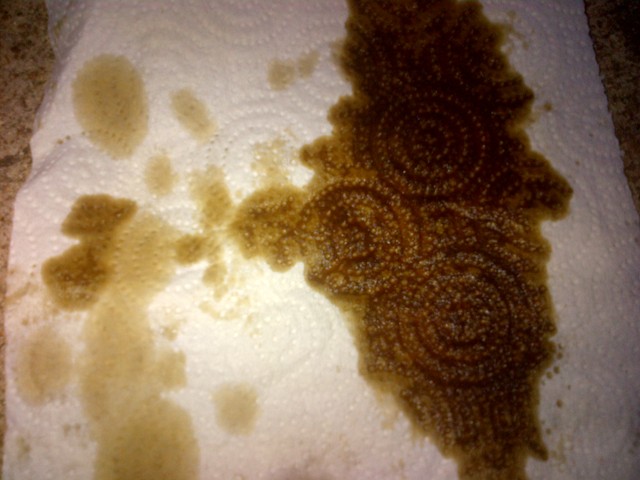
Drew some circles to better distinguish -- red is post Amsoil flush and bluish color is before (some oil spilled more than I wanted -- right red is more saturated than left red which is about the same quantity of oil as pre-Amsoil blue section):
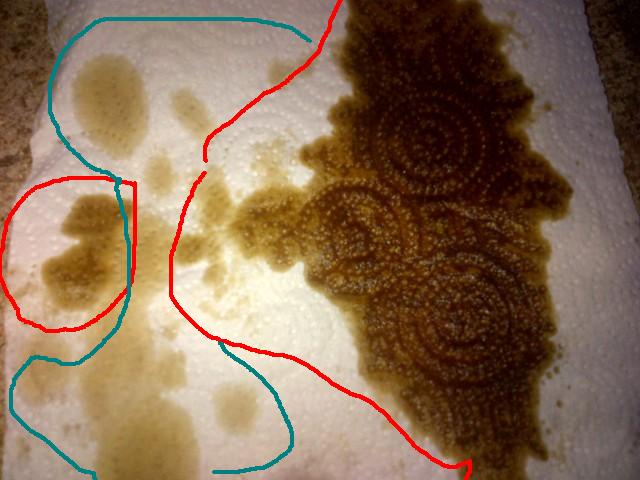
The flush definitely removes crap/sludge/varnish from your engine. Made a huge difference on my Yota 3vze, made it idle much smoother and quieter (despite just having my valves adjusted too w/ timing and RPMs set w/ a new distributor too). Less so on the wife's Honda.
I'm going to run through my truck next oil change too -- don't put many miles on it so probably around March time, but will check back with a similar analysis to see how much crud came out in the second go.
Before and after oil samples are on this paper towel. On my 3vze pickup, I'd say the oil was 2-3 shades darker than hers despite getting the synthetic oil treatment.
Roughly, pre-oil change and pre-Amsoil on left and pre-oil change, post-Amsoil on right:
Drew some circles to better distinguish -- red is post Amsoil flush and bluish color is before (some oil spilled more than I wanted -- right red is more saturated than left red which is about the same quantity of oil as pre-Amsoil blue section):
The flush definitely removes crap/sludge/varnish from your engine. Made a huge difference on my Yota 3vze, made it idle much smoother and quieter (despite just having my valves adjusted too w/ timing and RPMs set w/ a new distributor too). Less so on the wife's Honda.
I'm going to run through my truck next oil change too -- don't put many miles on it so probably around March time, but will check back with a similar analysis to see how much crud came out in the second go.
Last edited by RSR; 10-22-2013 at 03:18 PM.

 10-23-2013, 08:52 PM
#11
Registered User
Thread Starter
Any of the marine foams are supposed to be basically the same item I think... Like this stuff:
I think there may be an Amsoil dealer/sponsor for these forums that can get it to you...
Did you try placing an order for it on their website despite the disclaimer line? A quick search shows a lot of CA folks in other forums that have used it...
Two cans plus shipping should be in the $25-30 range. Two cans from a local dealer that has them on hand should be in the ~$20 range. (Amsoil's a lot like Mary Kay or Tupperware parties that the ladies do -- anyone can become a dealer and get product at the wholesale rate and then resell, so there's a lot of folks that are dealers and somewhere there's a dealer locator feature... Looking for it... I have preferred customer status right now b/c it saved me $ [same rate as dealers essentially]).
Last edited by RSR; 10-24-2013 at 08:29 PM.
10-23-2013, 08:54 PM
#12
Registered User
Thread Starter
Here's the dealer search. http://www.amsoil.com/locator/
10-24-2013, 08:31 PM
#14
Registered User
Thread Starter
MLP1 - Great! Glad to do it.
Yotaleigheehoo - Worst case, I suppose you can have a case or two (for those and other banned items) sent to a friend/mailbox store in NV or OR and do a road trip to pick them up...
Yotaleigheehoo - Worst case, I suppose you can have a case or two (for those and other banned items) sent to a friend/mailbox store in NV or OR and do a road trip to pick them up...
Last edited by RSR; 10-24-2013 at 08:32 PM.
11-13-2013, 12:51 PM
#15
Registered User

Join Date: Nov 2013
Posts: 1
Likes: 0
Received 0 Likes
on
0 Posts
hi yota tech,
i have a 1993 yota with 3vze and i had bought it with blown head gasket so needless to say iv put alot time and money into her. but recently iv tooken the plenum an tb off o clean and paint. the intake plenum looks great with hi temp black and a few coats of clear. but when i got to tb i started pulling the tps off and tried to get it prep for paint and relized the it problobly needs to go back on a certain way. any input would be greatly appricated.
i have a 1993 yota with 3vze and i had bought it with blown head gasket so needless to say iv put alot time and money into her. but recently iv tooken the plenum an tb off o clean and paint. the intake plenum looks great with hi temp black and a few coats of clear. but when i got to tb i started pulling the tps off and tried to get it prep for paint and relized the it problobly needs to go back on a certain way. any input would be greatly appricated.
02-26-2014, 01:01 PM
#18
Registered User

Join Date: Jun 2011
Location: Southern California 93510
Posts: 109
Likes: 0
Received 1 Like
on
1 Post
It has been a long time since I passed my smog test on the first go around. Two cans of Power Foam did the trick, though I'm not sure I'll be able to get away with it next time around (in 2 years). I'll keep the engine clean, but my HC measured at 83ppm with a max of 95ppm @ 15mph and 53ppm with a max of 60ppm @ 25mph. CO and NO were elevated from the measurements following the cat and O2 sensor replacement (2 years ago), but well within the acceptable limits. Any other suggestions as to how I can reduce my HC levels, without rebuilding the engine? I have over 304,000 miles on this truck, but it runs very smoothly. Thanks for the suggestions so far.
02-26-2014, 02:57 PM
#19
Registered User

Join Date: Sep 2007
Location: San Francisco East Bay
Posts: 8,254
Likes: 0
Received 822 Likes
on
649 Posts
Replace the O2 Sensor. Replace the catalytic converter.
The sensor isn't too expensive, but the catalytic converter is pretty dear. I plan to wait until I actually fail before that investment.
The sensor isn't too expensive, but the catalytic converter is pretty dear. I plan to wait until I actually fail before that investment.
02-26-2014, 05:38 PM
#20
Registered User
Join Date: Jun 2011
Location: Southern California 93510
Posts: 109
Likes: 0
Received 1 Like
on
1 Post
As you say, replacing those items make no sense unless the smog test fails. All were replaced two years ago, and O2 sensors should last 90,000 miles. I'm just interested in doing what I can do to prevent more damage. Cleaning the plenum was definitely helpful. I know what I can replace if I fail, but I passed, so I'm free for another 2 years. If anyone can educate me about things I didn't know (like cleaning the plenum), I am always eager to learn. If cleaning the plenum at the end of 2 years helped me pass, just imagine how keeping it clean could extend the life of a new cat (when I do need to replace it in the future). I'd love to learn other simple tips to maintain my truck. I actually never dreamed I'd be driving it for over 300,000 miles, so it has paid for itself many times over. Just as I'd do all in my power to maintain a healthy relationship, I'll also do all in my power to maintain an amazing vehicle.


