
Power up my 3vze 4runner
 07-17-2012, 11:23 PM
#1
Registered User
Thread Starter

Join Date: Jul 2012
Location: San Diego
Posts: 44
Likes: 0
Received 0 Likes
on
0 Posts
Power up my 3vze 4runner
So today was day one of a project ive been day dreaming about for a couple weeks now....
For a few years now ive been putting off a number of "little things" that have been leaking all over the street (rear main seal, valve cover gaskets, p/s hose, and even the damn water pump)
Then last month got a little body damage to front right corner
(bumper, fender, headlight, etc)
I cant stand driving with a smashed corner, so I figure if im gonna fix that, then i might as well kill an entire flock of birds with one stone, and lump all repairs together at once.
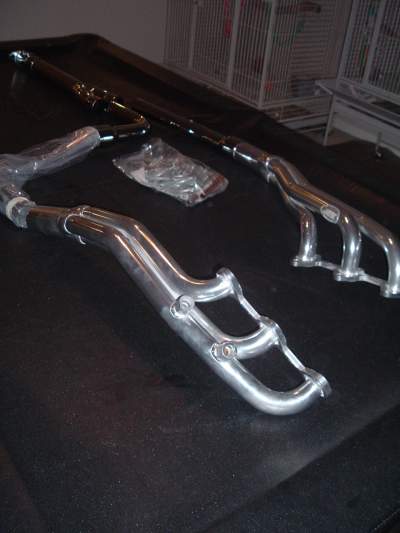
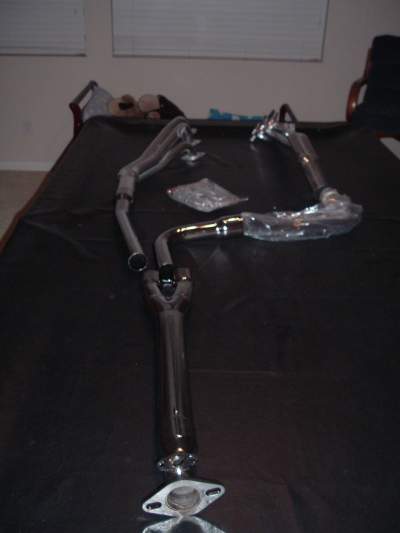
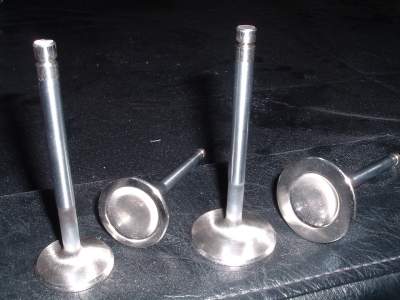
Then i really started thinking crazy, and long story short, i have all my parts ordered now, and along with the boring stuff, they include: K&N intake, Thorley headers, 2.25" magflow cat, 2.25 cat-back, o/s valves, crower cams.
NOW, Im actually motivated to get some grease under my nails!
Im hoping ill feel some nice gains form this... what u'all think?
For a few years now ive been putting off a number of "little things" that have been leaking all over the street (rear main seal, valve cover gaskets, p/s hose, and even the damn water pump)
Then last month got a little body damage to front right corner
(bumper, fender, headlight, etc)
I cant stand driving with a smashed corner, so I figure if im gonna fix that, then i might as well kill an entire flock of birds with one stone, and lump all repairs together at once.
Then i really started thinking crazy, and long story short, i have all my parts ordered now, and along with the boring stuff, they include: K&N intake, Thorley headers, 2.25" magflow cat, 2.25 cat-back, o/s valves, crower cams.
NOW, Im actually motivated to get some grease under my nails!
Im hoping ill feel some nice gains form this... what u'all think?
 07-20-2012, 06:39 PM
#3
Registered User
Thread Starter
Join Date: Jul 2012
Location: San Diego
Posts: 44
Likes: 0
Received 0 Likes
on
0 Posts
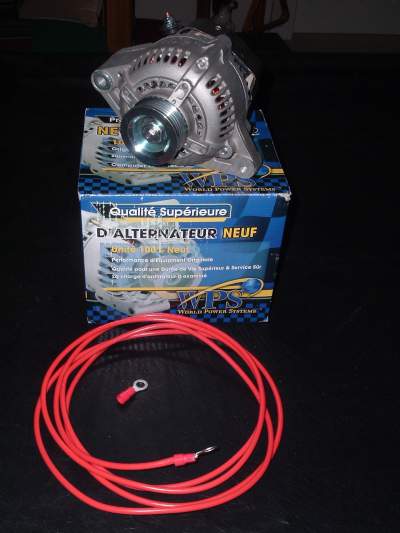
just coughed up a little bit more cash for the 130 amp alternator from LCE.... I've been needing some more juice for my 2150W stereo
It looks realy good, just like stock, and comes with larger upgrade wire
It looks realy good, just like stock, and comes with larger upgrade wire
 07-20-2012, 08:30 PM
#6
Registered User
Thread Starter
Join Date: Jul 2012
Location: San Diego
Posts: 44
Likes: 0
Received 0 Likes
on
0 Posts
LC Eng 130A alternator

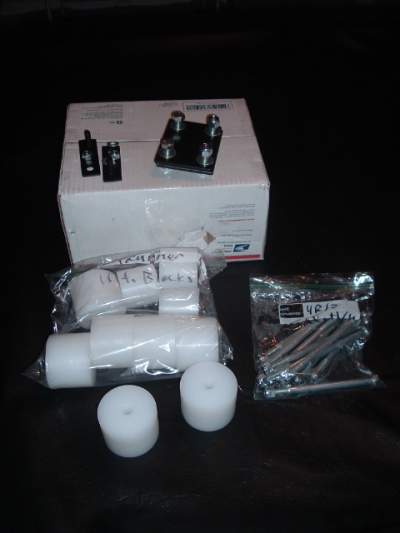
4crawl 2" body lift w/bumper & radiator brackets

I still need to order a hi flow cat and pick a muff
I have to say that so far everything looks pretty good, with exception of a few of the valves have some very small nicks on the edges of the heads...
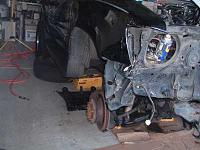
Here is the tear down so far...... (dropped cams at crower today, heads to machine shop monday)
4crawl 2" body lift w/bumper & radiator brackets
I still need to order a hi flow cat and pick a muff
I have to say that so far everything looks pretty good, with exception of a few of the valves have some very small nicks on the edges of the heads...
Here is the tear down so far...... (dropped cams at crower today, heads to machine shop monday)

Trending Topics
08-04-2012, 03:33 PM
#8
Registered User
Thread Starter
Join Date: Jul 2012
Location: San Diego
Posts: 44
Likes: 0
Received 0 Likes
on
0 Posts
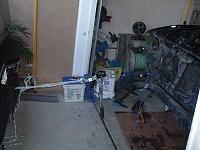
slowly moving forward
Ive had a lot of down time between the machine shop and Crower having to make me custom lash caps in order to meet adjustment spec, for my valves. But in the mean time ive pretty much got my body damage taken care of and 2" lift installed.
I have the bumper pulled, but you can see the corner pushed in an inch or two and the fender is messed up.....
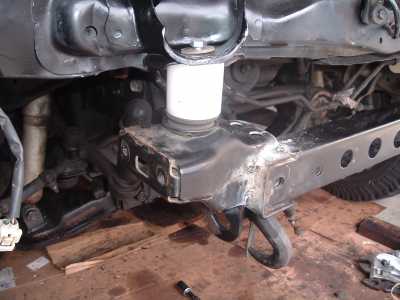
Also this bracket is destroyed!
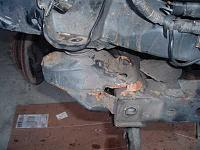
Had to cut it off

I have the bumper pulled, but you can see the corner pushed in an inch or two and the fender is messed up.....

Also this bracket is destroyed!

Had to cut it off
 08-04-2012, 03:44 PM
#9
Registered User
Thread Starter
Join Date: Jul 2012
Location: San Diego
Posts: 44
Likes: 0
Received 0 Likes
on
0 Posts
Replacement i cut from a junkyard 4runner

I unbolted the fender and the front-body-support bracket. Then I attached a come-along to the the body, where it connects to the bumper support bracket (Lucky that was about the center of the damage area). With alot of tension and hammering to help it along, I'd say its back to about 90-95% of where it all should be, and the important stuff is where it should be (bolt holes, etc)
Then I got the body lift spacers in and that made some extra space to weld around my new junkyard bracket.
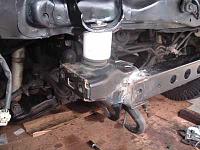
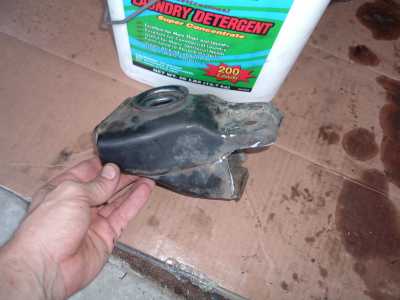
I unbolted the fender and the front-body-support bracket. Then I attached a come-along to the the body, where it connects to the bumper support bracket (Lucky that was about the center of the damage area). With alot of tension and hammering to help it along, I'd say its back to about 90-95% of where it all should be, and the important stuff is where it should be (bolt holes, etc)
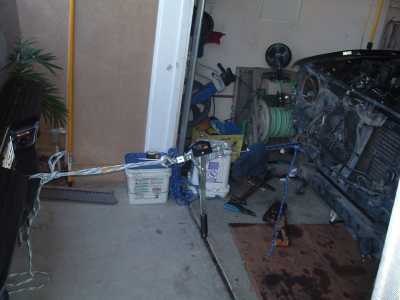
Then I got the body lift spacers in and that made some extra space to weld around my new junkyard bracket.
 08-04-2012, 03:50 PM
#11
Registered User
Thread Starter
Join Date: Jul 2012
Location: San Diego
Posts: 44
Likes: 0
Received 0 Likes
on
0 Posts
Looks pretty good with new fender and bumper... Also the extra 2" is nice. (wish i had taken a pic of the all the original damage but it was pretty ugly)
I will still need to paint fender and get new stripe decal...and maybe go from 31" to 32 or 33" tires next time.
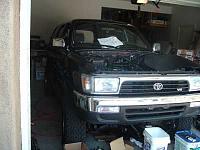
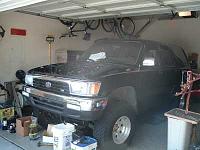
I should finally get my heads back from machine shop on monday...
I will still need to paint fender and get new stripe decal...and maybe go from 31" to 32 or 33" tires next time.

I should finally get my heads back from machine shop on monday...
10-13-2012, 12:05 AM
#12
Registered User
Thread Starter
Join Date: Jul 2012
Location: San Diego
Posts: 44
Likes: 0
Received 0 Likes
on
0 Posts
So i know its been a while... and ive finished up the project back in Aug, but i figured Id let u all know how the parts turned out....
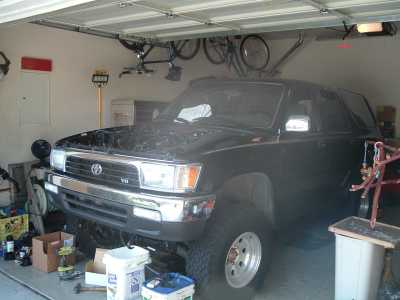
I posted pic above on how the body work turned out. (Id say pretty well), I just need to paint new fender and get new decal.
I JUST WANTED TO SAY ONE THING b4 i go on about how all the engine mods, worked out... I wanted to recommend to everyone what I will do for the rest of my life, and thats always doing as much work as u can yourself! ...Nobody is going to take the care to do things right as you!
Only thing i subed-out was the head machine work, and the valve adj... Well long story short even these "professionals" at the machine shop, who charged an arm and a leg, mixed up my left and right side heads, and all the cam retainers (which are suppose to be kept in original order ) and even though i even told them to make sure they didnt mix them up! The worst thing was at the last min b4 I installed the valve covers i figured I best double check their valve adjustments.... (Even though when i picked them up, they told me they were all dead on) I found 4 out of 12 valves were way wrong (like zero clearance) ,,, so i ended up adjusting the valve shims myself! ....Ahhh! so frustrating!
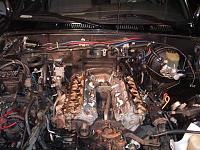
So anyways, i do have to say now it was all worth it... with all the new performance mods (k&n intake, 1mm o/s valves, cams, headers, 2.5" exhaust/cat/muff ) I am quite happily surprised with my performance gains... I dont feel to much down at lower speeds/ rpm, so i guess not much torque gains, but HP at higher speeds and RPM are very nice... i stomped on the gas at ~65-70mhp and almost got tossed back! The nicest thing about it is that i can now pass people on the freeway, i can pass people on the on-ramps, I can easily cruz at 75-85 when 70 used to be pushing it... Even accelerating up hills is surprisingly become pretty easy. Also the exhaust sounds very good, and not too laud at all. Two inch lift feels good too...
I posted pic above on how the body work turned out. (Id say pretty well), I just need to paint new fender and get new decal.
I JUST WANTED TO SAY ONE THING b4 i go on about how all the engine mods, worked out... I wanted to recommend to everyone what I will do for the rest of my life, and thats always doing as much work as u can yourself! ...Nobody is going to take the care to do things right as you!
Only thing i subed-out was the head machine work, and the valve adj... Well long story short even these "professionals" at the machine shop, who charged an arm and a leg, mixed up my left and right side heads, and all the cam retainers (which are suppose to be kept in original order ) and even though i even told them to make sure they didnt mix them up! The worst thing was at the last min b4 I installed the valve covers i figured I best double check their valve adjustments.... (Even though when i picked them up, they told me they were all dead on) I found 4 out of 12 valves were way wrong (like zero clearance) ,,, so i ended up adjusting the valve shims myself! ....Ahhh! so frustrating!
So anyways, i do have to say now it was all worth it... with all the new performance mods (k&n intake, 1mm o/s valves, cams, headers, 2.5" exhaust/cat/muff ) I am quite happily surprised with my performance gains... I dont feel to much down at lower speeds/ rpm, so i guess not much torque gains, but HP at higher speeds and RPM are very nice... i stomped on the gas at ~65-70mhp and almost got tossed back! The nicest thing about it is that i can now pass people on the freeway, i can pass people on the on-ramps, I can easily cruz at 75-85 when 70 used to be pushing it... Even accelerating up hills is surprisingly become pretty easy. Also the exhaust sounds very good, and not too laud at all. Two inch lift feels good too...
Last edited by BirdDogg; 10-13-2012 at 12:29 AM.
10-13-2012, 11:43 PM
#14
Registered User
Thread Starter
Join Date: Jul 2012
Location: San Diego
Posts: 44
Likes: 0
Received 0 Likes
on
0 Posts
no, i actually smogged it just b4 all the work... And when it comes to smog test, im actually not so worried about the headers as i am about the cam grind...
And as for the header install, you have to cut to length, the new solid copper pipe and flex pipe for the EGR, and PAR, and then also the pieces of pipe that make up the "y-pipe" will need to be cut to size, because they come in way too long... (I just waited and let the exhaust shop do the Y-pipe cut and fit at the same time as the rest of the new exhaust)
And as for the header install, you have to cut to length, the new solid copper pipe and flex pipe for the EGR, and PAR, and then also the pieces of pipe that make up the "y-pipe" will need to be cut to size, because they come in way too long... (I just waited and let the exhaust shop do the Y-pipe cut and fit at the same time as the rest of the new exhaust)
10-14-2012, 09:00 AM
#15
Registered User


This is pretty much the same list I have in mind for my truck. Saving that $$$$ as we speak.
I'm interested to see how much this wakes up your truck, you can be my guinea pig

Good job fixing that support bracket!

Thread
Thread Starter
Forum
Replies
Last Post
RedRunner_87
95.5-2004 Tacomas & 96-2002 4Runners (Build-Up Section)
84
06-01-2021 01:51 PM
skoti89
Offroad Tech
3
07-08-2015 12:05 AM


