
Identify a replacement part & earn $
 11-22-2010, 06:04 PM
#21
Cool, thanks for the tip MudHippy! I haven't done it to my truck yet, just screwed around on an old spare spindle to see what I was in for. I'm thinking that if it goes well I will do the other side. Then I guess I'll need to get a spare CV axle and put that silly $25 seal onto is so it will work if I need it on the trail. What a rip off! LOL
 12-07-2010, 05:42 AM
#22
Update: I installed these parts last night and everything went fine. The old bushing popped out super easy with a 17mm socket and extension. I just slid it into the spindle, toggled it to one side, tapped with a hammer, moved to another side, tapped again, and it came right out. Sure enough, the metal ring on the inside of the knuckle had to come off but it was very easy. The new seals on the knuckle and the axle were made with thin metal so I found a small block of wood was necessary to seat them.
The whole thing went together great, but the axle still doesn't come through the spindle *quite* far enough for the snap ring to go on. There may just be too much grease stuffed in there. Looking at how it's designed it doesn't seem like the snap ring does much anyway, given that the "gold bolt" is there holding things together!
The whole thing went together great, but the axle still doesn't come through the spindle *quite* far enough for the snap ring to go on. There may just be too much grease stuffed in there. Looking at how it's designed it doesn't seem like the snap ring does much anyway, given that the "gold bolt" is there holding things together!
12-07-2010, 10:57 AM
#23
The whole thing went together great, but the axle still doesn't come through the spindle *quite* far enough for the snap ring to go on. There may just be too much grease stuffed in there. Looking at how it's designed it doesn't seem like the snap ring does much anyway, given that the "gold bolt" is there holding things together!
EDIT: No I didn't, that's not the way that went at all. See post #25 below.

I'd be a little concerned that the shafts would have enough play without them to back off enough to cause a gap between those two seals though. Which may cause some leakage into the spindles. Then again, maybe not, just a thought.
Last edited by MudHippy; 12-07-2010 at 04:12 PM.
12-07-2010, 11:35 AM
#24
Yeah, I threaded a longer M8x1.25 bolt into the end of the shaft, put vise grips on that, and pulled as hard as I could while pushing the snap ring with a screwdriver, but to no avail.
Didn't think about the possibility of a gap without the snap ring... I'll have to see if that's the case or not...
Didn't think about the possibility of a gap without the snap ring... I'll have to see if that's the case or not...
12-07-2010, 04:01 PM
#25
Then I got to thinking "now how exactly do I explain that though?".

Well, a picture says a thousand words right? I guess I'll go pop one of them out and show 'em what I mean. Since they're just sitting there, trucks not put together at this point(long story), and it won't take me but 10-15 minutes to do...I might as well. All I have to do is pull the locking hub and CV half shaft on one of the spindles(A-arms and CVs still attatched)that are sitting out behind the shed, and then pop out one of those seals for a quick pic. No biggie. And I can use it as excuse to see how well they've been working in the mean time too. So I did just that, and they've been working splendidly too I might add. Nothing in there but grease, just how I likes it!

Anywho, here's the pic. This is the male end of the hub/spindle seal.
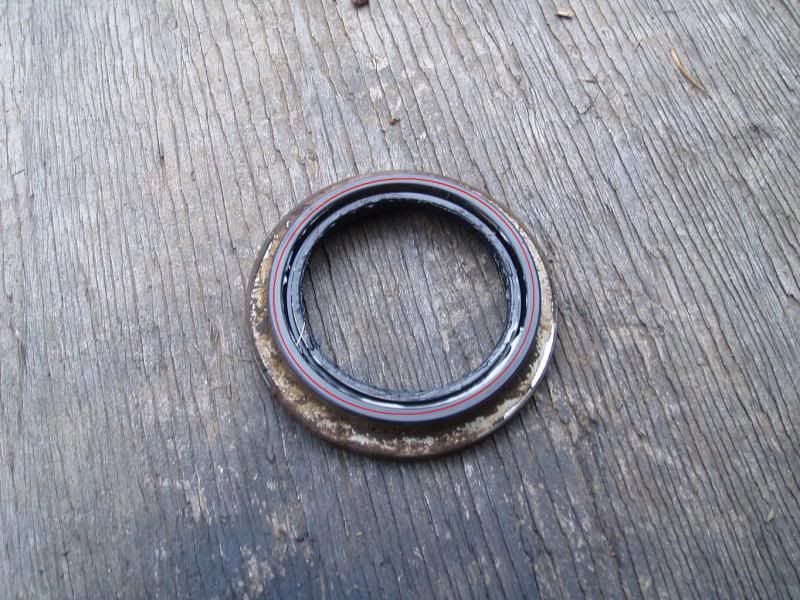
The part I filed down to make a custom fit seal out of it is marked down the center(ish) with a red stripe. Just file off a couple mm(at most, likely less, try maybe 1mm first) of the extra rubber from it there, bang it back into the hub/spindle, and that oughta do it. The snap ring will go on MUCH easier now. If not, pop it back out and take off some more, then try again. Sooner or later it WILL work. And you'll have done no real harm to the seal itself by doing so(if you're careful).

Now I'll go put it back on, and bolt everything back up. Feeling proud that I've done my YT good deed for the day.

Last edited by MudHippy; 05-01-2016 at 01:18 PM.
03-31-2011, 04:04 AM
#27
Quick update on this: I never did get around to trimming the new seal, so one CV has been running without a snap ring. However, the "gold bolt" seems to hold it in contact with the splines no problem. I have been on a few wheeling trips and spent some extended time in 4WD up to about 40mph in the ice Atlanta had after Xmas. So far no problems at all, which makes me think that the snap ring may simply be a redundant restraint -- it doesn't seem to be necessary with the gold bolt in place. This is kind of a bonus because the CV can come out without removing the hub body, just the face!
04-05-2011, 07:22 PM
#28
Registered User

Join Date: Oct 2007
Location: Seattle, WA 98107 (Ballard geek)
Posts: 212
Likes: 0
Received 0 Likes
on
0 Posts
Rustbucket and/or Mudhippy (and/or anyone else who has upgraded the the new superceded part replacement dohicky thingies...
Do you happen to have any pics, aside from the seal with the rubber trimmed down (thanks mudhippy)? I finally got my new spindle in and will be pulling the old one off in the next day or two. I'm just curious what exactly I'm going to be looking at, seeing as the FSM shows squat in terms of pics of these actual components.
Thanks.
-Chris
11-22-2011, 12:24 PM
#29
Registered User
gonna have to bump this. Hopefully MudHippy will see this. I have a qustion regarding this, I switched out my inner bushing for one out of an early 90's 4runner. Same issue, the bushing is slightly longer then the original one, I wonder if it's hitting some sort of lip inside the knuckle? Same problem, c-clip won't go on. The washer runs right over the groove in the cv.
The seal that is cut down, this is the one on the inner part of the knuckle that surrounds that bushing?
The seal that is cut down, this is the one on the inner part of the knuckle that surrounds that bushing?
 Am I one of the few who is changing these bushings?
  11-23-2011, 10:01 AM
#31
Registered User
ok, I'm back again. So need clarification on these two part numbers. 90304-76005 for the CV seal and 90316-60004 for the hub seal. This is so confusing because the parts catalog only show 1 part number. And what I took off appears to be one piece, however with the amt of rust we see , it wouldn't be surprising if the steel shield and seal were two different parts.
This is the photo of what Mud Hippy posted and what I took out.
Really surprised here that no one is chiming in on this. Maybe because the title is so vague? I am having a hard time believing I am the only currently active member who has or is replacing these.
This is the photo of what Mud Hippy posted and what I took out.
Really surprised here that no one is chiming in on this. Maybe because the title is so vague? I am having a hard time believing I am the only currently active member who has or is replacing these.
11-23-2011, 10:12 AM
#32
Registered User
ok, found both diagrams. Looks like originally this was two part numbers (90316-60001 plus 90304-76001) Both superseded into one part number (90304-76005). However 90316-60004 is nowhere listed in either of those two diagrams.
43211Q (90316-60001) in this diagram and the reference page

And then 43410E (90304-76001) in this diagram and the reference page.

43211Q (90316-60001) in this diagram and the reference page
And then 43410E (90304-76001) in this diagram and the reference page.
Last edited by xxxtreme22r; 11-23-2011 at 10:32 AM.
11-23-2011, 10:49 AM
#33
Registered User
I think I finally might be getting it. I just need a pic of 90316-60004 to be sure.
Here is the difference between the two different styles of CVs. Which is what leads to this confusion at least for me. And I have a feeling this is where the hangup is with the c-clip.
New style on the left, old style from my 87 on the right. Notice the lack of a "dust shield" on the one on the right. The one on the left also has a rubber seal whereas the one on the right does not.
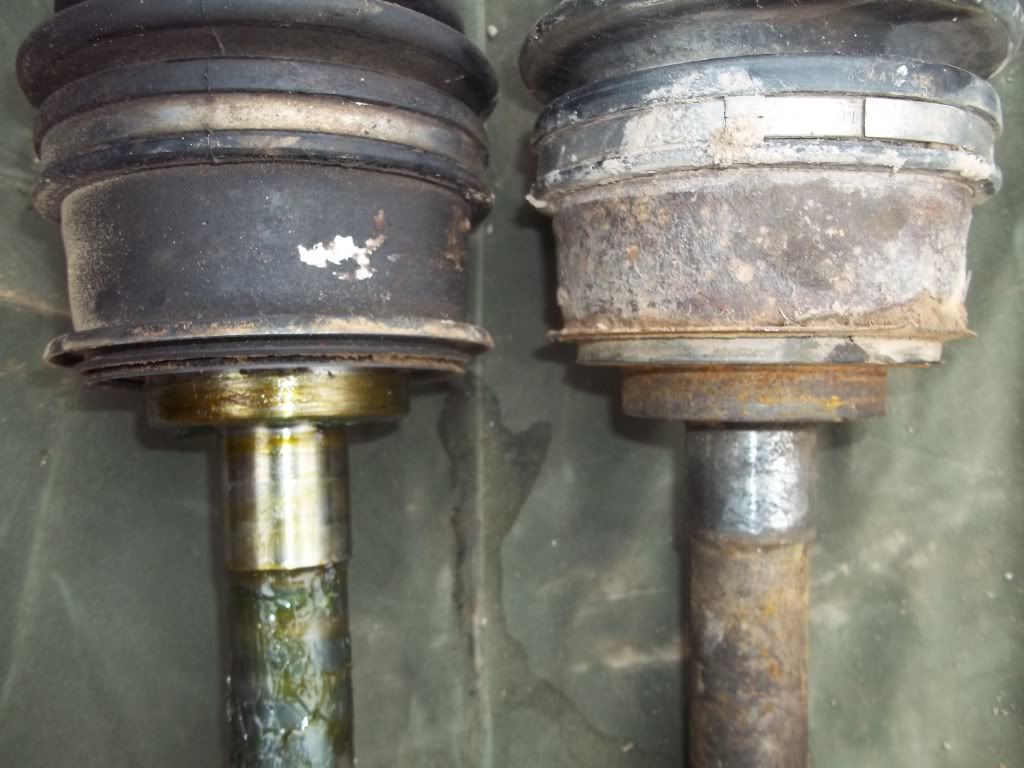
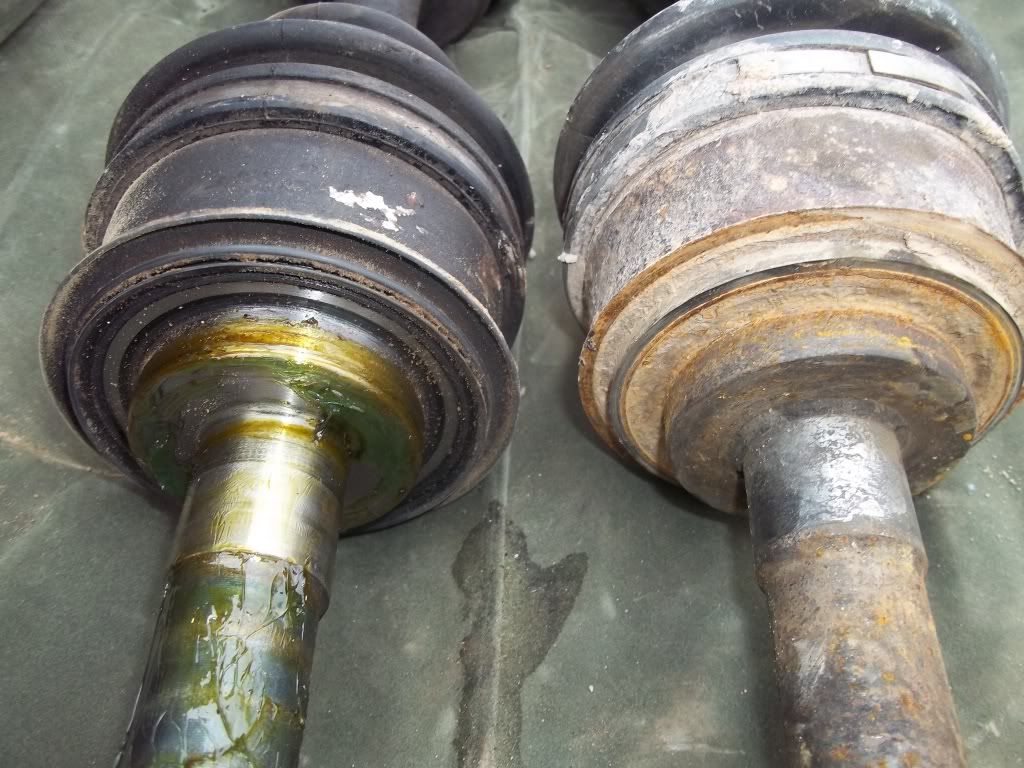
01-28-2012, 01:07 PM
#35
Registered User
Sorry didn't see this reply till now. Your not going to find them anywhere but an online Toyota OEM parts site or the dealer.
43211R BUSH (FOR STEERING KNUCKLE) 90999-70068 $12.60
Replaced by: 90381-30006
Manufacture notes:INNER
43211R BUSH (FOR STEERING KNUCKLE) 90381-30003 $27.20
Manufacture notes:OUTER
43211R BUSH (FOR STEERING KNUCKLE) 90999-70068 $12.60
Replaced by: 90381-30006
Manufacture notes:INNER
43211R BUSH (FOR STEERING KNUCKLE) 90381-30003 $27.20
Manufacture notes:OUTER
01-28-2012, 02:10 PM
#36
Registered User
A guy at a shop told me there was once a kit to replace the bushings with bearings. I wonder if it would be possible to take the bushing to a reputable bearing store, and see if they can't dig something up
01-28-2012, 02:26 PM
#37
Ok, now back to these seals...
This seal...

goes with this seal(which is one piece BTW, just muddy).
The ones that I replaced with those on my 88 were 2 pieces. There was a pretty standard looking radial lip seal that nested inside a metal flange part. When installed they looked as though they might be one piece, very similar to the one shown directly above. Upon their removal was when I realized they were actually 2 seperate parts.
I don't think the issue is with the seal on the end of the CV fitting differently. I didn't notice any misfitment there on mine, they seemed to fit them perfectly in place of the old style(though being quite different in appearance).
And when I did a side-by-side comparison of the early and late style bushings, they appeared to be the same thickness all around(the flange wasn't any thicker on the newer style IIRC). The only difference in those being the length(later style was a little longer is all). But I was still able to seat them fully flush(all the way in/bottomed out) with the rear faces of the spindles/hubs.
I don't know what else I can add at this point. But I PROMISE, I was able to get a proper fit with all of these parts on my 88 by simply modifying the seal that installs in the rear of the hub/spindle, AND NOTHING ELSE.
You'll figure it out one way or another...I have faith in ya...

Last edited by MudHippy; 01-28-2012 at 04:03 PM.
01-28-2012, 02:35 PM
#38
Registered User
See that's the problem. I cannot cut and reuse my old knuckle side seal. Northeast rust. Need I say more.
I think I figured this out though. I'll know in about a week or so. The above (clipping from my photo?) is the newer style CV side seal.
43211Q SEAL, OIL (FOR STEERING KNUCKLE) 90316-60001 $18.92 Times 2
Replaced by: 90304-76005
Notice it says replaced by 76005. But that is WRONG. The correct number is 60004.
Still trying to figure this one out. Every single thread here has a dead end with people NOT coming back to finish it to say if they fixed it or not. I hate that crap. Pretty sure the 90316-60004 is the knuckle side and the other one is the CV side which I don't really need.
I found another part number 90304-76002 Replaced by: 90304-76005. Which is listed this way: http://www.toyotapartszone.com/1995/...ive-shaft.html
90304-76005(MAIN) CV SIDE ????
90316-60004(SUB) KNUCKLE SIDE ????
Last edited by xxxtreme22r; 01-28-2012 at 02:37 PM.
01-28-2012, 02:50 PM
#39
Oh I hear ya on that. There's definitely still some confusion there as far as part #'s. I "think" I know which part # is for which part(stated previously), but I could be wrong. Unfortunately I didn't think to take pictures of the parts in question still in their OEM packaging. Trust me I'm regretting that oversight now...
01-28-2012, 03:02 PM
#40
Registered User
Ok 60004 it is. I hope. Otherwise it will be a $50 mistake. lol. Seals on the "new" CV's are in good shape as you can see from my photo. Minus the mud of course. lol.


