How to clean ventilation system on 84-88 trucks
 02-11-2015, 03:15 PM
#1
Super Moderator
Staff
Thread Starter
iTrader: (1)
Join Date: Aug 2008
Location: Anderson Missouri
Posts: 11,788
Likes: 0
Received 21 Likes
on
19 Posts
How to clean ventilation system on 84-88 trucks
These trucks came with R12 from the factory. If not upgraded you will need to convert to 134 or what is on the market. Have system vacuumed out at an ac shop and they will credit you what they remove. I would suggest going to an AC mechanic to restore the AC system.
It is possible to do it yourself but I wont be going into that. It is suggested to replace the drier behind the grill anytime the system is open to air.
Thread created by scope103... https://www.yotatech.com/forums/f116...-r134a-284801/ Great information. Most of the thread I created can be applied to the 89-95 trucks, just need to remove the glove box. 89-95 trucks the dash disassembes from the passenger to the driver side.
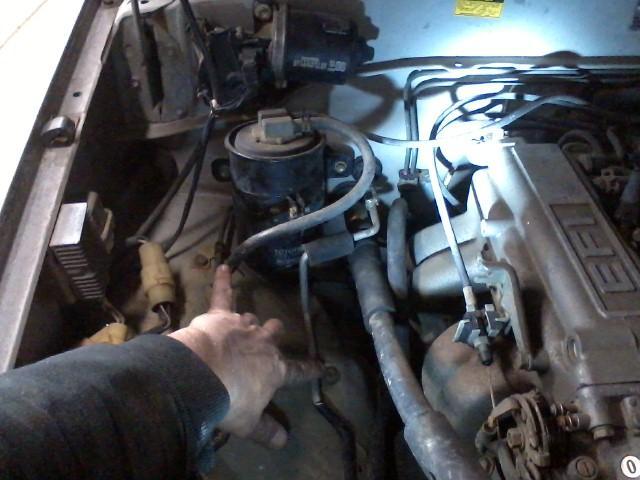
Remove the nut and bolt that is holding the smaller line to the inner fender for movement in next step.
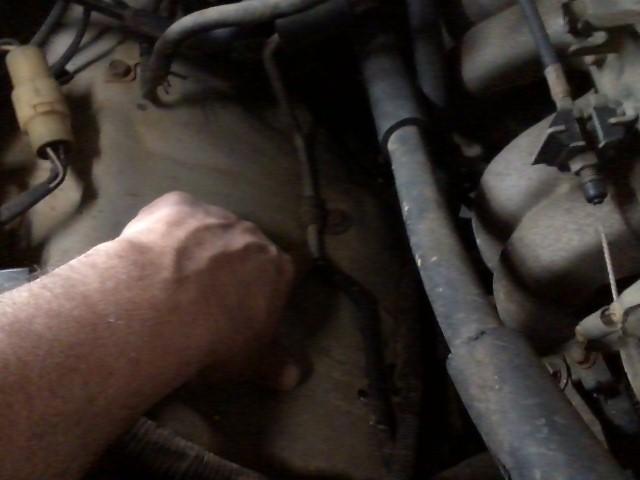
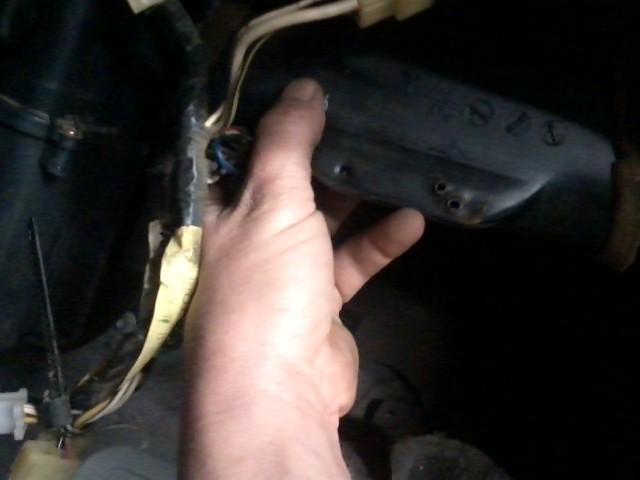
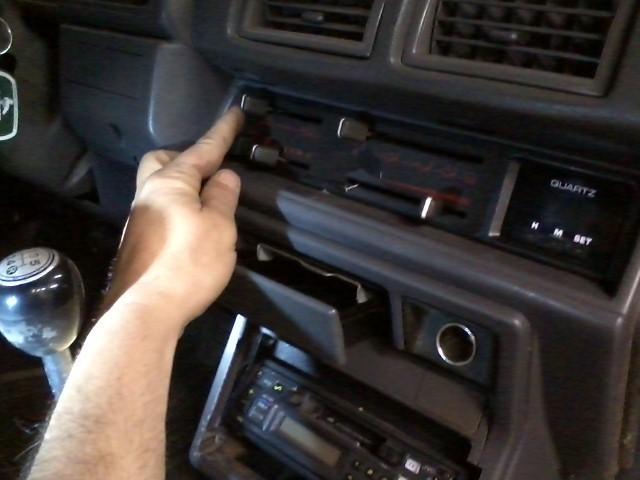
Loosen the bolt that my thumb is pointing at and remove the fuel charcoal canister.
Remove Canister bracket. This will give you access to the AC Lines.
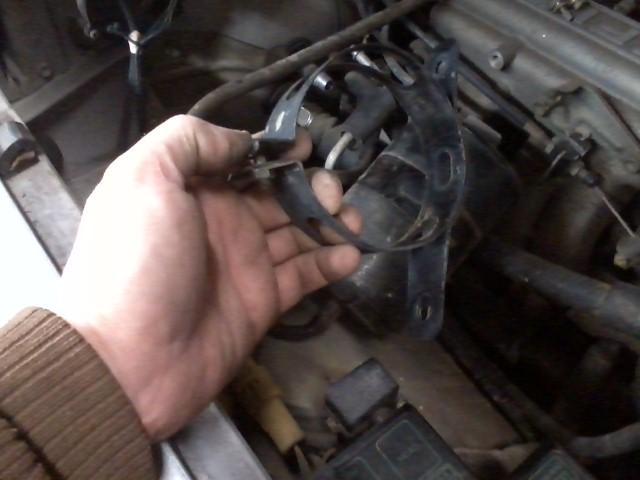
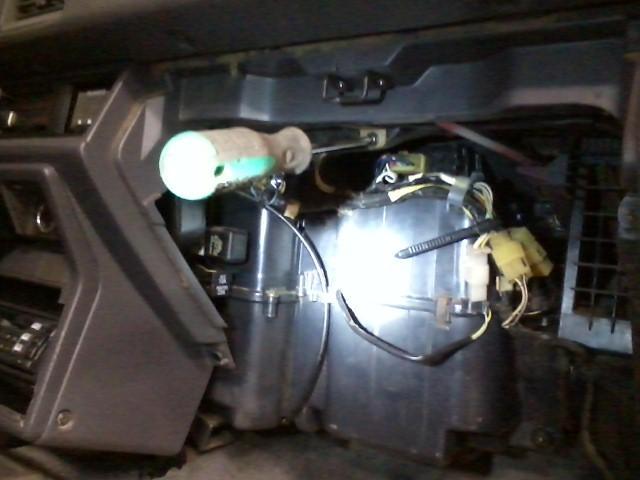
For the top lines use a 14mm and a 17mm wrench and seperate the top ac line.
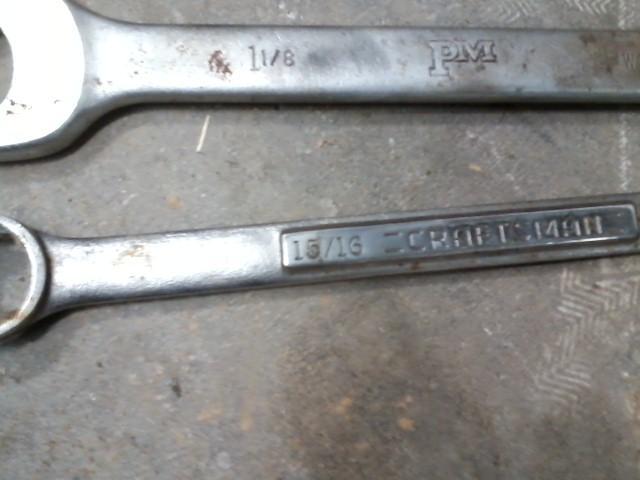
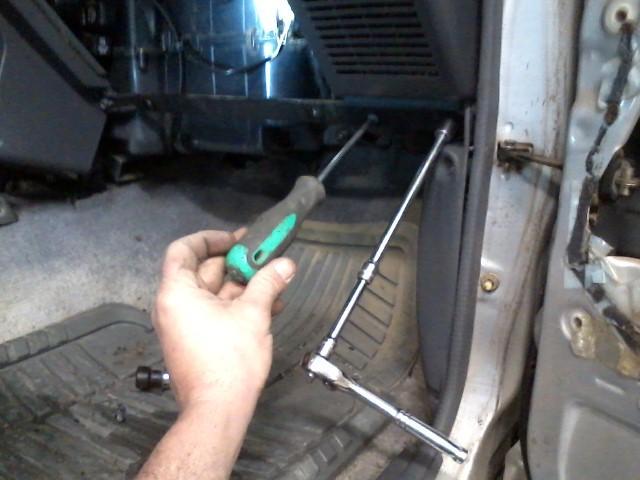
The following picture is for the lower lines. I do not have wrenches this big in the meteric size but these will work. 1 1/8th and a 15/16th.
Remove glove box and then remove the lower black bracket.
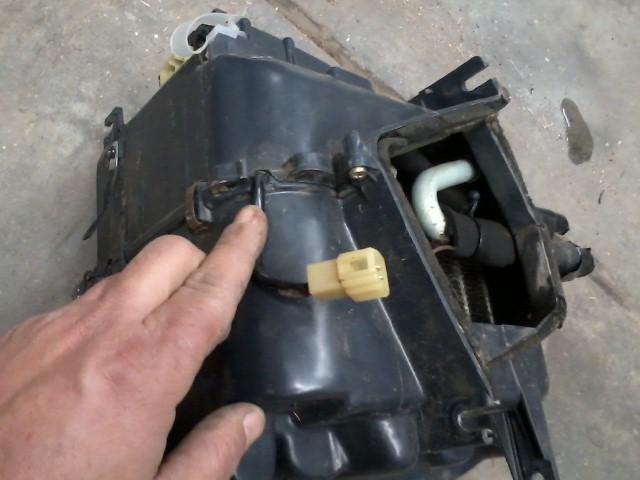
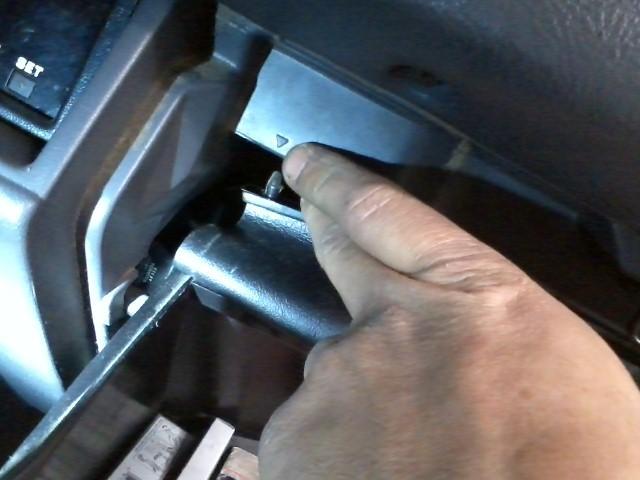
Remove PE pipe. Above my thumb will say PE. Remove the screw by my pinky to get the pipe out. Slide to the right, tilt down and pull left.
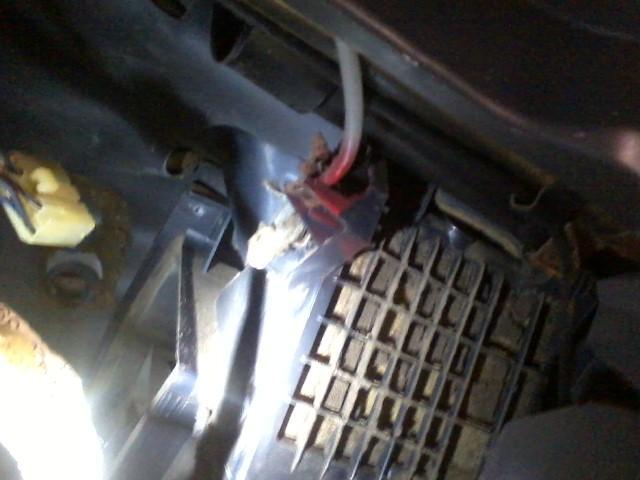
Disconnect 6 or so power connectors to the ac evaporator (Evaporator or condenser, someone correct me and I will edit the name to what it should be) and I use electric tape to cover ends of metal lines and to the below named part.
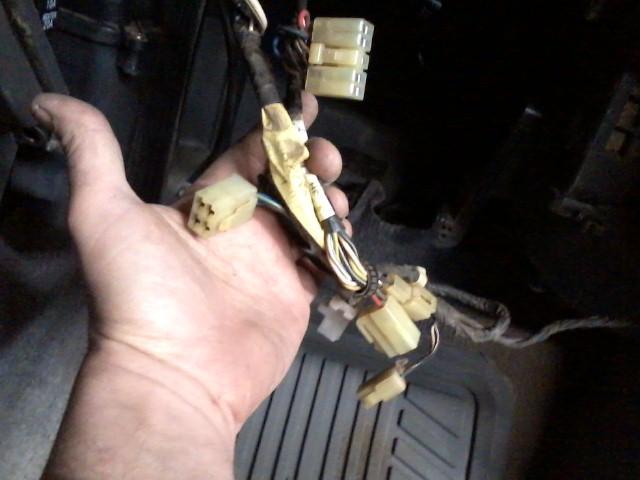
Pull the assembly out of the dash. There is a drain hose attached that is not showing. This is common of what you are going to find in the ac system.
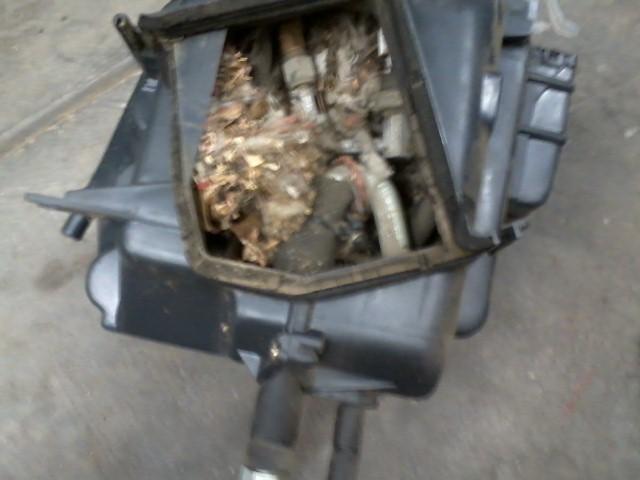
With a screwdriver in the slot of the metal clip, just pry down. There is 4 or so clips and remove the 5 or so gold screws that hold the plastic box togheter.

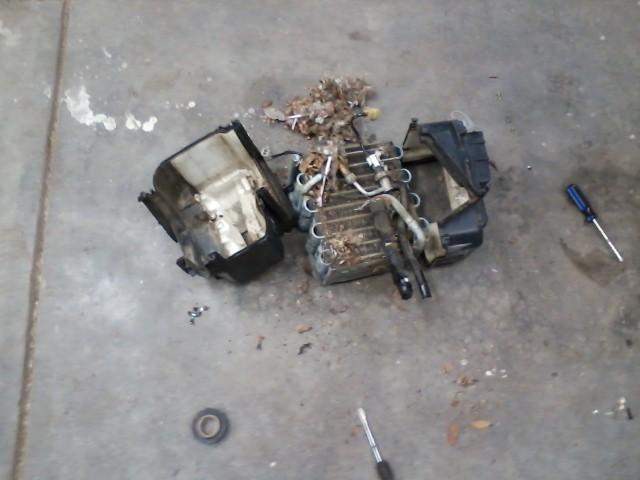
Seperate the box and I use an air hose to get as much of the dirt out as possible and then wash the coils with hot soapy water. Here you can see I have the lines covered in electrical tape.
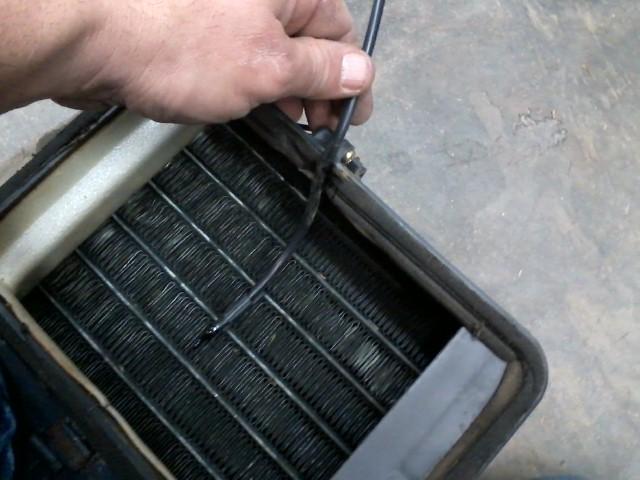
Before you pull the blower assembly out, using some spray paint or similar will make getting the cable to where it needs to be when reinstalling later. It will be covered up so it can stay on for the next time you need to remove components.
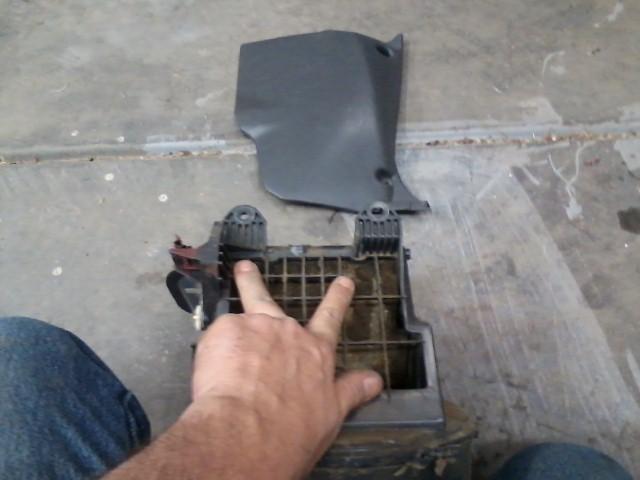
To remove the blower assembly, remove the passenger kick panel. Where my top two fingers are, you will need to get a 10mm wrench and get two gold nuts off. This will be the hardest part to do but is easily seen. Then there is one screw under the carpet you need remove and the assembly can be worked out.
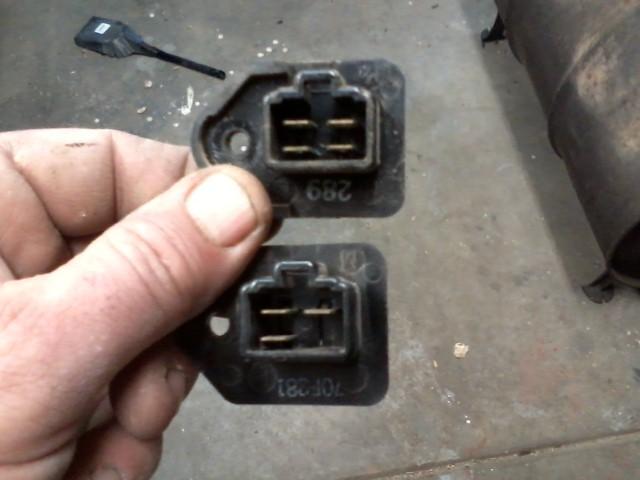
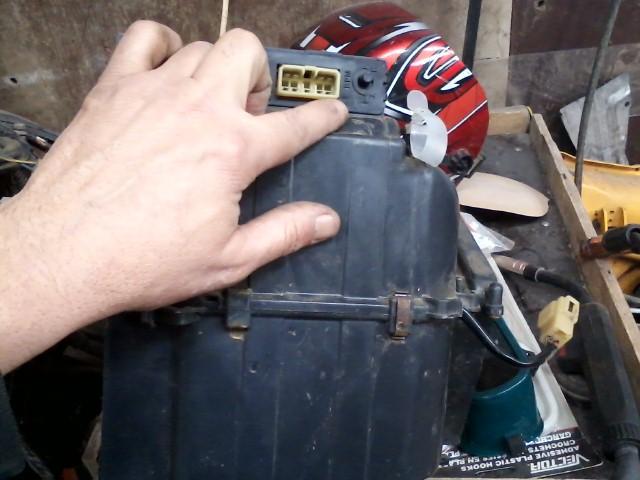
Once the blower assembly is out. Check to see if you have a 3 or 4 pronged blower resistor. This one is a four pronged and it does make a difference as to which resistor you need. If your blower only works on high, most likely your resistor is burnt up.

This resistor has been replaced recently. Most will turn to dust when touched if it is worn out. I did not touch with my fingers to keep from getting body oil on it and causing a hot spot on it and wearing it out faster. It should be solid. Will disentigrate if bad,
One thing I have run into in the past. Some have a 3 pronged resistor and others have a 4 prong resistor. Double check as to what you have. Not sure which years used which.
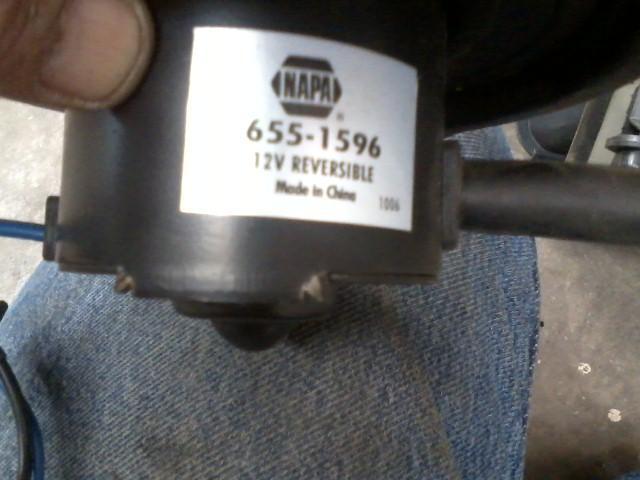
This motor has the correct connector on it but is not a Toyota blower. It is a part store blower and I will reuse it.
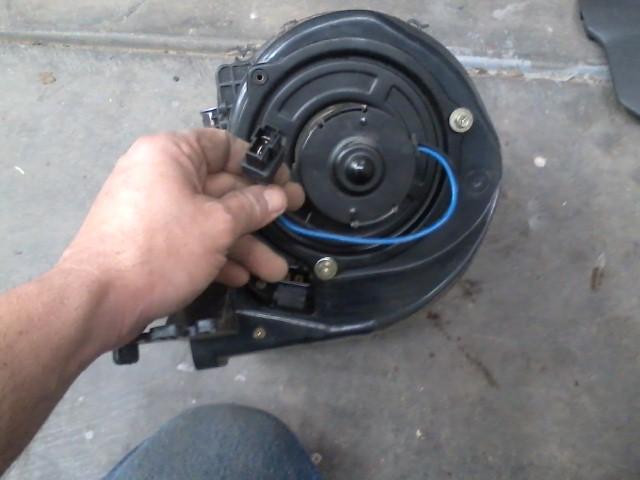
Besides the wire and connectors looks, I see the part store name on it.
Remove one nut that holds the fan blade on and the three holding the fan assembly in and just use an air hose to get all of the dirt out of the blades and the motor will have dust in it as well.
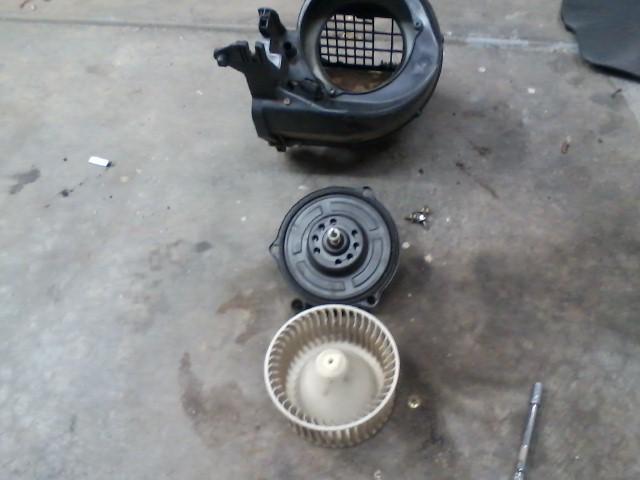
To reassemble, the blower assembly is just held in with the two gold nuts at the top and one screw at the bottom. Getting the blower assembly can be a little tricky getting over the studs that the gold nuts go to.
After cleaning and reassembling the ac evaporator, make sure this cable is routed out of the box. It actually goes inside and there is a cutout for it.
Same for this one.
Dont mess with this, not sure what it does and it is hidden behind the dash where it is not easily accessible. Your ac guy might know what to do with it. I think it has to do with idle speed but am not sure.
When sticking the evaporator back in, dont forget to hook up this drain hose or you will have a wet floorboard.
Here is where the drain hose hooks to.

Before putting the evaporator in, slide the botton cotroller to the right to get access to the heater core and see if there is any dirt there. The evaporator caught the dirt on this one but is still worth checking.
With the lever to the right, you can get access to the heater core. I could not get a good picture of it you can see inside with the right angle and feel in there as well.
If I recall right, it is 2 of these screws on top and 3 on the bottom that hold the evaporator in.
Re connect all power cables and screws are located below carpet.
Reconnect your white cable and passenger kick panel.

To check and see if your cable is installed correctly, operate this lever from one side to the other and make sure the fresh door is functioning correctly.
The screw driver is showing the PE pipe with the phillips screw that holds it in.
Install two 10mm bolts on each end of the black bar and the one phillips screw that holds it to the main frame.
Install the glovebox with two screws on the bottom of the black bar. ( will get pic later)
Once the glovebox is installed, the arrows show where the glovebox dust cover goes. They just snap into place. (I use a flatblade screwdriver next to the tabs to pop them out when disassembling)
Install bolt that supports the ac line.
Reconnect the ac lines to the firewall.
Reinstall your charcoal canister making sure the vent tube is routed correctly.
These trucks came with R12, most likely you will need to upgrade to 134 or the newest freon out there. At the beginning I did have a ac mechanic to vacuum the system. They will give you credit for what they remove from your system. At this point I would suggest having an ac shop to complete the ac system.
It is possible to do it yourself but I wont be going into that. It is suggested to replace the drier behind the grill anytime the system is open to air.
Thread created by scope103... https://www.yotatech.com/forums/f116...-r134a-284801/ Great information. Most of the thread I created can be applied to the 89-95 trucks, just need to remove the glove box. 89-95 trucks the dash disassembes from the passenger to the driver side.
Remove the nut and bolt that is holding the smaller line to the inner fender for movement in next step.

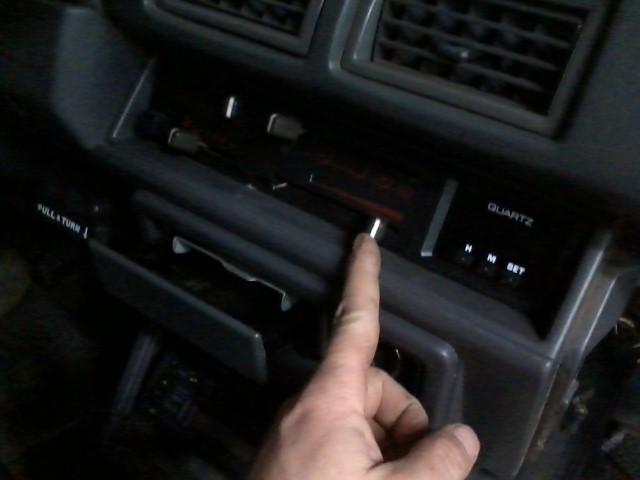
Loosen the bolt that my thumb is pointing at and remove the fuel charcoal canister.
Remove Canister bracket. This will give you access to the AC Lines.

For the top lines use a 14mm and a 17mm wrench and seperate the top ac line.
The following picture is for the lower lines. I do not have wrenches this big in the meteric size but these will work. 1 1/8th and a 15/16th.

Remove glove box and then remove the lower black bracket.

Remove PE pipe. Above my thumb will say PE. Remove the screw by my pinky to get the pipe out. Slide to the right, tilt down and pull left.

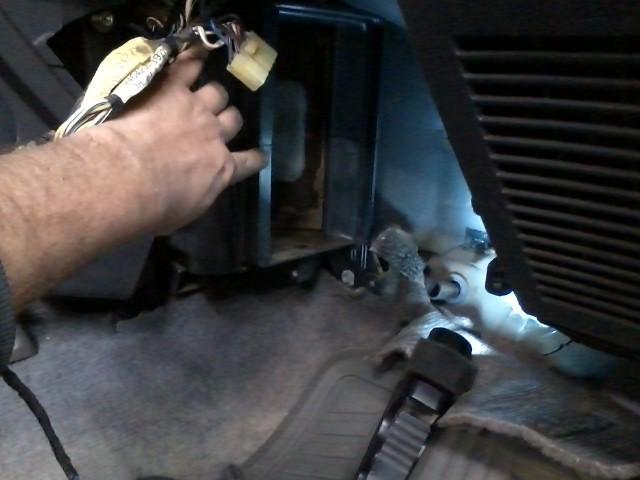
Disconnect 6 or so power connectors to the ac evaporator (Evaporator or condenser, someone correct me and I will edit the name to what it should be) and I use electric tape to cover ends of metal lines and to the below named part.

Pull the assembly out of the dash. There is a drain hose attached that is not showing. This is common of what you are going to find in the ac system.

With a screwdriver in the slot of the metal clip, just pry down. There is 4 or so clips and remove the 5 or so gold screws that hold the plastic box togheter.

Seperate the box and I use an air hose to get as much of the dirt out as possible and then wash the coils with hot soapy water. Here you can see I have the lines covered in electrical tape.

Before you pull the blower assembly out, using some spray paint or similar will make getting the cable to where it needs to be when reinstalling later. It will be covered up so it can stay on for the next time you need to remove components.

To remove the blower assembly, remove the passenger kick panel. Where my top two fingers are, you will need to get a 10mm wrench and get two gold nuts off. This will be the hardest part to do but is easily seen. Then there is one screw under the carpet you need remove and the assembly can be worked out.

Once the blower assembly is out. Check to see if you have a 3 or 4 pronged blower resistor. This one is a four pronged and it does make a difference as to which resistor you need. If your blower only works on high, most likely your resistor is burnt up.

This resistor has been replaced recently. Most will turn to dust when touched if it is worn out. I did not touch with my fingers to keep from getting body oil on it and causing a hot spot on it and wearing it out faster. It should be solid. Will disentigrate if bad,

One thing I have run into in the past. Some have a 3 pronged resistor and others have a 4 prong resistor. Double check as to what you have. Not sure which years used which.

This motor has the correct connector on it but is not a Toyota blower. It is a part store blower and I will reuse it.

Besides the wire and connectors looks, I see the part store name on it.

Remove one nut that holds the fan blade on and the three holding the fan assembly in and just use an air hose to get all of the dirt out of the blades and the motor will have dust in it as well.

To reassemble, the blower assembly is just held in with the two gold nuts at the top and one screw at the bottom. Getting the blower assembly can be a little tricky getting over the studs that the gold nuts go to.

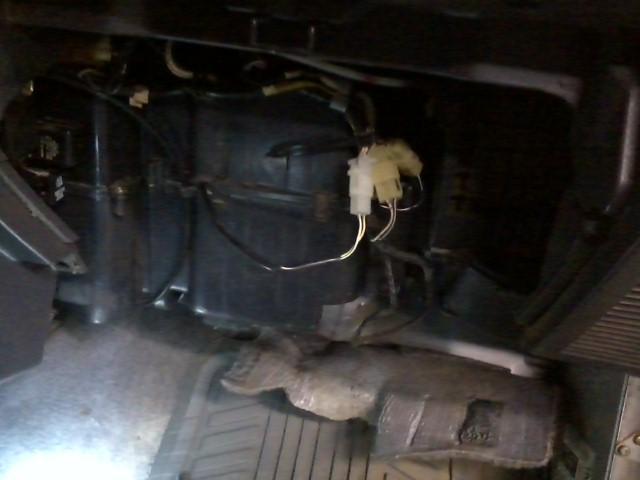
After cleaning and reassembling the ac evaporator, make sure this cable is routed out of the box. It actually goes inside and there is a cutout for it.

Same for this one.

Dont mess with this, not sure what it does and it is hidden behind the dash where it is not easily accessible. Your ac guy might know what to do with it. I think it has to do with idle speed but am not sure.

When sticking the evaporator back in, dont forget to hook up this drain hose or you will have a wet floorboard.

Here is where the drain hose hooks to.

Before putting the evaporator in, slide the botton cotroller to the right to get access to the heater core and see if there is any dirt there. The evaporator caught the dirt on this one but is still worth checking.

With the lever to the right, you can get access to the heater core. I could not get a good picture of it you can see inside with the right angle and feel in there as well.

If I recall right, it is 2 of these screws on top and 3 on the bottom that hold the evaporator in.

Re connect all power cables and screws are located below carpet.

Reconnect your white cable and passenger kick panel.

To check and see if your cable is installed correctly, operate this lever from one side to the other and make sure the fresh door is functioning correctly.

The screw driver is showing the PE pipe with the phillips screw that holds it in.

Install two 10mm bolts on each end of the black bar and the one phillips screw that holds it to the main frame.

Install the glovebox with two screws on the bottom of the black bar. ( will get pic later)
Once the glovebox is installed, the arrows show where the glovebox dust cover goes. They just snap into place. (I use a flatblade screwdriver next to the tabs to pop them out when disassembling)

Install bolt that supports the ac line.
Reconnect the ac lines to the firewall.
Reinstall your charcoal canister making sure the vent tube is routed correctly.
These trucks came with R12, most likely you will need to upgrade to 134 or the newest freon out there. At the beginning I did have a ac mechanic to vacuum the system. They will give you credit for what they remove from your system. At this point I would suggest having an ac shop to complete the ac system.

Last edited by Terrys87; 01-08-2016 at 09:26 AM.
 02-11-2015, 03:42 PM
#2

Image #20 controls the minimum engine RPM a/c clutch engagement. I had a customer come in for a noise and smell when A/C or heater was on, pulled the fan out, there was part of a mouse stuck in it.
02-11-2015, 04:07 PM
#3
Registered User

Join Date: Sep 2007
Location: San Francisco East Bay
Posts: 8,252
Likes: 0
Received 820 Likes
on
648 Posts
Very nice work!
The square-ish openings in the cooling unit (evaporator) that go to the heater core on one side and the fan on the other have a one-piece foam seal that is glued to the cooling unit case. http://personal.utulsa.edu/~nathan-b...15coolingu.pdf If you're as lucky as I was, that seal is still good, but you can't separate the halves of the cooling unit case without tearing it. I wanted to keep the old (still good) seal, so it got my sharpest razor and cut the foam seal right at the separation line. Then I just put it all back together with the tiny slit there.
The square-ish openings in the cooling unit (evaporator) that go to the heater core on one side and the fan on the other have a one-piece foam seal that is glued to the cooling unit case. http://personal.utulsa.edu/~nathan-b...15coolingu.pdf If you're as lucky as I was, that seal is still good, but you can't separate the halves of the cooling unit case without tearing it. I wanted to keep the old (still good) seal, so it got my sharpest razor and cut the foam seal right at the separation line. Then I just put it all back together with the tiny slit there.
02-11-2015, 04:13 PM
#4
Registered User

Great writeup.
I would add that you're never going to get your evaporator clean, and trying to clean it with water will usually just leave residue moisture in your evaporator's pipes that will cause your ac drier to need replaced more quickly...
So I'd recommend just getting a new evaporator from the start. ~$120 for a Denso, other brands cheaper: http://www.partsgeek.com/catalog/199...vaporator.html
And replace your AC gaskets/seals while you're in there (also not a bad idea to do your expansion valve while you're inside the evap box too...).
BG products foam is the best evap foam I've tried to date, but I know I will need to ultimately pull the box and replace the evaporator like you did...
02-13-2015, 12:12 PM
#6
Super Moderator
Staff
Thread Starter
iTrader: (1)
Join Date: Aug 2008
Location: Anderson Missouri
Posts: 11,788
Likes: 0
Received 21 Likes
on
19 Posts
Thanks guys!!! I want to add and respond more to this post but will be busy for a little bit but do want to add a quick bit of information and will go further into detail on it but just to get the information out there.
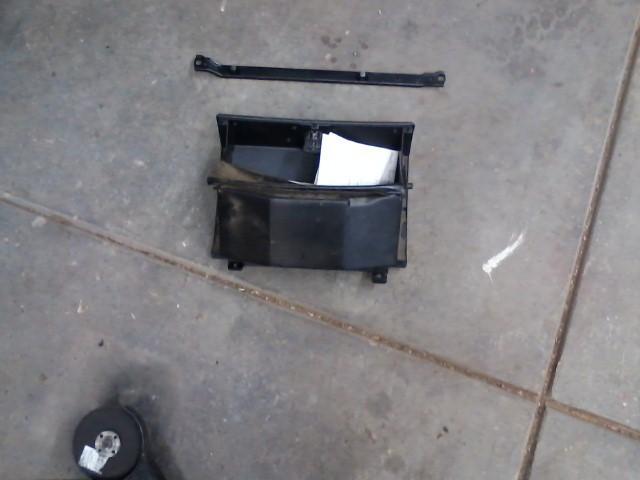
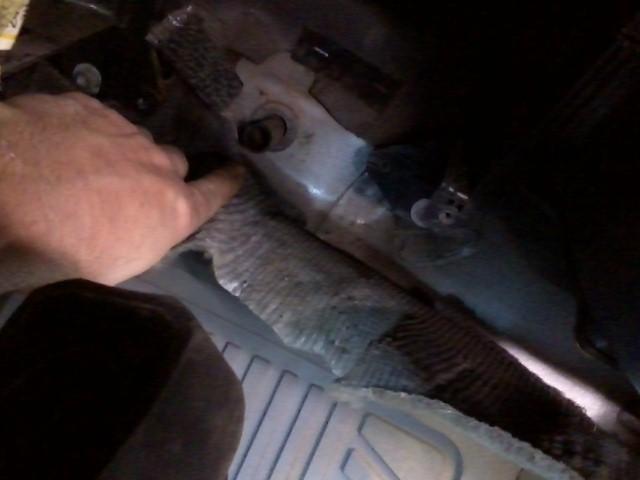
You need to clean out the cowl just in front of the windshield. Normally it is just held in with 3 screws and 2 clips just under the rear of the hood. This is where the debris comes from. Below is a picture of what I am talking about. I had already pulled out alot of debris with my hands and this is what I had to get with a vacuum cleaner. It was MUCH more dirtier then the pic shows.
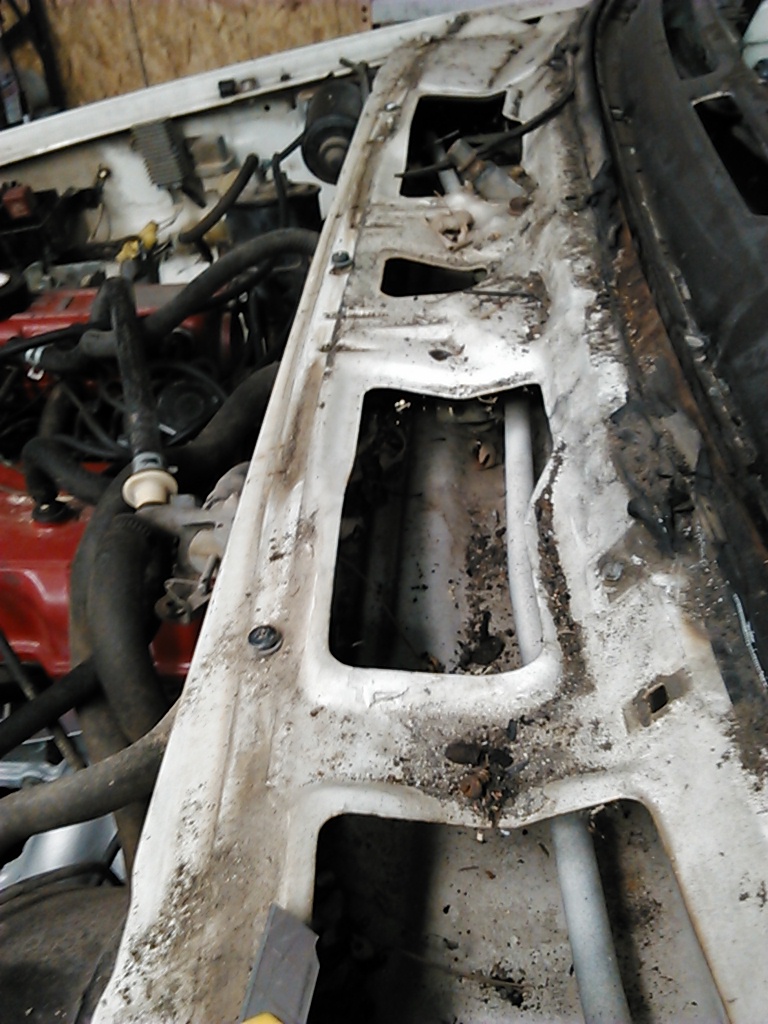
You need to clean out the cowl just in front of the windshield. Normally it is just held in with 3 screws and 2 clips just under the rear of the hood. This is where the debris comes from. Below is a picture of what I am talking about. I had already pulled out alot of debris with my hands and this is what I had to get with a vacuum cleaner. It was MUCH more dirtier then the pic shows.
 08-14-2015, 06:20 AM
#7
Registered User
This is a great thread!
Question: if you install the fiberglass cowl replacement which has no louvered openings, does that cut off your fresh air intake for ventilation?
Question: if you install the fiberglass cowl replacement which has no louvered openings, does that cut off your fresh air intake for ventilation?
Trending Topics
08-14-2015, 09:21 AM
#8
Thanks for this thread, Terry!
Guys, I wonder if anyone has tried:
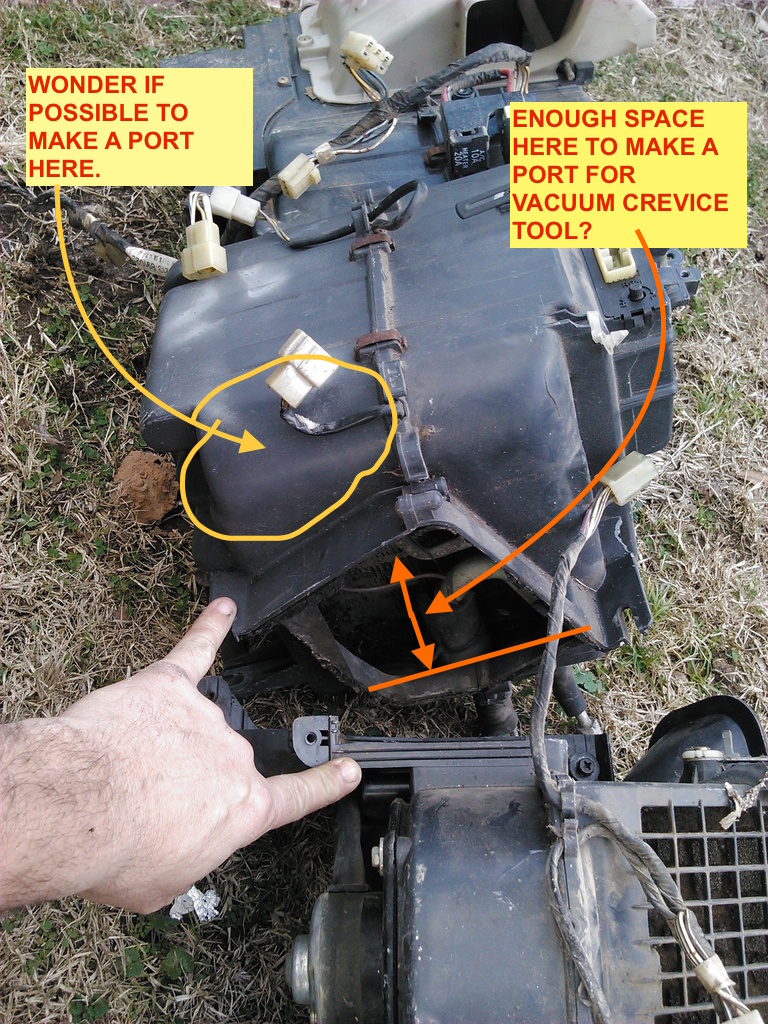
(1) Making a cleaning port in intake side of the cooling chamber so a small vacuum hose could be inserted as needed and port re-sealed with proper gasket. This way, the cooling chamber can be cleaned no a regular basis without having to break the coolant lines... OR
(2) Simply "cracking" the housing seal and vacuuming through there.
Either of the above would mean a convenient, easy, less expensive and environmentally-friendly cleaning process that can be done more often if desired.
Guys, I wonder if anyone has tried:
(1) Making a cleaning port in intake side of the cooling chamber so a small vacuum hose could be inserted as needed and port re-sealed with proper gasket. This way, the cooling chamber can be cleaned no a regular basis without having to break the coolant lines... OR
(2) Simply "cracking" the housing seal and vacuuming through there.
Either of the above would mean a convenient, easy, less expensive and environmentally-friendly cleaning process that can be done more often if desired.
08-14-2015, 03:25 PM
#9
Super Moderator
Staff
Thread Starter
iTrader: (1)
Join Date: Aug 2008
Location: Anderson Missouri
Posts: 11,788
Likes: 0
Received 21 Likes
on
19 Posts
The first picture shows the hole just infront of the door hinge.

The second picture shows where the owner had to open it up some to do the repair from debris causing rot in the cowl, but shows the factory hole I am talking about. The water and debris is supposed to run down and come out behind the mud flaps. Removing the mud flaps can be a tell tale sign if there is alot of debri behind the mud flap.

Last edited by Terrys87; 08-14-2015 at 03:28 PM.
08-14-2015, 03:36 PM
#10
Super Moderator
Staff
Thread Starter
iTrader: (1)
Join Date: Aug 2008
Location: Anderson Missouri
Posts: 11,788
Likes: 0
Received 21 Likes
on
19 Posts
Thanks for this thread, Terry!
Guys, I wonder if anyone has tried:
(1) Making a cleaning port in intake side of the cooling chamber so a small vacuum hose could be inserted as needed and port re-sealed with proper gasket. This way, the cooling chamber can be cleaned no a regular basis without having to break the coolant lines... OR
(2) Simply "cracking" the housing seal and vacuuming through there.
Either of the above would mean a convenient, easy, less expensive and environmentally-friendly cleaning process that can be done more often if desired.
Also the Evaporator has screws and clips on the back side that you might not have access to, to disassemble the case itself.
You may not have it as bad of a build up living in the city. Living in the country, trees wreak havoc on our ventilation systems. Still the dust that gets trapped in the fins of the Evaporator is quite a bit. I tried to get a picture of how bad it was after I vacuumed off the debri and then took the Evaporator to the carwash and used low pressure to spray out the dust. It was bad.
Last edited by Terrys87; 08-14-2015 at 03:38 PM.
08-14-2015, 03:42 PM
#11
Super Moderator
Staff
Thread Starter
iTrader: (1)
Join Date: Aug 2008
Location: Anderson Missouri
Posts: 11,788
Likes: 0
Received 21 Likes
on
19 Posts
http://www.ebay.com/itm/New-Denso-A-C-AC-Receiver-Drier-Truck-4-Runner-Van-Coupe-Sedan-Celica-Toyota-/151058290409?hash=item232bc696e9&vxp=mtr
Driers are coming down in price. Seems like the last one I bought was $75. This should be replaced anytime the ac system is opened up. Mounts behind grill beside the drivers side head light.
I am collecting the parts to get my ac going on one of my trucks. Other then a leak check, the ac system could possibly be doen by the DIY guy.
08-14-2015, 05:29 PM
#12
Registered User
Join Date: Sep 2007
Location: San Francisco East Bay
Posts: 8,252
Likes: 0
Received 820 Likes
on
648 Posts
How about just getting a garage? (or even a tarp if you live up in the trees) My evaporator was 21 years new, and while it had enough dust stuck to it to justify some attention with a vacuum cleaner, it's not the sort of thing that would call for maintenance more often than that.
12-19-2015, 06:16 PM
#13
Pull the assembly out of the dash. There is a drain hose attached that is not showing. This is common of what you are going to find in the ac system.
With a screwdriver in the slot of the metal clip, just pry down. There is 4 or so clips and remove the 5 or so gold screws that hold the plastic box togheter.
Seperate the box and I use an air hose to get as much of the dirt out as
TIA
12-20-2015, 12:12 AM
#14
Super Moderator
Staff
Thread Starter
iTrader: (1)
Join Date: Aug 2008
Location: Anderson Missouri
Posts: 11,788
Likes: 0
Received 21 Likes
on
19 Posts
I think you may have problems getting it to slide far enough into the cab with the hoses attached to get to the screws and clips on the back side.
What you might try doing is to remove the blower box and access the evaporator from the right side of the evaporator. The blower box goes in first and then the evaporator slides over the heater core and blower but I think if you loosened the evaporator and worked the blower out you should be able to get the blower out and get good access to the evaporator.
If you can get the blower box out, you would have good access to the evaporator and vacuum it out well.
The following users liked this post:
RAD4Runner (12-12-2019)
12-20-2015, 10:07 PM
#15
Thanks, Terry. Will try that.
12-22-2015, 11:35 AM
#16
Super Moderator
Staff
Thread Starter
iTrader: (1)
Join Date: Aug 2008
Location: Anderson Missouri
Posts: 11,788
Likes: 0
Received 21 Likes
on
19 Posts
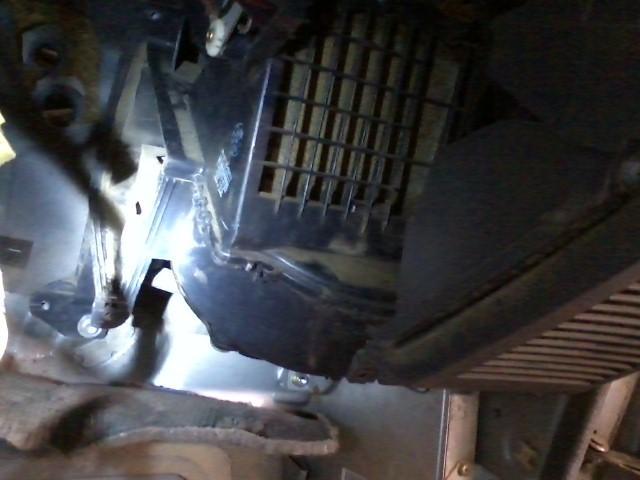
The evaporator slides over the heater core and blower aseembly. You might possibly pull the evaporator back far enough to let the blower assembly to come out and access it from the side.
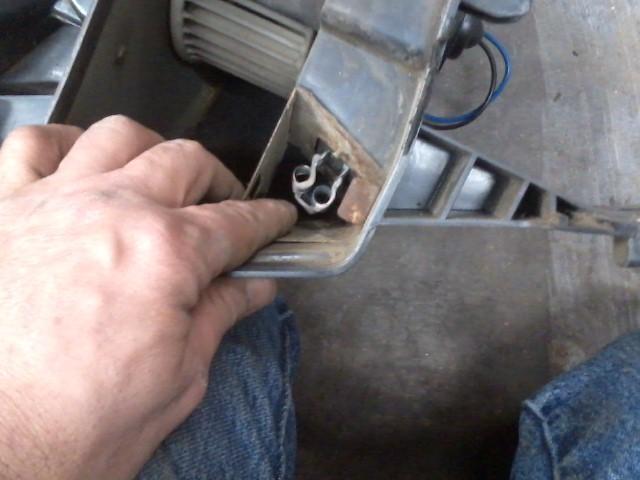
Here is the lip on the evaporator that I am talking about and give you an idea of how much access you would have.
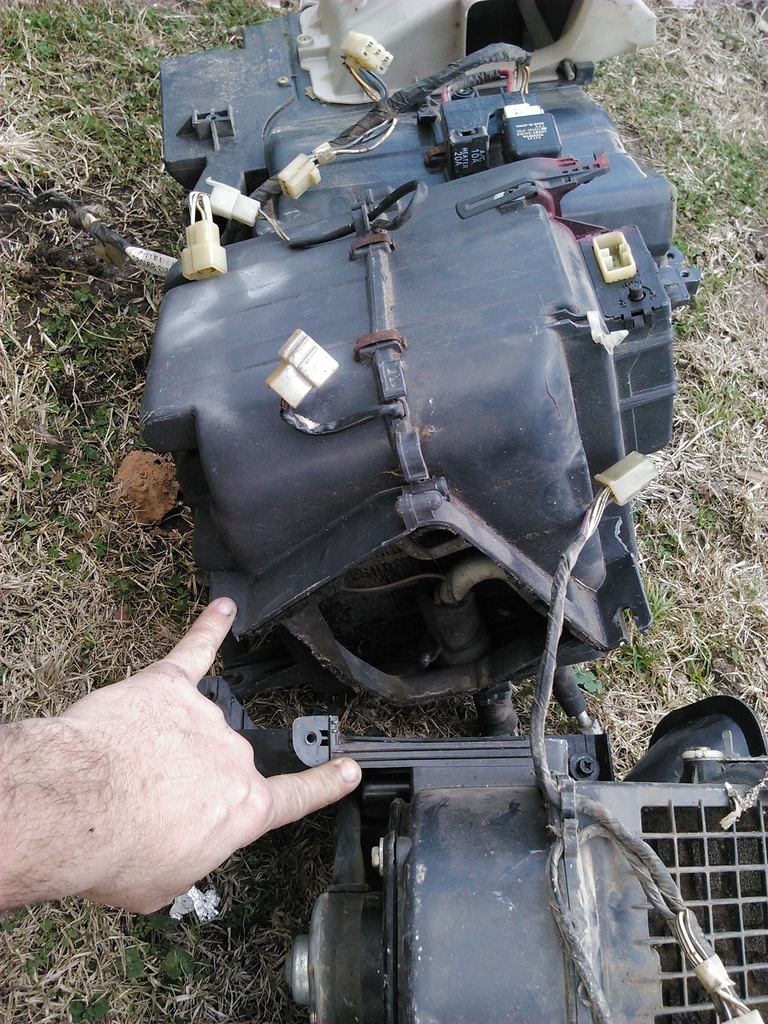
Here is the lip on the evaporator that I am talking about and give you an idea of how much access you would have.
 02-15-2016, 10:28 AM
#18
Do you remember if there's enough space between that lip and the evaporator to make a resealable port, about 0.5 to 1 inch in diameter on the plastic housing? I would not drill I'll carefully use a soldering iron to make the opening.
Of course, sliding the blower over and dropping it would be the safer way to do it.
I'll let you guys know when I get the chance to crawl under there.
Last edited by RAD4Runner; 02-15-2016 at 10:29 AM.
02-16-2016, 03:10 AM
#19
Registered User
iTrader: (8)
Join Date: May 2011
Location: Southeast Virginia
Posts: 1,510
Likes: 0
Received 346 Likes
on
215 Posts
Hi Terry, I just had my AC serviced, and I don't want to spend more money on it, but need to clean the evaporator/heater core box. Do you think it's possible to simply split the housing at the clips, and spread opening just enough to stick a skinny vacuum cleaning crevice tool in there?
TIA
TIA
Hope this helps. It's a lot easier to just pull the evap box as shown above but if you don't want to have to drain, vacuum, and recharge the whole system, it is possible.


