Head on, Oil Pan on 22re Timing chain with tons of pics!
 05-16-2013, 02:45 PM
#1
Registered User
Thread Starter
Join Date: Feb 2013
Location: Hampton VA
Posts: 167
Likes: 0
Received 0 Likes
on
0 Posts
Head on, Oil Pan on 22re Timing chain with tons of pics!
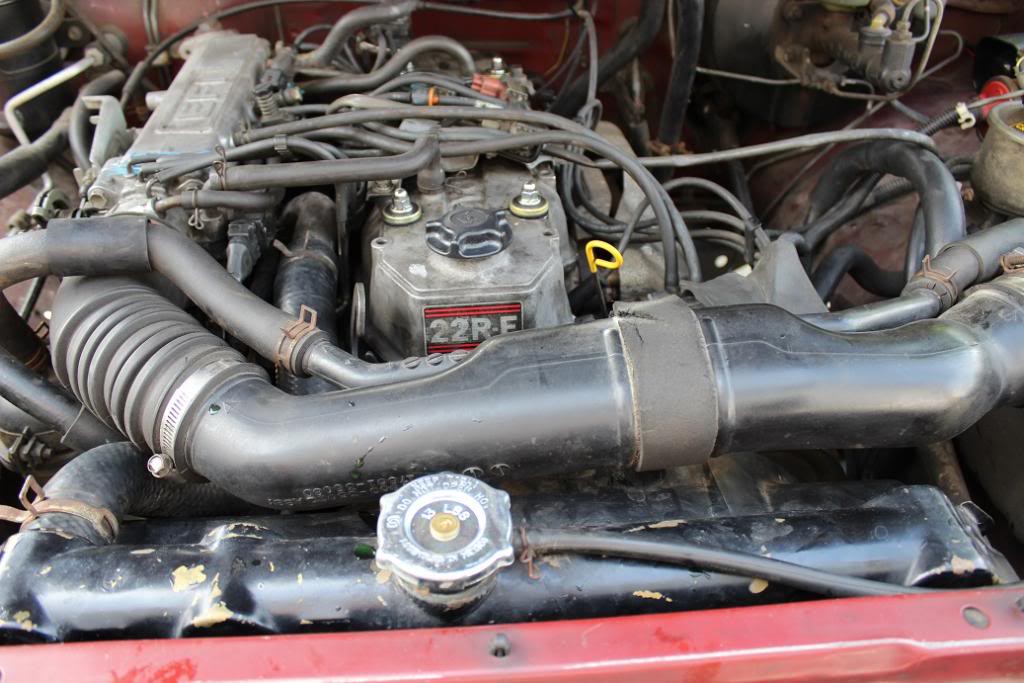
At the request of many people in my build thread wanting pictures of a Head On timing chain job, I have decided to do a dedicated thread and link it to my build thread. This engine has 168K original miles, and I was not aware if it had ever been done. I have also been getting a rattling noise that either sounds like a chain slapping a cover, or a wrist pin that is worn. So I decided to order the front end kit from engine builder and go to work.
There are effectively 3 ways the chain can be done, pull the head, pull the pan, or leave both.... Yes you can leave both and get it done. I had decided to pull the pan, but when I got in there the chain looked good and the plastic guides were in tact, good bud bad thing for me. I decided to go ahead and do the chain anyways, and I am glad I did. Not going to go over a huge step by step, they are already out there.
First you need parts.
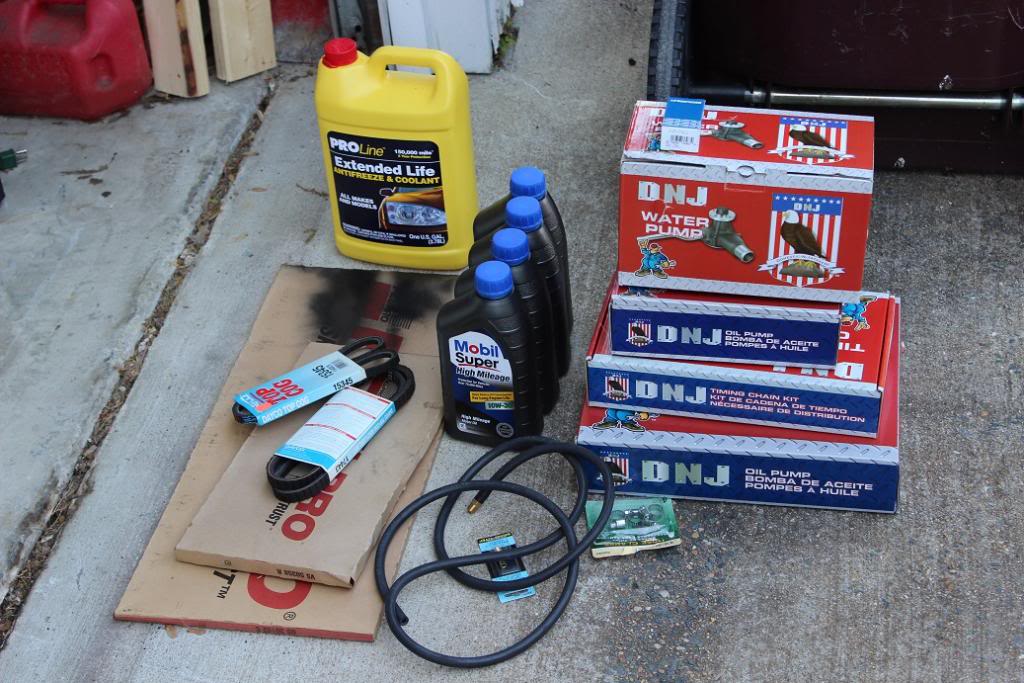
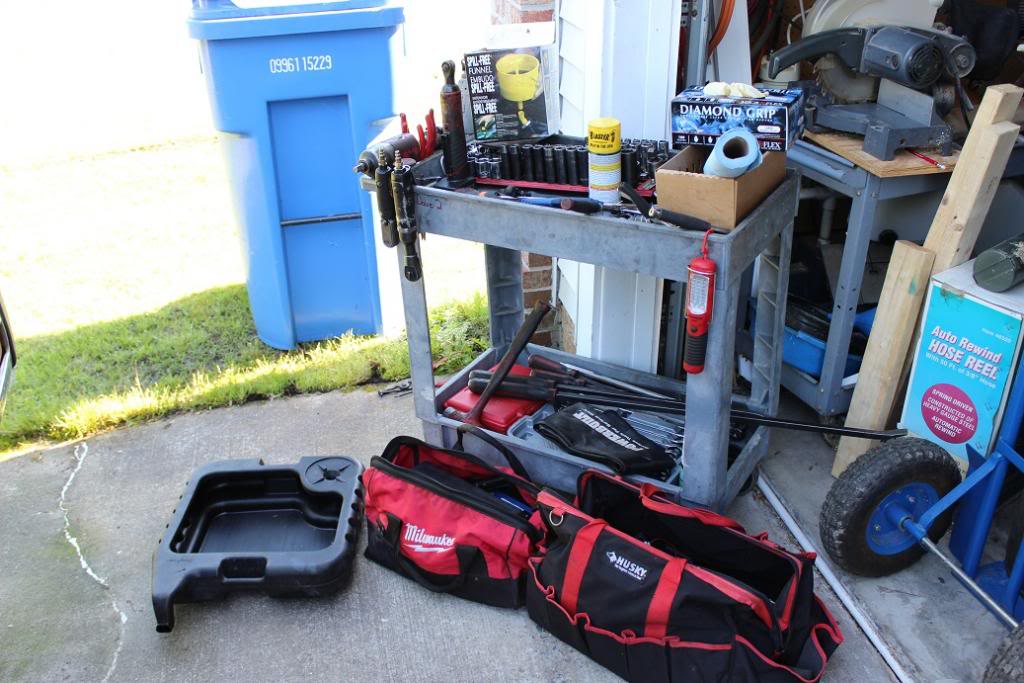
Then Some Tools
Then of course you need a 20r, 22r, 22re, or 22ret
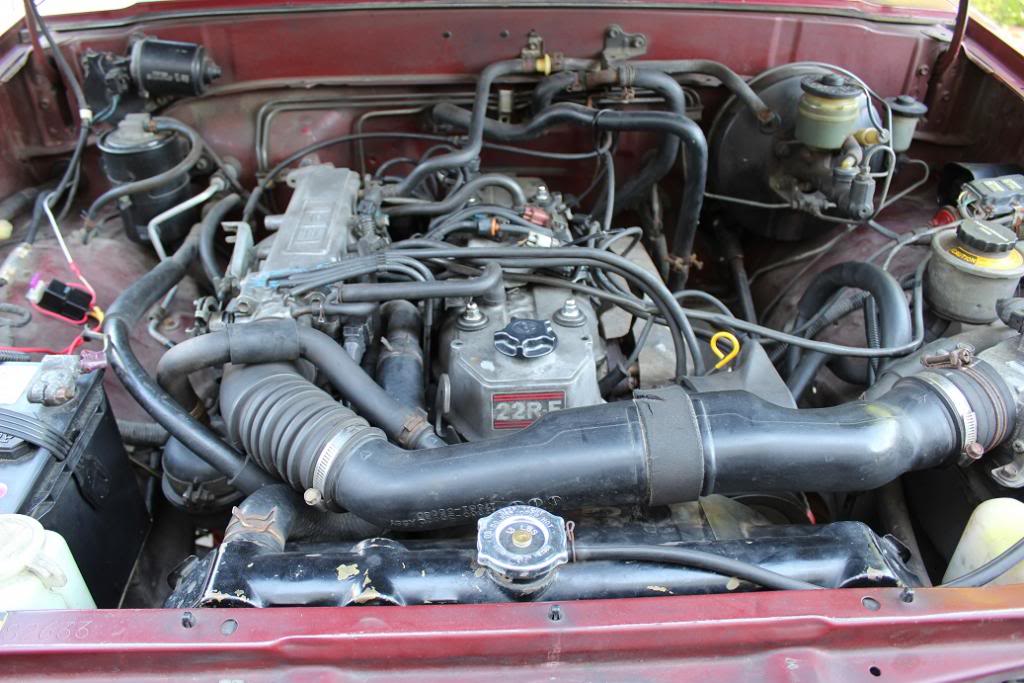
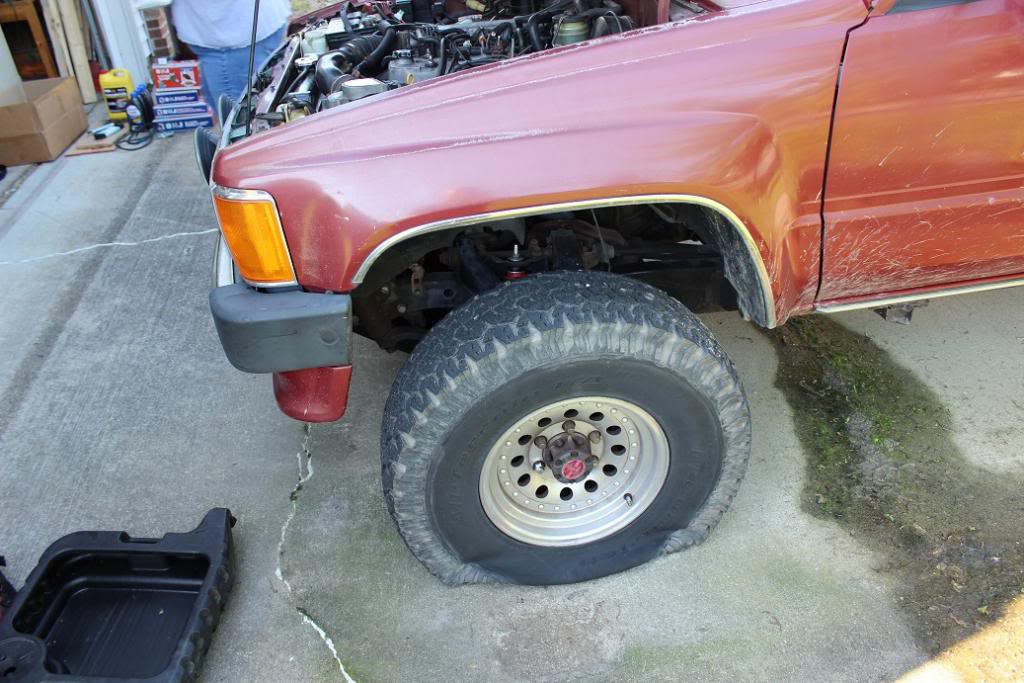
Now trucks are a PITA to bend over and work on the engine. Bring it down to your level!
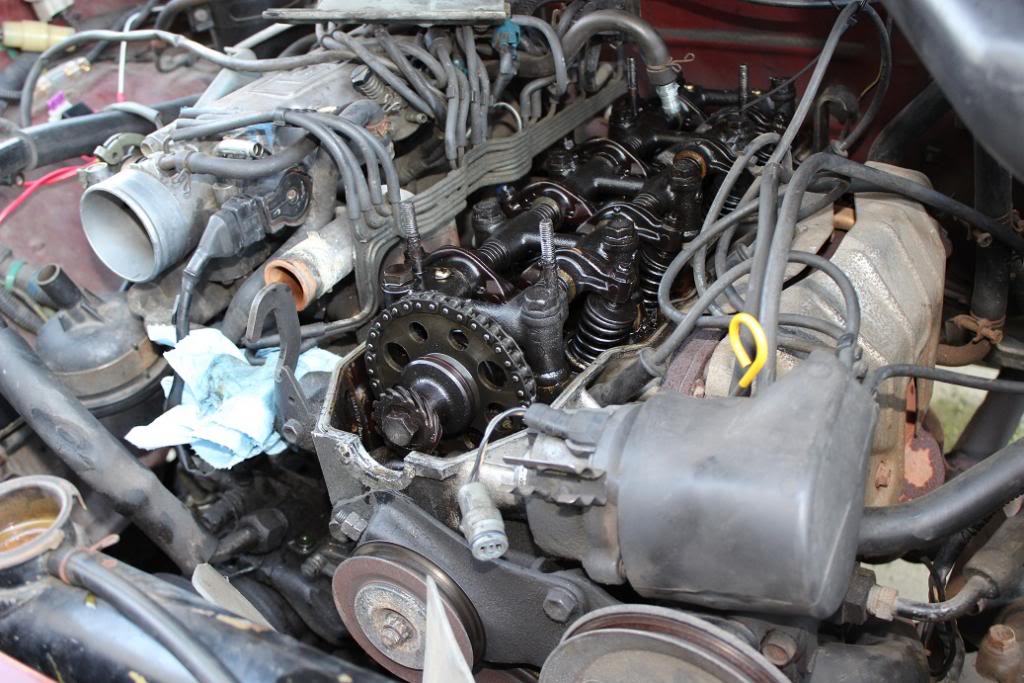
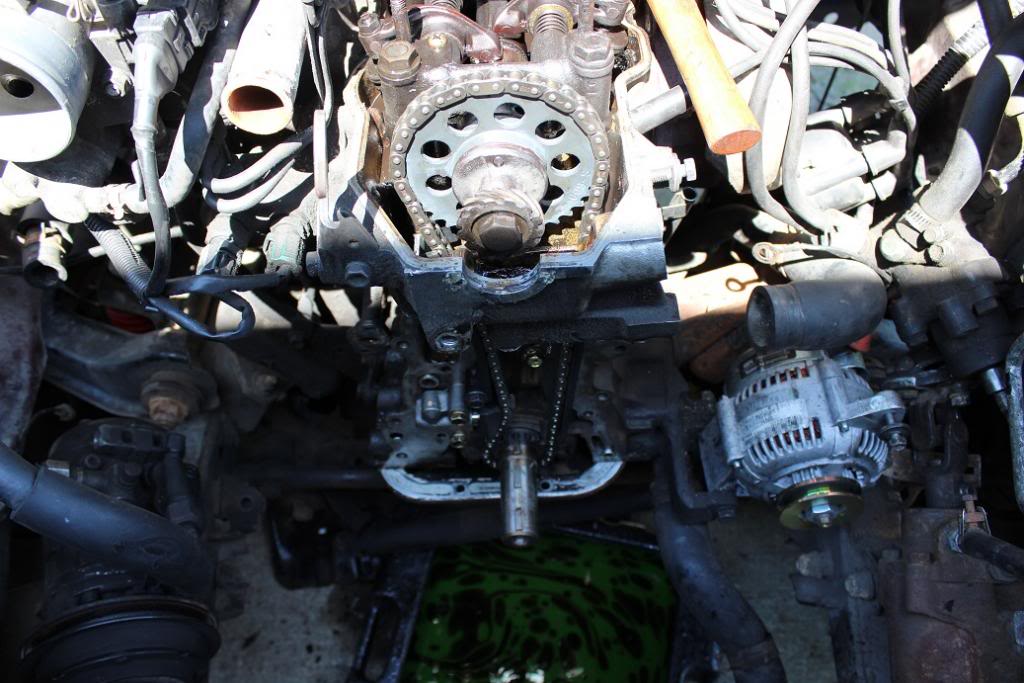
Of course got to pull the VC
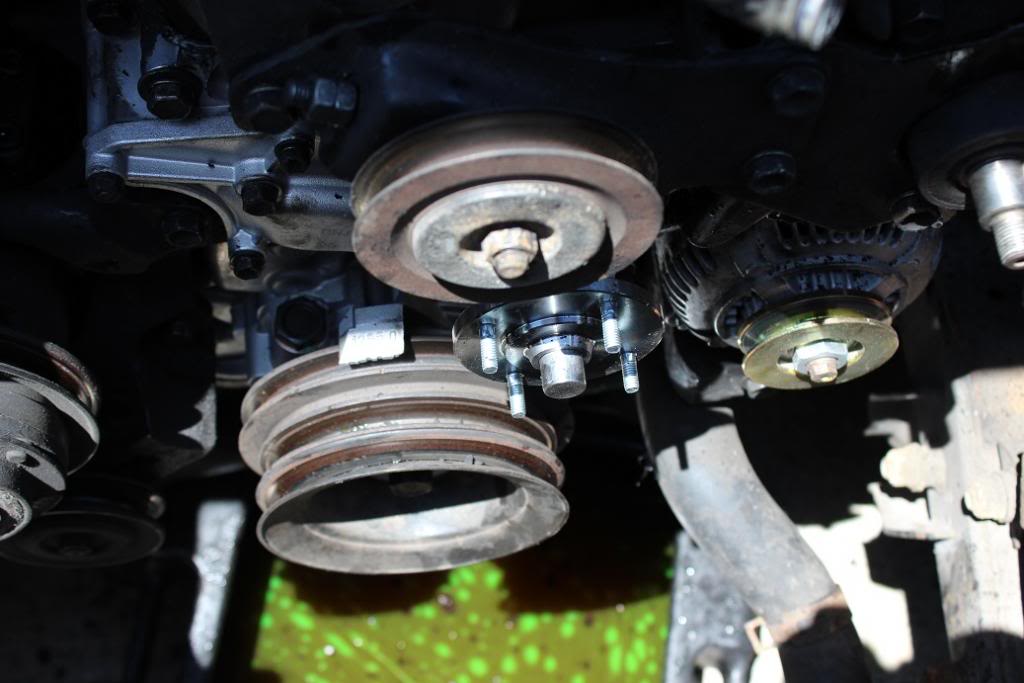
The radiator
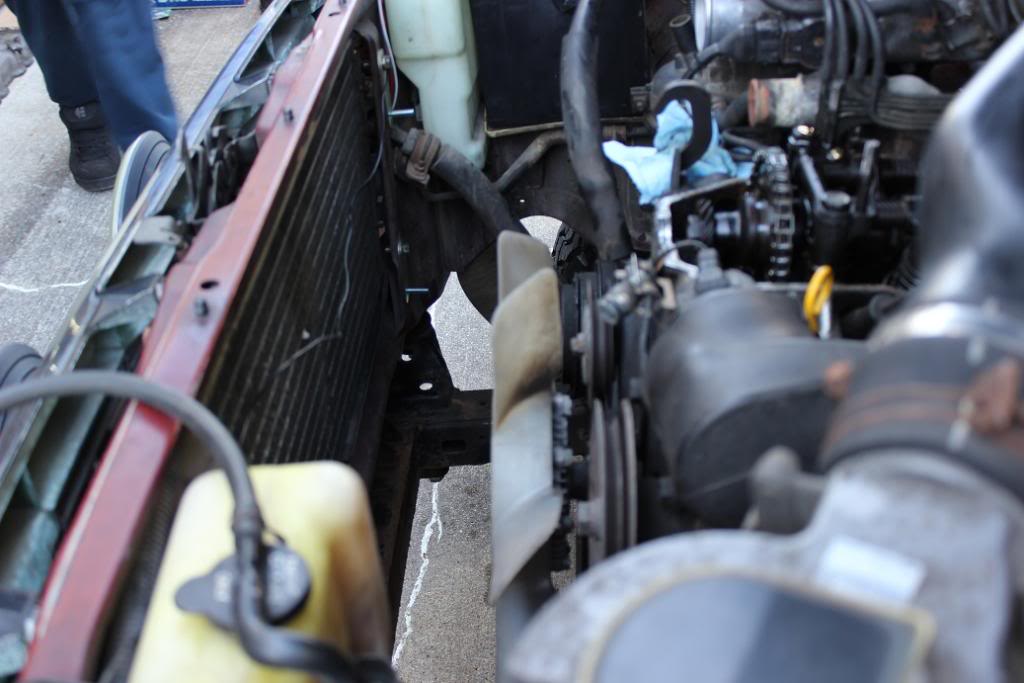
Then the fan
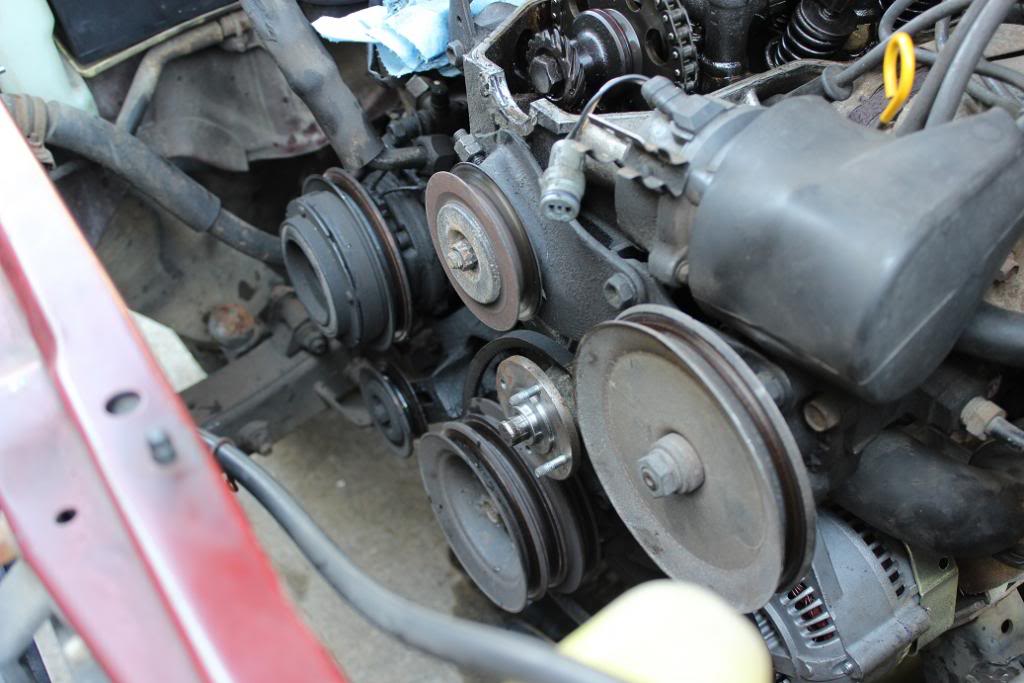
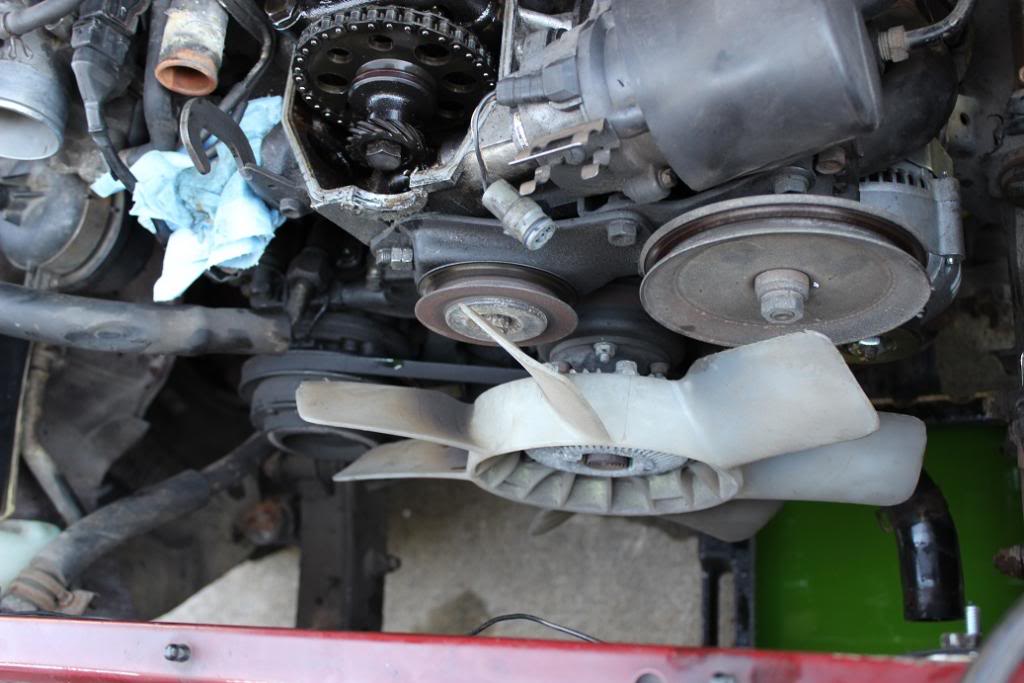
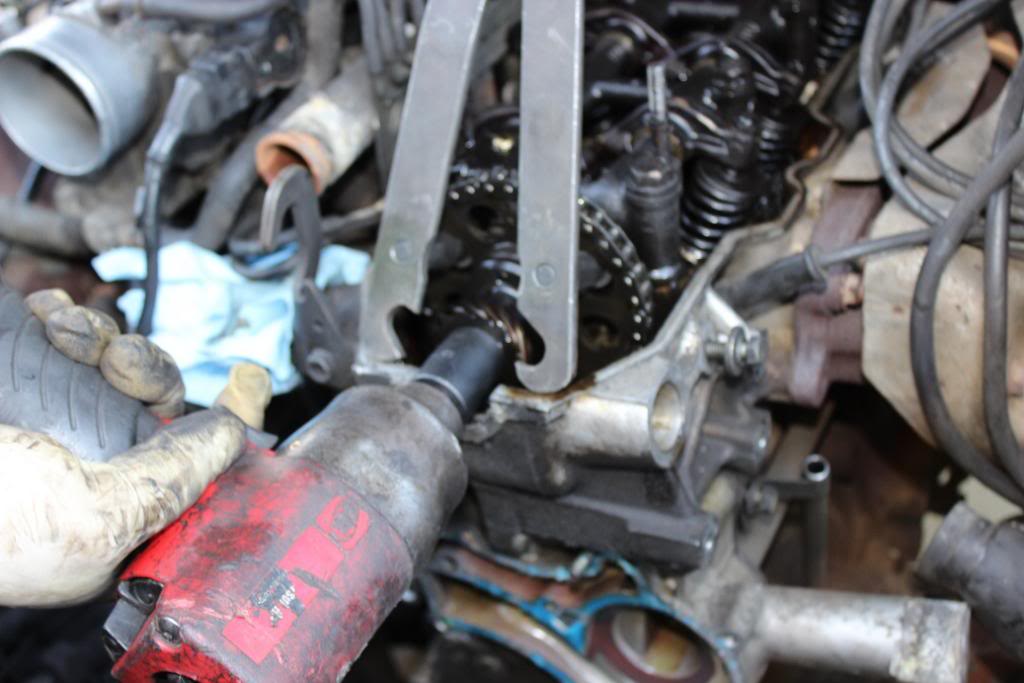
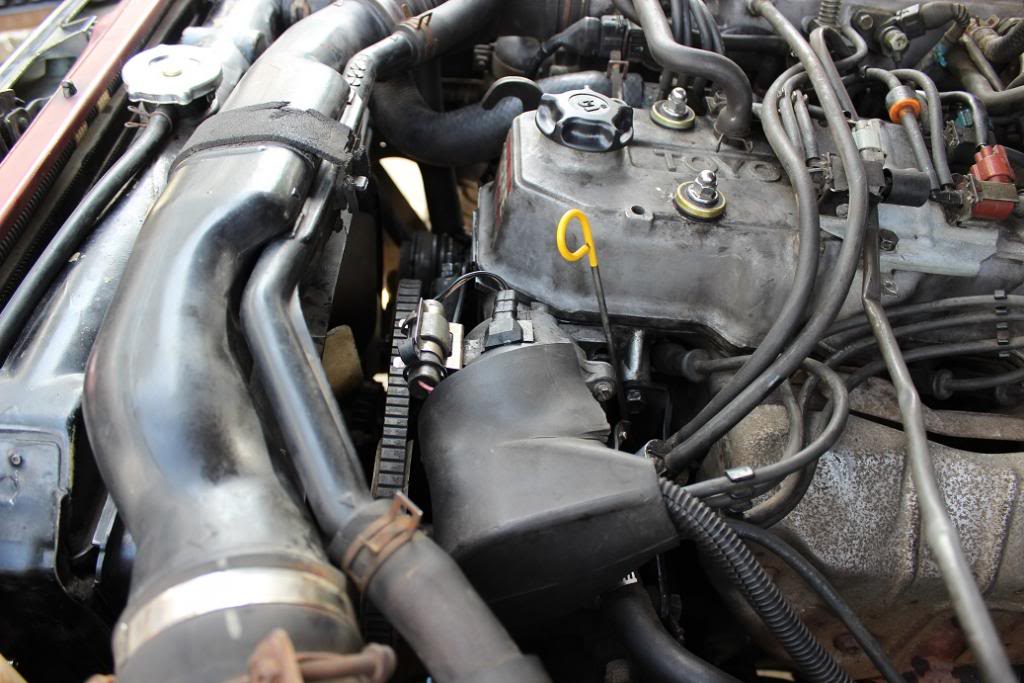
Then you pull the pulley for the PS, then remove the pump, and bracket. Take special note of the PS brackets it is 2 piece. Then pull the AC compressor, the bracket, then the upper alternator bracket. The battery should be disconnected. Of course if you are going to use a breaker bar and a 19mm socket on the frame to break the crank bolt loose then do this before you pull the alternator bracket. I used my impact gun. Remove the crank pulley.
Make sure to roll the engine up on TDC, where the timing mark says 0, and check that the rocker arms on cylinder number one are on the back side of the cam. They should have some play in them. Then pull the Distributor cap off. Make sure it is pointing at #1 cylinder post on the cap. Take a sharpie or paint pen and mark on the distributor housing where the rotor is pointing to. then pull the distributor strait out, as soon as the distributor gear clears the drive gear on the cam make a second mark. This is where it should point when you drop it back in, and it should return to the first mark.
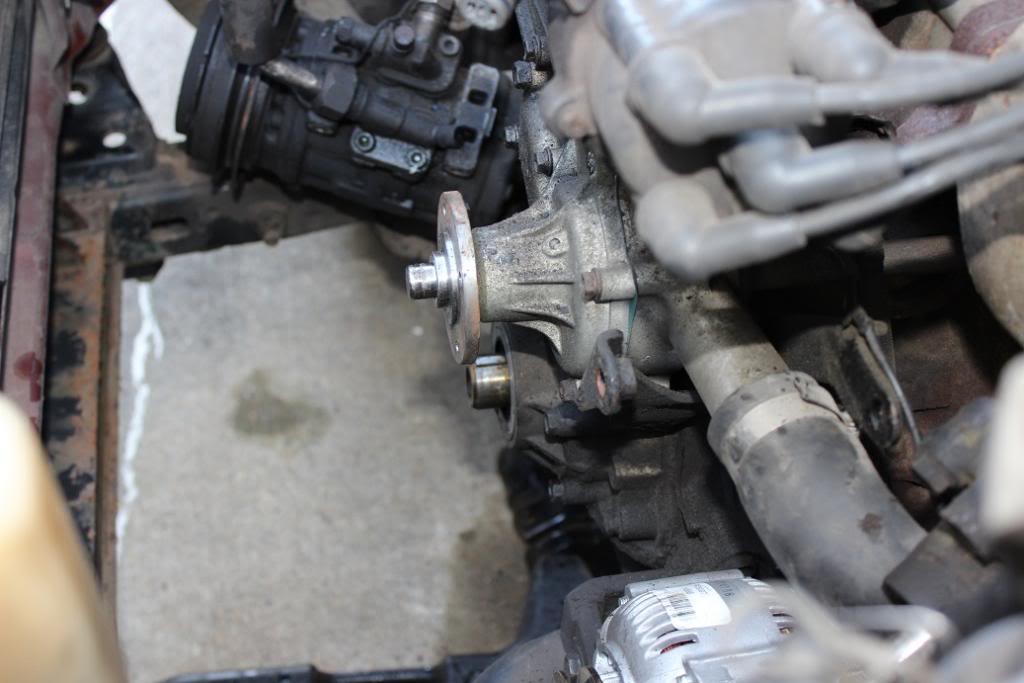
Now pull the water pump and oil pump off. Take special note of where the bolts go. If you have a new cover keep the bolts in the new cover as they come off. Then once the cover is off, transfer them to old cover to keep them in order while you install the new one.
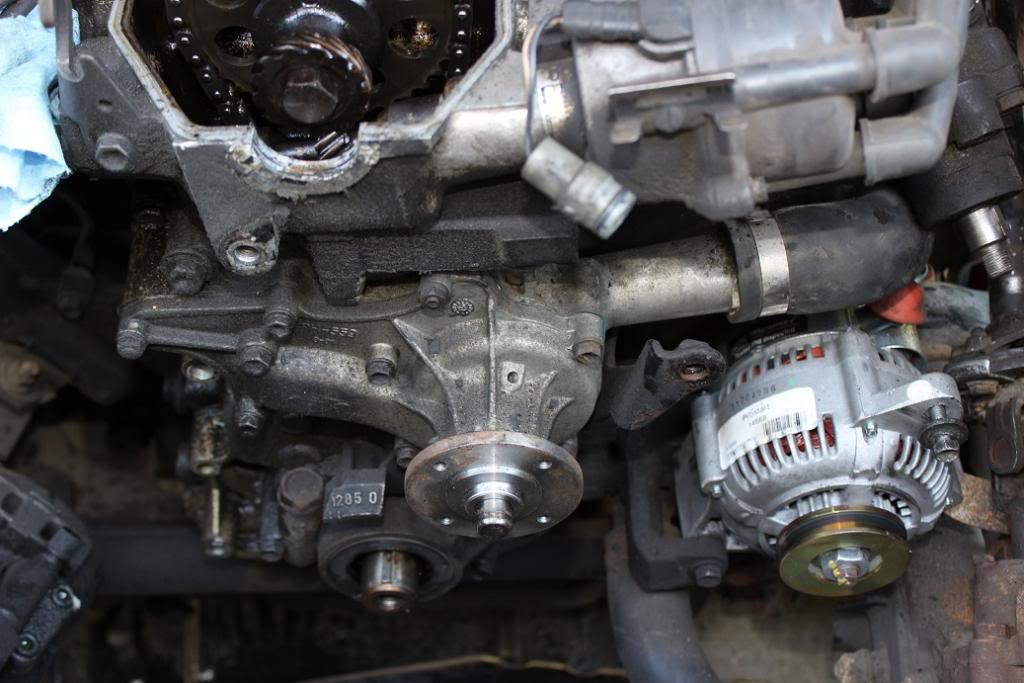
Now the next thing I did was to disconnect the pass side of the steering stabilizer, then pull the front 6 oil pan bolts off, this will allow it enough slack to get the cover off without having to pull it. I went ahead and broke the cam bolt loos at this point also, that way I could put the crank pulley back on and make sure I was still at TDC. And see why in the next step!
Double check to make sure all the bolts are out of the cover! Check the bolts on the back side of the cover where the coolant pipe bolts onto. DO NOT FORGET THE FAMOUS HIDDEN ONE UNDER THE DRIVE GEAR!
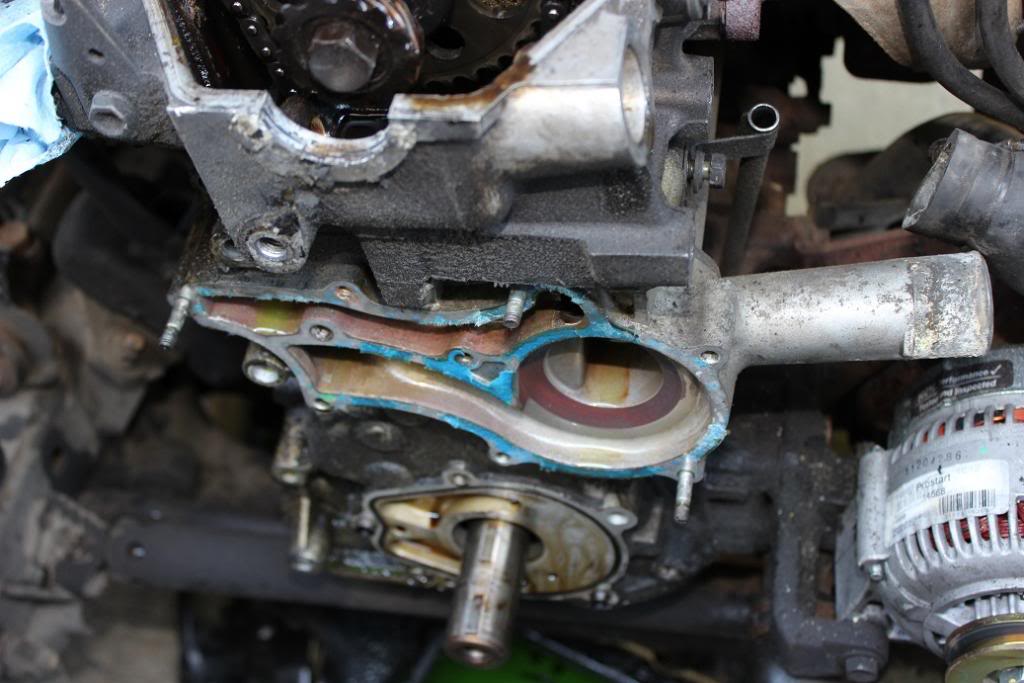
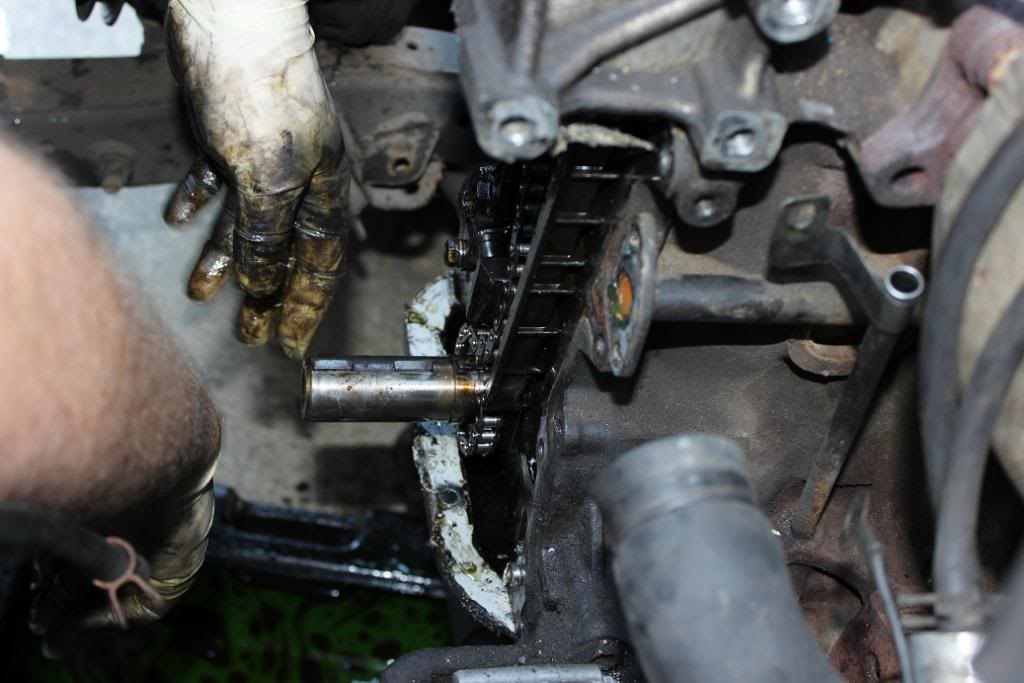
Ok now pull the cover! Start with some minor had slaps on the large coolant pipe to break it loose. Once it comes loose, use a flatblade screwdriver to pry the bottom side loose. You want to pull the bottom side out first, and gently lower the cover to make sure you do not damage the head gasket. Do not worry about the oil pan gasket.
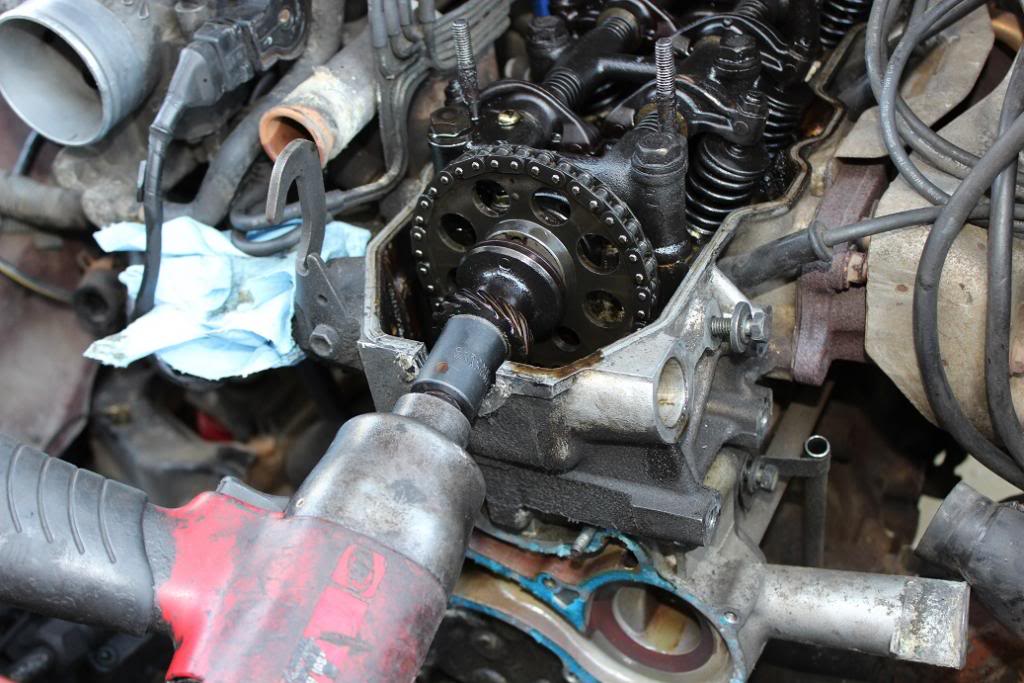
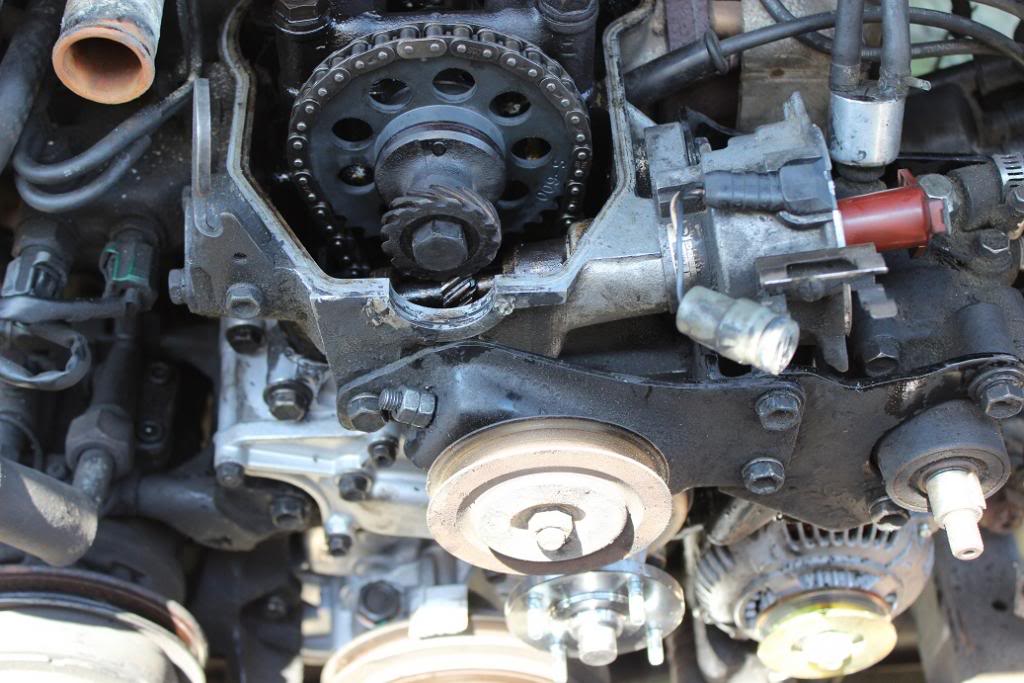
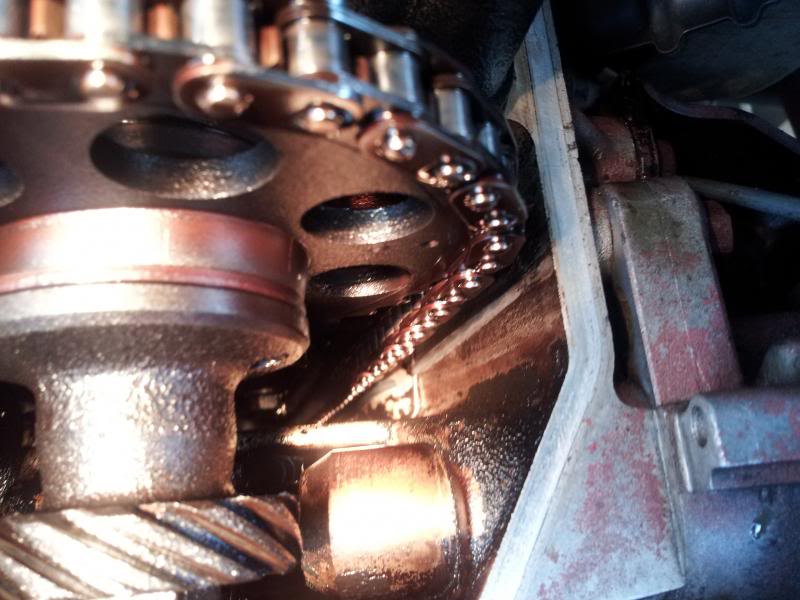
HOLY CRAP, the above picture is what not to do! This chain had been done before, and they sued way too much RTV! Go ahead and pull the timing parts off. Now put a rag or something to catch all the crap in the gap going to the oil pan. Cut the oil pan gasket flush with the block and throw the front part away.
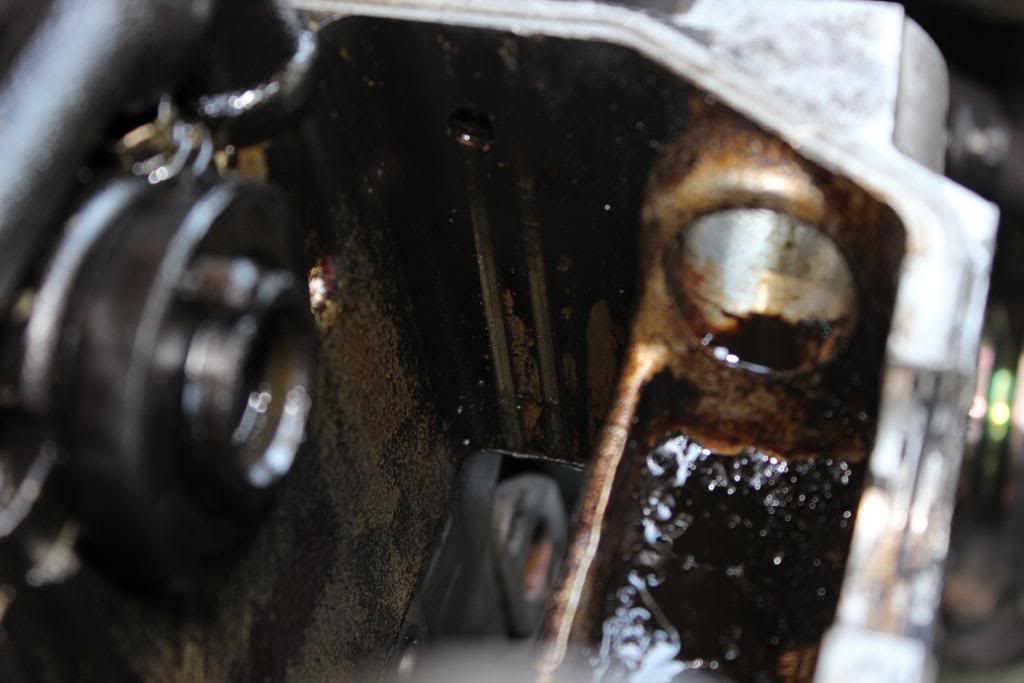
The chain must have been terrible before it was done previously. Here is the inside of the head behind the drivers side guide.
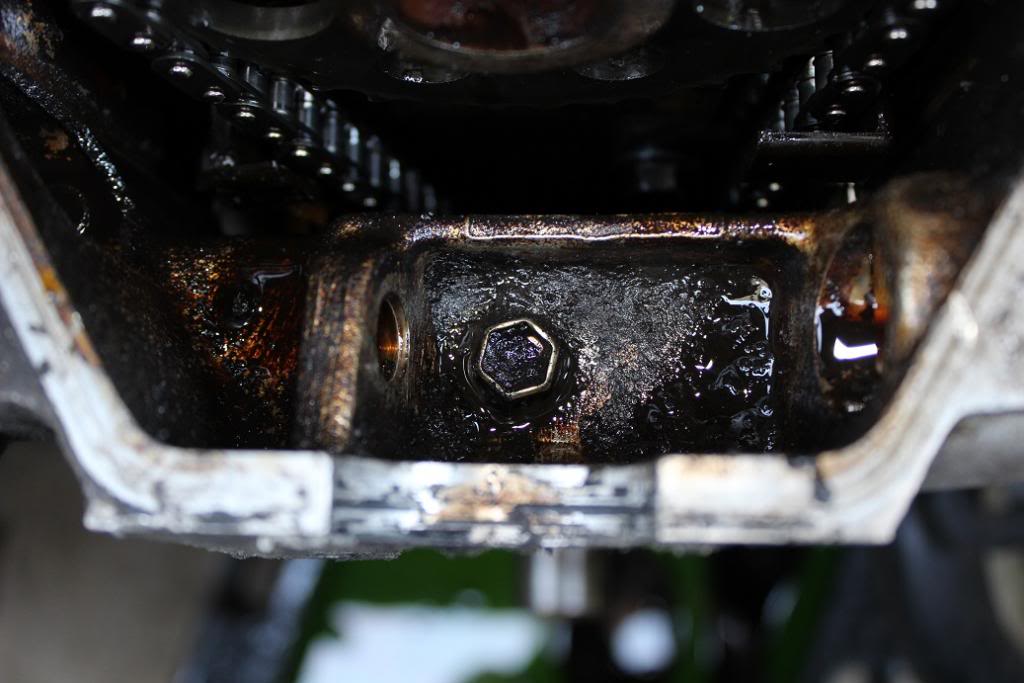
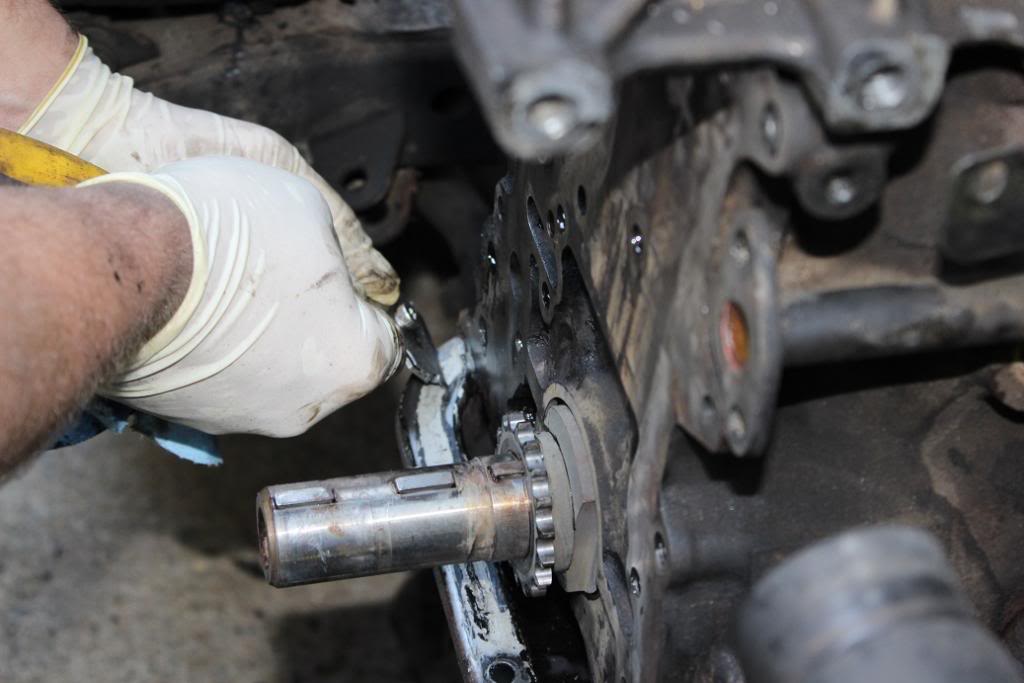
Now clean all your surfaces real good! Make sure there are no gasket chucnks left and all the surfaces are flat.

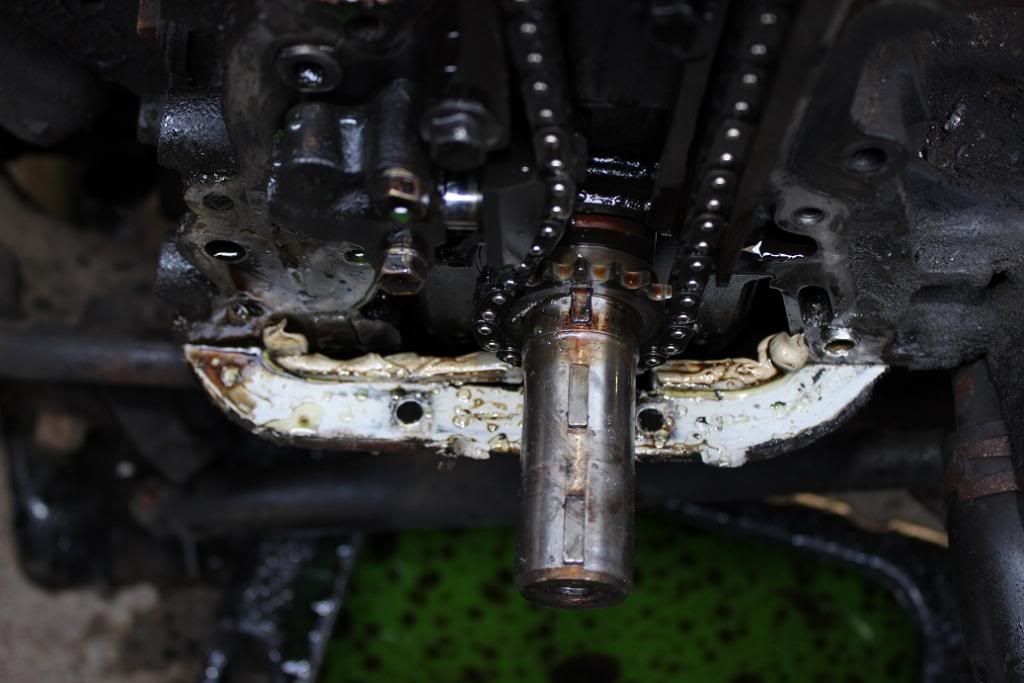
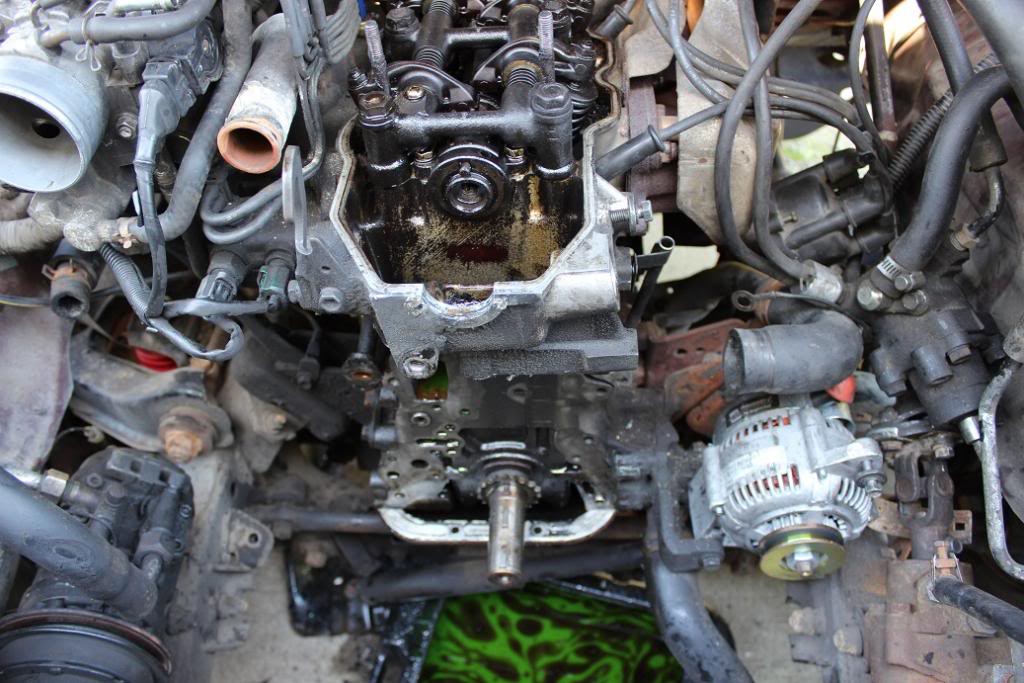
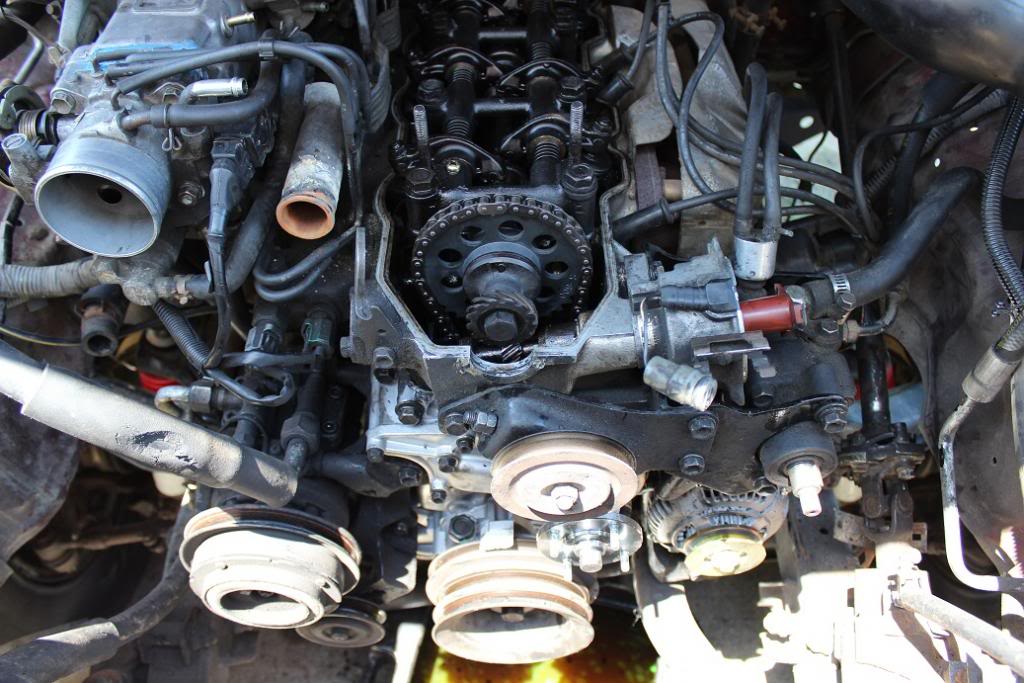
Now get your new parts on, and make sure to follow all torque specs with a torque wrench!

I use a very small amount of High Tack to stick the timing cover gaskets in place.Now run a small bead if your choice sealer around the pan, then spread it out, make it thin. There should be more in the corners where the block, oil pan, and timing cover meet. Then a small bead on the top of the timing cover, with a small blob on the top corners. When you install the cover, do so the same way it came out. You want to put the top in first angling it, this is to keep from damaging the head gasket. Then roll the bottom side back until it is centered and seated. Then start putting it back together!
Using gasket sealer is like doing a lift, just enough to get the job done and nothing more.
Make sure to change the oil, and put in fresh coolant. Then set the timing when you get it started. If the distributor is dropped in correctly it should fire righ up and purr like a cat. Oh and not a bad idea to adjust the valves while you are in there!
Take your time, do not be in a rush. Expect a job like this to take all day and maybe more if you run into problems. How fast can it be done? Well I got it done in about 4.5 hours taking my time, and taking breaks since it was 90 degrees today and I was working in the sun. Some will say you must drop the par or it will leaks, not true. Already made a 60 mile trip on the new front end, and it is bone dry! Hope this helps someone get theirs done. Unfortunately I need to begin the search for a block to build, or a different engine to put in, bet I am going to keep driving it!
There are effectively 3 ways the chain can be done, pull the head, pull the pan, or leave both.... Yes you can leave both and get it done. I had decided to pull the pan, but when I got in there the chain looked good and the plastic guides were in tact, good bud bad thing for me. I decided to go ahead and do the chain anyways, and I am glad I did. Not going to go over a huge step by step, they are already out there.
First you need parts.
Then Some Tools
Then of course you need a 20r, 22r, 22re, or 22ret
Now trucks are a PITA to bend over and work on the engine. Bring it down to your level!
Of course got to pull the VC
The radiator
Then the fan
Then you pull the pulley for the PS, then remove the pump, and bracket. Take special note of the PS brackets it is 2 piece. Then pull the AC compressor, the bracket, then the upper alternator bracket. The battery should be disconnected. Of course if you are going to use a breaker bar and a 19mm socket on the frame to break the crank bolt loose then do this before you pull the alternator bracket. I used my impact gun. Remove the crank pulley.
Make sure to roll the engine up on TDC, where the timing mark says 0, and check that the rocker arms on cylinder number one are on the back side of the cam. They should have some play in them. Then pull the Distributor cap off. Make sure it is pointing at #1 cylinder post on the cap. Take a sharpie or paint pen and mark on the distributor housing where the rotor is pointing to. then pull the distributor strait out, as soon as the distributor gear clears the drive gear on the cam make a second mark. This is where it should point when you drop it back in, and it should return to the first mark.
Now pull the water pump and oil pump off. Take special note of where the bolts go. If you have a new cover keep the bolts in the new cover as they come off. Then once the cover is off, transfer them to old cover to keep them in order while you install the new one.
Now the next thing I did was to disconnect the pass side of the steering stabilizer, then pull the front 6 oil pan bolts off, this will allow it enough slack to get the cover off without having to pull it. I went ahead and broke the cam bolt loos at this point also, that way I could put the crank pulley back on and make sure I was still at TDC. And see why in the next step!
Double check to make sure all the bolts are out of the cover! Check the bolts on the back side of the cover where the coolant pipe bolts onto. DO NOT FORGET THE FAMOUS HIDDEN ONE UNDER THE DRIVE GEAR!
Ok now pull the cover! Start with some minor had slaps on the large coolant pipe to break it loose. Once it comes loose, use a flatblade screwdriver to pry the bottom side loose. You want to pull the bottom side out first, and gently lower the cover to make sure you do not damage the head gasket. Do not worry about the oil pan gasket.
HOLY CRAP, the above picture is what not to do! This chain had been done before, and they sued way too much RTV! Go ahead and pull the timing parts off. Now put a rag or something to catch all the crap in the gap going to the oil pan. Cut the oil pan gasket flush with the block and throw the front part away.
The chain must have been terrible before it was done previously. Here is the inside of the head behind the drivers side guide.
Now clean all your surfaces real good! Make sure there are no gasket chucnks left and all the surfaces are flat.
Now get your new parts on, and make sure to follow all torque specs with a torque wrench!
I use a very small amount of High Tack to stick the timing cover gaskets in place.Now run a small bead if your choice sealer around the pan, then spread it out, make it thin. There should be more in the corners where the block, oil pan, and timing cover meet. Then a small bead on the top of the timing cover, with a small blob on the top corners. When you install the cover, do so the same way it came out. You want to put the top in first angling it, this is to keep from damaging the head gasket. Then roll the bottom side back until it is centered and seated. Then start putting it back together!
Using gasket sealer is like doing a lift, just enough to get the job done and nothing more.
Make sure to change the oil, and put in fresh coolant. Then set the timing when you get it started. If the distributor is dropped in correctly it should fire righ up and purr like a cat. Oh and not a bad idea to adjust the valves while you are in there!
Take your time, do not be in a rush. Expect a job like this to take all day and maybe more if you run into problems. How fast can it be done? Well I got it done in about 4.5 hours taking my time, and taking breaks since it was 90 degrees today and I was working in the sun. Some will say you must drop the par or it will leaks, not true. Already made a 60 mile trip on the new front end, and it is bone dry! Hope this helps someone get theirs done. Unfortunately I need to begin the search for a block to build, or a different engine to put in, bet I am going to keep driving it!
 05-16-2013, 05:36 PM
#2
Registered User
iTrader: (1)
Join Date: Oct 2011
Location: VA
Posts: 599
Likes: 0
Received 0 Likes
on
0 Posts
Great write-up and pics....It has been warm here in VA past few days haha!
I see you went engnbldr....haha that's two engnbldr timing kits to VA in what 3 weeks, haha ordered mine yesterday!
Yep....my chain got hungry likes yours....so yours is eat out in the head, not the timing cover?
I see you went engnbldr....haha that's two engnbldr timing kits to VA in what 3 weeks, haha ordered mine yesterday!
Yep....my chain got hungry likes yours....so yours is eat out in the head, not the timing cover?
05-16-2013, 06:11 PM
#3
Hey Stan, thanks for the great write up and cool pics....esp. since you kept the head and pan on. This will definitely help me as my 94 is still in the garage waiting for a new water pump and radiator. This has inspired me to do the timing chain like you did...since I am already there. You went with Ted's tc kit with the metal guides (or is it just the driver's side steel guide)? I bought my 94 2 years ago and that guy said that the PO before him had the chain done but she does do the rattle at times. And it also looks like like there is a ton of sealant at the bottom of the cover where it meets the pan. Since I don't have air yet in the garage, I would have to do the breaker bar on the frame. How would I tighten back up the crank bolt? And did you buy a new crank pulley bolt?
I have a 92 pickup in my parent's driveway that I picked up for $600. I bought it for the motor because it only has 107k miles but the 94's has 175k miles. If I do the chain on the 94, I can take my time building the 92's motor on a stand (which I want to buy with a cherry picker). I am doing now more mechanically then I have ever done but in no way, shape or form am I in your category of mechanic. Me, as well as plenty of guys here are glad that dudes like you share your wealth of knowledge because I am only happy to learn from guys like you. There is such satisfaction knowing you can do the job yourself and don't have to depend on someone else. Thanks again, Dave.
I have a 92 pickup in my parent's driveway that I picked up for $600. I bought it for the motor because it only has 107k miles but the 94's has 175k miles. If I do the chain on the 94, I can take my time building the 92's motor on a stand (which I want to buy with a cherry picker). I am doing now more mechanically then I have ever done but in no way, shape or form am I in your category of mechanic. Me, as well as plenty of guys here are glad that dudes like you share your wealth of knowledge because I am only happy to learn from guys like you. There is such satisfaction knowing you can do the job yourself and don't have to depend on someone else. Thanks again, Dave.
Last edited by daved5150; 05-16-2013 at 06:13 PM.
05-16-2013, 06:19 PM
#4
Registered User
Thread Starter
Join Date: Feb 2013
Location: Hampton VA
Posts: 167
Likes: 0
Received 0 Likes
on
0 Posts
Great write-up and pics....It has been warm here in VA past few days haha!
I see you went engnbldr....haha that's two engnbldr timing kits to VA in what 3 weeks, haha ordered mine yesterday!
Yep....my chain got hungry likes yours....so yours is eat out in the head, not the timing cover?
I see you went engnbldr....haha that's two engnbldr timing kits to VA in what 3 weeks, haha ordered mine yesterday!
Yep....my chain got hungry likes yours....so yours is eat out in the head, not the timing cover?
The chain I took off today was actually ok, it was replaced at some point. The original chain was the one that ate the inside of the head a little.
Follow the little paper he provides, it will help.
My surging idle returned this evening, so I am back at chasing it down. I already checked the coolant lines to IAC and I smoke tested the intake, no vacuum leaks. Coolant was bleed properly, but it surges with the brake applied. The idle setting screw is all the way in, so I need to pull the throttle body again and double check that the IAC is not plugged up, last time it was pulled it was dark and hard to see.
I also need to take it for a nice drive and get it nice and warm, then reset the timing again. But I am glad to know the chain should be good for quite a long time. I did notice a large increase in power and throttle response so that is a plus.
I am going to keep my eye out for a block so I can start building another motor for it. But in the mean time, I will fix the minor issues and keep working on other things on my list.
05-16-2013, 06:28 PM
#5
Registered User
Thread Starter
Join Date: Feb 2013
Location: Hampton VA
Posts: 167
Likes: 0
Received 0 Likes
on
0 Posts
bu
I did not replace the crank bolt. The torque is 58 foot pounds so it is not a lot. Most of the time you can put the vehicle in gear, put the brake on, and block the wheels and it will torque to specs. I was able to do that today. Torque on the cam bolt is the same, I used a large spanner wrench to hold the cam gear while I torqued it to specs.
Willing to help when and where I can.
Hey Stan, thanks for the great write up and cool pics....esp. since you kept the head and pan on. This will definitely help me as my 94 is still in the garage waiting for a new water pump and radiator. This has inspired me to do the timing chain like you did...since I am already there. You went with Ted's tc kit with the metal guides (or is it just the driver's side steel guide)? I bought my 94 2 years ago and that guy said that the PO before him had the chain done but she does do the rattle at times. And it also looks like like there is a ton of sealant at the bottom of the cover where it meets the pan. Since I don't have air yet in the garage, I would have to do the breaker bar on the frame. How would I tighten back up the crank bolt? And did you buy a new crank pulley bolt?
I have a 92 pickup in my parent's driveway that I picked up for $600. I bought it for the motor because it only has 107k miles but the 94's has 175k miles. If I do the chain on the 94, I can take my time building the 92's motor on a stand (which I want to buy with a cherry picker). I am doing now more mechanically then I have ever done but in no way, shape or form am I in your category of mechanic. Me, as well as plenty of guys here are glad that dudes like you share your wealth of knowledge because I am only happy to learn from guys like you. There is such satisfaction knowing you can do the job yourself and don't have to depend on someone else. Thanks again, Dave.
I have a 92 pickup in my parent's driveway that I picked up for $600. I bought it for the motor because it only has 107k miles but the 94's has 175k miles. If I do the chain on the 94, I can take my time building the 92's motor on a stand (which I want to buy with a cherry picker). I am doing now more mechanically then I have ever done but in no way, shape or form am I in your category of mechanic. Me, as well as plenty of guys here are glad that dudes like you share your wealth of knowledge because I am only happy to learn from guys like you. There is such satisfaction knowing you can do the job yourself and don't have to depend on someone else. Thanks again, Dave.
I did not replace the crank bolt. The torque is 58 foot pounds so it is not a lot. Most of the time you can put the vehicle in gear, put the brake on, and block the wheels and it will torque to specs. I was able to do that today. Torque on the cam bolt is the same, I used a large spanner wrench to hold the cam gear while I torqued it to specs.
Willing to help when and where I can.
05-16-2013, 09:32 PM
#6
 05-26-2013, 02:52 PM
#7
Registered User
Thread Starter
Join Date: Feb 2013
Location: Hampton VA
Posts: 167
Likes: 0
Received 0 Likes
on
0 Posts
Idle Surge
I did check the screw just to be sure, and it was ok, but when I took the throttle body off again today I put a new oring on the screw since it was rock hard, and adjusted the TPS again to be sure. It is running good.
Trending Topics
05-29-2013, 02:40 PM
#8
Registered User
I guess I'm the 3rd in VA to do an engnbldr timing chain kit. I did mine over Memorial Day week-end. It has 261,000 miles on the original chain. I figured I was pushing my luck. Drivers side guide broke off the top bolt but only a bit of minor scoring on the inside of the timing cover. Passenger guide was fully intact. I'm just about to put the timing cover back on. Got some good tips on how to do it here. Thanks !
Last edited by Larz28; 05-29-2013 at 02:53 PM.
05-30-2013, 06:36 PM
#9
How long did shipping take from engnbldr? Got a vacation coming up and id like to do this then, but i need to know when i should order it by..
Last edited by erock13; 05-30-2013 at 06:37 PM.
07-01-2013, 06:09 AM
#11
Registered User

Join Date: Apr 2013
Location: Golden, CO
Posts: 27
Likes: 0
Received 0 Likes
on
0 Posts
03-15-2014, 06:45 PM
#12
Registered User

This thread is nearly a year old, how is the head holding up?
Took a peek under my valve cover today:
I'm happy to drop the oil pan during the timing set replacement, but I really want to leave the head in place without messing up the HG. So I'm researching...
Took a peek under my valve cover today:
I'm happy to drop the oil pan during the timing set replacement, but I really want to leave the head in place without messing up the HG. So I'm researching...
03-15-2014, 07:22 PM
#13
Registered User
Join Date: May 2012
Location: southern NH
Posts: 552
Likes: 0
Received 0 Likes
on
0 Posts
removing the pan is a good thing. itll give you a chance to clean the pick up screen and oil pan out. itll be full of ground up plastic from the old guides. it can cause low oil pressure if you dont.
03-15-2014, 07:24 PM
#14
Registered User
Agree!
Easy to enough to do on my lifted '85 too. That just leaves the head gasket to be extra careful with, so I'm looking for long-term results from folks who do the shortcut of timing set without removing the head.
Easy to enough to do on my lifted '85 too. That just leaves the head gasket to be extra careful with, so I'm looking for long-term results from folks who do the shortcut of timing set without removing the head.
03-15-2014, 07:42 PM
#15
Registered User
Join Date: May 2012
Location: southern NH
Posts: 552
Likes: 0
Received 0 Likes
on
0 Posts
the hg will be fine its just needs to prevent oil leaking out from between head and timing cover. dont use a gasket on the pan, just clean and use permatex ultra sealer that says maximum oil resistance on the label. follow the instructions for drying and torquing.
07-17-2014, 04:30 PM
#16
Registered User
when you removed the oil pan, did you have to drop the front diff? I have a 93 4x4 22RE with IFS. Yota shop manual and Chilton says to drop the diff. Some blogs says to and others said they did not. Checked the oil and so far not plastic bits. Tnx - DC
07-18-2014, 09:58 AM
#17
I pulled my front differential and the center steering linkage to get my pan out. But I have read on here of guys who have loosened up the motor mounts and jacked up the motor a little to get the oil pan out. There should be threads on here about this - check it out.
About the plastic bits in the pan, to get a good idea of the shape your driver side chain guide is in, pull the valve cover to see. The lip on mine was broken and one of the bolt eyes (curved part) was broken so I knew I had plastic shredded in the pan. I sure did as well as on the oil pickup tube screen. The only way you will see it is by removing the pan...trust me. If any guide rail damage is present, you have plastic in the pan.
About the plastic bits in the pan, to get a good idea of the shape your driver side chain guide is in, pull the valve cover to see. The lip on mine was broken and one of the bolt eyes (curved part) was broken so I knew I had plastic shredded in the pan. I sure did as well as on the oil pickup tube screen. The only way you will see it is by removing the pan...trust me. If any guide rail damage is present, you have plastic in the pan.
07-18-2014, 05:25 PM
#18
Registered User
I pulled my front differential and the center steering linkage to get my pan out. But I have read on here of guys who have loosened up the motor mounts and jacked up the motor a little to get the oil pan out. There should be threads on here about this - check it out.
About the plastic bits in the pan, to get a good idea of the shape your driver side chain guide is in, pull the valve cover to see. The lip on mine was broken and one of the bolt eyes (curved part) was broken so I knew I had plastic shredded in the pan. I sure did as well as on the oil pickup tube screen. The only way you will see it is by removing the pan...trust me. If any guide rail damage is present, you have plastic in the pan.
About the plastic bits in the pan, to get a good idea of the shape your driver side chain guide is in, pull the valve cover to see. The lip on mine was broken and one of the bolt eyes (curved part) was broken so I knew I had plastic shredded in the pan. I sure did as well as on the oil pickup tube screen. The only way you will see it is by removing the pan...trust me. If any guide rail damage is present, you have plastic in the pan.

Thread
Thread Starter
Forum
Replies
Last Post


