When you click on links to various merchants on this site and make a purchase, this can result in this site earning a commission. Affiliate programs and affiliations include, but are not limited to, the eBay Partner Network.
Failing brake booster? Idle erratic w/pedal down, but not when vac hose plugged.
I have a '87 22re EFI pulling a 5000 pound camper (silly to put those two things together isn't it?). If I step on or pump the brake at idle the RPM changes. My idle is set at 750 rpm. With the brake pedal down the idle slows down, which suggests to me a vacuum leak. I take the vac line off the brake booster and plug it and the problem goes away - stepping on the brake has no effect on idle with booster line plugged. So my brake booster is going bad and leaking a bit right?
OK, if that's the case, then clearly I need to replace the booster. If I get the stock replacement then it's going to be a single diaphragm type I think. Given that the rig is really heavy, does it seem relevant in this situation to upgrade to a dual diaphragm type? I'm stopping OK now but I probably wouldn't complain if I had more stopping power under the pedal. If I were to get a later model dual diaphragm replacement (I haven't identified the specific year/model range that would fit my '87 pickup model) do I also have to replace the master cylinder at the same time or can I bolt up a dual diaphragm type to my existing master and get "more braking power"? This would be ideal simply because I'm not keen to bleed the system if I don't have to. Or is it the case that the booster/master set is essential to replace in order to achieve an improved level of braking power?
I did realize that there is a difference in the stock booster for the 1-ton model vs. the regular pickup for my '87 year model.
Left is the 1-ton model, right is the regular pickup model:
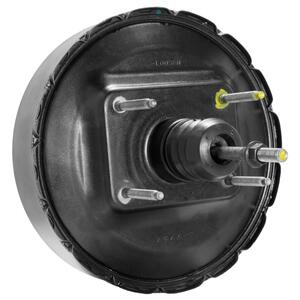
This is my booster is below - clearly the 1-ton model, but it may not be a dual diaphragm type:
Anyone have any suggestions on how to best replace this leaky booster? (assuming my diagnosis from the vacuum line test is correct).
Pretty sure the 1 ton brake booster is the same as V6 model trucks. I'm not 100% sure, but I think the master cyl is 2 bolt on tacoma, 3rd gen 4runner, and 95+ (maybe older too) T100's. Looks like your's is 4 bolt? I haven't looked at brake boosters too closely, but upgrading to a larger unit and a bigger master should help give a lot more stopping power. The 1 ton model from my understanding also has bigger brakes (atleast in the front), not sure if there is an "upgrade" for them as well or not.
I haven't had to diag a booster before, but I suspect you're on the right track, not sure if the PVC valve (on way valve) could cause similar issues or not when it goes bad. In my mind a vacuum test would tell you if it is bad or not. If you don't have a vacuum pump, then you could run the engine with it hooked up, turn it off and wait a few seconds and pull the brake booster line off. You should hear a vacuum, not very scientific but atleast tells you if there is a leak. I've pulled lines off brake boosters from trucks that haven't ran in years and still had vacuum, not all but a couple. On most cars/trucks I've been around parting out, if it's ran within a day, it seems to always have vacuum at the booster yet.
I'm fairly sure the 89-95 pickup v6 booster looks very similar to yours, so might be an option and maybe a slight upgrade. I have some around, but not sure if you want to go used oem vs new/reman. I'm up in Michigan, so your booster looks really clean compared to the one's I'd have.
If there's any other 1 ton only parts you're looking for, I had a 86 extra cab 1 ton I parted out. It has the single rear tires and was just a 1 ton pickup long box, not a camper/cab and chassis etc.
Thanks for the suggestions and info. I have access to a vac gauge and pump that I can borrow. I'll leak test the booster to be sure it's failing before I replace it. I tested the plastic valve previously and it's working fine.
I'm going to do the more straight forward swap with the stock replacement unit.
Based on the specs from the re-manufactured Cardone 53-2460 unit, this is apparently a dual diaphragm unit on the 1-ton models. It's an unusual small diameter dual diaphragm unit apparently.
I'm just going to choke on the cost of a reman unit rather than trying to find a cheaper used later model dual diaphragm unit. It's not worth the hassle of trying to make it fit. It'll be an easy swap and I won't need to bleed the master. I suspect the performance improvement from the direct replacement 8.5" dual diaphragm unit to the larger ~9.5" dual diaphragm units in the next gen V6 pickups is not worth the potential headache that comes with getting it to fit.
I poked around on google and found an old reference link that was down, waybackmachined it and it's archived, and seems to hold pretty good info from ~2003. Based on the photos on the home page, he's working with a 1st gen 4runner. Sounds like a 95-98 T100 4x4 brake booster is a bolt in swap. I've read it's also used to upgrade Tacoma's, so make the master cyl thing I'm a little off on. The T100 master cyl is 1 1/4in from what I've read, and the 1ton version is 1 1/2in while the Tacoma one is 1in. I noticed my Tacoma had pretty crappy brakes compared to my dad's T100 4x4, and when I got one it also had great brakes.
Poking around it sounds like an 86 brake booster is factory sized at 13/16in but
Another source on some brake booster talk, talks about increasing the master cyl size pushes more fluid, so it actually makes the peddle harder to push and a bigger booster is needed to get more assistance.
Originally Posted by ocdropzonesomethings I have been reading about the 1" MC (I have one to install too) is that the brakes will feel worse after the swap because the ratio is different unless you convert to a dual diaphram master cylinder (86-87 turbo truck or 88 V-6 4runner, T100's or something like that)
Looks like this is a great source of info which has a table of master cyl bore sizes, bolt patterns, etc. It appears it's missing into on the 86+ 1 ton pickups though. I saved the page for my personal info collection since it does have nice info, just never know when a site will go offline.
Anyway, your truck might have room for the older oem 10.5in single diaphragm booster (84-85 was the same body design) which should mean there is tons of room around your booster for larger diameter boosters like the T100 option. I have most models of trucks, 2wd and 4x4, none are abs, and a 2nd gen 4x4 v6 4runner (94ish) I could measure most parts with it installed in the truck with a tape measure if you need any measurements (shaft length etc). An inch larger booster dual diaphragm probably would assist your peddle quite a lot.
Based on a single diaphragm and the situation a different person was in, going from a 8.75in diaphragm to a 10.75in is around 50% increased assistance, probably not exact numbers, but going 1 inch larger than 8.5in seems to suggest around 20-30% (didn't do the math) extra assistance. The guy was running 40in+ tires so he was going for max assistance. The thread also suggests dual diaphragms are around 50% more assistance than the same size single diaphragm.
Now to mix things up a bit, I know if you upgrade your brake calipers to larger ones, that can also make a huge difference (more surface area, same function on how the boosters assist), and if possible larger rotor/drums would multiply the effect via leverage (ex: 10in drum vs 11in drum).
Having good brakes is really nice, and having good brakes with a big load makes life so much better which is why people go nuts about having trailer brakes. If you have trailer brakes, I've read that some don't help much and setting up the controller to put full brake assistance on when you hit the brakes (some just bypass it with a switch) does help a bit. Not sure how bad it is on the trailer brakes though (wear speed, heat etc). Speaking of trailers, hauling 2 1/2 tons is a pretty good load, if your trailer doesn't have load leveling bars, it wouldn't hurt getting a set and a hitch to match. My dad has hauled scrap for years and years with out load levers, and he hauled a 31 ft camper trailer(was a freebie trashed one caved in roof), and he completely loved the difference. It made his T100 feel like a 1 ton hauling it. It basically pulls your back end up (to "level" the load) which in turn pushes pressure down on the front tires and the whole system doesn't flex at the hitch point so the bounce etc from the trailer basically goes completely away. He wants to setup load leveling bars on his scrap hauling trailer, he just hasn't done it yet.
EDIT:
For the real math behind all of this, there is a good write up at the link below. They get to calculating the drag the brakes give on the front rotors, and the blog stops. They suggest larger calipers decrease brake line presure (lower ratio for master cyl to caliper) which makes sense. The big thing with multi cyl calipers is to make the pressure more balanced on the pad which makes it more efficient in my mind.
Well I'm learning a lot about brakes (it was a weak area of mine) and started to build a spread sheet to help compare brake boosters and master cylinder sizes and their effects on the brake system. Seems there isn't any sites online with a solid calculator to use for atleast estimated effects.
Appears your booster should be dual diaphragm (it looks like one too) and has a 8.69in diaphragm.
The older 1 ton trucks had a 10.5in single diaphragm, so I compared that first to see the net effect and if you put the 10.5in on your truck, you'd loose 2.7% of assistance, so fairly close and it seems the math is atleast close. I'd assume both operate about the same, but that's also assuming all the other brake parts are equal in both versions of the 1 tons.
Next I compared your stock booster with the non-ABS T100 booster (9.75in dual) and you'd gain 25.9% in braking assistance from a 12.2% increase in diameter of booster.
Going to the extreme (assuming it even fits) the ABS T100 booster (10.5in dual) and it's an increase of 46%.
Just to compare two stock options for anyone googling and having this pop up. Going from the single diaphragm 9.5in stock unit on 86-95 pickups to the 89-95 8.75in dual v6 diaphragm is +27.25% and 9.75in is listed too (1 tons?) which is +38.82%.
Also note, the numbers above are purely the assistance values to the input shaft of the master cylinder, not overall net gain, or brake line pressure which would be lower numbers. The idea is it's a good comparison that works for any master cylinder size.
Very interesting!
It seems that going with a T100 upgrade is really a good option. I think I'd like to try the non-ABS T100 dual. I can put it in with my existing master and then when it's time to open the brake lines I'll just upgrade the master at that time. Systematically I can work through the system to upgrade all of the brake parts. I really appreciate your effort and explanations. I'm still working through all of the info.
FYI, there is a ratio between master cylinder size and caliper size which is kind of like a gear ratio. If you make your master cylinder larger, you'll loose pressure/clamping force for the same amount of input force, but it will allow for more fluid to be displaced. It's one of the things I didn't know before, so glad I never tried to upgrade my Tacoma master cyl to the T100 style lol. Getting bigger calipers could be an option though, it's best to compare based on total piston area, more pistons generally helps even out the clamping force on the brake pad. Bigger calipers would mean more pedal movement, which might require the master cylinder upgrade. The write up I read on them mentioned it'd be less pressure with larger calipers, but that doesn't make sense on any of the math I've found behind it, I think they were trying to talk about the brake line pressure at the caliper or some sort of weird reverse logic going on for the resistance pushing back or something.
Have you driven your truck before the brake booster/idle change issue came up? Just want to make sure you're comparing your truck with a good working brake system instead of what you have now (leaking diaphragm equities to less assistance).
If my numbers are correct, the factory 86 pickup 4 piston caliper is about 5x more clamping force than a car that had a 2in single piston calipers (manual brakes, no booster and brake pedal of 6.2:1 ratio vs 4:1). Master cylinder size might be a little off though since it was just an example from the sites with the math. Really neat to see why cars/trucks have good/bad brakes. Really big one I know of is ford pickups have great brakes while chevys were hard pedal and didn't stop the best loaded, in this research it says ford stuck with smaller master cylinder (better "gear ratio") than the chevys.Ford typically used larger brake drums and disks too.
I had not made the connection between caliper piston area and master cylinder diameter, but it certainly does make sense that they work as a pair. The 'gear' analogy is a good way to think about it. As I look at other threads on brake upgrades I see a lot of caliper/master pair replacements. Now I know why. So the booster is a somewhat separate piece of the puzzle that can be upgraded independently to give more assist to the pedal but it doesn't mess with the caliper/MC ratio. I'll be able to use my existing set-up and have a little more help from the booster with an upgraded unit.
I've got pretty decent sized calipers on the front as this is a 1-ton dually 2WD with 6-lug rear axle. I wonder if it's as big or bigger than the "bolt on V6 caliper upgrade" I've read about. I'll be paying close attention to my stopping power after the bigger booster. I'll also have to go take a close look at what my front brakes actually look like.... I've never actually seen inside the rears (drum).
I only noticed the (very minor) vac leak from the booster recently, but I suspect it's been there a while. there's no trouble stopping now, but I'm still interested to see what the change is. I noticed it because I just did a head gasket and complete front end timing chain kit install (plus a header and new 2.25" pipes!) and I'm tweaking the tune on the motor much more carefully than I had previously. I noticed the idle issue and started tracking it down and ended up at the booster.
Yea a bigger booster just makes a softer pedal as people online like to describe it, but based on the readings online, everything is kind of sized together. It sounds like the OEM works backwards, weight of vehical, desired stopping speed, tire size, and how good oem tires get traction is looked at and the actual brake drum/rotor is sized based on that. Then caliper clamping force and master cyl and brake booster is sized to how much effort they want the driver to put in for the desired effect (the "feel" of the pedal). There's a pretty common ratio from caliper to master that most manufactures use, something like 13-18% and their example said it's the same from a MG to a Ford Pickup.
On calipers, sizing isn't the only thing, the top bridge and the housing will flex slightly while braking, less flex = more braking power put to the pads. Same goes for the pads, less flex gives the same result for pressure to rotor surface. I've read a smaller caliper that's built better and heavier can out perform a larger unit of poorer design which kind of throws a monkey wrench into everything lol.
Using oreilly's site to determine piston size (probably not the best way but where else can you get those specs?). It says 1 ton heavy dudty brake calipers are 60mm single piston, standard caliper is 57mm from the same era (isn't the rotor larger also on the 1 ton?). I looked up a 2wd and it came up with the same calipers for the next body style, but 4wd came up with a 4 piston. Maybe that's the "V6" caliper? Seems to be V6 + 4x4 only. Anyway the piston size is 43mm * 4. I also found there's a larger single piston caliper on the newer 1 ton trucks with dual rear tires at 67mm.
Anyway math.... surface area of a circle is pie * radius^2
EDIT: oops I fudged the numbers, used diameter instead of radius, same % difference though.
60mm = 2827 (same size as you should have)
67mm = 3526 (~25% larger)
43mm = 1452.2 * 4 = 5809 (basically 100% larger, double the size)
So purely based on surface area, the V6 caliper sounds like it will be a major upgrade and using a larger master might be needed to offset how soft the pedal will be, but could also be a good thing. Travel distance of the pedal will likely be longer (more piston surface area, so more fluid to displace for the same distance of clamp), so if you have to put the pedal to the flood to lock the tires up (or what ever your desired max braking effort is) goes nearly to the floor, you might want to use a larger master cyl. Also if the brakes are too soft and braking is too good, a larger master will make it stiffer and cause less pedal distance.
For the price of a reman, seems cheap enough of an upgrade for such a large change in braking power. It does look like mounting design is slight different, I suspect you need the bracket too? Also to point it out, double the caliper size doesn't directly mean 2x better brakes, the front brakes do around 60-70% of the braking, so that side of the equation basically doubles but the rear is static yet. Also another point, typically it's desired the front tires lock up before the rears. This effect is because locked up front tires "under steer" makes you continue in a stright light with no steering, rear tires locked up "over steer" has the rear end trying to spin out of control and the effect is multiplied on a corner. Once you're finished with your brake upgrade, you should take your truck out some place safe and lock the tires up (with it empty) to make sure the fronts, or all 4 lock up. If you can't lock up your tires with your current setup, then you could get more braking speed out of the upgrade (for empty). If you can, then the effort to lock them up will just be easier but stopping distance will remain the same (defendant on tire, road surface etc, the load in the back adds traction though). Worst case, atleast in my mind, is your hauling your 5000lb load (all on trailer?) and emergency brake and the front tires lock up. If there is a load in the bed, it will help add weight to the front. There are manual adjusted proportioning valves you can get to bump up the rear brake line pressure for the split, but you'd be loosing your OEM setup on the rear axle (I think the 87's had that).
Another factor of the v6 caliper I just thought of is rim clearance, you might have to upsize your rims. I suspect you have 15in current, so you might need 16in, or a rim with the same offset and similar as the 4x4 trucks. Your front tires are 5 lug right?
Seems every post I make is a huge book lol. Hopefully I'm not rambling too much and the facts are straight. Still a little new to this brake math, but it seems logical atleast.
Once again a lot of great info in your post. I looked around in the Toy motorhome forum on the topic of front brake and/or master upgrade and I can't find any good examples of a bolt-on upgrade.
Summary from my searching: "About all you can do is new rotors and pads."
Nobody complains about not being able to stop. I think it's a matter of working with what you have in my case since I don't want to do any serious mods. For example changing a rim to a larger one to accommodate a bigger caliper would require a second spare - too much trouble for me. I'd love to find an example of someone doing a low-mod bolt-on upgrade to the 4 piston V6 calipers on a 6-bolt 1 ton front end but I just can't find that info. Only thing I find is a few references to "it could be done but it requires modifications" (which is where I've reached my gumption threshold on this upgrade).
Some info taken from http://toyotamotorhome.org/ (my comments [bracketed]):
"The rotor in the 1 ton dually is the same 10" diameter as used in the 1/2 tons. The rotors get thicker over the years, not bigger in OD. 1978 trucks have solid rotors only 1/2" thick. Dually 1 tons and a few other lighter trucks in the 80s have rotors 10" by 1" thick and are hollow with fins for air cooling. The 1 ton duallys have single 60 mm pistons with calipers that float. So do a few lighter 2WD trucks in the 80s.
1987 dually 1 ton has a master cylinder with a 15/16" bore but with a four bolt mounting flange. Same 15/16" master cylinder as used on the motorhomes with full-floaters.
I believe parts from a dually full-floater 1 ton are a direct bolt-on swap for any Toyota 2WD with a torsion bar front suspension. [But the motorhomes already have the "big brakes" and getting a bolt-on caliper upgrade seems to be an elusive goal.]
The rotors for the 1987 1 ton FF dual-wheel truck are smaller at 10 1/8" diameter (257 mm) X 15/16" thick (24 mm) and are hollow to allow for air cooling.
The bracket on the 1 ton FF setup for the front caliper has two bolt holes and attaches to a two hole mount cast into the front spindle assembly. I think all the front spindles are the same for the 2WD trucks with torsion bars. So I assume all the changeover parts at direct "bolt-in" for any 2WD Toyota truck with torsion bars. [Again, if the brakes are already the 'big' size for that mount type I can't find any evidence of a bolt-on upgrade - for example the 4 piston V6 calipers don't bolt-on directly] The rotors on the 1 ton mount to the hub with 6 bolts on a 4.3" bolt circle (109 mm)."
Something noted in the motorhome forum is that the front brakes are really quite adequate with pad/rotor replacements with that existing master, BUT there is an issue with the front/rear proportioning valve. This is the Load Sensing Proportional Valve LSPV. That thing should be adjusted to optimize braking by balancing front/rears. One approach is to get all wheels to lock at the same time on loose gravel - a fun and logical test. I'm going to keep a close eye on my front (dipping) bias with heavy braking and see if I need to do that adjustment. With the non-leaking and larger booster I should be able to get a lot of grab out of the brakes if they are working correctly. Ugh, rear pads haven't been done in a LONG time and I'm probably due to get into that big rear axle....
I'm still aiming at doing the booster upgrade, feeling the results and then I'll evaluate the status of my front/back proportioning on the gravel alley behind my house.
I was thinking today that I never specified on the tire lockup details about it should be the same for pavement or dirt/gravel, but gravel would be much easier to do.
I have read the rear end based valving system can cause poor brake performance, the spot I read that the poster ended up changing the proportioning valve to a manual adjust one, and was able to lock up tires just fine, before he couldn't.
Another large factor are the actual pads and shoes. The softer ones grab better, but wear is also faster. I'm not sure how the terms at the part store would translate to the quote below, but it gives an idea of how much of an effect pads can do (0.40 to 0.48 is 20% difference w\o any other brake mods). If your brakes are super old, newer more modern materials might really make it work well. I generally run semi-metallic pads, but I've only replaced brakes on 2 pickups in my life, and both were extremely bad when I got them (cracked rotors and such).
Pad CF (Coefficient of Friction)
This is how grippy your pad is. If not sure; use .40 for street pads, .48 for street performance pads, and .60 for racing pads as a rough guide. You can typically look these up on manufacturer's websites.
If the brake booster isn't enough and as long as you have plenty of pedal left, you could down size a little on the master to increase that master cylinder to caliper ratio.
For giggles I looked up a tacoma 2wd caliper, and it looks like it uses the 60mm single piston one too (very similar looking as well).
It seems 4runners get bigger brakes (it's sometimes an upgrade for a tacoma), looked up a 96 4runner and it appears all of the 3.4L ones had the 4 piston 43mm caliper. Pretty sure they made the 4runners in 2wd as well, so not sure if the bracket mounting system is close enough to work on your pickup or not. Some time I should check around on the different trucks in my yard and see what calipers they came with, and try to eye ball the mounting system a little more. I have 86 pickups (mainly 4x4 though), and some 89-95 pickups in 2wd and 4x4, I4 and V6. Also this is the "15in rim" caliper, the other one is speced for the 16in rims and is 4x 45mm caliper which is probably the one used in the Tacoma upgrade I suspect.
The T100 4x4 caliper appears to be the same as the 16in 4runner caliper. The 2wd is the typical 60mm, and 2wd 1 ton (1993) had a 67mm caliper. My dad's 4x4 was 15in for a 1995, but my 1998 4x4 SR5 is 16in.
Just a few more sources/options for calipers, again rim clearance could be an issue sadly. If you have a local junk yard, maybe you can get a single caliper for cheap just to test fit. Could do that without disconnecting any brake lines as long as you can tuck your caliper somewhere out of the way for the tire to test fit on. If you was local, I'd let you try it free, then probably try to sell you the pair if they fit for cheap lol.
Very useful info on front/rear balance. Can't wait to get her in the gravel now! It'll probably look a little silly to the locals to see me trying to skid in the camper in the alley...
It would be cool to find a bigger bolt-on (or easy mod) caliper. I'm still not optimistic, but now I'll certainly be watching the option more carefully. Doing a master swap is relatively easy, too bad the front calipers couldn't be so easy.
The front/back proportion is definitely worth looking into carefully. It's possible that with a simple adjustment that I could improve my overall braking performance. This is relevant to me now because I'm in the process of doing some careful evaluation of my rear gear ratio. If I do end up getting into the back axle to swap diff gears from the current 4.10 to either a 4.56 or a 4.88 then I'll take the opportunity to evaluate the rear brakes. I don't know when the pads were last changed so it's quite possible that they will need pads. Interesting info on how grippy the pads can be based on material - I'll be sure to make a good selection based on how it does on gravel and how it responds to the proportional adjuster. Some folks have simply disabled that widget and had better performance as the campers are so heavy.
I have a couple of possible donor trucks at the local pull a part yards and if I go searching for a diff then I'll be sure and look carefully at the front calipers based on your nice and detailed descriptions. I'll take a good close look at my front pads/calipers before I go (IF I go, as I may just keep my existing 4.10 gear).
If you do grab the calipers, make sure to grab any brackets too. I've read the 4 piston ones are direct mounted, and the style you have is a L style bracket.
I wasn't sure if you had a pickup or a camper, doesn't really change anything, just locking the tires up will be harder from that extra weight .
For locking the tires up, you could always find a gravel parking lot, just be kind to the store owner and smooth over any ruts you make. A better option would be off road trails (if you have that there, we have state land to ride on etc), but probably not the best option for the camper. If there is sand around that's even easier to lock tires up in.
Funny thing about all this research and such, I'm learning as I'm going too, and upgrading brakes is something I'll probably look into for my T100 and my dad's, but the brakes are not bad on them at all, but the 1 ton upgrade might be worth it and/or the ABS brake booster .
I purchased a re-manufactured Cardone 532776 booster with a 9.75" dual diaphragm. It just BARELY fits after the edge is modified.
Here is a side by side comparison of the boosters:
The key things to notice is obviously the diameter, but also the depth AND the shape of the "lip" where it is sealed. On the original it's rounded at the edge near the firewall and the seal is towards the master cylinder. With the T100 unit the seal is near the fire wall and it's actually wide enough to hit the 2WD steering shaft (and remember, the 2WD shaft is MUCH smaller at the firewall than the 4x4 shaft...).
I don't know how the volume affects the performance of the booster - is it really directly proportional to the area of the diaphragm only or is the depth/volume of the older unit a significant factor? I guess I'll be investigating this question and reporting back.
This is the hack job I had to do to the edge of the booster to make it fit (goodbye warranty!):
The cutting doesn't get into the 'meat' of the booster, so it's ok. I have about 1/8" clearance between shaft and booster edge now.
SO, then I notice this message taped to the booster:
I take a look at the end of the master and, sure enough, it's leaking. Quite possible that the minor leak I found out the back actually caused the problem with the booster. Now I have to replace the master cylinder too. I ordered the replacement, It's a 15/16" bore one and it's a little hard to find - seems the auto shops don't have a good reference for the 1-ton option for brakes - makes life difficult for me. Anyway, that's on the way and I'll report back after it's been installed.
Given that I'll have to bleed the entire system now I'm going to look closely at my rear load balancing brake valve. Unfortunately I have to deal with a hack job - someone actually cut the load balancer adjuster in half when the previous muffler was installed. Look at what I found:
This is the adjuster that is supposed to allow for more or less back brake, but now it's totally toast. Is that ugly or what? I'm going to make sure the attached valve is operational and then unhook the adjuster and allow it to go "full pressure to rear", rather than adjust with load. It's supposed to 'sense' the height of the axle based on weight, but with a camper is ALWAYS heavy (like 5000 pounds heavy) so full pressure to the rears should be the norm. I'm not sure I'm even using my rear brakes right now. It really dips hard to the front when I hit the brakes now. I'll set it with full to rear (assuming the valve works) and then do the gravel lock up test. Here is the valve itself that is at the other end of that rod:
Jeez, I had no idea a little RPM drop when i hit the brakes would lead to such a deep dive on the brakes! Hopefully the camper will stop better after all of this is done and buttoned up.
Last edited by schil01-camper; 03-21-2017 at 07:53 PM.
Reason: update picture links
Just that rear bar being messed up could cause you quite the headache if it's actually limiting the pressure to the rear brakes (not sure if the weight of the arm alone is enough or not. Also none of the photos worked for me . I've read people hammering on the booster to make them fit, typically at the seams.
For how they function, I think it's the diaphragm inside that is the direct "power" of it, volume is your vacuum reserve. If you pumped your brakes really fast really hard, you'd eat up the reserve if it was too small or the vacuum line going to the booster was too restrictive. Dual diaphragm gives more surface area to pull at to increase the power instead of larger diameter.
I don't think I mentioned it, but there's a spacer for the brake booster between the fire wall and it. One was like 1/4in and the other style is like 1in. The thicker spacer would probably solve the clearance prob, but the master cylinder rod would have to be adjusted longer and make sure it's long enough to function right. Some sort of extension could work too as long as it's sturdy.
Back to the rear proportioning valve, if you can't get the rear tires to lock up at all (might be hard to do not sure with the weight of it), it might be best to bypass the proportioning valve, but if that gives too much rear braking, then you'd need the manually adjusted proportioning valve. My 86 2wd pickup was pretty easy to lock up the front tires empty, don't think I ever tried to lock all 4 up. I guess the best thing to do is try it out once you get your master cylinder in and see what it's like.
Oh another thing to point out, there is a seal between the master cylinder and brake booster, not sure if vacuum is there or not, but it's a good idea to put a new gasket on if the booster or master cylinder doesn't come with one.
Hopefully all works out well in the end and you'll have the best camper brakes around .
I updated the picture links, hopefully they work now.
I didn't have the 1/4" spacer installed in mine and if it was there I think I would not have had to do the modification. I think there would still have been enough distance on the booster studs to attach the nuts inside the cab at the pedal with a small spacer. I suppose if I had been patient and obtained a spacer I could have avoided cutting the edge of the booster, but, well, it's too late for that now :-) Or I could have just used some home-brew 1/4" spacers (i.e. washers) I suppose. I just went straight to the grinder, jeez, what a hack. You're right though, that booster is designed to have that spacer present isn't it... I have the hacked/modded booster mounted and attached to the pedal and the rod into the master was set at exactly the same distance (3.5 mm off the mounting plane where the booster and master meet) as my original booster push rod position. Hopefully all goes together correctly. I'm optimistic that it will be fine.
I was surprised (disappointed) that no gaskets came with the re-man unit. There is a paper gasket on the original between the firewall and the booster and another between the master and the booster. The booster holds vacuum by itself (I checked) and there is no vacuum seal between the master and the booster so that paper gasket isn't essential. Maybe it has a role if the vac seal around the rod goes out or weakens? I could not find a part number for a gasket or any way to buy the gasket itself alone. I have one of the two gaskets that is still usable (at the firewall). Likely the new master will (should) come with a gasket. I don' think it's a critical issue because it isn't really sealing anything. Seems like it's just there so that the interface isn't metal on metal.
Other people have installed manual proportioning valves with success in the rear, some have set it to 'full to back' on the valve (which may still not be equal front/back, but just the max level the valve allows to the back). The other camper owners say that it's really hard to lock up the back brakes regardless of how the valve is set. I have not read about anyone bypassing it with a Tee/manifold.
I believe this is a very similar if not identical setup (note the clear indication of where the gaskets go but no part numbers...): http://htftp.offroadsz.com/marinhake...12loadsens.pdf
The info there indicates that the front's always have more pressure than the rears, but they don't give a spec for a really heavy load. It also indicates ways to adjust the pressure by moving the valve body up and down. I have not really figured out the brake line routing yet. There are 2 lines going into the load prop valve, one from each side of the master I believe. If it was just one line in and two lines out (one for each wheel) then I could just put a Tee on there and remove the valve, but I think it's more complex than that and I have to trace the lines carefully to figure out how I could properly bypass it or insert a manual proportioning valve. I think that I'll just get in there and start testing during the bleeding procedure and see what happens. Unfortunately I don't have a brake pressure indicator, but I can get one if it becomes obvious that to set the front-back ratio properly I need to actually do measurements.
I've read about how people with other (lighter) 4X4's that use a similar valve have removed the valves and the most common side effect is "the rear's lock up easier now", but since I have the extra weight I may not have that same problem. I may wear out rear pads faster, which would be a bummer only because they are much harder to change compared to the fronts (speaking of which I've got to get a peek into the 'inspection hole' on the rears and see if I have enough pad left to be useful - there is no record of them _ever_ being serviced in my available paperwork). I hope I don't have to get into the rear axle to change rear pads just yet. Hopefully I can avoid that for the moment. I'm very curious to see what happens on this front/rear brake business.
With a new master, a clean bled system, a bigger booster, decent fronts (new pads/rotors 20k ago) and some attention to the load balancing, I suspect that I'll have a LOT more braking power in the near future.
Yea I'm pretty sure you'll at least have better brakes with the booster. Didn't know about the paper gaskets not being super important, I figured it was for vacuum seal, but I guess it would be more of a rubber material if that's the case. I haven't looked into the rear proportioning valve much, but I think it has a supply line, output line (which splits to both sides I'd guess), and a line that runs back to the front for the excess pressure?
If you can identify the supply line and the output line(s), you could get a straight though block (2 ports or 3 ports depending on the layout) to bypass it completely. The excess lines might need to be sealed/disabled. A hack job way would be to use a nail cut short and put into the brake line then tightened down, seen it done once that way and it worked well, but that was on a junker with the rear brake lines rotted out, so was just disabling it so it wasn't leaking fluid. The more correct way is to probably find where the extra line(s) go and see if it's possible to swap the block it goes into to one less port, or what exactly it does. I'd almost say to just try it as is after the system is bled out since the booster and master will be new. Might work really well and won't need to deal with it (for now?) lol.
Another thing to check, if you do take the drums off, is make sure the brake cylinder in the drums move freely side to side (not hanging up). Sometimes they can rust up and not expand out which gives poor rear brakes. The other thing is, the seal on the cylinder could leak, but you'd be loosing fluid and the level would go down at the master. I'm not sure of the exact design, so I could be a little off.
Oh also the pics work now =). I'm not sure how the brake booster is constructed exactly, but if it isn't too hard to get to, could probably throw a thin layer of RTV or similar gasket material at the grind spot just encase. A seeping leak probably wouldn't effect performance too much, but it would hinder the "reserve vacuum" effect I was talking about in my last post. Maybe it's just fine though, can't see it the greatest in the photo, and real life is always a lot better to see things anyway.
The new master cylinder was faulty. It would bypass - pedal to the floor, no brakes. I had to return it and I'm waiting for another new master cylinder. It wasn't the bleeding as I went back to the original master and everything is fine. I bench bled it with a kit and even took it to show a local mechanic. All at the shop said I just got a bad one. Jeez, it took me a good while (and a lot of brake fluid) to figure out that it wasn't the bleeding that was causing the pedal to the floor issue. Original master has a slow small leak out the piston seal so it works fine for now but I'll get it replaced asap. It might be 2 weeks now until I do this as we're off on vacation next week.
In the process of fiddling with the faulty master I did get a chance to more closely inspect the brakes and flush all of the nasty old fluid out. The rear load leveling proportional valve is a real head scratcher. It's supposed to put more pressure to the rear when the load lowers the body toward the axle. But in the camper, which is always heavy, there is also an 'air ride' add-on that will help smooth things out. You pump them up from 20 to 90 pounds. Thing is, the body rises and falls with the air pressure and this directly affects the proportional valve position. Totally messed up. I could bleed this load sensing prop valve directly and got very good fluid flow when bleeding (same flow rate as fronts), but bleeding at either of the two rear wheels gave a much slower flow rate and required more pressure on the pedal. Seems to be the proportioning valve working. To give myself some more room under the truck I pumped up the air ride bellows and it 'seemed' (no official measurements or gauge) like the flow was restricted more with the body raised (thus closing down the valve). There seems to be an incompatibility with the existing prop. valve setup and the air-ride. I plan to do some basic experimenting with the valve to confirm it's working an determine how to best set it so that I get a fixed and relevant amount of back brakes. Hopefully I'll come up with a 'set and forget' rig of the existing system so that I don't have to re-plumb to add a manual valve and it stays the same proportion regardless of load or body height.
OH, and the the new booster is really noticeable. I have a LOT more brake - they are very sensitive now and i can make it lock up on the gravel driveway (5 to 10 mph) - something it wouldn't do with the old booster. I took it around the block and it really does feel more 'grabby'. I'm going to wait for the new master install and prop valve fiddling to be complete to do a full and complete bleed and then determine if the increase in booster power is to much or just fine. Likely it's fine and I just have to learn the right touch on the pedal.
From my understanding on the proportioning valve is setup, when you hit your brakes, the nose dives down, rear comes up, and when the rear's up, it restricts more of the flow/pressure to prevent rear tire lockup. I suspect there should be some sort of adjustment for the bar, or try to remove the bar off the axle and bungee strap it up to see what the full flow would be like on the rear. Same test as before, lock em up on gravel. Fronts should always lock first, even with the least amount of weight in the back. If it seems to be just right, I've heard of people doing that "mod" for long term use so the option to go back to factory is still there.
When you did your lockup test, were you able to lock the rears too? Also should note that slamming on the brakes like this kind of tests your brake lines, but better to have them fail going 5mph vs 55mph. Of course I'm from up north, so rotted brake lines are common and typically a large bump or panic stops is what causes the line to pop.
The thing with weight and the camper is that it is always very heavy and a "light" load or a "heavy" load won't make a lot of difference - 4800 pounds vs 5500 pounds. This is why I'm aiming for the single set point approach the valve in the 'full open' position.
If the links work, here is some detailed info on the load sensing proportional and bypass valve: Toyota FSM-LSP&BV.pdf
It's not only a proportioning valve but also a bypass valve in case the front section of the master goes out. I'll do the testing on the valve (and make sure the rear flex hoses are clear/open) that I'm able to accomplish when I put the new master in and bleed the system, but I think it's going to be a few weeks before I can report back.

 03-17-2017, 04:36 PM


 somethings I have been reading about the 1" MC (I have one to install too) is that the brakes will feel worse after the swap because the ratio is different unless you convert to a dual diaphram master cylinder (86-87 turbo truck or 88 V-6 4runner, T100's or something like that)
 .
.


 . I've read people hammering on the booster to make them fit, typically at the seams.
 .
.


