
Definitive Temp Gauge Fix!
 07-31-2013, 04:51 PM
#21
Registered User
This just got added to the ''to-do'' list on mine as the temp gauge only works when it wants to, but it does shed a good light on where the culprit might be with mine as I have traced from temp sensor and even replaced the sensor thinking it was faulty... Major Kudos for this one.
 08-05-2013, 09:54 AM
#22
Registered User

Join Date: Jan 2013
Posts: 19
Likes: 0
Received 0 Likes
on
0 Posts
I disassembled my gauge cluster to attempt this fix, but found all wires intact and attached to the points. I still have the problem of the temp gauge needle jumping straight to the middle as soon as the engine is started. If a wire was broken and I missed it, would that show up while reading the resistances between the points? Mine show ~48 ohms and ~450 ohms for the 2 windings
08-09-2013, 10:46 AM
#23
Registered User

my temp gauge would very rarely work. it always shot straight up to the red. i took it apart per the instructions and saw no broken wires. i wiggled them around, and it actually worked. no idea if it was a loose connection/ weak contact but it worked. thanks!
08-13-2013, 02:24 AM
#24
Super Moderator
Staff
iTrader: (1)
Join Date: Aug 2008
Location: Anderson Missouri
Posts: 11,788
Likes: 0
Received 21 Likes
on
19 Posts
I have gotten 2 guages to work. Both of the ones I fixed did not have the insulating piece that Inferno is showing. It may not be on all guages, and I am sure both of mine had never been taken apart.

What I did and am not for sure if this fixed the problem, is I used electrical tape to isolated the two pieces, but this thread did get mine fixed. Also I did have the 3 long post loose. I have added electrial tape on both and they are working great. Great thread Inferno!!!


What I did and am not for sure if this fixed the problem, is I used electrical tape to isolated the two pieces, but this thread did get mine fixed. Also I did have the 3 long post loose. I have added electrial tape on both and they are working great. Great thread Inferno!!!

Last edited by Terrys87; 08-13-2013 at 03:43 AM.
The following users liked this post:
Theyseemespoolin (05-20-2019)
 08-14-2013, 10:53 AM
#27
Registered User

Join Date: Aug 2013
Location: Hampton, VA
Posts: 4
Likes: 0
Received 0 Likes
on
0 Posts
There are two wires that are individually connected to two separate posts. I checked mine and both were soldered and not disconnected or broken. I did see some goldish poweredly stuff on one so I used a small soft paint brush and gently knocked it off.
I read from another respinder they just cleaned and tightened the terminals, so I did that. Note- that z-shaped connector/bracket in pic #12 from te top was brown from oxidation, so I use fine sandpaper to get rid of all of it so i was as shinny as the one in pic#12.
Use contact cleaner on the interior and exterior circuit boards and tighten all the nuts for good contact.
Started the engine and the needle did not instantly jump to mid position-normal temp. I thought I broke it but after 1/2 mile it began to move up and after 2 miles it was in the normal temp posotion.
So something I did fixed the problem.
10-31-2013, 04:10 PM
#29
Registered User

Join Date: Feb 2010
Posts: 23
Likes: 0
Received 0 Likes
on
0 Posts
I fixed my temp gauge by cutting off the connecter at the sender and crimping on a new one, its not uncommon for the wires to get brittle and break on the wires behind the manifold on the 3- slo, even when the insulation holds it all together.
12-01-2013, 11:58 PM
#30
Nice post. Thanks!!
I didn't know how to remove the clear plastic face before. Wanna do this someday to add a normal operating temp mark.
I didn't know how to remove the clear plastic face before. Wanna do this someday to add a normal operating temp mark.
12-02-2013, 05:44 AM
#31
Registered User
Join Date: Jul 2012
Location: Red Bay, NW Forida
Posts: 474
Likes: 0
Received 0 Likes
on
0 Posts
I might attempt this, just to check connections. I'm very very bad at soldering for some reason (I like to blame it on my butane powered soldering iron), so I might not even attempt to solder any broken bits.
12-02-2013, 11:55 AM
#32
Registered User
Will be doing this soon!
Ditch the butane and get a pencil soldering iron. Cleanliness is next to godliness when soldering... Welding too
Ditch the butane and get a pencil soldering iron. Cleanliness is next to godliness when soldering... Welding too
Last edited by SoCal4Running; 12-02-2013 at 12:07 PM.
01-06-2014, 07:20 PM
#34
Registered User

Join Date: Jan 2014
Location: NW Washington
Posts: 15
Likes: 0
Received 0 Likes
on
0 Posts
Mine's a SR5 cluster that I got out of the junkyard, and the water temp gauge is always intermittent. Works or it don't. I've taken it apart several times to try and see any broken wires or other problems and haven't found anything. It seems to like the attention, though, because it seems to work for a while (half a day) after each re-installation. I messed with it today, so of course it worked after I put it back in. Then I noticed it quit as I pulled up to my garage. I got out to move a ladder out of my way (my own fault--can't blame my sons,) got back in and it was working. Maybe this is just how this truck is going to mess with my head.
01-07-2014, 12:20 AM
#35
Super Moderator
Staff
iTrader: (1)
Join Date: Aug 2008
Location: Anderson Missouri
Posts: 11,788
Likes: 0
Received 21 Likes
on
19 Posts
^^^Might try and removing the ground screw by the fuse box inside the cab and sand off the paint where the ground screw attaches to the body. Another thing that might help is to remove the water temp sensor (in between 2 and 3 on a 22r/e) and give it a good cleaning. It gets hard water build up or scaling on the sensor. I fixed a few flaky water temp gauges that was as well.
01-07-2014, 11:54 AM
#36
Registered User
Join Date: Jan 2014
Location: NW Washington
Posts: 15
Likes: 0
Received 0 Likes
on
0 Posts
Water Temp Fix
Thanks for the input. I've been through the grounds in the engine compartment, but haven't messed with anything in the cab. That's a good idea. I've swapped out both of the water temp sensors (I guess there are two,) and I would have figured that removal/reinstallation would have taken care of the any grounding issues there, but maybe not. I'll give it a whirl. Doesn't cost anything right? Thanks again, I'll let you know if it works!
01-31-2014, 01:26 AM
#37
Registered User

Join Date: Jan 2014
Location: Great State of Texas
Posts: 62
Likes: 0
Received 0 Likes
on
0 Posts
Thanks you for figuring this out
The temperature gauge in my 87' 4runner ha been finicky since i first got it years ago. Some have suggested bad senders, loose screws in the gauge cluster, etc. I tried a few things and after disassembly finally found a fix to what seems to be a VERY common problem. This fix will work for 4runners 84' to 89' and trucks 84' to 88 at LEAST and probably others.
Symptoms
-Temp gauge only works sometimes
-Needle jumps to middle regardless of whether engine is warm or not
-Smacking the dashboard sometimes helps it to work
Cause
-Broken wire inside temp gauge
Fix
-Remove gauge, resolder wire
Explanation
-The temp gauge works by having current flowing through 2 different windings of copper wire. Each winding tries to pull the gauge towards the top or bottom. With engine cold, there is high resistance to ground through the winding that tries to pull it to the top, and low resistance for the one pulling it to the bottom, this is why the needle is (or should be) at the bottom when cold. As the motor warms, resistance through the sender in the intake manifold lessens and lets more current flow through the winding that tries to pull the needle to the top. If one of the wires in the windings breaks, it will try to ground through somewhere else, causing erratic readings.
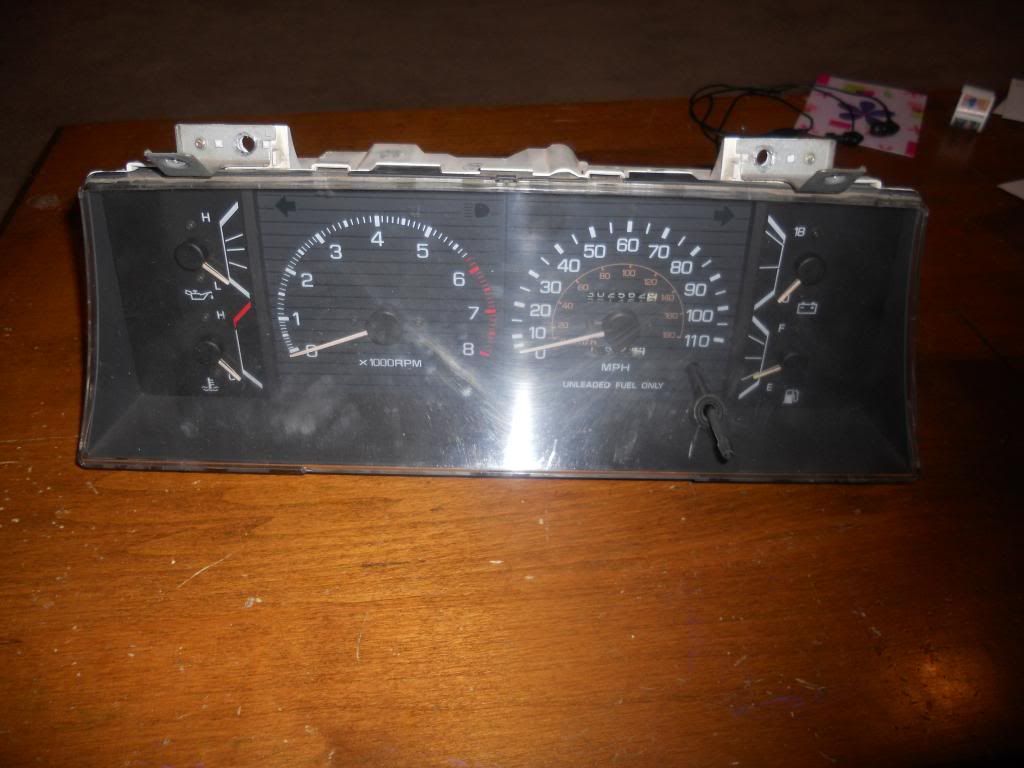
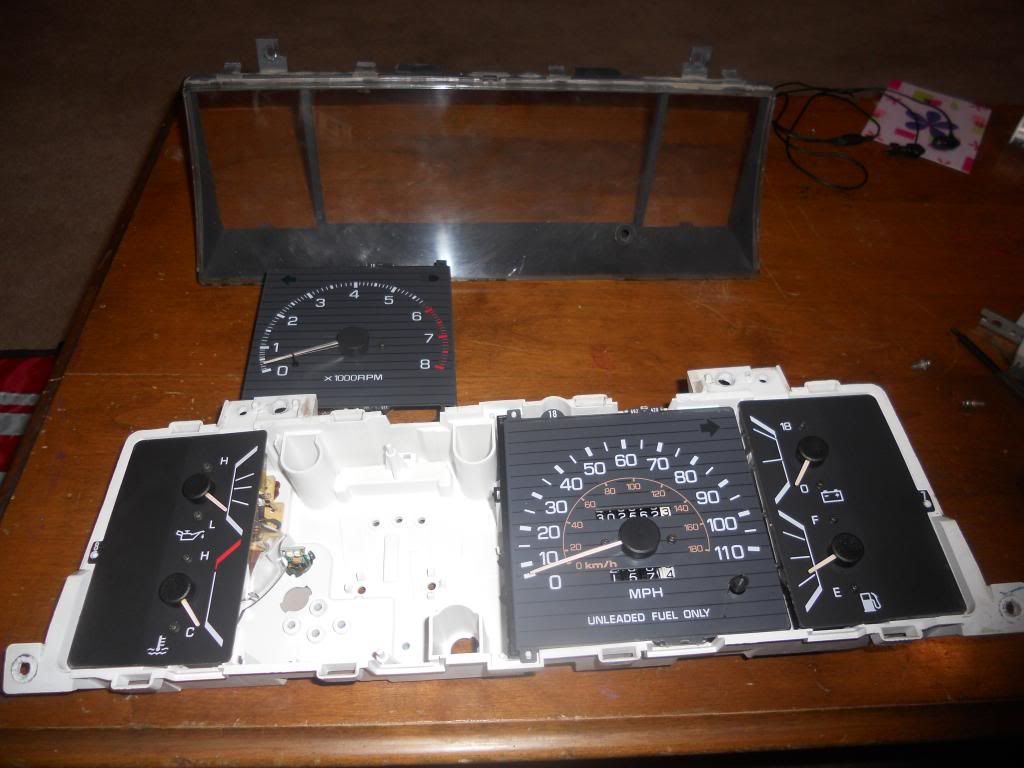
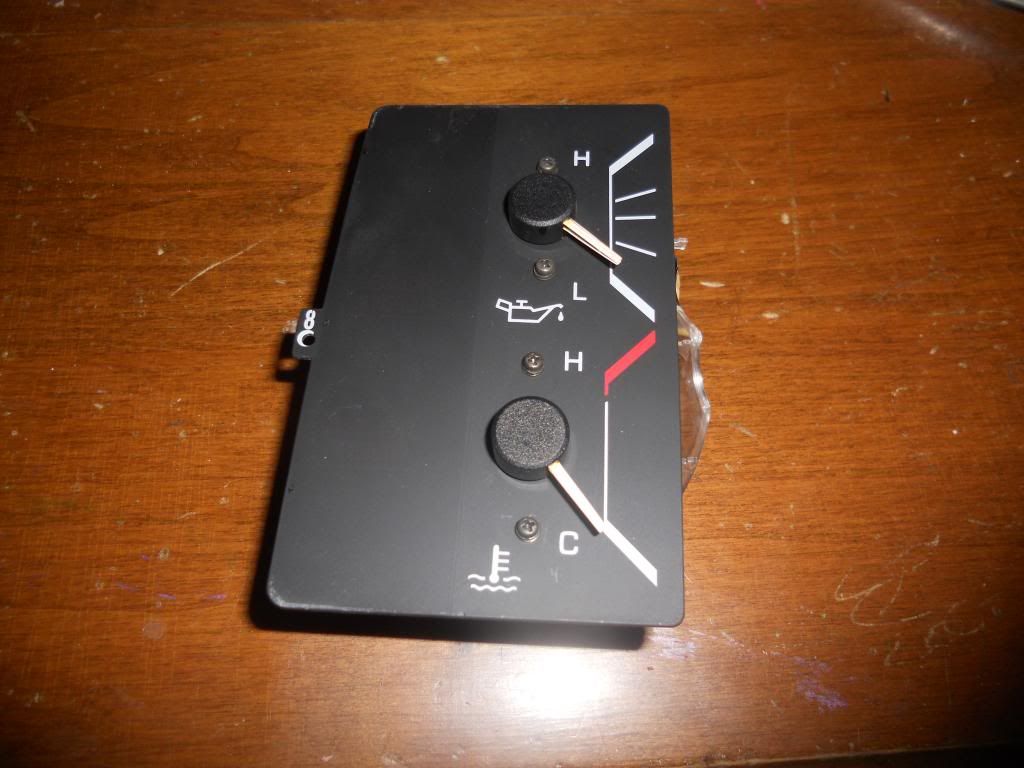
Begin by removing the gauge cluster. I won't detail that here, there are many good writeups here on Yotatech. You'll end up with this:
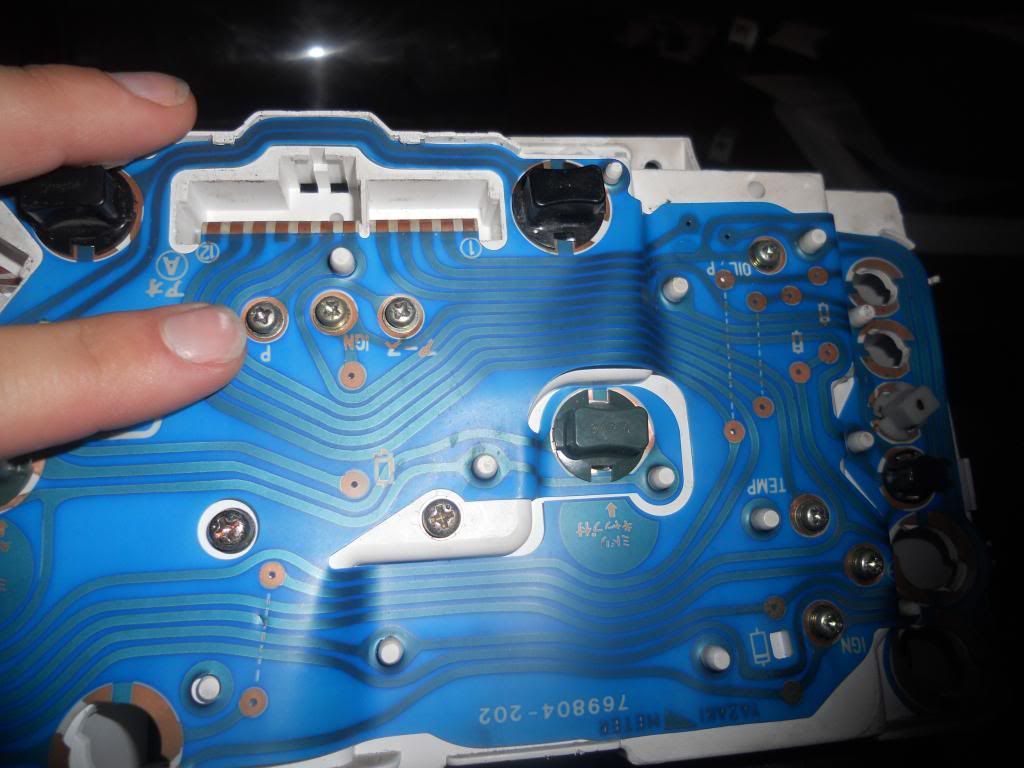
Remove these 2 brackets on the back of the gauge cluster by unscrewing them.
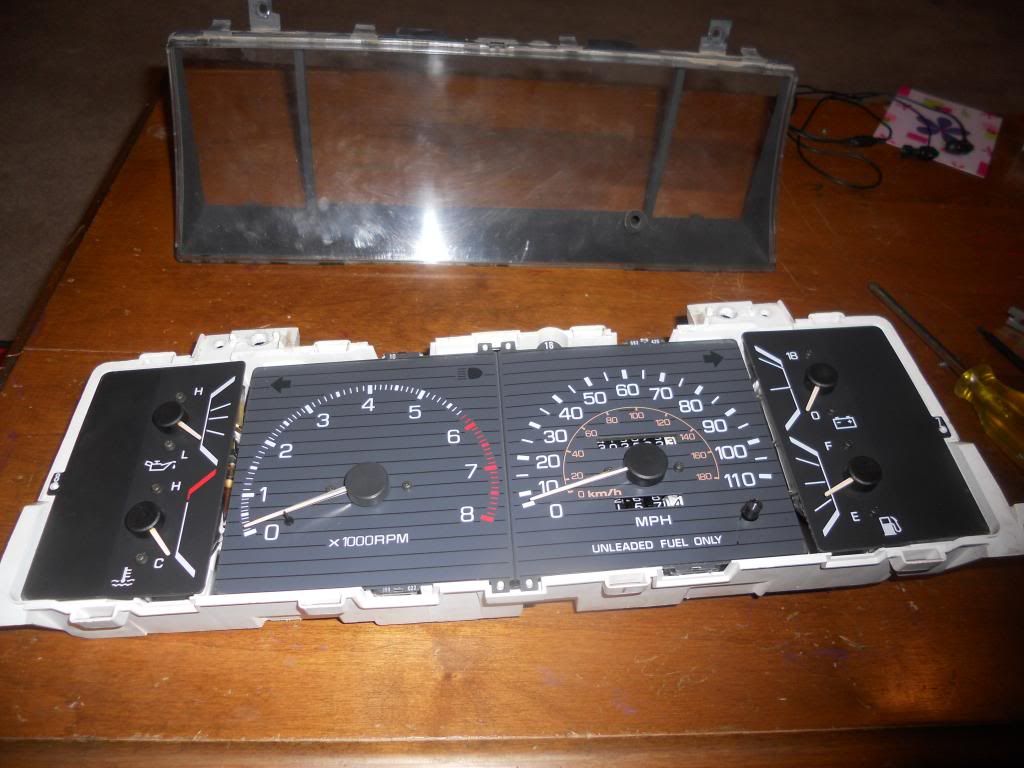
Push these clips down and they will pull out. This will let you remove the clear plastic face
End up with this:
Flip it over and remove the tachometer by unscrewing these 3 screws:
And these 2 Screws:

End up with this:
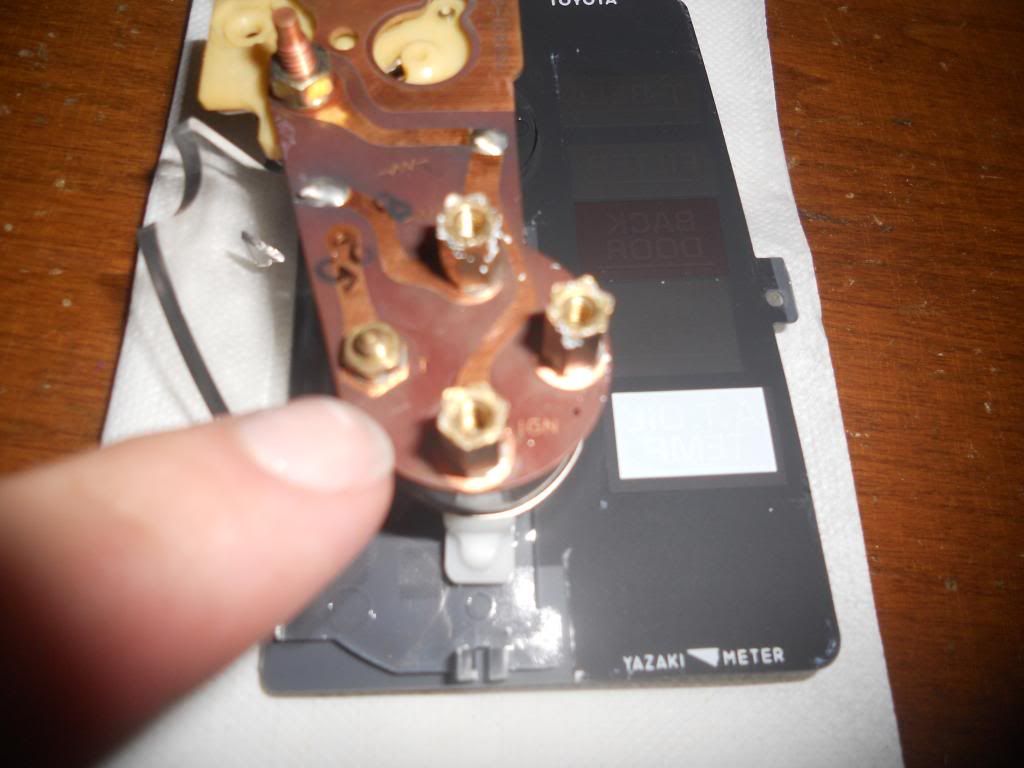
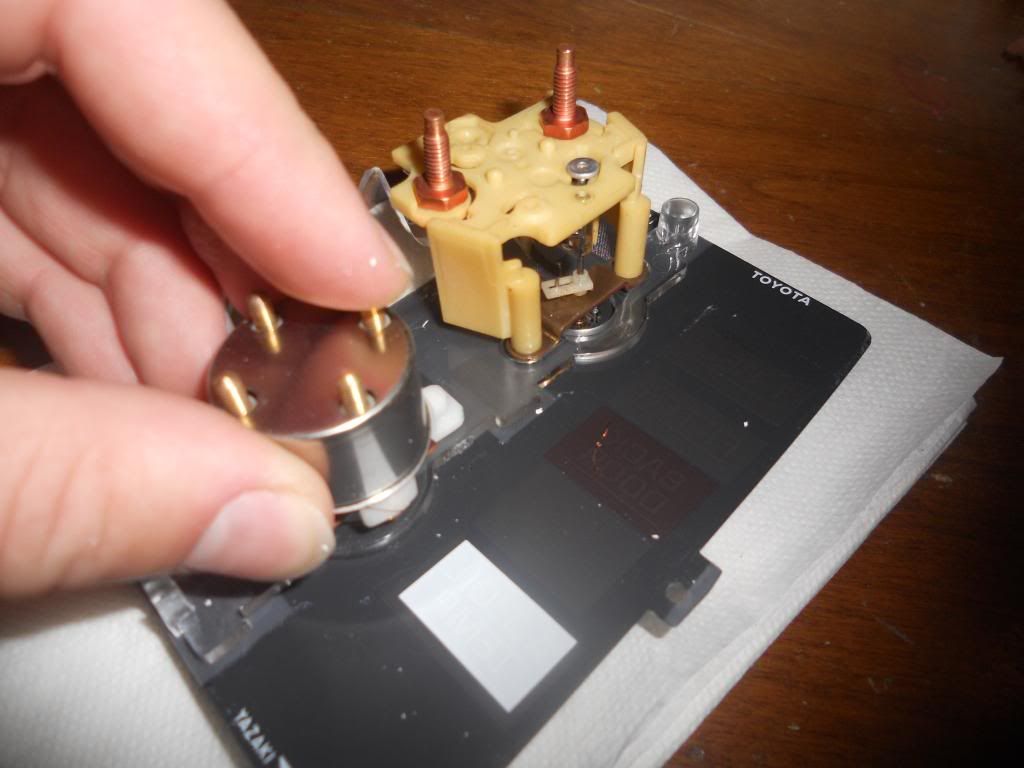
Remove the oil pressure/ temp gauge by unscrewing this top screw:
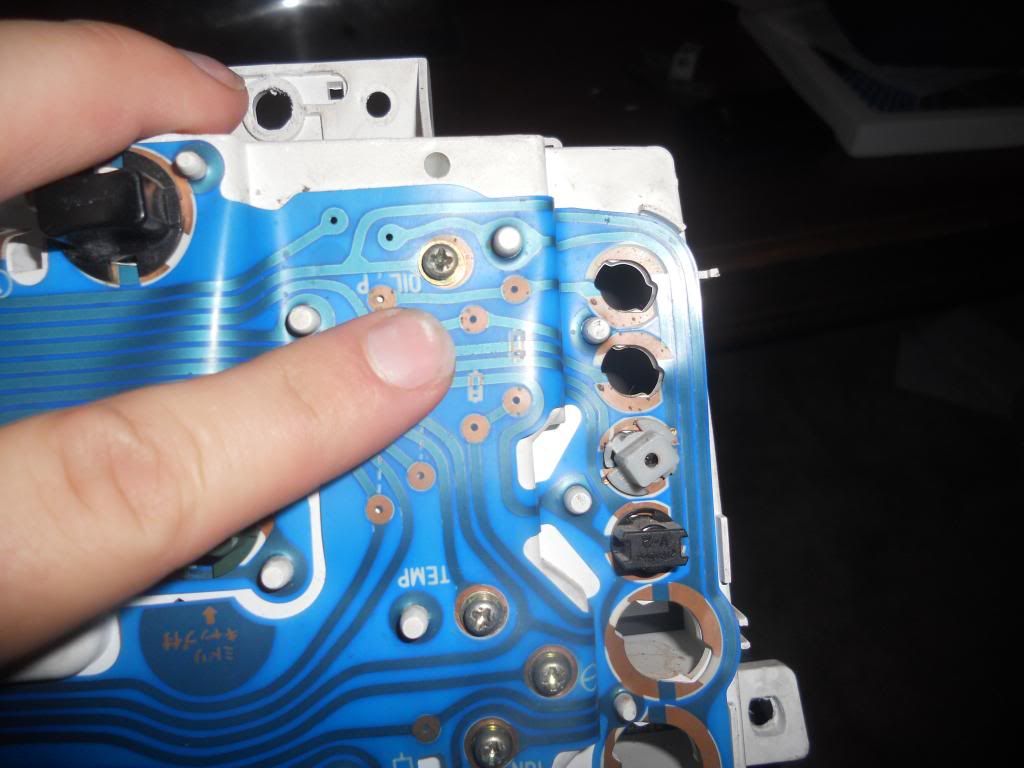
And these 3 screws:
Then pull out the gauge, set aside rest of the cluster, and end up with this:
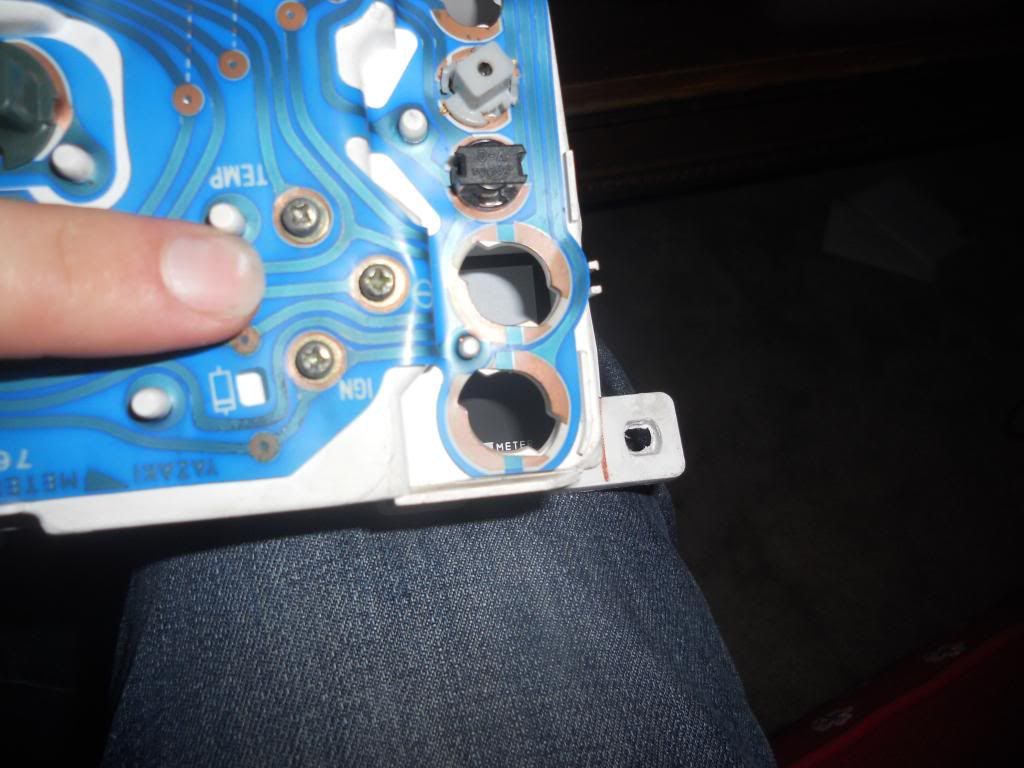
Flip it over and remove these 4 nuts and washers (remember where the small one goes):
And these 2 nuts and washers:
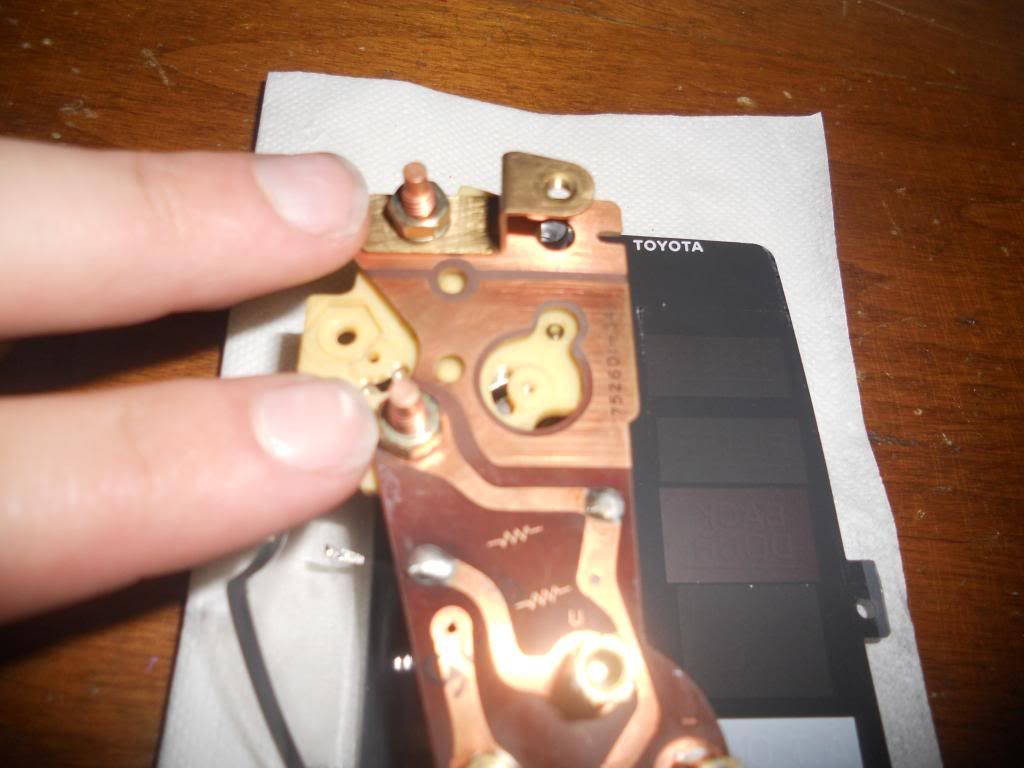
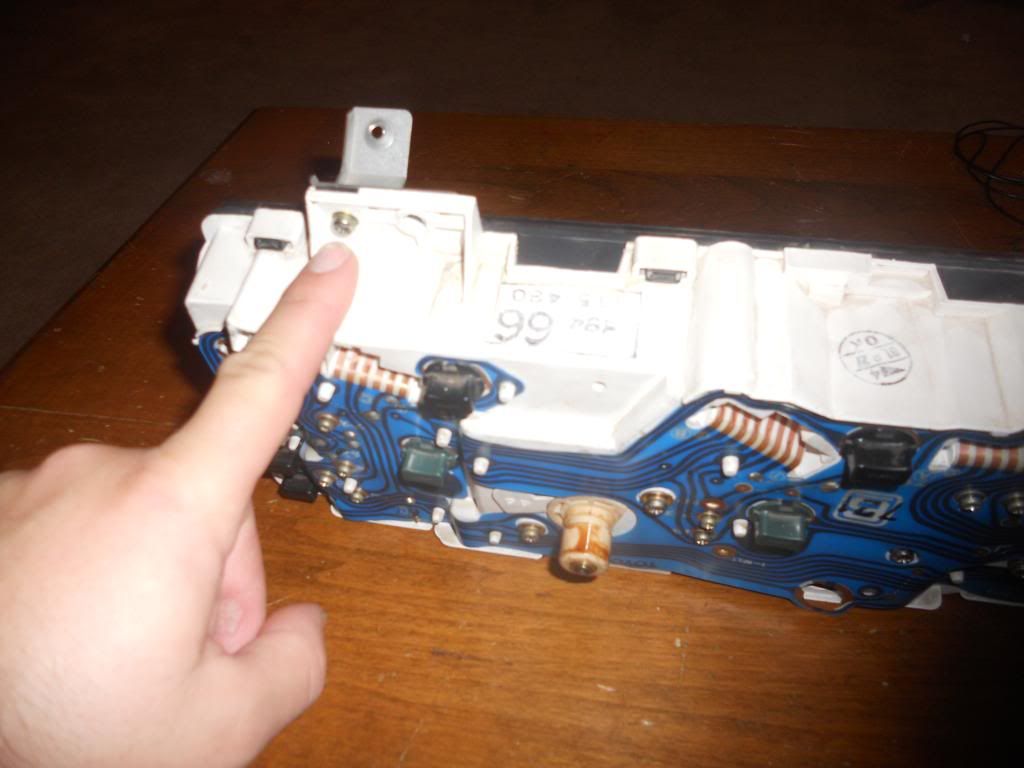
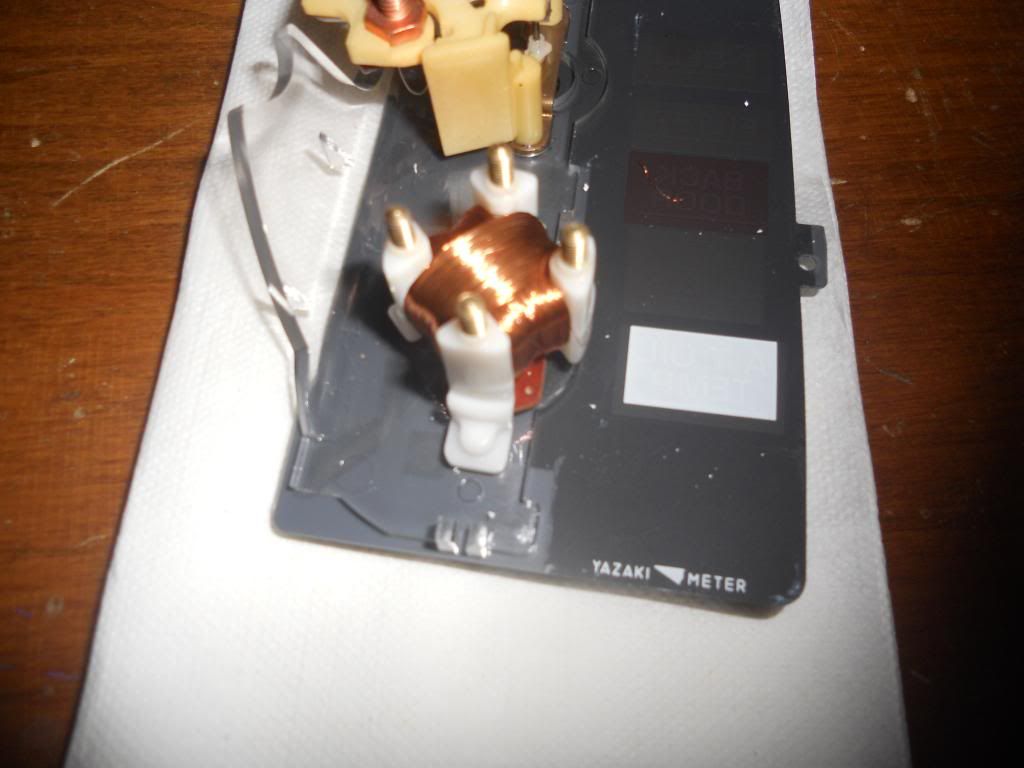
Remove the circuit board and end up with this:

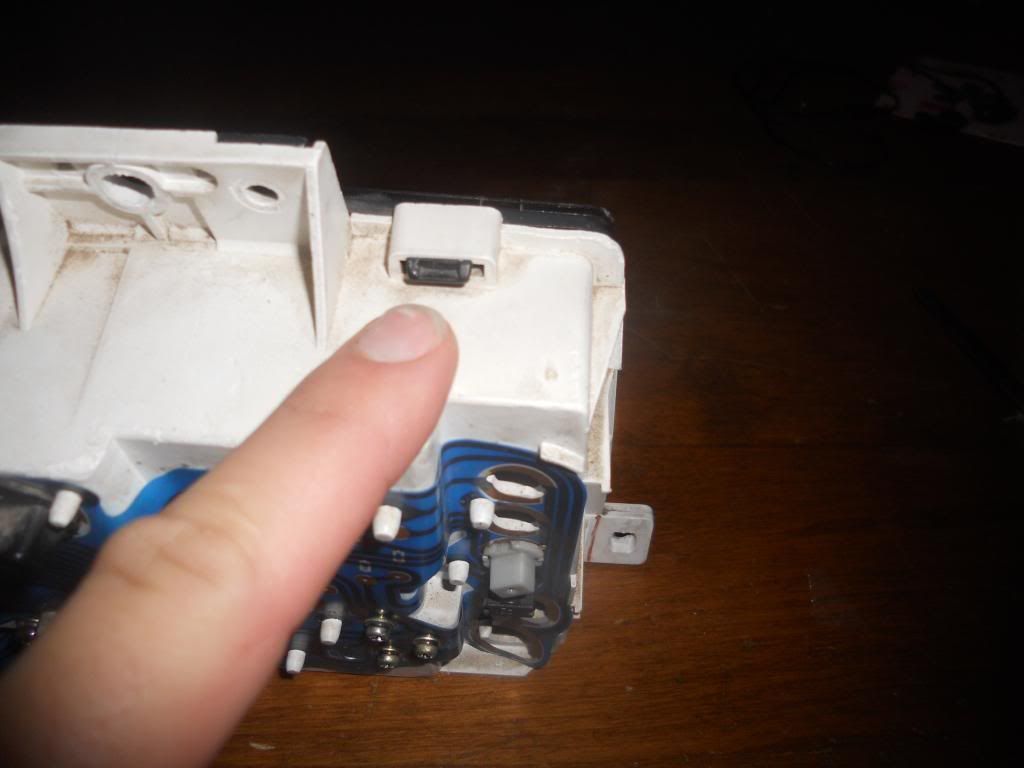
Remove the insulating piece from the back of temp gauge:
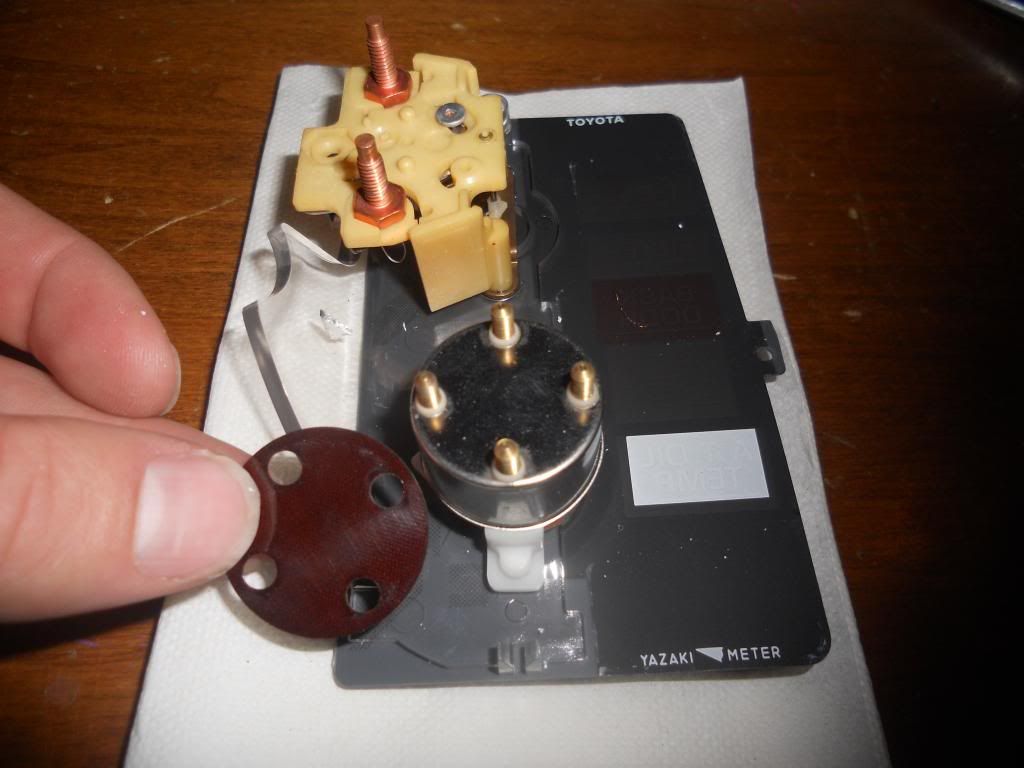
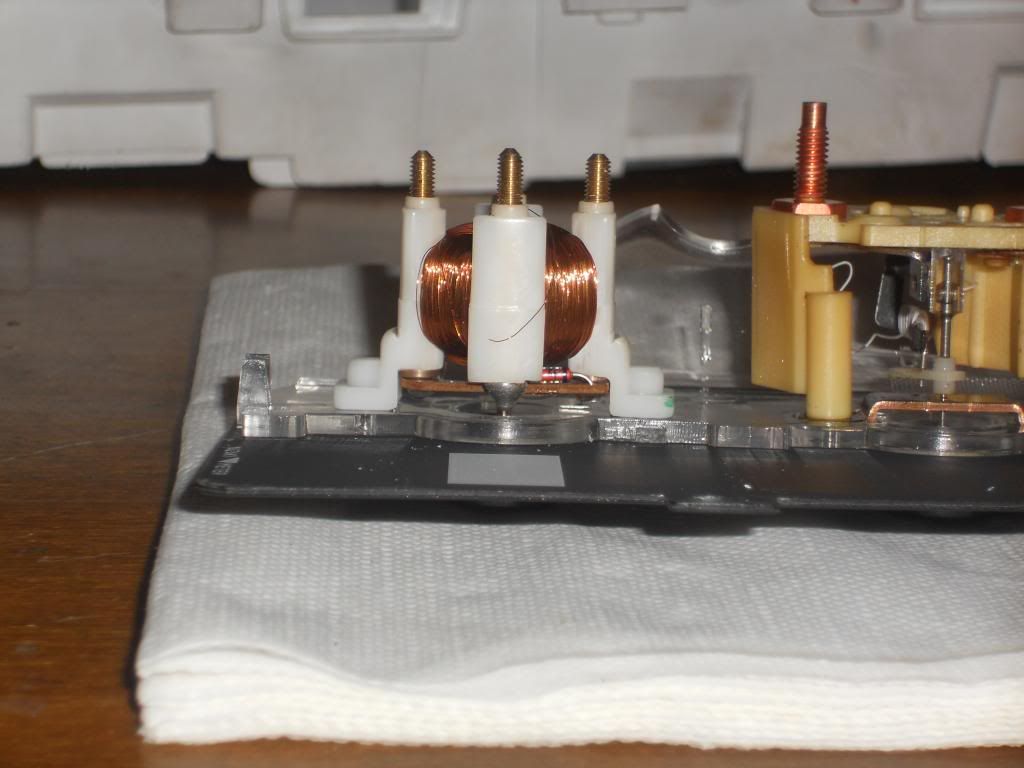
Lift off back of temp gauge by pushing on one of the studs and pulling on it with your fingers. It's not glued on or anything:
End up with windings revealed:
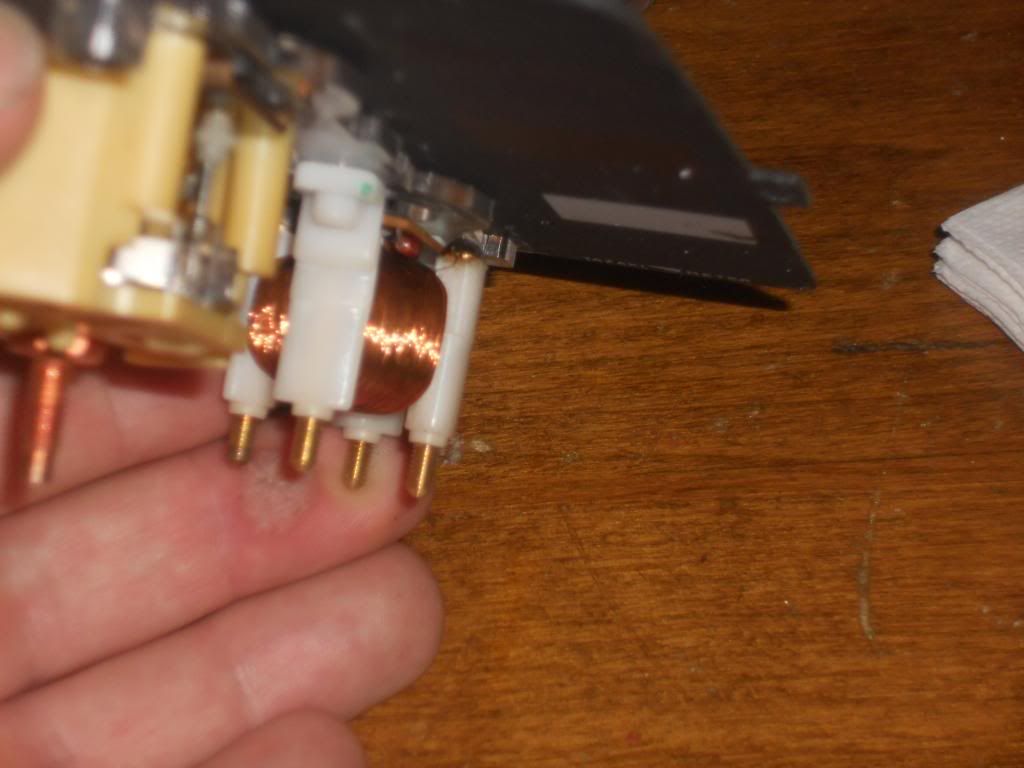
There's our culprit. This wire should be soldered onto that grey pointy peice below it. Check each wire carefully for breaks, your broken wire may not be the same as mine:
You will probably need to unwind one coil to have enough wire to solder to that terminal. These wires are covered with an insulating coating, so you'll have to strip it off either with a razor blade (what I used) or sandpaper, emory cloth, or similar. Be careful, these wires are extremely thin. Solder the wire back onto the terminal and end up with this:
Assembly is, as they say reverse of disassembly. I'm happy to say that my temp gauge now works 100%. Good luck!
Symptoms
-Temp gauge only works sometimes
-Needle jumps to middle regardless of whether engine is warm or not
-Smacking the dashboard sometimes helps it to work
Cause
-Broken wire inside temp gauge
Fix
-Remove gauge, resolder wire
Explanation
-The temp gauge works by having current flowing through 2 different windings of copper wire. Each winding tries to pull the gauge towards the top or bottom. With engine cold, there is high resistance to ground through the winding that tries to pull it to the top, and low resistance for the one pulling it to the bottom, this is why the needle is (or should be) at the bottom when cold. As the motor warms, resistance through the sender in the intake manifold lessens and lets more current flow through the winding that tries to pull the needle to the top. If one of the wires in the windings breaks, it will try to ground through somewhere else, causing erratic readings.
Begin by removing the gauge cluster. I won't detail that here, there are many good writeups here on Yotatech. You'll end up with this:

Remove these 2 brackets on the back of the gauge cluster by unscrewing them.

Push these clips down and they will pull out. This will let you remove the clear plastic face

End up with this:

Flip it over and remove the tachometer by unscrewing these 3 screws:

And these 2 Screws:

End up with this:

Remove the oil pressure/ temp gauge by unscrewing this top screw:

And these 3 screws:

Then pull out the gauge, set aside rest of the cluster, and end up with this:

Flip it over and remove these 4 nuts and washers (remember where the small one goes):

And these 2 nuts and washers:

Remove the circuit board and end up with this:

Remove the insulating piece from the back of temp gauge:
Lift off back of temp gauge by pushing on one of the studs and pulling on it with your fingers. It's not glued on or anything:

End up with windings revealed:

There's our culprit. This wire should be soldered onto that grey pointy peice below it. Check each wire carefully for breaks, your broken wire may not be the same as mine:

You will probably need to unwind one coil to have enough wire to solder to that terminal. These wires are covered with an insulating coating, so you'll have to strip it off either with a razor blade (what I used) or sandpaper, emory cloth, or similar. Be careful, these wires are extremely thin. Solder the wire back onto the terminal and end up with this:

Assembly is, as they say reverse of disassembly. I'm happy to say that my temp gauge now works 100%. Good luck!
I am restoring a 1995 Toyota 4runner with a 3FZ-E engine. I had the garage put a sensor on it since they were the ones that installed the ATK North America re-manufactured engine. Mine jumps over to half way just a few seconds after starting this winter. Before that here in The Houston, TX area we have a lot of heat and it was showing close to overheating but using in-fared temperature gun found that was not the case at all, they were at 220 deg F on the hoses and it heats up the cab ok. Now I just have to find away to keep my fingers from shaking while I solder. I have neuropathy shakes and pain in hands and legs. but I'lll Getterr done. Thanks for the great i
 nfo!
nfo!
 04-27-2014, 11:18 AM
#39
Registered User

Join Date: Mar 2014
Location: NW Washington
Posts: 5
Likes: 0
Received 0 Likes
on
0 Posts
Thanks man. Ive got the same symptoms. Im doing some other work to it but before im driving it daily im definatly going to fix this gauge. Not good to be driving around without a working tempurature gauge. So thanks!
04-27-2014, 11:31 AM
#40
Stock temp Gage has poor resolution
Hi guys, Many people say that stock temp gage has poor resolution. It just tells you whether it's cold, at OK temp or at overheat. Watch Redeth's thread. He just bought aftermarket universal gage for his V6 that actually reads in �F.


