
88 3.0 crankshaft gear
 04-10-2011, 07:17 AM
#1
Registered User
Thread Starter

88 3.0 crankshaft gear

How do i get the crankshaft gear off,do i remove the key first,if so how is that done,or does the gear slide over the key?
Last edited by waskillywabbit; 04-24-2011 at 06:08 AM. Reason: Cleaned up useless code
 04-10-2011, 08:11 AM
#2
 04-11-2011, 09:17 AM
#4
Registered User

Join Date: Sep 2007
Location: San Francisco East Bay
Posts: 8,254
Likes: 0
Received 822 Likes
on
649 Posts
It slides over the key (using the method in the FSM). But I'm pretty sure it is a Woodruff key, which means the shaft side is an arc, not straight. So if the key starts to move out while you're pulling the gear, it will rotate and jam. Then you just need to GENTLY tap the key back in so that its gear-side is parallel to the direction you are pulling.
04-24-2011, 05:30 AM
#5
Registered User
Thread Starter
ok folks whats the secret to getting the timing belt on?every time i think i have it,one of the gears are one notch off or one side is slack so it doesn't go on correctly.could it be because the belt is stretched? any suggestions?secrets?tricks?magic spells?
04-24-2011, 06:59 AM
#6
Registered User
It's done with patience. I had to do mine 3 times to keep all the marks where they should of been. Mine kept going to the right as you look at the front of the motor.
Here's a good write-up on the topic and the one that I followed.
Good luck.
https://www.yotatech.com/forums/f116...s-pics-183911/
Here's a good write-up on the topic and the one that I followed.
Good luck.
https://www.yotatech.com/forums/f116...s-pics-183911/
04-24-2011, 07:18 AM
#7
Registered User
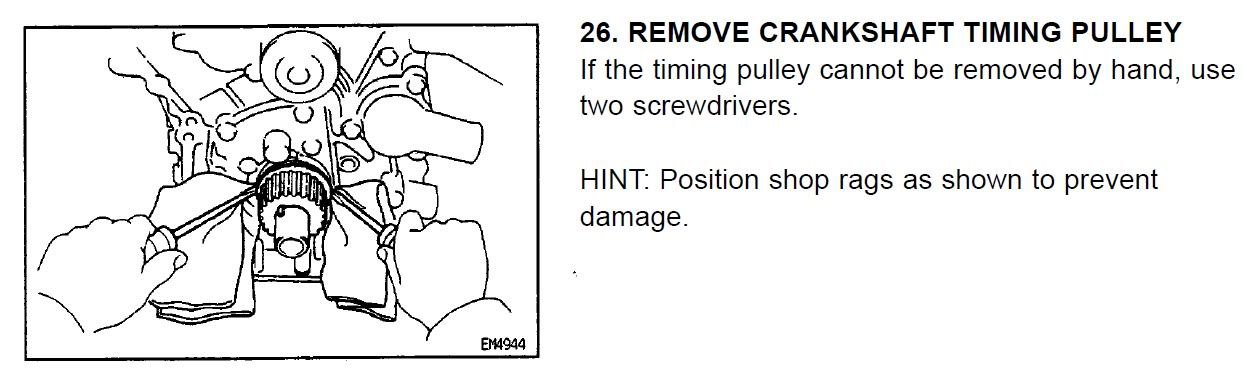
Removing that gear is fairly easy on some motors, but on others it can be a challenge (understatement). Spray the joint between the shaft and gear with PB Blaster, and allow to soak overnight if possible. If not, at least give it an hour or two. The key to removing the gear is to pry on both sides evenly. If you pry just one side, the gear gets cocked and locks up. You can't pry too hard because you might damage the soft aluminum oil pump behind it.
If you can't get the gear off, you may have to do what I eventually had to do on mine. It was well frozen and just would not come off. I had to drill two holes at the 9 and 3 o'clock positions and tap them. (I used a cobalt bit and stopped frequently to pour oil on the end.) Then I screwed in two threaded stocks and used a puller. That did the trick. Put a mark of tape around the drill bit to make sure you don't drill all the way through the gear and into the seal. (I drilled holes sized for 5mm threaded stock, but the force required was so much that if I had to do it over I'd use 6mm.)
When you mount the seal, be sure to grease it (of course) and you can use the gear to press it most of the way seated. I used a socket extension and small hammer to gently tap around the seal to seat it fully. Use the flat, top, female end of the extension against the seal, not the rounded lower part that might dent the seal.
If the gear and shaft have some rust and corrosion, clean it up with naval jelly, rinse well, then smooth the surfaces with very fine wet-or-dry sandpaper, wipe out with a damp rag, and use a small amount of anti-seize compound, wiped well onto both surfaces.
---
The timing marks on the belt are for the initial line-up only. When you rotate the motor, the marks travel. That's normal.
I recommend following the factory manual but be aware you do NOT have to remove the cam pulleys to change the timing belt. The fsm is confusing on that point. I find this technique works well for mounting the belt: position the driver side cam pulley exactly on the mark. Position the passenger cam pulley a half tooth clockwise of the mark (as viewed from the front of the vehicle looking back). Position the crankshaft pulley a half tooth counter-clockwise. If the motor is an 88 to 91 (old style without a tensioner), mount the lower idler pulley and spring (acts as a tensioner) but tighten it as much out of the way as possible (against the tension of the spring).
Then place belt around driver cam pulley (if using a toyota belt there will be timing marks on the belt). Then route belt under upper idler and around passenger cam pulley. Then position passenger cam pulley exactly on the mark - the belt should now have no slackness between the cam pulleys. Route belt around water pump pulley and then around crankshaft pulley. Position crankshaft pulley exactly on mark - there should now be no slackness between driver cam, water pump and crank pulley. Route belt around lower idler.
For the 92-95 motors with a tensioner, follow fsm procedure for tensioning belt. To tension the belt on the earlier design, loosen mounting bolt of the lower idler (tensioner) so pulley can press against belt, smoothly rotate crankshaft two full revolutions clockwise (viewed from front looking back) TDC to TDC so the spring can tension belt, then torque lower idler to 27 ft lbs, leaving spring in place. Check that the marks on both cam pulleys align with the marks on the backplate. On my veezy, the cam marks do not exactly align with the backplate marks when crank at TDC, but when in the right position the marked cam tooth is closer to the backplate mark than any other tooth is. And, as mentioned, the marks on the belt will have traveled.
Last edited by sb5walker; 05-04-2011 at 01:57 PM.
Trending Topics
04-24-2011, 03:43 PM
#8
Registered User
Thread Starter
http://img715.imageshack.us/slidesho...687968oak.smil
thanks for all the help i did get it on.now how bout a suggestion on holding the crank still while i tighten the bolt.anybody want to trade for a 86 or older runner 22r w/carb?
learning how to do the pic thing will get better ones up later.
thanks for all the help i did get it on.now how bout a suggestion on holding the crank still while i tighten the bolt.anybody want to trade for a 86 or older runner 22r w/carb?
learning how to do the pic thing will get better ones up later.
Last edited by rainman88; 04-24-2011 at 03:48 PM.
04-24-2011, 04:16 PM
#9
Registered User
https://www.yotatech.com/51094700-post10.html
https://www.yotatech.com/forums/f116...e-tool-191312/
https://www.yotatech.com/forums/f116...lt-job-122420/
https://www.yotatech.com/forums/f116...l-tool-186081/
https://www.yotatech.com/forums/f116...h-3vze-137934/
https://www.yotatech.com/forums/f116...ol-sst-161133/
https://www.yotatech.com/forums/f116...e-tool-191312/
https://www.yotatech.com/forums/f116...lt-job-122420/
https://www.yotatech.com/forums/f116...l-tool-186081/
https://www.yotatech.com/forums/f116...h-3vze-137934/
https://www.yotatech.com/forums/f116...ol-sst-161133/
05-04-2011, 12:01 PM
#11
Registered User
Thread Starter
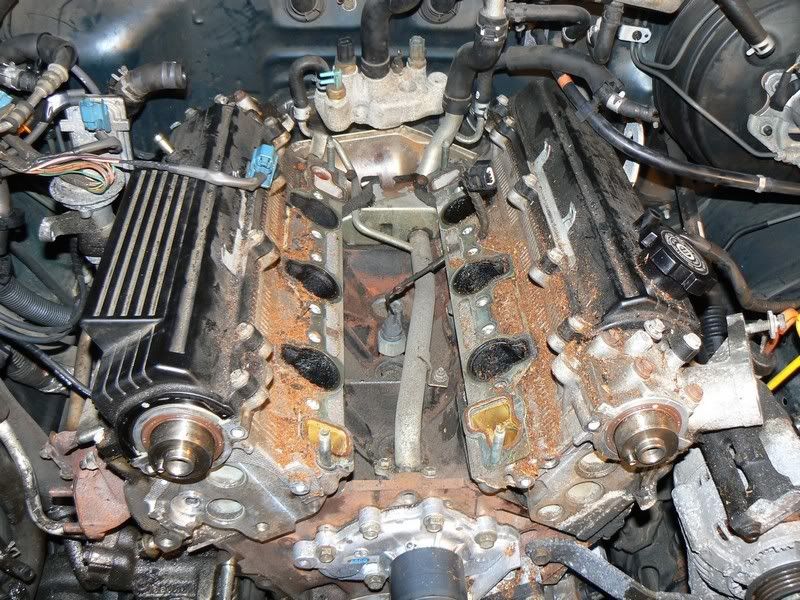
thanks to all of you for the info.its coming together just not at light speed.I have another question for you 3.0 heads.why is there sludgey gunkie crap in my intake.this is the first injected motor i have disassembled,and yes im over 50.im over the 2 piece intake but not this tar like crap in it.obviously its oil residue and i'll probably figure it out eventually but you guys are so much faster.what do i replace to prevent this?
05-04-2011, 12:45 PM
#12
Registered User
thanks to all of you for the info.its coming together just not at light speed.I have another question for you 3.0 heads.why is there sludgey gunkie crap in my intake.this is the first injected motor i have disassembled,and yes im over 50.im over the 2 piece intake but not this tar like crap in it.obviously its oil residue and i'll probably figure it out eventually but you guys are so much faster.what do i replace to prevent this?
It's mainly from the pcv venting some atomized oil together with the blow-by. And EGR adds some gunk too.
Worn rings and valve seals are probably the main culprits, and pcv valve might be contributing. Can't do much with the rings without a rebuild, but using a high mileage oil should tighten up the valve seals some (if you're not already using it). A thicker oil might slow down the blow-by a little bit. So I'd recommend giving Valvoline MaxLife 10W-40 a try. It's an excellent semi-synthetic oil that gives great UOAs over on bobistheoilguy. I used it last summer and it cut my front and rear main seal leaks down to essentially nothing.
A partially clogged pcv valve will cause more oil to squirt out through the pcv, so, as difficult and annoying as the job is, you might replace that (and the grommet which is probably steel-hard).
You'll still get gunk in the intake but it might lessen a little bit.
EDIT: Short of replacing the pcv valve, next time you change the oil you might first try to clean the valve with some carb cleaner (or Seafoam). Follow the hose from the valve (on passenger valve cover under the plenum) to it's attachment on the side of the plenum. Pull it off the plenum and spray some carb cleaner down the hose. Let it sit a few minutes, then cover the end of the hose with a rag and route it lower than the valve cover to drain out the dirty carb cleaner. Then lift it up again and repeat the cleaning cycle a couple more times. Definitely change the oil afterward, since some carb cleaner probably got into the oil. Seafoam won't work as quickly - you would need to leave it in there for maybe an hour instead of minutes, but it would be less likely to soften and damage the pcv hose.
Last edited by sb5walker; 05-04-2011 at 01:44 PM.
05-04-2011, 01:49 PM
#14
Registered User
FINALLY found an earlier posting on cleaning the pcv valve. Was over on TN, was the problem:
from: http://www.toyotanation.com/forum/sh...46#post3464946
The PCV valve is toward the back end of the passenger side valve cover, under the plenum (the aluminum upper intake). Yes, it's important that it not be clogged, and yes it's a holy be-atch to get to without removing the plenum, and yes, the rubber grommet has probably become as stiff as case-hardened steel, making removal of the valve that much more difficult. I replaced mine when I did the head gaskets about 70k miles ago, but one thing I've been considering as a possible easy, cheating alternative to removing the bugger is to try to clean it with Seafoam. There's a short rubber hose leading from the valve to a fitting on the passenger side of the plenum, and I would consider pulling the hose off that fitting and pouring Seafoam into it, and letting it soak. If the valve is clogged with gunk, the Seafoam should dissolve it, since all of the springs and moving parts are open to the top end where the hose attaches. The Seafoam will be able to get to where it's needed. Unless the valve is stuck open, it will be sealed, preventing the Seafoam from going down into the engine. Let it soak for a few hours, occasionally pushing the hose down to drain off the dirty Seafoam and refilling.
Do this before an oil change, so you can remove any Seafoam that goes into the oil. (Although it's okay if Seafoam does get into the oil, since cleaning sludge out of the crankcase is one of the uses suggested for Seafoam. Just don't run the motor for more than, say, a half hour or so if it has Seafoam in it. If you do use Seafoam to clean the crankcase, I wouldn't add more than 1/3 can to the oil. BTW using Red Line oil for one oil change is a far more effective and safer way to remove engine sludge - but be prepared that sludge may be plugging gaps that otherwise would be leaking oil.)
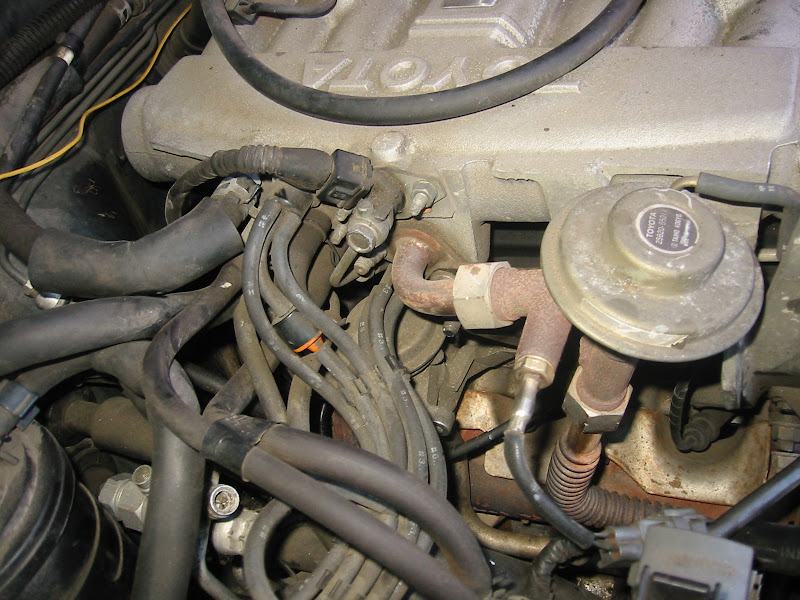
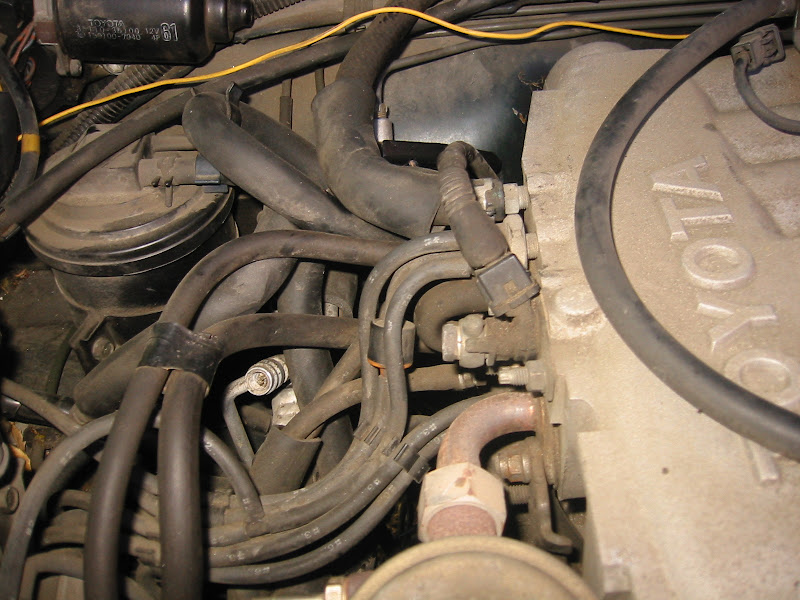
Here are some pics to help find the right hose. The valve:

The hose attached to the PCV valve is the thicker, U-shaped hose on the top left of this pic:
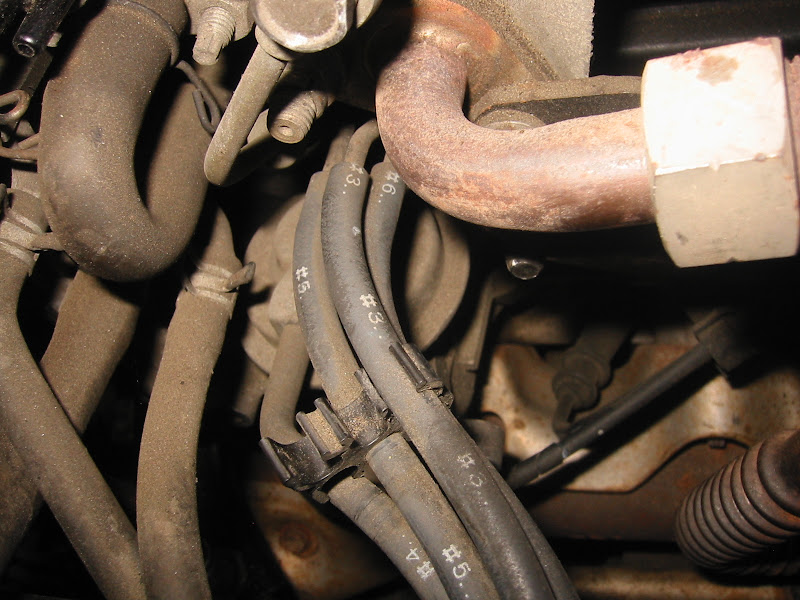
The hose attaches to the plenum just below the black plastic fitting that has three smaller vac lines attached:
Big thanks to YotaJunky, justinking060310 and runethechamp over on yotatech for these pics. Here are their threads which may be helpful:
https://www.yotatech.com/forums/f2/v...acement-52695/
https://www.yotatech.com/forums/f116...-lines-140356/
https://www.yotatech.com/forums/f116...et-job-104934/
Do this before an oil change, so you can remove any Seafoam that goes into the oil. (Although it's okay if Seafoam does get into the oil, since cleaning sludge out of the crankcase is one of the uses suggested for Seafoam. Just don't run the motor for more than, say, a half hour or so if it has Seafoam in it. If you do use Seafoam to clean the crankcase, I wouldn't add more than 1/3 can to the oil. BTW using Red Line oil for one oil change is a far more effective and safer way to remove engine sludge - but be prepared that sludge may be plugging gaps that otherwise would be leaking oil.)
Here are some pics to help find the right hose. The valve:
The hose attached to the PCV valve is the thicker, U-shaped hose on the top left of this pic:
The hose attaches to the plenum just below the black plastic fitting that has three smaller vac lines attached:
Big thanks to YotaJunky, justinking060310 and runethechamp over on yotatech for these pics. Here are their threads which may be helpful:
https://www.yotatech.com/forums/f2/v...acement-52695/
https://www.yotatech.com/forums/f116...-lines-140356/
https://www.yotatech.com/forums/f116...et-job-104934/
05-10-2011, 12:58 PM
#15
Registered User
Thread Starter
thanks for all the help guys.i got the dang thing back together triple checked the timing gears/crank now i cant seem to get it to fire.does anyone know where i can get dynamite?or does anyone know a person in north ga.,near atl. that would drop a new motor in this thing for a reasonable price.or will a 2jz fit this thing?
05-10-2011, 01:48 PM
#16
Registered User
Did you reattach the engine grounds?
You should be able to track down WHY it's not firing, whether no spark, no fuel pressure, injectors not firing, or cam or ignition timing.
To start, make sure +B in the check connector and the positive terminal of the coil are hot when ignition is on. Jump +B to FP in the check connector, which will hot-wire the fuel pump and see if that helps. Check for spark. Check compression to verify valve timing.
05-10-2011, 02:08 PM
#17
Registered User
Thread Starter
thanks for the quick reply walker,im getting fuel to the rails,the ground on the intake i replaced,i didnt remove any other type of wiring. guess it could be the timing.uhggg
05-10-2011, 02:47 PM
#18
Registered User
If you have a spare spark plug, you can pull one of the plug wires, stick the spare plug into it, and set it where the base of the plug contacts ground. Have a helper turn it over and you should see the spark.
Easiest way to tell if the injectors are firing is to place the metal rod of a mechanics stethoscope against the body of the injector. If it's firing you'll hear the clicks loud and clear. Mechanics stethoscopes are cheap and should be available at any discount auto parts place.
Easiest way to tell if the injectors are firing is to place the metal rod of a mechanics stethoscope against the body of the injector. If it's firing you'll hear the clicks loud and clear. Mechanics stethoscopes are cheap and should be available at any discount auto parts place.
05-10-2011, 09:12 PM
#19
Registered User
Thread Starter
i'll do that stethoscope thing,i just had my son put his tongue in the wire,its getting spark but he cant get his hair to lay down for some reason.


