86 4runner verses tree Front wheel pushed back
 01-29-2013, 06:29 AM
#1
Registered User
Thread Starter

Join Date: Dec 2011
Posts: 10
Likes: 0
Received 0 Likes
on
0 Posts
86 4runner verses tree Front wheel pushed back
I'll try to keep this as short as possible so bear with me. This is my first experience with Toyotas so pardon the ignorance. I restored an 86 4runner auto for my son, it's what he wanted for a graduation present. It has a freshly rebuilt 22re, Zuk mod for the sagging rear, 31/10.50/15 Kenda Klevers, Rhino lined interior and top. Now for the bad, my son and some of his friends were playing in some trails and he hung a tree with the passengers side front tire breaking the shaft out of the steering box. We replaced the steering box and pitman arm, the rest of the suspension appears to be undamaged. The passengers front wheel is pushed back 1", I haven't been able to find anything that is bent or broken. Is this a common problem when hitting some with a front wheel or does anyone have any ideas on a fix for this?
Thanks, Al
Thanks, Al
 01-29-2013, 06:49 AM
#4
Very common. Because most folks don't add the additional brace/truss between the LCAs(at the rearward LCA mounting brackets). Then, when you hit something with one of the front wheels, the frame rail gets pushed/bent inwards. So, in all likleyhood, you have a bent frame at this point. Unless you're one of the very very few of us that have installed a brace/truss to prevent it....
01-29-2013, 06:59 AM
#5
Registered User
Thread Starter
Join Date: Dec 2011
Posts: 10
Likes: 0
Received 0 Likes
on
0 Posts
I have not installed any additional bracing, so please tell me what needs bracing or support to prevent future issues. Can you explain this brace/truss and how/where it is installed? Also what is the best way to fix this?
Thanks, Al
Thanks, Al
01-29-2013, 07:06 AM
#6
Contributing Member
A frame shop can fix it for sure.
You might try and find a place that does front end work on big rigs as well as smaller trucks.
Some of them can straighten out minor stuff easily.
You might try and find a place that does front end work on big rigs as well as smaller trucks.
Some of them can straighten out minor stuff easily.
01-29-2013, 07:10 AM
#7
What I'm talking about is described in full detail by the link below:
http://www.sonoransteel.com/index.ph...products_id=25
As stated, the best way to fix it would be to have it straightened by a frame repair shop.
But, I managed to fix mine well enough buy other means...
http://www.sonoransteel.com/index.ph...products_id=25
As stated, the best way to fix it would be to have it straightened by a frame repair shop.
But, I managed to fix mine well enough buy other means...
Trending Topics
01-30-2013, 07:26 AM
#11
From another thread...
The strap on the driver's side was looped around the frame rail just to the rear of the UCA and connected to itself with a shackle I put in the loop at it's end. I made sure it wasn't going to pinch on the torsion bar under load by feeding the end of the strap under it and then around the frame rail before putting the shackle on to form the loop there. Then I turned the steering wheel all the way to the left so I could get the clearance needed to get a straight pull on the other frame rail with the chain without it pushing forward on the passenger side tire. Attaching the chain to that frame rail was a little more tricky because there's also some brake lines that run along top of it where I wanted to put it. I fed the hook on the end of the chain under those and under the torsion bar so it wouldn't pinch them when I pulled, and then used the hook to form a loop in the chain around the frame rail. Again I put the loop as close as I could get it to the UCA. I didn't worry too much about the fuel lines running along the inside of the frame rail there, because I figured the chain would be applying the most tension at the top and bottom corners of the frame rail. That proved to be the case, and those lines were unharmed in the process. After rigging it all up and attaching the come-along, I just pulled and pulled and pulled some more. I pulled on it 'till I thought I couldn't possibly pull it any tighter.
Then I took a breather. After which, to verify I'd given it everything I had, I tried one last tug. I got another click or two more tension on the chain, then felt/heard three rather loud pops coming from my lower back. No questions asked that was definitely as hard as I was going to be tugging on anything that day. And I regretted having taken it to that extreme for a couple good reasons. First because my back was aching something fierce at that point. Second, and if you've ever used a come-along you should already know this, it wasn't going to be easy to release the tension on the line. You see the harder you pull on those things, the harder you have to pull to get the release mechanism to activate. I knew this, but thought I still had it under control, and could figure out a way to do so.
And I eventually did. It took some carefully coordinated pushing, instead of pulling, on the handle. Or I would've had to cut the strap, and being the penny-pincher that I am, that wasn't gonna happen unless there was absolutely no other alternative.
01-30-2013, 09:23 AM
#12
Contributing Member
A friend installed a home made IFS brace on my rig. We had to use a porta power to spread the frame apart wide enough to fit the brace in. It is now back to it where it is supposed to be and so much stronger. Mine is welded in. The bolt on option looks good also.
01-30-2013, 10:11 AM
#13
Registered User
Thread Starter
Join Date: Dec 2011
Posts: 10
Likes: 0
Received 0 Likes
on
0 Posts
I think I'm going to try Mudhippy's route on the frame then build a truss for it myself this weekend. I'll post the results and pics if I can get them to load. From the link Mudhippy's posted it looks pretty straight forward.
Al
Al
Last edited by Bigal389; 01-30-2013 at 10:13 AM.
01-30-2013, 11:11 AM
#14
Registered User
Thread Starter
Join Date: Dec 2011
Posts: 10
Likes: 0
Received 0 Likes
on
0 Posts
Drivers side front wheel, the oil bottle fits loosely:

Pass. side front wheel, about an inch and a half differance:

Steering box and Pitman arm:


All within a 1/4 mile of entering the trail.
Thanks, Al
Pass. side front wheel, about an inch and a half differance:
Steering box and Pitman arm:
All within a 1/4 mile of entering the trail.
Thanks, Al
01-30-2013, 01:15 PM
#15
Contributing Member
I hope this is helpful.
[IMG]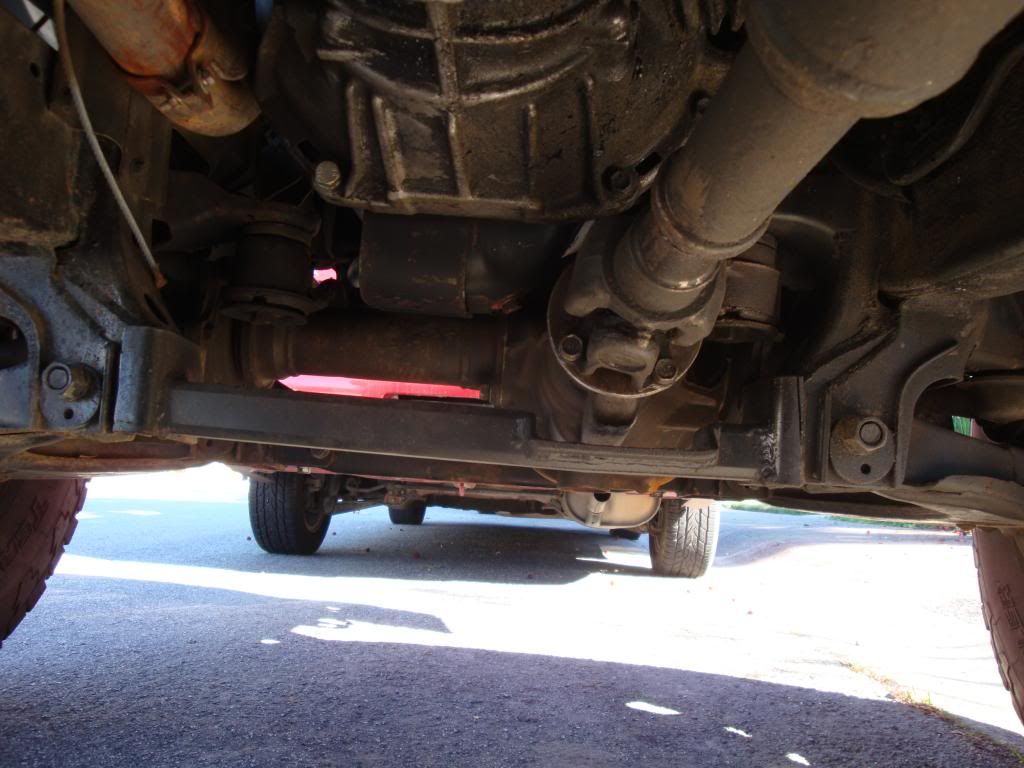 [/IMG][IMG]
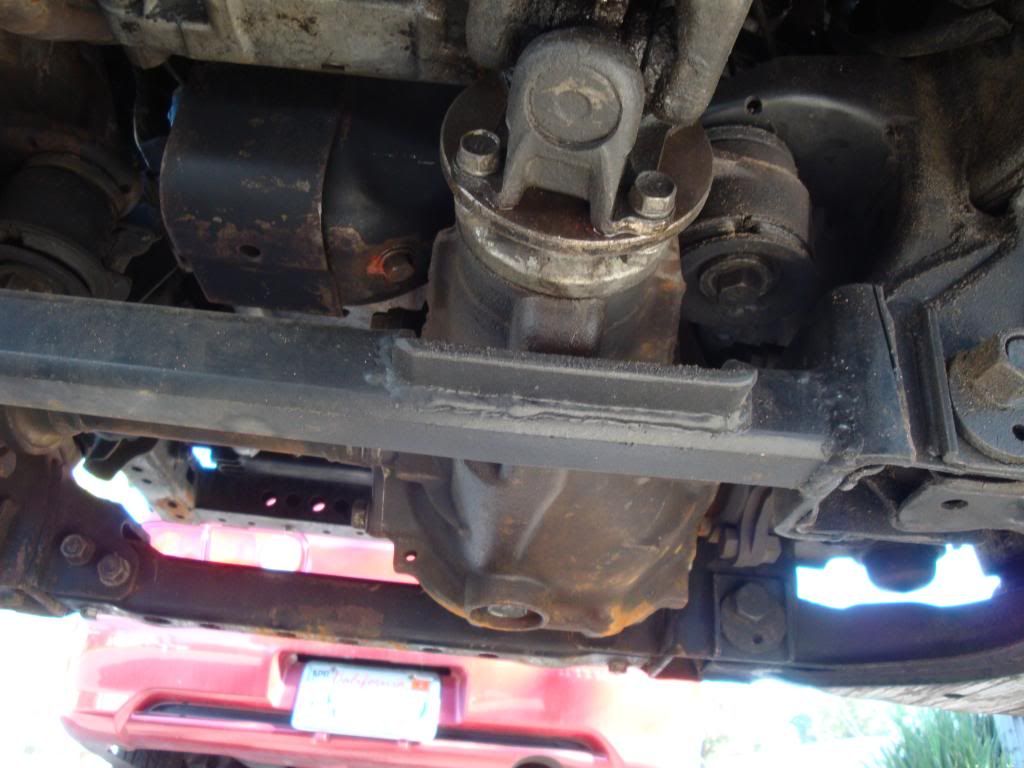 [/IMG]
[IMG]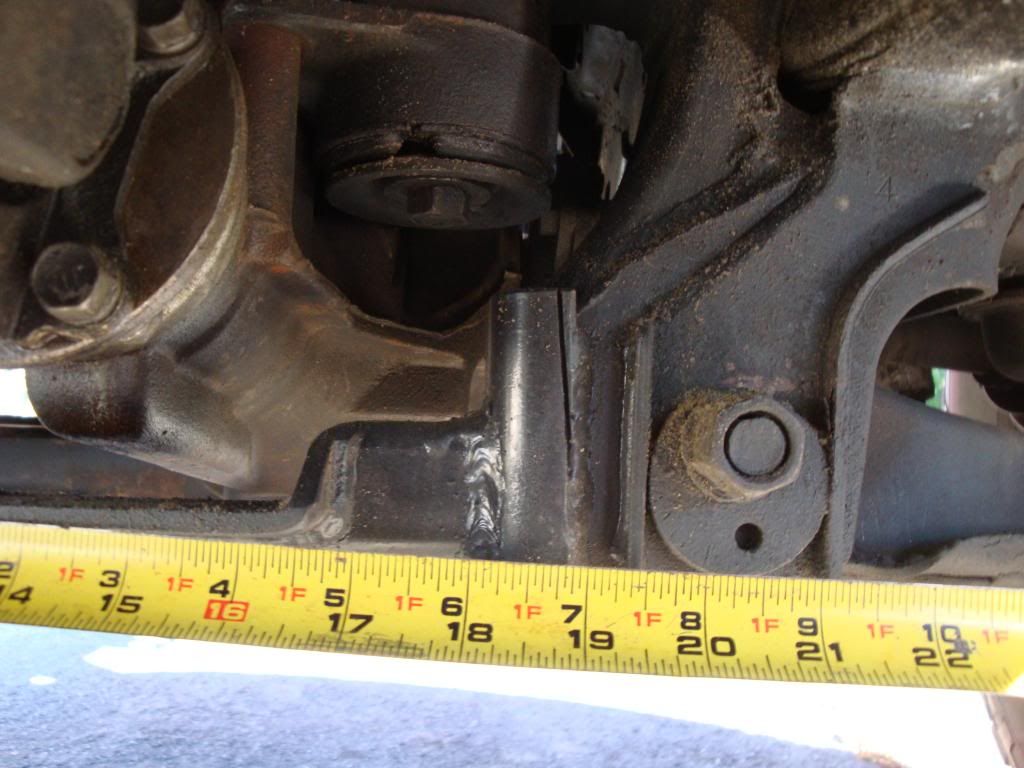 [/IMG]
[IMG] [/IMG]
When I installed mine I used a hydraulic porta power and spread the frame rails until they were back to normal. Should be easy and cheap to rent for a few hours if you prefab the brace first.
[IMG]
[/IMG][IMG][/IMG][IMG]
[/IMG][IMG]
[/IMG]When I installed mine I used a hydraulic porta power and spread the frame rails until they were back to normal. Should be easy and cheap to rent for a few hours if you prefab the brace first.
Last edited by Buck87; 01-30-2013 at 01:16 PM.

Thread
Thread Starter
Forum
Replies
Last Post
voiddweller
86-95 Trucks & 4Runners (Build-Up Section)
19
05-02-2016 09:10 PM
YotaGreenhorn
95.5-2004 Tacomas & 96-2002 4Runners
3
06-27-2015 07:00 AM
WI Girl
95.5-2004 Tacomas & 96-2002 4Runners
5
06-25-2015 03:45 AM


