'86 2wd pickup - Are my front shocks supposed to look like this?
 05-04-2013, 02:58 PM
#1
Registered User
Thread Starter

'86 2wd pickup - Are my front shocks supposed to look like this?
I was just curious why my front shocks look bottomed out. The rears don't look like this. I think they are Monroes, bought a few years ago.
Thanks for any info.

Thanks for any info.
 05-04-2013, 03:39 PM
#2
Registered User
You also have something that's leaking, could be the shock.
I'd suspect from your other thread one or numerous oil leaks.
Does it bottom out when hitting dips/bums in the road?
05-04-2013, 03:59 PM
#3
Registered User
Thread Starter
Thanks for the reply. The rear is sagging quite a bit so to me the front looks ok but I could be wrong. I was just thinking that usually on a shock you can see both sleeves, but on these the outer sleeve is sitting all the way at the bottom. I haven't noticed anything too harsh up front. I'm sure I have leaks, will need to do more cleaning to pinpoint. Parts look wet in the photo because I've been spraying PB Blaster everywhere as I'm doing new inner/outer tie rods and new upper/lower ball joints in a couple days. Planning to do a ball joint spacer lift soon so waiting till that's done to get new shocks.
05-04-2013, 04:32 PM
#4
Registered User

You may need to adjust the torsion bar to increase the frame height back to specs.
I did the very same thing about a month ago, including replacing the upper control arm bushings as well as the lower control arm bushing on both sides.
Have fun.
Have fun.
05-04-2013, 04:43 PM
#5
Registered User
Thread Starter
05-04-2013, 06:06 PM
#6
Registered User
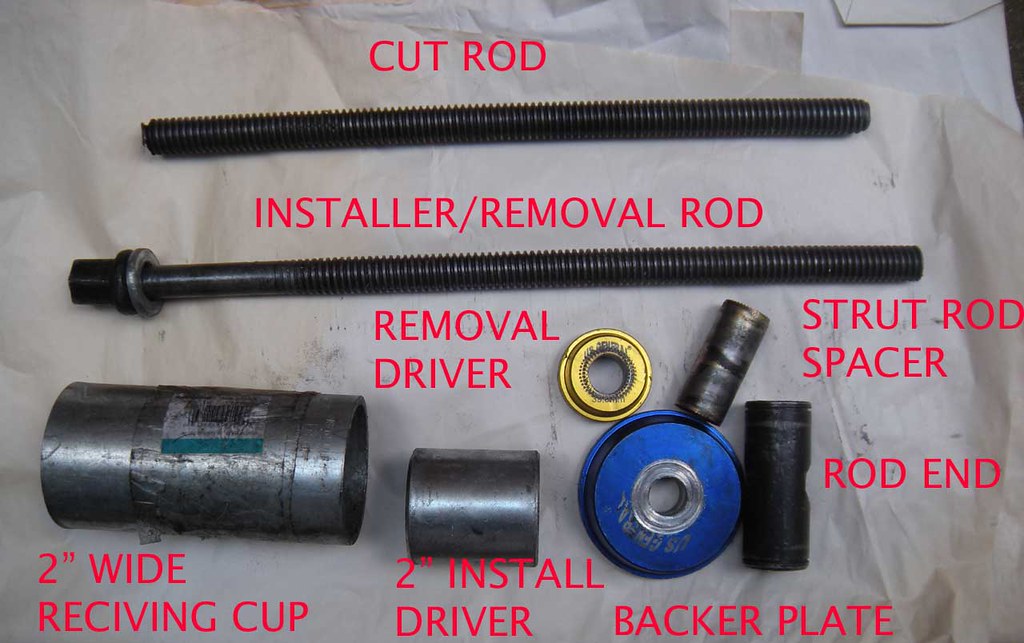
For the lower control arm bushing, I had to make my own "special service tool" that worked great. Before I did the R&R I did some research here and people were telling horror stories of R&R-ing the lower control arm bushing. So I did some research on Youtube and found a video of a guy in Europe who converted a scissor jack into a bushing R&R tool. Now I went this route because of what people here were saying about how hard these bushing replacement would be. The threaded rod on the scissor jack is very thick as well as the threads themselves. However, the whole following scenario could possibly done with a simple threaded rod from Home Depot. I don't know if it would work as my bushing removal & installer tool was made from the trailer jack.
I found a trailer jack at Harbor Freight to do my bushing tool.
http://www.harborfreight.com/2-1-4-q...ack-96406.html
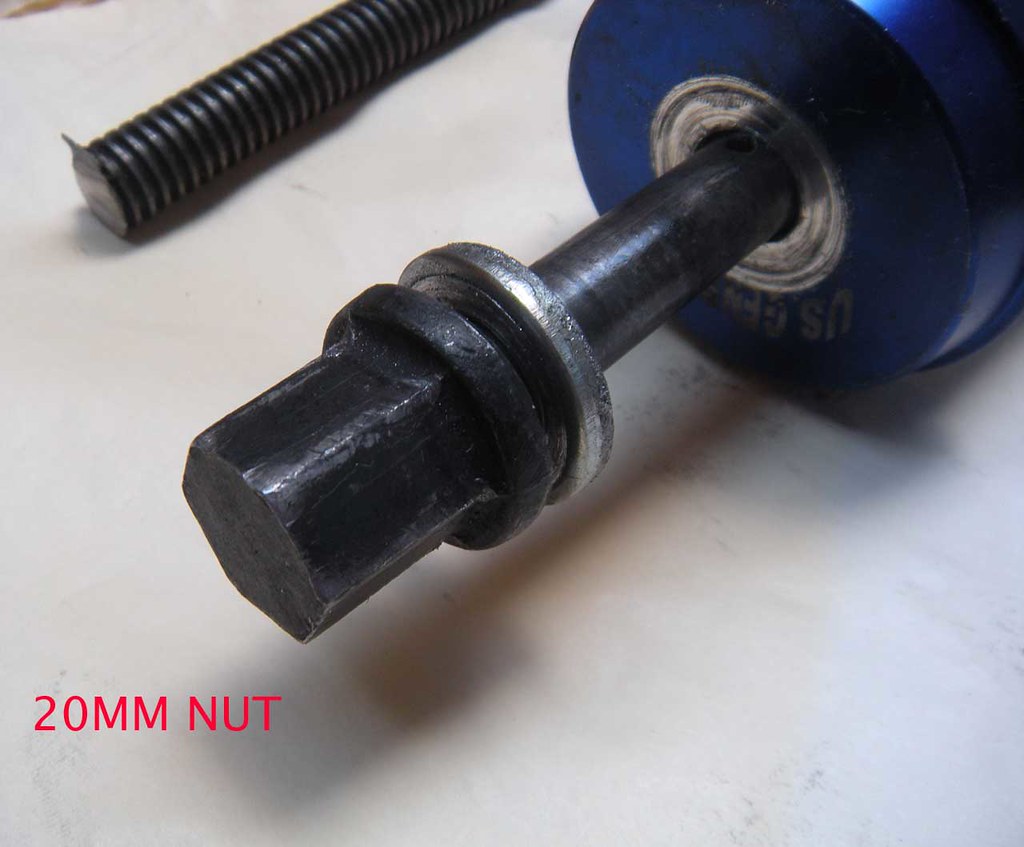
I tool it apart like in the video. The end of the scissor jack has a 20mm socket-size nut on it. Perfect for a 20mm socket and ratchet.
Now to find bushing driver (I guess one could call it that) that is the same diameter as the bushing itself. It has to be large enough in diameter to seat on the bushing, yet small enough to fit in the hole in the frame. It has to be able to draw (push) out the bushing. (edit to add: Oh, I forgot, when I was doing the test run, stated later, I found that I needed a spacer to put between the bushing driver and the scissor jack nut. I found a perfect length spacer being the sleeve of the Strut Bar, also stated later.) So I found the bushing diameter from Napa's auto part's website and then found that Harbor Freight has a Bearing Race & Seal Driver set.
http://www.harborfreight.com/10-piec...set-95853.html
The small gold colored one (1.555 inches) is a perfect fit to serve as this tool. However, I did have to enlarge the hole to accept the threaded rod of the scissor jack. That diameter is 5/8". I already had that drill bit so I did not have to buy it. Now I also needed a backing plate, so I used the 2.48" one and also enlarged it with the 5/8" drill bit.
Now the next thing is the receiving cup of the bushing tool. I went to Home Depot to find in their gas-pipe section, a 2" diameter, by 4" length piece. Apparently 2" gas pipe is not actually 2 inches. Hmmm, anyways. It has threaded ends on both sides but it is plenty strong. You can't go with the 3" length because the inner metal sleeve of the bushing is longer than the outer metal sleeve. You must go with the 2" diameter because the receiving cup must fit over the lip that is on the frame.
So now comes the installer tool cup. Also at Home Depot in the conduit pipe section (a different section), I brought with me a spare bushing and found a 2" diameter by 2" length piece of pipe. That fit the face of the new bushing perfectly. The length this time is not as important but it does have to fit over the rubber portion that sticks out from the metal sleeve of the bushing.
So now the whole tool is ready to go. One thing I did eventually do is cut down the rod length. At first I tried out this tool at my local Pick & Pull on a similar year 2wd truck. The length of the rod as it is for the jack is unnecessarily too long. So I calculated the maximum length I needed for the tool to work. I used my 10" cut-off wheel in my chop saw to cut the rod.
Even then the whole tool is still too long to be feed through the front (radiator) side of the bushing because of the frame bracket for the Strut Bar. The whole R&R has to be done from the rear side and it can be done that way.
If you go this route with the scissor jack or just a simple threaded rod, I'd recommend using at least a 1/2" ratchet wrench or even better a ratcheting breaker bar.
If I had my camera with me I'd be able to show the final product but the camera is at work.
Trending Topics
05-05-2013, 03:05 PM
#8
Registered User
Join Date: Feb 2013
Location: Hampton VA
Posts: 167
Likes: 0
Received 0 Likes
on
0 Posts
Nothing wrong with that shock, the shaft is clearly visible at the top of the picture, far from bottoming out.
FYI, shocks do not affect ride height, the springs do. All the shock does is dampen spring oscillations.
FYI, shocks do not affect ride height, the springs do. All the shock does is dampen spring oscillations.
05-06-2013, 04:43 PM
#9
Registered User
OK, I brought my camera home and here's some pics.
The lower control arm bushing remover & installer:
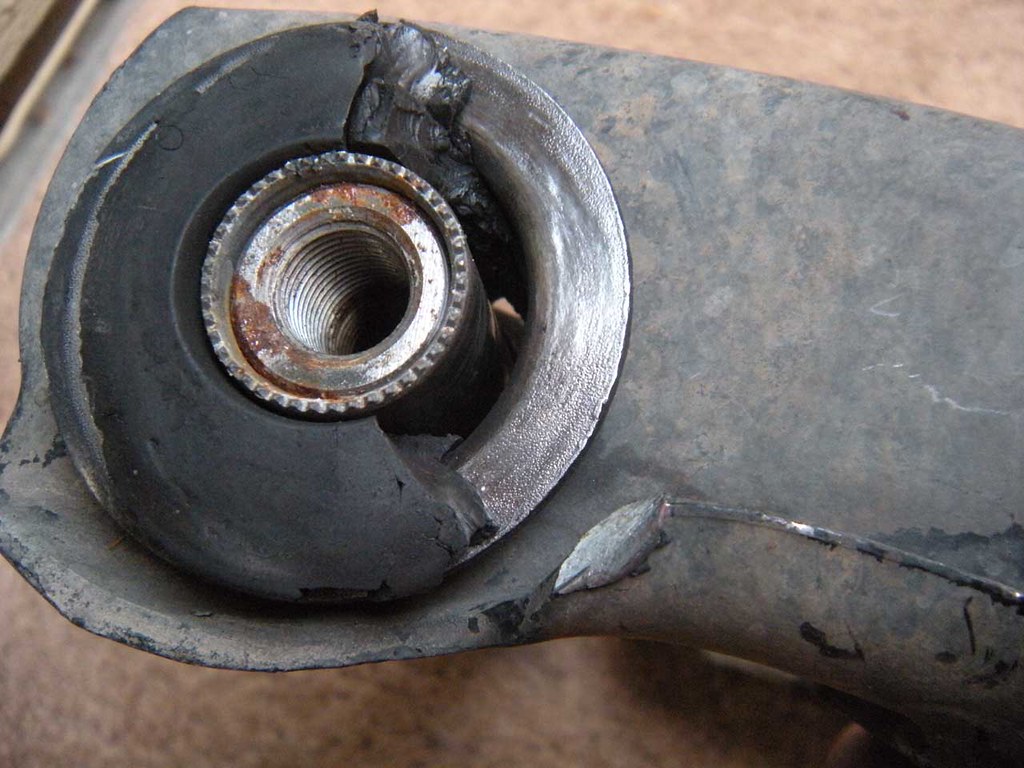
Here's how it would look in the removal state:

The trailer jack nut end:
My upper control arm bushing was in worse shape than my lower control arm bushing, but after 314,000+ miles & 26 years of being the only owner, it was time for the replacement.
The lower control arm bushing remover & installer:
Here's how it would look in the removal state:
The trailer jack nut end:
My upper control arm bushing was in worse shape than my lower control arm bushing, but after 314,000+ miles & 26 years of being the only owner, it was time for the replacement.

Thread
Thread Starter
Forum
Replies
Last Post
Mr.Black
86-95 Trucks & 4Runners
3
06-21-2015 10:17 AM


