3vze connecting rod replacement
 05-15-2013, 03:56 PM
#1
Registered User
Thread Starter

Join Date: Apr 2013
Location: Rapid City, SD
Posts: 32
Likes: 0
Received 0 Likes
on
0 Posts
3vze connecting rod replacement
A rod bearing failed in my 1990 v6 4runner, and the big end of the rod is almost certainly out of spec. I'm considering pulling the head and replacing the rod, however, I'm wondering if the wrist pin can be reused. If it can't can anyone supply a link to a place where they can be purchased, I can't seem to find them anywhere. Also isn't there a bushing/bearing that should be between the small rod end and the wrist pin? Can't seem to find them for sale either.
 05-15-2013, 04:40 PM
#2
You could reuse it. I don't know why you wouldn't if you're not going to be replacing the piston too. A new wrist pin in an old piston is kind of pointless. The wrist pin is press-fit into the CR, so a new one isn't going to fit any better in there. And there are no bushings in the pistons, or the CRs to replace. Because the piston, being aluminum, is essentially the bushing/bearing.
I've got a set of spares laying around somewhere. Mine all got replaced when I replaced the piston and rings. They were supplied with the new pistons(rings purchased seperately).
I've got a set of spares laying around somewhere. Mine all got replaced when I replaced the piston and rings. They were supplied with the new pistons(rings purchased seperately).
Last edited by MudHippy; 05-15-2013 at 04:47 PM.
05-15-2013, 04:56 PM
#3
Registered User
Thread Starter
Join Date: Apr 2013
Location: Rapid City, SD
Posts: 32
Likes: 0
Received 0 Likes
on
0 Posts
Thanks. Makes sense now. So from what I've gathered a minimum parts list if I'm going to do it is gonna look like:
head bolts
head gasket
connecting rod
intake gasket
rod bearing
Anything I'm missing? And this is also assuming the crank checks out.
head bolts
head gasket
connecting rod
intake gasket
rod bearing
Anything I'm missing? And this is also assuming the crank checks out.
05-16-2013, 08:14 AM
#4
I go by the book on the head bolts. Toyota says you should reuse them unless they're damaged(stripped, cracked, bent, distorted, etc.). Which, as strange as it sounds, works for me. I've reused mine 3 times without an issue.
But you could also replace the:
Upper and lower intake gaskets(if you can afford the lowers, not too cheap)
Timing belt(cheap enough, and the old one's coming off anyway)
Timing belt idler pulleys(if they don't look/feel good still, relatively cheap compared to having to go back in there later to replace them)
And don't forget some of this stuff.

http://www.store.partsdinosaur.com/product1907.html

But you could also replace the:
Upper and lower intake gaskets(if you can afford the lowers, not too cheap)
Timing belt(cheap enough, and the old one's coming off anyway)
Timing belt idler pulleys(if they don't look/feel good still, relatively cheap compared to having to go back in there later to replace them)
And don't forget some of this stuff.
http://www.store.partsdinosaur.com/product1907.html
Last edited by MudHippy; 05-16-2013 at 08:19 AM.
05-16-2013, 08:32 AM
#5
Registered User

Join Date: Sep 2007
Location: San Francisco East Bay
Posts: 8,250
Likes: 0
Received 820 Likes
on
648 Posts
Hmmm. Whenever the heads come off, it's hard to tell what you can re-use.
I would consider getting a "head" gasket set; it includes a lot of the little paper gaskets that you will tear up removing the heads. It also includes (relatively) expensive stuff like the exhaust gaskets, so you need to make a very general decision about whether you want to reuse them.
You'll need a set of crush washers for the fuel lines that come off to get the heads off. No, you cannot reuse those. You'll almost certainly want to replace all the o-rings and gaskets on the injectors (mine came in the gasket set).
At some point you'll want to check the valve clearances (much easier with the heads off). If those are off, you'll need to swap or buy some shims. Which suggests; why don't you have a machine shop service the heads (they have a whole rack of shims)? Well, someone on this site found out he could buy "new" heads for less than the price to service them ....
Discouraged? You might think of removing the pan, taking off the bearing cap, and looking at the crank. If it's badly damaged, that could affect your decision about how to proceed.
Let us know what you find.
05-16-2013, 08:36 PM
#6
Registered User
Thread Starter
Join Date: Apr 2013
Location: Rapid City, SD
Posts: 32
Likes: 0
Received 0 Likes
on
0 Posts
Thanks scope. Very helpful post. I had actually pulled the pan first. Crank journal seemed fine but the bearing cap came off with some resistance which is why I'm going to try replacing the rod. I decided since this is nothing more than a side project that I'm not going to be rushing I'd pull the head before ordering any parts. I have pretty much everything off and have another question. The FSM says to unbolt the crossover and front exhaust from the exhaust manifold, and then unless I missed something the head and manifold come off together. I can't see that working for me and was wondering if I can just unbolt the manifold from the head and get it off that way. Again thanks a lot guys
05-16-2013, 10:41 PM
#7
Registered User

Join Date: Apr 2013
Location: Tahoe City, Ca.
Posts: 10
Likes: 0
Received 0 Likes
on
0 Posts
As I recall, I took the head and manifold off together. There was a heat shield or something blocking the manifold nuts that was alot easier to access after the head/manifold was off. I'm sure Mud Hippy will tell you not to listen to me. But I'll forgive him.
Trending Topics
05-17-2013, 07:15 AM
#9
Long story. But yes.
I've also reused quite a few of those copper fuel line gaskets numerous times(on numerous different engines as a matter of fact). Again, without causing any issues/leaks. Don't know why anybody would bother replacing those(if they aren't leaking)...but whateva. Probably just because book says to I guess?
BTW, don't mind me. I'm just your typical know-it-all smart-ass.
Last edited by MudHippy; 05-17-2013 at 07:25 AM.
05-17-2013, 08:28 AM
#10
Registered User
Join Date: Sep 2007
Location: San Francisco East Bay
Posts: 8,250
Likes: 0
Received 820 Likes
on
648 Posts
Some folks have trouble removing the cross-over behind the engine; I've heard of some who went so far as to remove both heads still connected by the cross-over!
For me, the answer was: Flexhead bent ratchet.
It will bend the right way get the bolts out of the cross-over.
I was able to remove the exhaust header (stock) before lifting off the head, but the piece of the header that connects to the head is short enough that I imagine you could lift it up still attached.
The factory crush-washers (for my '94) are raw aluminum, not copper. I think the copper washers are for brakes lines, but I suspect they will work. The way I see it, if you re-use a gasket on an oil line, if that line leaks later you've got a mess on the driveway. But if you re-use a gasket on a fuel line, there's no guarantee you'll even get the chance to tell anybody about it. They're only about a dollar each, the hassle is thinking far enough ahead to get them (I've only found them at the dealer.)
05-17-2013, 02:31 PM
#11
Registered User
Thread Starter
Join Date: Apr 2013
Location: Rapid City, SD
Posts: 32
Likes: 0
Received 0 Likes
on
0 Posts
What I was hoping to do is unbolt the exhaust manifold from the head and just slide the head away from the manifold and not touch the crossover fasteners if that makes sense. Since there are studs between head and block and studs between head and manifold I would have to be able to get enough flex from the exhaust to lift the head/manifold off the block and then slide the head away from the manifold.
05-17-2013, 11:01 PM
#12
Registered User
Thread Starter
Join Date: Apr 2013
Location: Rapid City, SD
Posts: 32
Likes: 0
Received 0 Likes
on
0 Posts
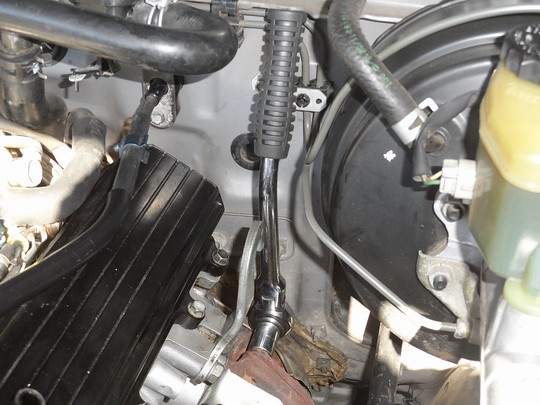
Again thank you all for your input. After a disturbing number of swear words the head is off. This pic should show you what I meant by pulling the head without removing the exhaust. As you can see I didn't touch the front exhaust or the crossover bolts.
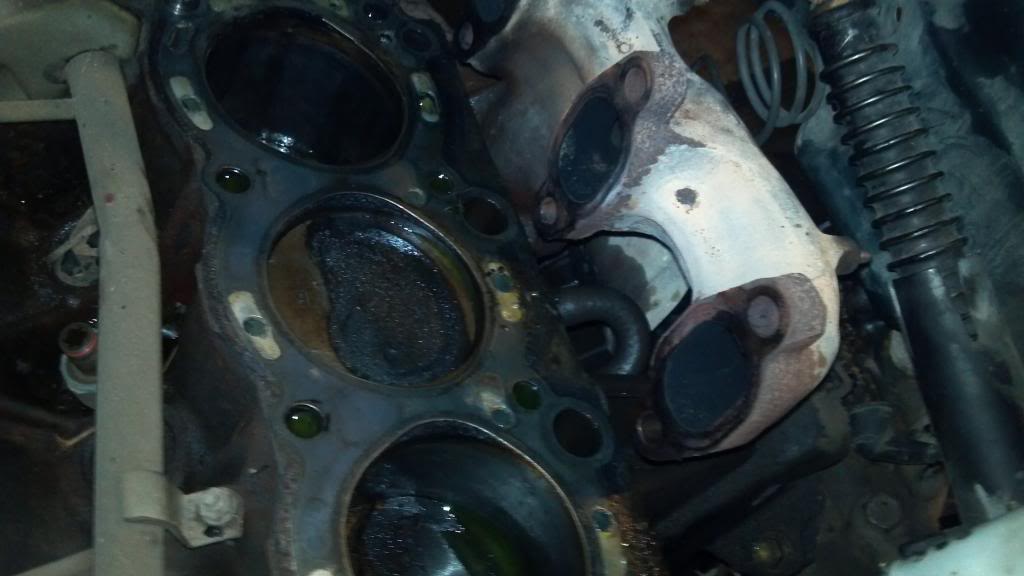
Unless I'm missing something it seems like this is way easier than pulling the head and exhaust manifold together. 5 of the 6 manifold studs came out when I tried to loosen the nuts on the manifold. The other came out easily with a 5mm 12 point socket after removing the nut. With those studs out the head slid off the block and away from the manifold with zero effort. After doing it this way I really can't see why anyone would do it according to the FSM and remove the manifold and head together.
So does anyone have any recommendations for removing the massive amounts of carbon from the valves and pistons?
05-19-2013, 09:16 PM
#13
Registered User
Thread Starter
Join Date: Apr 2013
Location: Rapid City, SD
Posts: 32
Likes: 0
Received 0 Likes
on
0 Posts
Figured I would update this in case anyone is watching and wondering what the outcome is. The connecting rod is out and I'll be ordering parts soon. This is being done as cheap as possible as I'm not certain the crank is still within spec and don't want to put the money into a knocking engine. I don't own a micrometer and can't imagine being able to get accurate measurements with the crank still in anyway so I'm calling this an experiment. The head gasket had also failed in the typical location which I was expecting. I'll be getting injector seals and pintle caps, a new headgasket, a connecting rod, rod bearings, camshaft seal and plug and a new knock sensor pigtail if i feel the original can't be repaired. Timing belt looked great, and everything else seemed salvageable to me.
I'll be having a machine shop press out the wrist pin and press it into the rod. Should be assembling everything early next week and I'll let everyone know how it goes. In the mean time any other tips are appreciated.
I'll be having a machine shop press out the wrist pin and press it into the rod. Should be assembling everything early next week and I'll let everyone know how it goes. In the mean time any other tips are appreciated.
05-22-2013, 10:19 PM
#15
Registered User
Join Date: Apr 2013
Location: Tahoe City, Ca.
Posts: 10
Likes: 0
Received 0 Likes
on
0 Posts
Flaming toast, I tryed your way of pulling the head without removing the exhaust. I had a hell of a time getting the head to clear the coolant tube flange on the back of the block and the long studs that mount the exhaust manifold. After wrestling around and even unbolting the coolant tube. I resorted back to the way the FSM recommends to do it. Mostly because I couldn't see anyway to reinstall the head later without bumping and scraping it back in. So why not just take the 6 nuts and 2 bolts off and do it the easy way?
05-22-2013, 11:06 PM
#16
You can check your clearance by using plastic gauge
clean dry surface torque the bearing cap it crushes you then look at the scale to see your clearance. Make sure to get the size for the range you need.
what do the other bearings look like??
When one goes the rest are not far behind.
Do you have any idea what caused the failure??
clean dry surface torque the bearing cap it crushes you then look at the scale to see your clearance. Make sure to get the size for the range you need.
what do the other bearings look like??
When one goes the rest are not far behind.
Do you have any idea what caused the failure??
05-23-2013, 10:33 AM
#17
Registered User
Thread Starter
Join Date: Apr 2013
Location: Rapid City, SD
Posts: 32
Likes: 0
Received 0 Likes
on
0 Posts
Flaming toast, I tryed your way of pulling the head without removing the exhaust. I had a hell of a time getting the head to clear the coolant tube flange on the back of the block and the long studs that mount the exhaust manifold. After wrestling around and even unbolting the coolant tube. I resorted back to the way the FSM recommends to do it. Mostly because I couldn't see anyway to reinstall the head later without bumping and scraping it back in. So why not just take the 6 nuts and 2 bolts off and do it the easy way?
05-23-2013, 10:41 AM
#18
Registered User
Thread Starter
Join Date: Apr 2013
Location: Rapid City, SD
Posts: 32
Likes: 0
Received 0 Likes
on
0 Posts
You can check your clearance by using plastic gauge
clean dry surface torque the bearing cap it crushes you then look at the scale to see your clearance. Make sure to get the size for the range you need.
what do the other bearings look like??
When one goes the rest are not far behind.
Do you have any idea what caused the failure??
clean dry surface torque the bearing cap it crushes you then look at the scale to see your clearance. Make sure to get the size for the range you need.
what do the other bearings look like??
When one goes the rest are not far behind.
Do you have any idea what caused the failure??
The cap/rod were actually messed up to the point that I would have had to hammer the cap back on to check clearance so I knew the rod was toast and I wouldn't be able to get an accurate measurement.
The other bearings weren't very good either. They're getting replaced since I'm this far into it. I can post pics of those if you want.
I bought the runner knowing it had a bad rod bearing. All I can do is guess but I think it was lack of oil.

Thread
Thread Starter
Forum
Replies
Last Post


