22RE removal
 03-24-2008, 05:57 PM
#1
Registered User
Thread Starter

Join Date: Oct 2007
Location: Lexington, SC
Posts: 632
Likes: 0
Received 0 Likes
on
0 Posts
22RE removal
I am getting ready to pop out the motor in my 4runner. Reading up on it, it seems to be the best way to take the engien and tranny out. Does this also include the Tcase still on the Tranny, or should i remove the Tcase first? Also the hood comes off for the procedure, but should i take the grill off also?
Thanks
Thanks
 03-24-2008, 06:03 PM
#2
Registered User
Why are you removing the motor in the first place? If it's going to be disassemble out of the vehicle anyway, I find it easier to take it down to the block and then pull the motor without the tranny/t-case. Much lighter and easier to maneuver. Take the motor mount brackets up with it that way it can just wiggle and slide right off the tranny shaft without hanging up while moving forward.
There's no need to remove the grill...just the radiator. And, might take the steering dampener down to so the oil pan clears.
There's no need to remove the grill...just the radiator. And, might take the steering dampener down to so the oil pan clears.
03-25-2008, 04:05 AM
#3
Registered User
Thread Starter
Join Date: Oct 2007
Location: Lexington, SC
Posts: 632
Likes: 0
Received 0 Likes
on
0 Posts
It is comeing out so i can put a new one in. Reading in the Chiltons says bring the engine out with tranny. I can understand just bringing the motor out. For me i have pulled my T18 out of the jeep a few times and left the motor in, and i absolutely hate doing that jsut because it just takes me forever to get both to spline up. If i take both out, at least i can have the space to uninstall and reinstall the tranny wiotuh being crowded under the rig.
03-25-2008, 04:17 AM
#4
Registered User
Join Date: Feb 2006
Location: Barrie, Ontario CANADA
Posts: 1,730
Likes: 0
Received 0 Likes
on
0 Posts
I would drop the trany and t-case first. You will have a bitch of a time getting all that out the front. 6ish bolts and the drive shafts then just slide it back and set it on the front sway bar with a jack under the t-case. Then it is right there when you put the new one it.
03-25-2008, 06:42 AM
#5
Registered User

If the transmission is ok, just remove the engine. It is not particularly hard to separate the engine from the transmission while both are in the vehicle. I disagree about stripping the components from the engine while it is in the vehicle. It is much easier to remove things with the enigne out and on a stand. Here is my experience with removing my 22RE:
Here is what I did or considered for my engine replacement:
New clutch
Remote oil filter kit (no more mess under the filter)
Spark plugs, ignition wires, cap, rotor
Toyota exhaust gaskets instead of the ones in the kit
New exhaust studs and nuts – the old ones will be annealed pretty soft
Replace alternator brushes
Replace Thermostat
Drain and Replace Power Steering Fluid
New belts
Vacuum hoses
Fuel filter (much easier with engine out of the truck)
Engine mounts (if worn)
Cooling and heater system hoses
Hoses under the intake manifold (They are attached to the manifold via the rear of the engine)
Radiator clean up if needed
For the actual removal and reinstallation, there are a number of threads on this subject; they should give you some idea of the problems others have solved.
Study the FSM or a Haynes manual on how to remove the engine. Here are some things not in the manual that I learned that might be useful:
I would just remove the engine, leave the transmission in the truck. Brace the transmission.
Do not remove any parts that can stay on the engine or just be disconnected. For instance, leave the power steering and A/C hoses connected, just disconnect the units from the engine, and tie them aside. Leave the fuel injection system, exhaust manifold, and alternator on the engine. Reinstall these items before you put the engine back in the truck. However, I would remove the battery; you can use the additional access, and avoid inadvertently shorting the terminals while you work.
The wire harness is difficult to remove from the fuel injection manifold, as it is under a wealth of other stuff. Also, it is woven through the fuel injection manifold. Instead, disconnect the wire harness from the ECU, MAF sensor, starter, transmission, etc, and remove it with the engine.
It is very important to LABEL EVERYTHING like hoses, vacuum tubes, electrical connections. This site is full of people whining and asking about how to reconnect these things after an engine change. Also, when you can, run fasteners back into their place after you have removed a component. You will then know where they belong, because they will be where they belong. Otherwise, bag and label.
After you get the engine out, the fuel injection manifold has an Allen bolt buried in the front that is hard to access and is in pretty tight. I had to turn it off by chiseling it, what a PITA. Replace it with a regular hex headed bolt. The bolt size is 100MM 8 X 1.25.
The starter is removed through the wheel well.
I would change the coolant hoses and vacuum hoses on the intake manifold while the engine is on the stand, because some of them are hard to even see with the engine in the truck.
While the engine is out, I would replace the clutch. Marlin seems to be the clutch of choice.
If you can, use two engine stands, one with the old engine on it, the other with the new engine, move parts from the old engine directly to the new one. This will help keep things organized.
If you can do simple soldering, slip a new set of brushes in the alternator. The alternator is hard to access with the engine in the truck, and you will have the unit off anyway.
When you reinstall the engine, level it side to side with ratchet straps or something, as it is unbalanced and will not hang level. The engine needs to be level to go back in.
There will be some unanticipated work to be done, like broken bolts, components that are bad and shoddy work from prior maintenance. These will add time and money to the job.
This job does not require any great knowledge, it is just time consuming. It took me about 15 hours spread over two weeks to accomplish it. I needed help getting the engine out and back in, other than that, I did it alone. You will need a cherry picker and at least one engine stand, and a sheltered place to work. I rolled my truck out of the garage to remove and replace the engine, other than that, it was in the garage. Some long extensions to remove the top engine to transmission bolts and the exhaust pipe to manifold nuts will be very useful.
Good luck with the project.
The following users liked this post:
SilverbackBeast (02-27-2021)
03-25-2008, 07:03 AM
#6
Registered User
I only meant if the motor's going to be disassembled, anyway.....if it was going to be rebuilt. Even then, I personally don't find it difficult to work on the 22re in the engine bay. Most of what I would call difficult to do....like removing the starter and exhaust....still has to be done with the motor in. Not to mention, with the head off, it's much easier getting to the top tranny bolts. But, to each his own....of course.
Danstew....
If you're set on pulling the whole powertrain as a unit, leaving the t-case attached would mean less to seal back up. It's all really whatever you want to do, though.
Danstew....
If you're set on pulling the whole powertrain as a unit, leaving the t-case attached would mean less to seal back up. It's all really whatever you want to do, though.
Last edited by thook; 03-25-2008 at 07:05 AM.
03-25-2008, 07:14 AM
#7
Registered User
Thread Starter
Join Date: Oct 2007
Location: Lexington, SC
Posts: 632
Likes: 0
Received 0 Likes
on
0 Posts
I am not set on pulling it all apart. Just trying to find best way. I know i have had hair pulling sessions trying to install a tranny to the motor while the motor is in the rig. But i am open to just removing the motor, i have never tried to mate the tranny and engine together while the tranny is still in the vehicle so it maybe easier since it is on the cherry picker. I hanvt slipped my head under the runner to see how to attack the bolts holding the engine to the bellhousing. How much of a PIA to get the top ones?
Dave, that is almost the exact list i have for my assembly. Fortuantely i had an extra motor on a stand so i just sent that out and kept the other motor in thetruck so i didnt lose anything, and made plans to only pull that motor and swap it only when i needed to. I am repalcing everything pretty much to make it new. But i am going to not touch the alternator, when it dies i will go with the GM bracket and GM alternator, jsut because i like them better. Finally i got my check from the IRS so i can go buy stuff, i am waiting on the machine work to be done.
Dave, that is almost the exact list i have for my assembly. Fortuantely i had an extra motor on a stand so i just sent that out and kept the other motor in thetruck so i didnt lose anything, and made plans to only pull that motor and swap it only when i needed to. I am repalcing everything pretty much to make it new. But i am going to not touch the alternator, when it dies i will go with the GM bracket and GM alternator, jsut because i like them better.
Finally i got my check from the IRS so i can go buy stuff, i am waiting on the machine work to be done.
Trending Topics
03-25-2008, 08:00 AM
#9
Registered User
I just did this over the last 2 weekends. Wasn't very hard at all. Actually easier than I expected. My dad and I had the old engine out and new engine bolted bolted in in a Saturday. Then I took another Saturday to finish things up. We left the tranny/t-case in place. It was a bit of pain to get the tranny spline to go into the back of the engine but we eventually got it by turning the crank with a ratchet while pushing on the front of the engine and jiggling. There was about an inch or two gap between the block and bellhousing that we couldn't get to close. Once I threaded the bolts in it pulled together.
Rob
Rob
Last edited by rdlsz24; 03-25-2008 at 08:05 AM.
03-25-2008, 08:03 AM
#10
Registered User
I am not set on pulling it all apart. Just trying to find best way. I know i have had hair pulling sessions trying to install a tranny to the motor while the motor is in the rig. But i am open to just removing the motor, i have never tried to mate the tranny and engine together while the tranny is still in the vehicle so it maybe easier since it is on the cherry picker. I hanvt slipped my head under the runner to see how to attack the bolts holding the engine to the bellhousing. How much of a PIA to get the top ones?
The two top bolts are impossible to get at unless you can change the angle of either the motor or the tranny side of the equation. The motor can tip down (requiring removal of motor mounts) or the tranny can tip down (requiring dropping the drivelines and crossmember). Some people have gone through the shifter hole. I've not tried that one.
03-25-2008, 01:30 PM
#12
Registered User
Dan - On installing the engine, I found that the engine had to be level left to right to go back in. If you get a few bolts started down low, the top ones will be aligned with their holes and will go in. I clean all of the bolt threads and their respective holes very well, as this helps get them started and and they can be run in most of the way by hand . I have tightened the top bolts from the front of the engine with a box end wrench. Works for me.
To remove the top bolts, a loooong extension or several snapped together may be useful to remove the top bolts and to remove the exhaust manifold nuts. I recommend a 1/2 inch drive. Actually, you can reach the engine-transmission bolts from the front with a box end wrench. You may have to hammer on the wrench a bit to break the bolts free. There isn't much swing for the wrench, but a few minutes of small incremental turns will remove the bolts. I would remove the top bolts first, as the engine is in alignment with the transmission, so no binding. Soak the manifold nuts and studs overnight with liquid wrench or something before you tackle them. You can see the ends of the studs where they thread through the exhaust manifold, soak those ends too, as it may be easier to turn the studs out by turning the nuts than to turn the nuts off the studs.
Tell us how it goes for you.
03-25-2008, 01:46 PM
#13
If I was doing this job I would simply remove the engine complete, without the trans or t-case. I would disassemble only what is necessary to get the engine out of the truck, then monkey around with the teardown after it is on the engine stand. It can be done any number of ways, and it probably depends more on what makes you feel warm and fuzzy inside, not what others think.
 03-25-2008, 04:09 PM
#15
Registered User
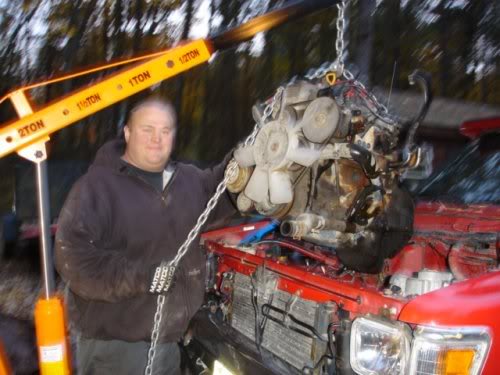
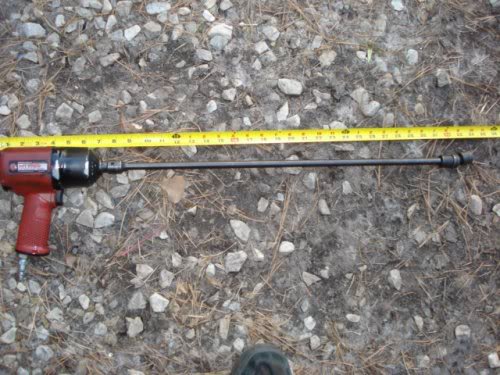
^^That looks like what I used to take off the 3 exhaust manifold to downpipe nuts lol. Laid on my back under the truck with about 3 feet of extensions on my ratchet lol. I have that same picker from Harbor Freight.
Rob
Rob
08-09-2008, 07:11 PM
#17
Registered User
Join Date: Apr 2008
Location: Calgary, AB, Canada
Posts: 45
Likes: 0
Received 0 Likes
on
0 Posts
Hey guys,
I've got some idiot first timer questions for who ever can help me. I've got an '86 4runner with a 22re that I hydro locked and its now toast. I've managed to pick myself up a '92 (I think) 4runner that was destroyed in a collision but still running which also has a 22re.
I've quickly discovered that my simple plan of swaping engines is in fact not so simple.
I had intended to pull the new engine with all its accesories (minus p.s. pump) and stick that into my 86. The wiring harnesses appear to have their differences which I'm not too concerned about, I'll just plug in what I need and ignore the rest (I'm planning on keeping the wiring in each original vehicle.) But whats got me really confused is the vaccume lines. No I haven't pulled them all off and lost track, but the new engine has more of them on the EFI, BUT my 86 has an extra "thing" (please forgive my lack of technical term) with a cable going to it and one vacume line off it. Also some of the lines that originate in the same place go to different locations.
I'M SOOOO LOST!
I just don't want to start pulling lines off and then spend a month wondering why my newly installed engine doesn't work anymore.
I'd really appreciate any help/advise/input that anyone could share with me. I've never done anything like this before but I can't afford to do it any other way. More importantly though, I want to learn.
Thanks.
08-09-2008, 07:20 PM
#18
Registered User
Join Date: Mar 2008
Location: Temecula Valley, CA
Posts: 12,723
Likes: 0
Received 4 Likes
on
4 Posts
swap only the longblock assembly (block and head) and you should be fine. get some electrical marking / numbering tape and mark each vacuum line and fitting with matching numbers as you disconnect them.
that extra 'thing' you mention... does the 86 have cruise control?
and in the future, start a new thread/discussion/topic for your own issues instead of posting onto someone else's. it'll make it easier for you to find, and for us to follow.
that extra 'thing' you mention... does the 86 have cruise control?
and in the future, start a new thread/discussion/topic for your own issues instead of posting onto someone else's. it'll make it easier for you to find, and for us to follow.
Last edited by abecedarian; 08-09-2008 at 07:22 PM.
08-09-2008, 07:38 PM
#19
Registered User
Join Date: Apr 2008
Location: Calgary, AB, Canada
Posts: 45
Likes: 0
Received 0 Likes
on
0 Posts
sorry about that.
And yes the 86 does have cruise control (not that it works).
So would I be ok to leave things such as the distributor and alternator on the new engine but remove the EFI unit and install the original EFI onto the new motor?
And in that case, I would obviously leave all the vacuum lines attached to the original EFI from the 86 right?
Sorry if I'm confusing you, I'm too confused to know if I'm being confusing!
08-09-2008, 07:44 PM
#20
Registered User
Join Date: Mar 2008
Location: Temecula Valley, CA
Posts: 12,723
Likes: 0
Received 4 Likes
on
4 Posts
I get what you're saying, and that is pretty much what I was saying. you may need to use the 86 distributor and alternator... and maybe even valve cover too... just to make sure the wiring is correct- plugs on the 86 harness may be different.


