
1986 heater control unit
 11-12-2012, 02:40 PM
#1
Registered User
Thread Starter

Join Date: Apr 2008
Posts: 38
Likes: 0
Received 0 Likes
on
0 Posts
1986 heater control unit
I am probably going to have to repair or replace my heater control unit. I searched and could not find any threads about removing it. Does the dash have to come out or can you just remove the control unit from the front?
 11-12-2012, 02:45 PM
#2
Registered User

Join Date: Sep 2012
Location: Pleasanton,CA
Posts: 9
Likes: 0
Received 0 Likes
on
0 Posts
If your talking about the levers that actuate the heater valves and the fan speed then the whole dash doesn't have to come out. Its a bit tricky but I was able to replace a heat control cable by just pulling out the control unit from the front. If you need a heater core then the whole dash will have to come out and what a joy that is.....
11-21-2012, 06:04 AM
#4
Registered User

Join Date: Nov 2012
Location: Clayton, OH
Posts: 31
Likes: 0
Received 0 Likes
on
0 Posts
Bump on this - I have the same situation. The pivots for the levers are broken and I need to get it fixed. Written instructions would be great, but pics would be even better (never hurts to ask).
Wasn't able to find much via search.
R-
Wasn't able to find much via search.
R-
11-21-2012, 08:54 AM
#5
Super Moderator
Staff
iTrader: (1)
Join Date: Aug 2008
Location: Anderson Missouri
Posts: 11,788
Likes: 0
Received 21 Likes
on
19 Posts
I have done with out pulling the dash or pad but it is a little eaier with them out of the way. Here is how I pulled mine.
1.Remove Speedometer Bezel and there is a 10 mm nut that holds the left side of the dash pad in.
2. Take out the far right vent on passener side. Videos below for this step. Mine cracked bad as it was brittle.There is another 10mm nut that holds the right side of the dashpad in.
3.Take out the glovebox. 2 screws at the bottom, holds the glovebox in. There is a black strip that has a cover attached to it. Just take a flatblade screwdriver and pop out the little tabs.
4. I will get a picture below but there is a little screw that holds part of the ventilation pipe in. Take the screw out and slide the 4-5inch vent pipe out of the way(first picture). Straight above it, there is another 10mm nut that has to be removed.
5.You have 5 screws at the bottom of the dashpad that you have to take out and it is done.
Not hard at all, but if you dont know how to do it, I dont think I would of figured it out. I will post the link that helped me out alot.
The ones that mention dashpad removal are the ones that saved my butt.
With the dashpad out of the way, it makes it easier to work on the heater control assembly. Mine is broken and it is still a pain to get to.
Notes for myself.
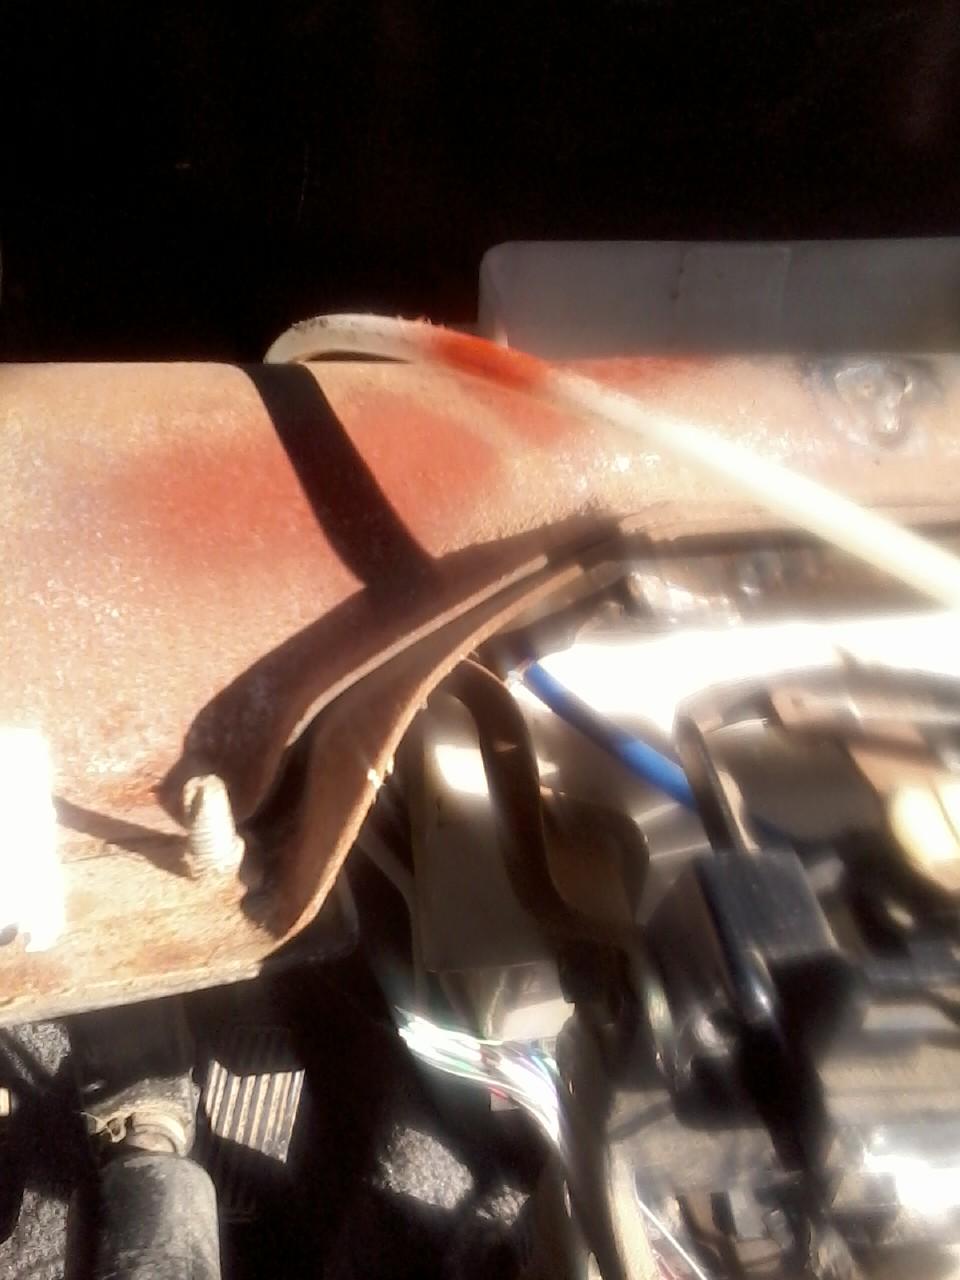
Black cable goes below heater core.
White/clear cable goes along top of dash to right side.
Blue cable goes to assembly under hood through firewall.
Great link to dashpad removal. https://www.yotatech.com/forums/f115...emoval-189633/
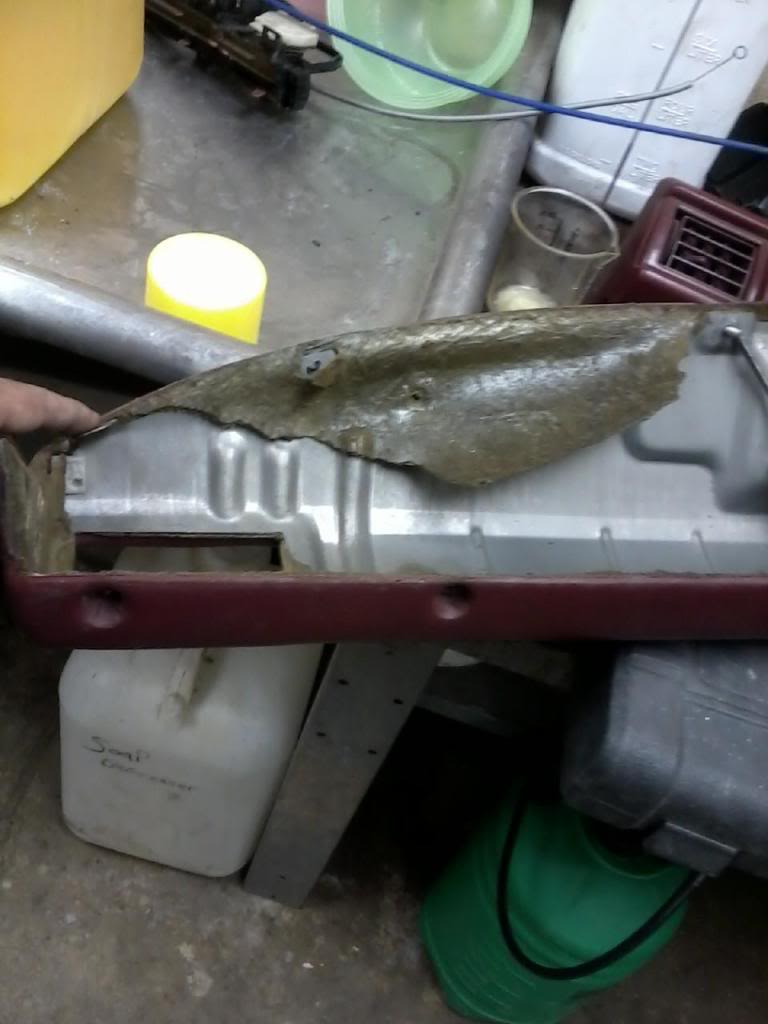
Duct that needs removed to get the center nut of dash pad. Once you remove it, straight up is the nut.
The bolt that holds the passenger side is where my finger is and the nut is for the center of the dashpad. Screwdriver tip is on the stud for where nut needs to go.
Youtube video I found that might help some.
Video I made to get the passenger vent out.
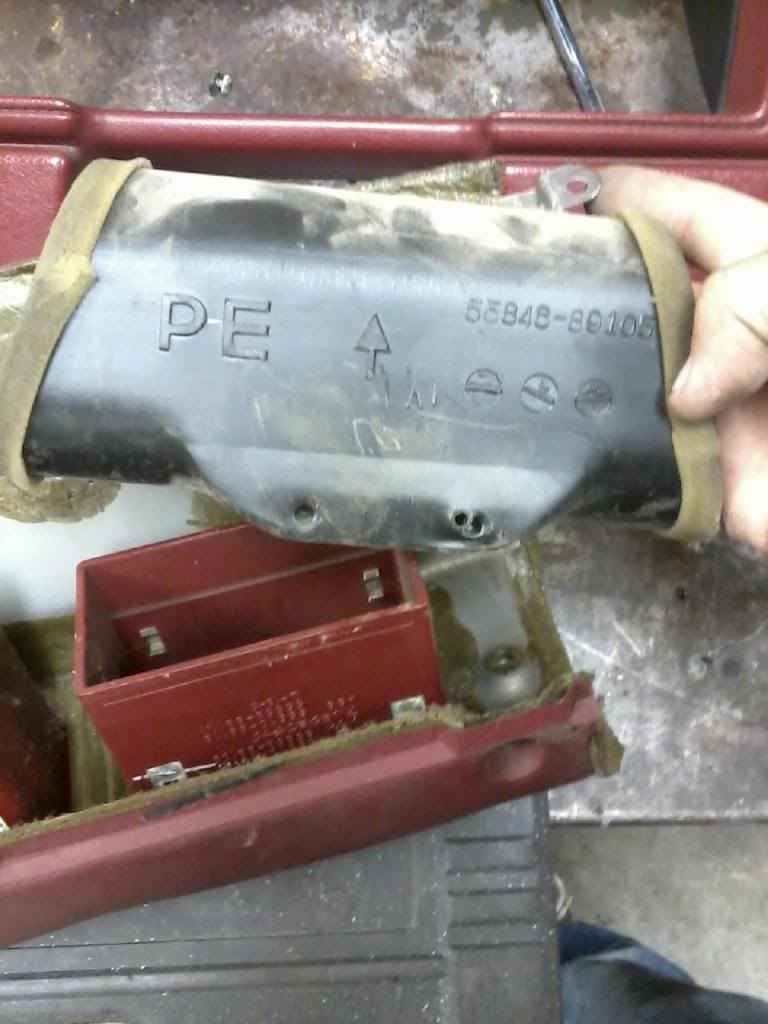
Video to get the PE pipe out and the center dashpad nut.
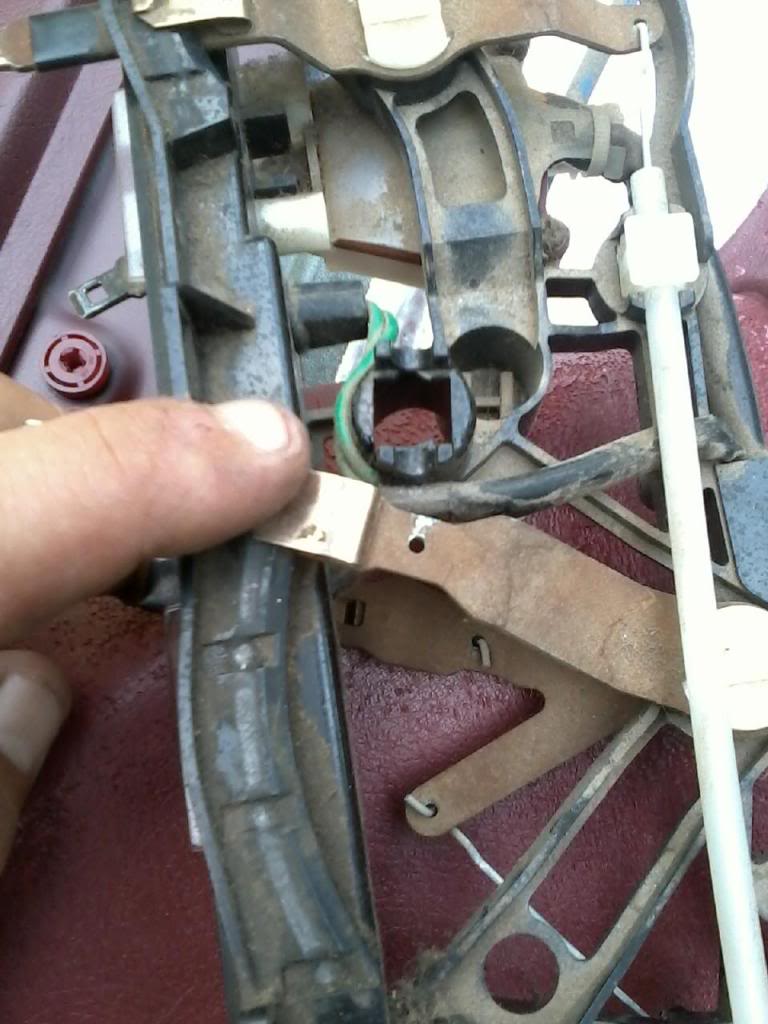
Most likely broken part on heater control. Once the dash pad is off, there is a single screw that holds the double plastic vent that needs to be removed to make a little more room to get the heater control assembly out. I pulled the whole assembly and cables out together making sure not to get any sharp bends in the cable. I was able to pull the cables from the right side and then the right side of the assembly and the the left side of the assembly and then left cables.
1.Remove Speedometer Bezel and there is a 10 mm nut that holds the left side of the dash pad in.
2. Take out the far right vent on passener side. Videos below for this step. Mine cracked bad as it was brittle.There is another 10mm nut that holds the right side of the dashpad in.
3.Take out the glovebox. 2 screws at the bottom, holds the glovebox in. There is a black strip that has a cover attached to it. Just take a flatblade screwdriver and pop out the little tabs.
4. I will get a picture below but there is a little screw that holds part of the ventilation pipe in. Take the screw out and slide the 4-5inch vent pipe out of the way(first picture). Straight above it, there is another 10mm nut that has to be removed.
5.You have 5 screws at the bottom of the dashpad that you have to take out and it is done.
Not hard at all, but if you dont know how to do it, I dont think I would of figured it out. I will post the link that helped me out alot.
The ones that mention dashpad removal are the ones that saved my butt.
With the dashpad out of the way, it makes it easier to work on the heater control assembly. Mine is broken and it is still a pain to get to.
Notes for myself.
Black cable goes below heater core.
White/clear cable goes along top of dash to right side.
Blue cable goes to assembly under hood through firewall.
Great link to dashpad removal. https://www.yotatech.com/forums/f115...emoval-189633/
Duct that needs removed to get the center nut of dash pad. Once you remove it, straight up is the nut.
The bolt that holds the passenger side is where my finger is and the nut is for the center of the dashpad. Screwdriver tip is on the stud for where nut needs to go.
Youtube video I found that might help some.
Video I made to get the passenger vent out.
Video to get the PE pipe out and the center dashpad nut.
Most likely broken part on heater control. Once the dash pad is off, there is a single screw that holds the double plastic vent that needs to be removed to make a little more room to get the heater control assembly out. I pulled the whole assembly and cables out together making sure not to get any sharp bends in the cable. I was able to pull the cables from the right side and then the right side of the assembly and the the left side of the assembly and then left cables.
Trending Topics
11-21-2012, 03:30 PM
#8
Registered User

If you just need to replace the control unit and cables, you really don't need to tear the dash apart. All you have to do is remove the knobs on the control arms, the face plate and the clock. Clock only because that will give you a little more room. Unhook the 4 cables and tie a piece of string about 4 feet long to each one. With the clock removed you can move the control unit around enough so that you can bring it out through the opening in the dash, remove it slowly making sure all the control cables are free. Disconnect the power plug to the switch and the back light. Once you have it out of the dash transfer the strings to the cables of the new unit (don't mix them up) and slowly pull the cables back into place using the strings. Connect everything and you are good to go. I've used this method to also replace one broken cable.
If you decide to remove the dash, the passengers side vent is the hardest part. You generally break one or two of the clips that hold it in and you mark up your dash pad. So if you can change your control unit without doing this I would recommend it.
If you decide to remove the dash, the passengers side vent is the hardest part. You generally break one or two of the clips that hold it in and you mark up your dash pad. So if you can change your control unit without doing this I would recommend it.
Last edited by Hadmatt54; 11-21-2012 at 03:31 PM.
11-22-2012, 10:14 AM
#10
Super Moderator
Staff
iTrader: (1)
Join Date: Aug 2008
Location: Anderson Missouri
Posts: 11,788
Likes: 0
Received 21 Likes
on
19 Posts
I have done it without removing the dash, but it does make it alot easier to get to the cables out and to work with it. The second video I made and shows how to get the dashpad off and getting the passenger vent out is the hardest part of getting the dash apart.
Keep your cables in long arches and not to bend them at to sharp of an angle. It is still a pain in the rear, but it makes a lot easier to do. The passenger vent is very brittle and I can usually get it out about 75% of the time without cracking. When I come across a good one in the boneyard, I always grab the passenger vent when possible just for this reason.
Keep your cables in long arches and not to bend them at to sharp of an angle. It is still a pain in the rear, but it makes a lot easier to do. The passenger vent is very brittle and I can usually get it out about 75% of the time without cracking. When I come across a good one in the boneyard, I always grab the passenger vent when possible just for this reason.
11-29-2012, 02:49 AM
#11
Super Moderator
Staff
iTrader: (1)
Join Date: Aug 2008
Location: Anderson Missouri
Posts: 11,788
Likes: 0
Received 21 Likes
on
19 Posts
I never thought of Hadmatt54 way of doing it, great suggestion.
I had to learn a lesson the hard way and thought I would post a little more info that I wish I would of thought earlier. I think it would make the job a lot easier. If you you do go the route of pulling the dash off to replace the cables or to change the heater core, I took some rattle can spray paint and hit the cable in a place that I knew the cable needed to go to.
Hard lesson learned. The flanges on the heater core are very soft. When I tried to squeeze the line into the heater core, I bent the flange on the core. The clip in my hand has to have a perfect fit with no mistakes, just like the one on the right. I got the clip back on and put everything back together. A few days later the core started leaking again so I had to take everything back out AGAIN.. I had the clip on but it worked itself off, thus causing the leak.
Thought the paint trick might make someone elses job easier and to warn of the soft flanges on the heater core. I had the dash apart and together and core replaced in about 2 hours as I have been into enough dashs that I know how they go. If you have never been into a dash for a core replacement, I would really consider this a 5 hour job.
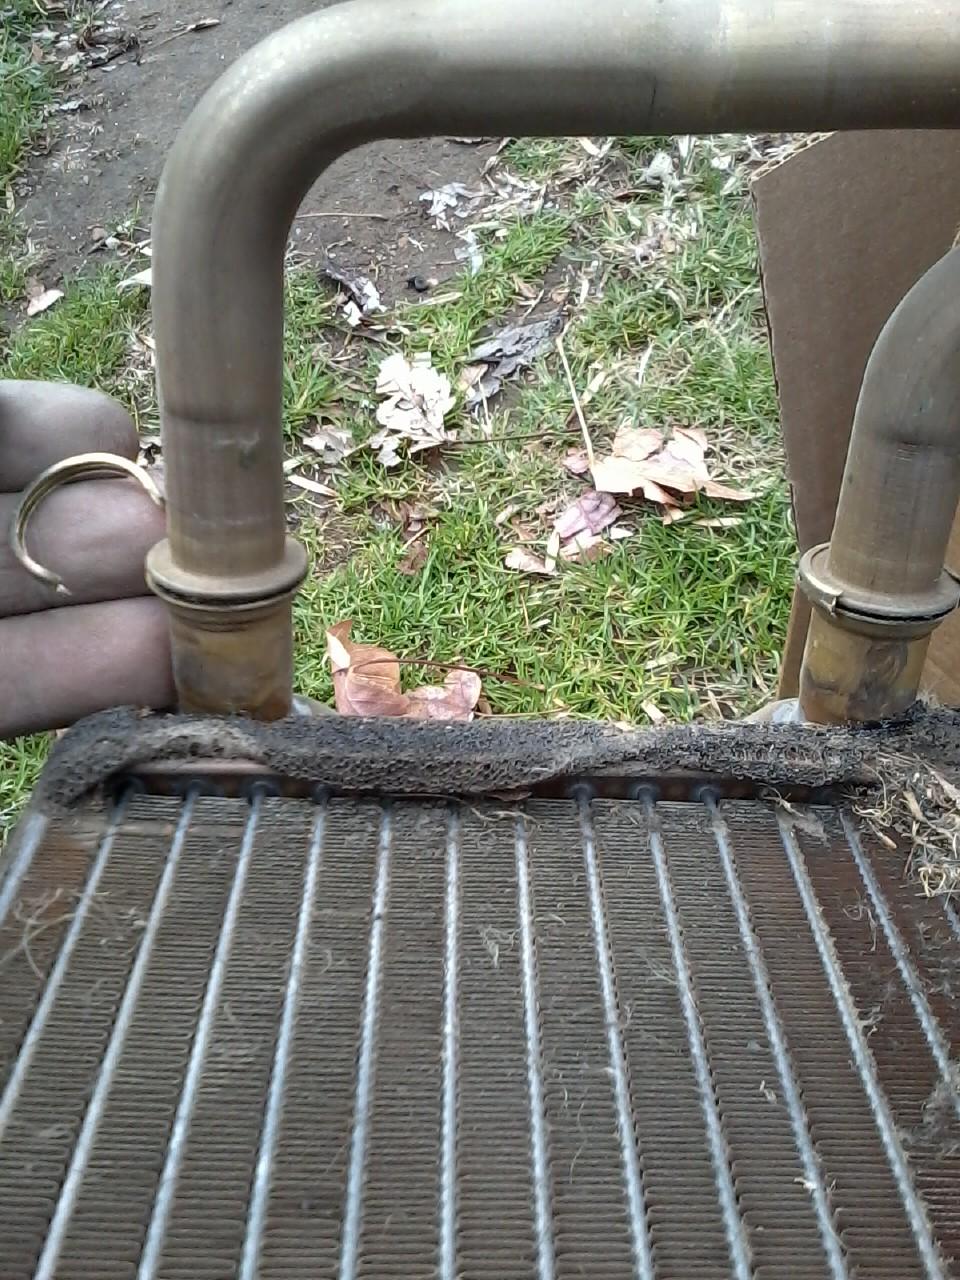
When trying to get the two flanges together to install the C clip. Push at the elbow of the pipe and the face of the heater core or set the core on a hard surface. Dont try and squeeze the flanges to close the gap to get the clip on.
I had to learn a lesson the hard way and thought I would post a little more info that I wish I would of thought earlier. I think it would make the job a lot easier. If you you do go the route of pulling the dash off to replace the cables or to change the heater core, I took some rattle can spray paint and hit the cable in a place that I knew the cable needed to go to.
Hard lesson learned. The flanges on the heater core are very soft. When I tried to squeeze the line into the heater core, I bent the flange on the core. The clip in my hand has to have a perfect fit with no mistakes, just like the one on the right. I got the clip back on and put everything back together. A few days later the core started leaking again so I had to take everything back out AGAIN.. I had the clip on but it worked itself off, thus causing the leak.
Thought the paint trick might make someone elses job easier and to warn of the soft flanges on the heater core. I had the dash apart and together and core replaced in about 2 hours as I have been into enough dashs that I know how they go. If you have never been into a dash for a core replacement, I would really consider this a 5 hour job.
When trying to get the two flanges together to install the C clip. Push at the elbow of the pipe and the face of the heater core or set the core on a hard surface. Dont try and squeeze the flanges to close the gap to get the clip on.
Last edited by Terrys87; 11-29-2012 at 02:52 AM.
02-09-2014, 06:08 PM
#13
Registered User

If the clips that hold the levers are broken like mine were, here's what I did.https://www.yotatech.com/forums/f116/heater-c-control-assembly-277537/
Just a bolt with washers and a but.
Just a bolt with washers and a but.


Thread
Thread Starter
Forum
Replies
Last Post
94 Newbie
95.5-2004 Tacomas & 96-2002 4Runners
3
08-06-2015 10:33 AM


