When you click on links to various merchants on this site and make a purchase, this can result in this site earning a commission. Affiliate programs and affiliations include, but are not limited to, the eBay Partner Network.
Who has desmogged their 22r and used the stock Aisin carb? I'm just finishing an engine rebuild and swapping in a new W56 transmission into my 86 4x4 pickup and am doing away with all smog equipment but I'm keeping the Aisin carb. Any particular vacuum lines that you chose to keep aside from the brake booster and vacuum advance to distributor?
I did this. Every single vacuum fitting (aside from the two advancers) on the carb was brazed off with a little dot of solder. Don't fool with the rubber vacuum caps. You will be chasing leaks forever. I converted mine to manual choke and removed the choke opener/choke breaker linkages, choke heater, FCS, OVCV, and HAC fittings. I also removed my AAP completely and filled in the hole with JB weld steel putty. The end result was a carb with nothing more than the throttle plate, bowl float, and accelerator pump as the moving parts. Totally bulletproof and cranked up instantly.
I did this. Every single vacuum fitting (aside from the two advancers) on the carb was brazed off with a little dot of solder. Don't fool with the rubber vacuum caps. You will be chasing leaks forever. I converted mine to manual choke and removed the choke opener/choke breaker linkages, choke heater, FCS, OVCV, and HAC fittings. I also removed my AAP completely and filled in the hole with JB weld steel putty. The end result was a carb with nothing more than the throttle plate, bowl float, and accelerator pump as the moving parts. Totally bulletproof and cranked up instantly.
Sounds good. Thanks for the reply. I was considering plugging every vacuum opening with a bit of JB weld. I'm a bit less familiar with some of these extra components that the aisin carb has that a traditional carb, such as a Weber, do not have. For example, what is the AAP?
I prefer solder as you can melt it with a lighter and suck it out if you ever want to reverse the process.
The AAP is the "auxiliary accelerator pump." It is the little can that faces the valve cover. The diaphragm is known to leak and screw up the mixture.
If I were to simply cap off the AAP and every other vacuum port on the aisin carb, would I experience poor performance? Would the choke not function at all? Would the fast idle not function at all?
I just gutted my 50 state 22r, converted to the Canadian evap schematic as best I could. All I have left are the lines to the air box, distributor, charcoal canisters and the 3 lines on the engine side. Fixed all my surging/slamming off throttle too!
If I start it and walk away it likes to ride up to 1800rpm or so, quick stab on the throttle and it settles right down. Haven't had any problem with hot restart.
Now you're ready to put it back together the "not so environmentally friendly way."
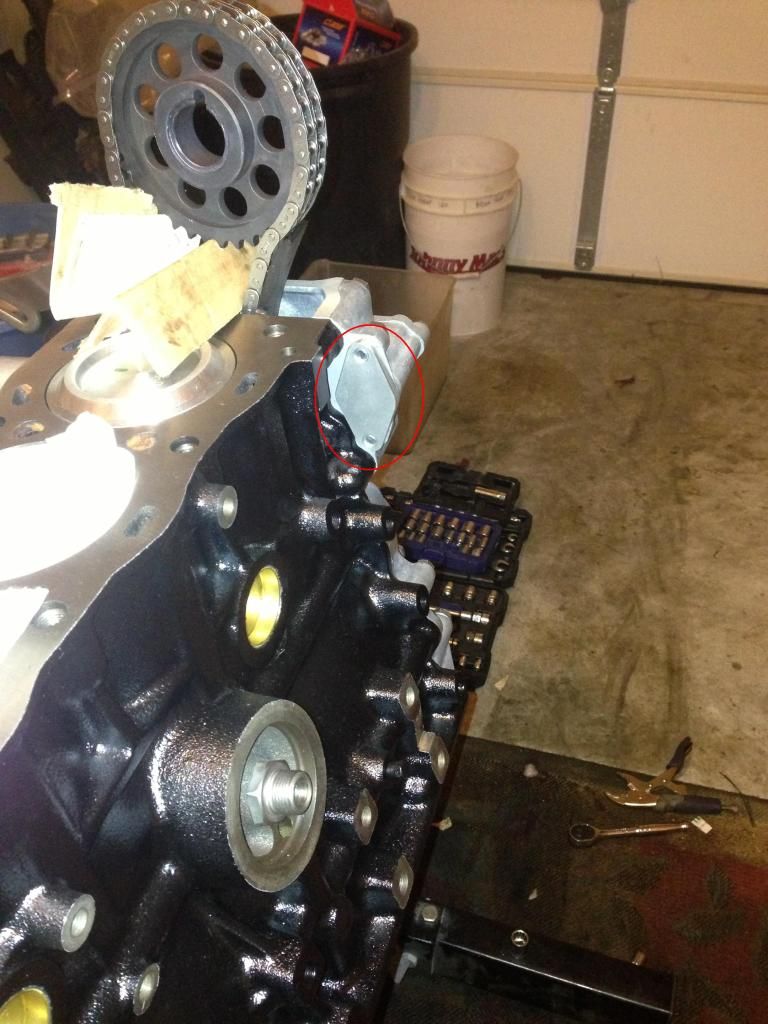
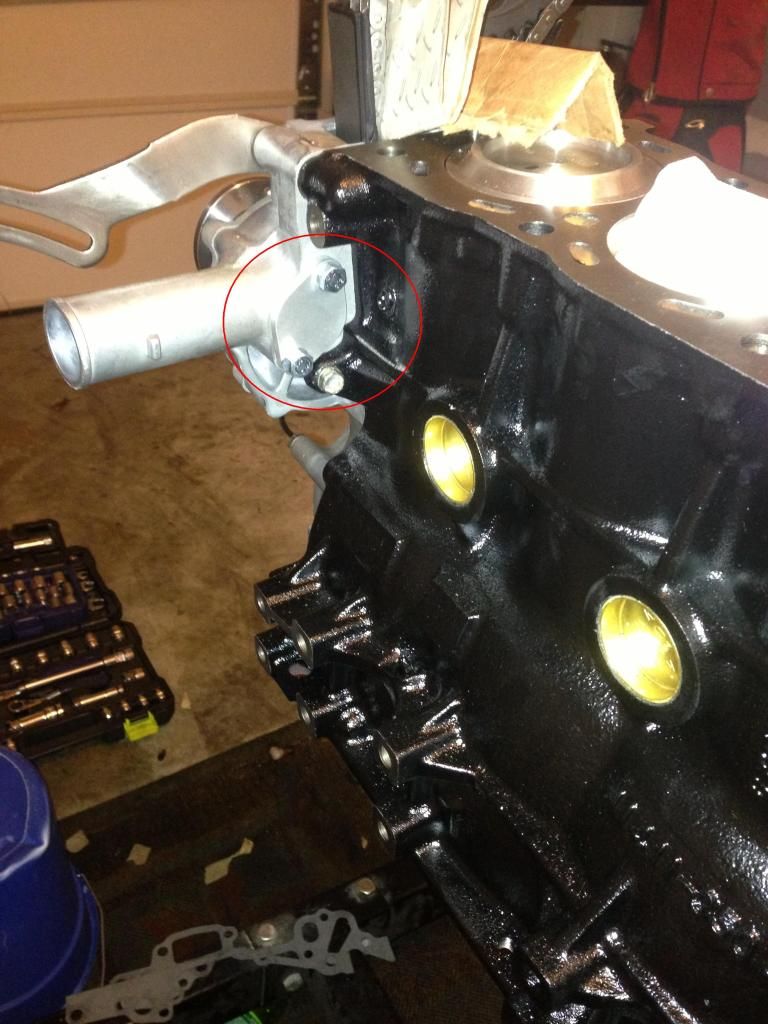
First, water block plates in the LCE Pro Water Block Plate Kit. Two of them go right on the back of the timing cover (note, I was rebuilding my engine when installing these, you DO NOT have to remove the head to install these plates as seen in the pictures, but make sure that either the gasket is in good condition or use some gasket sealer when installing these plates):
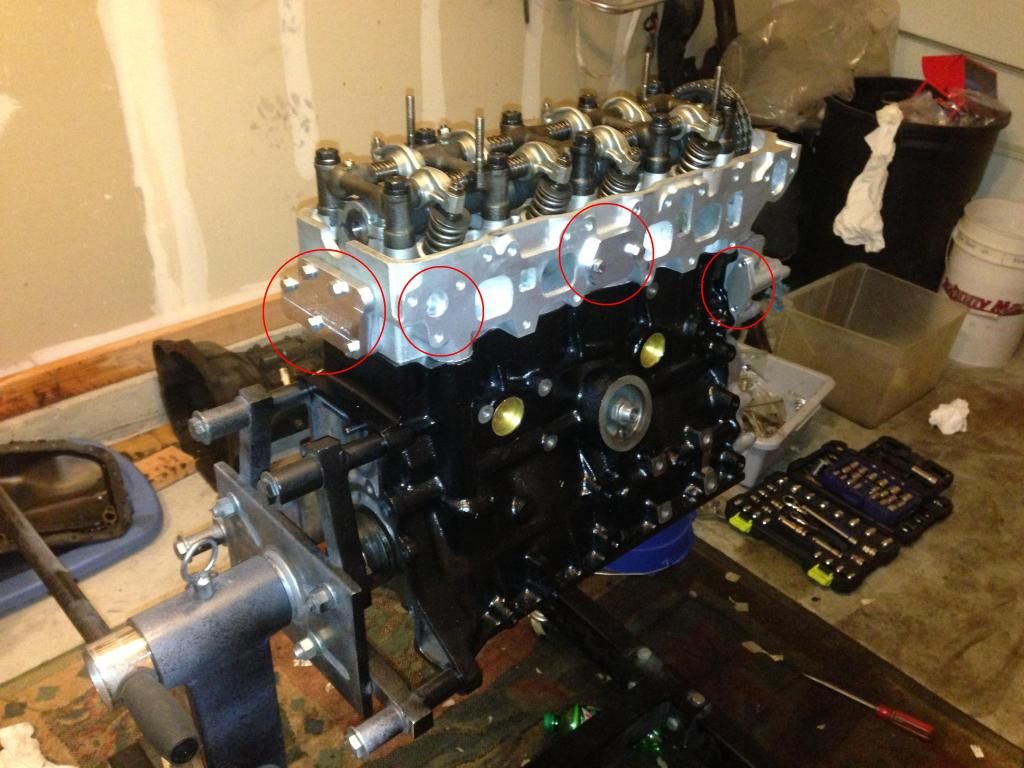
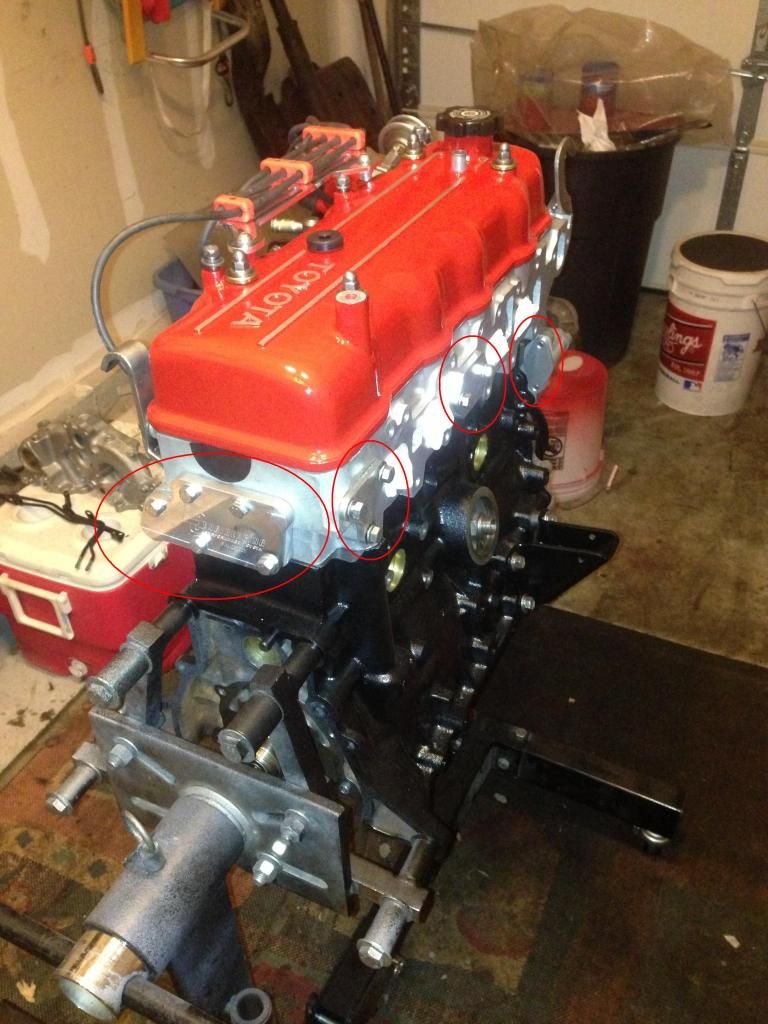
The other plate in this kit goes in the middle of the head on the intake side (Second circle from the right in the pictures below). This was just a mock up from me, but the intake manifold gasket runs between this plate and the head. Make sure that gasket is good or use gasket sealer.
Also in the above pictures, is the LCE EGR Block Plate Kit (second circle from the left). The intake manifold gasket also runs between this plate and the head so, again, check the condition of the gasket or use gasket sealer.
I'm having trouble putting it back together, I'm stuck at this point as I noticed too late that my engine was setup differently than yours. So I need to know what can be plugged if I want to delete the heater... much help needed and appreciated. Kinda in over my head but I'm excellent at follow in instructions. What needs to be pulled and what can be plugged off? I'm deleting the heater. Can you label these for me so I know what's what?
I recently did a full rebuild of my 22r in my 86 pickup. I am using the original Aisin carb. I omitted most all smog equipment at first but after reading a good deal into what all of this stuff actually is I have selectively added a few items back in. I threw together this diagram by combining components from several existing diagrams. This is essentially the bare bones basic 1983 canada 4x4 diagram with the additions of the Mixture Control system, and the Deceleration Fuel Cut System. The deceleration fuel switch senses vacuum pressure and will feed less fuel to the carb on deceleration. It looks like the idea is to save a bit of fuel. The mixture control system seems very similar and from what I read it feeds a bit of extra fresh air into the carb on deceleration. I also have retained the Hot Air Intake as it helps the motor when first started.
What do you think? Do these seem like worthwhile components to leave intact? Truck is running great and I feel that it is still minimal enough to be easy to stay on top of.
FROM YOUR LOCAL PARTS STORE:
6ft - 1/4� Fuel hose � about $10.00
6ft - 5/32� Vacuum hose � about $10.00
12 - 1/4� Stainless fuel hose clamps � about $10.00
1 - 1/4� male NPT to 3/8� Barb 90* elbow fitting (brake booster) � about $5.00
1 � 1/4� male NPT to 3/16� Barb (Manifold vacuum advance) � about $3.00
1 � 3/8� male NPT to 1/4� female reducer fitting (Fuel pressure gauge) - about $3.00
2 � 3/8� male NPT to 1/4� Barb 90* elbow fitting (Fuel lines to fuel pressure regulator) � about $8.00 (EDIT: I may have some of the fitting sizes wrong - your best bet is to take your manifold and FPR to the hardware store to match up your fittings properly)
TOTAL: about $49.00
GRAND TOTAL: about $541.55 plus shipping.
Hey guys. I have an 83 pickup that I want to desmog and convert to a Weber. I attached an image below of a Weber conversion kit for the 22R that shows all the parts that comes with it. I was wondering if someone could PLEASE tell me what parts I will still need from the list above? (I would prefer the manual choke but don't know yet if the kit in the attached image includes a manual or electric choke.)
Hey guys. I have an 83 pickup that I want to desmog and convert to a Weber. I attached an image below of a Weber conversion kit for the 22R that shows all the parts that comes with it. I was wondering if someone could PLEASE tell me what parts I will still need from the list above? (I would prefer the manual choke but don't know yet if the kit in the attached image includes a manual or electric choke.)
That is all you really need if you want to keep it simple and inexpensive. Many of those block plates you don't need to bother with. The EGR crossover block plate, for example, does not need to be blocked because it is already effectively blocked when you remove and block the EGR valve itself. You can even find some of these block plates for cheaper on ebay. Buying everything on that list is a waste of money. Unless you've got income to spare and want shiny block plates that aren't completely necessary. Also, you can buy various plugs, hose and fittings as needed locally.
Also, your picture is of a Weber with an electric choke.
Right, thanks for pointing out that the kit in the image had the electric choke. I found another kit with a manual choke for only $202.00 with free shipping (see image below.) I contacted the company that makes these kits (www.webercarbsdirect.com) and the guy there pretty much corroborated what you said. He said I will need the Holley fuel pressure regulator (part 12-804) but to leave it alone because it comes from the factory at 2.8 psi which works for the Weber. He said I only need a fuel pressure gauge if I buy a fuel pressure regulator that isn't the Holley. And like you said, he also said the EGE Block Plate Kit isn't needed and neither is the Air Injection Block Plate Kit.
Thanks again.
Last edited by magentawave; 05-16-2017 at 09:21 AM.
Right, thanks for pointing out that the kit in the image had the electric choke. I found another kit with a manual choke for only $202.00 with free shipping (see image below.) I contacted the company that makes these kits (www.webercarbsdirect.com) and the guy there pretty much corroborated what you said. He said I will need the Holley fuel pressure regulator (part 12-804) but to leave it alone because it comes from the factory at 2.8 psi which works for the Weber. He said I only need a fuel pressure gauge if I buy a fuel pressure regulator that isn't the Holley. And like you said, he also said the EGE Block Plate Kit isn't needed and neither is the Air Injection Block Plate Kit.
Thanks again.
One thing to keep in mind is that Weber has licensed their name to a number of manufacturers. So not all Weber carbs are of the same quality. It can be very difficult to discern between them sometimes as many say "genuine" and other meaningless terms. Many are much cheaper chineese made Weber licensed versions that are not actually made by Weber in Spain. Webercarbsdirect.com is definitely a knock of maker. Redline is one distributor that makes the real deal. They are more expensive but many people will say it's well worth it.
One thing to keep in mind is that Weber has licensed their name to a number of manufacturers. So not all Weber carbs are of the same quality. It can be very difficult to discern between them sometimes as many say "genuine" and other meaningless terms. Many are much cheaper chineese made Weber licensed versions that are not actually made by Weber in Spain. Webercarbsdirect.com is definitely a knock of maker. Redline is one distributor that makes the real deal. They are more expensive but many people will say it's well worth it.
I asked the guy about the cheap knock offs and he said the actual Weber company no longer manufactures anything but that Webercarbsdirect.com is licensed by Weber to make their carburetors. I dunno, the guy seemed to really know what he was talking about and said I can call anytime with questions when I install it. Webercarbsdirect.com has also been recommended by quite a few people on this forum.
I asked the guy about the cheap knock offs and he said the actual Weber company no longer manufactures anything but that Webercarbsdirect.com is licensed by Weber to make their carburetors. I dunno, the guy seemed to really know what he was talking about and said I can call anytime with questions when I install it. Webercarbsdirect.com has also been recommended by quite a few people on this forum.
Things may have changed since I bought and installed mine in 2013 but I kind of doubt it. I bought one from WeberCarbsDirect and it was made in china. I returned it. It definitely felt cheap compared to the Redline I ended up buying which had printed on the side of it Made In Spain. Ask WeberCarbsDirect where their 32/36 for the toyota pickup is made. They will probably reluctantly have to tell you china. Contact http://www.redlineweber.com/ and ask them where their 32/36 for the toyota pickup is made. Things may have changed but when I did all this it seemed to be common knowledge that there were a lot of lesser quality Weber branded carburetors out there and Redline was one of the only makers that still had the better quality ones. Maybe someone else will know more.
When desmoged what are you all doing for a temperature gauge. In the process of my install/desmog, I plugged the intake. What will control the temp gauge now? Are you using an after market temp gauge? Also what wires run the tach?
I got my desmog completed and I am very happy with the results truck runs great. I do have a small problem through. I hooked up the regulator and pressure gauge and set to 2.8 lbs. Took the truck for a test drive and it ran great, very happy with the performance. But when I got home my fuel pressure gauge was at 0, I raised the rpms and it flickered a lil bit but fell back to zero. What is confusing is the truck ran awesome so it has to be getting fuel. Not much adjustment left on the regulator, what could be the problem? Regulator/gauge bad? Fuel pump looks fairly new and has to be working since the truck runs well.
I'm not a mechanic so please bear with me. I'm installing a new Weber 32/36 with manual choke. There are a few parts on my California 83 22R that aren't shown in the image of the emissions on page 1 of this thread, or they just look different than what I'm seeing, so I have a few questions, please.
Image #1: My 83 California 22R.
1) IMAGE 1: I see the charcoal canister on the firewall but I don't see the second one. Was a second charcoal canister not used in the 2WD California 22R?
2) IMAGE 2: Should I remove the part located on the valve cover behind the PCV valve and all the hoses attached to it?
3) IMAGE 2: Do I still need the PCV?
4) IMAGE 3: Should I remove the thing I'm holding and all the hoses attached to it?
5) IMAGE 3: Should I remove all the hoses that the two red arrows are pointing to?
6) IMAGE 4: Should I remove the two parts I'm holding and all the hoses attached to them?
7) IMAGE 5: Where is the Check Valve near the distributor that's supposed to be removed?
8) IMAGE 6: The image of the parts to be removed from page 1 of this thread (see "Component Layout and Schematic Drawing" below) show only one Thermo S/W next to the BVSV but my California 22R has two Thermo S/W's next to each other. Should I remove both?
9) IMAGE'S 7 & 8: Should I remove all the hoses and parts including the bracket the arrows are pointing to?
THANKS!
Last edited by magentawave; 05-25-2017 at 09:48 AM.
I'm not a mechanic so please bear with me. I'm installing a new Weber 32/36 with manual choke. There are a few parts on my California 83 22R that aren't shown in the image of the emissions on page 1 of this thread, or they just look different than what I'm seeing, so I have a few questions, please.
Image #1: My 83 California 22R.
1) IMAGE 2: Should I remove the part located on the valve cover behind the PCV valve and all the hoses attached to it?
2) IMAGE 2: Do I still need the PCV?
3) IMAGE 3: Should I remove the thing I'm holding and all the hoses attached to it?
4) IMAGE 3: Should I remove all the hoses that the two red arrows are pointing to?
5) IMAGE 4: Should I remove the two parts I'm holding and all the hoses attached to them?
6) IMAGE 5: Where is the Check Valve near the distributor that's supposed to be removed?
7) IMAGE 6: The image of the parts to be removed from page 1 of this thread (see "Component Layout and Schematic Drawing" below) show only one Thermo S/W next to the BVSV but my California 22R has two Thermo S/W's next to each other. Should I remove both?
That's a pretty confusing post and I didn't try to read through it all and match with pictures. But the overall answer is YES. You can rip all that ˟˟˟˟ out of there. The only vacuum line you need is one to the distributor and the large one for the brake booster. PCV valve is optional. You can put a little breather filter on top of the valve cover instead.
The truck will run great without all of the smog equipment but many people overlook that some of this stuff is of benefit and makes the engine run more efficiently. I made a diagram which is a few posts back which includes emissions items I reinstalled after doing my engine rebuild. But for simplicity sake, yes you can rip out all the things you're asking about. One of those temperature sensors is likely for your dashboard temp gauge though.
I made a couple edits while you were replying I guess, but thanks for getting back so quickly. One question: Does removing all that stuff even include the part and hose in image 2 and the parts, bracket and multiple hoses that I have arrows pointing to in images 7 and 8? Just making sure!
Last edited by magentawave; 05-25-2017 at 09:54 AM.
I made a couple edits while you were replying I guess, but thanks for getting back so quickly. One question: Does removing all that stuff even include the parts, bracket and multiple hoses that I have arrows pointing to in images 7 and 8?
Yup! Rip that stuff out of there! You can literally rip out every single vacuum line. And every single switch a vacuum lines runs to. I know how you feel, I was there once too and I was hesitant about pulling certain things out. I asked very similar questions on this forum. It really is true that you can rip every bit of that stuff out. Rip it all out and it'll be pretty satisfying. Then you can simple reinstall the things you need.
Here are a couple pics of the engine bay of my 89 after I removed all emissions stuff and installed the Weber. I had 2 lines running to the distrubutor and one line going to the brake booster. That's it. All of the other items you're asking about are removed.
EDIT: PCV valve and the other valve cover breather hose I kept intact. They just feed raising gases in the engine into the carb to be burned. I just did an engine rebuild in my other truck and kept the stock carburetor and I also decided to keep a number of other emissions items. However these pictures are appropriate for the weber.
 04-11-2017, 04:16 AM