22R Desmog Tutorial
 01-23-2013, 09:05 AM
#1
22R Desmog Tutorial
NOTICE TO READERS (May 24, 2013)
Please post your questions regarding Desmogging in this thread. I have received numerous PM's asking the same questions over and over. I don't mind helping out, but if you post your questions here then we can answer them as a community and avoid repetition in my inbox. Thanks guys!
I recently wrote a thread regarding the rebuild on my 22R for my 1983 Toyota Pickup (My 22R Rebuild - KawaZX636). In rebuilding my engine, I completely eliminated any and all factory smog equipment. Since I created that thread, I have been approached by several YotaTech members with questions regarding the desmogging of a 22R. I don't mind helping, but it has become rather time consuming answering all of the questions I have received thus far so I decided to create a thread on desmogging a 22R. There are other threads out there that discuss the desmogging process, mainly Pumkinyota's De-Smogging an early 22R thread. Pumkinyota's thread is highly informative, but it has become inundated with questions and uses a slightly different approach to desmogging a 22R which involves capping vacuum hoses and utilizing the factory carb (no offense intended to you Pumkinyota).
In this thread, I will go over all the smog equipment, vacuum hoses and vacuum switches that need to be removed as well as which LCE block off plates to purchase and install in order to completely and effectively desmog a 22R engine. This desmogging guide will also utilize a Weber 32/36 carb with a manual choke. This guide will be based on my most recent 22R rebuild with the engine removed from the truck; however, all step shown below can be completed with the engine in the vehicle. I BELIEVE that desmogged the 20R is very similar to the 22R, but there may be slight variations.
Keep in mind that smog regulations vary from State to State so check your local laws prior to yanking your smog equipment. Eventually, I would like to develop a list of States with and without smog regulations with the help of YotaTech members.
In order for this thread to remain clutter free, I ask that you put off asking questions until I have completed the tutorial. So sit back and relax, the posts will be coming shortly.
Last edited by kawazx636; 05-24-2013 at 06:28 AM.
 01-23-2013, 09:13 AM
#2
Parts List, sources and costs (Click on the links to go to the product website):
FROM SUMMIT RACING:
Holley Fuel Pressure Regulator 1-4 PSI (12-804) - $28.95
Mr Gasket Fuel Pressure Gauge 0-15 PSI (1563) - $29.95
TOTAL: $58.90 plus shipping
FROM LCE PERFORMANCE:
Pro Water Block Plate Kit – 20R/22R (1016015) - $19.95
Water Block Plate Kit (11 Bolt) – 22R Under Intake (1032010) - $39.95
EGR Block Plate Kit (Cyl. Head) – 20R/22R/22RE/22RET (1016009) - $10.95
EGR Crossover Block Plate Kit – 20R/22R/22RE/22RET (1032007) - $19.95
Air Injection Block Plate Kit – 22R/22RE (1045014) - $14.95
EGR Block Plate Kit (Carb Manifold Plate) – 22R (1032001) - $10.95 **OPTIONAL**
Intake Manifold Plug Kit – 20R/22R (1032050) - 19.95
Weber 32/36 Carburetor Kit w/ Manual Choke – 20R/22R (1030032) - $297.00
TOTAL: $433.65 plus shipping
FROM YOUR LOCAL PARTS STORE:
6ft - 1/4” Fuel hose – about $10.00
6ft - 5/32” Vacuum hose – about $10.00
12 - 1/4” Stainless fuel hose clamps – about $10.00
1 - 1/4” male NPT to 3/8” Barb 90* elbow fitting (brake booster) – about $5.00
1 – 1/4” male NPT to 3/16” Barb (Manifold vacuum advance) – about $3.00
1 – 3/8” male NPT to 1/4” female reducer fitting (Fuel pressure gauge) - about $3.00
2 – 3/8” male NPT to 1/4” Barb 90* elbow fitting (Fuel lines to fuel pressure regulator) – about $8.00
(EDIT: I may have some of the fitting sizes wrong - your best bet is to take your manifold and FPR to the hardware store to match up your fittings properly)
TOTAL: about $49.00
GRAND TOTAL: about $541.55 plus shipping
Obviously prices may change, but this will give you an idea of what it will cost to get everything you need to desmog your engine.
Last edited by kawazx636; 10-28-2014 at 06:51 AM. Reason: Formatting
The following users liked this post:
musicearlyadopter (03-30-2024)
01-23-2013, 09:20 AM
#3
Here are some valuable resources to reference the smog equipment under your hood. These images come directly from the 1983 Toyota Pickup FSM. When asking questions, it's good to know what you're talking about and use the appropriate part name since the smog systems on Toyotas are quite extensive.
This image provides the abbreviations and functions of each piece of smog equipment:
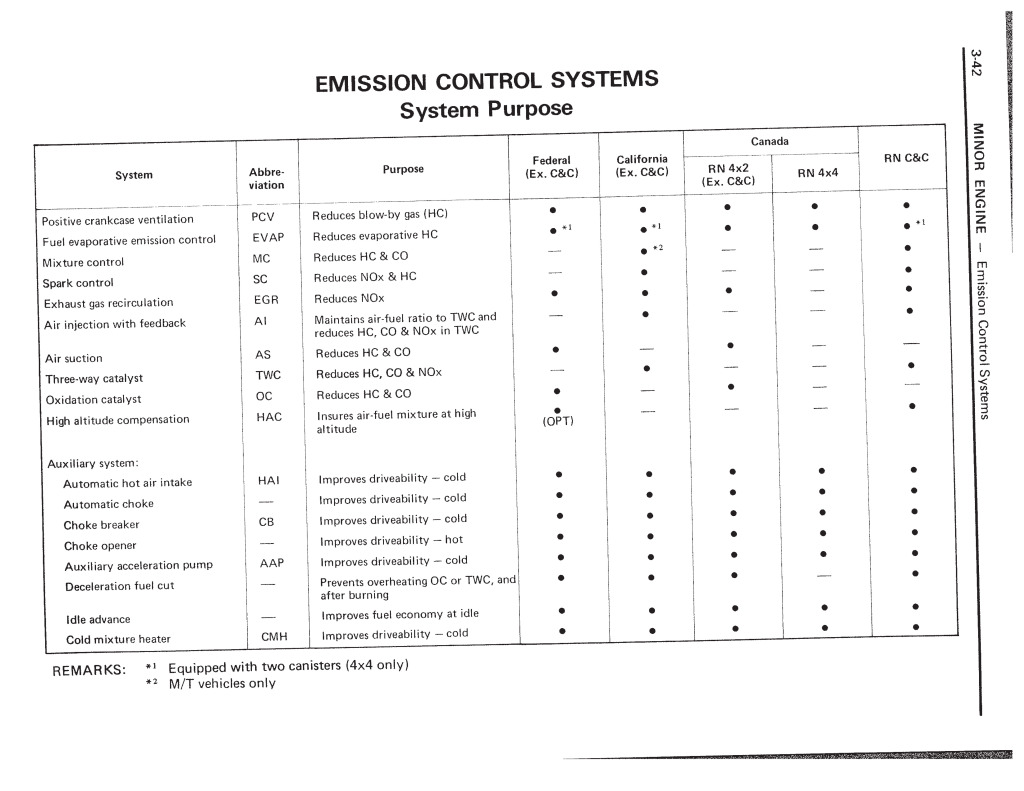
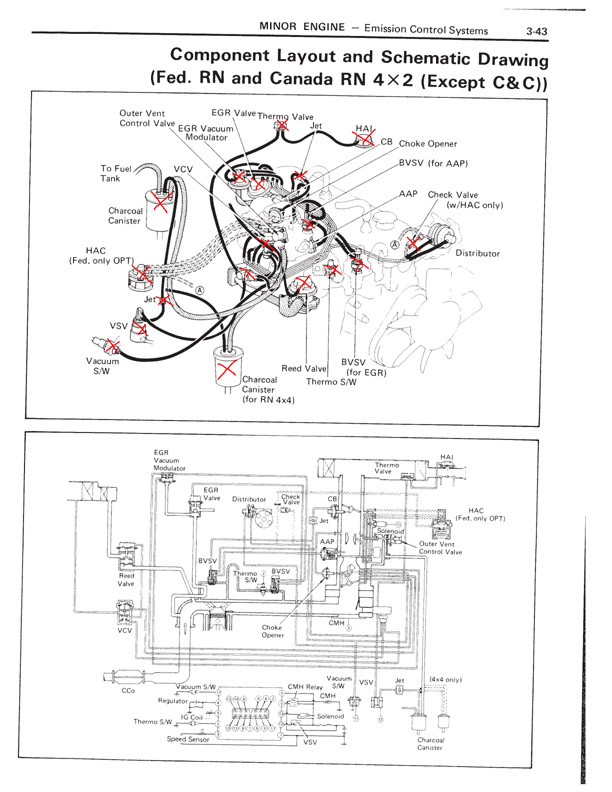
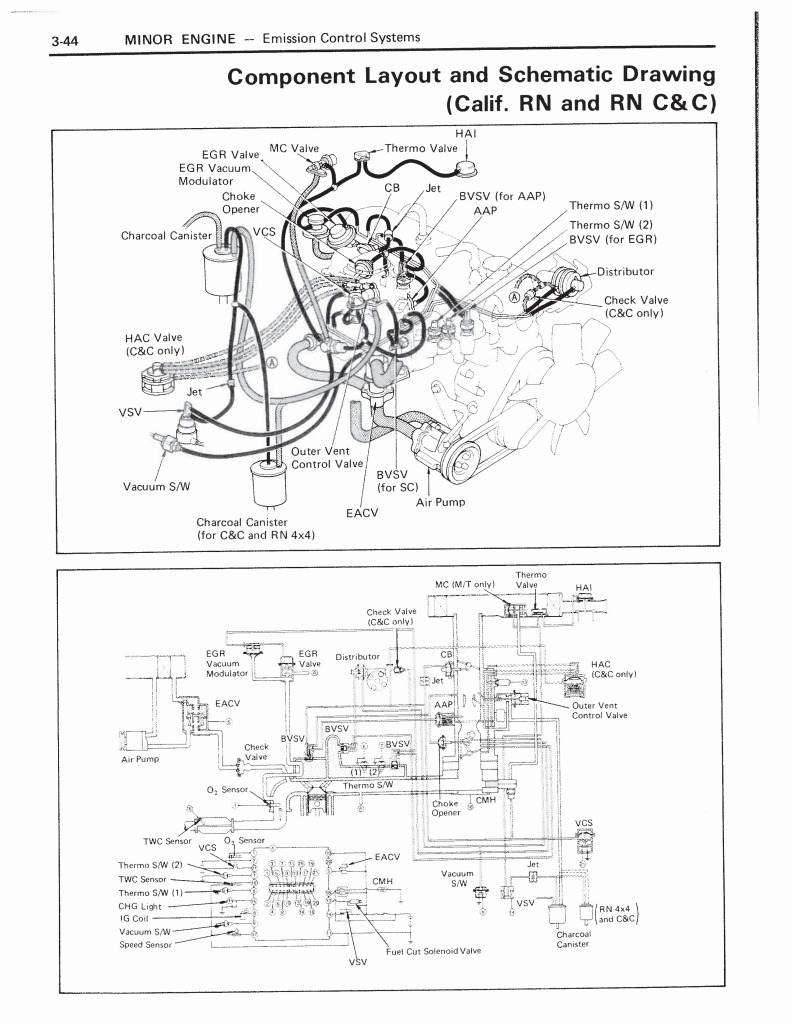
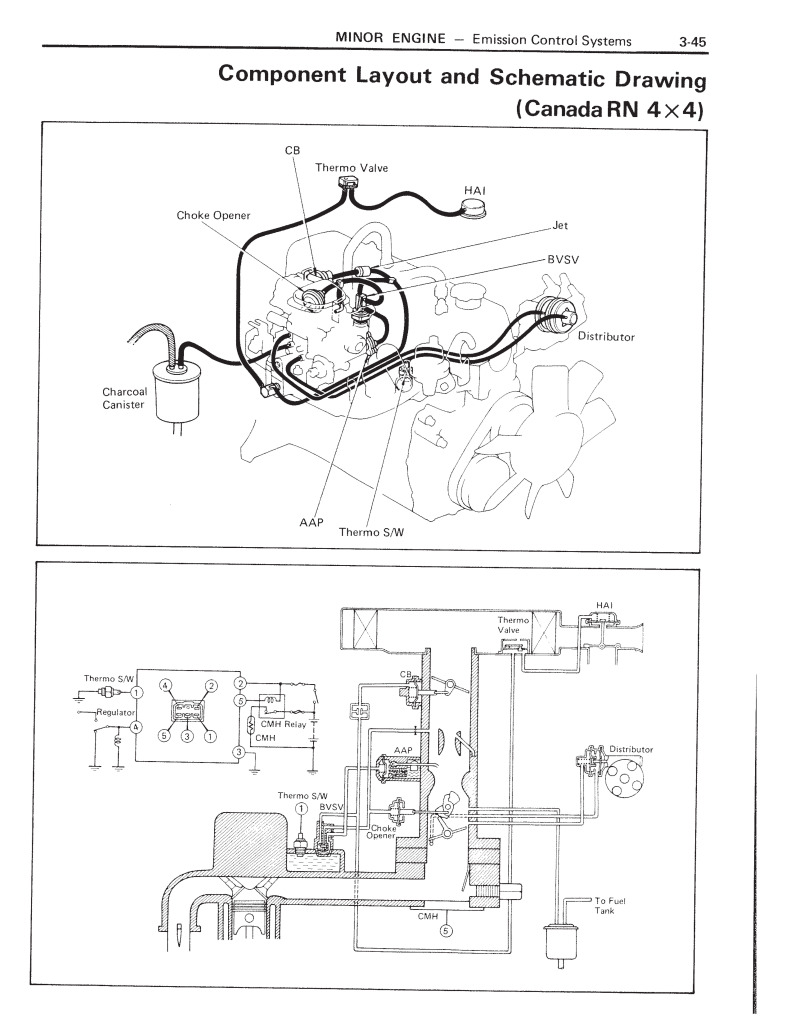
The following images so the location of the various smog components. In the first image below, I have crossed off everything you will be removing with desmogging your 22R.
This image provides the abbreviations and functions of each piece of smog equipment:
The following images so the location of the various smog components. In the first image below, I have crossed off everything you will be removing with desmogging your 22R.
01-23-2013, 09:31 AM
#4
The quickest and easiest way to rid your self of smog equipment is to hike up your britches and start yanking anything with a vacuum hose attached to it. Be brave, because at first you will second guess everything you should remove, but keep in mind that YOU DO NOT NEED SMOG EQUIPMENT FOR YOUR ENGINE TO FUNCTION PROPERLY!
Below are items that you can start to tear into first.
Counter clockwise from the top left circle:
-EGR Vacuum Module and Outer Vent Control Valve
-The pesky hard vacuum lines (remove all the vacuum lines attached to it too)
-Thermo switch
-Air injection piping (on the exhaust side of the head attached to the headers)
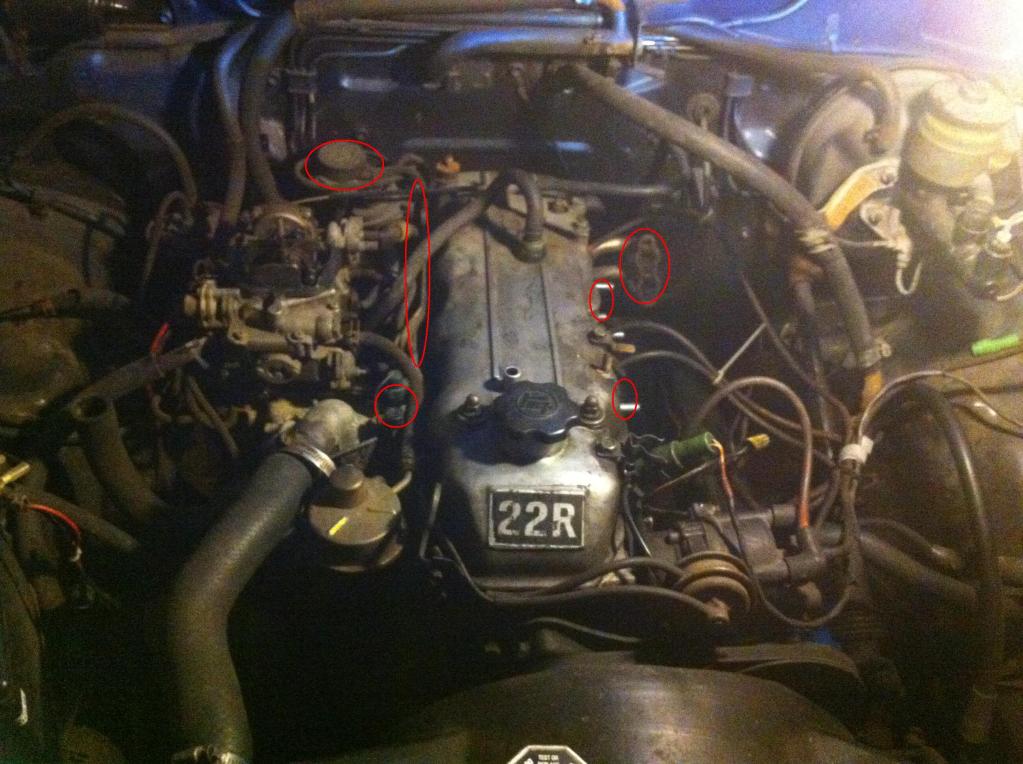
From the far left Circle:
-Vacuum switch (the High Altitude Compensator will be in this area too if you have one)
-VSV
-Reed Valve
-BVSV (attached to the center hole in the intake side of the head

Here is a shot of a rough desmogging prior to my rebuild:
Below are items that you can start to tear into first.
Counter clockwise from the top left circle:
-EGR Vacuum Module and Outer Vent Control Valve
-The pesky hard vacuum lines (remove all the vacuum lines attached to it too)
-Thermo switch
-Air injection piping (on the exhaust side of the head attached to the headers)
From the far left Circle:
-Vacuum switch (the High Altitude Compensator will be in this area too if you have one)
-VSV
-Reed Valve
-BVSV (attached to the center hole in the intake side of the head
Here is a shot of a rough desmogging prior to my rebuild:
01-23-2013, 09:37 AM
#5
You will remove two components from the back of the timing cover. Unfortunately I do no have pictures of them, but these are the locations of them (they will later be blocked off):

Remove the Thermo switch, vacuum switch and that big obnoxious vacuum hose port fitting from the intake manifold (these will later be plugged too). You can also remove all the factory plugs as these will be replaced with new plugs included in the LCE kit:
Remove the Thermo switch, vacuum switch and that big obnoxious vacuum hose port fitting from the intake manifold (these will later be plugged too). You can also remove all the factory plugs as these will be replaced with new plugs included in the LCE kit:
01-23-2013, 09:42 AM
#6
Every wonder what these do? 30 years later, that's right...NOTHING! The charcoal canisters get the boot too:
This is optional. There is a plate on the base of the intake manifold that has a temperature sensor for the electric choke (I believe) - I prefer a manual choke simply because manual chokes are far less likely to fail. The LCE plate does not allow you to retain the sensor housing, but will have a fitting for the heater core:

This is optional. There is a plate on the base of the intake manifold that has a temperature sensor for the electric choke (I believe) - I prefer a manual choke simply because manual chokes are far less likely to fail. The LCE plate does not allow you to retain the sensor housing, but will have a fitting for the heater core:
01-23-2013, 09:49 AM
#7
Right now, your engine should be free of the birds nest of vacuum hoses and emissions equipment. Go ahead and remove your headers if you haven't already (you'll probably need a new gasket anyway). If you removed everything then you should have the following left:
-The core of the motor (block, head, valve cover, timing cover, water pump, oil pump, fuel pump)
-Distributor (with no vacuum hoses attached)
-Intake manifold (bare with no carb, hoses or fittings attached)
It should look a little something like this (if you removed the intake manifold):
or this (if you left the intake manifold on):

Don't mind the circles, I get to those in a minute.
This is a good opportunity to clean the gasket surfaces and make sure that everything is removed.
-The core of the motor (block, head, valve cover, timing cover, water pump, oil pump, fuel pump)
-Distributor (with no vacuum hoses attached)
-Intake manifold (bare with no carb, hoses or fittings attached)
It should look a little something like this (if you removed the intake manifold):
or this (if you left the intake manifold on):
Don't mind the circles, I get to those in a minute.
This is a good opportunity to clean the gasket surfaces and make sure that everything is removed.
Last edited by kawazx636; 01-23-2013 at 09:50 AM. Reason: formatting
Trending Topics
01-23-2013, 09:59 AM
#8
Now you're ready to put it back together the "not so environmentally friendly way."
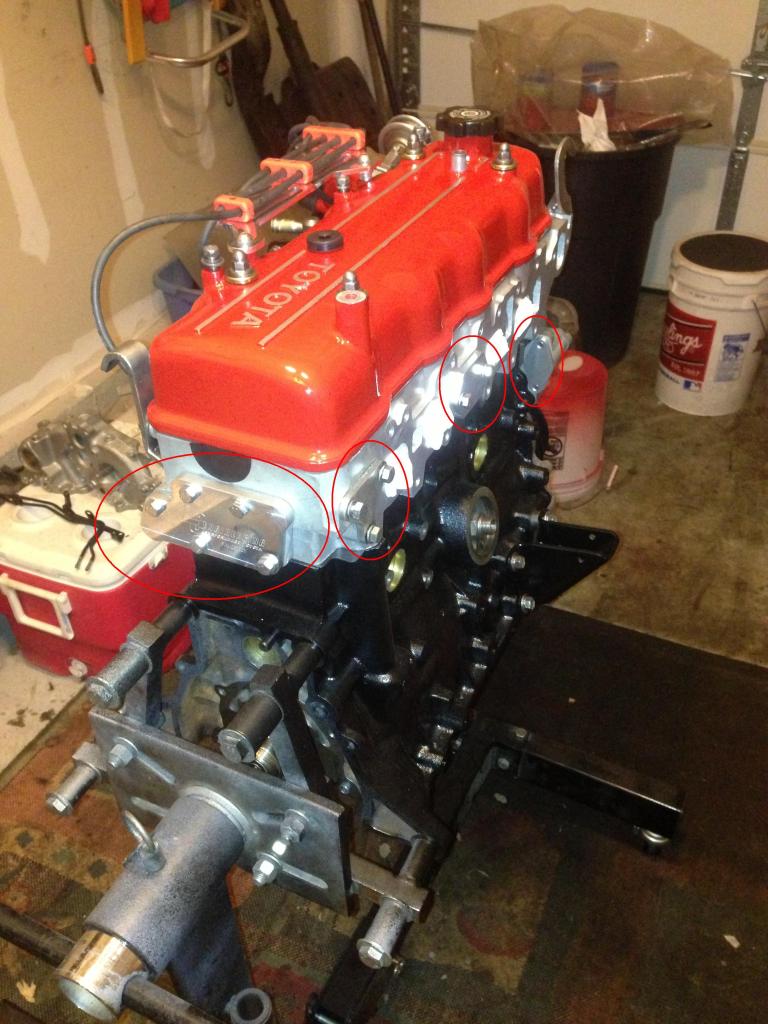
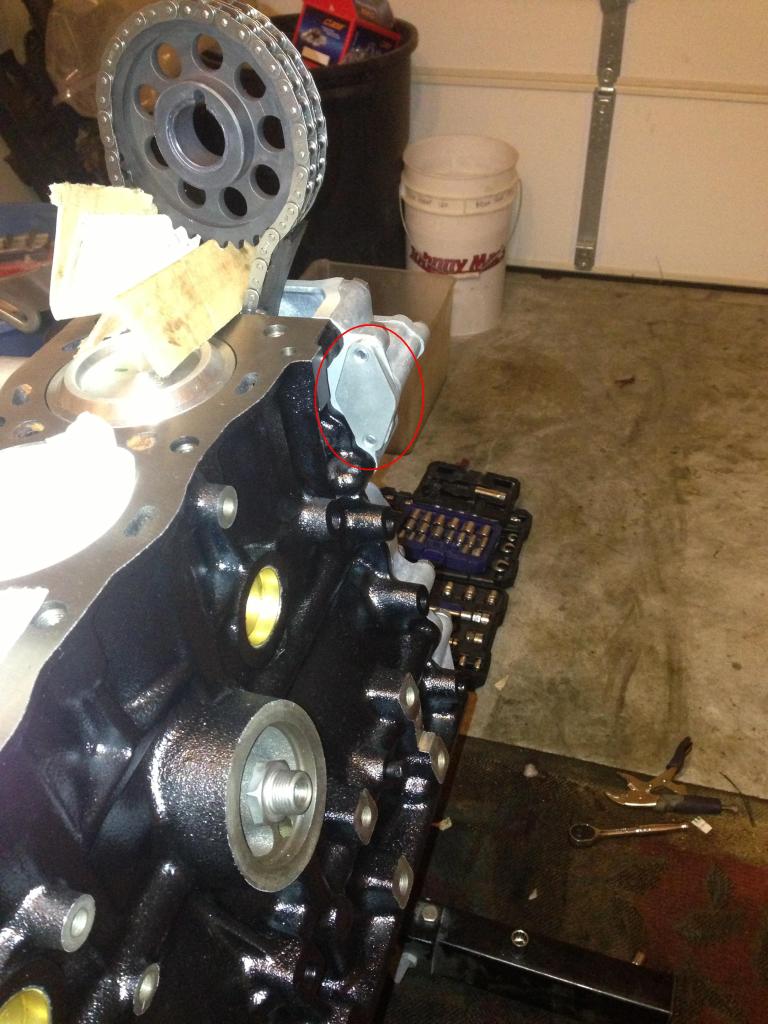
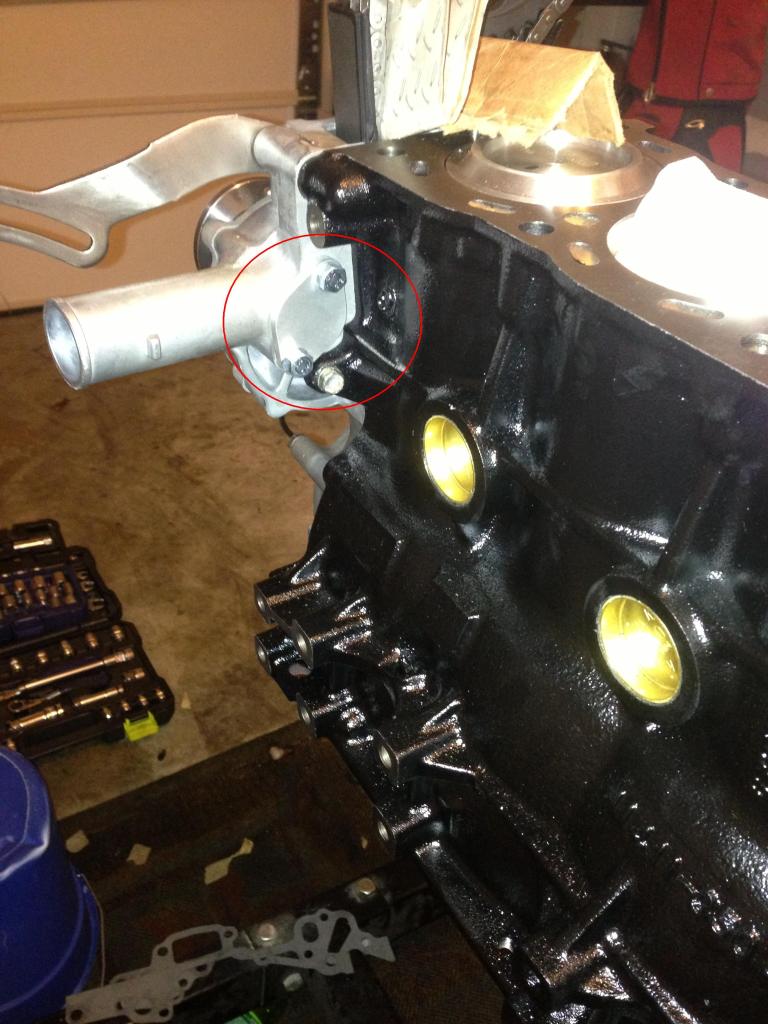
First, water block plates in the LCE Pro Water Block Plate Kit. Two of them go right on the back of the timing cover (note, I was rebuilding my engine when installing these, you DO NOT have to remove the head to install these plates as seen in the pictures, but make sure that either the gasket is in good condition or use some gasket sealer when installing these plates):
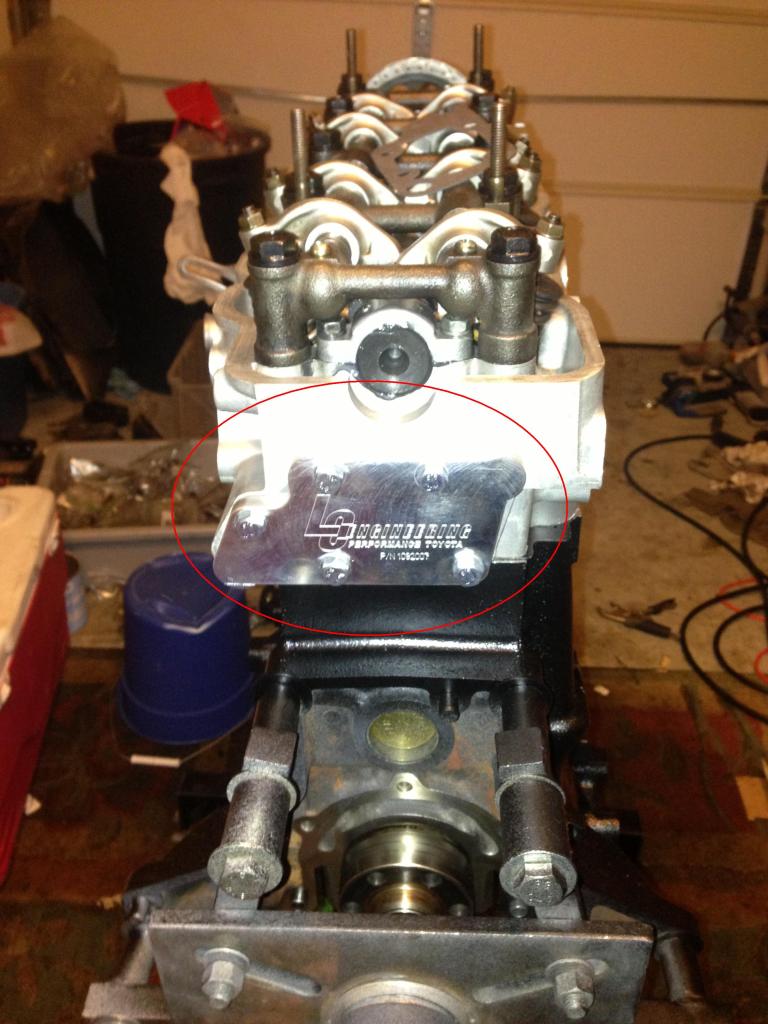
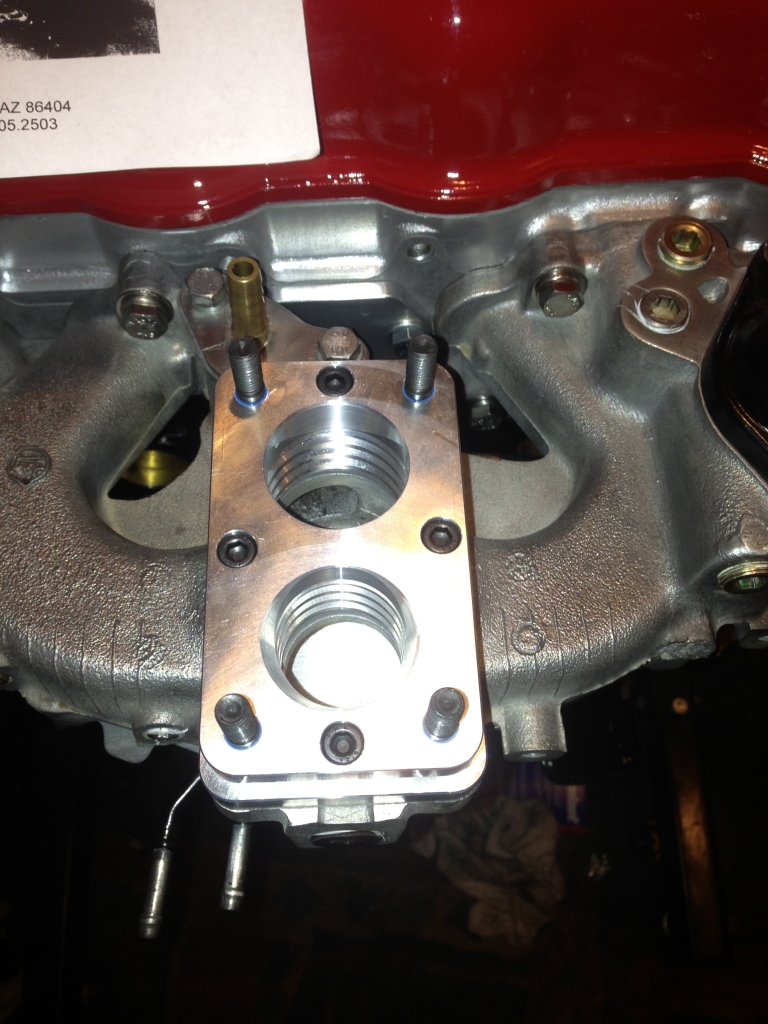
The other plate in this kit goes in the middle of the head on the intake side (Second circle from the right in the pictures below). This was just a mock up from me, but the intake manifold gasket runs between this plate and the head. Make sure that gasket is good or use gasket sealer.
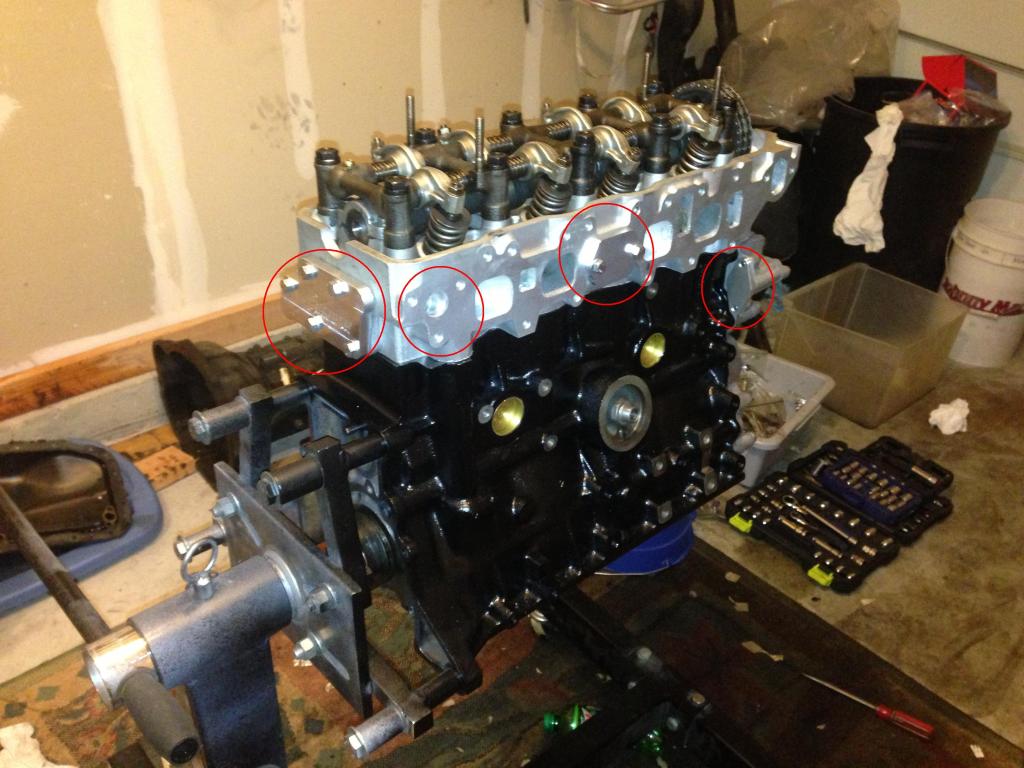

Also in the above pictures, is the LCE EGR Block Plate Kit (second circle from the left). The intake manifold gasket also runs between this plate and the head so, again, check the condition of the gasket or use gasket sealer.
First, water block plates in the LCE Pro Water Block Plate Kit. Two of them go right on the back of the timing cover (note, I was rebuilding my engine when installing these, you DO NOT have to remove the head to install these plates as seen in the pictures, but make sure that either the gasket is in good condition or use some gasket sealer when installing these plates):
The other plate in this kit goes in the middle of the head on the intake side (Second circle from the right in the pictures below). This was just a mock up from me, but the intake manifold gasket runs between this plate and the head. Make sure that gasket is good or use gasket sealer.
Also in the above pictures, is the LCE EGR Block Plate Kit (second circle from the left). The intake manifold gasket also runs between this plate and the head so, again, check the condition of the gasket or use gasket sealer.
Last edited by kawazx636; 01-23-2013 at 10:03 AM. Reason: formatting
 01-23-2013, 10:13 AM
#10
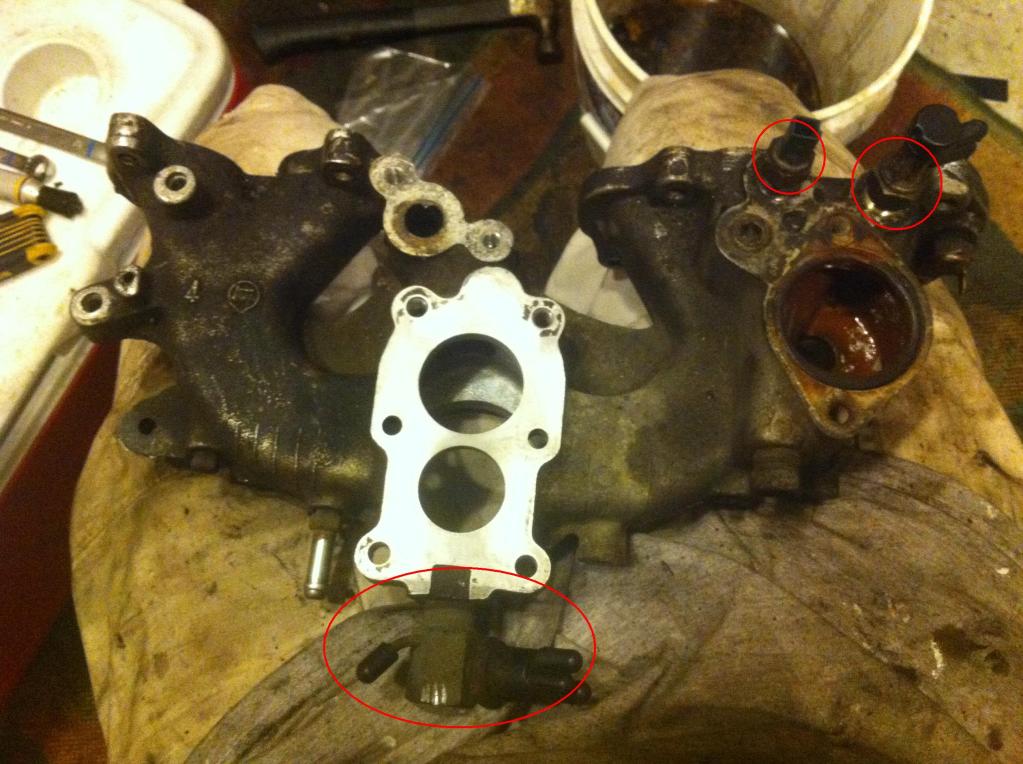
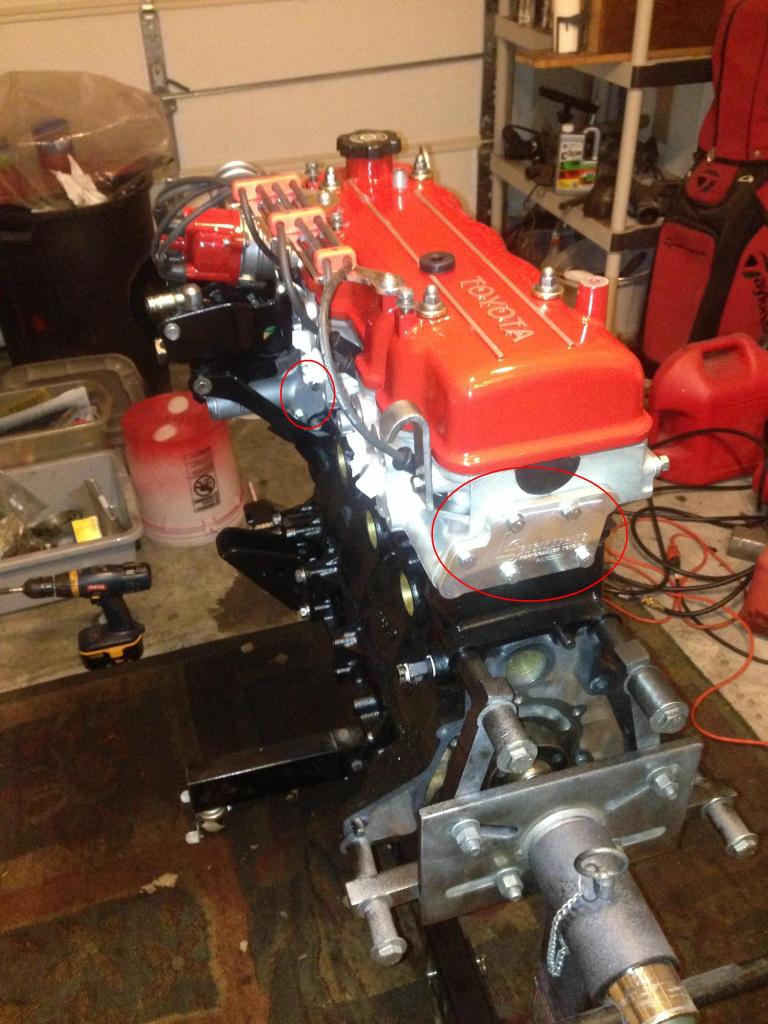
Next is the LCE Water Block Plate Kit (11 Bolt) located under the intake manifold. The elbow fitting supplied with the kit is for your heater core (optional if you choose to keep your heat) and new bolts are included with the kit as well. The factory hard fuel lines will bolt back up if you decide to keep them (recommended). Also in the below picture, you can see the locations of the plugs that come with the LCE Intake Manifold Plug Kit. The far left two plugs were temporarily plugged during my build, but will later be used for the brake booster fitting and the manifold advance to the distributor.
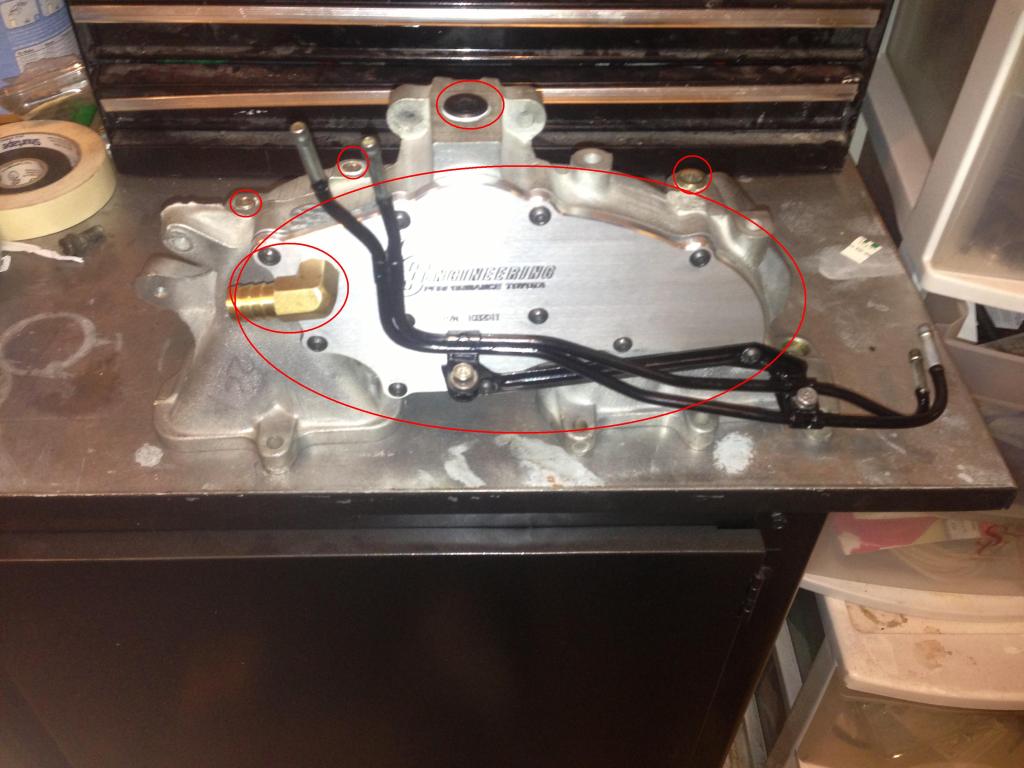
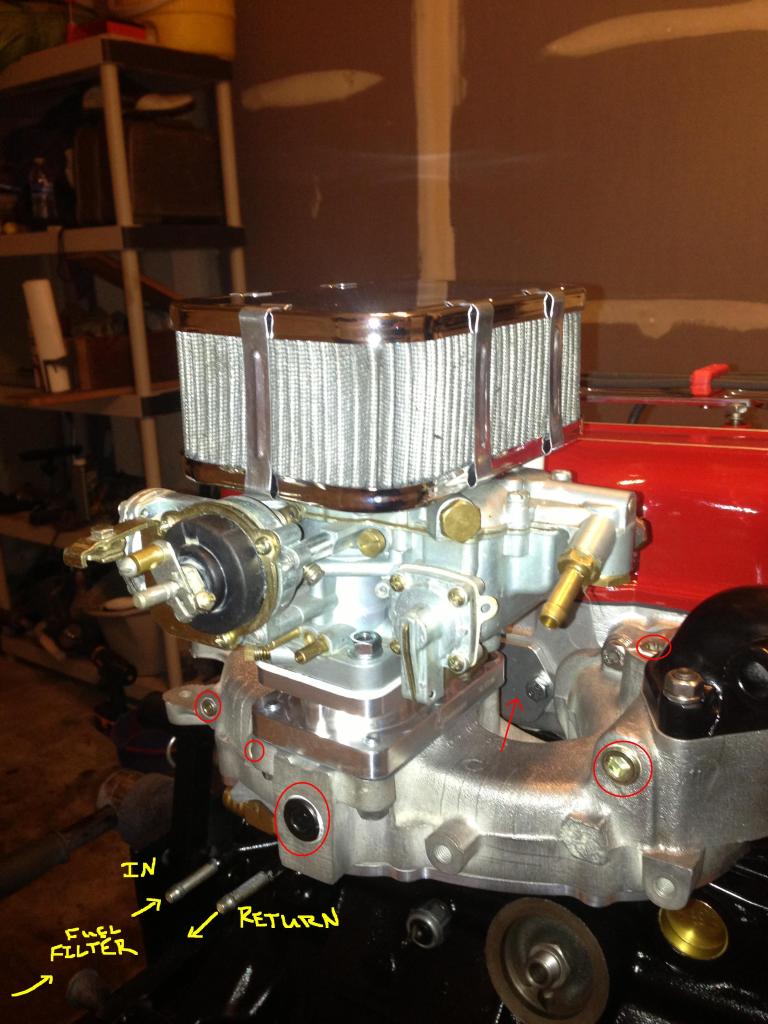
Here is the intake manifold bolted up. Notice the plug locations, the EGR block off plate to the left and the water block plate in the middle of the head. The barb fitting with the yellow arrow pointing to the PCV valve is an option. That particular plate and barb comes with the Weber kit; however, you can use the LCE EGR Block Plate Kit (Carb Manifold Plate) which DOES not have a barb and utilizes a breather filter on the PCV valve (for race applications). I would not recommend using the breather filter on the PCV because it can get reeeeeally messy under your hood really quick if something goes wrong.
Here's a shot of the LCE Spiral Adaptor for the Weber 32/36. I would recommend this, but it is not necessary to desmogging. This pic also gives you more of a close up of the manifold plugs and block off plates:
Last edited by kawazx636; 01-23-2013 at 10:15 AM. Reason: Formatting
01-23-2013, 10:19 AM
#11
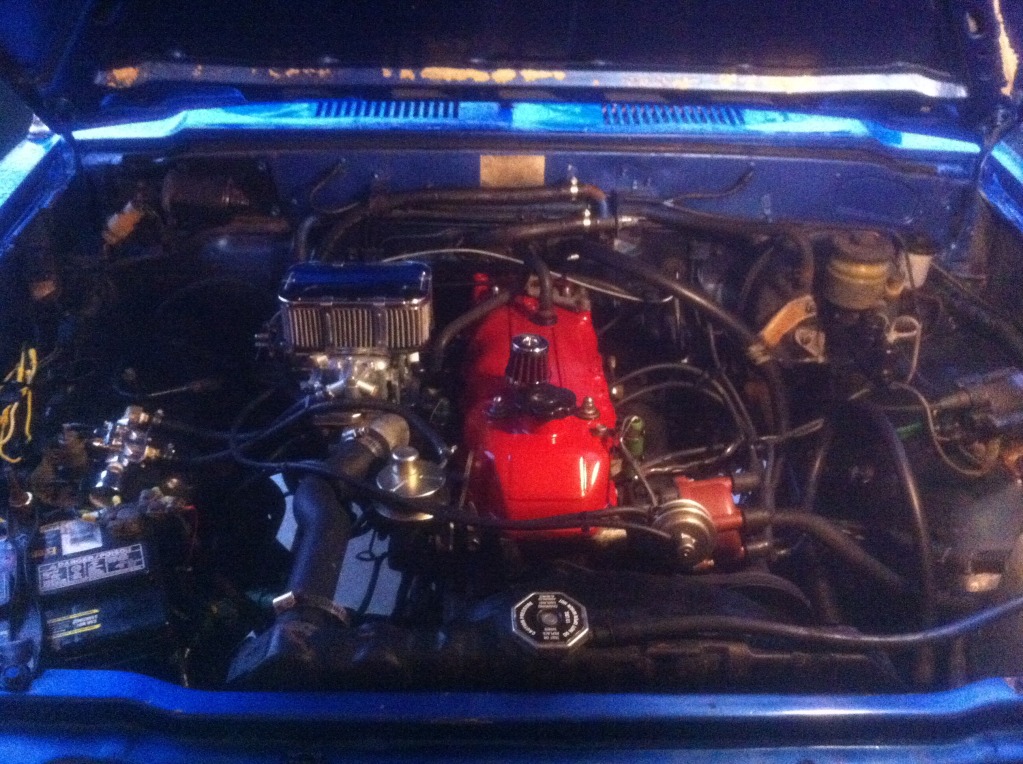
Now for that Weber! You can use a factory carb, but they are notorious for adjustment issues and they certainly don't increase the power like a Weber. Follow the weber directions for installation:
Your engine should now look something like this. Notice NO vacuum hoses and no fuel lines, we are getting to that. If you still have some fuel lines and vacuum lines then you didn't read the first step:
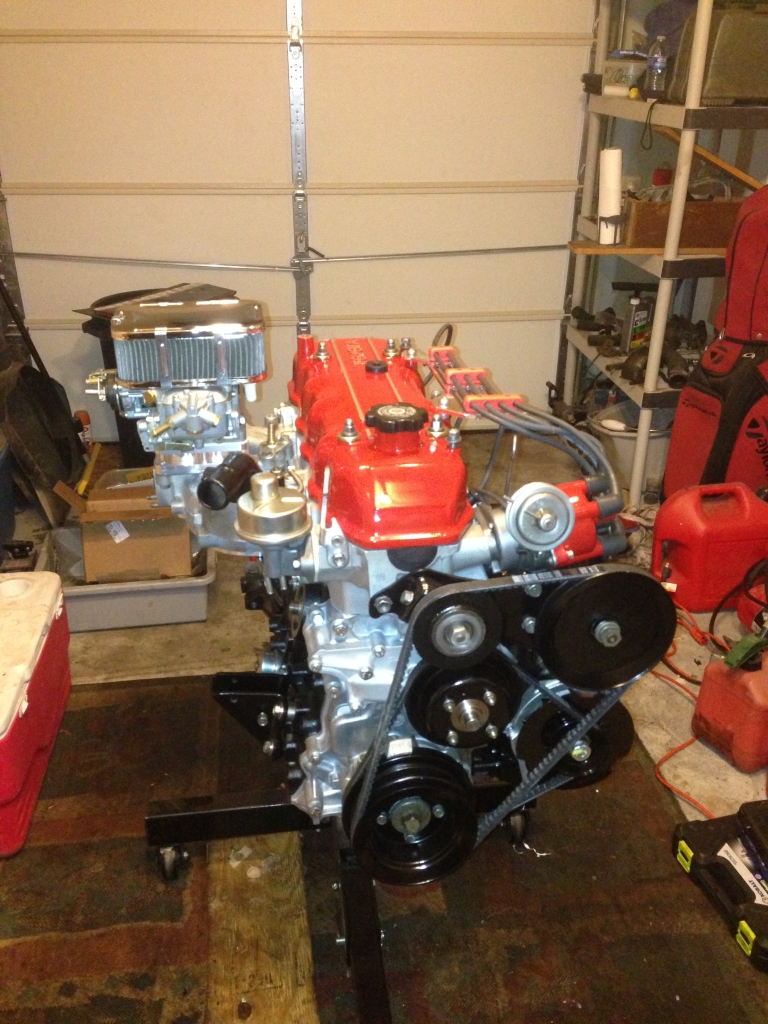
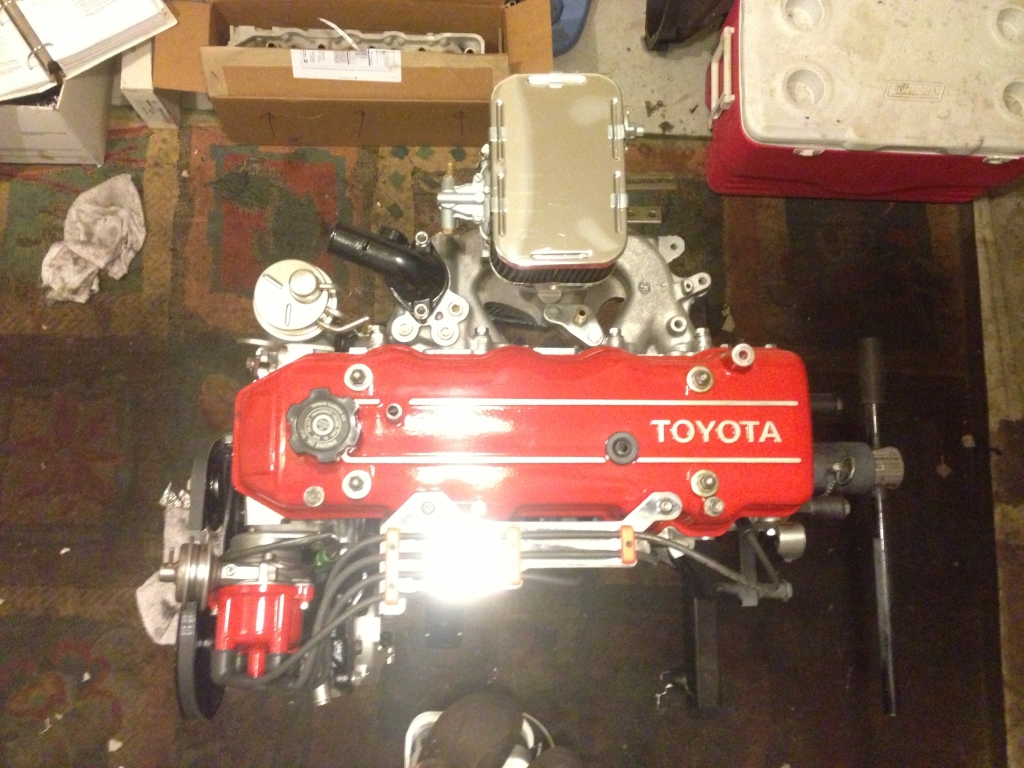
Your engine should now look something like this. Notice NO vacuum hoses and no fuel lines, we are getting to that. If you still have some fuel lines and vacuum lines then you didn't read the first step:
01-23-2013, 10:30 AM
#12
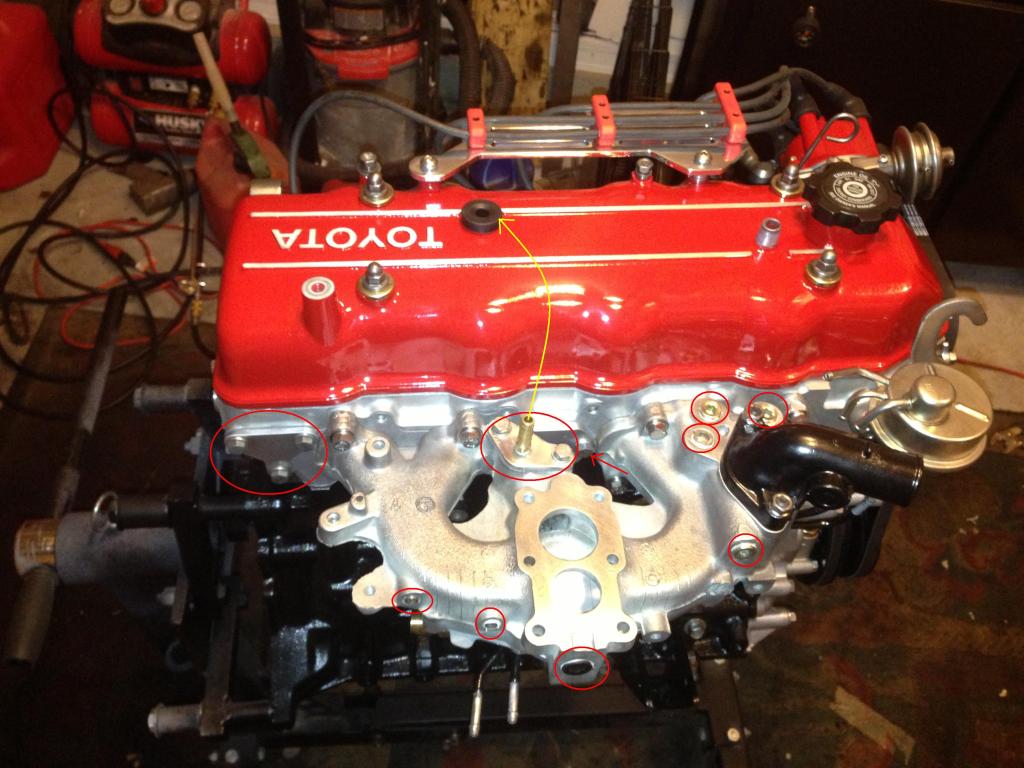
Now you can start the plumbing. Run a hose from the PCV valve to the manifold using the barb fitting that came with your Weber (note, if you chose to use a breather filter on your PCV valve then you will be installing that instead):
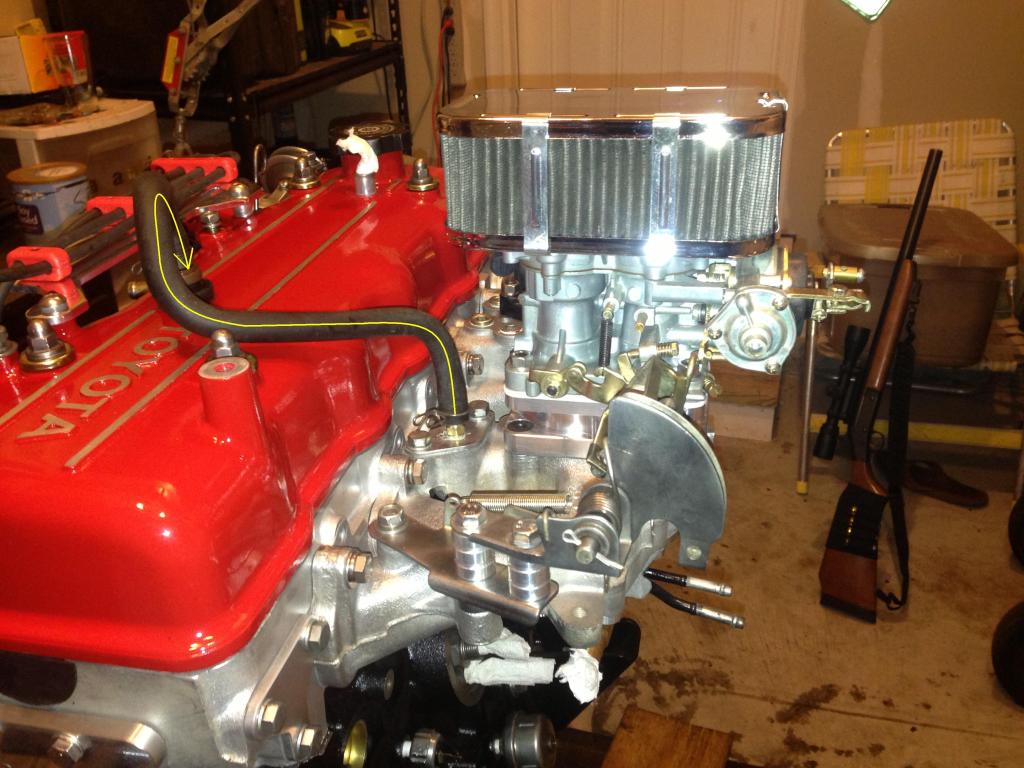
Install the Holley fuel pressure regulator. I used the bracket that came with the regulator and mounted it to the intake manifold. You can either do this or run it back to the fender wall. I prefer it this way because it is cleaner and keeps the hoses to a minimum. You will have to use the 3/8" NPT male to 1/4" NPT female reducer fitting to install the gauge and the 3/8" male NPT to 1/4" barb fittings to attach the fuel hoses. Run the Fuel "IN", Fuel "RETURN" and Fuel "FEED" lines as shown below:
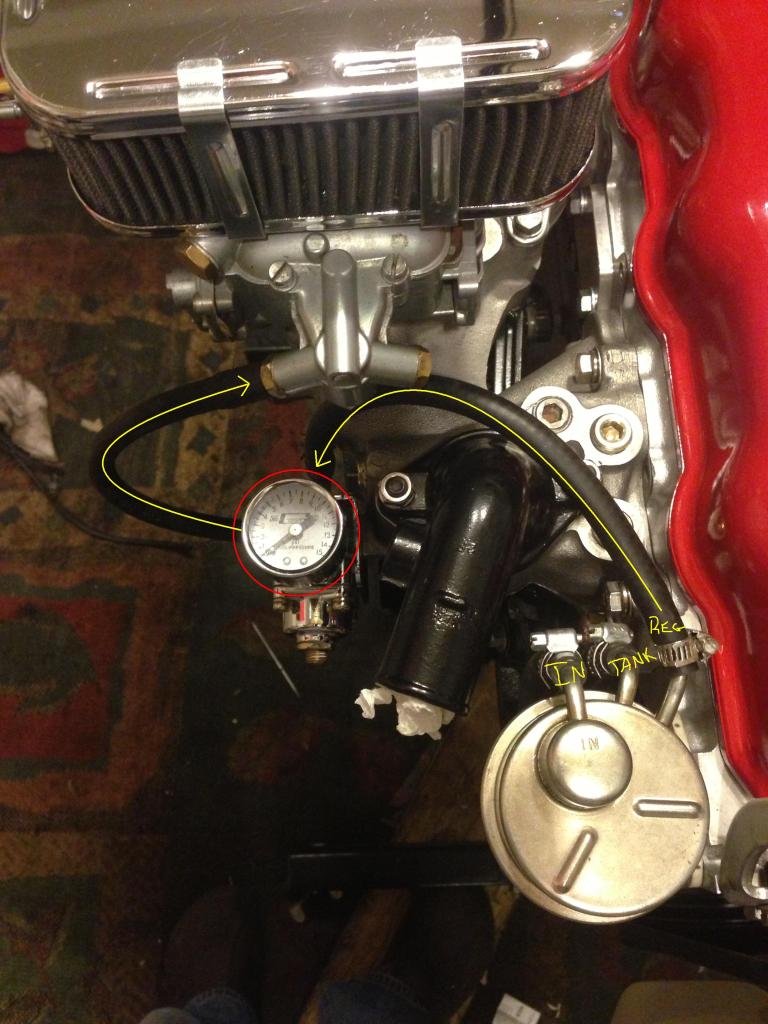
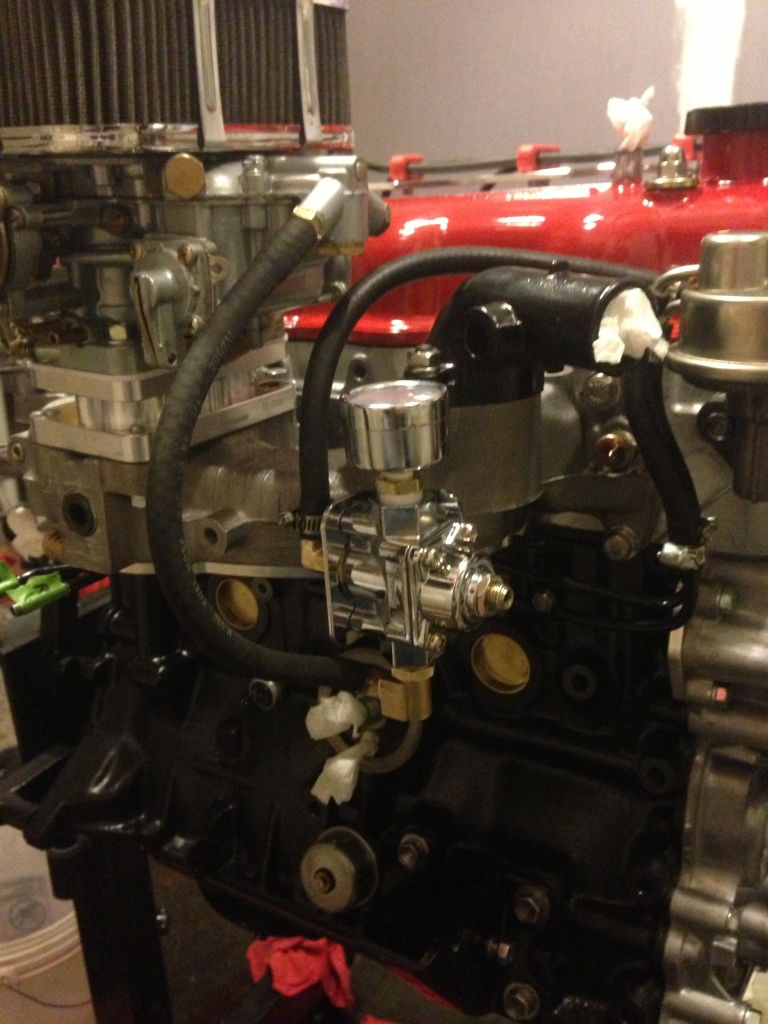

Make sure that you have the Fuel "IN" and Fuel "RETURN" lines hooked up properly at the other side of the hard fuel lines under the manifold and at the tank. You will only need about 6 ft of 1/4" fuel hose to do the job.
Install the Holley fuel pressure regulator. I used the bracket that came with the regulator and mounted it to the intake manifold. You can either do this or run it back to the fender wall. I prefer it this way because it is cleaner and keeps the hoses to a minimum. You will have to use the 3/8" NPT male to 1/4" NPT female reducer fitting to install the gauge and the 3/8" male NPT to 1/4" barb fittings to attach the fuel hoses. Run the Fuel "IN", Fuel "RETURN" and Fuel "FEED" lines as shown below:
Make sure that you have the Fuel "IN" and Fuel "RETURN" lines hooked up properly at the other side of the hard fuel lines under the manifold and at the tank. You will only need about 6 ft of 1/4" fuel hose to do the job.
Last edited by kawazx636; 01-23-2013 at 10:42 AM. Reason: formatting
01-23-2013, 10:40 AM
#13
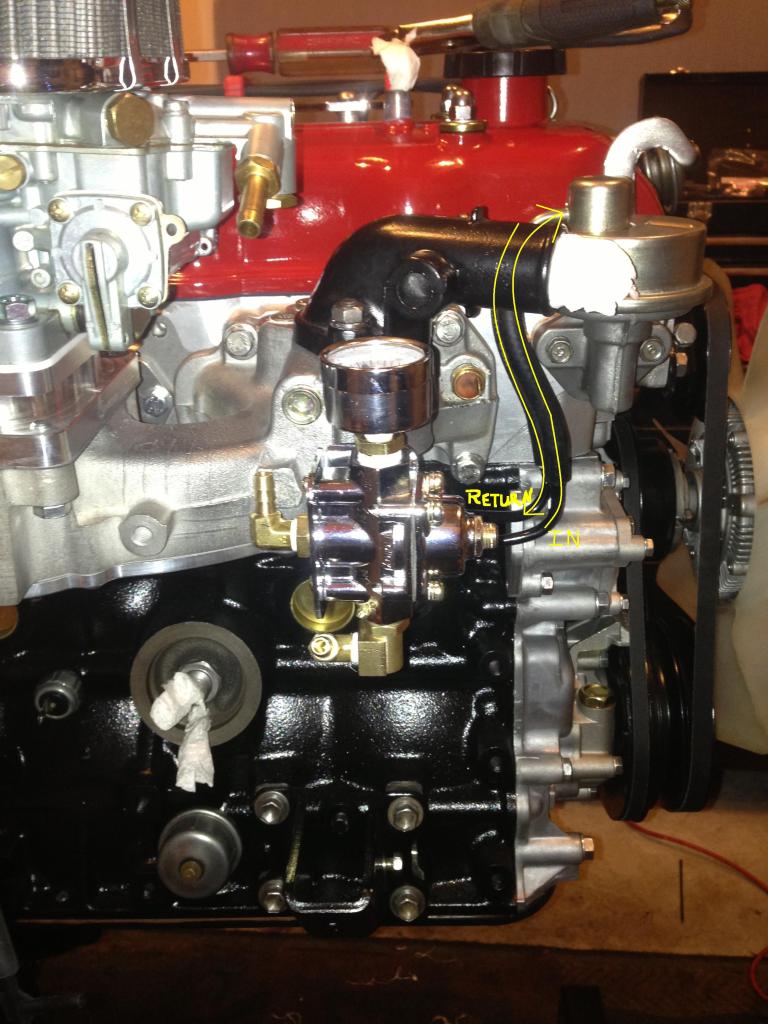
NOTE (11/30/2015): I talked with a tech from LCE a few weeks ago about the timing and advance on my truck and he said that the idle/manifold advance (port closest to the head) on the distributor is not necessary to use (#1 in the pictures below). I have since removed that vacuum hose and plugged the fitting on my setup and my truck is running well with a a more appropriate advance at higher RPM.
You now only need TWO, 2, DOS, DUEX vacuum lines!
1) Main/Port Advance - From the vacuum port on the distributor closest to the radiator to the vacuum port on the Weber.
2) Sub/Idle Advance - From the vacuum port on the distributor closest to the head to the vacuum port on the intake manifold. For the manifold port I installed a 1/4" NPT Male to 3/16" barb fitting on one of the existing holes on the intake manfold (temporarily plugged earlier).
You will only need about 6ft of 5/32" vacuum hose. See below:
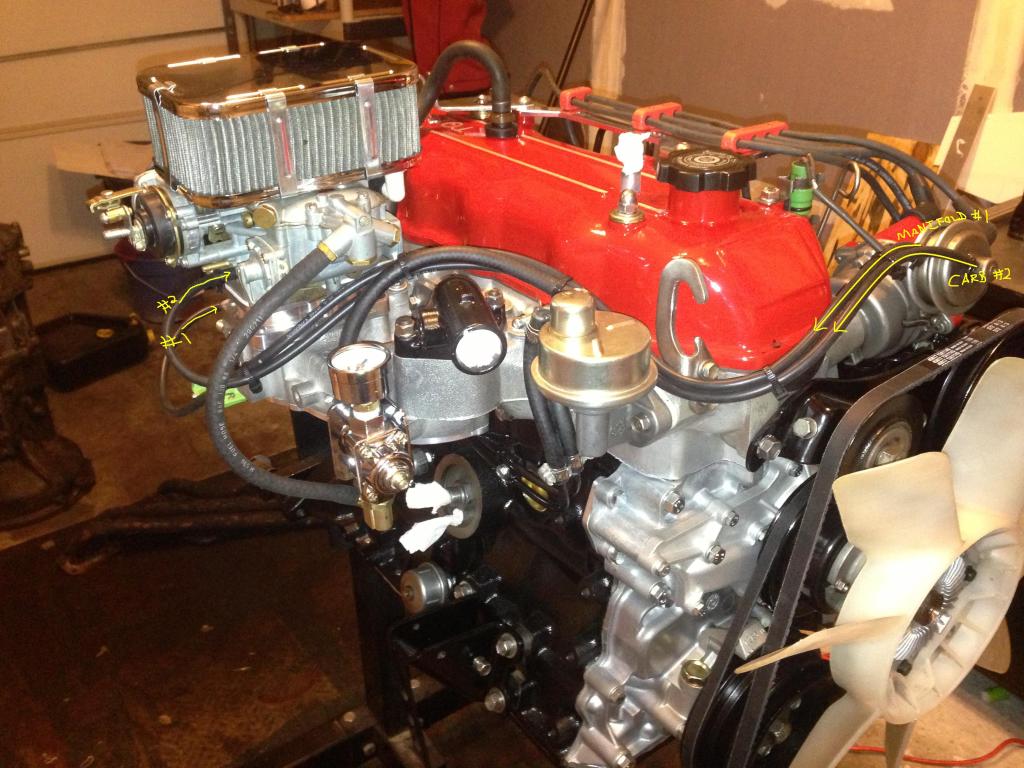
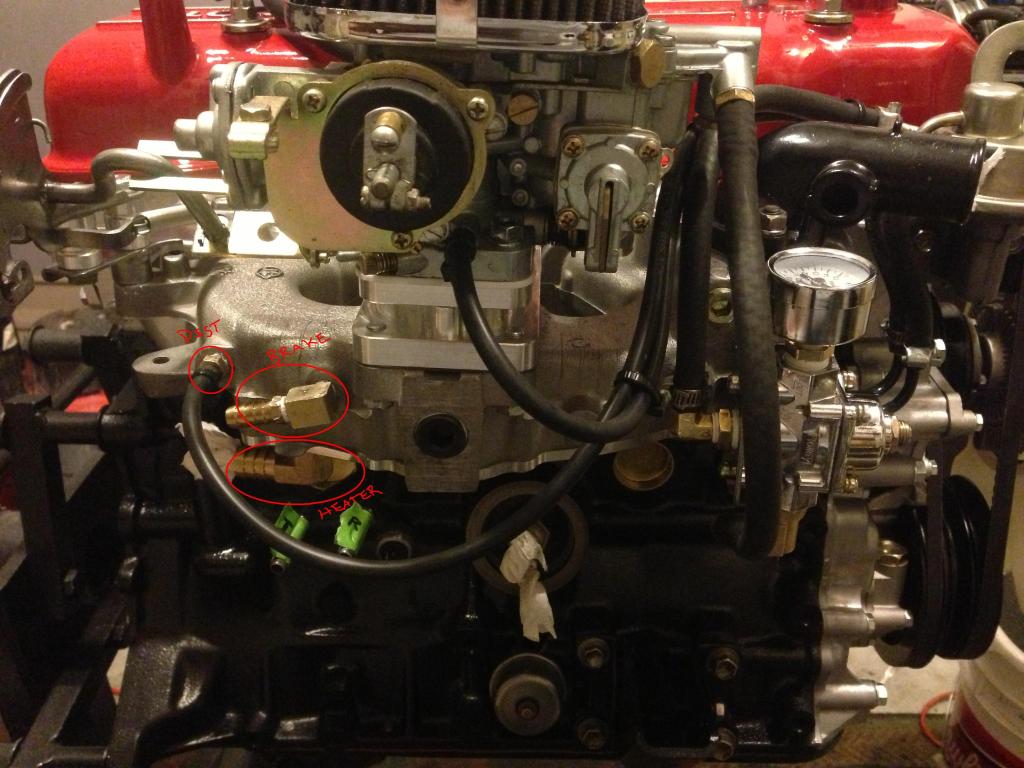
Also in the picture above, you can see the 90* barb I installed for my brake booster (you can use the factory barb, but I wanted the hose to be better routed) and the 90* barb for the heater core that comes with the LCE Under Manifold Water Block Plate Kit.
You now only need TWO, 2, DOS, DUEX vacuum lines!
1) Main/Port Advance - From the vacuum port on the distributor closest to the radiator to the vacuum port on the Weber.
2) Sub/Idle Advance - From the vacuum port on the distributor closest to the head to the vacuum port on the intake manifold. For the manifold port I installed a 1/4" NPT Male to 3/16" barb fitting on one of the existing holes on the intake manfold (temporarily plugged earlier).
You will only need about 6ft of 5/32" vacuum hose. See below:
Also in the picture above, you can see the 90* barb I installed for my brake booster (you can use the factory barb, but I wanted the hose to be better routed) and the 90* barb for the heater core that comes with the LCE Under Manifold Water Block Plate Kit.
Last edited by kawazx636; 11-30-2015 at 07:52 AM. Reason: Additional information
01-23-2013, 10:48 AM
#14
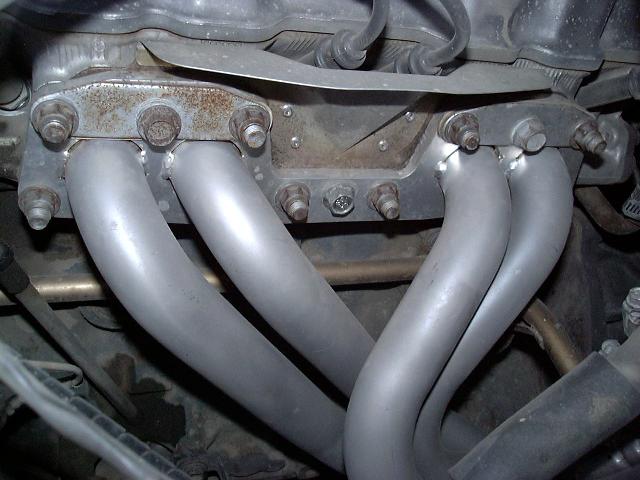
On the exhaust side, you will need to install the LCE Air Injection Block Plate Kit. These plates go on over the hole you have in your headers from where the air injection pipes used to mount. These plates come with new gaskets to install them, but I would recommend getting a new gasket for your headers as well. This picture isn't my truck, but it shows you how they mount:
01-23-2013, 10:53 AM
#15
For the port in your valve cover that sits just behind the oil cap, you can do one of two things:
1) Slap a 5/8" inlet breather filter on it and plug the hole in the Weber filter housing or,
2) Run a 5/8" hose from the breather port to the fitting in the Weber filter housing that comes with your Weber
I recommend #1
Don't forget to hook up your heater core and brake booster vacuum.
1) Slap a 5/8" inlet breather filter on it and plug the hole in the Weber filter housing or,
2) Run a 5/8" hose from the breather port to the fitting in the Weber filter housing that comes with your Weber
I recommend #1
Don't forget to hook up your heater core and brake booster vacuum.
Last edited by kawazx636; 01-23-2013 at 11:28 AM.
The following users liked this post:
Yotalife86 (12-19-2021)
01-23-2013, 11:05 AM
#16
The vacuum switches and sensor plugs that come from the wiring harness on the passenger side fender wall can either be plugged or taped off with electrical tape OR if you're feeling froggy, you can track all of those wires back to the Emissions Control Computer located on the driver side kick panel and completely remove all of the emissions electronics. I plan on removing the wiring from my truck when I get to the body work on the cab so I'll do a write up on that as well later. Meanwhile, it does not hurt to just have the wires and vacuum ports plugged or taped. The emissions equipment only "communicates" to its self so if there is no emissions equipment then it's talking to nothing! If you used all the block off plates mentioned above and removed all the smog equipment attached to the engine and manifold then THERE SHOULD BE ABSOLUTELY NOTHING TO CAP OFF.
FILL YOUR ENGINE WITH COOLANT BEFORE STARTING!!!
After you complete your desmogging you WILL need to time your engine and adjust your carb. IT WILL NOT RUN PROPERLY if you do not do this! The timing for a 22R should be 5*BTDC at 700-950 RPM WITHOUT the Vacuum advance.
Now your engine is officially desmogged!
Last edited by kawazx636; 01-23-2013 at 11:29 AM.
01-23-2013, 11:27 AM
#17
A couple of notes before I let you guys have at it:
1) You can make your own block off plates, but I would highly recommend going with LCE's products. They are the front runners in performance Toyota parts and they provide quality parts and service.
2) Like I said earlier, this can be done with a factory carb in a very similar fashion, but it does not work nearly as well (trust me, I've done it). Quit being cheap and buy a Weber, you'll thank me later.
3) The reason I recommend the complete desmogging like above is because those little rubber plugs have the tendency to crack and cause vacuum leaks. So when somebody says "my desmogged truck is running like crap and won't idle," 50% of the time, it's from those damn little cracked plugs.
4) These instructions are for a manual choke. You can desmog with an electric (or "water choke"), but my experiences with an electric choke are annoying. You will need to leave the appropriate sensors and wiring attached in order to use an electric choke. You also have to ask yourself, "am I really that lazy that I can't just pull the choke knob when I start my truck?"
5) Again, don't be scared, you don't need half the equipment under your hood. Pop the hood of a hot rod some time... notice what IS NOT under their hood and what IS under your's. That'll give you a good indication as to what you really need or don't need. The easiest way to look at it is to remove anything that is not your Weber, intake manifold, head, block, distributor, water pump, timing cover, oil pump, headers and valve cove, but remove anything attached to those parts and cover the hole. Sounds simple huh?
6) DO NOT THROW AWAY YOUR SMOG EQUIPMENT!!! For two reasons. One, you may need it later on down the road. And Two, there are people out there doing the exact opposite of what you are about to do and they would LOVE to have your parts. I personally sold my smog equipment on eBay for $290. If you can do the same then that brings your desmog cost down to the neighborhood of $250; especially for those people who are trying to cut corners by being cheap.
7) I will attempt to answer any questions that I can on here, but please use the appropriate terms when talking about the smog equipment. I posted the diagrams above for that very reason. I don't know everything about 20R engines, but I know that they should be close enough the the 22R to follow similar procedures.
8) Stupid questions will receive stupid answers.
9) If I missed anything I will try to go back and edit the write up.
10) Try not to fill this thread with a bunch of BS. I would like this to be an easy source to smog procedure questions.
Questions, comments?
01-23-2013, 04:34 PM
#18

So apart from a really clean and simple engine bay, what are the benefits and disadvantages of removing complete smog equipement with the weber swap compared to just the weber swap, in terms of driving conditions i.e. performance, fuel economy, smoothness etc...
Very good write-up, one of the best!
Very good write-up, one of the best!
01-23-2013, 07:53 PM
#19
So apart from a really clean and simple engine bay, what are the benefits and disadvantages of removing complete smog equipement with the weber swap compared to just the weber swap, in terms of driving conditions i.e. performance, fuel economy, smoothness etc...
Very good write-up, one of the best!
Very good write-up, one of the best!
In my case, I was getting 6-10 MPG on my factory set up. Granted, the PO had that carb tuned terribly and my smog equipment was no longer effective. When I desmogged and added the weber, I would get anywhere from 19-23 MPG (corrected with 31's). Powerwise, it is like night and day. The lower end has a lot more torque and the truck pulls much much much better at higher speeds with the Weber. I anticipate the HP and the MPG will go up considerably when I drop my rebuilt engine back in.
The difference between a desmog with a weber and a desmog with the factory carb is that the factory carb was designed to utilize the smog equipment. Removing the smog equip will affect the designed function of the factory carb. Not to mention, the factory carb is a B**** to adjust! I never could get it right and I've worked on a lot of carbs before. From what I understand, in most cases any truck with a Weber will not pass emissions in most States but that's just what I've heard. To me, failing emissions is the only downside of installing a weber. You certainly can't beat the performance of a Weber. I've spent a boat load of money on my truck so far and the $280 that I spent on the Weber is by far the best investment on my truck.
Also, if you're looking to simply your truck, a complete desmog is the way to go. If something goes wrong it is very quick and easy to diagnose because there are less things to go wrong and less to check. When I install my rebuilt engine, I can carry just a few tools in my truck to fix anything I need to fix where ever I will need to fix it.


